moogly

menu icon
go to homepage
  • Patterns
  • Tutorials
  • MooglyCAL
  • Giveaways
  • Lives
    • Facebook
    • Instagram
    • Pinterest
    • TikTok
    • Twitter
    • YouTube
  • search icon
    Homepage link
    • Patterns
    • Tutorials
    • MooglyCAL
    • Giveaways
    • Lives
    • Facebook
    • Instagram
    • Pinterest
    • TikTok
    • Twitter
    • YouTube
  • ×
    Home

    Polar Bearskin Mug Rug

    July 15, 2026 by Tamara Kelly Leave a Comment

    Polar Bearskin Mug Rug

    If you've been looking for a quick crochet project that's equal parts cozy and cute, you're going to love the Polar Bearskin Mug Rug! This charming coaster is a fun little make that works up fast with just a bit of yarn, making it perfect for stash busting, gift giving, or adding a touch of whimsy to your coffee table. No matter the weather, this playful mug rug is ready to keep your favorite cuppa company all year long. Get the pattern here on Moogly!

    Disclaimer: This post includes affiliate links; materials provided by Yarnspirations and Furls Fiberarts.

    Prefer an ad-free PDF? You've got options!

    This button leads to the pattern on Etsy

    Prefer the free blog version? Keep scrolling!

    Originally Part of the Stashbusting Quickies Collection

    This pattern was originally published in 2021, as part of a collection of holiday-themed patterns that I created with my friend and fellow designer Marly Bird! This collection is no longer available, so after polling the Moogly Community Group, we're now sharing it right here on the blog for free!

    Polar Bearskin Mug Rug

    Why You’ll Love the Polar Bearskin Mug Rug

    One of my favorite things about the Polar Bearskin Mug Rug is how much personality it has for such a quick project! Made with super fuzzy Bernat Pipsqueak, it has the perfect texture to really bring the "bearskin" look to life - while staying completely vegan and animal-friendly, of course! At just about 25 yards, it's a fantastic stash buster, and small enough to crochet year-round, no matter the actual season.

    Because it works up so quickly, it's easy to make a whole set for holiday entertaining or to tuck into gift baskets, stockings, or stack up for teacher gifts or craft fairs. It's a fun conversation starter, a practical coaster that helps protect your table, and a lighthearted "luxury" addition to your décor that's sure to put a smile on your face!

    Polar Bearskin Mug Rug


    Polar Bearskin Mug Rug

    Add this pattern to your Ravelry Queue and Favorites

    US-I, 5.5 mm hook or as needed to get gauge - Furls Streamline

    25 yds Bernat Pipsqueak (5-bulky; 100% polyester, 101 yds/92 m, 3.5 oz/100 g)
    Colorway Shown: Whitey White

    Safety Eyes and Nose or Buttons or Embroidery Thread

    Stitch Markers

    Gauge: 10 dc = 4” [10 cm]

    Size: 7” [18 cm] wide by 7” [18 cm] long

    HELPFUL LINKS AND TUTORIALS

    Crochet Abbreviations

    Bobble (See Special Stitch Below for exact st used)

    Extending a Row with Foundation Stitches

    FDC - Foundation Double Crochet

    NOTES:

    Crocheting with textured yarn can be challenging. Use your fingers to find your stitches and feel for where to insert your hook.

    Ch 2 at the beginning of the row does not count as a stitch throughout.

    Polar Bearskin Mug Rug

    SPECIAL STITCH

    Bobble: * Yarn over hook, insert hook into indicated stitch, yarn over and pull up a loop, yarn over and draw through 2 loops on hook; repeat from * twice more in same stitch indicated, yarn over and draw through all 4 loops on hook.

    Polar Bearskin Mug Rug Instructions

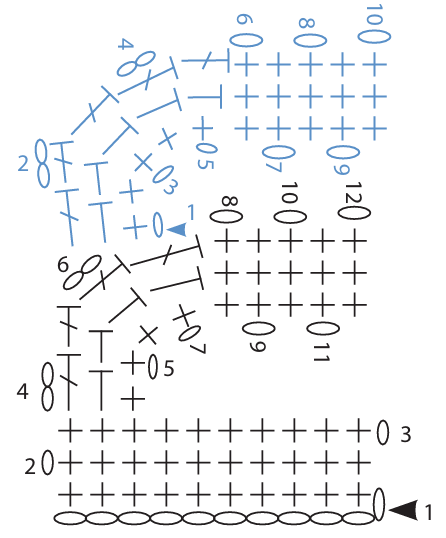
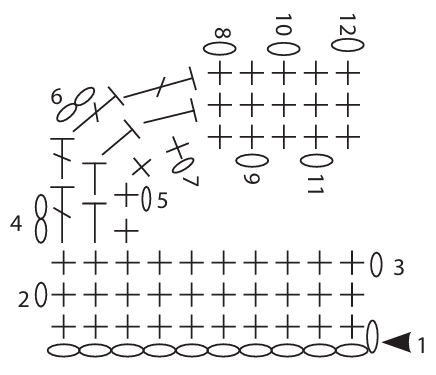
    LEG #1

    Row 1: Ch 2, skip ch closest to hook, 4 dc in last ch; fasten off and set aside. (4 dc)

    LEG #2 and BODY

    Row 1: Ch 2, skip ch closest to hook, 4 dc in last ch; turn. (4 dc)

    Row 2: Ch 2, dc in each dc across, ch 2, dc in each dc of Leg #1; turn. (8 dc, 2 ch)

    Row 3: Ch 2, dc in each dc to ch-2 sp, 2 dc in ch-2 sp, dc in each dc across; turn. (10 dc)

    Rows 4 and 5: Ch 2, dc in each dc across; turn.

    Row 6: Ch 5, skip 2 chs closest to the hook, dc in next 3 chs, dc in each dc of previous row, 3 fdc; turn. (16 dc)

    Row 7: Ch 1, hdc in first dc, dc in next 14 dc, hdc in last dc; fasten off and set aside. (14 dc, 2 hdc)

    HEAD

    Row 1: Ch 2, skip ch closest to hook, 6 dc in last ch; turn. (6 dc)

    Row 2: Ch 2, dc in each dc across; turn.

    Row 3: Ch 1, sc in first st, bobble in next st, sc in next 2 sts, bobble in next st, sc in last st; fasten off leaving a long tail.

    FINISHING

    Step 1: Add safety eyes or buttons to head.

    Step 2: Use long tail of head to sew last row of head to center of last row of body. Weave in all ends.


    Polar Bearskin Mug Rug

    I hope you enjoy making and using the Polar Bearskin Mug Rug! If you share on socials, I would love to see it! You can always tag me @mooglyblog!

    The Fine Print

    Follow Moogly on YouTube, Facebook, Twitter, Pinterest, TikTok, and Instagram! Thank you to Yarnspirations and Furls for providing the materials shown in this post. Written pattern copyright Tamara Kelly 2026, all rights reserved. Please do not reprint or repost this pattern. Please do link to this page to share this pattern with others. If you wish to make items for sale from this pattern or translate it to another language, please visit the About page for details.

    The Big Book of Beginner Amigurumi - Review and Giveaway

    July 14, 2026 by Tamara Kelly Leave a Comment

    The Big Book of Beginner Amigurumi - Review and Giveaway

    The Big Book of Beginner Amigurumi by Maggy and Pippa Woodley features "60 Easy Projects for Charming Crochet Creations!" Take a peek inside, and enter to win your own copy of this hefty collection below!

    Disclaimer: I was given a copy of this book for review; all opinions are my own. This post includes affiliate links.

    The Big Book of Beginner Amigurumi Review

    A Bit About the Authors

    The Big Book of Beginner Amigurumi - Review and Giveaway

    "Maggy and Pippa Woodley are the mother-daughter duo behind the popular craft website and YouTube channel Red Ted Art. They live in London, England."

    I am new to their work, so I went and checked out their site - and wow! They have over 2500 crafts designed for kids - and playful adults, I hope, because I found a few projects I'd like to try myself! Let's take a closer look at their new book!

    The Big Book of Beginner Amigurumi - Review and Giveaway

    Inside The Big Book of Beginner Amigurumi

    "Whether you have just started crocheting, or you’re looking for tons of quick projects to feed your amigurumi obsession, this book will have you turning yarn into the cutest little creatures you’ve ever seen in no time!

    Starting with a useful overview of foundational techniques, you’ll learn how to read a pattern, make basic stitches, and add all the little details that make every piece come to life. Then you’ll be ready to try your hook at fun-sized fruit, silly seaside creatures, fuzzy farm animals, whimsical woodland friends, and so much more. Plus, each project comes together quickly for instant gratification.

    These versatile projects are suitable for most yarns, so you can easily scale up with chenille yarn (to make plushies) or go tiny with thin yarn (to make bag charms and key chains). With these 60 super-easy, super-cute projects, you’ll never need another amigurumi book again."

    The Big Book of Beginner Amigurumi - Review and Giveaway

    Are you into sea creatures? Plants? Bit of a foodie? Grew up on a farm or have a kid obsessed with farm animals? Wanna make a doll with sweet little accessories? There are so many patterns in The Big Book of Beginner Amigurumi; there's something for just about everyone. Here's a look at the Table of Contents!

    The Big Book of Beginner Amigurumi - Review and Giveaway The Big Book of Beginner Amigurumi - Review and Giveaway

    The patterns in The Big Book of Beginner Amigurumi are meant to be made with what you have on hand. Whatever yarn you like to use is great, paired with the hook that gives you a solid fabric! They have included lots of tips to help you avoid buying expensive supplies!

    The Big Book of Beginner Amigurumi - Review and Giveaway

    For the examples shown in the book, the authors used a US/D 3.25mm crochet hook and acrylic DK/light worsted yarns. But they've been tested with all sorts of yarns, so you can get creative with your favorites!

    The Big Book of Beginner Amigurumi - Review and Giveaway

    There is a getting-started-with-crochet section for those who need a refresher, and great sections on adding facial features and hair to your amigurumi, as well as a ton of useful tips for creating and assembling your projects. There are lots of photos, and I would recommend even experienced stitchers read through this section!

    The Big Book of Beginner Amigurumi - Review and Giveaway

    The actual patterns are, of course, adorable. There are so many I had to check the back, and yep - there's an index to help you find exactly the ones you're looking for!

    The Big Book of Beginner Amigurumi - Review and Giveaway

    The patterns themselves are written in the simplified amigurumi format, in US terms, so it helps to have some familiarity with reading patterns before you start on this book.

    The Big Book of Beginner Amigurumi - Review and Giveaway

    If you love small, quick, adorable little makes that put a smile on your face, then this is one book you need to add to your collection!

    The Big Book of Beginner Amigurumi - Review and Giveaway

    Get your own copy of The Big Book of Beginner Amigurumi today!

    Pre-order your own copy of this book on Amazon, or ask for it at your local bookseller!

    The Big Book of Beginner Amigurumi - Review and Giveaway

    The Big Book of Beginner Amigurumi Giveaway

    The Big Book of Beginner Amigurumi Giveaway is open in the US and Canada. The giveaway ends August 11, 2026, at 12:15am Central US time. To enter, use the Kingsumo form below. Only the email option is mandatory – all other tasks are optional, for bonus entries only.

    One winner will receive a paperback copy of The Big Book of Beginner Amigurumi, courtesy of Page Street Publishing. They will be notified by email.


    GOOD LUCK ALL!

    You can follow Moogly on YouTube, Facebook, Twitter, Pinterest, TikTok, and Instagram. Don’t forget to sign up for the free newsletter at the top of the page! And don't forget to enter all the other fab giveaways on Moogly! 

    The Big Book of Beginner Amigurumi - Review and Giveaway

    MooglyCAL2026 Block 14

    July 9, 2026 by Tamara Kelly Leave a Comment

    MooglyCAL2026 Block 14

    MooglyCAL2026 Block 14 is a lovely, floral, center square by Golden Lucy Crafts! Olena Jones has designed the pretty Cotton Candy Square, and it's perfect for every skill level. Get all the details for this free crochet along, and the free pattern link below!

    Disclaimer: This post includes affiliate links; materials provided by Local Crafts.

    Just getting started with the Moogly Crochet Along? CLICK HERE for the intro info!

    Want to get help with the patterns, show off, and CAL with others? CLICK HERE for the Facebook group

    Like to see all the squares visually? CLICK HERE for the Pinterest Board! (Squares will be added as they are released.)

    Introducing the MooglyCAL ONLY Newsletter! Never miss a Square Debut!

    The 2026 Moogly CAL Schedule

    As the year progresses, links will be added, and you'll be able to click on any of the past squares to go to their posts. The numbers refer to the date of the month that the square will debut.

    January Archie Argyle Crochet Square and Radiate Champion Block
    February Cozy Circles Crochet Square and Endless Griddle Stitch Square
    March Blue Cascade Afghan Square and Woven Checkerboard Square
    April Crashing Waves Blanket Square, Marvelous Mosaic Square, and Diamonds in Diamonds Mosaic Square
    May Luscious Lattice Square and Crossroads Mosaic Crochet Square
    June Celtic Square Motif and T.G.I. Phi-Day Square
    July THIS POST and 23
    August 6 and 20
    September 3 and 17
    October 1, 15, and 29
    November 12 and 25

    *****

    Block #14:

    Cotton Candy Square

    by Golden Lucy Crafts

    MooglyCAL2026 Block 14

    Above, you can see the square that Olena made in 3 colors of Brava Worsted! Below is my CAL square, in my 6 colors of Brava Worsted - Custard, Seashell, Fig, Denim, Espresso, and Cream!

    MooglyCAL2026 Block 14

    Details for MooglyCAL2026 Block 14

    My Notes: This square is a fun and relaxing make, with a nice variety of stitches to keep it interesting. The pattern is well written and easy to follow, and the last few rounds make it super easy to adjust for size! It's just a great square to make - no sugarcoating needed!

    Helpful Links and Tutorials: Crochet Abbreviations, Post Stitches, Dc2tog, CSDC, standing double crochet, Standing hdc, Standing sc, and seamless join.

    Sizing: My square was coming out a bit big, so I worked the last round as hdc instead of dc, and that did the trick! Everyone's gauge is different, so be sure to measure as you go! Learn how to adjust for size HERE to ensure all your squares are the same size. Remember that the 12″ is measured across and up and down, not diagonally/corner to corner.

    Yarn Options: This year, our designers have chosen from a variety of yarns, including Brava Worsted, Swish Worsted, Jimmy Beans Wool Beanstalk, Berroco Vintage, and MadTosh Vintage. For this square, Olena and I used Brava Worsted!

    What I Did:

    I used a US-J, 6.0 mm crochet hook, and Brava Worsted yarn, and my color scheme was as follows (see pics for more info on placement):

    Rnds 1 and 2: Seashell
    Rnd 3 and 4:
    Custard
    Rnd 5:
    Fig
    Rnd 6:
    Denim
    Rnd 7:
    Espresso
    Rnd 8:
    Seashell
    Rnd 9:
    Custard
    Rnd 10:
    Fig
    Rnd 11:
    Denim
    Rnd 12:
    Espresso
    Rnd 13: C
    ream

    This square needed just a bit of blocking, so I used wet blocking.

    The Pattern:

    CLICK HERE FOR THE PATTERN FOR BLOCK #14

    PLEASE NOTE: The designers all hold individual copyrights for their patterns. They may choose to make videos of their patterns, and you can certainly request them from the designers. In addition, there are videos linked in the notes for specific stitches and techniques that may help you with the pattern. They may offer paid PDFs of the pattern, but have agreed to leave it up for free on their website or on Ravelry for as long as possible.

    Show Off Your Squares!

    If you share your photos on social media, be sure to use the hashtags #mooglycal2026 and tag your yarn - I'll be using #bravaworsted -  and tag me @mooglyblog so I can see them too! And don't forget to share them in the MooglyCAL Facebook Group! Thank you all for CAL-ing with me!

    And finally, here's a pin of MooglyCAL2026 - Block 14 for your own Pinterest boards!

    MooglyCAL2026 Block 14

    You can follow Moogly on YouTube, Facebook, Twitter, Pinterest, TikTok, and Instagram, and don't forget to sign up for the free newsletter at the bottom of the page! Thank you to Local Crafts for providing the materials for this crochet along.  

    Crochet and Catch Up with Moogly - July 8, 2026

    July 8, 2026 by Tamara Kelly Leave a Comment

    Crochet and Catch Up with Moogly - July 8, 2026

    It's July, friends! Summer is heating up, and it's time for another Crochet and Catch Up with Moogly. Grab your favorite project, pour yourself something cool, and join me as we chat about all the crochet goodness happening - simulcasting on Facebook and YouTube! I'll be sharing updates, answering your questions, and showing off a few projects along the way. As always, you'll find links to everything mentioned during the livestream right here in this post!

    Disclaimer: This post may contain affiliate links. Live videos are unscripted, unedited, and occasionally weird; all opinions are my own.

    Crochet and Catch Up with Moogly

    Going LIVE on Facebook and YouTube, at 11am CT!

    Click here to Like the Moogly Facebook Page and get notified when I go live!

    Click here to Subscribe to the Moogly YouTube Page and get notified when I go live!

    Moogly Community Group on Facebook

    What I'm Wearing: Rainbow Lattice Wrap

    MooglyCAL2026 Block 13 Courtesy of Cocky Crocheter

    CAL Yarns: Brava Worsted, Swish Worsted, Jimmy Beans Wool Beanstalk, Berroco Vintage, and MadTosh Vintage

    Ooh That's Why Online Summit HAPPENING NOW - Get your FREE ticket here - ends July 10, 2026

    Granny Crochet Bundle with Prizes from Twice Sheared Sheep - Save 90%! - ends July 10, 2026

    Crochet Sellers Summit 2026 hosted by The Crochetprenuer - Get your FREE ticket here - July 15 - 17, 2026

    StitchMore Virtual Stitch Circle  - Get your FREE ticket here - July 29, 2026

    Ridgeline Stripes Crochet Cowl - Free Pattern

    Ridgeline Stripes Crochet Cowl - Video Tutorials

    Ridgeline Stripes Crochet Hat - Free Pattern

    Ridgeline Stripes Crochet Hat - Video Tutorials

    Concept by Katia Merino Baby

    Crochet Bags and Totes Giveaway

    Christmas in July Hat Templates Giveaway

    Amigurumi Dog Breeds Giveaway

    Arctic Amigurumi Giveaway

    Sneak Peek: I may have gone a little MadTosh crazy at Jimmy Beans Wool... I'll share my finds, including my new Della Q bag! And keep your eyes peeled for news of a new Moogly Make Along!


    If you have a LYS or event you'd like me to teach at this year, or if you would like me to teach an online class to your group or guild, please do reach out!

    Have a wonderful day all - see you to crochet and catch up next time! And before you go, here's a Pin for today's post, so you can add it to your favorite Pinterest boards! We appreciate (and need) your shares on all our posts.

    Crochet and Catch Up with Moogly - July 8, 2026

    Follow Moogly on YouTube, Bluesky, Facebook, Pinterest, TikTok, and Instagram!

    Crochet Bags and Totes - Book Review and Giveaway

    July 7, 2026 by Tamara Kelly Leave a Comment

    Crochet Bags and Totes - Book Review and Giveaway

    Crochet Bags and Totes by Salena Baca features "10 fresh and modern crochet bag patterns you’ll enjoy making and look forward to carrying!" Take a peek inside, and enter to win your own copy of Salena's newest release below!

    Disclaimer: I was given a copy of this book for review; all opinions are my own. This post includes affiliate links.

    Crochet Bags and Totes Review

    A Bit About the Author

    Salena Baca, author of Crochet Granny Square Tops, Bags, and More: Review and Giveaway

    I first met Salena years ago - was it before her first book? I'm not sure, she's become such a prolific author and designer! Here's her author blurb:

    "I learned to crochet at the age of 5 and haven't put my hook down since! I've published over 500 patterns, authored 16 crochet books, taught 2 courses with Craftsy, and launched the American Crochet Association. I currently live in Oregon with my cute family and loud dog."

    Let's take a closer look at her newest book!

    Crochet Bags and Totes

    Inside Crochet Bags and Totes

    "Love quick crochet projects that don’t use a lot of yarn, are fun to work, and give you something useful when you’re done? This is the collection for you! From a sturdy little backpack to a cute drawstring cross-body to slouchy market bags and classic throw-over-your-shoulder totes, there’s a crochet bag or tote in here for everyone.

    Each design is made with easy-to-find yarns from Yarnspirations—like Handicrafter and Peaches & Creme—so getting started on every project in this collection is simple. These patterns are easy enough for newer crocheters to follow with confidence, and they’ve got plenty of personality to keep even the most seasoned crocheters inspired.

    Whether you’re heading to the beach, running errands, or just need a fun new project, you’ll find a design in this book that you’ll love make to (and use) all year long.

    • 10 simple crochet bag designs featuring a drawstring backpack, crossbody bag, and several totes
    • Use granny stitches, fan stitches, filet crochet, and working in the round to create a variety of shapes and textures
    • Low-sew and no-sew designs make these easy projects for advanced-beginner crocheters
    • Cut down on plastic waste by taking these to the grocery store or give as a gift to friends and family"

    Crochet Bags and Totes

    There are blanket crocheters, and sweater crocheters... but I think almost all of us love making bags! Ranging from super simple to clever challenges, there's a crochet bag pattern out there for every mood, every style, and every skill level.

    In Crochet Bags and Totes: 10 Fresh and Modern Designs, Salena Baca has collected designs that are on the simpler side - but there's still a wide variety of patterns! You'll find bags perfect for the beach, a trip to the store, or a fun evening out. 

    Crochet Bags and Totes

    As noted above, all the patterns in this book use yarns from Yarnspirations, which means you'll be able to find them (or a viable substitute) both online and at your nearest big box craft store. (And some of us will have plenty in our stash! 😉 )

    Crochet Bags and Totes

    Bags are the kind of project you return to again and again - they are fun to crochet, handy and practical, and every one is a new adventure! This book is full of inspiration and lovely patterns to keep your hook busy all summer. Salena's patterns are always clear and well-written in standard US terms and format.

    Crochet Bags and Totes

    No need to overthink this one - if you love crocheting bags and totes, then Crochet Bags and Totes is your next must-read crochet book!

    Crochet Bags and Totes - Book Review and Giveaway

    Get your own copy of Crochet Bags and Totes today!

    Pre-order your own copy of this book on Amazon, or ask for it at your local bookseller! It's releasing July 21, so you'll get it hot off the presses! And don't miss Salena's other titles, including the one we most recently reviewed, Crochet Layers to Love!

    The Crochet Bags and Totes Giveaway

    The Crochet Bags and Totes Giveaway is open in the US and Canada. The giveaway ends August 4, 2026, at 12:15am Central US time. To enter, use the Kingsumo form below. Only the email option is mandatory – all other tasks are optional, for bonus entries only.

    One winner will receive a paperback copy of Crochet Bags and Totes, courtesy of Stackpole Books. They will be notified by email.

    GOOD LUCK ALL!

    You can follow Moogly on YouTube, Facebook, Twitter, Pinterest, TikTok, and Instagram. Don’t forget to sign up for the free newsletter at the top of the page! And don't forget to enter all the other fab giveaways on Moogly!

    Ridgeline Stripes Crochet Hat Tutorial

    July 3, 2026 by Tamara Kelly Leave a Comment

    Ridgeline Stripes Crochet Hat Tutorial

    The Ridgeline Stripes Crochet Hat Tutorial will show you how to create this gorgeous hat that can be worn in two ways! Whether you prefer showing off the braid or simple stripes and texture, you can crochet along with the right and left-handed video tutorials below!

    Disclaimer: This post includes affiliate links.

    Be sure to scroll down past the videos to get the links to the free pattern and supplies!

    Ridgeline Stripes Crochet Hat Tutorial:

    How to Crochet the Ridgeline Stripes Crochet Hat - Right-Handed

    Learn to Crochet the Ridgeline Stripes Crochet Hat - Left-Handed

    As Seen in This Video (click each for more info!):

    The Free Pattern: Ridgeline Stripes Crochet Hat

    Matching Pattern: Ridgeline Stripes Crochet Cowl

    The Supplies:

    US-G+, 4.5mm hook or as needed to get gauge - Furls Streamline used

    300 yds total Concept by Katia Merino Baby (Sport/2 - 100% superwash merino wool, 180 yd/165 m; 50 g/1.76 oz)

    Stitch Markers

    And here's a Pin for your Crochet Pinterest Board! Make sure you are following Moogly on Pinterest for all the best knit, crochet, and craft pins!

    Ridgeline Stripes Crochet Hat Tutorial

    I hope you enjoy this tutorial for the Ridgeline Stripes Crochet Hat! If this video doesn't answer all your questions, please ask in the comments below - I'm always happy to help.

    If you make this or any Moogly pattern, please tag me in your photos so I can see them too, @mooglyblog or #mooglyblog! Then send them to tamarakelly@mooglyblog.com to see them featured in a future Moogly email newsletter!

    Get Moogly on your favorite social media sites: YouTube, Facebook, Pinterest, Tik Tok, Bluesky, and Instagram! And sign up for the free newsletter at the bottom of the page so you don’t miss a thing! Thank you to Katia and Furls for providing the materials for this video.

    Amigurumi Dog Breeds - Book Review and Giveaway

    July 2, 2026 by Tamara Kelly 5 Comments

    Amigurumi Dog Breeds - Book Review and Giveaway

    Amigurumi Dog Breeds: Patterns for 21 Cute Crochet Dogs by Elisabeth Faircloth features "patterns for popular breeds across all categories: Sporting, Hound, Terrier, Non-Sporting, Working, Herding, and Toy Groups!" Take a peek inside, and enter to win your own copy of Amigurumi Dog Breeds below!

    Disclaimer: I was given a copy of this book for review; all opinions are my own. This post includes affiliate links.

    Amigurumi Dog Breeds Review

    A Bit About the Author

    "Elisabeth Faircloth has been crocheting for fourteen years, and has written and designed dozens of patterns, mostly dog breeds. She is on Instagram @starlandcrochet and Etsy @Starland Crochet."

    Amigurumi Dog Breeds - Book Review and Giveaway

    Inside Amigurumi Dog Breeds

    "Whether you’re a crochet novice or an experienced crafter, this delightful guide will teach you how to make 21 lovable amigurumi dogs, one stitch at a time. From the loyal Golden Retriever to the spirited Border Collie, the book features patterns for popular breeds across all categories: Sporting, Hound, Terrier, Non-Sporting, Working, Herding, and Toy Groups. Want to make a one-of-a-kind pup? Use the patterns and tips you’ve learned to design your own breed or an adorable mixed breed!

    Grab your yarn and hook—it’s time to bring some tail-wagging joy into your crochet world!

    • Make any adorable, cuddly dog plushy with 21 interchangeable amigurumi crochet patterns
    • Learn the how to use loop stitches, French knots, and colorwork to make little dogs with the special characteristics of the real thing
    • When made with size 4 yarn, each dog stands ~5 inches (12.75 cm)
    • Simple written patterns, a photographic stitch guide, low-sew designs, and easy-to-make staple pieces make this book appropriate for even beginner crocheters with some more intricate pieces to engage intermediate crocheters
    • Great handmade birthday and Christmas gifts for any dog lover in your life
    • 8.5 x 11 inch, 120 page book makes it easy to read the written instructions and see photos
    • Written and designed by humans, for humans."

    Amigurumi Dog Breeds - Book Review and Giveaway

    Opening up Amigurumi Dog Breeds, the first thing I discovered is that this is a mix and match book with guides for specific dog breed designs. In other words, there are some basic head, body, tail, leg, and other body part patterns. With careful color choices and some special parts, you can then combine these to create these popular types!

    Amigurumi Dog Breeds - Book Review and Giveaway

    Because I know everyone will want to know if their specific pet is in here, here is a complete list of all the dogs included:

    • Weimaraner
    • Golden Retriever
    • English Springer Spaniel
    • Beagle
    • Dachshund
    • Irish Wolfhound
    • Fox Terrier
    • Scottish Terrier
    • Bull Terrier
    • French Bulldog
    • Dalmatian
    • Shiba Inu
    • Bernese Mountain Dog
    • Samoyed
    • Siberian Husky
    • Australian Shepherd
    • Border Collie
    • German Shepherd
    • Chihuahua
    • Pug
    • Shih Tzu

    Amigurumi Dog Breeds - Book Review and Giveaway

    Of course, lots of people have mutts and mixes - like me! So you can use all these parts as well as your color choices to create any breed or combo you can think of - there's a bit more guidance on this included in the book!

    Amigurumi Dog Breeds - Book Review and Giveaway

    Amigurumi Dog Breeds features patterns written in US terms, in a simplified "amigurumi format" (see the image above for a peek at a pattern). There is a fantastic section at the beginning outlining how to assemble amigurumi and how to make some of the special features, but I do recommend that you learn the basics of crochet before picking up this book. For dog-loving crocheters, Amigurumi Dog Breeds is a must-have!

    Amigurumi Dog Breeds - Book Review and Giveaway

    Get your copy of Amigurumi Dog Breeds today!

    Purchase your own copy of this book on Amazon, or ask for it at your local bookseller! And you can pre-order her upcoming matching book, Amigurumi Cat Breeds!

    Amigurumi Cat Breeds

    The Amigurumi Dog Breeds Giveaway

    The Amigurumi Dog Breeds Giveaway is open in the US and Canada. The giveaway ends July 28, 2026, at 12:15am Central US time. To enter, use the Kingsumo form below. Only the email option is mandatory – all other tasks are optional, for bonus entries only.

    One winner will receive a paperback copy of Amigurumi Dog Breeds, courtesy of Stackpole Books. They will be notified by email.

    GOOD LUCK ALL!

    You can follow Moogly on YouTube, Facebook, Twitter, Pinterest, TikTok, and Instagram. Don’t forget to sign up for the free newsletter at the top of the page! And don't forget to enter all the other fab giveaways on Moogly!

    Christmas in July Hat Templates Giveaway

    July 1, 2026 by Tamara Kelly 2 Comments

    Christmas in July Hat Templates Giveaway

    December may still be months away, but if you're a stitcher, you know that holiday making season starts now! Imagine how satisfying it will be to have a stack of beautiful, perfectly fitting hats ready to gift when December arrives. That’s why I’m so excited to celebrate Christmas in July with a special giveaway featuring one of my favorite crochet tools: the babé crochet Hat Templates!

    Disclaimer: This giveaway is sponsored by babé crochet and Moogly. This post includes affiliate links.  

    Crochet Hats Should Be Fun, Not Frustrating

    You finish a hat, try it on, and realize it's too big, too small, too short, too... market bag sized!? We've all been there. Hat sizing can be tricky, especially when you're making gifts or designing your own patterns.

    These babé crochet Hat Templates were specially designed to take the guesswork out of this process.

    Wrap Stitch Crochet Hat

    These easy-to-use templates help you quickly check crown size, hat circumference, and overall fit while you're crocheting top down hats. You don't need to pull out a tape measure, and then check a chart, and then do a bunch of math. Instead, you just pick out the template for the size you want to make, and then work a flat circle until the curve matches the curve of the template. Then work even til the length of the template. It's just that easy. 

    Whether you're following a pattern, modifying an existing design, or creating your own hats from scratch, the templates make the process faster, easier, and far more accurate. I've used them to design both all sorts of top down beanies, as well as a bucket hat!

    Casual Crochet Bucket Hat - Free Crochet Pattern on Moogly!

    Why Crocheters Love Hat Templates

    • Create better-fitting hats with confidence.
    • Check your size while you crochet.
    • Reduce frogging and guesswork.
    • Easily make hats for multiple sizes.
    • Adapt favorite patterns to fit different recipients.
    • Perfect for gift-making and charity crochet.
    • Great for both beginners and experienced crocheters.

    Each babé crochet Hat Template Set includes:

    • An 11 piece set of durable, flexible plastic templates that covers hat sizes from Newborn Baby to Adult XL
    • 1 Sizing Chart and Manual Card
    • 1 example crochet hat pattern
    • 1 metal storage ring

    If hats are one of your favorite projects, these templates quickly become the kind of tool you wonder how you ever crocheted without. And since Christmas gift-making season will be here before we know it, now is the perfect time to add them to your crochet toolkit! And for the month of July 2026, they are 10% off!

    CLICK HERE to purchase your own set if you live in the US or Canada

    CLICK HERE to purchase your own set if you live outside the US and Canada

    Christmas in July Hat Templates Giveaway

    The Christmas in July Hat Templates Giveaway

    The Christmas in July Hat Templates Giveaway is open worldwide! The giveaway ends July 31, 2026, at 12:15am Central US time. To enter, use the Kingsumo form below. Only the email option is mandatory – all other tasks are optional, for bonus entries only.

    The first winner selected will receive a physical copy of the Hat Templates. The next two winners will receive PDF copies of the templates. All winners will be notified by email.

    Good luck all! You can follow Moogly on YouTube, Facebook, Twitter, Pinterest, TikTok, and Instagram, and don’t forget to sign up for the free newsletter at the bottom of the page! 

    Ridgeline Stripes Crochet Hat

    June 28, 2026 by Tamara Kelly Leave a Comment

    Ridgeline Stripes Crochet Hat

    What's better than a new crochet pattern? What if we make it a set? Say hello to the Ridgeline Stripes Crochet Hat! This reversible design creates a textured beanie with two looks, featuring Katia Merino Baby. And it's part of the Hat of the Month Club 2026!

    Disclaimer: This post includes affiliate links; materials provided by Katia and Furls Fiberarts.

    Prefer an ad-free PDF? You've got options!

    This button leads to the pattern on Etsy

    Prefer the free blog version? Keep scrolling!

    Part of the 2026 Hat of the Month Club

    June Hat of the Month Club CAL 2026

    The Hat of the Month Club is hosted by Oombawka Design and The Stitchin Mommy! Each month in 2026, three free hat patterns will be shared on their blogs and one guest designer's blog, as part of this crochet-along. The previous week, each shares a scarf, for the Scarf of the Month Club. This month, it's Moogly!

    This is a relaxed, flexible CAL — join in when you can, make what you love, and crochet along at your own pace. This month, be sure to get the Simple Stitch Hat on Oombawka Design, and the Calm Serenity Beanie on The Stitchin Mommy!

    Get more Hat of the Month Club Patterns

    All of these patterns will be available for free on the blogs and for CAL participants, a free premium PDF copy will be available for a limited time (24-hours) from the publish dates. If you missed the free PDF be sure to subscribe for their reminder emails: Subscribe here And Click here to learn more and get all the fun patterns in this year long crochet along! And CLICK HERE to get the matching Ridgeline Stripes Crochet Cowl pattern!

    Ridgeline Stripes Crochet Cowl

    Why You’ll Love the Ridgeline Stripes Crochet Hat

    The Ridgeline Stripes Crochet Hat is a PULAD pattern - where we have multiple active loops going all at once! Crocheted in gorgeous Katia Merino Baby yarn, the shifting shades of green and purple create beautiful stripes and change every row.  This yarn is bouncy with great stitch definition, but you can swap it out if you have a wool allergy. The textured ridges add plenty of visual and tactile interest, and the way we carry the yarns inside the hat creates a smooth but attractive braid. In fact, it looks so good, it makes this hat pattern reversible!

    Ridgeline Stripes Crochet Hat

    Crocheted top down, this pattern creates a cozy beanie with two distinct looks. You can add a pom pom or leave it as is - choose your colors and make it your own!

    Ridgeline Stripes Crochet Hat


    Ridgeline Stripes Crochet Hat

    Add this pattern to your Ravelry Queue and Favorites

    US-G+, 4.5mm hook or as needed to get gauge - Furls Streamline used

    275-300 yds total Concept by Katia Merino Baby (Sport/2 - 100% superwash merino wool, 180 yd/165 m; 50 g/1.76 oz)
    A - 159 Dark Violet (60 yds)
    B - 157 Sage (60 yds)
    C - 155 Whitish Green (60 yds)
    D - 158 Lavender (60 yds)
    E - 55 Pearl Light Grey (60 yds)

    Stitch Markers

    Gauge: 21 sts x 13 rows = 4”[10 cm] in main st pattern

    Sizes: Small 22” (Large 23”) with stretch

    St Mult: 3 +2, +tch (tch not used when working in the round)

    HELPFUL LINKS AND TUTORIALS

    Ridgeline Stripes Crochet Hat 

    Matching Pattern: Ridgeline Stripes Crochet Cowl

    Crochet Abbreviations

    Magic Circle

    STHDC - Standing Half Double Crochet/Join with dc

    Post Stitches

    CSDC - Chainless Starting Double Crochet

    NOTES:

    Push active loops to the WS of the hat/behind new stitches when adding new yarns.

    Push active loops to the WS of the hat/behind work when joining at the end of the rnd.

    Start turning after Rnd 3. Use a stitch marker in the first last stitch of each round to keep track as you make these turns.

    PULAD stands for Pull Up Loop and Drop - remove hook from active loop and secure it with a stitch marker.

    Ridgeline Stripes Crochet Hat WIP

    Ridgeline Stripes Crochet Hat INSTRUCTIONS:

    Crown Instructions

    Rnd 1 [RS]: With Color E, make a magic circle, dc 12; join with sl st. (12 sts)

    Rnd 2 [RS]: (CSDC, dc) in first st, 2 dc in each rem st around, join and PULAD. (24 sts)

    Rnd 3 [RS]: With Color D, join with dc in first st, (fpdc, dc) in same st, skip next st, *(dc, fpdc, dc) in next st, skip next st; rep from * around, join and PULAD, turn. (36 sts)

    Rnd 4 [WS]: With Color C, join with dc in first st, (fpdc, dc) in same st, skip next st, (dc, fpdc, dc) in next st, skip next st, (dc, fpdc, dc) in next st, skip 2 sts, (dc, fpdc, dc) in next st, skip next st, *[(dc, fpdc, dc) in next st, skip next st] twice, (dc, fpdc, dc) in next st, skip next 2 sts, (dc, fpdc, dc) in next st, skip next st; rep from *, join and PULAD, turn. (48 sts)

    Rnd 5 [RS]: With Color B, join with dc in first st, (fpdc, dc) in same st, skip next st, (dc, fpdc, dc) in next st, skip next st, [(dc, fpdc, dc) in next st, skip 2 sts] twice, (dc, fpdc, dc) in next st, skip next st,*[(dc, fpdc, dc) in next st, skip next st] twice, [(dc, fpdc, dc) in next st, skip 2 sts] twice, (dc, fpdc, dc) in next st, skip next st; rep from *, join and PULAD, turn. (60 sts)

    Rnd 6 [WS]: With Color A, join with dc in first st, (fpdc, dc) in same st, skip next st, (dc, fpdc, dc) in next st, skip next st, [(dc, fpdc, dc) in next st, skip 2 sts] 3 times, (dc, fpdc, dc) in next st, skip next st,*[(dc, fpdc, dc) in next st, skip next st] twice, [(dc, fpdc, dc) in next st, skip 2 sts] 3 times, (dc, fpdc, dc) in next st, skip next st; rep from *, join and PULAD, turn. (72 sts)

    Rnd 7 [RS]: Insert hook in Color E loop, ch 7, (dc, fpdc, dc) in first st, skip next st, (dc, fpdc, dc) in next st, skip next st, [(dc, fpdc, dc) in next st, skip 2 sts] 4 times, (dc, fpdc, dc) in next st, skip next st,*[(dc, fpdc, dc) in next st, skip next st] twice, [(dc, fpdc, dc) in next st, skip 2 sts] 4 times, (dc, fpdc, dc) in next st, skip next st; rep from *, join and PULAD, turn. (84 sts) For Size Small, go to Sides Instructions. 

    Rnd 8 [WS] Large size ONLY: Insert hook in Color D loop, ch 7, (dc, fpdc, dc) in first st, skip next st, (dc, fpdc, dc) in next st, skip next st, [(dc, fpdc, dc) in next st, skip 2 sts] 5 times, (dc, fpdc, dc) in next st, skip next st,*[(dc, fpdc, dc) in next st, skip next st] twice, [(dc, fpdc, dc) in next st, skip 2 sts] 5 times, (dc, fpdc, dc) in next st, skip next st; rep from *, join and PULAD, turn. (96 sts) Go to Sides Instructions.

    Sides Instructions

    Rnd 1: With next color, ch 7, skip the first st, (dc, fpdc, dc) in next st, skip next st, *skip next st, (dc, fpdc, dc) in next st, skip next st; rep from * around, join and PULAD, turn.

    Rnds 2 - 18 (22): Rep Rnd 2.

    Brim

    Rnd 1: With Color A, ch 7, dc in each st around; join and PULAD, turn.

    Rnd 2: With Color E, ch 7, *fpdc in next st, bpdc in next st; rep from * around, join and break yarn, turn.

    Rnd 3: With Color D, repeat Rnd 2.

    Rnd 4: With Color C, repeat Rnd 2.

    Rnd 5: With Color B, repeat Rnd 2.

    Rnd 6: With Color A, ch 5, sc in each st around; join and break yarn. Weave in all ends. Can be worn with both RS and WS out!


    Ridgeline Stripes Crochet Hat

    I hope you enjoy making and wearing the Ridgeline Stripes Crochet Cowl! If you share on socials, I would love to see it! You can always tag me @mooglyblog!

    The Fine Print

    Follow Moogly on YouTube, Facebook, Twitter, Pinterest, TikTok, and Instagram! Thank you to Katia and Furls for providing the materials shown in this post. Written pattern copyright Tamara Kelly 2026, all rights reserved. Please do not reprint or repost this pattern. Please do link to this page to share this pattern with others. If you wish to make items for sale from this pattern or translate it to another language, please visit the About page for details.

    Ridgeline Stripes Crochet Cowl Tutorial

    June 25, 2026 by Tamara Kelly 2 Comments

    Ridgeline Stripes Crochet Cowl Tutorial

    The Ridgeline Stripes Crochet Cowl Tutorial walks you through every step of creating this gorgeous neckwarmer in two different styles! Whether you prefer a simple circle or the trendy bandana style, you can crochet along with the right and left-handed video tutorials below!

    Disclaimer: This post includes affiliate links.

    Be sure to scroll down past the videos to get the links to the free pattern and supplies!

    Ridgeline Stripes Crochet Cowl Tutorial:

    How to Crochet the Ridgeline Stripes Crochet Cowl - Right-Handed

    Learn to Crochet the Ridgeline Stripes Crochet Cowl - Left-Handed

    As Seen in This Video (click each for more info!):

    The Free Pattern: Ridgeline Stripes Crochet Cowl

    The Supplies:

    US-G, 4.5mm hook or as needed to get gauge - Furls Streamline used

    600 - 690 yds total Concept by Katia Merino Baby (Sport/2 - 100% superwash merino wool, 180 yd/165 m; 50 g/1.76 oz)

    Stitch Markers

    And here's a Pin for your Crochet Pinterest Board! Make sure you are following Moogly on Pinterest for all the best knit, crochet, and craft pins!

    Ridgeline Stripes Crochet Cowl Tutorial

    I hope you enjoy this tutorial for the Ridgeline Stripes Crochet Cowl! If this video doesn't answer all your questions, please ask in the comments below - I'm always happy to help.

    If you make this or any Moogly pattern, please tag me in your photos so I can see them too, @mooglyblog or #mooglyblog! Then send them to tamarakelly@mooglyblog.com to see them featured in a future Moogly email newsletter!

    Get Moogly on your favorite social media sites: YouTube, Facebook, Pinterest, Tik Tok, Bluesky, and Instagram! And sign up for the free newsletter at the bottom of the page so you don’t miss a thing! Thank you to Katia and Furls for providing the materials for this video.

    MooglyCAL2026 Block 13

    June 25, 2026 by Tamara Kelly 2 Comments

    MooglyCAL2026 Block 13

    MooglyCAL2026 Block 13 marks the start of the second half of this year's crochet along! Kelly Baum-Sehon of Cocky Crocheter has designed the smooth, sleek T.G.I. Phi-Day Square with simple stitches and a mathematically minimalist result. Get all the details for this free crochet along, and the free pattern link below!

    Disclaimer: This post includes affiliate links; materials provided by Local Crafts.

    Just getting started with the Moogly Crochet Along? CLICK HERE for the intro info!

    Want to get help with the patterns, show off, and CAL with others? CLICK HERE for the Facebook group

    Like to see all the squares visually? CLICK HERE for the Pinterest Board! (Squares will be added as they are released.)

    Introducing the MooglyCAL ONLY Newsletter! Never miss a Square Debut!

    The 2026 Moogly CAL Schedule

    As the year progresses, links will be added, and you'll be able to click on any of the past squares to go to their posts. The numbers refer to the date of the month that the square will debut.

    January Archie Argyle Crochet Square and Radiate Champion Block
    February Cozy Circles Crochet Square and Endless Griddle Stitch Square
    March Blue Cascade Afghan Square and Woven Checkerboard Square
    April Crashing Waves Blanket Square, Marvelous Mosaic Square, and Diamonds in Diamonds Mosaic Square
    May Luscious Lattice Square and Crossroads Mosaic Crochet Square
    June Celtic Square Motif and THIS POST
    July 9 and 23
    August 6 and 20
    September 3 and 17
    October 1, 15, and 29
    November 12 and 25

    *****

    Block #13:

    T.G.I. Phi-Day Square

    by Cocky Crocheter

    MooglyCAL2026 Block 13

    Above, you can see the square that Kelly made in 3 colors of Swish Worsted! Below is my CAL square, in my 6 colors of Brava Worsted - Custard, Seashell, Fig, Denim, Espresso, and Cream!

    MooglyCAL2026 Block 13

    Details for MooglyCAL2026 Block 13

    My Notes: This square uses only the very simplest of crochet stitches, but they twist around to create a colorful swirl! Kelly was inspired by Phi Day, the Golden Ratio, and modular crochet techniques - simple, elegant, and ready for your special touches! Color choices will make all the difference with this one, and it's a great opportunity for all of us to perfect our "working to the edge" skills!

    One tip that Kelly shares that I want to emphasize: add a stitch marker to the front of your work after finishing Section 1 - it makes the rest of the square a lot easier! If you need a stitch count for the later sections, just check the chart!

    Helpful Links and Tutorials: Crochet Abbreviations, Join with Sc, Working Into the Edge, and seamless join.

    Sizing: My square was coming out a bit big, so I stopped Section 7 after 23 rows, and then stopped Final Section at 5 rows. This left me just enough room for the sc border.

    Everyone's gauge is different, so be sure to measure as you go! Learn how to adjust for size HERE to ensure all your squares are the same size. Remember that the 12″ is measured across and up and down, not diagonally/corner to corner.

    Yarn Options: This year, our designers have chosen from a variety of yarns, including Brava Worsted, Swish Worsted, Jimmy Beans Wool Beanstalk, Berroco Vintage, and MadTosh Vintage. For this square, Kelly used Swish Worsted and I used Brava Worsted!

    What I Did:

    I used a US-J, 6.0 mm crochet hook, and Brava Worsted yarn, and my color scheme was as follows (see pics for more info on placement):

    Section 1: Fig
    Section 2: Denim
    Section 3: Espresso
    Section 4: Seashell
    Section 5: Custard
    Section 6: Fig
    Section 7: Denim
    Final Section: Espresso
    Finishing Border: Cream

    This square needed a bit of blocking, so I used steam and then finished with wet blocking.

    The Pattern:

    CLICK HERE FOR THE PATTERN FOR BLOCK #13

    PLEASE NOTE: The designers all hold individual copyrights for their patterns. They may choose to make videos of their patterns, and you can certainly request them from the designers. In addition, there are videos linked in the notes for specific stitches and techniques that may help you with the pattern. They may offer paid PDFs of the pattern, but have agreed to leave it up for free on their website or on Ravelry for as long as possible.

    Show Off Your Squares!

    If you share your photos on social media, be sure to use the hashtags #mooglycal2026 and tag your yarn - I'll be using #bravaworsted -  and tag me @mooglyblog so I can see them too! And don't forget to share them in the MooglyCAL Facebook Group! Thank you all for CAL-ing with me!

    And finally, here's a pin of MooglyCAL2026 - Block 13 for your own Pinterest boards!

    MooglyCAL2026 Block 13

    You can follow Moogly on YouTube, Facebook, Twitter, Pinterest, TikTok, and Instagram, and don't forget to sign up for the free newsletter at the bottom of the page! Thank you to Local Crafts for providing the materials for this crochet along.  

    Crochet and Catch Up with Moogly - June 24, 2026

    June 24, 2026 by Tamara Kelly Leave a Comment

    Crochet and Catch Up with Moogly - June 24, 2026

    Happy late June, all! Summer is officially underway, and it's time for another Crochet and Catch Up with Moogly. We'll chat about all the crochet goodness on Moogly, from new patterns and projects to upcoming events and favorite finds. I'll be live on YouTube and Facebook, sharing updates, answering questions, and showing off a few projects along the way. You'll find links to everything mentioned during the livestream right here in this post. Join me live or catch the replay below!

    Disclaimer: This post may contain affiliate links. Live videos are unscripted, unedited, and occasionally weird; all opinions are my own.

    Crochet and Catch Up with Moogly

    Going LIVE on Facebook and YouTube, at 11am CT!

    Click here to Like the Moogly Facebook Page and get notified when I go live!

    Click here to Subscribe to the Moogly YouTube Page and get notified when I go live!

    Moogly Community Group on Facebook

    What I'm Wearing: Bayside Tee

    MooglyCAL2026 Block 12 Courtesy of Celtic Knot Crochet

    CAL Yarns: Brava Worsted, Swish Worsted, Jimmy Beans Wool Beanstalk, Berroco Vintage, and MadTosh Vintage

    Granny Square Month 30 Pattern Bundle (Save $94!!)

    Granny Square Month Curated Pattern Collection

    Ooh That's Why Online Summit - Get your FREE ticket here!

    Star Spangled Trivet Mesh Tutorial Video

    Ridgeline Stripes Crochet Cowl - Free Pattern

    Ridgeline Stripes Crochet Cowl - Video Tutorials Coming Friday!

    Concept by Katia Merino Baby

    Arctic Amigurumi Giveaway

    Crochet AmiguWHOmi Giveaway

    Radical Potholder Weaving (Spiral Bound) Giveaway

    Tunisian Stitch Dictionary Spiral Bound Giveaway

    Sneak Peek: Get a sneak peek at coming patterns, featuring Concept by Katia Merino Baby and Circulo Natural Cotton 4/4! 


    If you have a LYS or event you'd like me to teach at this year, or if you would like me to teach an online class to your group or guild, please do reach out!

    Have a wonderful day all - see you to crochet and catch up next time! And before you go, here's a Pin for today's post, so you can add it to your favorite Pinterest boards! We appreciate (and need) your shares on all our posts.

    Crochet and Catch Up with Moogly - June 24, 2026

    Follow Moogly on YouTube, Bluesky, Facebook, Pinterest, TikTok, and Instagram!

    Ridgeline Stripes Crochet Cowl

    June 21, 2026 by Tamara Kelly Leave a Comment

    Ridgeline Stripes Crochet Cowl

    No matter the weather, small, satisfying projects are always in season - say hello to the Ridgeline Stripes Crochet Cowl! This self-bordering design creates a neckwarmer in your choice of two styles, featuring Katia Merino Baby. And it's part of the Scarf of the Month Club 2026!

    Disclaimer: This post includes affiliate links; materials provided by Katia and Furls Fiberarts.

    Prefer an ad-free PDF? You've got options!

    This button leads to the pattern on Etsy

    Prefer the free blog version? Keep scrolling!

    Part of the 2026 Scarf of the Month Club

    The Scarf of the Month Club is hosted by Oombawka Design and The Stitchin Mommy! Each month in 2026, three free scarf patterns will be shared on their blogs and one guest designer's blog, as part of this crochet-along. Then the following week, a hat from each as well, for the Hat of the Month Club. This month, it's Moogly!

    This is a relaxed, flexible CAL — join in when you can, make what you love, and crochet along at your own pace. This month, be sure to get the Simple Stitch Scarf on Oombawka Design, and the Calm Serenity Cowl on The Stitchin Mommy!

    Get more Scarf of the Month Club Patterns

    All of these patterns will be available for free on the blogs and for CAL participants, a free premium PDF copy will be available for a limited time (24-hours) from the publish dates. If you missed the free PDF be sure to subscribe for their reminder emails: Subscribe here And Click here to learn more and get all the fun patterns in this year long crochet along! (And watch for the Ridgeline Stripes Crochet Hat next week!)

    Ridgeline Stripes Crochet Cowl

    Why You’ll Love the Ridgeline Stripes Crochet Cowl

    The Ridgeline Stripes Crochet Cowl is a PULAD pattern - where we have multiple active loops going all at once! Crocheted in gorgeous Katia Merino Baby yarn, the shifting shades of green and purple create beautiful stripes and change every row.  This yarn is bouncy with great stitch definition, but you can swap it out if you have a wool allergy. The textured ridges add plenty of visual and tactile interest, and the self-bordering design means there are no extra edging rounds to fuss with when you're done.

    Ridgeline WIP

    It's worked in a way that keeps things interesting as you crochet, and when it's time to finish, you get to choose between two different finishing options for a look that's all your own. Whether you prefer a classic circular cowl or the bandana style I went with, you can customize the final result to suit your style.


    Ridgeline Stripes Crochet Cowl

    Add this pattern to your Ravelry Queue and Favorites

    US-G, 4.5mm hook or as needed to get gauge - Furls Streamline used

    600 - 690 yds total Concept by Katia Merino Baby (Sport/2 - 100% superwash merino wool, 180 yd/165 m; 50 g/1.76 oz)
    A - 159 Dark Violet (120 yds)
    B - 157 Sage (120 yds)
    C - 155 Whitish Green (120 - 210 yds)
    D - 158 Lavender (120 yds)
    E - 55 Pearl Light Grey (120 yds)

    Stitch Markers

    Gauge: 21 sts x 13 rows = 4”[10 cm] in main st pattern

    Size - laid flat, before sewing the final seam: 

    • Standard Cowl: 25.5” x 11”
    • Bandana Style Cowl: 34.5” x 11”

    St Mult: 3 +2, +tch

    HELPFUL LINKS AND TUTORIALS

    Ridgeline Stripes Crochet Cowl

    Crochet Abbreviations

    FDC - Foundation Double Crochet

    STHDC - Standing Half Double Crochet

    Post Stitches

    CSDC - Chainless Starting Double Crochet

    NOTES:

    Starting with Row 8, sl st on top of prev sl st, pushing other active loops up and to the back of the work. 

    PULAD stands for Pull Up Loop and Drop - remove hook from active loop and secure it with a stitch marker. 

    Ridgeline Stripes Crochet Cowl

    Ridgeline Stripes Crochet Cowl INSTRUCTIONS:

    Row 1: With Color A, FDC 53, turn, PULAD. (53 sts)

    Row 2: With Color B, join with STHDC in first st, skip next st, *(dc, fpdc, dc) in next st,** skip next 2 sts, rep from * finishing last rep at **, skip next st, hdc in last st, turn, PULAD.

    Row 3: With Color C, rep Row 2.

    Row 4: With Color D, rep Row 2.

    Row 5:< With Color E, rep Row 2.

    BEGIN REPEAT

    Row 6:Replace hook in loop of Color A, ch 4, sl st in top of st 2 rows above, ch 4, sl st in first st of previous row, ch 1, hdc in first st, skip next st, *(dc, fpdc, dc) in next st,** skip next 2 sts, rep from * finishing last rep at **, skip next st, hdc in last st, turn, PULAD.

    Row 7: Replace hook in loop of Color B, rep Row 6.

    Row 8: Replace hook in loop of Color C, rep Row 6.

    Row 9: Replace hook in loop of Color D, rep Row 6.

    Row 10: Replace hook in loop of Color E, rep Row 6.

    END REPEAT

    Rows 11 - 85: Rep Rows 6 - 10 ending on a Row 10 rep.

    For a “standard” round cowl: Break all yarns except for Color A. Cut a long tail of Color A, and use this to sew Row 1 to Row 85. Weave in all ends.

    Ridgeline Stripes Crochet Cowl - Circle Version

    For a “bandana” style cowl: Break all yarns except for Color C. Then continue as written below:

    Row 86: Replace loop in hook of Color C, ch 4, sl st in top of first st of Row 85, CSDC in first st, dc in each rem st across, turn.

    Rows 87 - 109: CSDC in first st, dc in each rem st across. After Row 109, break yarn.

    ASSEMBLY OF THE BANDANA STYLE COWL

    Lay out the piece as shown below, with the last row on the right.

    Ridgeline Stripes Crochet Cowl

    Fold the right half of the piece to the middle, pointing down, as shown below.

    Ridgeline Stripes Crochet Cowl

    Fold the left half of the piece to the middle, pointing down, so that the corners meet, as shown. Use stitch markers to match up stitches along each edge where pieces overlap.

    Use an additional length of yarn in Color A to stitch along the bottom edges of the overlapping sections as shown by the dotted lines. Weave in all ends.


    Ridgeline Stripes Crochet Cowl

    I hope you enjoy making and wearing the Ridgeline Stripes Crochet Cowl! If you share on socials, I would love to see it! You can always tag me @mooglyblog!

    The Fine Print

    Follow Moogly on YouTube, Facebook, Twitter, Pinterest, TikTok, and Instagram! Thank you to Katia and Furls for providing the materials shown in this post. Written pattern copyright Tamara Kelly 2026, all rights reserved. Please do not reprint or repost this pattern. Please do link to this page to share this pattern with others. If you wish to make items for sale from this pattern or translate it to another language, please visit the About page for details.

    Granny Square Month: Free Patterns, Crochet Tips, and a Special Bundle

    June 18, 2026 by Tamara Kelly Leave a Comment

    Granny Square Month: Free Patterns, Crochet Tips, and a Special Bundle

    June is Granny Square Month, so there's no better time to celebrate one of crochet's most versatile and beloved motifs! Whether you're making blankets, bags, garments, or colorful stash-busting projects, granny squares offer endless creative possibilities. To help inspire your next project, I've gathered some favorite block patterns and tutorials from here on Moogly, plus more great granny resources! Read on for plenty of granny square inspiration, helpful resources, and to add even more patterns to your collection!

    Disclaimer: This post includes affiliate links. 

    What You'll Find in This Post

    • What Makes Granny Squares So Popular?
    • The Granny Square Month Bundle (no longer available)
    • Free Granny Square Patterns on Moogly
    • Helpful Granny Square Tutorials and Resources
    • Project Ideas for Granny Squares

    What Makes Granny Squares So Popular?

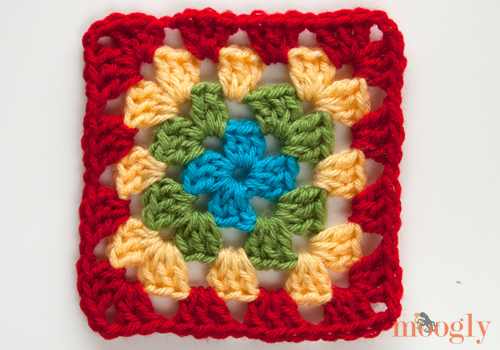
    Originally, "granny squares" refered to only those squares made with the granny stitch - you can see one example below!

    But since then, the term has expanded to encompass any square or motif that is meant to be joined to other squares or motifs to create a larger project! So now there are "granny squares" featuring all sorts of stitches and patterns! Most are still center out, but there are lots made in rows or even diagonally too. That said, there are few things they all tend to have in common - things that keep crocheters coming back for more.

    • Portable and beginner-friendly
    • Great for stash busting
    • Endless design possibilities
    • Can be joined into blankets, bags, garments, home decor, and more

    The Granny Square Month Bundle

    This bundle is no longer available, but the rest of the post is still good, so keep going!

    Free Granny Square Patterns on Moogly

    If you're looking for free inspiration, here are a few favorite granny square patterns and resources from the Moogly archives. Whether you're making your very first granny square or adding to a growing collection of motifs, these patterns are a great place to start!

    Forked Cable Square

    This 8-inch square is the perfect building block for afghans, lap blankets, sampler throws, and beyond. The design is achieved using simple front post stitches, using Red Heart With Love. Part of the Granny Square Month Crochet Pattern Bundle and free on the blog - CLICK HERE!

    Forked Cable Square - 8 Inch Crochet Block

    Ellie's 6" Afghan Square

    Ellie’s 6-inch afghan square is simple, floral, and pretty! Use your favorite shades of Red Heart With Love to make a bunch - CLICK HERE!

    Ellie's 6 Inch Afghan Square - free crochet pattern on Moogly

    Striped Hourglass Square

    This 12-inch square is a great addition to the Moogly Crochet Along - or any squares-based project! I designed this square using Red Heart With Love - CLICK HERE!

    Striped Hourglass Square Closeup

    Screen Window Square

    The Screen Window Square is a simple 12” Tunisian afghan block that features a light and lacy, summer-ready stitch pattern in Red Heart Roll With It - CLICK HERE!

    Screen Windows Square - free Tunisian crochet pattern on Moogly

    Heart Filled Square

    Get ready to create a cozy and charming 12-inch block with this easy-to-follow pattern featuring the classic granny stitch and Red Heart With Love - CLICK HERE!

    Heart Shaped Square - Moogly

    Leaping Stripes and Blocks Squared

    Make a 12” square as shown here or go as big as you like with this free crochet pattern featuring Red Heart With Love - CLICK HERE!

    Leaping Stripes and Blocks Squared in 4 Colors - free pattern on Moogly!

    Right Round Square

    The Right Round Square is a free crochet 12-inch square pattern! I hope you enjoy this “spin” on the crochet granny square made with Red Heart Chic Sheep by Marly Bird - CLICK HERE!

    Right Round Square - free pattern on Moogly!

    Every Little Thing Square

    The Every Little Thing Square is a second free crochet 12-inch square pattern that I designed with Red Heart Chic Sheep by Marly Bird - CLICK HERE!

    Every Little Thing Square: Free 12" Crochet Block Pattern by Mooglyblog.com

    Joyful Afghan Square

    This pattern was the second 12" square I ever designed, featuring Lion Brand Vanna's Choice - CLICK HERE!

    Block #16 in the Moogly Afghan CAL - Joyful Square!

    Fates Square

    The Fates Square is a fun 6” afghan square - featuring Lion Brand 24/7 Cotton - CLICK HERE!

    Fates Square - FREE 6" crochet block pattern on Mooglyblog.com!

    Magic Spike Mandala Square

    A mandala… square? Yes! This 12″ afghan block squares up at the end to make mandalas blanket-friendly! Made with Lily Sugar'n Cream - CLICK HERE!

    Magic Spike Mandala 12" Square - free crochet pattern

    Helpful Granny Square Tutorials and Resources

    How to Make Granny Squares

    There are lots of free "granny square patterns" out there, but the original is still a classic! You'll find video tutorials for each of the following types of blocks:

    How to Crochet the Granny Square

    How to Crochet Multi-Colored Granny Squares

    and finally, How to Crochet the Solid Granny Square

    How to Crochet Multicolor Granny Squares that look perfect every time! Video and photo #crochet tutorial on Moogly

    Joining Granny Squares

    There are lots of ways to connect your blocks- from simply stitching them together to fancier patterns that add texture and detail! CLICK HERE to check out a list of 14 ways to join crochet squares!

    The MooglyCAL2017 is finished! Get all the patterns free and make your own!

    Blocking Granny Squares

    It's lovely when your blocks are all nicely squared up, right off the hook. But that doesn't always happen! Blocking your squares before joining them together is often more manageable than blocking an entire blanket or larger finished piece - and it makes them easier to join together! CLICK HERE for a tutorial on wet blocking - and consider adding a bit of steam for stubborn acrylic pieces!

    How to Wet Block Afghan Squares - it makes SO much difference in the finished projects! Learn how with this tutorial - it's way easier than you think!

    Project Ideas for Granny Squares

    What can you make with crochet squares? Well, the obvious project is blankets! But you can actually use crochet squares to make all sorts of projects, in all sorts of sizes. CLICK HERE to see how to use squares to make all sorts of shapes and projects - blankets, bags, pillows, and garments! These are printable and downloadable for your convenience!

    Easy Crochet Projects to Make with Squares: Bags, Pillows, Blanket and More! - Moogly

    Share Your Granny Square Projects

    I hope you enjoy Granny Square Month - and Granny Square Year (that's every year, right?)! If this post inspires you, and you post your project on socials, I would love to see it! You can always tag me @mooglyblog! Add this pin to your crochet Pinterest board to save this post for later - we appreciate your shares! ♥

    Granny Square Month: Free Patterns, Crochet Tips, and a Special Bundle

    Follow Moogly on YouTube, Bluesky, Facebook, Pinterest, TikTok, and Instagram!

    Star Spangled Trivet and Hot Pad Tutorial

    June 16, 2026 by Tamara Kelly Leave a Comment

    Star Spangled Trivet and Hot Pad Tutorial

    The Star Spangled Trivet and Hot Pad Tutorial demonstrates how to crochet the mesh portion of this festive pattern! Keep your counters and tables safe - crochet along with the right and left-handed video tutorials below!

    Disclaimer: This post includes affiliate links.

    Be sure to scroll down past the videos to get the links to the free pattern and supplies!

    Made with bright washable cotton yarn, this trivet pattern will perk up your table for years to come! It starts with a mesh base, and then the "wiggles" are added to create the fun 3D look - CLICK HERE for a tutorial on how to add the "wiggles!"

    Star Spangled Trivet and Hot Pad Tutorial:

    How to Crochet Star Spangled Trivet and Hot Pad - Right-Handed

    Learn to Crochet the Star Spangled Trivet and Hot Pad - Left-Handed

    As Seen in This Video (click each for more info!):

    The Free Pattern: Star Spangled Trivet and Hot Pad

    The Supplies:

    US - I, 5.5mm hook - Furls Fiberarts

    Lily Sugar'n Cream (100% cotton, 4-Medium Weight Yarn)

    And here's a Pin for your Crochet Pinterest Board! Make sure you are following Moogly on Pinterest for all the best knit, crochet, and craft pins!

    Star Spangled Trivet and Hot Pad Tutorial

    I hope you enjoy this tutorial for the Star Spangled Trivet and Hot Pad! If this video doesn't answer all your questions, please ask in the comments below - I'm always happy to help.

    If you make this or any Moogly pattern, please tag me in your photos so I can see them too, @mooglyblog or #mooglyblog! Then send them to tamarakelly@mooglyblog.com to see them featured in a future Moogly email newsletter!

    Get Moogly on your favorite social media sites: YouTube, Facebook, Pinterest, Tik Tok, Bluesky, and Instagram! And sign up for the free newsletter at the bottom of the page so you don’t miss a thing! Thank you to Yarnspirations for providing the materials for this video.

    Arctic Amigurumi - Review and Giveaway

    June 16, 2026 by Tamara Kelly Leave a Comment

    Arctic Amigurumi - Review and Giveaway on Moogly

    Arctic Amigurumi: Step-by-Step Patterns for 18 Crochet Animals by Kristi Simpson and Kimberly Simpson features "cuddly creatures inspired by the icy tundra!" Take a peek inside, and enter to win your own copy of Arctic Amigurumi below!

    Disclaimer: I was given a copy of this book for review; all opinions are my own. This post includes affiliate links.

    Arctic Amigurumi Review

    A Bit About the Author

    Kristi Simpson

    If you read or collect crochet books, you've probably come across Kristi Simpson before. With Farm Friends Crochet, she partnered with her daughter Kimberly, and in this book, they have paired up again!

    "Kristi Simpson is the author of many crochet design publications, including the popular Supersize Crochet Animals, Sweet & Simple Baby Crochet, Adorable Baby Crochet, Ultimate Crochet Nursery, and Crochet Stitch Sampler Baby Blankets. Known for her fresh and modern style, Kristi's patterns have been published in magazines, books, catalogs, and online venues."

    "Kimberly Simpson discovered her love for knitting at just sixteen when she chose it for her senior project - she's been crafting ever since. Over the past twelve years, she's explored a variety of creative outlets, from crochet and embroidery to other hands-on crafts that let her imagination come alive. When she's not creating something new, Kimberly enjoys spending time outdoors - whether hiking through nature trails or soaking up the calm of the ocean. A lover of animals and all things natural, she balances her artistic passions with her career as a retail store manager."

    Arctic Amigurumi - Cover

    Inside Arctic Amigurumi

    "Journey to the frosty North with this adorable collection of Arctic Amigurumi animals!

    Even if you are just learning to crochet, Arctic Amigurumi invites you to create 18 cuddly creatures inspired by the icy tundra—from Wiggles the Penguin and Lumi the Orca to Ola the Caribou and Tuhin the Puffin. Alongside easy-to-follow instructions and a helpful stitch guide, you'll find tips for success, even if you're new to amigurumi. Designed with love by Kristi Simpson and her daughter Kim, each pattern has its own personality and charming details like a cozy hat and scarf or a snowflake sweater.

    Warm up your crochet skills while stitching up cold-weather friends! Written and designed by humans, for humans"

    Arctic Amigurumi

    Arctic Amigurumi is designed for beginner to intermediate crocheters, and all the patterns use size 4/worsted weight yarn and a size G/4 mm crochet hook. They are written in US terms, with lots of clear photos and close-ups. At the back of the book is a stitch guide with lots of photos, covering both the basics and special stitches.

    Arctic Amigurumi

    Almost every animal in this book has its own adorable little accessory - hats, scarves, sweaters, bows, and more! You can mix and match these to create custom creatures too. So cute!

    Arctic Amigurumi

    If you are new to crochet or to amigurumi, this book is a great place to start. Using almost exclusively single crochet stitches, the instructions are fully written out in standard crochet notation, making them easier to read and follow.

    Arctic Amigurumi

    If you love amigurumi or arctic animals, I think you'll love Arctic Amigurumi - "No matter the weather, these Arctic pals are ready to be a new best friend for anyone!"

    Arctic Amigurumi

    Get your own copy of Arctic Amigurumi today!

    Purchase your own copy of this book on Amazon, or ask for it at your local bookseller! Just released June 2nd, it's hot off the presses! And don't miss Kristi's other titles!

    Books by Kristi Simpson

    The Arctic Amigurumi Giveaway

    The Arctic Amigurumi Giveaway is open in the US and Canada. The giveaway ends July 14, 2026, at 12:15am Central US time. To enter, use the Kingsumo form below. Only the email option is mandatory – all other tasks are optional, for bonus entries only.

    One winner will receive a paperback copy of Arctic Amigurumi, courtesy of Stackpole Books. They will be notified by email.

    GOOD LUCK ALL!

    You can follow Moogly on YouTube, Facebook, Twitter, Pinterest, TikTok, and Instagram. Don’t forget to sign up for the free newsletter at the top of the page! And don't forget to enter all the other fab giveaways on Moogly!

    Arctic Amigurumi - Review and Giveaway on Moogly

    MooglyCAL2026 Block 12

    June 11, 2026 by Tamara Kelly Leave a Comment

    MooglyCAL2026 Block 12

    MooglyCAL2026 Block 12 is our yearly visit to Celtic Knot Crochet for one of her signature twisty and turny knotted designs! Jennifer Ryan has designed the Celtic Square Motif with simple stitches and amazing results. Get all the details for this free crochet along, and the free pattern link below!

    Disclaimer: This post includes affiliate links; materials provided by Local Crafts.

    Just getting started with the Moogly Crochet Along? CLICK HERE for the intro info!

    Want to get help with the patterns, show off, and CAL with others? CLICK HERE for the Facebook group

    Like to see all the squares visually? CLICK HERE for the Pinterest Board! (Squares will be added as they are released.)

    Introducing the MooglyCAL ONLY Newsletter! Never miss a Square Debut!

    The 2026 Moogly CAL Schedule

    As the year progresses, links will be added, and you'll be able to click on any of the past squares to go to their posts. The numbers refer to the date of the month that the square will debut.

    January Archie Argyle Crochet Square and Radiate Champion Block
    February Cozy Circles Crochet Square and Endless Griddle Stitch Square
    March Blue Cascade Afghan Square and Woven Checkerboard Square
    April Crashing Waves Blanket Square, Marvelous Mosaic Square, and Diamonds in Diamonds Mosaic Square
    May Luscious Lattic Square and Crossroads Mosaic Crochet Square
    June THIS POST and 25
    July 9 and 23
    August 6 and 20
    September 3 and 17
    October 1, 15, and 29
    November 12 and 25

    *****

    Block #12:

    Celtic Square Motif

    by Celtic Knit Designs

    MooglyCAL2026 Block 12

    Above, you can see the square that Jennifer made in 3 colors of Brava Worsted! Below is my CAL square, in my 6 colors of Brava Worsted - Custard, Seashell, Fig, Denim, Espresso, and Cream!

    MooglyCAL2026 Block 12

    Details for MooglyCAL2026 Block 12

    My Notes: Some days I wonder if you mapped Jennifer's brain, would it be a giant Celtic knot? Every year she creates designs with these loops of fabric that are simple, yet so so stunning. This year's square calls for lots of stitch markers - and I do recommend you use them! If you've made Jennifer's squares in past years, you might not need the cork board - but if you're new to them, I do recommend that or a blocking board to help you get things woven together. One thing that helps me is to remember that each cord goes over, then under, then over, then under... etc. If each is doing that, you're probably on track!

    Getting the right size with this pattern is easy - there are several rounds of stitches that square up the design, so you can adjust the last one or two to get right to 12" as needed.

    Helpful Links and Tutorials: Crochet Abbreviations, Magic Circle, BLO - Back Loop Only, Join with Sc, Join with Hdc, Join with Dc, Extended Dc, Chainless Starting Double Crochet, Whip Stitch Seaming, and seamless join.

    Sizing: My square was coming out just a little bit big, so I worked Knot Edging Rnd 4 as hdc, then finished with Rnd 5 as written! But everyone's gauge is different, so be sure to measure as you go! Learn how to adjust for size HERE to ensure all your squares are the same size. Remember that the 12″ is measured across and up and down, not diagonally/corner to corner.

    Yarn Options: This year, our designers have chosen from a variety of yarns, including Brava Worsted, Swish Worsted, Jimmy Beans Wool Beanstalk, Berroco Vintage, and MadTosh Vintage. For this square, Jennifer and I both used Brava Worsted!

    What I Did:

    I used a US-J, 6.0 mm crochet hook, and Brava Worsted yarn, and my color scheme was as follows (see pics for more info on placement):

    Cord 1: Seashell with Cream Edging
    Cord 2:
    Denim with Cream Edging
    Cord 3:
    Custard with Cream Edging
    Knot Edging Rnds 1 - 3:
    Fig
    Knot Edging Rnd 4:
    Espresso
    Knot Edging Rnd 5:
    Cream
    Center Small Motif: Fig

    This square benefited from wet blocking.

    The Pattern:

    CLICK HERE FOR THE PATTERN FOR BLOCK #12

    PLEASE NOTE: The designers all hold individual copyrights for their patterns. They may choose to make videos of their patterns, and you can certainly request them from the designers. In addition, there are videos linked in the notes for specific stitches and techniques that may help you with the pattern. They may offer paid PDFs of the pattern, but have agreed to leave it up for free on their website or on Ravelry for as long as possible.

    Show Off Your Squares!

    If you share your photos on social media, be sure to use the hashtags #mooglycal2026 and tag your yarn - I'll be using #bravaworsted -  and tag me @mooglyblog so I can see them too! And don't forget to share them in the MooglyCAL Facebook Group! Thank you all for CAL-ing with me!

    And finally, here's a pin of MooglyCAL2026 - Block 12 for your own Pinterest boards!

    MooglyCAL2026 Block 12

    You can follow Moogly on YouTube, Facebook, Twitter, Pinterest, TikTok, and Instagram, and don't forget to sign up for the free newsletter at the bottom of the page! Thank you to Local Crafts for providing the materials for this crochet along.  

    Crochet and Catch Up with Moogly - June 10, 2026

    June 10, 2026 by Tamara Kelly Leave a Comment

    Crochet and Catch Up with Moogly - June 10, 2026

    Happy June, friends! It's time for another Crochet and Catch Up with Moogly, where we'll chat about all the crochet goodness happening around the community. I'll be live on YouTube and Facebook, sharing updates, answering questions, and showing off a few projects along the way. You'll find links to everything mentioned during the livestream right here in this post. Join me live or watch later below!

    Disclaimer: This post may contain affiliate links. Live videos are unscripted, unedited, and occasionally weird; all opinions are my own.

    Crochet and Catch Up with Moogly

    Going LIVE on Facebook and YouTube, at 11am CT!

    Click here to Like the Moogly Facebook Page and get notified when I go live!

    Click here to Subscribe to the Moogly YouTube Page and get notified when I go live!

    Moogly Community Group on Facebook

    What I'm Wearing: Seaglass Summer Cardi

    MooglyCAL2026 Block 11 Courtesy of Juniper & Oakes

    CAL Yarns: Brava Worsted, Swish Worsted, Jimmy Beans Wool Beanstalk, Berroco Vintage, and MadTosh Vintage

    Granny Square Month 30 Pattern Bundle (Save $94!!)

    Forked Cable Square - 8" - Free Crochet Pattern

    Forked Cable Square - Right and Left-Handed Video Tutorials

    Red Heart With Love

    Crochet AmiguWHOmi Giveaway

    Radical Potholder Weaving (Spiral Bound) Giveaway

    Tunisian Stitch Dictionary Spiral Bound Giveaway

    New Crochet Stitch Dictionary Spiral Bound Giveaway

    Sneak Peek: Sharing the last of my finds from the Fiber Fest, including Twice Sheared Sheep Custom Printed Tins, Twice Sheared Sheep Inc/Dec Reminder Clip Marker Set, Scented Stitches Stitch Balms, and a stack of totes and swag!


    If you have a LYS or event you'd like me to teach at this year, or if you would like me to teach an online class to your group or guild, please do reach out!

    Have a wonderful day all - see you to crochet and catch up next time! And before you go, here's a Pin for today's post, so you can add it to your favorite Pinterest boards! We appreciate (and need) your shares on all our posts.

    Crochet and Catch Up with Moogly - June 10, 2026

    Follow Moogly on YouTube, Bluesky, Facebook, Pinterest, TikTok, and Instagram!

    Crochet AmiguWHOmi: Adventures in Time and Space - Review and Giveaway

    June 9, 2026 by Tamara Kelly Leave a Comment

    Crochet AmiguWHOmi: Adventures in Time and Space - Review and Giveaway

    Crochet AmiguWHOmi: Adventures in Time and Space by Liz Ward is bigger than it looks on the outside, stuffed with over 45 patterns from all around the Whoniverse! Explore the cosmos and the inside of this brand new book - and enter to win your own copy below!

    Disclaimer: I was given a copy of this book for review; all opinions are my own. This post includes affiliate links.

    Crochet AmiguWHOmi Review

    A Bit About the Author

    "Liz Ward is a crochet designer who has been creating original crochet patterns since 2011. Specializing in the amigurumi style, she creates cute, fun crochet designs that are simple to make from easy-to-follow written patterns. Her work is regularly featured in Love Crochet, Inside Crochet, Crochet Now, Let’s Get Crafting, and Let's Knit magazines, and Liz has also contributed patterns to many crochet books. A long-time fan of Doctor Who, she is delighted to have created all the original crochet patterns for Crochet AmiguWHOmi: Adventures in Time and Space."

    Crochet AmiguWHOmi

    Inside Crochet AmiguWHOmi

    "Crochet your way through time and space with fifty official Doctor Who amigurumi, apparel, and home decor projects!

    Bring the magic of the TARDIS, the Doctor, and their adventures to life—one stitch at a time—as you dive into this extraordinary collection of patterns to craft your very own Doctor Who friends and foes as well as cozy items to wear and use around your home.

    With amigurumi, apparel, and home decor patterns for all skill levels, accompanied by full-color step-by-step photography and primers for crochet techniques to get you started, Crochet AmiguWHOmi offers a galaxy of options for fans of all ages to enjoy. Whether you're snuggling up with a time vortex blanket, bringing your favorite characters to life with crochet dolls, or adding a touch of Whovian flair to your wardrobe with the Fourth Doctor's iconic scarf, this book is a must-have for any Doctor Who enthusiast with a passion for crafting. So grab your crochet hooks, stock up on yarn, and prepare to embark on a crafting adventure through time and space. Allons-y!"

    Crochet AmiguWHOmi

    These characters are made using standard crochet amigurumi techniques, and there's a section at the beginning to go over these stitches. But don't speed right past it if you already know you stitches - the sections on adding hair and embroidery are super helpful too!

    Crochet AmiguWHOmi

    Chapter 1 of Crochet AmiguWHOmi includes a basic doll pattern that can then be turned into a variety of different Doctors and characters from the show, as well as dedicated patterns. These include The Master, Donna Noble, Rose Tyler, Weeping Angel, Dalek, and the TARDIS itself!

    Crochet AmiguWHOmi

    Then, in Chapter 2, we dive into Apparel and Cosplay, with patterns for a Thirteenth Doctor-Inspired Tote, a Celery Brooch, and of course the Eleventh Doctor's Fez and Bow Tie.

    Crochet AmiguWHOmi

    Crochet AmiguWHOmi hasn't missed the home decor category either, with Chapter 3 including a Cyberman Cushion, TARDIS Book Sleeve, Meep Backback, Sonic Scredriver, and more. Finally, Chapter 4 wraps it up with a bunch of Mini-Amigurumi patterns! Here you'll find 6 different Doctors, 5 different Companions, and 5 unique aliens - as well as Jelly Babies!

    Crochet AmiguWHOmi

    The patterns in this book are written in the simplified "amigurumi-style" so be sure to read through the techniques section at the beginning if you aren't familiar with this format. But there are lots of pics to help with assembly, and you'll find patterns here that every Doctor Who fan will love and cherish for a lifetime - or several!

    Crochet AmiguWHOmi: Adventures in Time and Space - Review and Giveaway

    Get your own copy of Crochet AmiguWHOmi today!

    Purchase your own copy of this book on Amazon, or ask for it at your local bookseller! Just released TODAY!

    The Crochet AmiguWHOmi Giveaway

    The Crochet AmiguWHOmi Giveaway is open to U.S. addresses only. The giveaway ends July 7, 2026, at 12:15am Central US time. To enter, use the Kingsumo form below. Only the email option is mandatory – all other tasks are optional, for bonus entries only.

    One winner will receive a paperback copy of Crochet AmiguWHOmi, courtesy of Ten Speed Press/Penguin Random House. They will be notified by email.

    GOOD LUCK ALL!

    You can follow Moogly on YouTube, Facebook, Twitter, Pinterest, TikTok, and Instagram. Don’t forget to sign up for the free newsletter at the top of the page! And don't forget to enter all the other fab giveaways on Moogly!

    Forked Cable Square - 8 Inch Crochet Block Tutorial

    June 5, 2026 by Tamara Kelly Leave a Comment

    Forked Cable Square - 8 Inch Crochet Block Tutorial

    The Forked Cable Square Tutorial walks you through every step of creating this 8-inch crochet block featuring post stitches! Perfect for any "squares-based" project, crochet along with the right and left-handed video tutorials below!

    Disclaimer: This post includes affiliate links.

    Be sure to scroll down past the videos to get the links to the free pattern and supplies!

    Forked Cable Square Tutorial:

    How to Crochet the Forked Cable Square - Right-Handed

    Learn to Crochet the Forked Cable Square - Left-Handed

    As Seen in This Video (click each for more info!):

    The Free Pattern: Forked Cable Square

    The Supplies:

    US - J, 6.0mm hook or as needed to get gauge - Furls Odyssey II used

    55 yds Red Heart With Love (4-Aran; 100% acrylic; 370 yds/338 m; 198 g/6.98 oz)

    Stitch Markers

    And here's a Pin for your Crochet Pinterest Board! Make sure you are following Moogly on Pinterest for all the best knit, crochet, and craft pins!

    Forked Cable Square - 8 Inch Crochet Block Tutorial

    I hope you enjoy this tutorial for the Forked Cable Square! If this video doesn't answer all your questions, please ask in the comments below - I'm always happy to help.

    If you make this or any Moogly pattern, please tag me in your photos so I can see them too, @mooglyblog or #mooglyblog! Then send them to tamarakelly@mooglyblog.com to see them featured in a future Moogly email newsletter!

    Get Moogly on your favorite social media sites: YouTube, Facebook, Pinterest, Tik Tok, Bluesky, and Instagram! And sign up for the free newsletter at the bottom of the page so you don’t miss a thing! Thank you to Yarnspirations for providing the materials for this video.

    Forked Cable Square - 8 Inch Crochet Block

    June 3, 2026 by Tamara Kelly Leave a Comment

    Forked Cable Square - 8 Inch Crochet Block

    Introducing the Forked Cable Square! This 8-inch crochet block features striking post stitches that branch into forked lines, creating a unique cupped shape on each side. Some see a trident, others a clover, and still others see something spidery... What it definitely is, is a satisfying pattern for crocheters who enjoy a bit of texture without complicated construction! This granny square works up into a pleasing square perfect for any "squares-based" project. Whether you make just one or a whole set, you're sure to enjoy this pattern!

    Disclaimer: This post includes affiliate links; materials provided by Yarnspirations and Furls Fiberarts.

    Prefer an ad-free PDF? You've got options!


    This button leads to the pattern on Etsy

    Prefer the free blog version? Keep scrolling!

    Forked Cable Square - 8 Inch Crochet Block

    Part of the 2026 Granny Square Month Pattern Bundle

    2026 Granny Square Month CAL

    Summer is here, and that means it’s time for portable crochet projects you can take on road trips, to the pool, or wherever seasonal adventures lead! And when it comes to easy-to-pack projects, it’s hard to beat granny squares. If you love crocheting granny squares, blanket blocks, and fun square motifs as much as I do, then this brand new crochet along and bundle is going to be right up your alley!

    Forked Cable Square - 8 Inch Crochet Block

    I’m joining 20 of my crochet designer buddies for the 2026 Granny Square Month Crochet Along and Crochet Pattern Bundle! Every day in June, there will be a new featured pattern for an 8” granny square which you can get for free on the designer’s blog... Or, you can grab the entire bundle to get instant access to all 30 included patterns in a downloadable and printable ebook now at a deep discount! There are modified classics, florals, textured blocks, and even some lacy squares. The Granny Square Month CAL and Crochet Pattern Bundle will keep your hands happy til fall!

    Forked Cable Square - 8 Inch Crochet Block

    You'll find my pattern free below, but you can support the indie designers you know and love (and find some new-to-you folks to follow) when you join the 2026 Granny Square Month Crochet Along.

    Sorry, this deal is over. Please enjoy the PDF options above or the free option below!

    By buying from a coalition of designers instead of a huge publisher or an AI slop farm, you know that your money is going where it’s needed: into the pockets of your favorite designers so they can keep on creating the patterns you love to make!  And when you buy the Crochet Pattern Bundle, you’ll also get a planning guide with tips for joining squares and a planning grid for making your own blankets in multiple sizes using 8” squares.

    Forked Cable Square - 8 Inch Crochet Block

    Why You’ll Love the Forked Cable Square

    If you love crochet pieces that look intricate but are secretly simple, this Forked Cable Square is a perfect addition to your project list. The gently branching lines give this square a polished, almost sculpted look that stands out in any sampler. Whether you are building a crochet block collection, planning a textured afghan, or simply exploring new stitch techniques, this 8 inch square offers endless creative possibilities. It is easy to customize with your favorite yarns and colors, making it a versatile crochet square pattern you will reach for again and again.

    Forked Cable Square - 8 Inch Crochet Block


    Forked Cable Square - 8 Inch Crochet Block

    Add this pattern to your Ravelry Queue and Favorites

    US - J, 6.0mm hook or as needed to get gauge - Furls Odyssey II used

    55 yds Red Heart With Love (4-Aran; 100% acrylic; 370 yds/338 m; 198 g/6.98 oz)

    Stitch Markers

    Gauge: 7 rnds = 4"[10 cm]

    Size: 8" across

    HELPFUL LINKS AND TUTORIALS

    Forked Cable Square Tutorial 

    Crochet Abbreviations

    Magic Circle

    Post Stitches

    NOTES:

    Joining with a sc creates a ch sp in the last/first corner.

    The “next” fpdc is the one coming up next in the row below. It may be the next stitch, or a few stitches away. 

    The "prev” fpdc is the one most recently passed in the row below. It may be one stitch back, or several stitches back. 

    After making a fpdc, skip the top of the next st in the row below. 

    Forked Cable Square - 8 Inch Crochet Block

    Forked Cable Square INSTRUCTIONS:

    Rnd 1: Make a magic circle, [3 dc, ch 2] 3 times, 3 dc, ch 1, join with sc. (3 dc per side of square)

    Rnd 2: Ch 1, sc in same ch sp, *fpdc around next dc, sc in next dc, fpdc around next dc,** (sc, ch 2, sc) in ch-2 sp; rep from * around finishing last rep at **, sc in ch-sp, ch 1, join with sc. (5 sts per side of square)

    Rnd 3: Ch 1, sc in same ch sp, *fpdc around next fpdc, sc in next st, fpdc around next st, sc in next st, fpdc around prev fpdc,** (sc, ch 2, sc) in ch-2 sp; rep from * around finishing last rep at **, sc in ch-sp, ch 1, join with sc. (7 sts per side of square)

    Rnd 4: Ch 1, sc in same ch sp, *[sc in next st, fpdc around next fpdc] 3 times, sc in next st,** (sc, ch 2, sc) in ch-2 sp; rep from * around finishing last rep at **, sc in ch-sp, ch 1, join with sc. (9 sts per side of square)

    Rnd 5: Ch 1, sc in same ch sp, *fpdc around next fpdc, sc in the next 2 sts, fpdc around next fpdc, sc in the next st, fpdc around prev fpdc, sc in next 2 sts, fpdc around prev fpdc** (sc, ch 2, sc) in ch-2 sp; rep from * around finishing last rep at **, sc in ch-sp, ch 1, join with sc. (11 sts per side of square)

    Rnd 6: Ch 1, sc in same ch sp, *sc in next st, fpdc around next fpdc, sc in next 2 sts, fpdc around next fpdc, sc in next st, fpdc around next fpdc, sc in next 2 sts, fpdc around next st, sc in next st,** (sc, ch 2, sc) in ch-2 sp; rep from * around finishing last rep at **, sc in ch-sp, ch 1, join with sc. (13 sts per side of square)

    Rnd 7: Ch 1, sc in same ch sp, *fpdc around next fpdc, sc in the next 2 sts, fpdc around next fpdc, sc in the next 2 sts, fpdc around next st, sc in next 2 sts, fpdc around prev fpdc, sc in next 2 sts, fpdc around prev fpdc** (sc, ch 2, sc) in ch-2 sp; rep from * around finishing last rep at **, sc in ch-sp, ch 1, join with sc. (15 sts per side of square)

    Rnd 8: Ch 1, sc in same ch sp, *sc in next st, [fpdc around next fpdc, sc in next 2 sts] 4 times, fpdc around next st, sc in next st,** (sc, ch 2, sc) in ch-2 sp; rep from * around finishing last rep at **, sc in ch-sp, ch 1, join with sc. (17 sts per side of square)

    Rnd 9: Ch 1, sc in same ch sp, *sc in next 3 sts, fpdc around prev fpdc, sc in next 2 sts, fpdc around prev fpdc, sc in next st, fpdc around next fpdc, sc in next st, fpdc around next st, sc in next 2 sts, fpdc around next fpdc, sc in next 3 sts,** (sc, ch 2, sc) in ch-2 sp; rep from * around finishing last rep at **, sc in ch-sp, ch 1, join with sc. (19 sts per side of square)

    Rnd 10: Ch 1, sc in same ch sp, *sc in next 5 sts, fpdc around prev fpdc, sc in next st, [fpdc around next fpdc, sc in next st] 3 times, fpdc around next fpdc, sc in next 5 sts,** (sc, ch 2, sc) in ch-2 sp; rep from * around finishing last rep at **, sc in ch-sp, ch 1, join with sc. (21 sts per side of square)

    Rnd 11: Ch 1, sc in same ch sp, *sc in next 7 sts, fpdc around prev fpdc, sc in next st, fpdc around prev fpdc, fpdc around next 2 fpdcs, sc in next st, fpdc in next st, sc in next 7 sts,** (sc, ch 2, sc) in ch-2 sp; rep from * around finishing last rep at **, sc in ch-sp, ch 1, join with sc. (23 sts per side of square)

    Rnd 12: Ch 1, sc in same ch sp, *sc in next 9 sts, fpdc around prev fpdc, fpdc around next 4 fpdcs, sc in next 9 sts,** (sc, ch 2, sc) in ch-2 sp; rep from * around finishing last rep at **, sc in ch-sp, ch 1, join with sc. (25 sts per side of square)

    Rnd 13: Ch 1, sc in same ch sp, *blo sc in each st across,** (sc, ch 2, sc) in ch-2 sp; rep from * around finishing last rep at **, sc in ch-sp, ch 1, join with sc. (27 sts per side of square)

    Forked Cable Square - 8 Inch Crochet Block


    Forked Cable Square - 8 Inch Crochet Block

    I hope you enjoy making the Forked Cable Square! If you share on socials, I would love to see it! You can always tag me @mooglyblog!

    The Fine Print

    Follow Moogly on YouTube, Facebook, Twitter, Pinterest, TikTok, and Instagram! Thank you to Yarnspirations and Furls for providing the materials shown in this post. Written pattern copyright Tamara Kelly 2026, all rights reserved. Please do not reprint or repost this pattern. Please do link to this page to share this pattern with others. If you wish to make items for sale from this pattern or translate it to another language, please visit the About page for details. 

    Radical Potholder Weaving - Review and Giveaway

    June 2, 2026 by Tamara Kelly 2 Comments

    Radical Potholder Weaving - Review and Giveaway

    Radical Potholder Weaving: Techniques and Inspiration for the Potholder Loom by Deborah Jean Cohen takes this kid-friendly craft to the next level! After all, it's really just a small loom - so there are over 100 patterns in this collection, many never seen before. It's how I got my start with crafting - and now I need to try the "grown up" version! Take a peek inside, and enter to win your own copy of Radical Potholder Weaving - Spiral Bound Edition! 

    Disclaimer: I was given a copy of this book for review; all opinions are my own. This post includes affiliate links.

    Radical Potholder Weaving Review

    A Bit About the Author

    "Deborah Cohen began designing potholder weaving patterns when she was disappointed in the number of patterns available and began to convert other weaving patterns to work on her potholder loom. She found that the possibilities were endless, and she soon found others online who were also excited by what you could weave on a small loom. She is the founder and administrator of Radical Potholder Weavers, a dynamic, fast-growing Facebook Group, and she has also given Zoom workshops through The Weaving Way Community. IG @deborahjeancohen and @radicalpotholderweavers" Deborah wrote this book with the help of Mary Clarke, Christine Olsen Reis, Andréa Scheidler, Kendal Rosenberger, and Paula Royse.

    Spiral Bindings by Stackpole

    Inside Radical Potholder Weaving

    "Inside this book, you’ll find more than 100 patterns for your potholder looms: in plain weave, shadow weave, and twill. The majority of these are new, never charted for the small loom before, and the rest are strong classic patterns chosen to complete the collection. One chapter teaches you how to convert floor loom drafts for the potholder loom, reverse engineer any potholder, and chart your own design. Others introduce you to intriguing weaving techniques—and of course, basics are explained: sources, tips, heads-up advice."

    Radical Potholder Weaving - Review and Giveaway

    This is the first book of potholder patterns I've looked at, so I wasn't sure what to expect. It starts off with a Chapter on "How to Read Charts; Tips; Sources," and it is super helpful. I was surprised to see how similar the charts are to knitting charts and some crochet charts! While you might remember the basic techniques, this is serious looming done on a small, familiar scale.

    Radical Potholder Weaving - Review and Giveaway

    Radical Potholder Weaving has hacks for making your loom work with different-sized patterns, creating beautiful lines, and blocking your work when it's done. There is also a list of places where you can find loops better than we remember - and a super fun idea for making your own loops!

    Radical Potholder Weaving - Review and Giveaway

    There are weaving techniques outlined here I never would've imagined, and a section on how to create your own designs, too! She even goes over how to reverse engineer patterns you encounter elsewhere. Once you've learned all the techniques, it dives into the patterns - charts with lots of sample photos and plans!

    Radical Potholder Weaving - Review and Giveaway

    I got a chance to play with a potholder loom a few months ago while I was watching my niece - and I so wish I'd had this book with me for that trip! But I will definitely be breaking it out for her visit this summer - hopefully she'll let me have a few turns too! Nostalgic, exciting, and inspiring all at the same time!

    Radical Potholder Weaving - Review and Giveaway

    And it debuted with a spiral binding option! This makes it easy to leave it open to the page you need, reducing one more point of frustration when trying new things - great for crafters of all ages!

    Radical Potholder Weaving - Review and Giveaway

    Get your own spiral-bound copy of Radical Potholder Weaving today!

    Purchase your own copy of this book on Amazon, or ask for it at your local bookseller! Just released May 26!

    The Radical Potholder Weaving Giveaway

    The Radical Potholder Weaving Giveaway is open in the US and Canada. The giveaway ends July 7, 2026, at 12:15am Central US time. To enter, use the Kingsumo form below. Only the email option is mandatory – all other tasks are optional, for bonus entries only.

    One winner will receive a spiral-bound copy of Radical Potholder Weaving, courtesy of Stackpole Books. They will be notified by email.

    GOOD LUCK ALL!

    You can follow Moogly on YouTube, Facebook, Twitter, Pinterest, TikTok, and Instagram. Don’t forget to sign up for the free newsletter at the top of the page! And don't forget to enter all the other fab giveaways on Moogly!

    MooglyCAL2026 Block 11

    May 28, 2026 by Tamara Kelly 2 Comments

    MooglyCAL2026 Block 11

    MooglyCAL2026 Block 11 is a meditative mosaic square by Erin of Juniper and Oakes! The Crossroads Mosaic Crochet Square is a relaxing overlay project ready for your special touch! Get all the details for this free crochet along, and the free pattern link below!

    Disclaimer: This post includes affiliate links; materials provided by Local Crafts.

    Just getting started with the Moogly Crochet Along? CLICK HERE for the intro info!

    Want to get help with the patterns, show off, and CAL with others? CLICK HERE for the Facebook group

    Like to see all the squares visually? CLICK HERE for the Pinterest Board! (Squares will be added as they are released.)

    Introducing the MooglyCAL ONLY Newsletter! Never miss a Square Debut!

    The 2026 Moogly CAL Schedule

    As the year progresses, links will be added, and you'll be able to click on any of the past squares to go to their posts. The numbers refer to the date of the month that the square will debut.

    January Archie Argyle Crochet Square and Radiate Champion Block
    February Cozy Circles Crochet Square and Endless Griddle Stitch Square
    March Blue Cascade Afghan Square and Woven Checkerboard Square
    April Crashing Waves Blanket Square, Marvelous Mosaic Square, and Diamonds in Diamonds Mosaic Square
    May Luscious Lattic Square and THIS POST
    June 11 and 25
    July 9 and 23
    August 6 and 20
    September 3 and 17
    October 1, 15, and 29
    November 12 and 25

    *****

    Block #11:

    Crossroads Mosaic Crochet Square

    by Juniper and Oakes

    MooglyCAL2026 Block 11

    Above, you can see the square that Erin made in 2 colors of Brava Worsted! Below is my CAL square, in my 6 colors of Brava Worsted - Custard, Seashell, Fig, Denim, Espresso, and Cream!

    MooglyCAL2026 Block 11

    Details for MooglyCAL2026 Block 11

    My Notes: Erin is well known for her mosaic masterpieces and classes, so it's no surprise we have a new mosaic square! This pattern features a simple repeat that's perfect for beginners and experienced crocheters looking for a relaxing make. It's super easy to adjust this one for size too - just stop when you get to 12"!

    Helpful Links and Tutorials: Crochet Abbreviations, Magic Circle, Standing sc, BLO - Back Loop Only and FLO - Front Loop Only, and seamless join.

    Sizing: Erin has written this pattern so that you simply stop repeating the last round when you get to 12" - for me, that was after 19 rnds! But everyone's gauge is different, so be sure to measure as you go! Learn how to adjust for size HERE to ensure all your squares are the same size. Remember that the 12″ is measured across and up and down, not diagonally/corner to corner.

    Yarn Options: This year, our designers have chosen from a variety of yarns, including Brava Worsted, Swish Worsted, Jimmy Beans Wool Beanstalk, Berroco Vintage, and MadTosh Vintage. For this square, Erin and I both used Brava Worsted!

    What I Did:

    I used a US-J, 6.0 mm crochet hook, and Brava Worsted yarn, and my color scheme was as follows (see pics for more info on placement):

    Rnd 1: Seashell
    Rnd 2: Custard
    Rnd 3:
    Seashell
    Rnd 4:
    Custard
    Rnd 5:
    Seashell
    Rnd 6:
    Custard
    Rnd 7:
    Fig
    Rnd 8: Denim
    Rnd 9:
    Fig
    Rnd 10:
    Denim
    Rnd 11:
    Fig
    Rnd 12:
    Denim
    Rnd 13:
    Espresso
    Rnd 14: Cream
    Rnd 15: Espresso
    Rnd 16: Cream
    Rnd 17: Espresso
    Rnd 18: Cream
    Rnd 19: Cream

    This square didn't require much blocking to square, so I did a quick wet blocking.

    The Pattern:

    CLICK HERE FOR THE PATTERN FOR BLOCK #11

    PLEASE NOTE: The designers all hold individual copyrights for their patterns. They may choose to make videos of their patterns, and you can certainly request them from the designers. In addition, there are videos linked in the notes for specific stitches and techniques that may help you with the pattern. They may offer paid PDFs of the pattern, but have agreed to leave it up for free on their website or on Ravelry for as long as possible.

    Show Off Your Squares!

    If you share your photos on social media, be sure to use the hashtags #mooglycal2026 and tag your yarn - I'll be using #bravaworsted -  and tag me @mooglyblog so I can see them too! And don't forget to share them in the MooglyCAL Facebook Group! Thank you all for CAL-ing with me!

    And finally, here's a pin of MooglyCAL2026 - Block 11 for your own Pinterest boards!

    MooglyCAL2026 Block 11

    You can follow Moogly on YouTube, Facebook, Twitter, Pinterest, TikTok, and Instagram, and don't forget to sign up for the free newsletter at the bottom of the page! Thank you to Local Crafts for providing the materials for this crochet along.  

    Crochet and Catch Up with Moogly - May 27, 2026

    May 27, 2026 by Tamara Kelly Leave a Comment

    Crochet and Catch Up with Moogly - May 27, 2026

    We've made it through May - and it's time for another Crochet and Catch Up with Moogly! It's been a busy couple of weeks behind the scenes, and I've got some fun stuff to share! Join me for a simple crochet chat and behind-the-scenes peeks. Join in live, or watch the recording at your convenience - all the links are below!

    Disclaimer: This post may contain affiliate links. Live videos are unscripted, unedited, and occasionally weird; all opinions are my own.

    Crochet and Catch Up with Moogly

    Going LIVE on Facebook and YouTube, at 11am CT!

    Click here to Like the Moogly Facebook Page and get notified when I go live!

    Click here to Subscribe to the Moogly YouTube Page and get notified when I go live!

    Moogly Community Group on Facebook

    What I'm Wearing: Odds Are Shawl

    MooglyCAL2026 Block 10 Courtesy of Polly Plum

    CAL Yarns: Brava Worsted, Swish Worsted, Jimmy Beans Wool Beanstalk, Berroco Vintage, and MadTosh Vintage.

    Moogly Uppercase Crochet Alphabet - Refreshed and Renewed with Full Charts!

    Moogly Lowercase Crochet Alphabet - Refreshed and Renewed with Full Charts!

    How to Cut Off the Sides of Crochet Rows

    Tunisian Stitch Dictionary Spiral Bound Giveaway

    New Crochet Stitch Dictionary Spiral Bound Giveaway

    Thread + Maple Telescopic Tool Case Giveaway

    Sneak Peek: Universal Yarn Asonde, Berroco Vintage Handpaint, Dream in Color Smooshy Cashmere, Katia Silky Lace, Katia Merino 100%, Katia Merino Baby, Cascade Yarns Anthem, Cascade Yarns Pacific, Cascade Yarns Pacific Prints, and Ewe Ewe Wooly Worsted.

    Moogly Around the Web - and the World!

    FREE: TOMORROW Thursday, May 28, 2026 (6:00 PM - 7:00 PM) (CDT) - Stitch With Us! — A StitchMore Virtual Stitch Circle with of Tamara of Mooglyblog

    What to expect: A relaxed, upbeat hangout with plenty of room for conversation, crafty show-and-tell, and the kind of motivation that makes you want to pick your project back up. You'll get to connect with other makers, celebrate your progress (no matter how small), and enjoy some genuine community time... all without changing out of your pajamas 😄

    ​Come as you are, bring your work in progress, and join us for an evening of yarn, laughter, and satisfying little stitches.

    JBW 2026 Square

    June 17th-21st, 2026 - Biggest Little Getaway with Jimmy Beans Wool (just a few more tickets have been released!)

    Join us for an all-inclusive retreat full of yarn, knitting, crocheting, and learning at the spectacular Peppermill Resort in Reno! Each year we strive to make it bigger and better - truly deserving of the name, The Biggest Little Getaway! Come together with other retreaters who have a passion for the craft, and let your skills shine!


    If you have a LYS or event you'd like me to teach at this year, or if you would like me to teach an online class to your group or guild, please do reach out!

    Have a wonderful day all - see you to crochet and catch up next time! And before you go, here's a Pin for today's post, so you can add it to your favorite Pinterest boards! We appreciate (and need) your shares on all our posts.

    Crochet and Catch Up with Moogly - May 27, 2026

    Follow Moogly on YouTube, Bluesky, Facebook, Pinterest, TikTok, and Instagram!

    Tunisian Crochet Stitch Dictionary - Spiral Bound Review and Giveaway

    May 26, 2026 by Tamara Kelly 1 Comment

    Tunisian Crochet Stitch Dictionary - Spiral Bound Review and Giveaway

    Tunisian Crochet: A Stitch Dictionary with 501 Stitches to Explore by Lori Harrison is a treasury of Tunisian that belongs on every crocheter's shelf. While this book has been out for about a year now, today we're celebrating a new edition - Spiral Bound! Take a peek inside below, and then enter to win your own copy, right here on Moogly!

    Disclaimer: I was given a copy of this book for review; all opinions are my own. This post includes affiliate links.

    Tunisian Crochet Review

    A Bit About the Author

    Lori Harrison of Aklori Designs

    "Lori Harrison is the Tunisian crochet designer behind Aklori Designs and author of Exploring Tunisian Crochet. Designing since 2017, she strives to create enjoyable, inclusive, and easy-to-follow garment and accessory patterns for all levels of Tunisian crochet enthusiasts. As an engineer in her day job, she designs as a way to nurture her creative side while also relaxing at the end of the day. Influenced by her engineering background, patterns are concise but comprehensive and tailored to the experience level required for the pattern. Lori lives in Tucson, Arizona with her husband, three cats, and a sassy Shiba Inu. When she doesn’t have a Tunisian crochet hook in her hand, she enjoys cooking, hiking, and nature photography. "

    Inside - and Outside - Tunisian Crochet

    "Discover the ultimate guide to Tunisian crochet with this comprehensive stitch dictionary, featuring over 500 stitches and stitch patterns. Whether you're a beginner or an experienced maker, this book is your go-to resource for exploring Tunisian crochet stitches.

    • 500+ Tunisian crochet stitches: Each stitch is accompanied by a detailed swatch, chart, and step-by-step row-by-row instructions.
    • Clear tutorials: Packed with photo tutorials, so you'll never have to wonder where to place your hook.
    • Diverse stitch patterns: Explore cables, lace, colorwork, bobbles, shells, fans, and so much more.
    • From a trusted expert: Author Lori Harrison, celebrated for her innovative Tunisian crochet designs, builds on the success of her first book, Exploring Tunisian Crochet. This second book is inspired by her passion for pushing the boundaries of stitch creation.
    • The ultimate reference: A must-have addition to every Tunisian crocheter's library, this is the most complete stitch dictionary available."

    Tunisian Crochet

    I originally reviewed this book last year when it debuted in Paperback and Kindle editions. While it does include a section teaching beginners Tunisian crochet, it quickly dives into a wide variety of stitch patterns. Mine is already filled with sticky notes marking stitch patterns I’ve used and plenty more I want to try in future projects! It’s an excellent stitch dictionary, and one of my favorite resources whenever I need a little crochet inspiration and have a hankering for Tunisian!

    Tunisian Crochet

    There are lots of things to note about Tunisian Crochet - here are some of the features that I think stand out:

    • divided into 6 color coded sections: Basic Stitches and Variations, Stitch Patterns, Lace Stitches, Cable Stitches, Colorwork Stitches, and Tunisian in the Round!
    • the stitch multiple for each pattern is included first thing in the description
    • each entry includes RS and WS photos, a Tunisian crochet chart (for the patterns) with key,  and minimal written instructions

    Tunisian Crochet

    This is the most complete and comprehensive Tunisian stitch dictionary I own, and now they've made it even better - they've added a Spiral-Bound edition! It has the same layout, right down to the same number of pages - but now it's even easier to use!

    Tunisian Crochet

    With a spiral binding, your book lies flat while you stitch - no trying to weigh it down with notions that slip over the instructions while you try that new move. Taking your faves into the office supply store to be spiral-bound is an option, but this is a whole lot easier!

    Tunisian Crochet Stitch Dictionary - Spiral Bound Review and Giveaway

    Get your own spiral-bound copy of Tunisian Crochet today!

    Purchase your own copy of this book on Amazon, or ask for it at your local bookseller! Hot off the presses, releasing today!

    The Tunisian Crochet - Spiral Bound Edition Giveaway

    The Tunisian Crochet Giveaway is open in the US and Canada. The giveaway ends June 30, 2026, at 12:15am Central US time. To enter, use the Kingsumo form below. Only the email option is mandatory – all other tasks are optional, for bonus entries only.

    One winner will receive a spiral-bound copy of Tunisian Crochet, courtesy of Stackpole Books. They will be notified by email.

    GOOD LUCK ALL!

    You can follow Moogly on YouTube, Facebook, Twitter, Pinterest, TikTok, and Instagram. Don’t forget to sign up for the free newsletter at the top of the page! And don't forget to enter all the other fab giveaways on Moogly!

    The Moogly Crochet Lowercase Alphabet

    May 21, 2026 by Tamara Kelly 59 Comments

    So now you're looking for free crochet lowercase letter patterns? The Moogly Crochet Lowercase Alphabet is here to help! This collection features all 26 lowercase crochet letters in an easy applique style that’s quick to stitch, beginner-friendly, and perfect for customizing blankets, baby gifts, pillows, totes, wall hangings, and more. Spell out names, create sweet sayings, add monograms, or make your own crochet signage with these versatile alphabet appliques. Keep reading to see the refreshed 2026 update, complete with professionally created charts for each letter!

    Prefer an ad-free PDF? It's a Re-launch Special!

    Newly tech edited and updated with a professionally made chart for each letter! Get the ad-free PDF for The Moogly Crochet Lowercase Alphabet for only $4.99 US through May 27th, 2026!

    This button leads to the pattern on Etsy
    Prefer the free blog version? Keep scrolling!

    Newly Updated for 2026 and Beyond

    I originally designed this set of letters in 2014, specifically to mix and match with the Moogly Crochet Uppercase Alphabet! While updating the Uppercase letters, I decided it made sense to do the Lowercase ones too! I hired Lindsey Stephens to professionally tech edit all 26 lowercase letters and to create stitch diagrams for each one. I've completely rewritten and formatted this post, and created an ad-free PDF. In that PDF, each letter gets its own page, so you can print just what you need!

    So now, I feel confident that this lowercase alphabet is also the best it can be - and ready to head into the future, and help you say whatever you want to say!

    Matching Crochet Alphabet Applique Sets and Symbols

    Be sure to check out the rest of the matching Moogly Crochet Alphabet sets, too! You can mix and match all of these sets, created for the same scale:

    • Uppercase Alphabet
    • Number Set
    • Punctuation Set
    • Greek Alphabet
    • Currency Set
    • Musical Notes

    Mix and match the sets to create custom names, phrases, banners, monograms, and personalized crochet projects for every occasion!

    How to Use These Crochet Lowercase Letters

    These crochet lowercase letters are made as individual appliques, making them easy to use for nearly any project you can imagine. Since each letter is crocheted separately, you can arrange and rearrange them to create whatever you like. One of my favorite tricks is to use stitch markers or pins to hold the letters in place first, so you can adjust spacing, double-check spelling, and make sure everything lines up neatly before sewing.

    When it’s time to attach your crochet alphabet letters, you’ve got several easy options. A simple whip stitch with a yarn needle works great for adding letters to any fabric, while a backstitch can give extra durability for pieces that will see lots of use. If you’re using the letters for craft projects, fabric glue, fusible webbing, or even hook-and-loop fasteners can work well too, especially for banners, classroom decor, or interactive displays.

    And these little crochet letters aren’t limited to applique projects! They’re also wonderful for hands-on learning for beginning readers. Add magnets to the backs for a fun fridge activity, or use them as lightweight embellishments for party decor, scrapbook pages, and more!

    Sizing and Customizing Your Crochet Letters

    Another great thing about these crochet lowercase letters is how adaptable they are. By simply changing your yarn weight or hook size, you can make the letters larger, smaller, thicker, or more delicate to suit your project. That flexibility makes this crochet alphabet perfect for everything from tiny embellishments on baby items to bold statement lettering for pillows, banners, and home decor.

    Frequently Asked Questions

    Can beginners make these crochet letters?
    Yes, these lowercase letters are designed to be beginner-friendly and use basic stitches in an easy appliqué style.

    What yarn works best for crochet letters?
    For the clearest stitch definition, a smoother yarn will give you crisper edges, while a softer or fluffier yarn will create a more textured, decorative look. If you are attaching the letters to a blanket or garment, make sure that the fibers are all compatible for washing and drying!

    Do I need to block the letters?
    Blocking is optional, but it can help even out edges and make your finished letters lie flatter, especially for display pieces. I like to use spray starch on cotton letters to help them hold their shape!

    Moogly Lowercase Crochet Alphabet


    The Moogly Crochet Lowercase Alphabet

    Add this pattern to your Ravelry Queue and Favorites

    US - F, 3.75 mm hook

    Any worsted-weight yarn

    Stitch Markers

    Size: Finished letters in this yarn measure approx 3.5” tall. For larger or smaller letters, use thicker or thinner yarn and a hook size that gives you a solid fabric.

    HELPFUL LINKS AND TUTORIALS

    Crochet Abbreviations

    FSC – Foundation Single Crochet

    FSC - Extending a Row with Foundation Single Crochet

    Seamless Finishing

    SPECIAL STITCHES & TECHNIQUES:

    Wide sc2tog (wide single crochet 2 together) over next 3 sts: insert hook in first st, yo, pull up a loop, skip next st, insert hook in third st, yo, pull up a loop, yo, pull through all 3 loops on hook.

    Sc2tog (single crochet 2 together): insert hook in first st, yo, pull up a loop, insert hook in next st, yo, pull up a loop, yo, pull through all 3 loops on hook.

    Hdc2tog (half double crochet 2 together): Yo, insert hook in first st, yo, pull up a loop, insert hook in next st, yo, pull up a loop, yo, pull through all 4 loops on hook.

    Dc2tog (double crochet 2 together): Yo, insert hook in first st, yo, pull up a loop, yo, pull through 2 loops on hook, yo, insert hook in next st, yo, pull up a loop, yo, pull through 2 loops on hook, yo, pull through all 3 loops on hook.

    FSC (Foundation single crochet): (see tutorial linked above) Insert in base of last st made, yo, pull up a loop, yo, pull through 1 loop on hook, [yo, pull through 2 loops] twice.

    NOTES:

    Chain 2 at the beginning of a row does not count as a stitch throughout.

    Chain 1 at the beginning of a row does not count as a stitch throughout.

    Please note that the instructions for letters B, D, and P are the same, as are the instructions for N and U. For the letter D, see the instructions for the letter B, and flip it over when finished. To make the letter P, see the instructions for the letter B, and flip it over and give it a spin when finished. For the letter U, see the instructions for letter N and spin it around when finished!

    Each letter includes a photo of the finished letter made in worsted-weight yarn, followed by written instructions, followed by the crochet symbol diagram for that letter.

    CROCHET DIAGRAM STITCH KEY

    A grey/black arrow shows the beginning of the first row or round into the foundation chain.

    When a letter is composed of multiple parts, the latter parts are shown in a different color for clarity. A new arrow means the yarn is rejoined to start the next section.

    Moogly Crochet Alphabet Symbol Key

    The Moogly Crochet Lowercase Alphabet Instructions

    THE LETTER a

    letter a

    Row 1: Ch 11, sc in 2nd ch from hook, sc in each remaining ch. Turn. (10 sts)

    Rows 2 - 3: Ch 1, sc in each st. Turn. (10 sts)

    Row 4: Ch 2, dc in first st, hdc in next st, sc in last st. Turn, leaving remaining sts unworked. (3 sts)

    Row 5: Ch 1, sc in first st, hdc in next st, dc in last st. Turn. (3 sts)

    Row 6: Ch 2, dc in first st, hdc in next st, sc in last st. Turn. (3 sts)

    Rows 7 - 10: Repeat Rows 5 - 6.

    Row 11: Repeat Row 5.

    Finish off. Use end to whip stitch Row 11 to Row 3.

    THE LETTERS b, d, and p

    Row 1: Ch 16, sc in 2nd ch from hook, sc in each remaining ch. Turn. (15 sts)

    Rows 2 - 3: Ch 1, sc in each st. Turn. (15 sts)

    Row 4: Ch 2, dc in first st, hdc in next st, sc in last st. Turn, leaving remaining sts unworked. (3 sts)

    Row 5: Ch 1, sc in first st, hdc in next st, dc in last st. (3 sts)

    Row 6: Ch 2, dc in first st, hdc in next st, sc in last st. Turn. (3 sts)

    Rows 7 - 10: Repeat Rows 5 - 6.

    Row 11: Repeat Row 5.

    Finish off. Use end to whip stitch Row 11 to Row 3.

    THE LETTER c

    Row 1: Ch 4, sc in 2nd ch from hook, hdc in next ch, dc in last ch. Turn. (3 sts)

    Row 2: Ch 2, dc in first st, hdc in next st, sc in last st. Turn. (3 sts)

    Row 3: Ch 1, sc in first st, hdc in next st, dc in last st. Turn. (3 sts)

    Rows 4 - 13: Repeat Rows 2 - 3.

    Finish off.

    THE LETTER e

    Row 1: Ch 4, sc in 2nd ch from hook, hdc in next ch, dc in last ch. Turn. (3 sts)

    Row 2: Ch 2, dc in first st, hdc in next st, sc in last st. Turn. (3 sts)

    Row 3: Ch 1, sc in first st, hdc in next st, dc in last st. Turn. (3 sts)

    Rows 4 - 13: Repeat Rows 2 - 3.

    Row 14: Repeat Row 2.

    Row 15: Ch 5, sc in 2nd ch from hook, sc in each remaining ch.

    Finish off. Sew end of 4-sc crossbar in place.

    THE LETTER f

    Row 1: Ch 4, sc in 2nd ch from hook, hdc in next ch, dc in last ch. Turn. (3 sts)

    Row 2: Ch 2, dc in first st, hdc in next st, sc in last st. Turn. (3 sts)

    Row 3: Ch 1, sc in first st, hdc in next st, dc in last st. Turn. (3 sts)

    Rows 4 - 9: Repeat Rows 2 - 3.

    Rows 10 - 18: Ch 1, sc in each st. Turn. (3 sts)

    Finish off.

    Crossbar

    Row 1: With RS facing, rejoin yarn with a sl st to side as shown. Sc in this row edge and next 2 row edges. Turn. (3 sts)

    Row 2 - 3: Ch 1, sc in each st. Turn. (3 sts)

    Finish off.

    Repeat instructions for Crossbar on opposite side.

    THE LETTER g

    Row 1: Ch 4, sc in 2nd ch from hook, hdc in next ch, dc in last ch. Turn. (3 sts)

    Row 2: Ch 2, dc in first st, hdc in next st, sc in last st. Turn. (3 sts)

    Row 3: Ch 1, sc in first st, hdc in next st, dc in last st. Turn. (3 sts)

    Rows 4 - 9: Repeat Rows 2 - 3.

    Rows 10 - 18: Ch 1, sc in each st. Turn. (3 sts)

    Row 19: Rotating to work along the left side of Rows 18 - 16, ch 2, dc in first row edge, hdc in next row edge, sc in next row edge. Turn. (3 sts)

    Row 20: Ch 1, sc in first st, hdc in next st, dc in last st. Turn. (3 sts)

    Row 21: Ch 2, dc in first st, hdc in next st, sc in last st. Turn. (3 sts)

    Rows 22 - 25: Repeat Rows 20 - 21.

    Row 26: Repeat Row 20.

    Finish off. Whip stitch Row 26 in place as shown.

    THE LETTER h

    Row 1: Ch 16, sc in 2nd ch from hook sc in each remaining ch. Turn. (15 sts)

    Rows 2 - 3: Ch 1, sc in each st. Turn. (15 sts)

    Finish off.

    Side Leg

    Row 1: Join yarn in 6th st from edge, ch 2, dc in same st, hdc in next st, sc in next st. Turn. (3 sts)

    Row 2: Ch 1, sc in first st, hdc in next st, dc in last st. Turn. (3 sts)

    Row 3: Ch 2, dc in first st, hdc in next st, sc in last st. Turn. (3 sts)

    Row 4: Repeat Row 2.

    Rows 5 - 9: Ch 1, sc in each st. Turn.

    Finish off.

    THE LETTER i

    Row 1: Ch 11, sc in 2nd ch from hook, sc in each remaining ch. Turn. (10 sts)

    Rows 2 - 3: Ch 1, sc in each st. Turn. (10 sts)

    Finish off.

    Dot

    Round 1: Working into a magic ring, 6 sc into ring. Join with a sl st in first st. (6 sts)

    Round 2: Ch 1, 2 sc in each st around. Join with a sl st in first st. (12 sts)

    Finish off.

    THE LETTER j

    Row 1: Ch 4, sc in 2nd ch from hook, hdc in next ch, dc in last ch. Turn. (3 sts)

    Row 2: Ch 2, dc in first st, hdc in next st, sc in last st. Turn. (3 sts)

    Row 3: Ch 1, sc in first st, hdc in next st, dc in last st. Turn. (3 sts)

    Rows 4 - 9: Repeat Rows 2 - 3.

    Rows 10 - 17: Ch 1, sc in each st. Turn. (3 sts)

    Finish off.

    Dot

    Round 1: Working into a magic ring, 6 sc into ring. Join with a sl st in first st. (6 sts)

    Round 2: Ch 1, 2 sc in each st around. Join with a sl st in first st. (12 sts) Finish off.

    THE LETTER k

    Row 1: Ch 16, sc in 2nd ch from hook, sc in each remaining ch. Turn. (15 sts)

    Rows 2 - 3: Ch 1, sc in each st. Turn. (15 sts)

    Finish off.

    Upper Diagonal Bar

    Row 1: With RS facing, join to 7th st of previous row, ch 2, dc in same st, hdc in next st, sc in next st, turn. (3 sts)

    Rows 2 - 3: Ch 1, sc in each st. Turn. (3 sts)

    Row 4: Ch 1, sc in first st, hdc in next st, dc in last st.

    Finish off.

    Lower Diagonal Bar

    Row 1: Join to same st as joined to for Upper Diagonal Bar, ch 1, sc in same st, work 2 sc in sides of Rows 1 and 2 of Upper Diagonal Bar. Turn. (3 sts)

    Rows 2 - 4: Ch 1, sc in each st. Turn. (3 sts)

    Row 5: Ch 1, sc in first st, hdc in next st, dc in last st. Turn. (3 sts)

    Row 6: Ch 1, sc in each st. (3 sts) Finish off.

    THE LETTER l (L)

    Row 1: Ch 16, sc in 2nd ch from hook, sc in each remaining ch. Turn. (15 sts)

    Rows 2 - 3: Ch 1, sc in each st. Turn. (15 sts)

    Finish off.

    THE LETTER m

    Row 1: Ch 11, sc in 2nd ch from hook, sc in each remaining ch. Turn. (10 sts)

    Rows 2 - 3: Ch 1, sc in each st. Turn. (10 sts)

    Row 4: Ch 2, dc in first st, hdc in next st, sc in next st. Turn, leaving remaining sts unworked. (3 sts)

    Row 5: Ch 1, sc in first st, hdc in next st, dc in last st. Turn. (3 sts)

    Row 6: Ch 2, dc in first st, hdc in next st, sc in last st. Turn. (3 sts)

    Row 7: Repeat Row 5.

    Rows 8 - 12: Ch 1, sc in each st. Turn. Finish off.

    Hump

    Row 1: With RS facing, join yarn to side of curve on Row 7 as shown, ch 1, sc in first row edge, (hdc, dc) in next row edge. Turn. (3 sts)

    Row 2: Ch 2, dc in first st, hdc in next st, sc in last st. Turn. (3 sts)

    Row 3: Ch 1, sc in first st, hdc in next st, dc in last st. Turn. (3 sts)

    Rows 4 - 5: Repeat Rows 2 - 3.

    Rows 6 - 10: Ch 1, sc in each st. Turn. (3 sts) Finish off.

    THE LETTERS n AND u

    Row 1: Ch 11, sc in 2nd ch from hook, sc in each remaining ch. Turn. (10 sts)

    Rows 2 - 3: Ch 1, sc in each st. Turn. (10 sts)

    Row 4: Ch 2, dc in first st, hdc in next st, sc in next st. Turn, leaving remaining sts unworked. (3 sts)

    Row 5: Ch 1, sc in first st, hdc in next st, dc in last st. Turn. (3 sts)

    Row 6: Ch 2, dc in first st, hdc in next st, sc in last st. Turn. (3 sts)

    Row 7: Repeat Row 5.

    Rows 8 - 12: Ch 1, sc in each st. Turn.

    Finish off.

    THE LETTER o

    Row 1: Ch 4, sc in 2nd ch from hook, hdc in next ch, dc in last ch. Turn. (3 sts)

    Row 2: Ch 2, dc in first st, hdc in next st, sc in last st. Turn. (3 sts)

    Row 3: Ch 1, sc in first st, hdc in next st, dc in last st. Turn. (3 sts)

    Rows 4 - 15: Repeat Rows 2 - 3.

    Finish off and whip stitch ends together.

    THE LETTER q (Q)

    Row 1: Ch 4, sc in 2nd ch from hook, hdc in next ch, dc in last ch. Turn. (3 sts)

    Row 2: Ch 2, dc in first st, hdc in next st, sc in last st. Turn. (3 sts)

    Row 3: Ch 1, sc in first st, hdc in next st, dc in last st. Turn. (3 sts)

    Row 4: Ch 1, sc in each st, make 12 FSC. Turn. (15 sts)

    Rows 5 - 6: Ch 1, sc in each st. Turn. (15 sts)

    Row 7: Ch 2, dc in first st, hdc in next st, sc in last st. Turn, leaving remaining sts unworked. (3 sts)

    Row 8: Ch 1, sc in first st, hdc in next st, dc in last st. Turn. (3 sts)

    Row 9: Ch 2, dc in first st, hdc in next st, sc in last st. Turn. (3 sts)

    Rows 10 - 13: Repeat Rows 8 - 9.

    Row 14: Repeat Row 8.

    Finish off and whip stitch Row 14 to side of Row 6.

    THE LETTER r

    Row 1: Ch 11, sc in 2nd ch from hook, sc in each remaining ch. Turn. (10 sts)

    Rows 2 - 3: Ch 1, sc in each st. Turn. (10 sts)

    Row 4: Ch 2, dc in first st, hdc in next st, sc in next st. Turn, leaving remaining sts unworked. (3 sts)

    Row 5: Ch 1, sc in first st, hdc in next st, dc in last st. Turn. (3 sts)

    Row 6: Ch 2, dc in first st, hdc in next st, sc in last st. Turn. (3 sts)

    Finish off.

    THE LETTER s

    Row 1: Ch 4, sc in 2nd ch from hook, hdc in next ch, dc in last ch. Turn. (3 sts)

    Row 2: Ch 2, dc in first st, hdc2tog in next 2 sts. Turn. (2 sts)

    Row 3: Ch 1, sc in first st, dc in last st. Turn. (2 sts)

    Row 4: Ch 2, dc in first st, sc in last st. Turn. (2 sts)

    Rows 5 - 8: Repeat Rows 3 - 4.

    Row 9: Repeat Row 4.

    Rows 10 - 13: Repeat Rows 3 - 4.

    Row 14: Repeat Row 3.

    Row 15: Ch 2, dc in first st, 2 hdc in last st. Turn. (3 sts)

    Row 16: Ch 1, sc in first st, hdc in next st, dc in last st. Turn.

    Finish off.

    THE LETTER t

    Row 1: Ch 16, sc in 2nd ch from hook, sc in each remaining ch. Turn. (15 sts)

    Rows 2 - 3: Ch 1, sc in each st. Turn. (15 sts)

    Finish off.

    Crossbar

    Row 1: With RS facing, join yarn to side as shown. Sc in this row edge and next 2 row edges. Turn. (3 sts)

    Row 2 - 3: Ch 1, sc in each st. Turn. (3 sts)

    Finish off.

    Repeat instructions for Crossbar on opposite side.

    THE LETTER v

    Row 1: Ch 24, sc in 2nd ch from hook, sc in next 9 chs, wide sc2tog over next 3 sts. Sc in remaining 10 chs. Turn. (21 sts)

    Row 2: Ch 1, sc in first 9 sts. Wide sc2tog over next 3 sts. Sc in remaining 9 sts. Turn. (19 sts)

    Row 3: Ch 1, sc in first 8 sts. Wide sc2tog over next 3 sts. Sc in remaining 8 sts. Turn. (17 sts)

    Finish off.

    THE LETTER w

    Row 1: Ch 40, sc in 2nd ch from hook, sc in next 9 chs, wide sc2tog over next 3 sts. Sc in 6 chs, 3 sc in next ch, sc in next 6 chs. Wide sc2tog over next 3 sts. Sc in remaining 10 chs. Turn. (37 sts)

    Row 2: Ch 1, sc in first 9 sts. Wide sc2tog over next 3 sts. Sc in next 6 sts. 3 sc in next st. Sc in next 6 sts. Wide sc2tog over next 3 sts. Sc in remaining 9 sts. Turn. (35 sts)

    Row 3: Ch 1, sc in first 8 sts. Wide sc2tog over next 3 sts. Sc in next 6 sts. 3 sc in next st. Sc in next 6 sts. Wide sc2tog over next 3 sts. Sc in remaining 8 sts. Turn. (33 sts)

    Finish off.

    THE LETTER x

    Row 1: Ch 12, sc in 2nd ch from hook, sc in each remaining ch. Turn. (11 sts)

    Rows 2 - 3: Ch 1, sc in each st. Turn.

    Finish off.

    Crossbar

    Row 1: With RS facing, rejoin yarn with a sl st in 5th st. Ch 1, sc in same st and next 2 sts. Turn. (3 sts)

    Row 2 - 4: Ch 1, sc in each st. Turn. (3 sts)

    Finish off.

    Repeat instructions for Crossbar on opposite side.

    THE LETTER y

    Row 1 (WS): Ch 4, sc in 2nd ch from hook, hdc in next ch, dc in last ch. Turn. (3 sts)

    Rows 2 - 14: Ch 1, sc in each st. Turn. (3 sts)

    Row 15: Ch 1, sc in first st, hdc in next st, dc in last st. (3 sts)

    Finish off.

    Diagonal Bar

    Row 1: Join yarn to side of left side of Row 7, ch 1, working in sides of rows make 3 sc. Turn. (3 sts)

    Rows 2 - 7: Ch 1, sc in each st. Turn. (3 sts)

    Row 8: Ch 1, sc in first st, hdc in next st, dc in last st. (3 sts)

    Finish off.

    THE LETTER z

    Main Bar

    Row 1: Ch 18, sc in 2nd ch from hook, sc in each remaining ch. Turn. (17 sts)

    Rows 2 - 3: Ch 1, sc in each st. Turn. (17 sts) At the end of Row 3, finish off.

    Upper Diagonal Bar

    Row 1: Rejoin yarn with a sl st in 8th st from left edge on either long side. Sc in this st and next 2 sts. Turn. (3 sts)

    Row 2 - 7: Ch 1, sc in each st. Turn. (3 sts)

    Finish off.

    Lower Diagonal Bar

    Repeat instructions for Upper Diagonal Bar on opposite long edge of Main Bar.


    I hope you enjoy using the Moogly Crochet Lowercase Alphabet to personalize your life! If you share on socials, I would love to see it! You can always tag me @mooglyblog!

    The Fine Print

    Follow Moogly on YouTube, Facebook, Twitter, Pinterest, TikTok, and Instagram! Written pattern copyright Tamara Kelly 2026, all rights reserved. Please do not reprint or repost this pattern. Please do link to this page to share this pattern with others. If you wish to make items for sale from this pattern or translate it to another language, please visit the About page for details.

    How to Cut the Sides of Crochet Rows

    May 20, 2026 by Tamara Kelly 1 Comment

    How to Cut the Sides of Crochet Rows

    Sometimes a crochet project needs a little surgery! Previously, I covered how to remove the beginning rows of crochet, but that led to the next question - how do we remove the ends of rows, or the side of our work? When your piece is just too wide, and for whatever reason (we don't judge!), frogging and re-crocheting isn't an option, then it is absolutely possible to cut the sides of crochet rows safely. It sounds scary, but it doesn't have to be! In this video tutorial, I’ll walk you through exactly how to cut the sides of crochet rows step by step, so you can confidently modify your crochet projects and save your hard work.

    Disclaimer: This post includes affiliate links.

    Can You Really Cut Crochet Fabric?

    Usually, cutting your crochet stitches is the last thing you want to do! I've snipped the wrong strand before - and know the heartbreak. But when done intentionally, it can open up possibilities you might not have considered before!

    Normally, reworking stitches is preferable. But not always! You might need to do a repair on a gift, be up against a deadline, or just not have the heart to redo that section one more time. You can use this to get creative, removing specific stitches to create special effects! I do recommend that you try it out on a scrap swatch before trying it on your precious project. Knowing how crochet fabric behaves when cut can open up all sorts of possibilities for fixes, alterations, and creativity!

    How to Cut the Sides of Crochet Rows

    When You Might Need to Cut the Side of a Crochet Row

    There are several situations where cutting crochet rows can come in handy:

    • Removing extra width from a project
    • Correcting shaping mistakes
    • Creating openings or slits in crochet fabric
    • Fixing damaged stitches
    • Removing a section without frogging the entire project

    While this is definitely an advanced crochet technique, it can save hours of work and help rescue projects that might otherwise be abandoned.

    How to Cut the Sides of Crochet Rows:

    The Supplies Used In This Video:

    Red Heart With Love Yarn

    Stitch Markers

    Yarn Needle

    Final Tips for Cutting and Removing Crochet Rows Successfully

    • Before making your first cut, take a little extra time to examine the stitch structure and plan your approach. Understanding the direction the stitches will unravel is the key to controlling the process. Again, it's a great idea to practice on a small swatch before trying this technique on a large or important project.
    • Different yarn fibers and stitch patterns can behave differently when cut. Tighter stitches and textured fabrics may respond differently than open stitch patterns or slippery yarns. I recommend working with your project supported on a table, with good lighting.
    • Be sure to use your stitch markers to secure loops as they appear, and give yourself a little extra room when you make that cut - you can always unravel more!
    • And lastly, remember that this works best when a final border or seaming will be done along the "surgery edge" to hide any the evidence!

    I hope you enjoy this tutorial Cutting into the Sides of Crochet Rows! If this video doesn't answer all your questions, please ask in the comments below - I'm always happy to help.

    And here's a Pin for your Crochet Pinterest Board! Make sure you are following Moogly on Pinterest for all the best knit, crochet, and craft pins!

    How to Cut the Sides of Crochet Rows

    If you make use this tip or make any Moogly pattern, please tag me in your photos so I can see them too, @mooglyblog or #mooglyblog!

    Get Moogly on your favorite social media sites: YouTube, Facebook, Pinterest, Tik Tok, Bluesky, and Instagram! And sign up for the free newsletter at the bottom of the page so you don’t miss a thing! 

    The Moogly Crochet Uppercase Alphabet

    May 19, 2026 by Tamara Kelly 329 Comments

    Moogly Crochet Uppercase Alphabet
    Looking for free crochet letter patterns? The Moogly Crochet Uppercase Alphabet Letters are a fun and easy way to personalize blankets, hats, bags, nursery decor, gifts, signage, yarn bombs, and so much more! This collection includes all 26 uppercase crochet letters in a simple applique style that is beginner-friendly, quick to make, and easy to sew onto your projects. Whether you want to crochet names, monograms, initials, or custom messages, these crochet alphabet patterns make it easy to add a handmade touch to every project! Read on to see how we've updated this pattern for 2026!

    Prefer an ad-free PDF? It's a Re-launch Special!

    Newly tech edited and updated with a professionally made chart for each letter! Get the ad-free PDF for The Moogly Crochet Uppercase Alphabet for only $4.99 US through May 25th, 2026!

    This button leads to the pattern on Etsy
    Prefer the free blog version? Keep scrolling!

    Newly Updated for 2026 and Beyond

    I originally designed this set of letters in 2013 - and they have been used for all sorts of purposes since then! After all these years, I decided it was time to revisit this pattern and freshen it up a bit. I hired Lindsey Stephens to professionally tech edit all 26 uppercase letters and to create stitch diagrams for each one. I've completely rewritten and formatted this post, and created an ad-free PDF. In that PDF, each letter gets it's own page, so you can print just what you need!

    So now, I feel confident that this alphabet is the best it can be - and ready to head into the future, and help you say whatever you want to say!

    Perfect Party Pennant Garlands - free #crochet pattern

    Matching Crochet Alphabet Applique Sets and Symbols

    Be sure to check out the rest of the matching Moogly Crochet Alphabet sets, too! You can mix and match all of these sets, created for the same scale:

    • Lowercase Alphabet
    • Number Set
    • Punctuation Set
    • Greek Alphabet
    • Currency Set
    • Musical Notes

    Mix and match the sets to create custom names, phrases, banners, monograms, and personalized crochet projects for every occasion!

    How to Use These Crochet Uppercase Letters

    These crochet uppercase letters are designed as appliques, which means you can sew or attach them to just about any project. Because each letter is made individually, you can mix and match them to spell anything you like, then arrange them before attaching to get the perfect layout. My best tip is to use stitch markers to hold each letter in place before you start stitching. This allows you to check your layout and spelling - and keep a straight line!

    There are a few easy ways to attach your crochet letters, depending on your project. The most common method for adding to other crochet or knit fabrics is to use a yarn needle and whip stitch the letters in place along the edges. For a more secure hold, you can use a backstitch. For craft projects, glue or fusible webbing, or even velcro might be an option, especially for wall hangings or display pieces.

    Of course, they don't have to be appliques! You can use them on their own as a learning toy with beginning readers - or add fridge magnets for extra fun!

    Sizing and Customizing Your Crochet Letters

    One of the best things about these crochet letters is how easy they are to customize. You can change hook size or yarn weight to make them larger or smaller while keeping the same proportions. This makes it simple to adapt the alphabet for everything from baby blankets to oversized home decor projects.

    Frequently Asked Questions

    Can beginners make these crochet letters?
    Yes, these uppercase letters are designed to be beginner-friendly and use basic stitches in an easy appliqué style.

    What yarn works best for crochet letters?
    For the clearest stitch definition, a smoother yarn will give you crisper edges, while a softer or fluffier yarn will create a more textured, decorative look. If you are attaching the letters to a blanket or garment, make sure that the fibers are all compatible for washing and drying!

    Do I need to block the letters?
    Blocking is optional, but it can help even out edges and make your finished letters lie flatter, especially for display pieces. I like to use spray starch on cotton letters to help them hold their shape!

    Free Crochet Alphabet by Moogly! #crochet


    The Moogly Crochet Uppercase Alphabet

    Add this pattern to your Ravelry Queue and Favorites

    US - F, 3.75 mm hook

    Any worsted-weight yarn

    Stitch Markers

    Size: Finished letters in this yarn measure approx 3.5” tall. For larger or smaller letters, use thicker or thinner yarn and a hook size that gives you a solid fabric.

    HELPFUL LINKS AND TUTORIALS

    Crochet Abbreviations

    FSC – Foundation Single Crochet

    FSC - Extending a Row with Foundation Single Crochet

    Seamless Finishing

    Klik HIER voor de Nederlandse vertaling van de Moogly Alfabet, met dank aan Elke Wellens!

    SPECIAL STITCHES & TECHNIQUES:

    Wide sc2tog (wide single crochet 2 together) over next 3 sts: insert hook in first st, yo, pull up a loop, skip next st, insert hook in third st, yo, pull up a loop, yo, pull through all 3 loops on hook.

    Sc2tog (single crochet 2 together): insert hook in first st, yo, pull up a loop, insert hook in next st, yo, pull up a loop, yo, pull through all 3 loops on hook.

    Hdc2tog (half double crochet 2 together): Yo, insert hook in first st, yo, pull up a loop, insert hook in next st, yo, pull up a loop, yo, pull through all 4 loops on hook.

    Dc2tog (double crochet 2 together): Yo, insert hook in first st, yo, pull up a loop, yo, pull through 2 loops on hook, yo, insert hook in next st, yo, pull up a loop, yo, pull through 2 loops on hook, yo, pull through all 3 loops on hook.

    FSC (Foundation single crochet): (see tutorial linked above) Insert in base of last st made, yo, pull up a loop, yo, pull through 1 loop on hook, [yo, pull through 2 loops] twice.

    NOTES:

    Chain 2 at beginning of a row does not count as a stitch throughout.

    Chain 1 at beginning of a row does not count as a stitch throughout.

    Please note that the instructions for letters M and W are the same, as are the instructions for N and Z: For the letter W, see the instructions for the letter M, and turn it upside down when finished. For the letter Z, see the instructions for the letter N, and turn it on it's side when finished.

    Each letter includes a photo of the finished letter made in worsted-weight yarn, followed by written instructions, followed by the crochet symbol diagram for that letter.

    CROCHET DIAGRAM STITCH KEY

    A grey/black arrow shows the beginning of the first row or round into the foundation chain.

    When a letter is composed of multiple parts, the latter parts are shown in a different color for clarity. A new arrow means the yarn is rejoined to start the next section.

    Moogly Crochet Alphabet Symbol Key

    The Moogly Crochet Alphabet Instructions

    THE LETTER A

    Row 1: Ch 30, sc in 2nd ch from hook, sc in next 12 chs, wide sc2tog over next 3 sts. Sc in remaining 13 chs. Turn. (27 sts)

    Row 2: Ch 1, sc in first 12 sts. Wide sc2tog over next 3 sts. Sc in remaining 12 sts. Turn. (25 sts)

    Row 3: Ch 1, sc in first 11 sts. Wide sc2tog over next 3 sts. Sc in next 5 sts, leaving remaining sts unworked. Ch 4. (16 sc, 4 ch - this ch 4 starts the horizontal cross bar of the A.)

    Row 4: Sc in back bump of 2nd ch from hook, sc in remaining 2 chs. Sc2tog into same st as last sc of Row 3 and next unworked st on Row 2. Turn. (4 sts)

    Row 5: Do not ch. Sc in next 4 sts (the sc2tog and the 3 sc from Row 4). Turn. (4 sts)

    Row 6: Ch 1, 2 sc in first st, sc in next 3 sts. Sc2tog into last st worked into on Row 2 and next unworked st on Row 2. Sc in remaining 4 unworked sts from Row 2. (10 sts total)

    Finish off. Sew the loose end of the crossbar to the other side.

    THE LETTER B

    Row 1: Ch 16, sc in 2nd ch from hook, sc in each remaining ch. Turn. (15 sts)

    Rows 2 - 3: Ch 1, sc in each st. Turn. (15 sts)

    Row 4: Ch 2, dc in first st, hdc in next st, sc in next st. Turn, leaving remaining sts unworked. (3 sts)

    Row 5: Ch 1, sc in first st, hdc in next st, dc in last st. Turn. (3 sts)

    Row 6: Ch 2, dc in first st, hdc in next st, sc in last st. Turn. (3 sts)

    Row 7: Repeat Row 5.

    Rows 8 - 11: Repeat Rows 6 - 7. At the end of Row 11, do not turn.

    Row 12: Ch 1, and working into the outside edge, work 2 sl st in the side of the dc from Row 11, work 1 sl st in the side of the dc from Row 10. Ch 1, sc in the side of the same dc, hdc and dc in the side of the dc from Row 9. Turn. (3 sl st, 1 sc, 1 hdc, 1 dc)

    Rows 13 - 18: Repeat Rows 6 - 7.

    Row 19: Repeat Row 6.

    Row 20: Ch 1, sc in each st. Finish off and use tail to sew Row 20 to last 3 sts of Row 3.

    THE LETTER C

    Row 1: Ch 4, sc in 2nd ch from hook, hdc in next ch, dc in last ch. Turn. (3 sts)

    Row 2: Ch 2, dc in first st, hdc in next st, sc in last st. Turn. (3 sts)

    Row 3: Ch 1, sc in first st, hdc in next st, dc in last st. Turn. (3 sts)

    Row 4: Repeat Row 2.

    Rows 5 - 7: Ch 1, sc in each st. Turn. (3 sts)

    Rows 8 - 11: Repeat Rows 2 - 3.

    Rows 12 - 16: Repeat Row 5.

    Rows 17 - 20: Repeat Rows 3 - 4.

    Rows 21 - 23: Repeat Row 5.

    Rows 24 - 27: Repeat Rows 2 - 3.

    Finish off.

    THE LETTER D

    Row 1: Ch 16, sc in 2nd ch from hook, sc in each remaining ch. Turn. (15 sts)

    Rows 2 - 3: Ch 1, sc in each st. Turn. (15 sts)

    Row 4: Ch 1, sc in first 3 sts. Turn, leaving remaining sts unworked. (3 sts)

    Rows 5- 6: Ch 1, sc in each st. Turn. (3 sts)

    Row 7: Ch 1, sc in first st, hdc in next st, dc in last st. Turn. (3 sts)

    Row 8: Ch 2, dc in first st, hdc in next st, sc in last st. Turn. (3 sts)

    Rows 9 - 10: Repeat Rows 7 - 8.

    Rows 11 - 15: Repeat Row 5.

    Row 16: Ch 2, dc in first st, hdc in next st, sc in last st. Turn. (3 sts)

    Row 17: Ch 1, sc in first st, hdc in next st, dc in last st. Turn. (3 sts)

    Rows 18 - 19: Repeat Rows 16 - 17.

    Row 20 - 22: Repeat Row 5.

    Finish off. Use tail to sew Row 22 to last 3 sts of Row 3.

    THE LETTER E

    Row 1: Ch 12, sc in 2nd ch from hook, sc in each remaining ch. Turn. (11 sts)

    Rows 2 - 3: Ch 1, sc in each st. Turn. (11 sts)

    Row 4: Ch 1, sc in first 3 sts. Turn, leaving remaining sts unworked. (3 sts)

    Row 5: Ch 1, sc in each st. Turn. (3 sts)

    Row 6: Ch 1, sc in each st, ch 6. Turn. (3 sc, 6 ch)

    Row 7: Sc in 2nd ch from hook, sc in each remaining ch, sc in each st. Turn. (8 sts)

    Rows 8 - 9: Ch 1, sc in each st. Turn. (8 sts)

    Row 10: Ch 1, sc in first 3 sts. Turn, leaving remaining sts unworked. (3 sts)

    Row 11: Ch 1, sc in each st. Turn. (3 sts)

    Row 12: Ch 1, sc in each st, ch 9. Turn. (3 sts, 9 ch)

    Row 13: Sc in 2nd ch from hook, sc in each remaining ch, sc in each st. Turn. (11 sts)

    Rows 14 - 15: Ch 1, sc in each st. Turn. (11 sts)

    Finish off.

    THE LETTER F

    Row 1: Ch 12, sc in 2nd ch from hook, sc in each remaining ch. Turn. (11 sts)

    Rows 2 - 3: Ch 1, sc in each st. Turn. (11 sts)

    Row 4: Ch 1, sc in first 3 sts. Turn, leaving remaining sts unworked. (3 sts)

    Row 5: Ch 1, sc in each st. Turn. (3 sts)

    Row 6: Ch 1, sc in each st, ch 6. Turn. (3 sc, 6 ch)

    Row 7: Sc in 2nd ch from hook, sc in each remaining ch, sc in each st. Turn. (8 sts)

    Rows 8 - 9: Ch 1, sc in each st. Turn. (8 sts)

    Row 10: Ch 1, sc in first 3 sts. Turn, leaving remaining sts unworked. (3 sts)

    Rows 11 - 15: Ch 1, sc in each st. Turn. (3 sts)

    Finish off.

    THE LETTER G

    Row 1: Ch 4, sc in 2nd ch from hook, sc in each remaining ch. Turn. (3 sts)

    Rows 2 - 3: Ch 1, sc in each st. Turn.

    Row 4: Ch 1, sc in first 2 sts.Turn, leaving last st unworked. (2 sts)

    Row 5: Ch 1, skip first st, sc in the next st. Turn. (1 st)

    Row 6: Ch 2, skip sc made in Row 5, dc in beginning ch-1 of Row 5. Hdc in the side of the last sc made in Row 4. Sc in unworked st from Row 3. Turn. (3 sts)

    Row 7: Ch 1, sc in first st, hdc in next st, dc in last st. Turn. (3 sts)

    Row 8: Ch 2, dc in first st, hdc in next st, sc in last st. Turn. (3 sts)

    Rows 9 - 10: Repeat Rows 7 - 8.

    Row 11: Repeat Row 7.

    Rows 12 - 14: Repeat Row 2.

    Rows 15 - 18: Repeat Rows 7 - 8.

    Rows 19 - 23: Repeat Row 2.

    Row 24: Repeat Row 8.

    Row 25: Repeat Row 7.

    Rows 26 - 27: Repeat Rows 24 - 25.

    Rows 28 - 30: Repeat Row 2.

    Rows 31 - 34: Repeat Rows 7 - 8.

    Finish off.

    THE LETTER H

    First Vertical Bar

    Row 1: Ch 16, sc in 2nd ch from hook, sc in each remaining ch. Turn. (15 sts)

    Rows 2 - 3: Ch 1, sc in each st. Turn. (15 sts)

    Crossbar

    Row 4: Ch 1, skip first st, sl st in next 5 sts. Ch 6, sc in 2nd ch from hook, sc in each
    remaining ch, sl st in next unworked st of Row 3, ch 1, sl st in next unworked st of Row 3. Turn. (5 sc)

    Row 5: Sc in each sc. Turn. (5 sts)

    Row 6: Ch 1, sc in each sc, sl st in next unworked st of Row 3. Turn. (5 sc, 1 sl st)

    Row 7: Ch 1, skip sl st, sl st in each of the 5 sc, ch 7. Do not turn. (5 sl st, 7 chs)

    Second Vertical Bar

    Row 8: Sc in 2nd ch from hook, sc in each remaining ch, 3 sc in the sides of Crossbar Rows, make 6 FSC. Turn. (9 sc, 6 FSC)

    Rows 9 - 10: Ch 1, sc in each st. Turn. (15 sts)

    Finish off.

    THE LETTER I

    Row 1: Ch 16, sc in 2nd ch from hook, sc in each remaining ch. Turn. (15 sts)

    Rows 2 - 3: Ch 1, sc in each st. Turn. (15 sts)

    Finish off.

    THE LETTER J

    Row 1: Ch 4, sc in 2nd ch from hook, sc in each remaining ch. Turn. (3 sts)

    Rows 2 - 11: Ch 1, sc in each st. Turn. (3 sts)

    Row 12: Ch 1, sc in first st, hdc in next st, dc in last st. Turn. (3 sts)

    Row 13: Ch 2, dc in first st, hdc in next st, sc in last st. Turn. (3 sts)

    Rows 14 - 15: Repeat Rows 12 - 13.

    Rows 16 - 18: Repeat Row 2.

    Row 19: Repeat Row 13.

    Row 20: Repeat Row 12.

    Rows 21 - 22: Repeat Rows 19 - 20.

    Row 23: Ch 1, sc in each st.

    Finish off.

    THE LETTER K

    Row 1: Ch 16, sc in 2nd ch from hook, sc in each remaining ch. Turn. (15 sts)

    Row 2: Ch 1, sc in each st. Turn. (15 sts)

    Row 3: Ch 1, sc in first 8 sts, leaving remaining sts unworked, ch 9. Do not turn. (8 sc, 9 chs)

    Upper Diagonal Bar

    Row 4: Sc in 2nd ch from hook and each remaining ch. Sc in next unworked st of Row 2. Turn. (9 sts)

    Row 5: Ch 1, skip first 2 sts, sc in remaining 7 sts. Turn. (7 sts)

    Row 6: Ch 1, sc in each of 7 sts, sc in remaining 6 unworked sts of Row 2. Finish off.

    Lower Diagonal Bar

    Row 1: Rejoin yarn with a sl st to the 8th (last) sc of Row 3. Sc in the same st, working in opposite side of chs of
    Upper Diagonal Bar, sc in next 2 chs. Turn. (3 sts)

    Rows 2 - 9: Ch 1, sc in each st. Turn. (3 sts)

    Finish off.

    THE LETTER L

    Row 1: Ch 16, sc in 2nd ch from hook, sc in each remaining ch. Turn. (15 sts)

    Rows 2 - 3: Ch 1, sc in each st. Turn. (15 sts)

    Row 4: Ch 1, sc in first 3 sts. Turn, leave remaining sts unworked. (3 sts)

    Rows 5 - 11: Ch 1, sc in each st. Turn. (3 sts)

    Finish off.

    THE LETTERS M AND W

    Row 1: Ch 16, sc in 2nd ch from hook, sc in each remaining ch. Turn. (15 sts)

    Rows 2 - 3: Ch 1, sc in each st. Turn. (15 sts)

    Row 4: Ch 1, skip first st, sc in next st, 2 sc in next st. Turn, leaving remaining sts unworked. (3 sts)

    Row 5: Ch 1, 2 sc in first st, sc in next st, sl st in last st. Turn. (3 sc, 1 sl st)

    Row 6: Ch 1, skip sl st and first sc, sc in next st, 2 sc in last st. Turn. (3 sts)

    Row 7: Repeat Row 5.

    Row 8: Repeat Row 6.

    Row 9: Repeat Row 5.

    Row 10: Ch 1, skip sl st, 2 sc in next st, sc in next st, sl st in last st. Turn. (3 sc, 1 sl st)

    Rows 11 - 14: Repeat Rows 6 - 7.

    Row 15: Repeat Row 6.

    Row 16: Ch 1, sl st loosely in each st. Ch 13, turn. (3 sl st, 13 ch)

    Row 17: Sc into 2nd ch from hook, sc in each remaining ch, sc in each sl st. Turn. (15 sts)

    Rows 18 - 19: Ch 1, sc in each st. Turn. (15 sts)

    Finish off.

    THE LETTERS N AND Z

    Row 1: Ch 16, sc in 2nd ch from hook, sc in each remaining ch. Turn. (15 sts)

    Rows 2 - 3: Ch 1, sc in each st. Turn. (15 sts)

    Row 4: Ch 1, skip first st, sl st in next st. Ch 1, sc in next st, 2 sc in next st. Turn, leaving remaining sts unworked. (1 sl st, 3 sc)

    Row 5: Ch 1, 2 sc in first st, sc in next st, sl st in last st. Turn. (3 sc, 1 sl st)

    Row 6: Ch 1, skip sl st and first sc, sc in next st, 2 sc in last st. Turn. (3 sts)

    Row 7: Ch 1, 2 sc in first st, sc in next st, sl st in last st. Turn. (3 sc, 1 sl st)

    Row 8 - 15: Repeat Rows 6 - 7 four times. At end of last row, ch 10.

    Row 16: Sc in 2nd ch from hook and each remaining ch, sc in sl st and each sc, make 2 FSC. Turn. (13 sc, 2 FSC)

    Rows 17 - 18: Ch 1, sc in each st. Turn. (15 sts)

    Finish off.

    THE LETTER O

    Row 1: Ch 4, sc in 2nd ch from hook, sc in each remaining ch. Turn. (3 sts)

    Rows 2 - 5: Ch 1, sc in each st. Turn. (3 sts)

    Row 6: Ch 1, sc in first st, hdc in next st, dc in last st. Turn. (3 sts)

    Row 7: Ch 2, dc in first st, hdc in next st, sc in last st. Turn. (3 sts)

    Rows 8 - 9: Repeat Rows 6 - 7.

    Rows 10 - 12: Repeat Row 2.

    Row 13: Repeat Row 7.

    Row 14: Repeat Row 6.

    Rows 15 - 16: Repeat Rows 13 - 14.

    Rows 17 - 21: Repeat Row 2.

    Rows 22 - 25: Repeat Rows 6 - 7.

    Rows 26 - 28: Repeat Row 2.

    Rows 29 - 32: Repeat Rows 13 - 14.

    Finish off. Use end to stitch Rows 32 and 1 together.

    THE LETTER P

    Row 1: Ch 16, sc in 2nd ch from hook, sc in each remaining ch. Turn. (15 sts)

    Rows 2 - 3: Ch 1, sc in each st. Turn. (15 sts)

    Row 4: Ch 1, sc in first 3 sts. Turn, leaving remaining sts unworked. (3 sts)

    Rows 5- 6: Ch 1, sc in each st. Turn. (3 sts)

    Row 7: Ch 1, sc in first st, hdc in next st, dc in last st. Turn. (3 sts)

    Row 8: Ch 2, dc in first st, hdc in next st, sc in last st. Turn. (3 sts)

    Rows 9 - 14: Repeat Rows 7 - 8.

    Rows 15 - 17: Repeat Row 2.

    Finish off. Use end to sew Row 17 to the middle of Row 3.

    THE LETTER Q

    Main Body

    Row 1: Ch 4, sc in 2nd ch from hook, sc in each remaining ch. Turn. (3 sts)

    Rows 2 - 5: Ch 1, sc in each st. Turn. (3 sts)

    Row 6: Ch 1, sc in first st, hdc in next st, dc in last st. Turn. (3 sts)

    Row 7: Ch 2, dc in first st, hdc in next st, sc in last st. Turn. (3 sts)

    Rows 8 - 9: Repeat Rows 6 - 7.

    Rows 10 - 12: Repeat Row 2.

    Row 13: Repeat Row 7.

    Row 14: Repeat Row 6.

    Rows 15 - 16: Repeat Rows 13 - 14.

    Rows 17 - 21: Repeat Row 2.

    Rows 22 - 25: Repeat Rows 6 - 7.

    Rows 26 - 28: Repeat Row 2.

    Rows 29 - 32: Repeat Rows 13 - 14. At the end of Row 32, do not turn.

    Tail

    Row 1: Ch 1, and working into the sides of Rows 32 and 31, on the outside of the "O", make 3 sc. Turn. (3 sts)

    Rows 2 - 4: Ch 1, sc in each st. Turn. (3 sts)

    Finish off.

    THE LETTER R

    Row 1: Ch 16, sc in 2nd ch from hook, sc in each remaining ch. Turn. (15 sts)

    Rows 2 - 3: Ch 1, sc in each st. Turn. (15 sts)

    Row 4: Ch 1, sc in first 3 sts. Turn, leaving remaining sts unworked. (3 sts)

    Rows 5-6: Ch 1, sc in each st. Turn. (3 sts)

    Row 7: Ch 1, sc in first st, hdc in next st, dc in last st. Turn. (3 sts)

    Row 8: Ch 2, dc in first st, hdc in next st, sc in last st. Turn. (3 sts)

    Rows 9 - 14: Repeat Rows 7 - 8.

    Rows 15 - 16: Repeat Row 2. (3 sts)

    Row 17: Repeat Row 2. Do not turn (3 sts)

    Lower Diagonal Bar

    Row 18: Ch 1, working into the sides of Rows 17 through 14, on the outside of the curve, sl st, ch 1, work 3 sc. Turn. (3 sts, 1 sl st)

    Row 19: Ch 1, sc in first st, hdc in next st, dc in last st. Turn. (3 sts)

    Rows 20 - 23: Ch 1, sc in each st. Turn. (3 sts)

    Finish off. Use one tail to sew Row 17 to the middle of Row 3.

    THE LETTER S

    Row 1: Ch 4, sc in 2nd ch from hook, hdc in next ch, dc in last ch. Turn. (3 sts)

    Row 2: Ch 2, dc in first st, hdc in next st, sc in last st. Turn. (3 sts)

    Row 3: Ch 1, sc in first st, hdc in next st, dc in last st. Turn. (3 sts)

    Row 4: Ch 2, dc in first st, hdc in next st, sc in last st. Turn. (3 sts)

    Rows 5 - 6: Ch 1, sc in each st. Turn. (3 sts)

    Rows 7 - 14: Repeat Rows 3 - 4.

    Rows 15 - 16: Repeat Row 5.

    Rows 17 - 24: Repeat Rows 2 - 3.

    Rows 25 - 26: Repeat Row 5.

    Rows 27 - 30: Repeat Rows 2 - 3.

    Finish off.

    THE LETTER T

    Row 1: Ch 13, sc in 2nd ch from hook, sc in each remaining ch. Turn. (12 sts)

    Row 2: Ch 1, sc in each st. Turn. (12 sts)

    Row 3: Ch 1, sc in each st. Do not turn. (12 sts)

    Row 4: Ch 7, sc in 2nd ch from hook and each remaining ch, work 3 sc across the ends of Rows 1 - 3, make 6 FSC. Turn. (9 sc, 6 FSC)

    Rows 5 - 6: Ch 1, sc in each st across. Turn. (15 sts)

    Finish off.

    THE LETTER U

    Row 1: Ch 4, sc in 2nd ch from hook, sc in each remaining ch. Turn. (3 sts)

    Row 2 - 11: Ch 1, sc in each st. Turn. (3 sts)

    Row 12: Ch 1, sc in first st, hdc in next st, dc in last st. Turn. (3 sts)

    Row 13: Ch 2, dc in first st, hdc in next st, sc in last st. Turn. (3 sts)

    Rows 14 - 15: Repeat Rows 12 - 13.

    Rows 16 - 18: Repeat Row 2.

    Row 19: Repeat Row 13.

    Row 20: Repeat Row 12.

    Rows 21 - 22: Repeat Rows 19 - 20.

    Rows 23 - 33: Repeat Row 2. Finish off.

    THE LETTER V

    Row 1: Ch 30, sc in the 2nd ch from hook, sc in the next 12 chs. Wide sc2tog over next 3 sts. Sc in remaining 13 chs. Turn. (27 sts)

    Row 2: Ch 1, sc in first 12 sts. Wide sc2tog over next 3 sts. Sc in remaining 12 sts. Turn. (25 sts)

    Row 3: Ch 1, sc in first 11 sts. Wide sc2tog over next 3 sts. Sc in remaining 11 sts. (23 sts)

    Finish off.

    THE LETTER X

    Main Bar

    Row 1: Ch 18, sc in 2nd ch from hook, sc in each remaining ch. Turn. (17 sts)

    Rows 2 - 3: Ch 1, sc in each st. Turn. (17 sts) At the end of Row 3, finish off.

    Upper Diagonal Bar

    Row 1: Rejoin yarn with a sl st in 8th st from left edge on either long side. Sc in this st and next 2 sts. Turn. (3 sts)

    Row 2 - 7: Ch 1, sc in each st. Turn. (3 sts)

    Finish off.

    Lower Diagonal Bar

    Repeat instructions for Upper Diagonal Bar on opposite long edge of Main Bar.

    THE LETTER Y

    Row 1: Ch 4, sc in 2nd ch from hook, sc in each remaining ch. Turn. (3 sts)

    Rows 2 - 5: Ch 1, sc in each st. Turn. (3 sts)

    Row 6: Ch 1, sc in each st, ch 10. Turn. (3 sts, 10 chs)

    Row 7: Sc in the 2nd ch from hook and each remaining ch, sc in each sc from Row 6, ch 10. Turn. (12 sc, 10 ch)

    Row 8: Sc in the 2nd ch from hook and each remaining ch, sc in each sc to end. Turn. (21 sts)

    Row 9: Ch 1, sc in first 9 sts. Wide sc2tog over the next 3 sts. Sc in the remaining 9 sts. Turn. (19 sts)

    Row 10: Ch 1, sc in first 9 sts. Break yarn and use seamless join to finish off, joining to the sc2tog st in the center.


    I hope you enjoy using the Moogly Crochet Uppercase Alphabet to personalize your life! If you share on socials, I would love to see it! You can always tag me @mooglyblog!

    The Fine Print

    Follow Moogly on YouTube, Facebook, Twitter, Pinterest, TikTok, and Instagram! Written pattern copyright Tamara Kelly 2026, all rights reserved. Please do not reprint or repost this pattern. Please do link to this page to share this pattern with others. If you wish to make items for sale from this pattern or translate it to another language, please visit the About page for details.

    MooglyCAL2026 Block 10

    May 14, 2026 by Tamara Kelly Leave a Comment

    MooglyCAL2026 Block 10

    MooglyCAL2026 Block 10 is a lovely and lively square by Justina of Polly Plum! The Luscious Lattice Square is super satisfying with lots of layout options. Get all the details for this free crochet along, and the free pattern link below!

    Disclaimer: This post includes affiliate links; materials provided by Local Crafts.

    Just getting started with the Moogly Crochet Along? CLICK HERE for the intro info!

    Want to get help with the patterns, show off, and CAL with others? CLICK HERE for the Facebook group

    Like to see all the squares visually? CLICK HERE for the Pinterest Board! (Squares will be added as they are released.)

    Introducing the MooglyCAL ONLY Newsletter! Never miss a Square Debut!

    The 2026 Moogly CAL Schedule

    As the year progresses, links will be added, and you'll be able to click on any of the past squares to go to their posts. The numbers refer to the date of the month that the square will debut.

    January Archie Argyle Crochet Square and Radiate Champion Block
    February Cozy Circles Crochet Square and Endless Griddle Stitch Square
    March Blue Cascade Afghan Square and Woven Checkerboard Square
    April Crashing Waves Blanket Square, Marvelous Mosaic Square, and Diamonds in Diamonds Mosaic Square
    May THIS POST and 28
    June 11 and 25
    July 9 and 23
    August 6 and 20
    September 3 and 17
    October 1, 15, and 29
    November 12 and 25

    *****

    Block #10:

    Luscious Lattice Square

    by Polly Plum

    MooglyCAL2026 Block 10

    Above, you can see the square that Justina made in 3 colors of Jimmy Beans Beanstalk Worsted! Below is my CAL square, in my 6 colors of Brava Worsted - Custard, Seashell, Fig, Denim, Espresso, and Cream!

    MooglyCAL2026 Block 10

    Details for MooglyCAL2026 Block 10

    My Notes: This is such a fun square to crochet - and a quick one too! Just 13 rounds and done - with just as many or as few yarn color changes as you like. For this square, I decided to let the Espresso color create a rich backdrop for the other colors, and I'm so pleased with how it turned out! I love how it makes the other colors pop, creating a lovely bit of texture. Take your time with the first few rounds, and the pattern will become easy quite quickly!

    Helpful Links and Tutorials: Crochet Abbreviations, Magic Circle, Standing sc, Chainless Starting Double Crochet, Front Post Single Crochet, and seamless join.

    Sizing: My gauge for this one just a little big, so I worked Rnd 12 as dc and sc sts, instead of tr and dc sts. But everyone's gauge is different, so be sure to measure as you go! Learn how to adjust for size HERE to ensure all your squares are the same size. Remember that the 12″ is measured across and up and down, not diagonally/corner to corner.

    Yarn Options: This year, our designers have chosen from a variety of yarns, including Brava Worsted, Swish Worsted, Jimmy Beans Wool Beanstalk, Berroco Vintage, and MadTosh Vintage. For this square, Courtney used Jimme Beans Beanstalk, and I used Brava Worsted!

    What I Did:

    I used a US-J, 6.0 mm crochet hook, and Brava Worsted yarn, and my color scheme was as follows (see pics for more info on placement):

    Rnd 1: Espresso
    Rnd 2: Espresso
    Rnd 3:
    Cream
    Rnd 4: 
    Espresso
    Rnd 5:
    Seashell
    Rnd 6:
    Espresso
    Rnd 7:
    Custard
    Rnd 8: Espresso
    Rnd 9:
    Fig
    Rnd 10:
    Espresso
    Rnd 11:
    Denim
    Rnd 12:
    Espresso
    Rnd 13:
    Cream

    This square didn't require much blocking to square, so I did a quick wet blocking.

    The Pattern:

    CLICK HERE FOR THE PATTERN FOR BLOCK #10

    PLEASE NOTE: The designers all hold individual copyrights for their patterns. They may choose to make videos of their patterns, and you can certainly request them from the designers. In addition, there are videos linked in the notes for specific stitches and techniques that may help you with the pattern. They may offer paid PDFs of the pattern, but have agreed to leave it up for free on their website or on Ravelry for as long as possible.

    Show Off Your Squares!

    If you share your photos on social media, be sure to use the hashtags #mooglycal2026 and tag your yarn - I'll be using #bravaworsted -  and tag me @mooglyblog so I can see them too! And don't forget to share them in the MooglyCAL Facebook Group! Thank you all for CAL-ing with me!

    And finally, here's a pin of MooglyCAL2026 - Block 10 for your own Pinterest boards!

    MooglyCAL2026 Block 10

    You can follow Moogly on YouTube, Facebook, Twitter, Pinterest, TikTok, and Instagram, and don't forget to sign up for the free newsletter at the bottom of the page! Thank you to Local Crafts for providing the materials for this crochet along.  

    Crochet and Catch Up with Moogly - May 13, 2026

    May 13, 2026 by Tamara Kelly Leave a Comment

    Crochet and Catch Up with Moogly - May 13, 2026

    I'm back in the basement, and that means it's time for Crochet and Catch Up with Moogly! I've spent a week and a half at a fiber fest and trade show, and I've got some fun new things to share! Join me for a relaxed crochet chat and behind-the-scenes peeks. Join in live, or watch the recording at your convenience - all the links are below!

    Disclaimer: This post may contain affiliate links. Live videos are unscripted, unedited, and occasionally weird; all opinions are my own. 

    Crochet and Catch Up with Moogly

    Going LIVE on Facebook and YouTube, at 11am CT!

    Click here to Like the Moogly Facebook Page and get notified when I go live!

    Click here to Subscribe to the Moogly YouTube Page and get notified when I go live!

    Moogly Community Group on Facebook

    What I'm Wearing: Color Block Cocoon

    MooglyCAL2026 Block 9 Courtesy of Creations by Courtney

    CAL Yarns: Brava Worsted, Swish Worsted, Jimmy Beans Wool Beanstalk, Berroco Vintage, and MadTosh Vintage.

    Little Princess Baby Blanket Tutorial (and Free Crochet Pattern)

    Cheery Cherry Booties Crochet Pattern

    New Crochet Stitch Dictionary Spiral Bound Giveaway

    Thread + Maple Telescopic Tool Case Giveaway

    Pattern Spree Giveaway

    Sneak Peek: Prym Ergonomics Crochet Hooks, Prym Ergonomics Knitting Needles, My Two Ladies Tunisian Crochet Hooks, My Two Ladies Knitting Needles

    Moogly Around the Web - and the World!

    FREE: Thursday, May 28, 2026 (6:00 PM - 7:00 PM) (CDT) - Stitch With Us! — A StitchMore Virtual Stitch Circle with of Tamara of Mooglyblog

    What to expect: A relaxed, upbeat hangout with plenty of room for conversation, crafty show-and-tell, and the kind of motivation that makes you want to pick your project back up. You'll get to connect with other makers, celebrate your progress (no matter how small), and enjoy some genuine community time... all without changing out of your pajamas 😄

    ​Come as you are, bring your work in progress, and join us for an evening of yarn, laughter, and satisfying little stitches.

    JBW 2026 Square

    June 17th-21st, 2026 -  Biggest Little Getaway with Jimmy Beans Wool (just a few more tickets have been released!)

    Join us for an all-inclusive retreat full of yarn, knitting, crocheting, and learning at the spectacular Peppermill Resort in Reno! Each year we strive to make it bigger and better - truly deserving of the name, The Biggest Little Getaway! Come together with other retreaters who have a passion for the craft, and let your skills shine!


    If you have a LYS or event you'd like me to teach at this year, or if you would like me to teach an online class to your group or guild, please do reach out!

    Have a wonderful day all - see you to crochet and catch up next time! And before you go, here's a Pin for today's post, so you can add it to your favorite Pinterest boards! We appreciate (and need) your shares on all our posts.

    Crochet and Catch Up with Moogly - May 13, 2026

    Follow Moogly on YouTube, Bluesky, Facebook, Pinterest, TikTok, and Instagram! 

    The New Crochet Stitch Dictionary - Spiral Bound Review and Giveaway

    May 12, 2026 by Tamara Kelly 5 Comments

    The New Crochet Stitch Dictionary - Spiral Bound Review and Giveaway

    The New Crochet Stitch Dictionary by Nele Braas and Eveline Hetty-Burkart features "440 Patterns for Textures, Shells, Bobbles, Lace, Cables, Chevrons, Edgings, Granny Squares, and More." While this book has been out for a few years, today we're celebrating a new edition - Spiral Bound! Take a peek inside below, and then enter to win your own copy, right here on Moogly!

    Disclaimer: I was given a copy of this book for review; all opinions are my own. This post includes affiliate links. 

    The New Crochet Stitch Dictionary Review

    A Bit About the Authors

    Nele Braas studied graphic design and photography in college. After completing her studies she did editorial work in various photo editorial departments. Then, she worked as a freelance photographer in the field of architecture, interior, garden, and people for various lifestyle magazines. With hooks and knitting she started as a child and then stopped, before beginning again later in life. She finds the most fun in creating her own designs and making usable pieces.

    Eveline Hetty-Burkart works as a freelance editor and author for magazine and book publishers. Her field of work encompasses a wide variety of handicraft techniques from the design through the creative implementation to the manual. Crochet is her favorite. She lives with her husband and son near Hamburg.

    Inside - and Outside - The New Crochet Stitch Dictionary

    "This is the ultimate collection of crochet stitch inspiration! 440 stitches are presented in color, each with a sample swatch of the fabric and charted instructions with notes and detailed chart keys. Divided into ten chapters by the type of stitches, such as shells, waves and chevrons, openwork, cables and textures, and even borders and granny squares, this collection boasts a vast variety of stitches, well organized and presented in an easy-to-use fashion. You'll reference this indispensable resource again and again!"

    Index from The New Crochet Stitch Dictionary

    I originally reviewed this book in 2021, when it debuted in Paperback and Kindle editions. And it's earned its spot on my "special bookshelf" - the one right above my desk, where I keep all the books I reference on a regular basis. And right now, it's full of sticky notes marking stitch patterns I've used, and plan to use in the future! It's a great stitch dictionary, and one I grab whenever I'm looking for inspiration.

    The New Crochet Stitch Dictionary with Sticky Notes

    The things I love about The New Crochet Stitch Dictionary are many. Here are some of the features that combine to make it stand out:

    • written instructions and a chart with key are included for each stitch pattern
    • the stitch multiple for each pattern is easy to see at a glance
    • each section (bobbles, shells, lace, etc) is color-coded along the edges of the pages
    • the stitch patterns are numbered as well as named for easy reference
    • there is a well-organized index that also includes the stitch multiples
    • clear, helpful photos for each stitch pattern

    The New Crochet Stitch Dictionary Inside

    All that, and I had one more wish - one I didn't bother voicing, because it's a rare thing. But now... It's perfect: they've added a Spiral-Bound edition! I'm still waiting on mine to arrive, but I have received a couple of this publisher's other newly spiral-bound books (spoiler alert for future giveaways? maybe...). So I am super excited!

    Spiral Bindings by Stackpole

    With a spiral binding, your book lies flat while you stitch - no trying to weigh it down with notions that slip over the instructions while you try that new move. I know I'm not the only one who struggles with this - I've met many others who have taken their favorites to the local office supply to have them re-bound with a spiral. Now, you can get this amazing book already spiral-bound for you - ready to become your New *FAVORITE* Crochet Stitch Dictionary!

    The New Crochet Stitch Dictionary - Spiral Bound Review and Giveaway

    Get your own spiral-bound copy of The New Crochet Stitch Dictionary today!

    Purchase your own copy of this book on Amazon, or ask for it at your local bookseller! Now available for pre-order, dropping May 26!

    The New Crochet Stitch Dictionary Giveaway

    The New Crochet Stitch Dictionary Giveaway is open in the US and Canada. The giveaway ends June 16, 2026, at 12:15am Central US time. To enter, use the Kingsumo form below. Only the email option is mandatory – all other tasks are optional, for bonus entries only.

    One winner will receive a spiral-bound copy of The New Crochet Stitch Dictionary, courtesy of Stackpole Books. They will be notified by email.

    GOOD LUCK ALL!

    You can follow Moogly on YouTube, Facebook, Twitter, Pinterest, TikTok, and Instagram. Don’t forget to sign up for the free newsletter at the top of the page! And don't forget to enter all the other fab giveaways on Moogly! 

    Cheery Cherry Booties

    May 7, 2026 by Tamara Kelly 3 Comments

    Cheery Cherry Booties

    The Cheery Cherry Booties are a quick, beginner-friendly project that adds a playful pop of summer style and charm to any little outfit. With their simple stitches and adorable cherry details, they are designed to fit babies 0-6 mths. These booties come together quickly and make a thoughtful, handmade gift - now free on Moogly!

    Disclaimer: This post includes affiliate links. 

    Prefer an ad-free PDF? You've got options!

    This button leads to the pattern on Etsy

    Prefer the free blog version? Keep scrolling!

    Originally designed for I Like Crochet Magazine

    This pattern was originally published in the June 2018 issue of I Like Crochet Magazine! So it's time to finally share them here on the blog for free!

    Cheery Cherry Booties
    Courtesy of I Like Crochet Magazine

    If you are searching for an easy crochet baby booties pattern or quick crochet gift idea, the Cheery Cherry Booties are a great choice. This free crochet pattern features simple stitches, step-by-step written instructions, and a seamless design that makes it approachable for new crocheters while still being enjoyable for more experienced makers. This pattern offers a fast, cute, and practical option you will want to make again and again!

    Cheery Cherry Booties


    Cheery Cherry Booties

    Add this pattern to your Ravelry Queue and Favorites

    US – G/6. 4.0mm

    Lion Brand 24/7 Cotton (100% Cotton, Worsted ”4” weight)
    Colorways Shown:
    Grass (CA) – 1 ball
    Pink (CB) – 1 ball
    Rose (CC) – 1 ball

    Two ⅝” (16mm) buttons

    Stitch Markers

    Gauge: 9 sc and 20 rows = 4” [10 cm]

    Size: 0-6 months (up to 3.5” foot length)

    HELPFUL LINKS AND TUTORIALS

    Crochet Abbreviations

    Post Stitches

    Magic Circle

    NOTES:

    This pattern does include a right and a left. Instructions for the Uppers are listed by foot.

    The soles are identical and made as ovals, beginning by working all the way around the foundation chain.

    SPECIAL STITCH

    bphdc (back post half double crochet): Yo, insert hook from back to front to back around post of indicated st, yo, pull up a lp, yo, pull through all lps on hook.

    Cheery Cherry Booties Instructions

    Soles (make 2)

    With CA, ch 12.

    Rnd 1: Sc in 2nd ch from hook, sc in next 9 chs, 3 sc in last ch, working into bottom of ch, sc in next 9 sts, 2 sc in same ch as first st, join. (24 sts)

    Rnd 2: Ch 1, 2 sc in first st, sc in next 9 sts, 2 sc in next 3 sts, sc in next 9 sts, 2 sc in last 2 sts, join. (30 sts)

    Rnd 3: Ch 1, sc in first st, 2 sc in next st, sc in next 9 sts, (sc in next st, 2 sc in next st) 3 times, sc in next 9 sts, (sc in next st, 2 sc in next st) twice, join. (36 sts)

    Rnd 4: Ch 1, 2 sc in first st, sc in next 11 sts, (2 sc in next st, sc in next 2 sts) twice, sc in next 11 sts, (2 sc in next st, sc in next 2 sts) twice, join. (42 sts)

    Rnd 5: Ch 1, sc in first 3 sts, 2 sc in next st, sc in the next 12 sts, 2 sc in next st, (sc in next 3 sts, 2 sc in next st) twice, sc in next 12 sts, 2 sc in next st, sc in next 3 sts, 2 sc in last st, join and break A, place stitch marker in last st of Rnd. (48 sts)

    Upper - Right Foot

    Rnd 1: With CB, join to marked st of Sole from RS, ch 1, bphdc in each st around, join. (48 sts)

    Rnd 2: Ch 1, hdc in each st around, join. (48 sts)

    Rnd 3: Ch 1, hdc in first 12 sts, (dc2tog, dc in next st) 8 times, hdc in last 12 sts, join. (40 sts)

    Rnd 4: Ch 1, hdc in first 12 sts, dc2tog 8 times, hdc in last 12 sts, join. (32 sts)

    Rnd 5 (final edging and strap): Ch 1, sc in first 11 sts, ch 12, skip 4 chs closest to hook, sc in rem 8 chs, sc in last 21 sts, join and break B.

    Upper - Left Foot

    Rnd 1: With CB, join to marked st of Sole from RS, ch 1, bphdc in each st around, join. (48 sts)

    Rnd 2: Ch 1, hdc in each st around, join. (48 sts)

    Rnd 3: Ch 1, hdc in first 12 sts, (dc in next st, dc2tog) 8 times, hdc in last 12 sts, join. (40 sts)

    Rnd 4: Ch 1, hdc in first 12 sts, dc2tog 8 times, hdc in last 12 sts, join. (32 sts)

    Rnd 5 (final edging and strap): Ch 1, sc in first 23 sts, ch 12, skip 4 chs closest to hook, sc in rem 8 chs, sc in last 9 sts, join and break B.

    Cherry Appliques

    Stems (make 2)

    With CA, ch 9, skip ch closest to hook, sc in next ch, hdc in next ch, sc in next ch, sl st in next ch, ch 5, skip ch closest to hook, sc in next ch, hdc in next ch, sc in next ch, sl st in next 2 chs, ch 3, break yarn leaving long tail for sewing.

    Cherries (make 4)

    With CC, make a magic circle, ch 1, work 6 sc in the ring, join and break yarn leaving a long tail for sewing.

    Assembly

    Step 1: Sew Stems to shoes as shown, using the long tail left at the end.

    Step 2: Sew a pair of Cherries to each shoe as shown, using the long tail left on each.

    Step 3: Sew a button to each shoe as shown, using color of choice (B shown).

    Finishing: Weave in all ends.


    I hope you enjoy making the Cheery Cheery Booties! If you share on socials, I would love to see it! You can always tag me @mooglyblog!

    Cheery Cherry Booties

    The Fine Print

    Follow Moogly on YouTube, Facebook, Twitter, Pinterest, TikTok, and Instagram! Written pattern copyright Tamara Kelly 2026, all rights reserved. Please do not reprint or repost this pattern. Please do link to this page to share this pattern with others. If you wish to make items for sale from this pattern or translate it to another language, please visit the About page for details. 

    Little Princess Baby Blanket Tutorial

    May 6, 2026 by Tamara Kelly 2 Comments

    Little Princess Baby Blanket Tutorial

    This Little Princess Baby Blanket Tutorial walks you through every step of creating this beautiful afghan! It's been nearly 10 years since I designed this pattern, but I still get requests for a tutorial  - it's a truly timeless piece, fit for any little prince or princess. Crochet along with the right and left-handed video tutorials below!

    Disclaimer: This post includes affiliate links.

    Be sure to scroll down past the videos to get the links to the free pattern and supplies!

     Little Princess Baby Blanket Tutorial:

    How to Crochet the Little Princess Baby Blanket - Right-Handed

    Learn to Crochet the Little Princess Baby Blanket - Left-Handed

    As Seen in This Video (click each for more info!):

    The Free Pattern: Little Princess Baby Blanket 

    The Supplies:

    US - K, 6.5 mm hook - Furls Crochet

    Lion Brand Vanna's Choice (Aran/yarn symbol “4”/UK: 10 ply; 145 yds; 3oz)
    Color A: Purple (2 balls)
    Color B: Eggplant (2 balls)
    Color C: Dusty Purple (2 balls)

    And here's a Pin for your Crochet Pinterest Board! Make sure you are following Moogly on Pinterest for all the best knit, crochet, and craft pins!

    Little Princess Baby Blanket Tutorial

    I hope you enjoy this tutorial for the Little Princess Baby Blanket! If this video doesn't answer all your questions, please ask in the comments below - I'm always happy to help.

    If you make this or any Moogly pattern, please tag me in your photos so I can see them too, @mooglyblog or #mooglyblog! Then send them to tamarakelly@mooglyblog.com to see them featured in a future Moogly email newsletter!

    Get Moogly on your favorite social media sites: YouTube, Facebook, Pinterest, Tik Tok, Bluesky, and Instagram! And sign up for the free newsletter at the bottom of the page so you don’t miss a thing! 

    Thread and Maple Telescopic Tool Case Giveaway

    May 5, 2026 by Tamara Kelly 1 Comment

    Thread and Maple Telescopic Tool Case Giveaway

    The Thread + Maple Telescopic Tool Case is a touch of functional luxury you can enjoy every time you stitch! This zip-top genuine leather case transforms into a stand-up cup to hold your tools - great on flat surfaces or in your car's cup holder! Take a closer look and enter to win your own here on Moogly!

    Disclaimer: This giveaway is sponsored by Thread + Maple. This post includes affiliate links.  All opinions are my own.

    All About the Thread + Maple Telescopic Tool Case

    Thread and Maple Telescopic Tool Case Giveaway

    When Thread + Maple sent me the Telescopic Tool Case, I fell in love. It's practical, easy to use, and wonderful on all the senses. I use it around the house, and have been using it while on a business trip as I write this. I've been using it to keep all my tools safe and ready, for all those stolen moments of crochet sanity!

    It looks and feels amazing, it's both high-end and classic, with excellent stitching and top-quality materials. Even the packaging it comes in is stunning. From the elegant box to the drawstring dust bag, it's a luxury experience from start to... every day use!

    Thread and Maple Telescopic Tool Case Giveaway

    Here's how they describe it on the site: "Do you wish you had the easy access of a cup and the portability of a zippered pouch for your writing and crafting tools? Meet your new desktop companion! The unique telescopic design of our tool case allows for quick and easy access to everything inside. (And did we mention it's a perfect fit for a bunch of bulky crochet hooks?)

    When you open the case, it transforms into a free-standing cup, as the top shell slides down and all your items “pop up” so you can see and reach everything with ease. Need to take it on the go? Simply grasp the outer layer, slide up to extend and zip it up to lock everything securely inside. Another neat feature is that it fits in most car cup holders, perfect for all you knitting/crocheting passengers."

    Thread and Maple Telescopic Tool Case Giveaway

    Here are all the facts:

    • Base diameter when expanded: 8cm/3"
    • Base diameter when collapsed: 9cm/3 ½"
    • Width of top zip: 13cm / 5"
    • Collapsed Height: 11.5cm / 3 ½" (items longer than this will be clearly visible when collapsed)
    • Expanded Height: 20cm / 8"
    • Artisan-crafted in Ukraine from the highest quality genuine leather
    • The interior of the pouch is lined with durable cream-colored cotton fabric and has 4 slim inner pockets to organize your tools

    Thread and Maple Telescopic Tool Case Giveaway

    With 5 gorgeous colors, to me the hardest part is picking just one - but you don't have to! CLICK HERE to buy your own Thread + Maple Telescopic Tool Case now!

    And Explore Everything Thread + Maple Has to Offer!

    Of course, the Telescopic Tool Case is just one of the gorgeous items on Thread + Maple. From On The Go needle organizers to The Boundless Bag extra-large tote, there are a plethora of things to add to your cart and wish list. Even their Maple Tape Measure takes it up a level! And don't forget to check out the stunning Louie & Lola Merino Silk Yak Fingering yarn!

    Thread and Maple Products

    The Thread + Maple Telescopic Tool Case Giveaway

    The Thread + Maple Telescopic Tool Case Giveaway is open to US and Canadian addresses. The giveaway ends June 2, 2026, at 12:15am Central US time. To enter, use the Kingsumo form below.

    Thread + Maple is giving away one Telescopic Tool Case, and the winner will be notified by email.

    Enter the Giveaway Here:

    Good luck all! You can follow Moogly on YouTube, Facebook, Twitter, Pinterest, TikTok, and Instagram, and don’t forget to sign up for the free newsletter at the bottom of the page! 

    MooglyCAL2026 Block 9

    April 30, 2026 by Tamara Kelly Leave a Comment

    MooglyCAL2026 Block 9

    MooglyCAL2026 Block 9 is a fabulous mosaic square by Creations by Courtney! The Diamonds in Diamonds Mosaic Square is the perfect follow-up to our last block, taking those skills to the next level! Get all the details for this free crochet along, and the free pattern link below!

    Disclaimer: This post includes affiliate links; materials provided by Local Crafts.

    Just getting started with the Moogly Crochet Along? CLICK HERE for the intro info!

    Want to get help with the patterns, show off, and CAL with others? CLICK HERE for the Facebook group

    Like to see all the squares visually? CLICK HERE for the Pinterest Board! (Squares will be added as they are released.)

    Introducing the MooglyCAL ONLY Newsletter! Never miss a Square Debut!

    The 2026 Moogly CAL Schedule

    As the year progresses, links will be added, and you'll be able to click on any of the past squares to go to their posts. The numbers refer to the date of the month that the square will debut.

    January Archie Argyle Crochet Square and Radiate Champion Block
    February Cozy Circles Crochet Square and Endless Griddle Stitch Square
    March Blue Cascade Afghan Square and Woven Checkerboard Square
    April Crashing Waves Blanket Square, Marvelous Mosaic Square, and THIS POST
    May 14 and 28
    June 11 and 25
    July 9 and 23
    August 6 and 20
    September 3 and 17
    October 1, 15, and 29
    November 12 and 25

    *****

    Block #9:

    Diamonds in Diamonds Mosaic Square

    by Creations by Courtney

    Diamonds in Diamonds Mosaic Crochet Square - Creations by Courtney

    Above, you can see the square that Courtney made in 2 colors of Jimmy Beans Beanstalk Worsted! Below is my CAL square, in my 6 colors of Brava Worsted - Custard, Seashell, Fig, Denim, Espresso, and Cream!

    Diamonds in Diamonds Mosaic Crochet Square - Creations by Courtney

    Details for MooglyCAL2026 Block 9

    My Notes: We have another mosaic square using the overlay mosaic technique, utilizing the front and back loops of stitches to create an overlapping pattern! More proof that mosaic is still hot in crochet! One tip specific to this square - be sure to work the ch 2 at the corners loosely! You'll be working into the blo of these chains, not around them. So make sure they are easy to get back into!

    If you plan on breaking the yarn after every round, I recommend joining each new yarn in a different spot around the square. This will prevent the visible seam that can be caused when all the slip stitches are lined up. If you do this, you can join with a standing sc in the first st along any side, and then just follow the directions in the brackets for each side! I can't wait to see how you use your color changes!

    Helpful Links and Tutorials: Crochet Abbreviations, Magic Circle, Standing sc, BLO - Back Loop Only, and seamless join.

    Sizing: My gauge for this one just a little big - I got to 12" after 19 Rnds, so I stopped there. But everyone's gauge is different, so be sure to measure as you go! Learn how to adjust for size HERE to ensure all your squares are the same size. Remember that the 12″ is measured across and up and down, not diagonally/corner to corner.

    Yarn Options: This year, our designers have chosen from a variety of yarns, including Brava Worsted, Swish Worsted, Jimmy Beans Wool Beanstalk, Berroco Vintage, and MadTosh Vintage. For this square, Courtney used Jimme Beans Beanstalk, and I used Brava Worsted!

    What I Did:

    I used a US-J, 6.0 mm crochet hook, and Brava Worsted yarn, and my color scheme was as follows (see pics for more info on placement):

    Rnd 1: Cream
    Rnd 2: Denim
    Rnd 3:
    Custard
    Rnd 4:
    Espresso
    Rnd 5:
    Seashell
    Rnd 6:
    Fig
    Rnd 7:
    Seashell
    Rnd 8: Espresso
    Rnd 9:
    Custard
    Rnd 10:
    Denim
    Rnd 11:
    Custard
    Rnd 12:
    Espresso
    Rnd 13:
    Seashell
    Rnd 14: Fig
    Rnd 15:
    Seashell
    Rnd 16:
    Espresso
    Rnd 17:
    Custard
    Rnd 18:
    Denim
    Rnd 19:
    Cream
    Rnd 20: Skipped for size

    This square didn't require much blocking to square, so I did a quick wet blocking.

    The Pattern:

    CLICK HERE FOR THE PATTERN FOR BLOCK #9

    PLEASE NOTE: The designers all hold individual copyrights for their patterns. They may choose to make videos of their patterns, and you can certainly request them from the designers. In addition, there are videos linked in the notes for specific stitches and techniques that may help you with the pattern. They may offer paid PDFs of the pattern, but have agreed to leave it up for free on their website or on Ravelry for as long as possible.

    Show Off Your Squares!

    If you share your photos on social media, be sure to use the hashtags #mooglycal2026 and tag your yarn - I'll be using #bravaworsted -  and tag me @mooglyblog so I can see them too! And don't forget to share them in the MooglyCAL Facebook Group! Thank you all for CAL-ing with me!

    And finally, here's a pin of MooglyCAL2026 - Block 9 for your own Pinterest boards!

    Diamonds in Diamonds Mosaic Crochet Square - Creations by Courtney

    You can follow Moogly on YouTube, Facebook, Twitter, Pinterest, TikTok, and Instagram, and don't forget to sign up for the free newsletter at the bottom of the page! Thank you to Local Crafts for providing the materials for this crochet along.  

    Crochet and Catch Up with Moogly - April 29, 2026

    April 29, 2026 by Tamara Kelly 2 Comments

    Crochet and Catch Up with Moogly - April 29, 2026

    We're squeezing in one more Crochet and Catch Up with Moogly before I leave for 10 days of Fiber Festing! Join me for a quick and easy break with crochet chat, behind-the-scenes peeks, and live Q&A. Join in live, or watch the recording at your convenience - all the links are below!

    Disclaimer: This post may contain affiliate links. Live videos are unscripted, unedited, and occasionally weird; all opinions are my own. 

    Crochet and Catch Up with Moogly

    Going LIVE on Facebook and YouTube, at 11am CT!

    Click here to Like the Moogly Facebook Page and get notified when I go live!

    Click here to Subscribe to the Moogly YouTube Page and get notified when I go live!

    Moogly Community Group on Facebook

    What I'm Wearing: Batwing Lace Sweater

    MooglyCAL2026 Block 8 Courtesy of Detroit Knots

    CAL Yarns: Brava Worsted, Swish Worsted, Jimmy Beans Wool Beanstalk, Berroco Vintage, and MadTosh Vintage.

    Wrap Stitch Crochet Hat

    Wrap Stitch Crochet Hat Tutorial

    Mary Maxim Prism

    babé Crochet Hat Templates

    Pattern Spree Giveaway

    GoSadi Craft Events Hub Giveaway

    Furls $100 Shopping Spree Giveaway

    Sneak Peek: Clawlab Tufting Kit

    Moogly Around the Web - and the World!

    Want to see me online?

    Monday, May 18, 2026 (6:00 PM - 8:00 PM) (CDT) - CGOA Class - Edinburgh Evenings Scarf - How to Crochet Linked Stitch Mesh

    Want to see me in person in 2026?

    Moogly at FFCF

    May 1 - 2 THIS WEEKEND: I will be teaching four classes at the new Fiber and Fabric Craft Festival in Chicago - one on Friday, and three on Saturday! The easiest way to find my classes is to "Filter by Speakers" and then scroll down to Tamara Kelly.  CLICK HERE to get your event ticket for FREE!

    If you have a LYS or event you'd like me to teach at this year, or if you would like me to teach an online class to your group or guild, please do reach out!

    Have a wonderful day all - see you to crochet and catch up next time! And before you go, here's a Pin for today's post, so you can add it to your favorite Pinterest boards! We appreciate (and need) your shares on all our posts.

    Crochet and Catch Up with Moogly - April 29, 2026

    Follow Moogly on YouTube, Bluesky, Facebook, Pinterest, TikTok, and Instagram! 

    Pattern Palooza Giveaway - Win 10 Crochet Pattern PDFs from Moogly!

    April 28, 2026 by Tamara Kelly 1 Comment

    Pattern Palooza Giveaway - Win 10 Crochet Pattern PDFs from Moogly!

    It's time to plan your "to crochet" list for summer - and we're here to help! Start picking your favorites - and then enter the Pattern Palooza Giveaway - Win 10 PDFs of Your Choice from Moogly!

    Most Moogly Patterns are Free... But...

    But some people don't like working from the blog - and that's why I offer my patterns in PDF form, on both Ravelry and Etsy! It's not all my patterns - some are in books or owned by other companies. And I'm still working on getting the ones I do own all up on Etsy. Designing takes a lot of time, that's not actually designing!

    Moogly on Etsy

    And since I had a spot in my schedule, I decided to give away 10 PDFs to one lucky winner! The winner will have two options:

    1: Coupon code for 10 free patterns from the Moogly Ravelry Store - these will keep them in your Ravelry library and allow you to download any updates.

    2: Pick out 10 PDFs (browsing Ravelry or Etsy) and email me the list - and I'll email them directly to your inbox!

    Which one will you pick? Enter below and we'll both find out!

    Moogly on Ravelry

    The Pattern Palooza Giveaway

    The Pattern Palooza Giveaway is open WORLDWIDE, and the prize will be delivered via email. This giveaway ends May 19, at 12:15am Central US time. To enter, use the Kingsumo form below.

    Good luck all! Now, don't forget to enter all the other great giveaways happening now on Moogly! And save this pin to help spread the word!

    Pattern Palooza Giveaway - Win 10 Crochet Pattern PDFs from Moogly!

    Wrap Stitch Crochet Hat Tutorial

    April 22, 2026 by Tamara Kelly Leave a Comment

    Wrap Stitch Crochet Hat

    This Wrap Stitch Crochet Hat Tutorial walks you through every step of creating this beautifully textured design, from the crown to brim! A textured 5 stitch repeat allows you to make this pattern in almost any size! Crochet along with the right and left-handed video tutorials below!

    Disclaimer: This post includes affiliate links.

    Be sure to scroll down past the videos to get the links to the free pattern and supplies!

    Wrap Stitch Crochet Hat Tutorial:

    How to Crochet the Wrap Stitch Crochet Hat - Right-Handed

    Learn to Crochet the Wrap Stitch Crochet Hat - Left-Handed

    As Seen in This Video (click each for more info!):

    The Free Pattern: Wrap Stitch Crochet Hat 

    The Supplies:

    4.5 mm crochet hook - Furls Odyssey II used

    90 - 200 yds Mary Maxim Prism (3 - Light; 100% acrylic; 100g/3.5 oz; 265 m/290 yds)
    Colorway shown: Rain Shower

    Stitch Markers

    babé Crochet Hat Templates (optional)

    And here's a Pin for your Crochet Pinterest Board! Make sure you are following Moogly on Pinterest for all the best knit, crochet, and craft pins!

    Wrap Stitch Crochet Hat Tutorial

    I hope you enjoy this tutorial for the Wrap Stitch Crochet Hat! If this video doesn't answer all your questions, please ask in the comments below - I'm always happy to help.

    If you make this or any Moogly pattern, please tag me in your photos so I can see them too, @mooglyblog or #mooglyblog! Then send them to tamarakelly@mooglyblog.com to see them featured in a future Moogly email newsletter!

    Get Moogly on your favorite social media sites: YouTube, Facebook, Pinterest, Tik Tok, Bluesky, and Instagram! And sign up for the free newsletter at the bottom of the page so you don’t miss a thing! Thank you to Mary Maxim for providing the materials for this video.

    Wrap Stitch Crochet Hat

    April 22, 2026 by Tamara Kelly 4 Comments

    Wrap Stitch Crochet Hat

    The Wrap Stitch Crochet Hat is a joy to stitch! The shifting colors of Mary Maxim Prism yarn add beautiful depth to the textured stitches, but this design is just as lovely in any yarn you have on hand. Even better, you can make it in any size, using the babé Crochet Hat Templates! Whether you are stitching for spring or building up your gift stash, this is a satisfying project that lets the yarn and texture shine.

    Disclaimer: This post includes affiliate links; materials provided by Mary Maxim and Furls Fiberarts.

    Prefer an ad-free PDF? You've got options!

    This button leads to the pattern on Etsy

    Prefer the free blog version? Keep scrolling!

    A 5 Stitch, 2 Row Repeat

    When designing this hat, I wanted to create a pattern that was incredibly flexible. We start from the top of the hat, with simple rounds of half double crochet. This sets us up in multiples of 10 stitches to create a flat circle. Rnd 1 has 10 sts, Rnd 2 has 20, Rnd 3 has 30, etc. If you're making a custom size with the hat templates, work until the circumference matches the top curve of the template for your size. If a jump of 10 sts is too many, then you can increase by only 5 for the last round of the crown - either way works!

    Wrap Stitch Crochet Hat

    Once you have the circumference, it's time to make the sides. As long as you ended the crown with a multiple of 5, this stitch pattern will work! There are 2 rows in this Sides pattern repeat, so that we get an "offset" look to our wrapped stitch texture. It doesn't matter which of these row repeats you end this section on, and you can add more for a "slouchier" look too. If  you are making a custom size with the hat templates, then work until the length is about an inch short of the length of the template - or however wide you want your brim to be!

    Wrap Stitch Crochet Hat

    The last step is adding the brim. In the yarn shown, I made a brim that is 6 sts wide. But you can make it as wide or as narrow as you prefer! Working back and forth in these short BLO rows creates a lovely, stretchy brim that I really like the look of. But you can use whatever ribbing or brim style you prefer - make it your own!

    Wrap Stitch Crochet Hat

    Made in Mary Maxim Prism!

    I had a few skeins of this yarn in my stash, just waiting for the right moment -and it's here! This is the first time I've used this yarn, and I really enjoyed it. It has a lovely, luxurious look to it, with gorgeous gradient depth of color. Although it looks a bit "wooly," it's actually 100% acrylic! I used 2 skeins to make all four sizes shown here.

    Wrap Stitch Crochet Hat

    Follow the Pattern or Make Your Own Path

    As mentioned above, you don't have to use this yarn to make this hat. You don't even have to use a yarn of the same weight! With the babé Crochet Hat Templates you can use this pattern to make a hat in any size. You can switch the top rounds to single crochet or double crochet as well (again, just end with a multiple of 5 on the last round of the crown)! I think these hats would look great with pom poms too - and in so many different fibers. One quick note on fibers though - watch out for yarns like alpaca which grow a lot with blocking... or as soon as they get wet. If you do use one of these yarns, you'll need to make a gauge swatch to figure out how big that crown really gets!

    Wrap Stitch Crochet Hat


    Wrap Stitch Crochet Hat

    Add this pattern to your Ravelry Queue and Favorites

    4.5 mm crochet hook - Furls Odyssey II used

    90 - 200 yds Mary Maxim Prism (3 - Light; 100% acrylic; 100g/3.5 oz; 265 m/290 yds)
    Colorway shown: Rain Shower

    Stitch Markers

    babé Crochet Hat Templates (optional)

    Gauge: 6 rnds = 4" [10 cm]

    Sizes: 0-6 mths, 6 - 12 mths, Child, Adult

    HELPFUL LINKS AND TUTORIALS

    Wrap Stitch Crochet Hat Tutorial

    Crochet Abbreviations

    Magic Circle

    Hdc - half double crochet

    CSDC - Chainless Starting Double Crochet

    BLO - Back Loop Only

    Whip Stitch Seaming

    NOTES:

    Instructions for working 10 rnds in hdc with a flat circle are given below.

    The notes in italics for size apply to hats worked with Mary Maxim Prism to the given gauge. If you are making a custom size or using different yarn, crochet to measure.

    When using a thinner yarn, if you need more than 10 rnds for the crown, continue to increase by 10 sts per round, or 5 sts if the size gets too big.

    If you prefer not to use the CSDC stitch, you can chain 3 or used a Stacked Single Crochet or whatever dc turning chain/stitch substitute is preferred.

    When finishing the brim, the last slst2tog may end up in the last 2 sts, or in the last st and the first st of the last rnd of the Sides. Either is fine.

    Wrap Stitch Crochet Hat INSTRUCTIONS:

    Starting at the Top/Crown of the Head

    Rnd 1: Make a magic circle, ch 1, 10 hdc in the ring; join with a sl st. (10 sts)

    Rnd 2: Ch 1, 2 hdc in each st around; join. (20 hdc)

    Rnd 3: Ch 1, *hdc in the next st, 2 hdc in the next st; rep from * around, join. (30 hdc)

    Rnd 4: Ch 1, *2 hdc in the next st, hdc in the next 2 sts; rep from * around, join. (40 hdc)

    Rnd 5: Ch 1, *hdc in the next 3 sts, 2 hdc in the next st; rep from * around, join. (50 hdc)

    Rnd 6: Ch 1, *hdc in the next 2 sts, 2 hdc in the next st, hdc in the next 2 sts; rep from * around, join. (60 hdc) For Size 0-6 mths, go to Sides Instructions.

    Rnd 7: Ch 1, *hdc in the next 5 sts, 2 hdc in the next st; rep from * around, join. (70 hdc) For Size 6-12 mths, go to the Sides Instructions.

    Rnd 8: Ch 1, *2 hdc in the next st, hdc in the next 6 sts; rep from * around, join. (80 hdc) For Child Size, go to the Sides Instructions.

    Rnd 9: Ch 1, *hdc in the next 7 sts, 2 hdc in the next st; rep from * around, join. (90 hdc) For Adult Size, go to the Sides Instructions.

    Rnd 10: Ch 1, *hdc in the next 4 sts, 2 hdc in the next st, hdc in the next 4 sts; rep from * around, join. (100 hdc) 

    Sides Instructions

    Rnd 1: CSDC in the first st, dc in the next st, skip 1 st, dc in the next 2 sts, dc around posts of 2 dc sts just made, *dc in the next 2 sts, skip 1 st, dc in the next 2 sts, dc around posts of last 2 dc sts made; rep from * around, join. (any multiple of 5 sts)

    Rnd 2: CSDC in the first st, dc in the next st, dc around posts of 2 dc sts just made, dc in the next 2 sts, skip 1 st, *dc in the next 2 sts, dc around posts of last 2 dc sts made, dc in the next 2 sts, skip 1 st; rep from * around, join.

    Repeat Rnds 1 and 2: O-6 mths work 6 Sides Rnds total; 6-12 mths work 8 Sides Rnds total; Child work 10 Sides Rnds Total; Adult work 11 Rnds Total.

    For Custom Sizing: Repeat Rnds 1 and 2 leaving 1" of length on the template for the brim. You can end on either Rnd.

    Brim Instructions

    For Custom Sizing: Chain to the desired brim width, plus 1.

    Row 1: Ch 7, skip the ch closest to the hook, blo sc in each rem ch across, slst2tog in next 2 sts of last row of sides; turn. (6 sc)

    Row 2: Skip the slst2tog, blo sc in each rem st across; turn.

    Row 3: Ch 1, blo sc in each st across, slst2tog in next 2 sts of last row of sides; turn.

    Repeat Rows 2 and 3 working around the hat, ending on a Row 2 repeat. Break yarn leaving a 12" tail for seaming. Whipstitch the first and last rows of the brim together. Weave in ends.


    Wrap Stitch Crochet Hat

    I hope you enjoy making and wearing the Wrap Stitch Crochet Hat! If you share on socials, I would love to see it! You can always tag me @mooglyblog!

    The Fine Print

    Follow Moogly on YouTube, Facebook, Twitter, Pinterest, TikTok, and Instagram! Thank you to Mary Maxim and Furls for providing the materials shown in this post. Written pattern copyright Tamara Kelly 2026, all rights reserved. Please do not reprint or repost this pattern. Please do link to this page to share this pattern with others. If you wish to make items for sale from this pattern or translate it to another language, please visit the About page for details. 

    Fiber + Fabric Craft Festival - April 30 - May 3, 2026

    April 21, 2026 by Tamara Kelly Leave a Comment

    Moogly at FFCF

    You are invited to the all-new Fiber + Fabric Craft Feastival, happening April 30 through May 3, 2026, at the Donald E. Stephens Convention Center in Rosemont, Illinois! If you love learning new stitches, meeting fellow makers, and soaking up creative inspiration, you will want to make the trip. I will be there teaching and sharing some of my favorite techniques, and I would absolutely love to see you in there!

    What Is the Fiber + Fabric Craft Festival?

    This exciting new event is shaping up to be one of the biggest celebrations of creativity in the Midwest, with hundreds of classes, hands-on workshops, and a vibrant marketplace all under one roof. Whether you love crochet, knitting, quilting, sewing, or just trying something new, it is designed to bring makers together to learn, connect, and be inspired. Here are some of the highlights:

    Classes: "Get ready to dive headfirst into a weekend of hands-on creativity, expert insights, and non-stop inspiration!" You'll find live demos and workshops as well as technical classes on offer. There are a combination of 200+ free and paid classes to choose from - including four by me (more on that below)! On the Classes/Events Page, you can sort by class name, speaker/teacher name, track, craft, date, session type, and skill level. Look for "Tamara Kelly" under Speakers to find mine!

    Exhibits: "Prepare to explore a vibrant marketplace brimming with top brands, rising talent, and creative pioneers from across the crafting world!" A quick count by yours truly found about 275 booths registered as of April 15th! You'll see brands like Yarnspirations, Lion Brand, Sirdar, Singer, Louet, Kraeo, Janome, DMC, and so many more. You can search for your favorite brands on the Exbibitor Listing page!

    Experiences: In addition to the learning and shopping, there's endless inspiration to be found at the FFCF. Art exhibits, live demos, meeting new friends - it's what you make of it! There is a Partner Lounge and activities for kids, so you can bring the whole family! Check out the First Timer's Guide to learn what to expect and what you need to make the most of the weekend.

    Where and When is the Fiber + Fabric Craft Festival?

    Where: Donald E. Stephens Convention Center in Rosemont, IL, USA

    When: April 30, 2026 Classes; May 1 – 3, 2026 Classes and Festival

    Where Will You Find Moogly at the Fest?

    Unfortunately, I cannot link directly to my classes  - here's how to find them!

    How to Register for Classes at FFCF

    Friday, May 1st:

    10 am - 12pm: Stitching Help Lounge - I'll be showing off Moogly designs, answering your crochet questions, and hanging out - come say hi and check out some Moogly stuff in person (like me)!

    Stitching Help Lounge FFCF

    2:00 pm - 5:00 pm: Fun with Fabulous Foundation Stitches (CGOA Approved) - In this class, I will demonstrate the varieties of foundation stitches, how to increase and decrease with them, and how to mix them together!

    Foundation Stitches Moogly

    Saturday, May 2nd:

    9:00 am - 12:00 pm: PULAD: Working with Two Active Loops At Once - I'll show you how to use this unique colorwork technique for even more pattern possibilities!

    PULAD with Moogly

    2:00 pm - 3:30 pm: Crochet Your First Top Down Shawl (CGOA Approved) - The First Fall Shawl is designed to be an easy and relaxing introduction to shawl crocheting - free yarn included with the class, courtesy of Circulo Yarn!

    First Fall Shawl - Moogly

    4:30 pm - 6pm: Crochet an Easy One Skein Bandana Cowl - I'll show you how to crochet the Aspen Valley Cowl - free yarn included with the class, courtesy of Yarnspirations!

    Aspen Valley Cowl

    Here's what the page on the FFCF site looks like when you've searched by Speaker for my name!

    FFCF Moogly Classes

    Ready for Registration?

    CLICK HERE TO GET YOUR FREE EVENT TICKET and get registered - see you there! ♥

    Teaching Moogly

    Follow Moogly on YouTube, Bluesky, Facebook, Pinterest, TikTok, and Instagram! 

    « Previous Page
    Next Page »
    Tamara Kelly of Moogly

    Moogly is world-famous for fresh. modern, and approachable crochet designs - as well as a little knitting and crafting here and there. On Moogly, you'll find several new free patterns every month, top quality video tutorials, giveaways, and more!

    More about Moogly →

    Popular

    • MooglyCAL2026 Block 21
      MooglyCAL2026 Block 21
    • Crochet and Catch Up with Moogly - October 14, 2026
      Crochet and Catch Up with Moogly - October 14, 2026
    • Seamless Crochet Sweaters Review and Giveaway
      Seamless Crochet Sweaters - Review and Giveaway
    • Ghost Treat Basket Tutorial
      Ghost Treat Basket Tutorial
    gosadi
    I'm a Craftsy Instructor. Click to see my classes.
    I Like Crochet


    Footer

    ↑ back to top

    About

    • About
    • Privacy Policy

    Newsletter

    Contact

    Email Moogly

    As an Amazon Associate I earn from qualifying purchases.
    Copyright © 2026 Mooglyblog.com