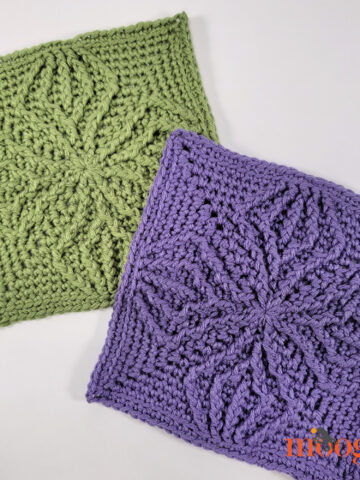
A mandala... square? Yes! I recently had a request come in asking me to turn the Magic Spike Mandala into an afghan square. I thought it was a great idea ( particularly for such a busy week). Here's the result - the Magic Spike Mandala Square!


The Magic Spike Mandala Square is a 12" x 12" afghan block that retains the look of the original mandala but is decidedly blanket-friendly. It would look great in a mixed square blanket or repeated in a throw. I can't wait to see what you all do with it!
Magic Spike Mandala Square - 12"
Add this pattern to your Ravelry Queue
- US - I/9, 5.50mm hook
- 135 yds total worsted weight yarn in 4 colors (Lily Sugar'n Cream shown)
- Special Stitch (Click HERE for tutorial): Spike St - Keeping tension on the active loop on the hook, insert hook into specified stitch, yo and pull up a loop to the height of the current row. Yo and pull through both loops.
- Click HERE for the UK terms version! (Updated 9/1/13 with error correction)
Instructions:
Round 1: Using Color A, make a magic circle. Working into the ring, ch 4 (counts as first dc and ch 1). [Dc, ch 1] into the ring 7 more times. Join to 3rd ch with sl st. (8 dc, 8 ch)
Round 2: Ch 3 (counts as first dc), 2dc in next ch sp. *Dc in next dc, 2 dc in next ch sp. Repeat from * to end. Break yarn and seamless join to second dc. (24 sts)
Round 3: Using Color B, join with a sl st to top of one of the dc sts that is worked into a dc (not a dc that's worked into the ch sp). Work a spike st into the top of the dc from Round 1 directly below. Sc in the next st, sc between posts of previous st and next st, sc in next st. *Work a spike st into the top of the dc from Round 1 directly below the next st. Sc in the next st, sc between posts of previous st and next st, sc in next st. Repeat from * to end. Join with a sl st to top of first spike st. (32 sts)
Round 4: Ch 1, sc in first st. Ch 4, skip next 3 sts. *Sc in next st, ch 4, skip next 3 sts. Repeat from * to end. Break yarn and seamless join to first sc of round. (40 sts)
Round 5: Using Color C, join with a sl st to the top of a sc st from previous round. Ch 1, hdc in same st. [2 dc, ch 1, 2 dc] in ch sp. *Hdc in next st, [2 dc, ch 1, 2 dc] in ch sp. Repeat from * to end. Join with a sl st to first hdc of round. (48 sts)
Round 6: Ch 1, hdc in first st. Skip next 2 sts, work 6 dc in ch sp. Skip next 2 sts. *Hdc in next st, skip next 2 sts, work 6 dc in ch sp. Skip next 2 sts. Repeat from * to end. Break yarn and seamless join to top of first hdc of round. (56 sts)
Round 7: Using Color D, join with a sl st to the top of a hdc from previous round. Work a spike st into the top of the sc from Round 4 directly below. Sc in the next 3 sts, sc between posts of previous st and next st, sc in next 3 sts. *Work a spike st into the top of the sc from Round 4 directly below the next st. Sc in the next 3 sts, sc between posts of previous st and next st, sc in next 3 sts. Repeat from * to end. Join with a sl st to top of first spike st. (64 sts)
Round 8: Ch 1, sc in first st. Ch 4, skip next 3 sts. *Sc in next st, ch 4, skip next 3 sts. Repeat from * to end. Break yarn and seamless join to first sc of round. (80 sts)
Round 9: Using Color A, join with a sl st to the top of a sc st from previous round. Ch 1, hdc in same st. Work 4 dc in ch sp. *Hdc in next st, 4 dc in ch sp. Repeat from * to end. Join with a sl st to first hdc of round. (80 sts)
Round 10: Ch 1, hdc in first st. Skip next 2 sts, work 5 dc between posts of previous and next st (second and third sts of group). Skip next 2 sts. *Hdc in next st, skip next 2 sts, work 5 dc between posts of previous and next st. Skip next 2 sts. Repeat from * to end. Break yarn and seamless join to top of first hdc of round. (96 sts)
Round 11: Using Color B, join with a sl st to top of one of the hdc sts from previous row. Work a spike st into the top of the sc from Round 8 directly below. Sc in the next 5 sts. *Work a spike st into the top of the sc from Round 8 directly below the next st. Sc in the next 5 sts. Repeat from * to end. Join with a sl st to top of first spike st. (96 sts)
Round 12: Ch 1, sc in first st. Ch 6, skip next 5 sts. *Sc in next st, ch 6, skip next 5 sts. Repeat from * to end. Break yarn and seamless join to first sc of round. (112 sts)
Round 13: Using Color C, join with a sl st to top of one of the sc sts from previous row. *Sc in the first st, then [sc 4, hdc] in the next ch sp, dc in the next st, then [dc 3, ch 1, trc 3] in the next ch sp, then [dtrc, ch 3, dtrc] in the next st. [Trc 3, ch 1, dc 3] in the next ch sp, dc in the next st, then [hdc, sc 4] in the next ch sp, sc in the next st. Repeat from * 3 times, starting with a sc in the next st (rather than the first). Join with a sl st in the first sc. (128 sts)
Round 14: Ch 1, *hdc in the first st. Dc in the next 3 sts, ch 1, dc in the same st as the previous st, dc in the next 2 sts. Hdc in the next st, dc in the next 3 sts, dc in the ch sp, dc in the next 3 sts, hdc in the next st, work [dc 2, ch 1, dc 2] in the ch sp. Hdc in the next st, dc in the next 3 sts, dc in the ch sp, dc in the next 3 sts, hdc in the next st, dc in the next 3 sts, ch 1, dc in the same st as the previous st, dc in the next 2 sts. Repeat from * 3 times, starting with a hdc in the next st. Break yarn and seamless join to first hdc of round. (152 sts)
Round 15: Using Color D, join with a sl st to the center hdc of any side (between the corners). *Work a spike st into the top of the sc from Round 12 directly below the next st. Sc in the next 3 sts, sc in the ch sp, sc in the next 3 sts. Work a spike st into the top of the sc from Round 12 directly below the next st, sc in the next 7 sts. Work a spike st into the top of the dtrc from Round 13 directly below the next st, sc in the next 2 sts, work [sc, ch 2, sc] in the ch sp, sc in the next 2 sts. Work a spike st into the top of the dtrc from Round 13 directly below the next st, sc in the next 7 sts. Work a spike st into the top of the sc from Round 12 directly below the next st, sc in the next 3 sts, sc in the ch sp, sc in the next 3 sts. Repeat from * 3 times, starting with a spike st in the next st. Join with a sl st to the top of the first spike st. (164 sts)
Round 16: (NOTE: You can adjust the height of the sts in this round if needed to get to 12" exactly. Be sure to measure before you break the yarn.) Ch 1, skip the first st. *Hdc in the next 7 sts, skip the next st, hdc in the next 7 sts. Skip the next st. Hdc in the next 3 sts, work 3 hdc in the ch sp, hdc in the next 3 sts, skip the next st. Hdc in the next 7 sts, skip the next st, hdc in the next 7 sts.** Skip the next st. Repeat from * 2 times and then from * to ** 1 time. Double check measurements, then break yarn and seamless join to the 2nd hdc of the round. (148 sts)
And now the mandala is a square! I hope to see some blankets and throws made with the square - it's so pretty! Please share your pictures on the Moogly Facebook page or email them to me if you prefer - then you might see them in the newsletter!

Written pattern copyright Tamara Kelly 2013. Please do not reprint or repost this pattern, but please do link to this page to share this pattern with others. If you wish to make items for sale from this pattern, please visit the About page for details.You can contact me via Facebook messages or at TamaraKelly@mooglyblog.com.


Elena Hunt says
I love this in the square! Thanks for working the pattern up!!
Simply Knots says
This is so gorgeous! 😀
Emily says
This is gorgeous and definitely on my list of things to crochet. I was wondering though if it was possible to make more stitches on the top and bottom and less on the sides to make it rectangular?
Tamara Kelly says
Hm, that's a tough one! I think you'd have to work taller stitches on the top and bottom with shorter stitches on the sides for a few rows. It could be done but it would take some fooling around with it! And thank you!
Joan Dunn says
I am thinking about using this as my 3rd square on the CAL. I simply do not like the third square featured, using all kinds of stitches I am not familiar with like the BCS Tower and the Back Cross Stitch. They just do not show up good in my square.
Jen says
I'm using this as my 3rd square for the CAL, too. It's so pretty!
Grace says
ooooo!!! I'm going to have to make this square and add it to the CAL Afghan 🙂 Thanks for sharing!!!
Lee Ann says
What a beautiful afghan square! I love the potential of making different looks with different colors; gray stash buster too! Thank you very much! 🙂
______
Lee Ann
Barb says
This is gorgeous. Have you thought of doing a video? I would love to see one. They're much easier to follow for crocheters who are not real experienced.
Tamara Kelly says
Thank you Barb! I'll add it to my list!
Mindy says
I am working this square and I LOVE IT, but I’m really confused by something in Row 13. The pattern says: “Repeat from * 3 times starting with a sc in the next stitch (rather than the first). Could you explain this to me or maybe show me what you mean by that? Thank you for your help.
Tamara Kelly says
Hi Mindy! The first side starts off in the first st of the previous rnd, but the repeats around the rest of the square continue on in line - you don't want to go back to the first st of the previous rnd!