
Woohoo! Hookin On Hump Day is back for 2014! If this is your first look, this is a fantastic bi-monthly link party run on both My Merry Messy Life and Moogly! An entry on one site shows up on both - and we both promote the featured projects each round on our various social media outlets. And we love seeing what all you fab blogger are up to, as we take turns picking the featured projects! One party, twice the promotion, lots of opportunity to see what's up in the worlds of crochet, knitting, and sewing! So let's get started and see what you were up to on holiday vacation!
Brrrrr-ing Me Balaclavas: 10 Free Crochet and Knit Patterns!
In honor of this epic wind chill I've decided to do a roundup of 10 free balaclavas patterns! Balaclavas, aka ski masks, are knitted or crocheted hats that include a face covering portion - usually leaving just the eyes free. Closer fitting and easier to wear in the cold than a scarf, these make a great first layer when battling the elements! So here are 5 free crochet ski mask patterns and 5 free knit balaclava patterns to help you stay warm this winter!

Get Those Yarns in Line: Yarn Organization Ideas to Use Now!
Disclaimer: This post includes affiliate links.
Recently on the Moogly Facebook page I got a reader suggestion - ways to organize the yarn stash! And talk about a hot topic! There are probably as many ways to organize yarn as there are crocheters and knitters. Even yarn stores use different methods. But here are a few ideas I've used or found online that might inspire your own organizational endeavors. 
Amazing One Piece Bow in Small: Guest Pattern by Stacey Williams of Busting Stitches!
Can a blogger have better friends? As I continue to recover from my respiratory troubles, the wonderful Stacey Williams, designer at Busting Stitches, has generously shared a free crochet pattern here on Moogly! The Amazing One Piece Bow shared here is the Small Size - this pattern also comes in Medium, Large, and XL! And they're all just perfect! So let's get to it!

Moogly Year in Review - 2013 Was Amazing!
This past year was amazing here at Moogly! And I owe so much of it to each and every one of you. Once again, it's been a fantastic journey, and watching the site grow and expand has come with a few challenges as well as rewards. But it's all been worth it!

Using Yarn to Keep Your Kiddos Busy Over Break: Guest post by Mary Kathryn!
And a huge thank you this morning to Mary Kathryn of Crochet Chiq! She surprised me with this super fun guest post for Moogly and I'm so excited to share it with you - such a great (and timely!) topic! Be sure to visit Crochet Chiq after you read this - Mary Kathryn writes fab free patterns, some of which have even been published by Red Heart Yarns!
Instead of getting upset of little ones tangling your current project give them their own ball and help them with these awesome projects.
Moogly on Social Media: Guest Post by "e" Lee!
How wonderful is the crochet community?! I let my fellow bloggers know I'm sick and put out a call for help - and I get wonderful gifts in my email inbox! A huge thank you to "e" Lee of The Crochet Lounge for putting this together for Moogly today! Be sure to visit The Crochet Lounge too - "e" has come out with a whole slew of amazing free patterns this month!

How to use PicMonkey, Powerpoint, and SlideShare to Make a Crochet Portfolio
Today, as I sit in an antibiotic-steroid-codeine fog, I am so so grateful to Sara Duggan, blogger at Crochet Business and author of several ebooks, for putting together this fabulous guest post for Moogly! Great stuff here, I always learn something from Sara's posts!
Do you use PicMonkey? Do you have access to Office Powerpoint or OpenOffice? If so, you can use SlideShare. What is Slideshare? It is the world’s largest community for sharing presentations, infographics and documents. It’s not just for Wall Street you as a Crochet Business or Blogger can use it too.
Step 1: Visit PicMonkey and Design Your Slide Background

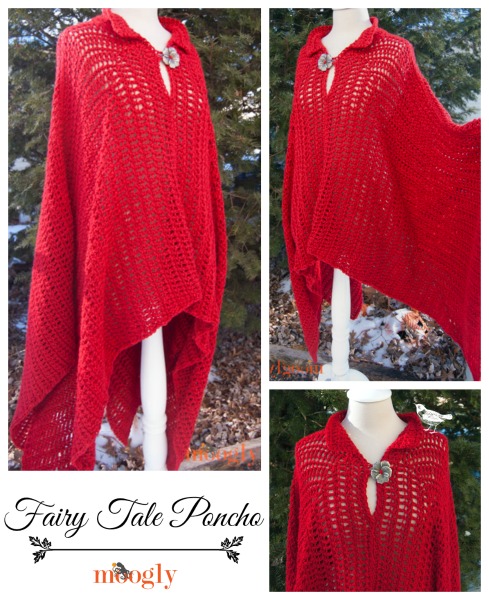
Fairy Tale Poncho
The Fairy Tale Poncho is my first adult garment design! It's easier to make than it looks, and with it's asymmetrical hem and mitered stitching, it's designed to flatter larger bodies as well as smaller ones - and look as good with jeans and boots as it does with a crown and glass slippers!
What Moogly Made This Holiday!
Disclaimer: This post includes affiliate links.
During the year I get to admire and recommend patterns from lots of amazing designers. But with blogging and designing my own patterns, I very rarely get a chance to actually make them myself. Holiday gifting is where I get to make an exception - and here's a few of the things I've made this year!

Linked Double Crochet Stitch (LDC)
Disclaimer: This post includes an affiliate link.
The Linked Double Crochet Stitch, abbreviated LDC, is a great stitch to have in your roster. It's got the height of double crochet stitches, but because each stitch is linked, or joined in the middle of the post, you don't get the holes and gaps you get with standard double crochet stitches. It creates a much more solid fabric than double crochet, without the thickness or stiffness of single crochet. Here's how it's done!

Hookin On Hump Day #61: Link Party for the Fiber Arts!
It's time for the last Hookin On Hump Day of 2013 - and we're wrapping up a fantastic year filled with amazing projects! I was so happy to come on board this year and join Sara from My Merry Messy Life as co-host - and get to know all of you! And once again, of course, both Sara and I will be sharing the featured posts on our various social media channels. One party, twice the promotion! So let's get to it - this round crochet swept the field!

Fantastic Fast Gifts: 10 Free Crochet Patterns Using Less Than 100 Yards of Yarn!
Time is short, but it doesn't take much! Here are 10 free crochet patterns that make fantastic finishing touches, fast gifts, and stocking stuffers - and each takes 100 yds of yarn or less (sometimes MUCH less!), so there's still plenty of time!

Warm Hands For Winter: 9 Free Crochet Mittens Patterns
Winter has wrapped North America in it's chilly, blustery grip - and our fingers are frozen! Fingerless mitts are great for indoors, but right now, you need full coverage outside. No one likes frozen fingers, and that's why mittens also make great gifts! So without further ado, here are 9 free crochet mittens patterns!

Christmas Tree Coffee Cozy

The Christmas Tree Coffee Cozy is for Secret Santas, teachers, coworkers, friends - aka people who get coffee shop gift cards or mug based gifts at the holidays. Or really anyone who'd enjoy a holiday hot drinks holder! Add a homemade touch that lifts your gift or morning joe above the rest with this free mug cozy pattern.
Disclaimer: This post includes affiliate links.
Prefer an ad-free PDF? You've got options!


Prefer the free blog version? Keep scrolling!
Adjust It to Fit!
The Christmas Tree Coffee Cozy fits all of the standard sized mugs in my house, as well as the taller travel mugs. If you're making it for one of those giant over-sized mugs (you know, the one for Mondays), you might want to add an extra row or three of evergreens or trunk - just try it on as you go!

Christmas Tree Coffee Cozy
Add this pattern to your Ravelry Queue and Favorites
US - I, 5.5mm hook
25-30 yds or .5 oz total Worsted or Aran weight yarn in 2 colors
- Shown in Lion Brand Vanna's Choice
Star shaped button or button of choice
Size: Finished cozy as written is 9.5" (24 cm) long, excluding the loop.
Special Stitch: LDC - Linked Double Crochet (click for video tutorial)
Click HERE for a Video Tutorial for this pattern
Christmas Tree Coffee Cozy Instructions
Start with the Evergreens
Row 1: (With Green/Color A) Ch 8 (or long enough to fit around the button of your choice), and join with a sl st to the 1st ch to make a ring. Ch 1, sc 1 into the ring. Turn.
Row 2: Ch 3, work 3 LDC into the same 1st st. Turn. (3 sts)
Row 3: Ch 3, work 2 LDC into the 1st st, LDC in the next st, 2 LDC in the last st. Turn. (5 sts)
Row 4: Ch 3, work 2 LDC into the 1st st, LDC in the next 3 sts, 2 LDC in the last st. Turn. (7 sts)
Row 5: Ch 3, work 2 LDC into the 1st st, LDC in the next 5 sts, 2 LDC in the last st. Turn. (9 sts)
Row 6: Skip the 1st st, sl st in the next 3 sts. Ch 3, work 2 LDC in the same st, LDC in the next st, 2 LDC in the next st, leave the last 3 sts unworked. Turn.(5 sts)
Row 7: Ch 3, work 2 LDC into the 1st st, LDC in the next 3 sts, 2 LDC in the last st. Turn. (7 sts)
Row 8: Ch 3, work 2 LDC into the 1st st, LDC in the next 5 sts, 2 LDC in the last st. Turn. (9 sts)
Row 9: Ch 3, work 2 LDC into the 1st st, LDC in the next 7 sts, 2 LDC in the last st. Turn. (11 sts)
Row 10: Skip the 1st st, sl st in the next 3 sts. Ch 3, work 2 LDC in the same st, LDC in the next 3 st, 2 LDC in the next st, leave the last 3 sts unworked. Turn. (7 sts)
Row 11: Ch 3, work 2 LDC into the 1st st, LDC in the next 5 sts, 2 LDC in the last st. Turn. (9 sts)
Row 12: Ch 3, work 2 LDC into the 1st st, LDC in the next 7 sts, 2 LDC in the last st. Turn. (11 sts)
Row 13: Ch 3, work 2 LDC into the 1st st, LDC in the next 9 sts, 2 LDC in the last st. Turn. (13 sts)
Edge: Ch 1, sc all around the tree bottom and branches, skipping the ch 8 loop. Break yarn and seamless join to 1st sc of the edge.
Add the Trunk
Row 1: (With Brown/Color B) from the RS of the evergreens, join with a sl st in the BLO of the 5th st from the right. Ch 1, sc in the same st, sc in the BLO of the next 6 sts. Turn. (7 sts)
Row 2 - 6: Ch 1, sc in each st across. Turn. (7 sts)
Row 7: Ch 1, sc in each st across. Break yarn and finish off. (Add more rows if you're a little short on the length you need!)
Edge: Rejoin yarn on upper right corner of trunk with sl st. Ch 1 and sc around 3 sides of trunk. Break yarn and finish off. Weave in all ends.
Sew the Button to the trunk as shown in the photos.
So what do you think? Do you like the rustic look shown here, or would you add some swag, glitter, and tiny ornaments? Maybe use a sparkly yarn? Just like full size trees, how you decorate it is up to you! I can't wait to see how you trim your Christmas Tree Coffee Cozies!
Written pattern copyright Tamara Kelly 2013. Please do not reprint or repost this pattern, but please do link to this page to share this pattern with others. If you wish to make items for sale from this pattern, please visit the About page for details.
The Incredible Bonita Patterns & Furls Fiberarts Hooks Giveaway!
Congratulations to Erica G., Anne H., and Karen Y. - you've each won a hook from Furls Fiberarts and your choice of 10 patterns from Bonita Patterns! Watch your email for details! Thanks to everyone else for entering, and stay tuned for more great giveaways and crochet fun in the new year!
*********************************************************
This giveaway has knocked MY socks off, and I'm not even eligible to enter! Bonita Patterns, with all the amazing designs you know and love, has teamed up with Furls Fiberarts, creator of jaw dropping luxury crochet hooks, to put together this giveaway to end all giveaways - and I'm the lucky duck that gets to share it with you!

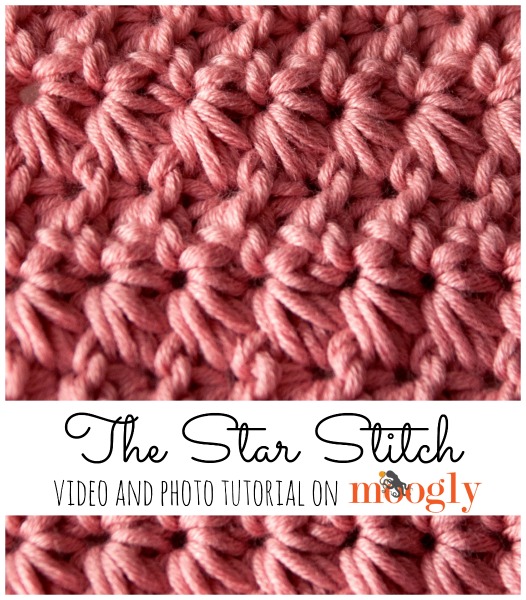
Star Stitch or Marguerite Stitch
The Marguerite Stitch comes in several variations. The easiest of all has 3 spikes, and is know as the Simple Marguerite Stitch - and I had a lot of fun demonstrating it! When you read just "Marguerite Stitch" it could mean 4 or 5 spikes - both versions share the name. But the 5 spike Marguerite Stitch goes by another name... the Star Stitch! Still following? Good, because today I'm showing you how to make this full size, 5 spiked, Star Stitch - AKA the Marguerite Stitch!
Handmade Holidays with 10 *More* Free Crochet Ornaments!
Last year I put together a roundup of 10 crochet Christmas ornaments, as well as a roundup of 10 knit ornaments. Well it's a new year and there are dozens of new ornament patterns that deserve to be in the spotlight, as well as a few I missed the first time around. So here are 10 *more* free crochet ornaments for you to add to your tree!

Leaping Crochet Baby Hoodie
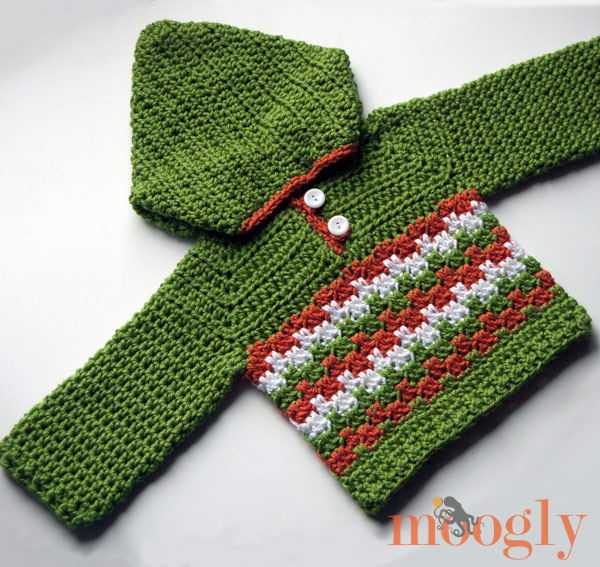
After designing the Leaping Stripes and Blocks Blanket, making a video tutorial for it, and then designing the Mesmerizing Messenger Bag and Leaping Blocks and Stripes Beanies, you might well think I'd be done with this stitch pattern! But then I got a reader request, and couldn't resist... So I give you the Leaping Crochet Baby Hoodie!
Disclaimer: This post contains affiliate links.
Prefer an ad-free PDF?


Prefer the free blog version? Keep scrolling!
Mix Up the Details for Your Baby!
The Leaping Crochet Baby Hoodie features all the requested items - it's an easy crochet pullover sweater pattern, with a hood, featuring the eponymous stitch pattern. And with an endless world of color changes, it's great for all babies. But it's a great pattern to work up style variations of too! Leave off the sleeves for a vest, replace the hood with a row of post stitches like the bottom - you might just have to make them all. Or since it includes sizes 6 months to 2T, you can make a different variation for every size!

Leaping Crochet Baby Hoodie
Add this pattern to your Ravelry Queue and Favorites
US - J, 6.0 mm hook - Furls Crochet
460 - 800 yds Red Heart Soft (100% acrylic; 4/Worsted/UK: 10-12 ply; 256yd (234m); 5oz (141g))
2 ¾" buttons (or size desired)
Gauge: 12 sts x 9 rows = 4 inches in hdc
Sizes: 6 mths (12 mths, 18 mths, 2T)
Helpful Links and Tutorials:
Leaping Crochet Baby Hoodie - UK version
How to crochet armholes in a top down sweater
Leaping Stripes and Blocks stitch tutorial
Fpdc/Bpdc - front post double crochet/back post double crochet
STDC - Standing Double Crochet
NOTES:
Odd numbered rows/rounds: RS; Even numbered: WS
You may wish to print out a copy of the pattern using the green Print Friendly button and circle the numbers that apply to the size you wish to make.
If you prefer not to use the STDC (see linked tutorial above), substitute a ch 3 and treat it as the first dc of the round.
INSTRUCTIONS:
YOKE ROWS (With Main Color):
Row 1: Ch 43 (47, 49, 53). Hdc in the 2nd ch from hook and next 6 (7, 8, 9) ch, then hdc 3 in the next ch (make corner), and place maker (pm) in the center of these 3 sts. Hdc in the next 6 ch, make corner and pm in the next ch, hdc in the next 12 (14, 14, 16) ch, make corner and pm in the next ch, hdc in the next 6 ch, and make corner and pm in the next ch. Hdc in the last 7 (8, 9, 10) ch. Turn. (50 (54, 56, 60) sts)
Row 2: Ch 1, hdc in the first 8 (9, 10, 11) sts, make corner and pm (move up from previous row), hdc in the next 8 sts, make corner and pm. Hdc in the next 14 (16, 16, 18) sts, make corner and pm. Hdc in the next 8 sts, make corner and pm. Hdc in the last 8 (9, 10, 11) sts. Turn. (58 (62, 64, 68) sts)
Row 3: Ch 1, hdc in the first 9 (10, 11, 12) sts, make corner and pm, hdc in the next 10 sts, make corner and pm. Hdc in the next 16 (18, 18, 20) sts, make corner and pm. Hdc in the next 10 sts, make corner and pm. Hdc in the last 9 (10, 11, 12) sts. Turn. (66 (70, 72, 76) sts)
Row 4: Ch 1, hdc in the first 10 (11, 12, 13) sts, make corner and pm, hdc in the next 12 sts, make corner and pm. Hdc in the next 18 (20, 20, 22) sts, make corner and pm. Hdc in the next 12 sts, make corner and pm. Hdc in the last 10 (11, 12, 13) sts. Turn. (74 (78, 80, 84) sts)
Row 5: Ch 1, hdc in the first 11 (12, 13, 14) sts, make corner and pm, hdc in the next 14 sts, make corner and pm. Hdc in the next 20 (22, 22, 24) sts, make corner and pm. Hdc in the next 14 sts, make corner and pm. Hdc in the last 11 (12, 13, 14) sts. Turn. (82 (86, 88, 92) sts)
Row 6: Ch 1, hdc in the first 12 (13, 14, 15) sts, make corner and pm, hdc in the next 16 sts, make corner and pm. Hdc in the next 22 (24, 24, 26) sts, make corner and pm. Hdc in the next 16 sts, make corner and pm. Hdc in the last 12 (13, 14, 15) sts. Turn. (90 (94, 96, 100) sts)
FOR SIZES:
6 mths and 12 mths, skip to Armpit Row below.
18 mths and 2T, continue with Row 7.
Row 7 (sizes 18 mths (2T) only): Ch 1, hdc in the first 15 (16) sts, make corner and pm, hdc in the next 18 sts, make corner and pm. Hdc in the next 26 (28) sts, make corner and pm. Hdc in the next 18 sts, make corner and pm. Hdc in the last 15 (16) sts. Turn. (104 (108) sts)
Row 8 (sizes 18 mths (2T) only): Ch 1, hdc in the first 16 (17) sts, make corner and pm, hdc in the next 20 sts, make corner and pm. Hdc in the next 28 (30) sts, make corner and pm. Hdc in the next 20 sts, make corner and pm. Hdc in the last 16 (17) sts. Turn. (112 (116) sts)
ARMPIT ROW/ROUND: Ch 1, hdc in the first 13 (14, 17, 18) sts, hdc in the marked st (remove 1st marker), ch 5 (5, 6 6), skip to st with next marker. Hdc in marked st (remove 2nd marker). Hdc in the next 24 (26, 30, 32) sts, hdc in the next marked st (remove 3rd marker), ch 5 (5, 6, 6), skip to st with next marker. Hdc in last marked st (remove 4th marker). Hdc in the last 13 (14, 17, 18) sts. Break yarn and seamless join to 2nd hdc of the row (this connects the two front flaps for working in the round. (54 (58, 68, 72) hdc and 10 (10, 12, 12) ch)
TRUNK/MIDSECTION ROUNDS: (Begin Leaping Stripes and Blocks Pattern)
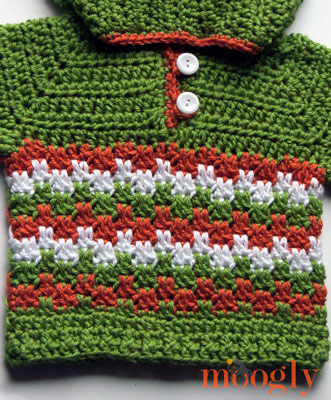 Round 1: With next color, STDC in one of the middle ch of either armpit of last Row/Round. Dc in the next st, ch 2, skip 2. *Dc in the next 2 sts, ch 2, skip 2. Repeat from * to end. Join with a sl st in the STDC. (64 (68, 80, 84) sts)
Round 2: Ch 4, skip 2, dc 2 in the skipped sts of Armpit Row, enclosing the ch 2 from Round 1. *Ch 2, skip 2, dc 2 in the skipped sts of Armpit Row (enclosing the ch 2). Repeat from * to end, join with a sl st in the ch 4 sp. Break yarn and finish off. (64 (68, 80, 84) sts including chs)
Round 3: With Next Color, STDC in any skipped st of Round 1, enclosing the ch 2 sp from Round 2 in the st. Dc in the next st, ch 2, skip 2. *Dc in the next 2 sts, ch 2, skip 2. Repeat from * to end. Join with a sl st in the STDC. (64 (68, 80, 84) sts including chs)
Round 4: Ch 4, skip 2, dc 2 in the skipped sts of Round 2, enclosing the ch 2 from Round 3. *Ch 2, skip 2, dc 2 in the skipped sts of Round 2. Repeat from * to end, join with a sl st in the ch 4 sp. Break yarn and finish off. (64 (68, 80, 84) sts including chs)
Rounds 5 - 14 (16, 18, 20): Repeat Rounds 3-4, switching colors every 2 rows or as desired and working dc sts into the skipped sts from 2 rows previous.
Round 15 (17, 19, 21): With Main Color, STDC in any skipped st of 2 Rounds previous, enclosing the ch 2 sp in the st. Dc in the next st, sc in the next 2 sts. *Dc in the next 2 sts, sc in the next 2 sts. Repeat from * to end. Join with a sl st in the STDC. (64 (68, 80, 84) sts) Continue with Hip Rounds.
HIP ROUNDS (Continue with Main Color):
Round 1 - 2: Ch 1, hdc in each st around. Join with a sl st in the 1st st. (64 (68, 80, 84) sts)
Round 3: Ch 2, fpdc in 1st st and bpdc in next st. *Fpdc in next st, bpdc in next st. Repeat from * around. Break yarn and seamless join. (64 (68, 80, 84) sts)
SLEEVES: (If omitting sleeves, work a row of sc around each arm opening)
Round 1: From RS of sweater, join with main color with a sl st - join to the center st of the armpit for the left arm (as worn), join to the center st of the top of the shoulder for the right arm (as worn). Ch 1, hdc 26 (26, 32, 32) sts evenly around arm opening. Join to 1st st with a sl st. (26 (26, 32, 32) sts)
Round 2 - 16 (17, 18, 19): Ch1, hdc in each st around. Join to 1st st with a sl st. (26 (26, 32, 32) sts)
Round 17 (18, 19, 20): Ch 2, fpdc in 1st st and bpdc in next st. *Fpdc in next st, bpdc in next st. Repeat from * around. Break yarn and seamless join. (26 (26, 32, 32) sts)
HOOD:
Row 1: From WS of sweater, join to the 1st st of the neckline (on the unused side of the starting ch) with a sl st. Ch 1 and hdc in each st of starting ch/neckline. Turn. (42 (46, 48, 52)
Row 2: Ch 1, hdc in the 1st 20 (22, 23, 25) sts, [2 hdc in the next st] twice, hdc in the last 20 (22, 23, 25) sts. Turn. (44 (48, 50, 54) sts)
Row 3: Ch 1, hdc in each st across. Turn. (44 (48, 50, 54) sts)
Row 4: Ch 1, hdc in the 1st 21 (23, 24, 26) sts, [2 hdc in the next st] twice, hdc in the last 21 (23, 24, 26) sts. Turn. (46 (50, 52, 56) sts)
Row 5: Ch 1, hdc in each st across. Turn. (46 (50, 52, 56) sts)
Row 6: Ch 1, hdc in the 1st 22 (24, 25, 27) sts, [2 hdc in the next st] twice, hdc in the last 22 (24, 25, 27) sts. Turn. (48 (52, 54, 58) sts)
Row 7: Ch 1, hdc in each st across. Turn. (48 (52, 54, 58) sts)
Row 8: Ch 1, hdc in the 1st 23 (25, 26, 28) sts, [2 hdc in the next st] twice, hdc in the last 23 (25, 26, 28) sts. Turn. (50 (54, 56, 60) sts)
Row 9 - 17 (18, 18, 19): Ch 1, hdc in each st across. Turn. (50 (54, 56, 60) sts)
Row 18 (19, 19, 20): Ch 1, hdc in each st across. Break yarn, leaving an 18 inch tail. Fold top of hood in half, WS together, and seam together with mattress stitch using the tail. Weave in ends.
EDGING AND BUTTONS:
Round 1: Join with main color with a sl st at the right side (as worn) of the base of the V of the neck opening. Ch 1 and sc evenly up the V opening, continue to sc along the edge of the hood, and down the other side of the V of the neck opening. Break yarn and seamless join to first scof the edging. Do not turn.
Round 2: Join with a contrasting color with a sl st to the first st of the previous Round. Ch 1 and sc evenly along Round 1, working 2 ch 6 button loops opposite where you wish to sew on the buttons (for other size buttons ch as appropriate, and be sure to test your loop on your chosen button before continuing the edging). Continue with sc to end of round. Break yarn and seamless join to first sc of the round.
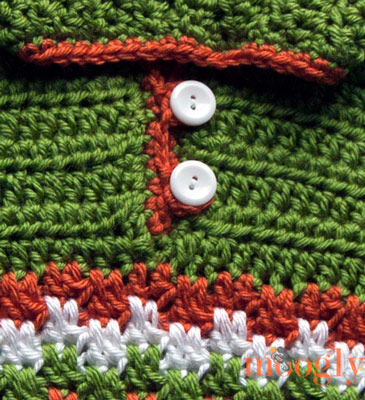
I hope you all enjoy this pattern for the Leaping Crochet Baby Hoodie - I can't wait to see all the colors and variations and creativity I know you'll all bring to it!
The Fine Print
Written pattern copyright Tamara Kelly 2013. Please do not reprint or repost this pattern, but please do link to this page to share this pattern with others. If you wish to make items for sale from this pattern, please visit the About page for details. For printing and download info, click here.
Do you Sussle? A Review and Amazon Gift Card Giveaway!
This giveaway is now closed! Congratulations to Ashley Z. and Amber M. - enjoy your Amazon Gift Cards! Thanks to all who entered and stay tuned for more giveaways on Moogly!
~~~~~~~~~~~~~~~~~~~~~~~~~~~
A few months ago I got an email from Chuck Kao, founder of Sussle.org. He told me about his site, and asked me to join up and help out with the Crochet channel! And now Sussle is sponsoring an Amazon Gift Card giveaway for Moogly readers!

Wiggle It Crochet Trivet & Dishcloth Tutorial
The Wiggle It Crochet Trivet and Dishcloth pattern is one of my most requested - to make for friends and family! Pretty, practical, and easily customized for any size, this pattern is fun to make and use. Most wiggle crochet is done in squares, but this pattern mixes it up and works in the round. Here's how it's done!

Hookin On Hump Day #60 - Link Party for the Fiber Arts
It's December already! This year has flown by and it's been full of amazing crafts and fiber arts. Coming on as co-host has been a real honor, and I'm so glad to work with Sara from My Merry Messy Life to bring you this link party twice every month. We love seeing what you're up to and working together to promote your projects and sites! Now let's take a look at the stand outs from last round!

Star Light Star Bright: Guest Pattern from MadMadMe!
Charissa of Mad Mad Me contacted me a little while ago about doing a guest post, and having seen her fantastic crochet patterns I had to say yes! This talented lady is part of the Design Wars team and has great color sense and photos. When she told me she was designing a free crochet pattern specifically for the guest post, I was incredibly honored! And now I'm happy to share Star Light Star Bright with all of you! - Tamara

Bake (or Make!) A Dozen Free Crochet Gingerbread Patterns
The holiday season has two great pleasures for me - crafting and baking. And crochet gingerbread is a great combo of the two! This iconic cookie has inspired dozens of tasty crafts, and here are my 12 favorite free crochet gingerbread patterns!
 Disclaimer: This post may contain affiliate links.
Small Business Saturday Sale!
It's Small Business Saturday, and to celebrate I'm doing a one day only deal - until 11:59, Central time zone, you can get 50% off on the Sven Sweater! Go HERE and use the coupon code MOOGLYMOOLAH and save! Have a great weekend all!

Glittery Crochet Stars in 2 Rounds
Disclaimer: This post includes affiliate links.
This week's free crochet pattern is perfect for the weekend after Thanksgiving - easy and relaxing, perfect for whipping up between turkey leftovers and naps. And they're so fast and fun (only 2 rounds!) you'll want to keep making them right on through the holidays! Introducing the free crochet pattern for Glittery Crochet Stars in 2 Rounds.

5 Things I Learned About Writing Crochet Patterns from My Tech Editor: Guest Post by Sara Duggan
As I prep for the Thanksgiving holiday this week, I'm thankful for this guest post by Sara Duggan! Sara is a crochet designer, blogger, and author of several eBooks aimed at helping people get started and make a success of their crochet businesses, the latest of which is a joint work titled Create Crochet Patterns (update - this book is no longer available to the best of my knowledge)! Here's what Sara has to share with budding designers about writing crochet patterns! - Tamara
5 Things I Learned About Writing Crochet Patterns from My Tech Editor

Craftwich Creations Crochet Hook Giveaway!
Congratulations to Ann H., winner of the Craftwich Creations Crochet Hook Giveaway! Thank you to all who entered and thank you to Craftwich Creations for sponsoring the giveaway! Craftwich Creations makes amazing hooks, buttons, and other goodies, so be sure to add her stuff to your holiday shopping list!
This giveaway is now closed.
~~~~~~~~~~~~~~~~~~~~~~~~~~~~~~~~~~~~~~~~~~~~~~~~~~~~~~~~~~~~~~~~~~~~~~~~~~~~~~~~~~~~~~~~~
Recently I got the chance to try out one of the fantastic handcarved crochet hooks from Craftwich Creations - and I felt like the luckiest girl in the world! This hook is a crocheter's dream - and now I get to share with all of you, because she's agreed to sponsor a crochet hook giveaway here on Moogly!

Big Rib Scarf

The Big Rib Scarf pattern is one of my new favorites for so many reasons. It's super fast to make, it's simple enough for beginners, it's easily customized, completely unisex, and the end result is super chunky and warm!
Disclaimer: This post includes affiliate links.
Prefer an ad-free PDF? You've got options!
Prefer the free blog version? Keep scrolling!
The Little Details
The Big Rib Scarf is made using 2 strands of worsted or aran weight yarn held together - or you could try it with one strand of super bulky! Either way will work, but the fun of using 2 strands of worsted is mixing and matching the colors. For this scarf I used 2 different colorways of Lion Brand Heartland. This created a tweedy jewel toned scarf and I just love the look!

Beyond the colors, you can also customize how you wear it. There are instructions for a big button hole, so you can dress it up (or down) with your favorite button. Move the button hole around and get a whole new look!

Or you can leave the button hole out and work it solid - then wear it as a regular scarf, or use a shawl pin to pin it in place! It's all up to you! There are so many ways to wear it, and with all these options it's a great unisex pattern too!

Big Rib Scarf
Add this pattern to your Ravelry Queue and Favorites
US - M/N 13, 9.0 mm hook
500 yds Worsted or Aran weight yarn (Lion Brand Heartland shown, 1 skein each of Glacier Bay and Olympic)
2" button (optional)
Gauge: 7 sts x 5 rows = 4" in pattern
Finished size: 44" long x 10" wide
Helpful Links and Tutorials:
FDC - foundation double crochet
BLO - back loop only
NOTE: This pattern is worked holding 2 strands of yarn together, one end of each skein, worked as if they were one strand of yarn.
INSTRUCTIONS
Row 1: FDC 80, turn. [Alternate beginning: Ch 82, dc in the 4th ch from the hook, dc in each remaining ch to end. Turn.] (80 sts)
Rows 2 - 9: Ch 2 (does not count as first st), dc in BLO of each st to end. Turn. (80 sts)
Row 10 (button hole row - if skipping the button hole, work this Row as for Row 2): Ch 2, dc in the BLO of the first 72 sts. FDC 2 (see Extending a Row with FSC video linked above - it's the same principle but with dc sts), skip the next 2 sts, dc in the BLO of the last 6 sts. Turn. (80 sts)
Row 11 - 12: Repeat Row 2. Break both strands of yarn and finish off, weave in ends. If desired, sew button to scarf as shown in photos using leftover yarn.
The Wrap Up
Easy as can be, right? The Big Rib Scarf is so simple, but I love the look. So inviting and warm but chic at the same time. And quick enough to work up a few in time for the holidays! I hope you enjoy this pattern as much as I enjoyed writing it - and make some to share with those who need a little extra warmth!
Written pattern copyright Tamara Kelly 2013. Please do not reprint or repost this pattern, but please do link to this page to share this pattern with others. If you wish to make items for sale from this pattern, please visit the About page for details.
Super Small Business Saturday Crochet Giveaway!
Black Friday is coming up next week, and it's a HUGE sales day in the US, as everyone goes crazy getting holiday bargain shopping done. It's usually a big box mega store event... but what about the little guys? That's where Small Business Saturday comes in! And you don't have to live in the US to celebrate it, with the Super Small Business Saturday Crochet Giveaway!

Lion Brand Holiday from the Heartland Giveaway!
This giveaway is now finished! Congratulations to the winner, Adrienne M! Thank you to Lion Brand Yarn for sponsoring the giveaway! Happy Holidays all!
~~~~~~~~~~~~~~~~~~~~~~~~~~~~~~~~~~~~~~~~~~~~~~~~~~~~~~~~~~~~~~~~~
I am so super excited to be bringing you this fantastic giveaway from Lion Brand yarn! They've put together an amazing prize package for one lucky winner, and I've dubbed it the Lion Brand Holiday from the Heartland Giveaway - read on to see why!

Pampering Massage Soap Saver Tutorial
The Pampering Massage Soap Saver pattern debuted this week last year - just in time for holiday gift giving. Combined with a bar of lovely handcrafted or boutique soap, it's a great stocking stuffer or holiday gift for teachers, coworkers, friends... you name it! It's an easy to memorize pattern that whips up quickly, and now with a video, anyone can make it! And I've got just the thing to fill it with, from Bean Tree Soap!

Learn to "Create Crochet Patterns" with this New eBook - a Giveaway!
This giveaway is now ended! Congratulations to all the winners! Check the Rafflecopter form below to see if you are one of the lucky ones! And if you're not, you can go HERE to order your own copy today!
~~~~~~~~~~~~~~~~~~~~~~~~~~~~~~~~~~~~~~~~~~~~~~~~~~~~~~~~~~~~~~~
Several great bloggers have teamed up to put together a brand new eBook -
Create Crochet Patterns: A Step-by-Step Guide for Beginners.
And they're doing a giveaway across several different blogs - including Moogly!

Hookin On Hump Day #59 - Link Party for the Fiber Arts
Ready? In denial? I won't scare you with the current countdown - instead I'll entice you with all the great projects and inspiration featured in this week's Hookin On Hump Day link party! We've got lots of great seasonal and gift ideas, so be sure to check them out. Sara from My Merry Messy Life and I love all the projects you link, but each week we only feature the 5 best! Thinking of linking your fiber arts project this time around? Remember, with the two of us as co-hosts, the featured projects get twice the publicity, with links on both our sites and all our social media outlets. And if you tweet about it using the hashtag #HOHD, we'll use these to get even MORE attention on your posts and entries. So let's get to it!

Mini Moogly Sweater
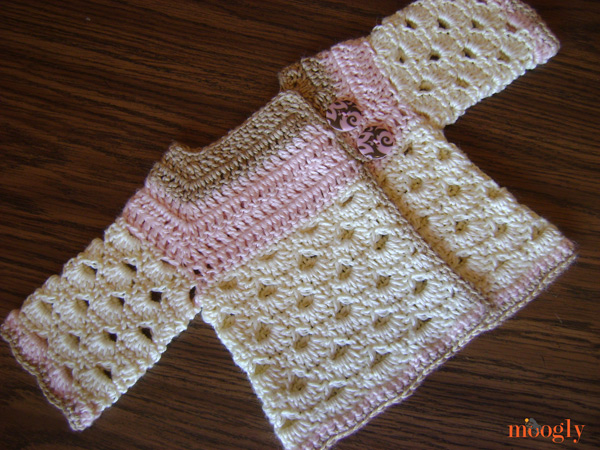
The MIni Moogly Sweater was the first sweater pattern I ever wrote, and in fact one of the first baby sweater patterns I ever made! It was a mashup inspired by two great patterns: Kelly's Sweater, by Bella Bambina Knits, and Auntie M's Abigail's Baby Sweater, which was nearly lost before it found a new home here on Moogly. Since I first posted my little sweater recipe, new sizes, refinements and errata have been added. So it was time to re-write it, re-work it, insert all the things I've learned about pattern writing in the meantime, and put it all together in one, easy to read pattern!
Rejoice! It's 10 Free Crochet Angel Patterns!
Recently I had a request for a tree topper roundup - and so I went on a search. Alas, I didn't find very many free tree topper patterns at all. Not nearly enough for a roundup. But what I *did* find was a whole chorus of Angels - including a tree topper! My daughter has quite a collection of angel ornaments from her grandmother, and I have a few lovely ones that have been given to me as well - and they make me smile every year. Well, I can take a hint - here's 10 free crochet Angel patterns!

Luscious One Skein Fingerless Mitts
The Luscious One Skein Cowl was a hit, so I decided to create the pattern for the Luscious One Skein Crochet Hat. And then I was on a roll, and before you know it I'd designed the matching Luscious One Skein Fingerless Mitts!
 Disclaimer: This post includes affiliate links.
Luscious One Skein Crochet Hat
The Luscious One Skein Cowl was a hit, so I decided that with the holidays coming and bulky yarns trending, it was time to make it a set - and then some! So today I'm sharing the pattern for the Luscious One Skein Crochet Hat.. and the matching Luscious One Skein Fingerless Mitts!
Just Be Happy Review & Giveaway
Disclaimer: This post includes affiliate links.
The Just Be Happy Giveaway is over! Thank you to all who entered and thank you to Just Be Happy Patterns for sponsoring the giveaway! Congratulations to Stephanie B. W., winner of the book, and Gem C., Yuka O., and Janet M., winners of the pattern picks! You'll all be getting emails shortly! Click here to purchase your own copy of Just Be Happy: Crochet Hats for Babies and Toddlers, and click here to visit the Just Be Happy Craftsy store to purchase her great indie patterns!
~~~~~~~~~~~~~~~~~~~~~~~~~~~~~~~~~~~~~~~~~~~~~~~~~~~~~~~~~~~~~~~~~~
Alessandra Hayden is the designer and blogger at Just Be Happy - and she specializes in super cute patterns for kids! Recently she sent me a copy of her book, Just Be Happy: Crochet Hats for Babies and Toddlers - and now I get to share the fun with all of you!

Extending a Row with Foundation Single Crochet
This week's tutorial is a quick demonstration of a neat little trick to extend a row of crochet. Foundation stitches, in particular foundation single crochet, are a great way to to start a project. But what happens when you've made a few (or a bunch of) rows, and want the next row to continue on past the previous row, but don't want to chain? Extending a row with foundation single crochet! Here's how it's done.
