Recently, I had a fan request - design a hat to go with the Leaping Blocks and Stripes Blanket pattern. Well if you've been reading Moogly for a while, you know I love to take requests. So here we are - the Leaping Stripes and Blocks Beanies!
Disclaimer: This post includes affiliate links.
Prefer an ad-free PDF? You've got options!


Prefer the free blog version? Keep scrolling!
Sizes for the Whole Family
While I'm sure she was just looking for a baby hat to make a little layette set, one of the fun things about the Leaping Blocks and Stripes Blanket pattern is that it includes instructions for several different sizes. Therefore, I just had to design hat sizes for the whole family! Pair it with the blanket for little ones, with the Mesmerizing Messenger Bag for big ones, or let it stand alone as the great beanie pattern it is!

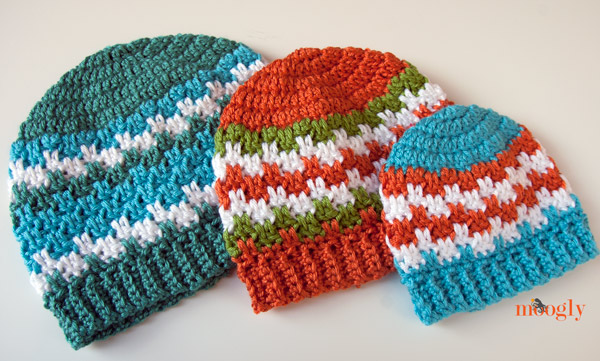
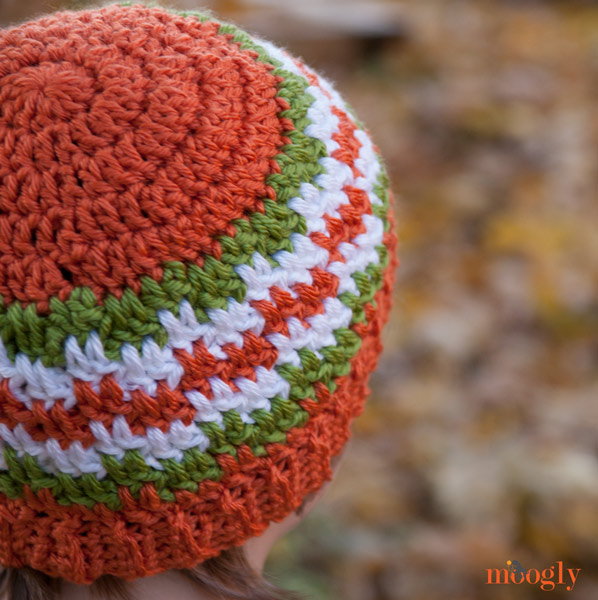
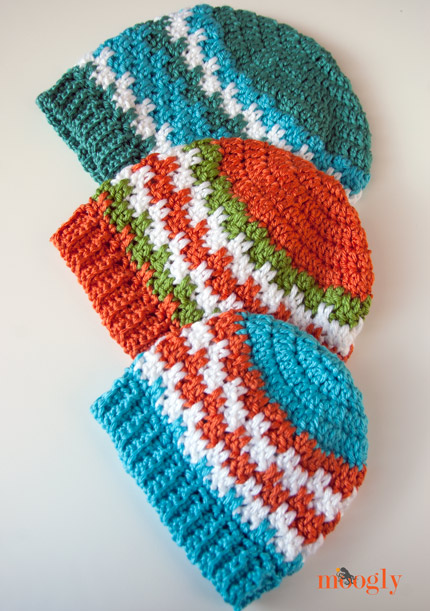
Leaping Stripes and Blocks Beanies
Add this pattern to your Ravelry Queue and Favorites
US - J, 6.00mm hook
75-150 total yds Red Heart Soft (100% acrylic; 4/Worsted/UK: 10-12 ply; 256yd (234m); 5oz (141g))
Colorways Shown: White, Tangerine, Guacamole, Turquoise, and Deep Sea
Gauge: After the first 4 rows, the circle should measure 5" across.
Sizes: Baby (14"-16"); Toddler (16"-18"); Child (18"-20"); Teen/Small Adult (20"-22"); Large Adult (22"-24"); Be sure to scroll down to the instructions for the correct size!
Helpful Links and Tutorials:
CSDC - chainless starting double crochet
STDC - standing double crochet
BLO - Back Loop Only
Note: Color changes for the "stripes" of the pattern are up to you - make it your own! The hats pictured all follow different patterns, but always change color after two or four rows of "leaping stripes and blocks." Or don't, it's up to you! If you do not want to use the CSDC and STDC, you can substitute a ch 2 and dc or ch 3 as desired.
Baby Beanie
Round 1: With Main Color, make a magic circle, ch 2 (does not count as a stitch) and dc 12 times in the ring. Join to first dc with a sl st. (12 sts)
Round 2: CSDC, dc in the first st, 2dc in each remaining st around. Join to CSDC with a sl st. (24 sts)
Round 3: CSDC, dc in the first st, dc in the next st. *2 dc in the next st, dc in the next st. Repeat from * to end. Join to CSDC with a sl st. (36 sts)
Round 4: CSDC, dc in the first st, dc in the next 2 sts. *2 dc in the next st, dc in the next 2 sts. Repeat from * to end. Break yarn and seamless join in the 2nd st of the round. (48 sts)
Round 5: (Begin Leaping Stripes and Blocks Pattern - click here for the tutorial if you are unfamiliar with the basic stitch pattern) With Next Color, STDC in any st of Round 4. Dc in the next st, ch 2, skip 2. *Dc in the next 2 sts, ch 2, skip 2. Repeat from * to end. Join with a sl st in the STDC. (48 sts including chs)
Round 6: Ch 4, skip 2, dc 2 in the skipped sts of Round 4, enclosing the ch 2 from Round 5. * Ch 2, skip 2, dc 2 in the skipped sts of Round 4 (enclosing the ch 2). Repeat from * to end, join with a sl st in the ch 4 sp. Break yarn and finish off. (48 sts including chs)
Round 7: With Next Color, STDC in any skipped st of Round 5, enclosing the ch 2 sp in the st. Dc in the next st, ch 2, skip 2. *Dc in the next 2 sts, ch 2, skip 2. Repeat from * to end. Join with a sl st in the STDC. (48 sts including chs)
Round 8: Ch 4, skip 2, dc 2 in the skipped sts of Round 6, enclosing the ch 2 from Round 7. * Ch 2, skip 2, dc 2 in the skipped sts of Round 6. Repeat from * to end, join with a sl st in the ch 4 sp. Break yarn and finish off. (48 sts including chs)
Rounds 9 - 12: Repeat Rounds 7-8 twice, switching colors as desired and working dc sts into the skipped sts from 2 rows previous.
Round 13: With Main Color, STDC in any skipped st of Round 12, enclosing the ch 2 sp in the st. Dc in the next st, sc in the next 2 sts. *Dc in the next 2 sts, sc in the next 2 sts. Repeat from * to end. Join with a sl st in the STDC. (48 sts including chs)
Row 1: (Begin Ribbed Brim - click here for the brim tutorial if you are unfamiliar with this style of ribbing. Note that we'll be working around the hat, vertically, in short rows.) Ch 5. Working in BLO, sc in the 2nd ch from hook and each ch, working back toward Round 13. Sc2tog in the next 2 Round 13 sts. This is the “securing st” that attaches the vertical brim rows to the horizontal setup row. Turn. (4 sts plus securing st)
Row 2: Skipping the securing st, sc in the BLO of each st. Turn. (4 sts)
Row 3: Ch 1, sc in the BLO of each st. Make securing stitch. Turn. (4 sts plus securing st)
Rows 4 - 48: Repeat Rows 2 - 3. Break yarn leaving long tail for sewing. Sew the brim together using the whip stitch, joining first and last rows. Be sure to work into the BLO of the last row to maintain the ribbed look.

Toddler Beanie
Round 1: With Main Color, make a magic circle, ch 2 (does not count as a stitch) and dc 12 times in the ring. Join to first dc with a sl st. (12 sts)
Round 2: CSDC, dc in the first st, 2dc in each remaining st around. Join to CSDC with a sl st. (24 sts)
Round 3: CSDC, dc in the first st, dc in the next st. *2 dc in the next st, dc in the next st. Repeat from * to end. Join to CSDC with a sl st. (36 sts)
Round 4: CSDC, dc in the first st, dc in the next 2 sts. *2 dc in the next st, dc in the next 2 sts. Repeat from * to end. Join to CSDC with a sl st. (48 sts)
Round 5: CSDC, dc in the next 4 sts, 2 dc in the next st. *Dc in the next 5 sts, 2 dc in the next st. Repeat from * to end. Break yarn and seamless join in the 2nd st of the round. (56 sts)
Round 6: (Begin Leaping Stripes and Blocks Pattern - click here for the tutorial if you are unfamiliar with the basic stitch pattern) With Next Color, STDC in any st of Round 5. Dc in the next st, ch 2, skip 2. *Dc in the next 2 sts, ch 2, skip 2. Repeat from * to end. Join with a sl st in the STDC. (56 sts including chs)
Round 7: Ch 4, skip 2, dc 2 in the skipped sts of Round 5, enclosing the ch 2 from Round 6. * Ch 2, skip 2, dc 2 in the skipped sts of Round 4 (enclosing the ch 2). Repeat from * to end, join with a sl st in the ch 4 sp. Break yarn and finish off. (56 sts including chs)
Round 8: With Next Color, STDC in any skipped st of Round 6, enclosing the ch 2 sp in the st. Dc in the next st, ch 2, skip 2. *Dc in the next 2 sts, ch 2, skip 2. Repeat from * to end. Join with a sl st in the STDC. (56 sts including chs)
Round 9: Ch 4, skip 2, dc 2 in the skipped sts of Round 7, enclosing the ch 2 from Round 8. * Ch 2, skip 2, dc 2 in the skipped sts of Round 7. Repeat from * to end, join with a sl st in the ch 4 sp. Break yarn and finish off. (56 sts including chs)
Rounds 10 - 15: Repeat Rounds 8-9 three times, switching colors as desired and working dc sts into the skipped sts from 2 rows previous.
Round 16: With Main Color, STDC in any skipped st of Round 15, enclosing the ch 2 sp in the st. Dc in the next st, sc in the next 2 sts. *Dc in the next 2 sts, sc in the next 2 sts. Repeat from * to end. Join with a sl st in the STDC. (54 sts including chs)
Row 1: (Begin Ribbed Brim - click here for the brim tutorial if you are unfamiliar with this style of ribbing. Note that we'll be working around the hat, vertically, in short rows.) Ch 6. Working in BLO, sc in the 2nd ch from hook and each ch, working back toward Round 16. Sc2tog in the next 2 Round 16 sts. This is the “securing st” that attaches the vertical brim rows to the horizontal setup row. Turn. (5 sts plus securing st)
Row 2: Skipping the securing st, sc in the BLO of each st. Turn. (5 sts)
Row 3: Ch 1, sc in the BLO of each st. Make securing stitch. Turn. (5 sts plus securing st)
Rows 4 - 56: Repeat Rows 2 - 3. Break yarn leaving long tail for sewing. Sew the brim together using the whip stitch, joining first and last rows. Be sure to work into the BLO of the last row to maintain the ribbed look.
Child Beanie
Round 1: With Main Color, make a magic circle, ch 2 (does not count as a stitch) and dc 12 times in the ring. Join to first dc with a sl st. (12 sts)
Round 2: CSDC, dc in the first st, 2dc in each remaining st around. Join to CSDC with a sl st. (24 sts)
Round 3: CSDC, dc in the first st, dc in the next st. *2 dc in the next st, dc in the next st. Repeat from * to end. Join to CSDC with a sl st. (36 sts)
Round 4: CSDC, dc in the first st, dc in the next 2 sts. *2 dc in the next st, dc in the next 2 sts. Repeat from * to end. Join to CSDC with a sl st. (48 sts)
Round 5: CSDC, dc in the first st, dc in the next 3 sts. *2 dc in the next st, dc in the next 3 sts. Repeat from * to end. Break yarn and seamless join in the 2nd st of the round. (60 sts)
Round 6: (Begin Leaping Stripes and Blocks Pattern - click here for the tutorial if you are unfamiliar with the basic stitch pattern) With Next Color, STDC in any st of Round 5. Dc in the next st, ch 2, skip 2. *Dc in the next 2 sts, ch 2, skip 2. Repeat from * to end. Join with a sl st in the STDC. (60 sts including chs)
Round 7: Ch 4, skip 2, dc 2 in the skipped sts of Round 5, enclosing the ch 2 from Round 6. * Ch 2, skip 2, dc 2 in the skipped sts of Round 5 (enclosing the ch 2). Repeat from * to end, join with a sl st in the ch 4 sp. Break yarn and finish off. (60 sts including chs)
Round 8: With Next Color, STDC in any skipped st of Round 6, enclosing the ch 2 sp in the st. Dc in the next st, ch 2, skip 2. *Dc in the next 2 sts, ch 2, skip 2. Repeat from * to end. Join with a sl st in the STDC. (60 sts including chs)
Round 9: Ch 4, skip 2, dc 2 in the skipped sts of Round 7, enclosing the ch 2 from Round 8. * Ch 2, skip 2, dc 2 in the skipped sts of Round 6. Repeat from * to end, join with a sl st in the ch 4 sp. Break yarn and finish off. (60 sts including chs)
Rounds 10 - 15: Repeat Rounds 8-9 three times, switching colors as desired and working dc sts into the skipped sts from 2 rows previous.
Round 16: With Main Color, STDC in any skipped st of Round 15, enclosing the ch 2 sp in the st. Dc in the next st, sc in the next 2 sts. *Dc in the next 2 sts, sc in the next 2 sts. Repeat from * to end. Join with a sl st in the STDC. (60 sts including chs)
Row 1: (Begin Ribbed Brim - click here for the brim tutorial if you are unfamiliar with this style of ribbing. Note that we'll be working around the hat, vertically, in short rows.) Ch 6. Working in BLO, sc in the 2nd ch from hook and each ch, working back toward Round 16. Sc2tog in the next 2 Round 16 sts. This is the “securing st” that attaches the vertical brim rows to the horizontal setup row. Turn. (5 sts plus securing st)
Row 2: Skipping the securing st, sc in the BLO of each st. Turn. (5 sts)
Row 3: Ch 1, sc in the BLO of each st. Make securing stitch. Turn. (5 sts plus securing st)
Rows 4 - 60: Repeat Rows 2 - 3. Break yarn leaving long tail for sewing. Sew the brim together using the whip stitch, joining first and last rows. Be sure to work into the BLO of the last row to maintain the ribbed look.
Teen/Small Adult Beanie
Round 1: With Main Color, make a magic circle, ch 2 (does not count as a stitch) and dc 12 times in the ring. Join to first dc with a sl st. (12 sts)
Round 2: CSDC, dc in the first st, 2dc in each remaining st around. Join to CSDC with a sl st. (24 sts)
Round 3: CSDC, dc in the first st, dc in the next st. *2 dc in the next st, dc in the next st. Repeat from * to end. Join to CSDC with a sl st. (36 sts)
Round 4: CSDC, dc in the first st, dc in the next 2 sts. *2 dc in the next st, dc in the next 2 sts. Repeat from * to end. Join to CSDC with a sl st. (48 sts)
Round 5: CSDC, dc in the first st, dc in the next 3 sts. *2 dc in the next st, dc in the next 3 sts. Repeat from * to end. Join to CSDC with a sl st. (60 sts)
Round 6: CSDC, dc in the first st, dc in the next 14 sts. *2 dc in the next st, dc in the next 14 sts. Repeat from * to end. Break yarn and seamless join in the 2nd st of the round. (64 sts)
Round 7: (Begin Leaping Stripes and Blocks Pattern - click here for the tutorial if you are unfamiliar with the basic stitch pattern) With Next Color, STDC in any st of Round 6. Dc in the next st, ch 2, skip 2. *Dc in the next 2 sts, ch 2, skip 2. Repeat from * to end. Join with a sl st in the STDC. (64 sts including chs)
Round 8: Ch 4, skip 2, dc 2 in the skipped sts of Round 6, enclosing the ch 2 from Round 7. * Ch 2, skip 2, dc 2 in the skipped sts of Round 6 (enclosing the ch 2). Repeat from * to end, join with a sl st in the ch 4 sp. Break yarn and finish off. (64 sts including chs)
Round 9: With Next Color, STDC in any skipped st of Round 7, enclosing the ch 2 sp in the st. Dc in the next st, ch 2, skip 2. *Dc in the next 2 sts, ch 2, skip 2. Repeat from * to end. Join with a sl st in the STDC. (64 sts including chs)
Round 10: Ch 4, skip 2, dc 2 in the skipped sts of Round 6, enclosing the ch 2 from Round 5. * Ch 2, skip 2, dc 2 in the skipped sts of Round 6. Repeat from * to end, join with a sl st in the ch 4 sp. Break yarn and finish off. (64 sts including chs)
Rounds 11 - 18: Repeat Rounds 9-10 four times, switching colors as desired and working dc sts into the skipped sts from 2 rows previous.
Round 19: With Main Color, STDC in any skipped st of Round 18, enclosing the ch 2 sp in the st. Dc in the next st, sc in the next 2 sts. *Dc in the next 2 sts, sc in the next 2 sts. Repeat from * to end. Join with a sl st in the STDC. (64 sts including chs)
Row 1: (Begin Ribbed Brim - click here for the brim tutorial if you are unfamiliar with this style of ribbing. Note that we'll be working around the hat, vertically, in short rows.) Ch 7. Working in BLO, sc in the 2nd ch from hook and each ch, working back toward Round 19. Sc2tog in the next 2 Round 19 sts. This is the “securing st” that attaches the vertical brim rows to the horizontal setup row. Turn. (6 sts plus securing st)
Row 2: Skipping the securing st, sc in the BLO of each st. Turn. (6 sts)
Row 3: Ch 1, sc in the BLO of each st. Make securing stitch. Turn. (6 sts plus securing st)
Rows 4 - 64: Repeat Rows 2 - 3. Break yarn leaving long tail for sewing. Sew the brim together using the whip stitch, joining first and last rows. Be sure to work into the BLO of the last row to maintain the ribbed look.
Large Adult Beanie
Round 1: With Main Color, make a magic circle, ch 2 (does not count as a stitch) and dc 12 times in the ring. Join to first dc with a sl st. (12 sts)
Round 2: CSDC, dc in the first st, 2dc in each remaining st around. Join to CSDC with a sl st. (24 sts)
Round 3: CSDC, dc in the first st, dc in the next st. *2 dc in the next st, dc in the next st. Repeat from * to end. Join to CSDC with a sl st. (36 sts)
Round 4: CSDC, dc in the first st, dc in the next 2 sts. *2 dc in the next st, dc in the next 2 sts. Repeat from * to end. Join to CSDC with a sl st. (48 sts)
Round 5: CSDC, dc in the first st, dc in the next 3 sts. *2 dc in the next st, dc in the next 3 sts. Repeat from * to end. Join to CSDC with a sl st. (60 sts)
Round 6: CSDC, dc in next 4 sts, 2 dc in the next st, dc in the next 4 sts, 2 dc in the next st, dc in the next 4 sts. *Dc in the next 5 sts, 2 dc in the next st, dc in the next 4 sts, 2 dc in the next st, dc in the next 4 sts. Repeat from * to end. Break yarn and seamless join in the 2nd st of the round. (68 sts)
Round 7: (Begin Leaping Stripes and Blocks Pattern - click here for the tutorial if you are unfamiliar with the basic stitch pattern) With Next Color, STDC in any st of Round 6. Dc in the next st, ch 2, skip 2. *Dc in the next 2 sts, ch 2, skip 2. Repeat from * to end. Join with a sl st in the STDC. (68 sts including chs)
Round 8: Ch 4, skip 2, dc 2 in the skipped sts of Round 6, enclosing the ch 2 from Round 7. * Ch 2, skip 2, dc 2 in the skipped sts of Round 4 (enclosing the ch 2). Repeat from * to end, join with a sl st in the ch 4 sp. Break yarn and finish off. (68 sts including chs)
Round 9: With Next Color, STDC in any skipped st of Round 7, enclosing the ch 2 sp in the st. Dc in the next st, ch 2, skip 2. *Dc in the next 2 sts, ch 2, skip 2. Repeat from * to end. Join with a sl st in the STDC. (68 sts including chs)
Round 10: Ch 4, skip 2, dc 2 in the skipped sts of Round 6, enclosing the ch 2 from Round 5. * Ch 2, skip 2, dc 2 in the skipped sts of Round 6. Repeat from * to end, join with a sl st in the ch 4 sp. Break yarn and finish off. (68 sts including chs)
Rounds 11 - 18: Repeat Rounds 9-10 four times, switching colors as desired and working dc sts into the skipped sts from 2 rows previous.
Round 19: With Main Color, STDC in any skipped st of Round 18, enclosing the ch 2 sp in the st. Dc in the next st, sc in the next 2 sts. *Dc in the next 2 sts, sc in the next 2 sts. Repeat from * to end. Join with a sl st in the STDC. (68 sts including chs)
Row 1: (Begin Ribbed Brim - click here for the brim tutorial if you are unfamiliar with this style of ribbing. Note that we'll be working around the hat, vertically, in short rows.) Ch 7. Working in BLO, sc in the 2nd ch from hook and each ch, working back toward Round 19. Sc2tog in the next 2 Round 19 sts. This is the “securing st” that attaches the vertical brim rows to the horizontal setup row. Turn. (6 sts plus securing st)
Row 2: Skipping the securing st, sc in the BLO of each st. Turn. (6 sts)
Row 3: Ch 1, sc in the BLO of each st. Make securing stitch. Turn. (6 sts plus securing st)
Rows 4 - 68: Repeat Rows 2 - 3. Break yarn leaving long tail for sewing. Sew the brim together using the whip stitch, joining first and last rows. Be sure to work into the BLO of the last row to maintain the ribbed look.
And that's it! With 5 sizes of the Leaping Stripes and Blocks Beanie you can make hats for the whole family. And the stripey stitch pattern makes it a fantastic stashbuster too! Add a pom pom or earflaps to personalize it even more. I can't wait to see what you do with it!
Written pattern copyright Tamara Kelly 2013 – share this pattern via links only please! Seller’s policy is detailed on the About page. Get Moogly on your favorite social media sites: Facebook, Twitter, Pinterest and sign up for the Newsletter so you don’t miss a thing!


Vicki says
How cool is this!!!!!!
Thank you.
Gigi Lee says
Great hat pattern! I'm definitely adding this to my wishlist. Also, would you be interested in doing a roundup of Christmas angels that could be used as tree-toppers? Thanks for your consideration.
Tamara Kelly says
I'll see what I can find! Thank you for the idea!
Diane says
Super cute pattern, Tamara. Can't wait to start playing with it. Thank you for making such amazing patterns!! I really appreciate it. I love to do charity crocheting and it really helps to get such fab patterns free. Thank you so much!!
Teressa says
These will be great for Christmas presents!! Thank you so much!!!
Kathryn says
Are the dimensions shown (i.e., 14" - 16") the circumference at the edge of the brim? Thanks!
Tamara Kelly says
They're the size head they should fit - so at the bottom of the brim it's at the bottom of the range, and then they'll stretch a bit. 🙂
Penny says
Adorable! And just in time for Christmas! I love it. Thank you!
Melinda says
I tried to print the leaping stripes and blocks beanie pattern but the Print Friendly button will not let me print. Is there a problem with this pattern/print button or am I not doing something right? All other patterns from you have printed just fine. Would Love to start these ASAP! Thanks. 🙂
Tamara Kelly says
It's an external plug-in and sometimes it seems to hiccup, I have no idea why. I had one other person say it wouldn't work today but when they tried again a bit later it worked fine. I think maybe if a lot of people are using it, it can get overloaded? I'm sorry you had trouble!
Melinda says
Today the print button is working! 🙂 So excited to get started on these hats. Thanks for all the GREAT patterns and tips!
Tamara Kelly says
Hooray! Sorry about that, again, wish I could do something about it but it's all external really.
Melanie says
I love your patterns! I also love that fact you live in Iowa. I'm in Cedar Rapids.
Tamara Kelly says
😀 Hello over there! And thank you!
Janet Weidner says
LOVE this pattern!! Can't wait to make it up for my son & grandson!!! THANK YOU so much for sharing!!!!
Saw someone else suggest Angel round-up----how about gingerbread?? Bet there's a bunch!!! =)
Tamara Kelly says
😀 Thanks Janet! And great idea!
Marilou Razon says
You are really great Tamara. I'm you avid follower and so amazed with your very cute, unique and beautiful creations. How I wish I could be like you endowed with such golden hands. Keep going and God bless.
Tamara Kelly says
Thank you so much Marilou!
Ice Pandora says
I love making beanies in the winter, this is a great
pattern! Thanks c: Xx
Angela says
Hi Tamara! Another lovely pattern of yours that I couldn't wait to start! 🙂 I finished an adult size (just need to find my tapestry needle so I can start sewing), and I just saw one concern in the pattern. A minor thing and it may just be me misinterpreting, but in the large adult size you say this:
"Round 8: Ch 4, skip 2, dc 2 in the skipped sts of Round 4, enclosing the ch 2 from Round 5. * Ch 2, skip 2, dc 2 in the skipped sts of Round 4 (enclosing the ch 2). Repeat from * to end, join with a sl st in the ch 4 sp. Break yarn and finish off. (68 sts including chs)"
but I think where it says "round 4" you may mean "round 6", and where you say "round 5" I think it's "round 7"? either way, it's a great pattern and I can't wait to finish it up! 🙂 Thanks again!
Tamara Kelly says
Yes, sorry about that, durn typos! Thanks for letting me know, I'll get them fixed.
Lynnette says
I love your tutorials. I hope you can help me. I'm on round 7 and confused how to get started with the STDC on round 4. It seems very akward.
thank you
Lynnette says
I got it! Fun pattern.
Phyllis says
I am visualizing making these in my grandkids school colors....for Christmas of course....and I too crochet for charity so I'm sure a few will be made for that as well. Many thanks!
Nicole says
I love these hats! It's one of the only crochet beanies that scream "boy." I was trying to find something to make for my nephews, and this will definitely be it! Thanks for the great pattern!
--Nicole, http://www.livialovia.com
cathy urbanski says
This is sch a great pattern! I've been making one every day since I found it. Completely depleted all the yarn I could find. Freaking out trying to remember where the rest of my stash is hiding! LOL! Thanks so much for sharing!
Tamara Kelly says
😀 Thanks so much Cathy! SO glad you like it!
Makiko says
Thank you for sharing those cute beanies! I just made one and learned some great techniques from your video too.
aardvark says
There must be some wonderful creativity genes in Iowa stock. Hubby is from outside CR . His whole side of the family contributed those genes to our family. Meanwhile, I plod along and follow directions! Thanks SO much for the designs and inspiration!
Tamara Kelly says
😀 You're very welcome aardvark! I'm not a native Iowan but I have enjoyed making it my home!
Tara says
Hi, Tamara! I love, love, LOVE your patterns and really appreciate that they are free! This hat is adorable and I'm making a toddler-sized one right now. I just wanted to double check, what I think is a typo.
Round 5: CSDC, dc in the next 5 sts, 2 dc in the next st. *Dc in the next 5 sts, 2 dc in the next st. Repeat from * to end. Break yarn and seamless join in the 2nd st of the round. (56 sts)
I THINK it should read:
Round 5: CSDC, dc in the next 4 sts, 2 dc in the next st. *Dc in the next 5 sts, 2 dc in the next st. Repeat from * to end. Break yarn and seamless join in the 2nd st of the round. (56 sts)
I keep getting 55 stitches when I follow the directions above. Did I read it wrong? Thanks!
Tamara Kelly says
Right you are, sorry, that 5 should be a 4! Thanks for the heads up Tara!
Ana says
Love it! Do easy to follow and your tutorials are great! I live in DSM, Iowa!! No native but is where i found love and now is my home.
Tamara Kelly says
😀 Thank you Ana! And hello to you too!
Traci says
Thanks SO much for posting this pattern and tutorial..... and for free!! I'm almost finished with my first hat.... LOVE IT! And I just love this stitch! I want to make a baby blanket for a friend that's due to deliver in January. For the hat, I've cut my yarn with each color change (3 colors), but for the blanket, I think I'd like to "float" the yarn like you did in the tutorial. I'll admit that I didn't watch the entire tutorial....I was too excited to get started! I'm hoping the rest of the tutorial shows how to do it. Again, thanks so much!!
Traci says
Oh, and one more thing. For the finish, am I ending after a 'row 2' or after a 'row 3' (after making the last securing stitch)? Thanks in advance!
Tamara Kelly says
You'll make 2-4 rows with each stripe color, so in blanket terms I guess that would be a row 2. Then you work a "fill in" row like at the very end of the blanket, before starting on the brim. 🙂
Traci says
I wasn't clear with my question.... sorry. With the brim, do I end after a "row 2" or after a "row 3"? Basically, do I end after making the last securing stitch, and then sew towards the outside of the brim, or do I end at the outside of the brim, and sew towards the hat body. I hope I'm not confusing you! LOL
Tamara Kelly says
Ah I see now! End at the outside and sew towards the hat body. That should give you an even # of rows. 🙂
Tamara Kelly says
😀 Thank you Traci! Floating it along side is just a matter of tension. You'll want to sort of tug on the first st when you make a new row with a previously used yarn to make sure that it's not too loose and not too tight. 🙂
Kim says
Hi, I love this pattern. Wonder if you can tell me what I am doing wrong. I am doing the child size but it comes out to small for my 6yr old granddaughter. My first 4 rows only measure a little over 4". I've checked and redone it several times and it comes out the same each time. I am using a "J" hook would the "K" be too big??
thank you.
Tamara Kelly says
It sounds like you just crochet a lot more tightly than I do - not that that's wrong, we're just different people! Going up to a K hook would be a great solution - I don't think it would be too big at all.
Alicia says
This was great! I made it in really girly colors as a donation to a little girl our office "adopted" for Christmas, and added a pompom on top- it is too cute!
Tamara Kelly says
😀 Thank you Alicia! So glad you liked it!
Monika says
Hey Tamara! I really like your pattern but somehow I have issues with it (it seems beanies are not my type of thing when it comes to crocheting XD XD XD I always seem to have problems with them X_X).
I was just wondering if you (or somebody who is just in the making of the hat?) could post some pictures concerning the last stitches of row 8 and the 4 ch - is it ok if it looks as if there were 3 dc? O.o otherwise the total stitchcount would be wrong...? I'm confused... XD (and I feel pretty dumb because noone else seems to have this kind of problem which totally speaks for my lack of competence as a crocheter :D).
ANYWAY: Your patterns and videos rock and helped me a lot 🙂
Tamara Kelly says
When you sl st into that ch 4 it will definitely look as if you have 3 dc there. You just ignore it in the next round. I think you're doing fine! 😀
kirstie says
Phew! so glad i read the comments as i was just about to search for the ssame question. I am very much a noob and thought i must be doing it wrong.
If the hat is a little oversized (i'm using slightly bulkier yarn) then do you think it would be ok to loose a stitch on the previous round so that i can do one uk treble at the end then join it to the ch4 so that it looks like 2 instead of looking like 3?
Tamara Kelly says
I think it would be fine. 🙂
Stacey says
I am making this hat and had the same confusion. I'm glad you asked your question, as there is no such thing as a "dumb question! " 🙂 And thank you Tamara for answering! 😉 I'm really enjoying making this hat.
Tamara Kelly says
😀 I'm so glad you're enjoying it Stacey!
Jenn says
What a beautiful pattern! I have a ton of nieces and nephews that will have warm little noggins this Christmas all sportiyour design♥ THANK YOU for sharing your talent with us all.
Liz says
Love this pattern. I started a baby blanket-didn't have enough yarn so I changed it to a scarf and it looks great!! Kind of like a cowl. I am making the beanie to match. I too, didn't get the Ch 4 but it looks OK. I especially want to THANK YOU for the other 'tricks' to replace the dreaded Ch3!! I've hated the way it looks. This is SO much better. 🙂
Tamara Kelly says
😀 Thank you! That ch 4 is just the best way I could find to work this pattern in the round. I don't think it's so noticeable in the finished hat.
Carmen says
I've just learned to do the CSDC, I'm only on row two of the baby Beanie my question is
Is the CSDC considered to be the.first DC in the count
Tamara Kelly says
Hi Carmen! Yes, the CSDC counts as the first dc of the round/row. 🙂
Anita says
Hello, I made the large adult and found it to be way too big, my question is when you say after CSDC do you do your same 1st stitch into the same space as the CSDC? Had to undo the first beanie! Thanks for the pattern it really is a cool one for a guy!! Thanks for any help you can give me! Anita
Tamara Kelly says
The CSDC counts as the first stitch, so the next stitch goes in the next stitch. Sorry you had trouble with the size! Did you get gauge and the correct stitch counts?
Anita says
For some reason my counts are off, I'm guessing I didn't count the CSDC as the first stitch and the crochet hook i'm using is a 5 and not a 6. The 6 seemed too large.
Kim says
I cannot figure out wear to slip stitch on row eight. Do I slip stitch into the SPACE of the chain four Or do I need to slip stitch into the 3rd chain of the 4 chain? I need additional instructions.
Tamara Kelly says
Hi Kim! The instructions read, "join with a sl st in the ch 4 sp" - this means to crochet into the chain space - under the whole set of chains. Not into the 3rd ch. Hope that helps! 🙂
Kim says
Thank you very much for the quick reply!! AND THANKS FOR THE FREE PATTERN!!!
Patricia Seaton says
Thank you for the pattern and the great ribbing tutorial, Tamara. This is the first time I've made a crocheted ribbing for a hat and I'm really pleased that I've learned this. I made your pattern in the child size for the Chemo Cap CAL. Thanks again!
Marketa says
Hello,
just wondered is the printer friendly version meant to add all the comments?
I have started printing and realized that all the comments have printed as well and before I managed to stop the print I have already printed 30 pages...
thank you
PS love all your work it is aswesome what you can do xxx
Tamara Kelly says
Hi Marketa!
The Print Friendly should remove all the ads and the comments. Did it not work for you? Thank you!
Kaaren says
Tamera,
On the pattern for the Toddler Beanie, it indicates on round 8 to STDC in any missed stitch of round 5...should it read Round 6 instead of 5?
Just asking because I don't have any skipped stitches on round 5, since I enclosed them on Round 7.
Thanks,
Kaaren
Tamara Kelly says
Hi Kaaren! Yes, that's a typo, I'll fix it. Thanks!
Wanda says
Looking forward to trying this stitch and pattern. Want to try and make a scarf or cowl from the blanket pattern. Would love to have this stitch in a fingerless mitten pattern. Thank you so very much for all the patterns.
Tamara Kelly says
Thank you Wanda!
Roberta Litchfield says
I love the look of this hat and have made several. The pattern is so easy to follow. I was getting gaps in the row where the ribbing started so i changed to sc front post, back post to make it look ribbed. Thank you for sharing.
Dusti says
Love this pattern! Thank you!
Tamara Kelly says
Thank you Dusti!
Rayna says
I am doing the child size hat, in the rows that say chain 4 and end with slip stitch in chain 4 I am ending up with 62 stitches and not the 60, can you tell me what I am doing wrong? Do I not do the last stitches leaping down? Love the pattern its fun to do bvut this part has wracked my brain, Thank you
Tamara Kelly says
Hi Rayna! In the rounds beginning with ch 4, you do finish with 2 dc right before you sl st into the ch. But that ch 4 only counts as 2 sts for the st count. Maybe that's the confusion?
Rayna says
Thank you!! yes that was the confusion, works perfect now!!
Tamara Kelly says
Ah good! Love when I can guess right! 😀
Jera says
I am having the worst time with joining the rounds with the leaping stripes and blocks pattern. Could I get some more detail on it? I am really having a great time learning! Thank you in advance!
Tamara Kelly says
What part Jera? Is it the joining to the ch4 space? The first two chs of the ch-4 don't count at all - they are "ghosts" used to anchor the other stitches, but not counted or used otherwise. Does that help?
alyssa says
I'm working on the child size hat. I'm finishing row 7 and I slip stitch. However I'm ending up with 62 stitches. I've already undone it once and did it again. If I take away the two stitches I don't fill in the last space. But if I try to fill in the last space not only do I have 2 extra stitches I have two DC slip stitched right against the ch 4. I have pictures if you want to see what I'm asking about. I can email them. Thanks!
Alyssa says
I'm also having trouble with joining to the ch 4 space. I know it only counts as 2 st but I still have 62. And when I join my 2 DC to the ch 4 I have 3 st side by side....is that not wrong? I'm on the child size finishing round 7.
Tamara Kelly says
Having it look like there are 3 sts is correct. You have to have a multiple of 4 for the pattern to work, so I'm not sure how you're getting 62.
Alka says
Just made about 5 hats using this pattern! Super fun pattern, and great video tutorial. Blogged about it here
http://the5cees.blogspot.com/
Thanks for this great free pattern, love your work 🙂
Tamara Kelly says
😀 Awesome! Thank you Alka!
Michelle says
Row 7 is missing in the instructions for the large adult size.
Tamara Kelly says
I can see it there... if you're on mobile, you might want to check on a computer, I've heard one other time that one or two lines of text can get dropped from mobile, I don't know why!
Michelle says
There seem to be a few errors in the instructions for the large adult size.
Priscilla says
Just came across this (from Pinterest) and have started...however, in the leaping stripes and blocks tutorial, you mention this pattern is for multiples of 4, plus 2. I am making the child's beanie, and have 60 stitches at the end of round 5...not a multiple of 4, plus 2. By the end of round 6, I seem to have more than 60 stitches! Help! 🙂
Tamara Kelly says
When working it flat, it's a multiple of 4 +2. In the round, it's just a multiple of 4 - you don't need sts at the ends to "anchor" it. 🙂
As for too many stitches, be sure to skip 2 when you chain 2 🙂
PriScilla says
Thank you!!! This is such a neat pattern...I'm determined to get it!
Lori says
Wonderful patterns. This one is baffling me for the hat pattern. I do have the leaping stripes & blocks down, no problem. I watched the video's and I just don't get the last row of 6 and the starting of row 7! That transition is stumping me. 🙁 LOL Is there more help available? Any help with be muchly appreciated. Thank You.
Tamara Kelly says
Hi Lori! At the beginning of Round 6, you ch 4. The first 2 chs don't actually count as anything, they are ignored in the next row - but the last 2 chs create the ch-2 sp that get worked over in Round 7. So to start Round 7, you dc right over the ch-2 in Round 6, into Round 5. Does that help?
sharon says
i am unable to download your free pattern ithe printer friendly button don,t work
Tamara Kelly says
Hi Sharon! I'm sorry you're having trouble, if you go to PrintFriendly.com and put the URL for the pattern in, you should be able to get a copy there.
Michelle says
I have a question about the magic circle.... How do you determine the number of dc to crochet into the circle? It seems that no matter the size, you use 12 and that seems to create a flat circle. I have seen patterns by other people that use 10 dc into the circle. When I started that pattern, 10 didn't seem to get me around the circle and it was pulling.
lisa chapman says
Hi Tamara, I am having trouble between Round 8 and Round 9. I do not understand how the chain 4 at the beginning of round 8 ties in with round 9. At the end of round 8 when counting stitches are the 4 chains from the beginning part of the final 64 stitches? I was looking for a video or photo tutorial for a visual on this but could not find one for the hat! Any help you could give me would be appreciated. I am trying to make this hat for a cancer group I volunteer for. The steps I am referring to are below:
Round 7: (Begin Leaping Stripes and Blocks Pattern – click here for the tutorial if you are unfamiliar with the basic stitch pattern) With Next Color, STDC in any st of Round 6. Dc in the next st, ch 2, skip 2. *Dc in the next 2 sts, ch 2, skip 2. Repeat from * to end. Join with a sl st in the STDC. (64 sts including chs)
Round 8: Ch 4, skip 2, dc 2 in the skipped sts of Round 6, enclosing the ch 2 from Round 7. * Ch 2, skip 2, dc 2 in the skipped sts of Round 6 (enclosing the ch 2). Repeat from * to end, join with a sl st in the ch 4 sp. Break yarn and finish off. (64 sts including chs)
Round 9: With Next Color, STDC in any skipped st of Round 7, enclosing the ch 2 sp in the st. Dc in the next st, ch 2, skip 2. *Dc in the next 2 sts, ch 2, skip 2. Repeat from * to end. Join with a sl st in the STDC. (64 sts including chains)
Much thanks!
Lisa
Tamara Kelly says
Hi Lisa! The first 2 chs of the ch 4 are like a ch 2 at the beginning of a row - they don't count as a stitch. The second 2 chs of the ch 4 get crocheted over in the next round, like the ch 2s between the sets of dc sts. Does that help?
Amy says
So then, we should slip stitch into the second chain of the chain 4? I just made this doing slip stick in top of chain four, and so in some places I have three log stitches. Thanks!
Tamara Kelly says
You can just sl st into the ch-4 sp. 🙂
Amy says
Ahhh, yes, exactly as you wrote it and clarified in another comment. Thanks so much.
I so appreciated learning the standing double crochet and the chainless double crochet and the seamless join method. Great techniques!
Thanks again!
KHadijah says
hello, i am stuck on round 6 for the adult hat. should i count csdc as the 68 sticth or did i miss a stitch?
Tamara Kelly says
The CSDC does count as a stitch! Does that help?
Colorful Canary says
Thank you for the beautiful pattern, I featured it on my blog 🙂 http://www.colorfulcanary.com/2016/01/14-fashionable-crochet-hat-patterns-for.html
Tamara Kelly says
Thank you so much! 😀
Shirley says
Hi Tamara,
Is there any way to make this preemie size to go along with the smaller size blanket? Thanks. Shirley
Tamara Kelly says
Hi Shirley! Depending on the size of the preemie, I would use the directions for the baby size, make Rnds 1 -2 (skip rounds 3 and 4 or just 4 if it's a larger preemie), make rounds 5-8 (or 5-10), and then skip to Rnd 13, and make that and the brim. I hope that helps!
Shirley says
Oh and can you float the colors like on the blanket instead of FO and joining the new color?
Tamara Kelly says
Yes, just be sure to do so on the inside of the blanket! 🙂
vidya says
thank you for giving number of stitches after every round because i find it very confusing to count of stiches
Tamara Kelly says
I always try to provide as much info as possible. 🙂 Thank you Vidya!
Janet.Rohrer says
I love the stripes and blocks pattern. I have the materials for an adult hat, and would like matching fingerless mitts. Do you have directions for making them or do you plan to post a pattern for them.. Thanks for your lovely designs.
Tamara Kelly says
I don't have a pattern for them - yet! 😉
prabha says
I used the leaping stripes pattern to make a clutch purse . here's the link to the photo - https://www.facebook.com/CForCrochet/photos/a.243292599124902.55470.243287825792046/894241247363364/?type=3&theater
Tamara Kelly says
Very cool, thank you! 🙂
CONNI says
The pictures show you don't start with the new color and the Leaping Stripes until Row 6 but in the pattern you say start it at Row 5.
Tamara Kelly says
It depends on what size you are making. The modeled hat is the toddler size, the leaping stripes start at Row 5 for the newborn size. 🙂
Jen says
I made the toddler size, it was too small. So I followed the pattern for child size. I ended up with the same size again. It's the same pattern at the toddler one, right? Shouldnt there be some increases somewhere to make it bigger? Or more than 12DC's in the magic ring?
Tamara Kelly says
I'm sorry to hear you had trouble! The toddler size increases through Round 5, to 56 sts. The child size increases through Round 5 to 60 sts, so it is 4 sts larger. The ribbing is also longer on the child size to add length.
April says
The "print friendly" version printed out with ads covering some of the directions. Not very print friendly if you ask me.
Tamara Kelly says
It's an outside plugin, so it doesn't always work perfectly, but you can click on anything you don't want to print before sending it to the printer to take it off the printed copy.
Joanne Crook says
I have made the child size hat and made a few extra rows for a slouch style as requested,but what I would like to know how do I go about making a matching scarf?
Thanks for the pattern.
Tamara Kelly says
Hi Joanne! Here's the matching scarf pattern: https://www.mooglyblog.com/stripes-and-blocks-scarf/
Joanne Crook says
Thank you very much,since my last post I have now almost finished what for my husband. Thanks again
Margareth says
Hey Tamara! I'm loving the look of this pattern, but I'm struggling a bit to achieve the right gauge. I was wondering what the repetition is, so that I could adjust my yarn. I just can't seem to do the math today <.<
Thank you for the beautiful patterns you provide us <3
Tamara Kelly says
Hi Margareth! It would a rep of 4! 🙂
Jamie Henderson says
I adore making these hats! The pattern is so easy to follow and works up so quickly. I've made six already in the different sizes and with various colors, some with Poms and some without. They're all super cute. I'm working on a scarf version from the Messenger Bag pattern to give as a set for Christmas. Thanks for sharing this wonderful pattern. Whenever anyone has a crochet question I always refer them to your blog and videos because they are so clear and concise. Keep up the good work! Jamie
Tamara Kelly says
Thank you so very much, Jamie! ♥ There's also a scarf pattern here if you need it: https://www.mooglyblog.com/stripes-and-blocks-scarf/
Hannah says
I am stuck trying to finish round 6, I have 68 stitches but have two remaining stitches, I have even written it down on paper and its leaving me with 2 empty stitches on paper as well to make sure I have 68, in the instructions for round 6 it says to seamlessly finish it in the 2nd st, so would that be the last stitch that is empty. Or do I skip over those two and finish it in the 2nd stitch of round 6? I have also reworked it 3 times and all my other rounds have the right amount of total stitches
Tamara Kelly says
Hi Hannah! It sounds like you're making the largest size. Rnd 6 repeats the same series of 17 sts four times, for a total of 68. The series is, [dc 5, 2 dc, dc 4, 2 dc, dc 4]. You shouldn't have any skipped stitches, and the join is to maintain stitch count without a slip stitch.