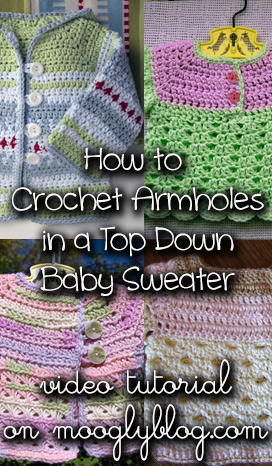
There are several baby sweater patterns here on Moogly that start with a top down yoke, with increases in the four corners that are later joined to create the armholes.
It's a simple technique, but the first time you make a sweater like this it can be a bit of a mystery! I've had a couple of requests for help understanding how these armholes are made, so I'm happy to have been able to make this video!
So if you'd like to make the Mini Moogly Sweater, Baby in Bloom Sweater, Summer Breeze Baby Sweater, or the Sven Sweater, but need a little help getting started, this video tutorial is for you! In fact, you might find yourself designing your own...
How to Crochet Armholes in a Top Down Baby Sweater
As you can see, the first few rows of stitches are made in a sort of rectangle, with increases in the four corners. It's very important to use stitch markers to keep these lined up! These markers also tell us where the "armpits" will go. When it's time to make the armholes, you crochet to the first marked stitch, make a specified number of chains, and start crocheting again in the second marked stitch - skipping all the stitches in between. Then you crochet all the way over to the third marker, make the same number of chains, and start crocheting again in the fourth marker. Crochet to the end of the row, and you'll have made two armholes!
It doesn't matter what stitch, how many rows, or how many chains the pattern calls for, the technique is the same. It turns a flat rectangle into the top of a sweater, with the chains in the armpits and the short sides of the rectangle becoming the tops of the shoulders. Even though I've done it over a dozen times, it still feels a little bit like magic when it happens! Anything more than the simplest origami has always been a mystery to me, so if I can do this, you can too! I hope this helps you "see" how a top down sweater in this style gets started. There are lots of different ways to start a sweater, but this one is definitely my favorite! Thanks again for watching!
Be sure to check out and like the moogly Facebook page to get the latest updates, links, and sneak peeks. Moogly is also on Pinterest, Twitter, Tumblr, and Google+ – come join the fun! You can contact me via the Facebook page or at TamaraKelly@mooglystore.com.


Eleanor
This was the first time I've watched one of your videos, and Wow! Not only does it make yoke patterns crystal clear - just the concept that you start with a rectangle is hard to pick up from reading a pattern - but it's eye opening watching your technique with the hook, certainly explains why I'm so slow, must have a go at adjusting how I hold yarn and hook...
moogly
I'm glad you like it Eleanor! 😀 As for how to hold the hook, there's no right or wrong way to do it, this is just what came naturally to me. Everyone does it little bit differently I think!
miriam miranda
muy bonito....gracias por enseñarme..me gusta el crochet...y puntos nuevos.
Tricia
Thank you so much for this video! It made it all very clear. I have been wanting to start making garments, but was afraid of the arm holes. I'm really looking to make something for myself, but I think I will do one of your baby sweaters first to get the technique down and then tackle my "real" project. I'm sure there are plenty of places where I can donate a baby sweater if it comes out good enough.
Tamara Kelly
Thank you so much Tricia! I agree, baby sweaters are much less intimidating - and easier to shape!
june hart
Hi
Loved the video on how to crochet the armholes.... |After I try the wee sweater, I would like
to crochet a pullover in xl (my size)
Do you have any pullover sweater patterns with this same technique that I could purchase?
Hope to hear from you soon.... and thanks.
June
Tamara Kelly
Hi June! I don't have any adult size sweaters using that technique, but the Leaping Baby Hoodie is a vneck pullover and uses this armhole technique: https://www.mooglyblog.com/leaping-crochet-baby-hoodie/ It's only a couple sizes now, but I hope to add more eventually. 🙂
Linda Kane
TAMARA I'm about to start this gorgeous eloise sweater. I've watched both videos MANY times and wish there was a video explaining more completely about the whole top/ where it joins to the skirt. Perhaps it'll come to me as I progress. Can you give me a ball park figure as to how many chains to start my rectangle with for a 6 month size and how many stitches I might end with when I'm finished with the top and lastly how many rows of double crochet I'd need before I'm ready to join top and bottom. Give or take!!! I'm really too old for this (75)...........but I'll give it a whirl for a great grandchild someday, HOPEFULLY ! THANK YOU
Tamara Kelly
Hi Linda! The top is crocheted right onto the bottom - no chains or rectangles of any of that with the Eloise. 🙂
Linda Kane
PREVIOUS (E-mail March 1, 15).. 8 Are there directions (PATTERN) for the first 3 rows of RECTANGLE as in how many chains (stitches) do I start with and how many D.C. would I have at the end of the third row (6 month size), in top down yoke AND does this final number coincide with the number of stitches I end up with on the skirt when It's completed? I'm doing each one separately. Obviously the yoke has me baffled, but then it doesn't take much!!!!!!
Tamara Kelly
Linda I responded to your email. This pattern isn't written with the yoke separate, that would be a different design.
Christy
I love your patterns, and read your newsletters avidly when they come in. I am left handed and have no problem. I am working on the Baby in Bloom sweater for 12 month. I am at the chain 3 to create the armpit and understand the concept, but wonder if for a size 12 month the chain 3 is the same, or should be increased? I agree the neck measurement doesn't change as they grow, but does the armpit? Thank you! Christy
Tamara Kelly
Hi Christy!
The armpit does grow, but the additional rows in the yoke can make up the difference until you start getting into even bigger sizes. 🙂
Millie Garcia
Hi Tamara & the Moogly staff. my name is Millie Garcia and here I am trying to crochet this lovely sweater. First and foremost would like to thank you for sharing such a beautiful pattern with us the public. (crochet lovers). I am writing to you because I've come into a snag now that I'm trying to do the yoke. My problem begins on row 2 of the yoke. in the middle of the paragraph the instructions are to turn. 54 dc's and 40 chains.Then on row 3 CSDC, dc in the next 8 stiches. So here is where I am confused. Where do I start row 3? on the chain of 40? Don't know where to start row 3. Please help me when you get an opportune time at your convenience to reply. My email addy is "sweetdreams12a@yahoo.com. Looking forward to your answer as I'm almost there!!
Sincrely,
Millie Garcia
Tamara Kelly
Hi Millie!
Thank you so much! 😀 It's just me (Tamara) with tech help from my husband Geoff - I'm so glad you are enjoying the pattern!
Okay, so unfortunately I don't know which pattern you are following as this comment is on the "generic" tutorial. Can you tell me which pattern you are asking about? That will let me help you!