The MIni Moogly Sweater was the first sweater pattern I ever wrote, and in fact one of the first baby sweater patterns I ever made! It was a mashup inspired by two great patterns: Kelly's Sweater, by Bella Bambina Knits, and Auntie M's Abigail's Baby Sweater, which was nearly lost before it found a new home here on Moogly. Since I first posted my little sweater recipe, new sizes, refinements and errata have been added. So it was time to re-write it, re-work it, insert all the things I've learned about pattern writing in the meantime, and put it all together in one, easy to read pattern!
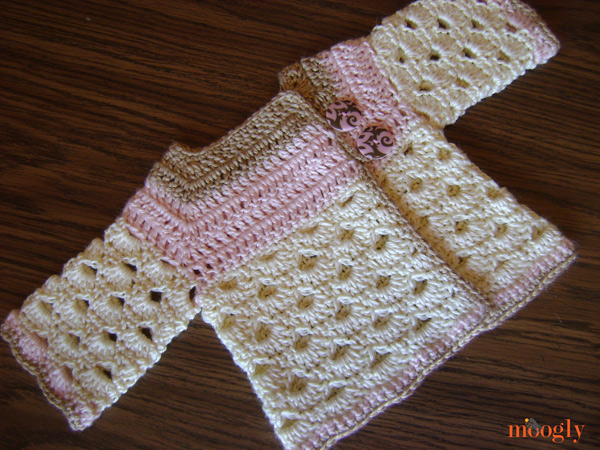
I've tried to streamline the instructions by adding some great techniques and linking to the necessarily tutorials. I've also double checked the sizing and weights to give you the most accurate patterns possible. Change colors whenever you like in the pattern, and remember to make each one your own! Many thanks again to Bella Bambina Knits and Auntie M for their inspiration and permissions!
The Mini Moogly Sweater
Add this pattern to your Ravelry Queue
- US - G, 4.00 mm hook
- 250 - 300 yds worsted weight yarn (a light worsted is recommended)
- 4 st markers
- 2 buttons
- Gauge: 16 sts x 8 rows = 4" in dc
- Sizes: 0-3 mths, 3-6 mths (Be sure to scroll down to the correct size you want to make!)
- Special Instructions: FDC Corner: Work a FDC as usual, then work 2 regular dc sts in the base of the FDC st. Place a marker in the center of these 3 sts.
- Video tutorials: FDC - foundation double crochet; CSDC - chainless starting double crochet; Seamless join.
- If you prefer not to use the CSDC, you can ch 2 and dc in the first st. If you prefer not to use the FDC, see the Alternative Row 1 instructions below.
- Mini Moogly Sveter v slovenčine (Slovak PDF) - Ďakujem Andrea v Klbkoviny pre preklad!
Size 0-3 mths
Row 1:FDC 6, FDC Corner (see special instructions above), FDC
6, FDC Corner, FDC 12, FDC Corner, FDC 6, FDC Corner, FDC 14. Turn. (56 sts)
Row 2: CSDC, dc in the next 14 sts, 3 dc in the next (marked) st, place maker (pm) in new center st, dc in the next 8 sts, 3 dc in the next st (pm in new center st), dc in the next 14 sts, 3 dc in the next st (pm in new center st), dc in the next 8 sts, 3 dc in the next st (pm in new center st), dc in the last 7 sts. Turn. (64 sts)
Row 3: CSDC, dc in the next 7 sts, 3 dc in the next st (pm in new center st), dc in the next 10 sts, 3 dc in the next st (pm in new center st), dc in the next 16 sts, 3 dc in the next st (pm in new center st), dc in the next 10 sts, 3 dc in the next st (pm in new center st), dc in the last 16 sts. Turn. (72 sts)
Row 4: CSDC, dc in the next 16 sts, 3 dc in the next st (pm in new center st), dc in the next 12 sts, 3 dc in the next st (pm in new center st), dc in the next 18 sts, 3 dc in the next st (pm in new center st), dc in the next 12 sts, 3 dc in the next st (pm in new center st), dc in the last 9 sts. Turn. (80 sts)
Row 5: CSDC, dc in the next 9 sts, 3 dc in the next st (pm in new center st), dc in the next 14 sts, 3 dc in the next st (pm in new center st), dc in the next 20 sts, 3 dc in the next st (pm in new center st), dc in the next 14 sts, 3 dc in the next st (pm in new center st), dc in the last 18 sts. Turn. (88 sts)
Row 6: CSDC, dc in the next 18 sts, dc in the first marked st, ch 5, skip the next 16 sts, dc in the next marked st, dc in the next 22 sts, dc in the next marked st, ch 5, skip the next 16 sts, dc in the last marked st, dc in the last 11 sts. Turn (56 sts and 10 ch)
Row 7: Ch 1, sc in each st and ch across. Turn. (66 sts)
Row 8: Ch 1, sc in the first 2 sts. *Ch 3, skip 2 sts, sc in the next 3 sts. Repeat from * until 4 sts remain. Ch3, skip 2 sts, sc in the last 2 sts. Turn. (13 ch-3 loops)
Row 9: Ch 1, sc in the 1st st, skip the next st, work 5 dc in the ch sp. *Skip the next st, sc in the next st, skip the next st, work 5 dc in the ch sp. Repeat from * until 2 sts remain. Skip the next st, sc in the last st. Turn. (13 5-dc shells)
Row 10: Ch 1, hdc in the 1st st, ch 1, skip the next st, sc in the next 3 sts. *Ch 3, skip the next 3 sts, sc in the next 3 sts. Repeat from * until 2 sts remain. Ch 1, hdc in the last st. Turn. (12 ch-3 loops, 2 ch-1 loops)
Row 11: CSDC, work 2 dc in the ch sp. *Skip the next st, sc in the next st, skip the next st, work 5 dc in the ch sp. Repeat from * until 4 sts remain. Skip the next st, sc in the next st, skip the next st, work 2 dc in the ch sp, dc in the last st. Turn. (12 5-dc shells, 2 half shells)
Row 12: Ch 1, sc in the first 2 sts. *Ch 3, skip the next 3 sts, sc in the next 3 sts. Repeat from * until 5 sts remain. Ch 3, skip the next 3 sts, sc in the last 2 sts. Turn. (13 ch-3 loops)
Row 13 - 16: Repeat Rows 9-12.
Rpw 17 - 19: Repeat Rows 9-11.
Row 20: CSDC, dc in each remaining st to end. (79 sts) Break yarn if using different color for edging. If using the same color, turn.
Edging: Join to last st of Row 20 with new yarn if desired. Ch 1, work in sc around bottom, front, neck, and other front, with 3sc in each corner. Make two (or however many you like) button loops and attach to trim where desired. For these buttons I used a ch of 8, but you’ll need to play around a bit to get them just right for the buttons you bought. If you prefer, smaller buttons can be used and you can close them right through the dc stitches in the yoke.
Sleeves:
(For vest, skip sleeves and edge armholes. For short sleeves, stop after Round 6 and skip to edging. For ¾ sleeves (shown in main photo at the top), stop after Round 12. For full length sleeves, work as below.)
Round 1: From RS, join to bottom of armhole (the armpit) and ch 1. Sc in same st and next st, ch 3, skip 2 sts. *Sc in next 3 sts, ch 3, skip 2 sts. Repeat from * until 1 st remains. Sc in the last st, join to the first sc of the round with a sl st. (5 ch-3 loops)
Round 2: Ch 1, sc in the 1st st, skip the next st, work 5 dc in the ch sp, skip the next st. *Sc in the next st, skip the next st, work 5 dc in the ch sp. Repeat from * until 5 shells made, skip the next st, join to the first sc of the round with a sl st. (5 shells)
Round 3: Ch 3, skip the next 2 sts, sc in the next 3 sts. *Ch 3, skip the next 3 sts, sc in the next 3 sts. Repeat from * until 2 sts remain. Ch 1, join with a sl st to the beginning ch 3 sp. (4 ch-3 loops and split loop)
Round 4: CSDC, work 2 dc in the ch sp, skip the next st, sc in the next st. *Skip the next st, work 5 dc in the ch sp, skip the next st, sc in the next st. Repeat from * until 1 st and ch 1 sp remains. Skip the next st, work 2 dc in the ch 1 sp, join with a sl st to the CSDC. (5 shells)
Round 5: Ch 1, sc in the 1st st and the next st. *Ch 3, skip the next 3 sts, sc in the next 3 sts. Repeat from * until 4 sts remain. Ch 3, skip the next 3 sts, sc in the last st. Join with a sl st to the first sc of the round. (5 ch-3 loops)
Round 6 - 13: Repeat Rounds 2 - 5 twice.
Round 14 - 16: Repeat Rounds 2 - 4. Break yarn if using different color for edging. If using the same color, proceed with sleeve edging. Repeat for other sleeve.
Sleeve Edging: From RS of sleeve, join to last st of sleeve with new yarn if desired. Ch 1, sc in each st around. (36 sts) Break yarn and seamless join.
Sew Buttons opposite the button loops. Weave in any remaining ends.
Size 3-6 mths
Row 1:FDC 6, FDC Corner (see special instructions above), FDC
6, FDC Corner, FDC 12, FDC Corner, FDC 6, FDC Corner, FDC 14. Turn. (56 sts)
[ALTERNATIVE ROW 1: Ch 50, dc in the 4th ch from the hook, dc in the next 4 sts, work 3 dc in the next ch (place marker(pm) in center st), dc in the next 6 chs, work 3 dc in the next ch (pm in center st), dc in the next 12 chs, work 3 dc in the next ch (pm in center st), dc in the next 6 chs, work 3 dc in the next ch (pm in center st), dc in the last 14 chs. Turn. (56 sts)]
Row 2: CSDC, dc in the next 14 sts, 3 dc in the next (marked) st, place maker (pm) in new center st, dc in the next 8 sts, 3 dc in the next st (pm in new center st), dc in the next 14 sts, 3 dc in the next st (pm in new center st), dc in the next 8 sts, 3 dc in the next st (pm in new center st), dc in the last 7 sts. Turn. (64 sts)
Row 3: CSDC, dc in the next 7 sts, 3 dc in the next st (pm in new center st), dc in the next 10 sts, 3 dc in the next st (pm in new center st), dc in the next 16 sts, 3 dc in the next st (pm in new center st), dc in the next 10 sts, 3 dc in the next st (pm in new center st), dc in the last 16 sts. Turn. (72 sts)
Row 4: CSDC, dc in the next 16 sts, 3 dc in the next st (pm in new center st), dc in the next 12 sts, 3 dc in the next st (pm in new center st), dc in the next 18 sts, 3 dc in the next st (pm in new center st), dc in the next 12 sts, 3 dc in the next st (pm in new center st), dc in the last 9 sts. Turn. (80 sts)
Row 5: CSDC, dc in the next 9 sts, 3 dc in the next st (pm in new center st), dc in the next 14 sts, 3 dc in the next st (pm in new center st), dc in the next 20 sts, 3 dc in the next st (pm in new center st), dc in the next 14 sts, 3 dc in the next st (pm in new center st), dc in the last 18 sts. Turn. (88 sts)
Row 6: CSDC, dc in the next 18 sts, 3 dc in the next st (pm in new center st), dc in the next 16 sts, 3 dc in the next st (pm in new center st), dc in the next 22 sts, 3 dc in the next st (pm in new center st), dc in the next 16 sts, 3 dc in the next st (pm in new center st), dc in the last 11 sts. Turn. (96 sts)
Row 7: CSDC, dc in the next 11 sts, 3 dc in the next st (pm in new center st), dc in the next 18 sts, 3 dc in the next st (pm in new center st), dc in the next 24 sts, 3 dc in the next st (pm in new center st), dc in the next 18 sts, 3 dc in the next st (pm in new center st), dc in the last 20 sts. Turn. (104 sts)
Row 8: CSDC, dc in the next 20 sts, dc in the first marked st, ch 5, skip the next 20 sts, dc in the next marked st, dc in the next 26 sts, dc in the next marked st, ch 5, skip the next 20 sts, dc in the last marked st, dc in the last 13 sts. Turn (64 sts and 10 ch)
Row 9: Ch 1, 2 sc in the first st, sc in each st until 1 st remains, 2 sc in the last st. Turn. (76 sts)
Row 10: Ch 1, sc in the first 2 sts. *Ch 3, skip 2 sts, sc in the next 3 sts. Repeat from * until 4 sts remain. Ch 3, skip 2 sts, sc in the last 2 sts. Turn. (15 ch-3 loops)
Row 11: Ch1, sc in the 1st st, skip the next st, work 5 dc in the ch sp. *Skip the next st, sc in the next st, skip the next st, work 5 dc in the ch sp. Repeat from * until 2 sts remain. Skip the next st, sc in the last st. Turn. (15 5-dc shells)
Row 12: Ch1, hdc in the 1st st, ch 1, skip the next st, sc in the next 3 sts. *Ch 3, skip the next 3 sts, sc in the next 3 sts. Repeat from * until 2 sts remain. Ch 1, hdc in the last st. Turn. (14 ch-3 loops, 2 ch-1 loops)
Row 13: CSDC, work 2 dc in the ch sp. *Skip the next st, sc in the next st, skip the next st, work 5 dc in the ch sp. Repeat from * until 4 sts remain. Skip the next st, sc in the next st, skip the next st, work 2 dc in the ch sp, dc in the last st. Turn. (14 5-dc shells, 2 half shells)
Row 14: Ch1, sc in the first 2 sts. *Ch 3, skip the next 3 sts, sc in the next 3 sts. Repeat from * until 5 sts remain. Ch 3, skip the next 3 sts, sc in the last 2 sts. Turn. (15 ch-3 loops)
Row 15 - 22: Repeat Rows 11 - 14 twice.
Row 23: Repeat Row 11.
Row 24: CSDC, dc in each remaining st to end. (91 sts) Break yarn if using different color for edging. If using the same color, turn.
Edging: Join to last st of Row 24 with new yarn if desired. Ch 1, work in sc around bottom, front, neck, and other front, with 3sc in each corner. Make two (or however many you like) button loops and attach to trim where desired. For these buttons I used a ch of 8, but you’ll need to play around a bit to get them just right for the buttons you bought. If you prefer, smaller buttons can be used and you can close them right through the dc stitches in the yoke.
Sleeves:
(For vest, skip sleeves and edge armholes. For short sleeves, stop after Round 6 and skip to edging. For ¾ sleeves, stop after Round 14. For full length sleeves, work as below.)
Round 1: From RS, join to bottom of armhole (the armpit) and ch 1. Sc in same st and next st, ch 3, skip 2 sts. *Sc in next 3 sts, ch 3, skip 2 sts. Repeat from * until 4 sts remain. Sc in the next 2 sts, ch 3, skip the last 2 sts, join to the first sc of the round with a sl st. (7 ch-3 loops)
Round 2: Ch 1, sc in the 1st st, skip the next st, work 5 dc in the ch sp, skip the next st. *Sc in the next st, skip the next st, work 5 dc in the ch sp. Repeat from * until 6 shells made, skip the next st, sc in the next st, work 5 dc in the last ch sp, join to the first sc of the round with a sl st. (7 5-dc shells)
Round 3: Ch 3, skip the first 2 sts, sc in the next 3 sts. *Ch 3, skip the next 3 sts, sc in the next 3 sts. Repeat from * until 1 st remains. Ch 1, join with a sl st to the beginning ch 3 sp. (6 ch-3 loops and split loop)
Round 4: CSDC, work 2 dc in the ch sp, skip the next st, sc in the next st. *Skip the next st, work 5 dc in the ch sp, skip the next st, sc in the next st. Repeat from * until 1 st and ch 1 sp remains. Skip the next st, work 2 dc in the ch 1 sp, join with a sl st to the CSDC. (7 shells)
Round 5: Ch 1, sc in the 1st st and the next st. *Ch 3, skip the next 3 sts, sc in the next 3 sts. Repeat from * until 4 sts remain. Ch 3, skip the next 3 sts, sc in the last st. Join with a sl st to the first sc of the round. (7 ch-3 loops)
Round 6 - 17: Repeat Rounds 2 - 5 three times.
Round 18 - 20: Repeat Rounds 2 - 4. Break yarn if using different color for edging. If using the same color, proceed with sleeve edging. Repeat for other sleeve.
Sleeve Edging: From RS of sleeve, join to last st of sleeve with new yarn if desired. Ch 1, sc in each st around. (42 sts) Break yarn and seamless join.
Sew Buttons opposite the button loops. Weave in any remaining ends.

I haven't had a chance to rework the 18 month size, but here are the notes on that, taken from the original posts' comments thread:
Use H hook
Rows 1 - 7: Work as 3-6 mths size. (same rows)
Row 8: in same pattern as Rows 2-7 (increasing by 8 sts).
Row 9: Make armholes as in pattern Row 8, using 7 ch in armpits instead of 5 ch.
Row 10-22: Work as 3-6 mths size (same rows, adjust st counts to get 16-17 shells)
Row 23-30: Repeat Rows 11-14 twice more.
Row 31: Repeat Row 11.
Row 32: Work as 3-6 mths Row 24.
Work 7 ch -3 loops and shells around for each sleeve, to length desired.
Overall, I hope this version is easier to use and read. I'm always striving to improve - even when it means re-working patterns that are 2 years old! Thanks for growing with me!
Written pattern copyright Tamara Kelly 2013. Please do not reprint or repost this pattern, but please do link to this page to share this pattern with others. If you wish to make items for sale from this pattern, please visit the About page for details. TamaraKelly@mooglyblog.com.


priscilla says
Adorable ! Thanks so much for the pattern !
Tamara Kelly says
Thank you priscilla!
AJ says
Would you mind telling exactly what yarn you used for this project in the photo above?
Thank you for sharing your beautiful work!
AJ
Tamara Kelly says
Hi AJ! I used Bernat Soy Natural Blends. Unfortunately it's been discontinued since I wrote the pattern, it was lovely stuff. Some people are still selling it out of their stash on Ravelry. It was about the same thickness as Caron Simply Soft, which is why I recommend a lighter worsted.
Alaynah says
Hi Tamara! This pattern looks great and I can't wait to try it. However, for the life of me, I cannot master the FDC stitch. I saw you put alternative instructions for the 0-3 months size for those of us that have trouble with that stitch. But I didn't see any for the 3-6 month size. Could I use the same alternative beginning from the smaller size or? Thank you in advance!! 😀
Tamara Kelly says
Whoops! Meant to copy and paste that and forgot - yes, it's exactly the same! 😀 You're welcome!
Maria Elena Espinosa says
no soy muy ducha con el crochet, pero es mi debilidad, por eso procuro aprender de lo que encuentro en vuestra pagina .GRACIAS...
Tamara Kelly says
No hay de qué! Gracias por leer!
michelle says
Thank you! I just finished making this sweater using Caron Simply Soft. I did the sweater in the same colors used in the picture. Can you tell me what rows you made the color changes? It took me a bit to figure it out and then I forgot to write it down and mailed it off. I am pretty sure I didn't have the brown right. Thanks for such a lovely pattern. I am going to be making another one soon.
Tamara Kelly says
Hi Michelle! I made this one about 2 years ago and promptly gave it as a gift, but looking at the photo it looks like I did the first 3 rows in brown and then worked in pink through the armholes row, and then switched to white for the sc row. And then back to pink for that last row of dc sts. Glad you enjoyed the pattern!
Courtney Emery says
I can not for the life of me figure out why i am not getting 56 stitches in the first row. I have taken it out and did it again so many times that I had to cut off my yarn. Am I missing something?
Tamara Kelly says
I'm sorry you're having so much trouble Courtney! The first row should be 6 + 3 (corner) + 6 + 3 (corner) + 12 + 3 (corner) + 6 + 3 (corner) + 14 = 56
Does that help at all?
Davina says
I was having the same issue and counted back from second row to get the 6.
Courtney Emery says
That worked perfect! Thanks so much for getting back to me so fast! I am doing the alternative row. I only see where it says to do 1 dc. I love this pattern thanks so much for sharing it!!
Kamila Jns says
the stih count for the alternative first row in 3-6 mnts is wrong. "Ch 50, dc in the 4th ch from the hook, work 3 dc in the next ch (place marker(pm) in center st), dc in the next 6 chs, work 3 dc in the next ch (pm in center st), dc in the next 12 chs, work 3 dc in the next ch (pm in center st), dc in the next 6 chs, work 3 dc in the next ch (pm in center st), dc in the last 14 chs. Turn. (56 sts)]" (1+3+6+3+12+3+6+3+14=51) Should add those missing 5dcs at the beginnig, right?
Now that I have figured it out I'll give it a try again. Thanks for sharing!
Tamara Kelly says
It sounds like you might have an old cached version of the page. If you hit CTRL-SHIFT-R you'll get an updated version of the page with the updated instructions. 🙂
Lil says
I am having the same issue with the first row and the control, shift R didn't do anything.
Can you help? I want to get this done to take to my new grandbaby in April.
Thank you,
Lil
Tamara Kelly says
Hi Lil! The alternative instructions for the first row should read as follows:
ALTERNATIVE ROW 1: Ch 50, dc in the 4th ch from the hook, dc in the next 4 sts, work 3 dc in the next ch (place marker(pm) in center st), dc in the next 6 chs, work 3 dc in the next ch (pm in center st), dc in the next 12 chs, work 3 dc in the next ch (pm in center st), dc in the next 6 chs, work 3 dc in the next ch (pm in center st), dc in the last 14 chs. Turn. (56 sts)]
ummi says
thanks for such a nice pattern can you tell me please how can i change the size to 12 month old or should i use 18 months for 1 year old toddler .thanks again
Tamara Kelly says
If you plan on using it as a layer over other tops, 18 mths might work. Otherwise you could try the larger hook size with the 6mths instructions.
April says
I'm looking for 6-9 months pattern for this, do you have it listed somewhere?
Thanks!
Tamara Kelly says
Hi April! When I reworked the pattern I discovered that the 6-9 mth size was really more like 3-6 mths. To upsize to 6-9 you can use a larger hook!
April says
Should I use the 3-6 month pattern with an H hook or go up to an I? What is your recommendation?
Tamara Kelly says
It depends on the thickness of the yarn and your personal tension. If you tend to crochet tightly, 2 hook sizes might be best. To see if you're on track, the armpit row should measure 17.5" around, or about 8.75" across when laid flat.
stephanie says
I'm trying to figure out how to make this a 4t sweater. Do you have any pointers?
Tamara Kelly says
Hi stephanie! I would continue increasing in the yoke until it will fit a chest 23 inches around (11.5" laid flat). Then move on to the armpit rows, adding more shells and loops as needed. Then of course add some length the sleeves. 🙂
Brenda Vance says
This pattern was made by a dear friend...and she shared the post with us today where we could find the pattern. So beautiful....now to make it for my grand-daughter who is 1......gorgeous sweater!!! Thanks for sharing!
Tamara Kelly says
😀 Thank you so much Brenda!
Courtney Emery says
I am wondering why the first row for the 0-3 size is longer then the 3-6 size. Also wondering if there pattern or a way to make it for a 6-9 and a 12m size.
Courtney Emery says
Nevermind haha i figured out what I was doing wrong lol
Paula says
Love this pattern, but I'm a little confused as to where I join the yarn for the sleeves. Is it at the armpit corner, or in the armpit middle? Thanks so much.
Tamara Kelly says
The center will hide the seam best, but either way works! 🙂
Theresa says
Does the mini moogly baby girl side cardigan sweater crochet pattern come in a 12 month size?
Tamara Kelly says
Not currently, no.
Theresa says
Do you think if I use a hood 2 sizes larger it would work for 12 months?
Tamara Kelly says
I think so! Just remember to work loosely! 🙂 I found that bumping up a hook size or two and adding some length and an extra yoke row worked for 18 months, so that should work well for 12. 🙂
Jackie says
Does the mini come in larger sizes like 2T or bigger?
Tamara Kelly says
No, this pattern is only available in the smaller sizes at this time, sorry!
Maureen Garrigan says
This is lovely thank you so much for sharing the pattern...!!
Tamara Kelly says
😀 Thank you Maureen!
Rosalind says
Thank you Tamara for giving us this beautiful sweater. I love it. Am determined to make it for my latest granddaughter. I've gotten past the missing 6+3 and now I'm stuck on Row 8 where it says to skip the next 20 stitches twice in that row. What do we do with the skipped yarn? Do we just drag it along so that in row 9 we 2sc over it. The picture shows something like that. But that still leaves 2 places that act like a stip to work the sc's over.. I don't even know if my question makes sense. Thanks so much for your response.
Tamara Kelly says
Hi Rosalind! The skipped 20 sts become the shoulders - this video should help: https://www.mooglyblog.com/tutorial-armholes-top-down-crochet-baby-sweater/
Rosalind says
Thanks so much Tamara. The video made it all make sense. But as soon as I completed the armhole it appeared way too tiny. Would I be safe just adding another row or two to the rectangle/colored part or will it throw it all off kilter?
I really love this sweater but I'm so slow the babies keep outgrowing it before I can get it finished. Many thanks!
Tamara Kelly says
You can add another row - it might through off the counts for the skirt, but a little fudging never hurt. 😉
Ang says
Then in the next row, do we do 5 SC over the chain 5 part?
Tamara Kelly says
Yes, you crochet one st in each ch, as well as one in each st. 🙂
Mandy Tangedahl says
I am in love with this pattern, thank you!
https://scontent-b-sea.xx.fbcdn.net/hphotos-xpf1/t1.0-9/q80/s720x720/10298703_782417448458796_3983816974781745492_n.jpg
Tamara Kelly says
Thank you Mandy! And yours is too cute! I love the colors and the button!
Flo says
Hi! I would really like to make this one for a 3 year girl, but I have never enlarged a pattern, do you have any recommendations for me? Thanks!! Flo
Tamara Kelly says
Hi Flo! I'd use a thicker yarn, aran weight - such as Red Heart With Love or Lion Brand Vanna's Choice, and go up one or two hook sizes. Then add more length as you go, as needed. 🙂
Flo says
Thanks Tamara!! I love this mini moogly! I did this one for a newphew
https://scontent-b-mia.xx.fbcdn.net/hphotos-xpf1/t1.0-9/1969396_10152219043517771_3724283176961708049_n.jpg
Tamara Kelly says
<3 Super cute Flo! Thank you!
Sarah says
Hi love this pattern and have made it for my niece. But I was now wanting to make it for a 1 year old, i know you have said in a previous comment to just adjust length and use bigger hook size. but what about width? the neck size would be two small? thanks
Tamara Kelly says
With a bigger hook, the neck will be bigger as well. 🙂 Or you can add 8 stitches - one on each side of the increases!
Rosalind says
Hi Tamara,
Well I've come up with another question that I know I should be able to figure out, but no . . . Rows 15-22 says to repeat rows 11 -- 14 twice.
Well now that I've reached row 15, am I really going to make 8 (11-14x2=8) smaller rows? The same notion applies to Row 23. I might be able to figure it out except in the color section I made 5 rows of sc which changed the count radically because of the number or rows. Don't know if this is something you'll be able to answer because of my own fault/creativity, but if you can I'd sure appreciate it.
Many thanks.
Tamara Kelly says
Hi Rosalind! I'm a little confused. Rows 15-22 shouldn't be any smaller - they're just the loop rows and scallop rows. You can add or subtract rows here for length, as desired. Row 23 is just done to end you on a scallop row and give the sweater a pretty edge.
Rhonda stone says
hi Tamara, I'm hoping you can help me. This sweater is so pretty and I would love to get it done before Christmas. However , I am having trouble with keeping the edges straight. I know it has to do with placement of those last stitch s. I have frogged it once and now I hope you can help me please. 🙂 MY edges increase on one side and shrink on the other even though I am doing the pattern . help!! thank YOU so much 🙂 LOVE YOUR WORK!!!!
Tamara Kelly says
Thank you Rhonda! The only thing I can think of is that it's an issue with the half shells/loops?
Rhonda stone says
i have been wondering if its the way I do the placement of the beginning and end stitch of the rows... like when i chain 3, do i do next stitch in the same one or move to next st? and maybe I'm not putting last stitch in right place.... seems like i cant get it straight on the sides as in the picture.... can you tell me how you did this? thanks so much for your help and have a wonderful Blessed Christmas !!
Tamara Kelly says
When you ch 3 for the loops in the skirt portion you skip the next 3 sts before you crochet in the next st. Or are you referring to the yoke?
Rhonda stone says
Thanks for getting back to me. I realize I may not be explaining myself in a clear way , sorry. I am past the yoke , no problem there. I am at row 11 now. I have been using the chains to begin the rows , not the csdc. you say to do the chains and the first stitch in the SAME stitch or do i do the ch 2 and put first stitch in the NEXT chain ? I have only been crocheting for a year now so still learning. I t just seems like I'm adding a stitch on one side and forgetting it on the other, at the end or beginning of each row. the pattern in between is going fine. Not sure if thats clear or not 🙂 thank you
Rhonda says
thanks so much for this beautiful baby sweater ! I figured out what i was stuck on and just want to say I really enjoy all your creativity!!! the new mommy to be loved it !! THANK YOU!! 🙂
Tamara Kelly says
I'm so glad to hear it!! Thank you Rhonda!
Jeanne-Marie says
Tamara, when working the sleeves, do I turn at the end of each row,or continue in the round?
Thanks!
Tamara Kelly says
You can do either, I believe - I continued in the round. 🙂
sarah says
Im doing the size for 3 to 6 month but the neckline looks small. Is it normal?
Tamara Kelly says
They do have little necks! But you can always start with foundation stitches for a stretchier neckline if you prefer!
Nair says
Hi!
I've done the 0-3 months sweater without problems, but now I'm trying the 3-6 months size and already done the vest with 8 rows (including the armhole 5 sc-chain). I'm stuck on the sleeves beginning: it is supposed to have 7 ch-3 loops but it only fits 6, and at the union of the first stiches with the last ones, it gests 5 sc. Can't figure it out were to place the last 2sc after the chain 3 you mencioned in instructions.
I'll kip trying because maybe I'm not using all free spaces as stiches. How many stiches do I count at the lateral side of the harmhole (row 7 and row 8)?
Thank you very much!
Tamara Kelly says
Hi Nair! This is one of the first patterns I put together and it's a mashup of two others (with their permission) so it can require some fudging to get it to work.
Tara says
Ahh! I was just trying to figure this out, too. I think I'm going to fudge it with six loops. 🙂
Simona says
Hi Tamara! Thank you for this wonderful pattern and for all the other!! I love your blog so much!!!
I've made this sweather in the size 3- 6 but it results so little!!!! It doesn't fit to a new born 🙁 How can I enlarge the pattern without to change my yarn?? thank you very much for your patience and kindness
Simona
Tamara Kelly says
Hi Simona! Try going up a hook size or two! 🙂
Simona says
Done!!!!!! I used size 4,5 mm hook and follow the instruction for size 18 months.....
Thank you!!! I'll send you a photo 🙂
****** i love moogly blog ******
Tamara Kelly says
😀 Thank you so much Simona!
Carmen says
Good day. I would appreciate if you could make a video of this jacket, long time ago that I would make it, but I can hardly understand written instructions.
A greeting,
Carmen
Tamara Kelly says
I'll see what I can do Carmen, thank you!
susana says
Hola!!!Muy lindo el saquito, pero sería interesante usar gráficos para entender el desarrollo
sin leer todo el tutorial, además lo entenderían en cualquier idioma el gráfico. Gracias!!!
Corry says
Hello
I made this beautiful sweater for my grandchild ,it's nearly finished, but now I realise it's closing left over right, can't figure out what went wrong thank you by the way for this and other beautiful patterns .I also love your awesome tutorials
Corry
Tamara Kelly says
Hi Corry! It sounds like it might be wrong side out? And thank you! 🙂
Susan says
Need some help, what is a "pm" and what is a "csdc"? Updated like to try this but have no idea what that is thanks
Susan says
Need some help, what is a "pm" and what is a "csdc"? I'd like to try this but have no idea what that is thanks
Tamara Kelly says
PM is place marker, and CSDC is chainless starting double crochet. 🙂
Susan says
Thanks Tamara!
Gabriella Perkins says
I love this pattern thank you so much for it.
I am not actually making this for a baby but my girls's dolls teddies etc. so wondered is there an easy way to make it a tad smaller?
Thank you x
Tamara Kelly says
Hi Gabriella, thank you! To make is smaller, I'd use thinner yarn and a smaller hook! 🙂
Gabriella Perkins says
Thank you for your quick reply I will try that 🙂 xx
WENDY says
Hi Tamara
Thank you for this lovely cardigan - I'm quite new to crochet and haven't yet mastered how to change patterns but I've been asked to make a 3 - 6months sized cardigan for a girl.
I have some lovely soft white and pale green variegated yarn which I would like to use - but I think it is probably a 4ply (fingering?) weight. I inherited it from a lady who, 10 -15years ago, used to work at Robin Wools in Bradford, West Yorkshire, England.
Can you suggest what hook I should use to obtain the correct guage if I use this, please?
Thank you 🙂
PS: I happened across this as I had thought to make the Eloise Baby Sweater which came in the Moogly Newsletter today - but I don't have any suitable yarn in my stash for it - though I am tempted to make one later - it's so nice to see a more "modern" cardigan for babies under 1 yr.
Tamara Kelly says
Hi Wendy!
With fingering yarn, it will be a very light and lazy little sweater! I would recommend holding it with 3-4 strands held together as one, if you have enough, so it can act as a worsted weight. Otherwise, you'll need to experiment a bit to get the same gauge - perhaps an 5.5mm hook would be a good starting point?
vicky says
hello i'm sorry i might sound a little silly but i don't understand the ch13-3 loop? i know to chain 13 but what does the 3 loop mean?
Tamara Kelly says
Hi Vicky! That's the stitch count. You should have 13 ch-3 loops at the end of that row.
Anna says
Thanks for this sweet little pattern. I just made one in 3 shades of pink and will shortly start another in 3 shades of blue. Super fast and easy.... this will be a go to from now on.
Tamara Kelly says
Thank you so much, I'm so glad you like it!
Mary Anne Davidson says
I am about finished with the 0-3 mo. Size. I have worked it in Berroco color 3341 (Flicker) and BerrocoFlicker 3340. These colors look terrific, if non-traditional!
How about providing ADULT size instructions, please. ? The Mini MooglySweater is a winner!
Tamara Kelly says
Hi Mary Anne! Thank you, I'm so glad you like it! Maybe someday! 😀
Lora says
I can't wait to try this pattern. Question: You have 3-6 months and the next look like 18 months? Is that right or is that for a 9-12 month? Thanks for clearing me up.
Tamara Kelly says
Yes, that's correct. 🙂
Lora Williams says
Thank you!
Deborah Singer says
Hi there is there a left handed crocheter version?
Tamara Kelly says
No, this pattern only has the one version.
Bianca says
Great sweater but what does RS mean?
Tamara Kelly says
RS is the abbreviation for Right Side. Thank you! 🙂
Bianca says
No, thank you. 🙂
Sylvia Becker says
Heya Tamara, I just found this pattern. The sweater looks just lovely and I will definitely try it. Thank you so much for sharing it 🙂
Tamara Kelly says
Thank you so much Sylvia!:)
Maria says
I just started this sweater for 0-3 month size. Is the beginning row supposed to fit a baby’s neck? I checked my gauge before starting and I’m using an H hook, but the space looks small to me. Thanks for your help!
Tamara Kelly says
Baby necks are truly tiny! But you can place the buttons lower if desired for an even bigger opening. 🙂
Rebecca Taylor says
I just love this sweater and have made many. I have a great niece that I would like to make this for but she wears a 5t. Do you by chance have any toddler sweaters that are the top down crochet pattern. Thanks, Love your work.
Tamara Kelly says
Hi Rebecca! I'm afraid I don't have a pattern that fits that description.