The Marguerite Stitch comes in several variations. The easiest of all has 3 spikes, and is know as the Simple Marguerite Stitch - and I had a lot of fun demonstrating it! When you read just "Marguerite Stitch" it could mean 4 or 5 spikes - both versions share the name. But the 5 spike Marguerite Stitch goes by another name... the Star Stitch! Still following? Good, because today I'm showing you how to make this full size, 5 spiked, Star Stitch - AKA the Marguerite Stitch!
Star Stitch or Marguerite Stitch Video Tutorial
Star Stitch or Marguerite Stitch Photo Tutorial
This tutorial was filmed and photographed using LB Collection Cotton Bamboo yarn and a Susan Bates H hook.
The Star Stitch or Marguerite Stitch is worked over a multiple of 2 plus 1, plus 3 for the starting chain! So for this swatch, I started with a chain of 12 (8 (4 x 2) +1, +3 = 12). Each Marguerite or Star takes up 2 sts, so this swatch will make 4 stars (note that this is the multiple of 2 above - easy to plan your starting chain now, right?). I recommend working into the underside loops of the chain for this stitch.
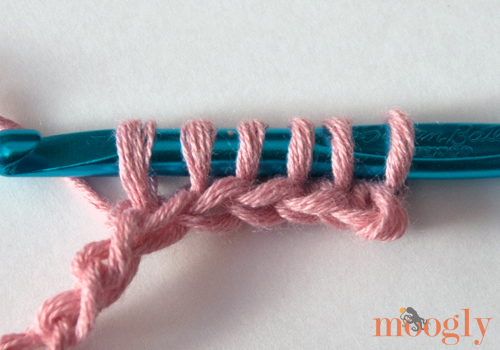
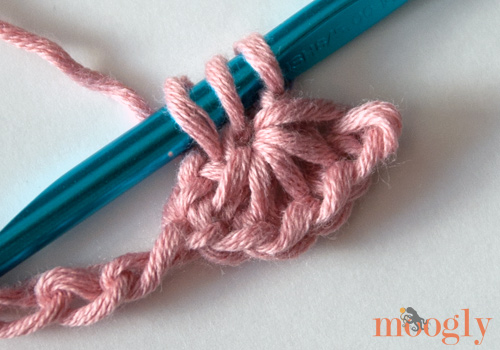
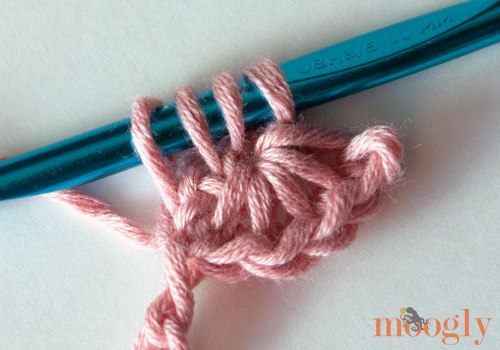
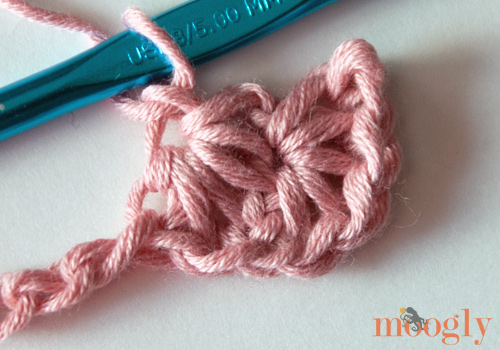
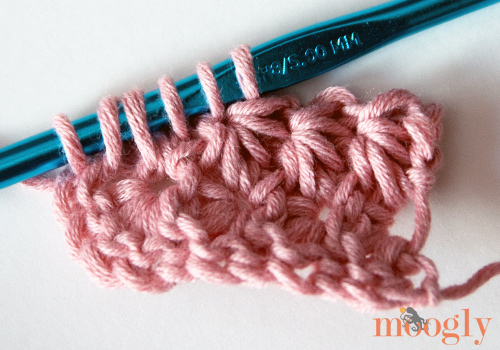
After making your starting chain, insert the hook into the 2nd ch from the hook and pull up a loop. Then do the same in the 3rd, 4th, 5th, and 6th ch from the hook. This leaves you with 6 loops on the hook. Try to pull the last couple of loops up a bit higher than the others.
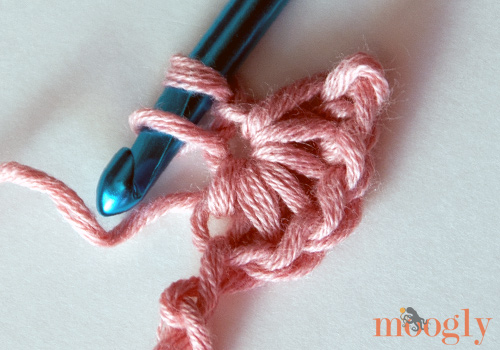
Yarn over and pull through all 6 loops.
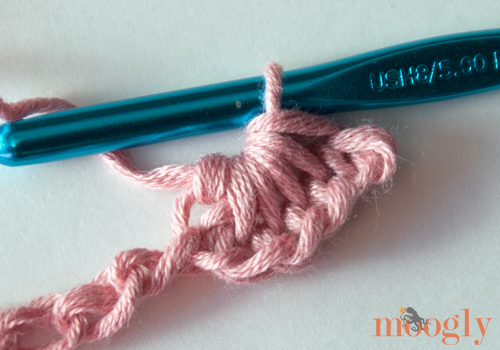
Ch 1 to finish off the stitch. First Star made!
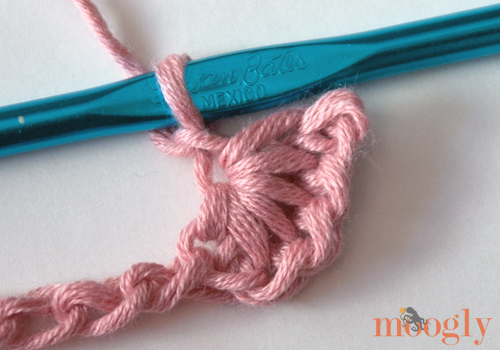
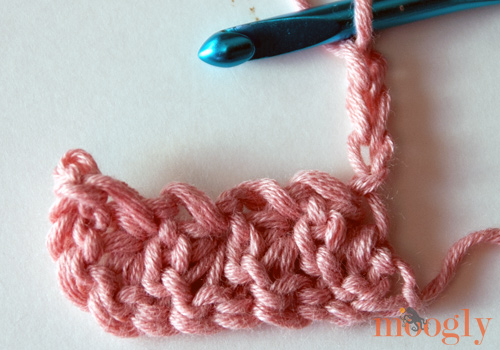
To start the next Star, insert the hook into the ch 1 just made, and pull up a loop.
Then insert the hook under the 2 strands on the side of the last spike or loop made in the previous stitch, and pull up a loop.
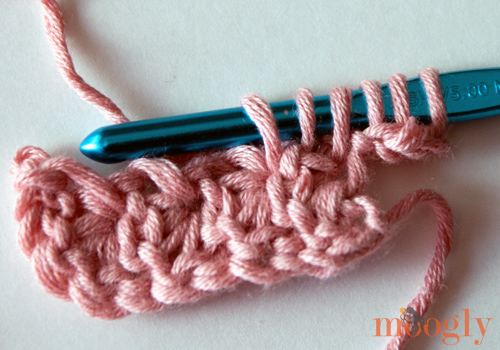
Then insert the hook into the same ch that the last loops of the previous stitch was worked in, and pull up a loop.
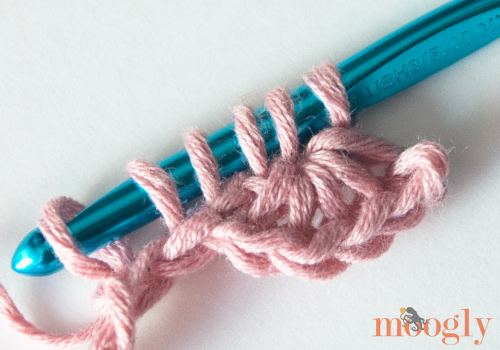
Finally, insert the hook into the next ch and pull up a loop, and then into the next ch and pull up a loop. Try to pull these last two loops up a little higher than the others.
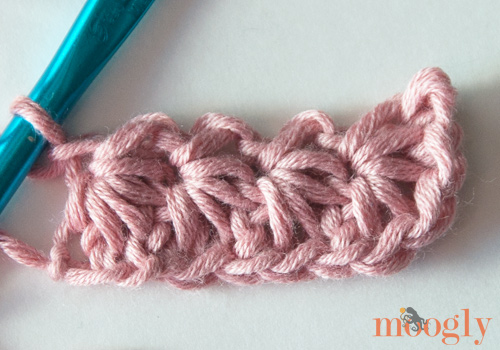
Yarn over and pull through all 6 loops, then ch 1 to finish off the stitch. Second Star made!
Continue as for the second Star until the end of the chains, finishing the last Marguerite in the last ch.
To start the second row, you're going to start with a ch 3. But wait! Before you turn, before you chain, very carefully remove the hook from the active loop and replace it in the loop from the other direction. THEN turn and make your ch 3. This way the underside loop of the chains is on the "inside" of the row, and the Vs are on the outside edge - a much nicer look (at least in my opinion - feel free to try it both ways and see what you think!). Oh, and make sure that the chains are nice and loose - you'll be working into all 3 eventually!
After the ch 3, insert your hook in the 2nd ch from the hook and pull up a loop. Then do the same in the 3rd ch, then in the 1st, 2nd, and 3rd st of the row.
Yarn over and pull through all 6 loops, then ch 1 to finish off the stitch. First Star of the second row made!
Continue making Stars to the end of the row, working them as you did the second and subsequent stars of the 1st row. When you get to the end of the row, the last loop will be in the ch that you skipped when you made the very first Star! This is why, as you make each row, you're going to want to have made all 3 chs at the beginning of the previous row nice and loose. Working into that skipped ch is no fun when it's tight!
And that's all there is to it! Just repeat the directions for the second row until you've got the length you want. To work the Star Stitch or Marguerite Stitch in the round, you'll start with a multiple of 2 plus 1, and save that ch 3 until after you've joined in a circle.
If you're curious about the 4 spike Marguerite - it's easy as can be! Just skip the 3rd loop in the version above - work the loops in the 2nd ch, 4th ch, 5th ch, and 6th chain for the first st. Then make the next 4 spike Marguerite by working into the ch 1 that closed the previous st, the same ch that the last loop was worked in, and the next 2 chains. Easy peasy!

Thanks for watching! Get Moogly on your favorite social media sites: Facebook, Twitter, G+, Pinterest and Tumblr, and sign up for the Newsletter so you don’t miss a thing! TamaraKelly@mooglyblog.com

Margaret S says
What a pretty stitch. I love your easy to understand videos and your great step by step instructions!
Tamara Kelly says
Thank you Margaret! 😀
Rhonda says
Tammt I am inspired by your techniques in crocheting I just wanted to express about your slipper pattern ABSOLUTELY LOVE IT very talented. I have only been crocheting for 1 Te. The patterns I see every where quite a lot if work but O love the challenge I love this star stitch it would make a nice Blanket for Someone ThankYou for sharing these patterns Also I am interested in keeping your Moogly page on the Internet how do I help with this I saw the Amazon page let me Ease - Happy Holidays to You and Yours sincerely Rhonda Fannin
Tamara Kelly says
😀 Thank you Rhonda! The best way to help is to use the Amazon link for your Amazon shopping, and beyond that just spread the word and share the page with other crocheters and yarn lovers! I don't pay for advertising - it's all word of mouth. The best advertising of all!
Rebecca Williams says
Would like to receive your beautiful patterns. Please send it to my email address
Tamara Kelly says
All the patterns are here on the site Rebecca! You can use the green Print Friendly button at the bottom to print them out for personal use if you like. 🙂
Albertine says
I don't want to be too picky, but you had 5 loops on your hook with the last star stitch of the first row 😉 I do love the stitch very much! I've learned so many new and handy things from you. Thanks! 😀
Tamara Kelly says
Ack, you're right! I missed the one in the same ch as the last loop of the previous stitch. Ah well, hopefully the rest of the video makes up for it lol.
Jessica says
I love this stitch! I've never seen it before. I've been crocheting for over 15 years and just recently started moving beyond the basic stitches. I've been working on an afghan for my son and now I'm convinced that I need to make a few squares in this stitch. I'm using bulky variegated yarns and I think it will look stunning. Thanks for sharing these wonderful tutorials and patterns. Keep up the good work.
Jeanette says
Your instructions, video, and pictures are so clear and easy to follow! Thank you for the lesson.
Tamara Kelly says
Thank you so much Jeanette! I'm so glad you liked it! 😀
mahin says
thank you very much
Veronica says
Thanks you. I gave this a try today and was able to figure it out really quickly. Great tutorial.
Tamara Kelly says
😀 I'm so glad Veronica, thank you!
Marrie says
Verryy neat work.. love your work { XOXO }
dheepa says
its so easy to learn by step by step photo procedure.. thanx a lot
Jessica says
I'm learning this stitch for a pattern, and I found myself really struggling with it. Found your tutorial and photos very helpful--thanks for posting!
Tamara Kelly says
😀 I'm so glad to hear it! Thank you!
farahnaz faryadi says
hi thank you very nice
Tamara Kelly says
Thank you! 🙂
amber says
thank you, my fave stitch found and i can make it finally
perfect tutorial perrrrfect
Tamara Kelly says
😀 Thank you Amber!
ardith says
tx, tamara!! i've been all over the 'net looking for a sane explanation/tutorial for the star stitch - aaarrrgh!!!
FINALLY, i came across your link & NOW I GET IT!! yay!! i've bookmarked moogly, so i will forever start HERE FIRST for crochet info, help, patterns & inspiration!! you make me smile - please keep up the great work!!! 🙂
Tamara Kelly says
😀 I'm SO glad you found it Ardith! Thank you so much!!
Nell says
How many do I chain for starter row on the star stitch pattern for twin size bed?
Tamara Kelly says
Hello Nell! That would depend on the hook, yarn, and tension you are using. I would recommend picking your yarn and hook, and then chaining to the width desired, in the multiple given! 🙂
charlene Garcia says
Wooo... I love your tutorial
Tamara Kelly says
Thank you so much Charlene!
Deena says
Hi Tamara,
If i want to do the single crochet row, do i just ch 1 turn and crochet in all the stitches?
Tamara Kelly says
Yes! Just watch your stitch count. 🙂
Deena says
I'm a tadbit confused. When i got to the last circle ( center of star stitch) it seemd like i have 2 stitches left. One of the star stitch and i think the chain that i skipped,do i have make a sc in that skipped stitch? And after that do i still chain 3 and start the new star stitch row in the second chain ?
Hope you can visualize what i'm talking about 😉
Tamara Kelly says
That skipped ch is the turning chain, so you don't work into that one. 🙂
Ann says
Please stop calling it marguerites its STAR STITCH
Tamara Kelly says
Both names for this stitch are used quite frequently, and date back several decades at least, so for those looking for one or the other, it's important to use both names so they can find the tutorial. 🙂
Gemma says
Great tutorial, but this version of it means each alternative row looks different i.e. back of stitch and front of stitch on either side, which looks different. There is a version where you alternate between star cluster row and regular htr row, which means there is a definite rs and ws. So the star clusters look the same on one side. How about doing a tutorial for that version?
Tamara Kelly says
I'll add it to my list! 🙂 Thank you Gemma!
Naomi says
Hi Tamryn, like many others I love your helpful video tutorials. I am designing a cowl that has a round of Star stitch, when I complete it and go back to working HDC's I can't get my stitch count to be the same it was before the round of Star stitch, any suggestion as to what I am doing wrong?
Tamara Kelly says
Thank you so much, Naomi! The star stitch is tricky that way - from the top it can look like a lot different from how you started!
If you have too many sts: I would recommend skipping every few "sts" to get the right stitch count. It doesn't have to be any particular stitches, just be consistent as you work across (ie: always skip the smallest V that appears every x sts) and it should all work out fine!
If you have toofew sts: would recommend doubling up every few "sts" to get the right stitch count. Again, it doesn't have to be any particular stitches, just be consistent as you work across (ie: always put 2 sts in every x sts) and it should all work out fine this way too!