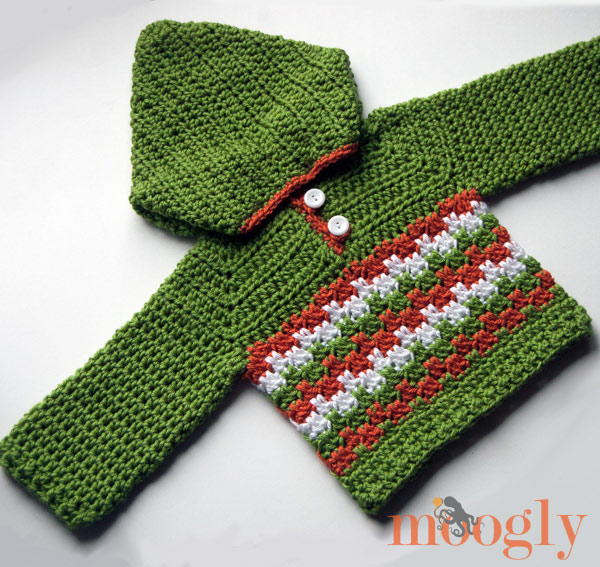
After designing the Leaping Stripes and Blocks Blanket, making a video tutorial for it, and then designing the Mesmerizing Messenger Bag and Leaping Blocks and Stripes Beanies, you might well think I'd be done with this stitch pattern! But then I got a reader request, and couldn't resist... So I give you the Leaping Crochet Baby Hoodie!
Disclaimer: This post contains affiliate links.
Prefer an ad-free PDF?


Prefer the free blog version? Keep scrolling!
Mix Up the Details for Your Baby!
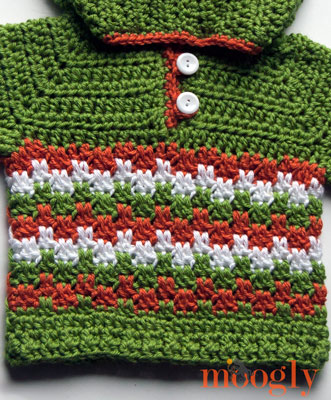
The Leaping Crochet Baby Hoodie features all the requested items - it's an easy crochet pullover sweater pattern, with a hood, featuring the eponymous stitch pattern. And with an endless world of color changes, it's great for all babies. But it's a great pattern to work up style variations of too! Leave off the sleeves for a vest, replace the hood with a row of post stitches like the bottom - you might just have to make them all. Or since it includes sizes 6 months to 2T, you can make a different variation for every size!

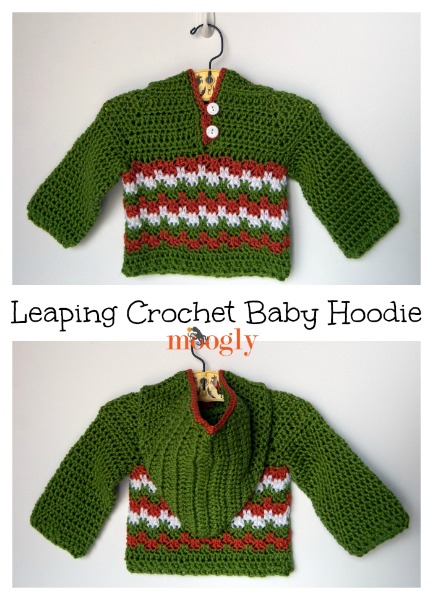
Leaping Crochet Baby Hoodie
Add this pattern to your Ravelry Queue and Favorites
US - J, 6.0 mm hook - Furls Crochet
460 - 800 yds Red Heart Soft (100% acrylic; 4/Worsted/UK: 10-12 ply; 256yd (234m); 5oz (141g))
2 ¾" buttons (or size desired)
Gauge: 12 sts x 9 rows = 4 inches in hdc
Sizes: 6 mths (12 mths, 18 mths, 2T)
Helpful Links and Tutorials:
Leaping Crochet Baby Hoodie - UK version
How to crochet armholes in a top down sweater
Leaping Stripes and Blocks stitch tutorial
Fpdc/Bpdc - front post double crochet/back post double crochet
STDC - Standing Double Crochet
NOTES:
Odd numbered rows/rounds: RS; Even numbered: WS
You may wish to print out a copy of the pattern using the green Print Friendly button and circle the numbers that apply to the size you wish to make.
If you prefer not to use the STDC (see linked tutorial above), substitute a ch 3 and treat it as the first dc of the round.
INSTRUCTIONS:
YOKE ROWS (With Main Color):
Row 1: Ch 43 (47, 49, 53). Hdc in the 2nd ch from hook and next 6 (7, 8, 9) ch, then hdc 3 in the next ch (make corner), and place maker (pm) in the center of these 3 sts. Hdc in the next 6 ch, make corner and pm in the next ch, hdc in the next 12 (14, 14, 16) ch, make corner and pm in the next ch, hdc in the next 6 ch, and make corner and pm in the next ch. Hdc in the last 7 (8, 9, 10) ch. Turn. (50 (54, 56, 60) sts)
Row 2: Ch 1, hdc in the first 8 (9, 10, 11) sts, make corner and pm (move up from previous row), hdc in the next 8 sts, make corner and pm. Hdc in the next 14 (16, 16, 18) sts, make corner and pm. Hdc in the next 8 sts, make corner and pm. Hdc in the last 8 (9, 10, 11) sts. Turn. (58 (62, 64, 68) sts)
Row 3: Ch 1, hdc in the first 9 (10, 11, 12) sts, make corner and pm, hdc in the next 10 sts, make corner and pm. Hdc in the next 16 (18, 18, 20) sts, make corner and pm. Hdc in the next 10 sts, make corner and pm. Hdc in the last 9 (10, 11, 12) sts. Turn. (66 (70, 72, 76) sts)
Row 4: Ch 1, hdc in the first 10 (11, 12, 13) sts, make corner and pm, hdc in the next 12 sts, make corner and pm. Hdc in the next 18 (20, 20, 22) sts, make corner and pm. Hdc in the next 12 sts, make corner and pm. Hdc in the last 10 (11, 12, 13) sts. Turn. (74 (78, 80, 84) sts)
Row 5: Ch 1, hdc in the first 11 (12, 13, 14) sts, make corner and pm, hdc in the next 14 sts, make corner and pm. Hdc in the next 20 (22, 22, 24) sts, make corner and pm. Hdc in the next 14 sts, make corner and pm. Hdc in the last 11 (12, 13, 14) sts. Turn. (82 (86, 88, 92) sts)
Row 6: Ch 1, hdc in the first 12 (13, 14, 15) sts, make corner and pm, hdc in the next 16 sts, make corner and pm. Hdc in the next 22 (24, 24, 26) sts, make corner and pm. Hdc in the next 16 sts, make corner and pm. Hdc in the last 12 (13, 14, 15) sts. Turn. (90 (94, 96, 100) sts)
FOR SIZES:
6 mths and 12 mths, skip to Armpit Row below.
18 mths and 2T, continue with Row 7.
Row 7 (sizes 18 mths (2T) only): Ch 1, hdc in the first 15 (16) sts, make corner and pm, hdc in the next 18 sts, make corner and pm. Hdc in the next 26 (28) sts, make corner and pm. Hdc in the next 18 sts, make corner and pm. Hdc in the last 15 (16) sts. Turn. (104 (108) sts)
Row 8 (sizes 18 mths (2T) only): Ch 1, hdc in the first 16 (17) sts, make corner and pm, hdc in the next 20 sts, make corner and pm. Hdc in the next 28 (30) sts, make corner and pm. Hdc in the next 20 sts, make corner and pm. Hdc in the last 16 (17) sts. Turn. (112 (116) sts)
ARMPIT ROW/ROUND: Ch 1, hdc in the first 13 (14, 17, 18) sts, hdc in the marked st (remove 1st marker), ch 5 (5, 6 6), skip to st with next marker. Hdc in marked st (remove 2nd marker). Hdc in the next 24 (26, 30, 32) sts, hdc in the next marked st (remove 3rd marker), ch 5 (5, 6, 6), skip to st with next marker. Hdc in last marked st (remove 4th marker). Hdc in the last 13 (14, 17, 18) sts. Break yarn and seamless join to 2nd hdc of the row (this connects the two front flaps for working in the round. (54 (58, 68, 72) hdc and 10 (10, 12, 12) ch)
TRUNK/MIDSECTION ROUNDS: (Begin Leaping Stripes and Blocks Pattern)
 Round 1: With next color, STDC in one of the middle ch of either armpit of last Row/Round. Dc in the next st, ch 2, skip 2. *Dc in the next 2 sts, ch 2, skip 2. Repeat from * to end. Join with a sl st in the STDC. (64 (68, 80, 84) sts)
Round 2: Ch 4, skip 2, dc 2 in the skipped sts of Armpit Row, enclosing the ch 2 from Round 1. *Ch 2, skip 2, dc 2 in the skipped sts of Armpit Row (enclosing the ch 2). Repeat from * to end, join with a sl st in the ch 4 sp. Break yarn and finish off. (64 (68, 80, 84) sts including chs)
Round 3: With Next Color, STDC in any skipped st of Round 1, enclosing the ch 2 sp from Round 2 in the st. Dc in the next st, ch 2, skip 2. *Dc in the next 2 sts, ch 2, skip 2. Repeat from * to end. Join with a sl st in the STDC. (64 (68, 80, 84) sts including chs)
Round 4: Ch 4, skip 2, dc 2 in the skipped sts of Round 2, enclosing the ch 2 from Round 3. *Ch 2, skip 2, dc 2 in the skipped sts of Round 2. Repeat from * to end, join with a sl st in the ch 4 sp. Break yarn and finish off. (64 (68, 80, 84) sts including chs)
Rounds 5 - 14 (16, 18, 20): Repeat Rounds 3-4, switching colors every 2 rows or as desired and working dc sts into the skipped sts from 2 rows previous.
Round 15 (17, 19, 21): With Main Color, STDC in any skipped st of 2 Rounds previous, enclosing the ch 2 sp in the st. Dc in the next st, sc in the next 2 sts. *Dc in the next 2 sts, sc in the next 2 sts. Repeat from * to end. Join with a sl st in the STDC. (64 (68, 80, 84) sts) Continue with Hip Rounds.
HIP ROUNDS (Continue with Main Color):
Round 1 - 2: Ch 1, hdc in each st around. Join with a sl st in the 1st st. (64 (68, 80, 84) sts)
Round 3: Ch 2, fpdc in 1st st and bpdc in next st. *Fpdc in next st, bpdc in next st. Repeat from * around. Break yarn and seamless join. (64 (68, 80, 84) sts)
SLEEVES: (If omitting sleeves, work a row of sc around each arm opening)
Round 1: From RS of sweater, join with main color with a sl st - join to the center st of the armpit for the left arm (as worn), join to the center st of the top of the shoulder for the right arm (as worn). Ch 1, hdc 26 (26, 32, 32) sts evenly around arm opening. Join to 1st st with a sl st. (26 (26, 32, 32) sts)
Round 2 - 16 (17, 18, 19): Ch1, hdc in each st around. Join to 1st st with a sl st. (26 (26, 32, 32) sts)
Round 17 (18, 19, 20): Ch 2, fpdc in 1st st and bpdc in next st. *Fpdc in next st, bpdc in next st. Repeat from * around. Break yarn and seamless join. (26 (26, 32, 32) sts)
HOOD:
Row 1: From WS of sweater, join to the 1st st of the neckline (on the unused side of the starting ch) with a sl st. Ch 1 and hdc in each st of starting ch/neckline. Turn. (42 (46, 48, 52)
Row 2: Ch 1, hdc in the 1st 20 (22, 23, 25) sts, [2 hdc in the next st] twice, hdc in the last 20 (22, 23, 25) sts. Turn. (44 (48, 50, 54) sts)
Row 3: Ch 1, hdc in each st across. Turn. (44 (48, 50, 54) sts)
Row 4: Ch 1, hdc in the 1st 21 (23, 24, 26) sts, [2 hdc in the next st] twice, hdc in the last 21 (23, 24, 26) sts. Turn. (46 (50, 52, 56) sts)
Row 5: Ch 1, hdc in each st across. Turn. (46 (50, 52, 56) sts)
Row 6: Ch 1, hdc in the 1st 22 (24, 25, 27) sts, [2 hdc in the next st] twice, hdc in the last 22 (24, 25, 27) sts. Turn. (48 (52, 54, 58) sts)
Row 7: Ch 1, hdc in each st across. Turn. (48 (52, 54, 58) sts)
Row 8: Ch 1, hdc in the 1st 23 (25, 26, 28) sts, [2 hdc in the next st] twice, hdc in the last 23 (25, 26, 28) sts. Turn. (50 (54, 56, 60) sts)
Row 9 - 17 (18, 18, 19): Ch 1, hdc in each st across. Turn. (50 (54, 56, 60) sts)
Row 18 (19, 19, 20): Ch 1, hdc in each st across. Break yarn, leaving an 18 inch tail. Fold top of hood in half, WS together, and seam together with mattress stitch using the tail. Weave in ends.
EDGING AND BUTTONS:
Round 1: Join with main color with a sl st at the right side (as worn) of the base of the V of the neck opening. Ch 1 and sc evenly up the V opening, continue to sc along the edge of the hood, and down the other side of the V of the neck opening. Break yarn and seamless join to first scof the edging. Do not turn.
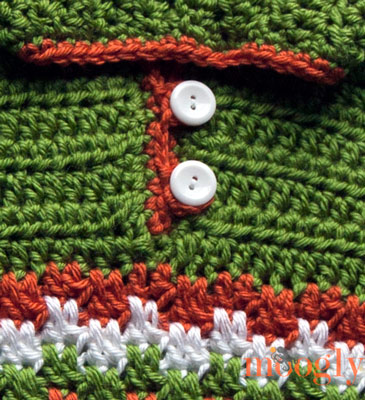
Round 2: Join with a contrasting color with a sl st to the first st of the previous Round. Ch 1 and sc evenly along Round 1, working 2 ch 6 button loops opposite where you wish to sew on the buttons (for other size buttons ch as appropriate, and be sure to test your loop on your chosen button before continuing the edging). Continue with sc to end of round. Break yarn and seamless join to first sc of the round.
I hope you all enjoy this pattern for the Leaping Crochet Baby Hoodie - I can't wait to see all the colors and variations and creativity I know you'll all bring to it!
The Fine Print
Written pattern copyright Tamara Kelly 2013. Please do not reprint or repost this pattern, but please do link to this page to share this pattern with others. If you wish to make items for sale from this pattern, please visit the About page for details. For printing and download info, click here.


mary says
LOVE IT.
Tamara Kelly says
😀 Thank you!
Mary says
Hi, I just started to crochet, I understand all the pattern..just need to know what making a corner is..couldn't get this far with out you Tutorial Videos..Thank You So Much..I want to make this Hooted Sweater for my first Grandchild..Yes, it's going to be a boy...Thank You, Mary
Tamara Kelly says
Hi Mary! Congratulations on the new grandson! 😀 "Make corner" is hdc 3 in the next stitch.
Crystal Wernet says
Oh I cannot WAIT to make this!!! Do you know what size the chest is for a 2t? I'm wondering if it will fit my son or if I will have to go up to a 3t.
Tamara Kelly says
The 2T should fit a 20 inch chest - if that's cutting it close try going up to a K hook. 😀 Thanks!
Crystal says
Thank you 🙂
tess says
K hook 🙂
Elena Hunt says
This is fabulous... Another Great Pattern!!!!
Tamara Kelly says
😀 Thanks Elena!
April Torres says
I actually just finished making the corresponding beanie hat and love it! I was going to try making matching mittens and then I saw this- just fabulous! I can't believe you are giving this away free! Thank you so much!
Tamara Kelly says
😀 Thank you April! And you're very welcome!
Sam says
Hi I am loving.this pattern, just got a quick question about making a corner. Are you crocheting 3 hdc in the same chain space then moving on to the next chain space.
Sorry still learning to read patterns.
Tamara Kelly says
No worries! Yes, you're reading it corrently - work 3 hdc sts into the same chain. That will cause the row to bend, and create a corner - 4 corners to each row. 🙂
Susiee says
So, so cute. You are amazing!
Carrie Ann says
Tamara, I was the one that requested this. I truly thank you for creating this pattern. I am in the midst of moving but I will be making this as soon as I am done. I am super excited!!! Thanks so much for all you do.
Tamara Kelly says
😀 And I thank you for the inspiration! So glad you like it Carrie Ann!
Petra says
Oh, this is truly wonderful! I have a baby boy and I do not find the crocheted clothes too boyish, but this is just perfect! I would not be able to figure it out on my own. THANK YOU so much for sharing freely! I am definitely going to made one! Thank you again!
Tamara Kelly says
😀 You're very welcome!
dana says
Thank you very much for the pattern. Lovely sweater.
Tamara Kelly says
🙂 Thank you Dana!
Heather Haigh says
I am having a hard time with the step that says break yarn and seamless join to 2nd hdc of the row (this connects the two front flaps for working in the round. I see your standing double crochet tutorial when I google what this means, but is that what I am supposed to do? I was hoping to make this little sweater for a Christmas gift, but I'm completely stuck on that one. I hate to break the yarn until I know what I am doing 🙂
Tamara Kelly says
Hi Heather! The seamless join tutorial is here: https://www.mooglyblog.com/crochet-video-tutorial-seamless-finishing-when-working-in-the-round/
Francesca says
I'm a crochet noob so please bear with me and forgive my ignorance. I am having a heck of a time understanding the seamless join tutorial. I don't get how it relates to this pattern. I'm stuck at the ''seamless join to 2nd hdc of the row.'' What am i joining and to what part? The flap i broke the yarn from?
Btw, all your patterns are lovely and i so appreciate all the information on your site. It's very inspiring!
Tamara Kelly says
Thank you Francesca! 😀 You've created the top portion of the sweater, and right now it's basically a cardigan, with two fronts. You seamless join or stitch the two front pieces together to make it a pullover. Does that help?
Marcia Hackney says
I'm looking for a pattern for a boy's pullover sweater. This one would work, but I'd like to omit the hood and just do a round neck. I suppose I can fake it, but wonder whether you already have a boy's pullover pattern somewhere. He will be 3 in April.
Thanks much.
Tamara Kelly says
Omitting the neck on this is super easy! You just work a row of edging around the neckline, make your button loops, and done! 🙂
marcia hackney says
Thanks for your quick response. I'm looking forward to working this hoodie.
Denene Taylor says
Hi. I love the pattern but once i get to the "trunk/midsection round". I get confused. Do u have a video or can u break it down?
Tamara Kelly says
Hi Denene! If you look at the pattern, under the hook, yarn, and sizing info, there are links to several video tutorials that might help! Just click on the name of the tutorial you'd like to see.
Karen says
I'm making this now and I'm confused about the trunk/midsection. What is the purpose of the Ch 4 and how do you treat it in subsequent rounds? Thanks!
Tamara Kelly says
The ch 4 acts as a ch 2 for height and the ch 2 that you work between each ch 2 section. You treat it like a ch 2 in any other part of the row, joining into the ch 4 sp with a sl st.
Karen says
Thank you. I'm going to try again.
Karen says
I have another problem. I'm about to rip the right sleeve out for the third time. My join stitch is migrating to the front of the sleeve. I can't see that in the pictures above and wonder what I'm doing wrong. I'm making the 18-month size and each round is 32 hdc + a ch 1. It's not that visible at 4 rounds, but at 10 or more, it's very obvious that there is a seam and that it's crooked. Should I send a picture?
Karen says
In spite of myself, I've almost finished this. I'd like to make another in 4T. Can you give any recommendations in how to upscale this pattern? It's just so cute that I want everyone to have one.
Tamara Kelly says
The easiest way would be to use a bit thicker yarn and larger hook, and work the yoke until it reaches below the armpits - the make the armpit row and join the front - then work in the round and add repeats to the leaping pattern as needed. That's the rough draft of it anyway. 🙂
Karen says
Thanks so much. I'll give it a shot.
Jade says
I wished this had youth and adult sizes!! I am making this for my 18 month old. But I would love to make myself one!!!
Carmen says
Buen día. Quiero hacerle esta chaqueta a mi nieto de tres años. Pero me es dificil entender el tutorial y no sé como hacer el aumento para tres años. ¿Me podría enviar gráfico o vídeo. Gracias anticipadas.
Carmen.
bazar19n@yahoo.es
Tamara Kelly says
Hello Carmen! I haven't written the pattern for that size yet, though it is on my to do list!
Claire says
Would love this in bigger sizes please! My son is jealous because I am making the Eloise sweater for my daughter!
Tamara Kelly says
🙂 It's on the to-do list!
kaysiebee says
What do you mean by "make corner"? Is hdc 3 half double crochet together with 3 stitches? Love the sweater
Clare says
Thanks so much for "translating" the Leaping crochet baby hoodie pattern into UK terms!!! I'm learning to crochet, although a experienced knitter, and have to keep altering patterns so they make sense (to me). I'm sure more experienced crocheters will be conversant in both British and American terms, but for a beginner, it has made things so much easier!
Tamara Kelly says
😀 So glad it helped Claire!
Ashley W says
First I wanted to say thanks for the very cute, free sweater pattern! This is the first time I am attempting to crochet something with a little more difficulty than a scarf. Hoping to give it as a gift if I can get it to turn out right. I do have a question. In step one it is written to make a corner and then pm in next ch. So once I put 3 hdc in the same chain I put the marker in the next chain and do I hdc into the chain with the marker?
Tamara Kelly says
Hi Ashley, and thank you! When you make the corner (3 hdc sts in the same ch) the directions read "place maker (pm) in the center of these 3 sts." This means you put the marker in the center hdc, not the next ch. Then when you make the next row, you'll work another 3 hdc in that marked stitch - remove the marker first, make the 3 hdc, and then put the marker back in the new center hdc. 🙂 Does that help?
Ashley W says
Yes it does help. I put the marker in the center hdc for the first corner but misunderstood what to do with the other corners. Thanks for things up for me!
wendy s says
thank you for another beautiful free pattern. I'm starting this tonight for a soon to be born nephew! i love following moogly on FB and pintrest. your patterns are just my style!
Tamara Kelly says
D Thank you so much Wendy!
Donna says
Hello: I love this pattern! I have worked down to the row after the "armpit" into row 2, but can't figure out after the chain 4 where to go with the hdc into the slipped stitiches of the 4th round. I don't see any slipped stitichs in round 4. Could you explain this please? Thanks. Donna
Tamara Kelly says
I believe you are looking for skipped sts, not slipped sts. 🙂
Donna says
Thanks! I've found the stitches and it's looking fine. Now if I don't want the hood, could you tell me if just doing ribbing around the neck will turn out OK on the rectangular opening? Thank you again for taking the time to help!
Tamara Kelly says
Yes! I've seen a few done that way and they look great!
LyNNe says
I'm confused about starting the hood. What is the unused side of the starting ch? Also, on the sleeves, do we start in different areas of each sleeve ie: join to center of armpit & to the center st of the top of shoulder for the right arm?
Love the sweater!
Tamara Kelly says
When you start the sweater, you chain, and then work into those chains to create the first row. Since you're working the sweater top down, that row will actually be upside down as the sweater is worn. The loops of the chains that you didn't crochet into in the first row are the unused side of the starting ch - these are the loops you work the hood into.
And yes, you start the sleeves in different places, to minimize where the seams show. 🙂
Crystal Fraley says
Lovely pattern and I can't wait to make it, FOR ALL MY BABIES!!! A couple questions though, if I wanted to make this for a 4 yr old, a 7 yr old and a 9 yr old, would I need to go up a hook size or add rows? If I wanted to make this for say a 9 lb newborn would going down a hook size be sufficient? Sorry to be a bother but I've never made clothing bigger or smaller, unless you count beanies.
Tamara Kelly says
Hi Crystal! For the newborn you could probably get away with switching to a light weight yarn, with yarn symbol 3, and a smaller hook. For larger scale upsizing though, you'd need to add both more rows and more stitches, and adjust the grading as the proportions change. I hope to add more sizes as time permits.
tess says
Help me... I want to make for grandson... he'll be 2 in Jan, but think maybe a 3T... how would I adjust... add 1 or 2 st to 2T pattern? Theresa, you're so good at this!!! Or do you have a pattern that works for 3T?
Thanks!
~Tess
tess says
PS, I know you are Tamara!!!!! Theresa on the brain???
Sharon Collis says
I am in the midst of making the Leaping Stripes/Blocks sweater and was wondering if you have a mitten pattern as I will be making the beanie as well as a baby gift so I thought the whole set would be a great shower present. Thank you so much and loving the sweater pattern.
Sharon
Tamara Kelly says
Not yet, but I like that idea! Thank you Sharon!
Sharon Collis says
Thank you for the speedy reply re: the inquiry about a leaping stripes mitten pattern. Now another question re: this pattern. How can I adapt it to an adult size. Was showing my adult daughter the sweater and she stated she would like a sweater for herself. Thank you again for this great pattern. It is my favorite. Hugs, Sharon
Tamara Kelly says
That would take some experimentation to figure out where to start the neck. I think it might be easiest to find a very simple sweater pattern in her size that's already out there, and just add the "leaping" part where you like it! 🙂
Vicki kleine says
First Id like to say Thank you for the free pattern ,Ive made it all the way to the hood and Im kind of stuck,When it says to hdc in the 1st 20 (22, 23, 25) sts, [2 hdc in the next st] twice, hdc in the last 20 (22, 23, 25) sts. Turn. (44 (48, 50, 54) sts)......does this mean that I do 4 HDC in stitch 21 or do I HDC twice in 21 and then twice in 22? It sounds like I do 4 HDC in stitch 21 but I want to make sure before I start ..Thank you for any info!
Tamara Kelly says
Hi Vicki! Thank you! It means to HDC twice in 21 and then twice in 22. 🙂
antonella ceravolo says
complimeti bellissimi lavori ..cè un piccolo probelma io che non parlo la vostra lingua come posso farlo ???? non si potrebbe avere il tutorial in italiano ...grazie mille
Melissa says
Did you ever create the Leapin Lizard Hoodie in any larger sizes? My grandson wears a size 5-6. Can I just use a bigger hook?
Tamara Kelly says
I'm afraid it's still on my to do list. A larger hook and thicker yarn may get you the size you need though!
Carmen says
Buen día Tamara. Sería posible ver un vídeo o el gráfico de esta chaquetita? Muchas gracias por todo lo que aprendo de usted.
Un saludo,
Carmen
Mireille says
I ma making this hoodie And I was wondering how long it should be for2t because I find its not that long can I add more FedCup And bpdc to make it longer.
Thank you
Tamara Kelly says
I based it on the standard sizes, but adding more rows to make it longer is a great way to add length!
Ruthann Stice says
I just made the 18 mo old last nite. It is adorable.
Now i have a 6 month and 2t to make for my two other grandchildren.
I was reading thru the comments and had to laugh, i have taught alot of people to crochet and the one thing they all have to learn is to appreciate the beauty of yarn. All seams in the round migrate over, just let it be, no matter how you try it will not ever stay straight.
This was a very well written and clearly written pattern, i had the hoodie made in 4 hours. great job!
Tamara Kelly says
😀 Thank you so much Ruthann!
Helene montini says
Tamara
I want to make this for my new granddaughter but I am confused from the beginning. The first pm is in the middle of the 3 hdc's and I see your earlier response. But the next 3 say place after a stitch. Does that mean the next row corner is in the stitch after the group of three? I love your patterns and thanks for making them free.
Helene
Helene montini says
Thanks
Tamara Kelly says
The marker always goes in the center of the 3 hdc to help keep them lined up. 🙂 Thank you!
amyKandc says
Is there a place to find the measurements of the different sizes? In something like centimetres or inches? Thanks in advance! 🙂
Tamara Kelly says
The sizes are based on the standards at http://www.craftyarncouncil.com/babysize.html 🙂
AmyKandC says
Thanks! That should help. 🙂
Sarah says
Nice pattern, making it at the moment.
My only concern is that I had to use a number 10 needle instead of the 6 you recommand to get my gauge.
So it is a bit loose in my opinion.
(I had the same problem with another pattern calling for worsted weight yarn)
I think I used the correct type of yarn
(but in my small country they never heard of worsted weight and they are now trying to implement that international code with numbers, so only 10% of the yarn has a number as code name :p)
But my other project looked nice, so hope this one is also nice at the end
Tamara Kelly says
Thank you Sarah! Finding just the right weight yarn internationally can be difficult for sure!
annette Crepinsek says
Wondering if you ever made this pattern in larger sizes. Maybe to fit a 5 year old. I have not seen it anywhere on your site but noticed in the comments that you talked about doing it. Thank you.
Tamara Kelly says
Not yet! I'd like to in the future as time allows.
kelly says
I just finished making this hoodie - turned out great; thank you!
Do you happen to have a pattern of pants to match? Or any pants (6 mo)?
Thank you.
Tamara Kelly says
Thank you! I'm afraid pants are one thing I've never made. There are some super cute patterns on Ravelry though! http://bit.ly/1lsPBvX
Carol D says
Is there any way to make this to a 3T or 4T?
I'm guessing just using a larger hook will not do it.
I'd LOVE to make this for my little granddaughter, but 2T will NOT make it.
Hope you see this since this is an older post.
Sue Vargo says
I just finished this sweater and the pattern worked wonderfully. It was easy and I love the fact it was all one piece. It turned out great. Thank you
Tamara Kelly says
😀 I'm so glad to hear it! Thank you Sue!
Robin Wordsworth says
Your designs are delightful!! Patterns are =so= well written written. (They remind me of tight code when I was in IT. ) I noticed the stitch count on row 8 of 2T size may be a typo? Should it be (112 116 sts)? Thanks, again. t.
Tamara Kelly says
Thank you so much Robin! I do my best (though of course I'm only human)! As you have discovered - great catch! Thank you for letting me know, I'll correct the pattern immediately!
Belen says
Do you have any tips for making this in a 0-3 month size? My babies skip the newborn size altogether, but with our next by 6 months old it'll be summer, and my babies may be big, but they aren't 6 month size as newborns, thank goodness! 😉
If you've already answered this question, just direct me to which comment.
Thanks!
Tamara Kelly says
Hi Belen! To make the newborn size just a bit bigger, you can use a larger hook! 🙂
Samantha Andes says
Thank you so much for this pattern! I searched and low for a nice pattern for a baby boy and this is so nice! Well designed and easy to follow. Thank you, thank you!
Samantha Andes says
*high and low
Tamara Kelly says
Thank you so much Samantha!! I'm so glad you like it!
Jill Pohren says
Hi Tamara, I'm really enjoying your blog and videos, thank you for sharing your time & talent. I'm making the hoodie in a 6 mo size and am struggling with the mid/trunk section. The st count/row should be 68 but I can't figure out how to start a new row of the leap stitches. The st count creeps up each time I go round (I've re-done it 3 times). Do you have a video of starting a new row in the round for this stitch? If not can you explain how and where to start a new row? Thanks again.
Tamara Kelly says
Thank you so much Jill!
I don't have a video, but my best guess is that you're treating the ch 4 at the beginning of every other row as a stitch - it's just a "ch sp" in terms of working into it in the next row. Does that help?
Misty says
Ok, first of all this is seriously adorable! I have gotten through to the arm pit area, but now I am slightly stuck. I'm making for 18 months, so I did the 17 hdc to the stitch marker, then removed it and crocheted in it once more.
After that, it says chain 5, ok got it no problem...but then it says skip to the next stitch marker. So do I fasten off and re join? Or do I slip stitch until I get to that marker?
Your answer will be much appreciated.
Thank you!
Misty says
Duh moment! Figured it out, so sorry!
Tamara Kelly says
Whoops, saw this after I linked. 🙂 Glad you figured it out!
Tamara Kelly says
Hi Misty! I think this video will help you: click here
Dawn Roehrs says
Thank you so very much for this wonderful free pattern. It is just splendid! I am however getting stuck on the part after the armpit row , into row 2 it says... Ch 4, skip 2, dc 2 in the skipped sts of Round 4, enclosing the ch 2 from Round 1. So I am confused about the "Round 4" I don't know where to look for that, but I am thinking it should be the armpit row (Round 4?) since that is where I find the skipped stiches and it also says...*Ch 2, skip 2, dc 2 in the skipped sts of Armpit Row (enclosing the ch 2)...Is that right? Where is the round 4?
Thank you
Dawn
Tamara Kelly says
Hi Dawn! Thank you so much!
And oh my gosh, I think of all the dozens of these that have been made, you're the first to catch that typo! Instead of Round 4 there, it should read Armpit Round. I've corrected it now. Thank you so much for letting me know!
Lori Shields says
Hi Tamara; I have made two of these hoodies; when I made the one size for a 1 year old, it was too small. I made another one and added 4 more rows in the body and the sleeves; that worked. It's awesome! How do I post a picture?
Tamara Kelly says
Yay, I'm so glad that worked! I'd love to see it! You can email it to me at tamarakelly@mooglyblog.com, or come on over to the Moogly Facebook page and share it there!
Beryl skog says
Dear Tamara
This is just the best pattern! I consider myself a pretty comfortable crocheted but I learned so many great techniques from this pattern and your awesome tutorial links!! Thank you so much. I’ll send you a px of my interpretation 😉
Beryl
Tamara Kelly says
Thank you so much! 😀 I look forward to it!
patrice fountain says
Nice job Beryl! I just saw a picture of your hoodie on the Moogly newsletter. I love that Tamara not only shares her patterns, but she also is generous with her praise by sharing pictures of her followers creations. That's one more reason to support her. Thanks to the both of you!!!
Tamara Kelly says
♥ Thank you Patrice!
Angela says
This is the second time I’ve made this sweater and it’s so cute!
But I always get confused as to how many sets of 2 dc go into the chain 5s of the armpit row.
I can’t get it to work out evenly to end up with the required number of stitches before starting on the main body. I either end up with too few, or too many total stitches.
Tamara Kelly says
Hi Angela! Thank you! The 5 chains should be treated as any other 5 stitches. In the first armpit you join to, you work a STDC in the center chain, then dc in the next chain, then skip the next... when you get to the next armpit chain it just depends on the size and where you are in the pattern... the coming back around, you should end with a ch 2 and skip the remaining 2 chains of that first armpit before the first st of the rnd. Does that help?
LuAnn Batt says
Hi Tamara, quick question: for the 12 month size, do you have a ballpark estimate for how much total yarn I’ll need?
Tamara Kelly says
Between 600-700 yds most likely!
Karen says
Hi Tamara
I luv this pattern but I am a little confused on armpit row/round... I get that you are joining rows but after you break yarn do you join at that time? What is the 10 HD’s mean? A little confused. Thx for your help
Tamara Kelly says
Hi Karen, I'm happy to help if I can! 🙂
Here is a seamless join tutorial: https://www.mooglyblog.com/crochet-video-tutorial-seamless-finishing-when-working-in-the-round/
I don't see 10 HD's, but I'm guessing you are referring to the stitch count at the end? "(54 (58, 68, 72) hdc and 10 (10, 12, 12) ch)" - that just tells you what you have made that round, like the stitch counts for previous rounds.
Sheri'L Richards says
I saw this pattern today (5/31/2025). Some years ago I made the Mesmerizing Messenger Bag pattern an over time forgot where the pattern came from. I am so glad to finally to be reminded.
I can't wait to try my hand at this sweater!
Tamara Kelly says
Yay, so glad you found us again!