The Mesmerizing Messenger Bag was a very special request - from my 11-year-old daughter Riley! My kids inspire many of my designs, but the credit for this free crochet pattern really does go to Ri! After seeing the Leaping Stripes and Blocks Blankets I made for her new cousins, she promptly declared that she wanted a crochet messenger bag using the same stitch pattern. So we took a trip to the store, where she picked out the yarn and all the details. And now our collaboration is ready to share!
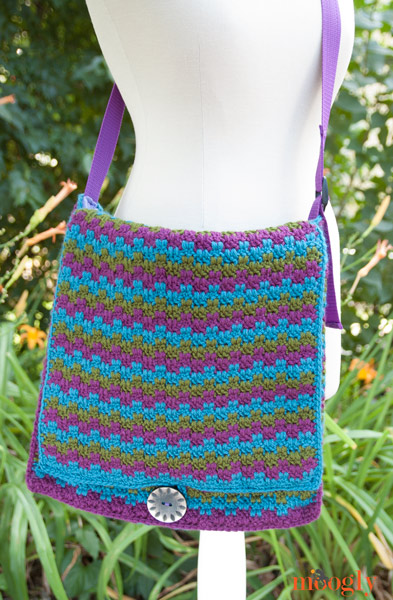
The Mesmerizing Messenger Bag looks great, but it's also very functional. It's big enough to hold a binder 3 inches wide - nice and roomy! It's also completely lined with fluffy fleece, so it's padded to protect your precious cargo. Don't balk - the fleece lining is super easy to make, and I've included all the steps below. Add the optional strap adjuster and it's the perfect crochet bag pattern for tweens to adults!
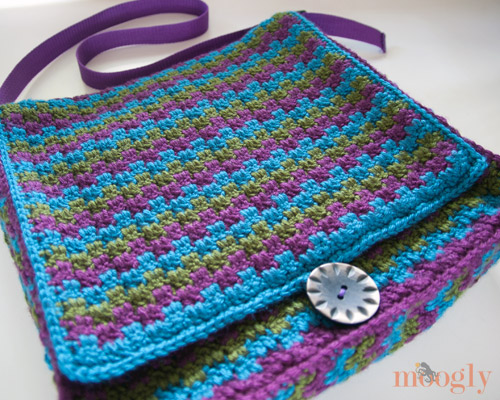
Mesmerizing Messenger Bag
Add this pattern to your Ravelry Queue and Favorites
- US - H, 5.0mm hook
- 750 yds Red Heart Soft (worsted/aran/US:10-12 ply; 250 yds each of 3 colors)
Colorways Shown: Teal, Dark Leaf, and Berry - 47" by 17.5" fabric for lining - fleece or other non-raveling fabric preferred
- 2 yds 1" wide polyester/nylon strap/webbing, or strap of your choice
- 2" button
- crochet thread, size 5 or 10
- sewing thread
- sharp tapestry/yarn needle
- strap adjuster (optional)
- stitch markers
- Video tutorial for the crochet stitch pattern HERE
Instructions for the Front Piece: (Finished measurement: 13.5" wide x 12" long)
Row 1: With Color A, ch 50. Dc in the 4th ch from hook, then dc in the next ch. *Ch 2, skip 2 ch, dc in next 2 ch. Repeat from * until last ch remains, dc in the last ch. Turn. (48 sts and ch)
Row 2: Ch 1 and sc in the 1st st. Ch 2, skip next 2 sts. *Working over the chains and into the unworked foundation chains below, dc in each of the next two foundation chs. (The chains from Row 1 are enclosed within these dc sts.) Ch 2, skip the next 2 sts. Repeat from * until last st remains. Sc in the last st (top of ch 3), finishing the st with Color B. Drop first color to carry along the side. Turn. (48 sts and ch)
Row 3: Continuing with Color B, ch 1 and sc in the 1st st. *Working over the chains and into the top of the sts from two rows previous, dc in each of the next two sts.** Ch 2, skip the next 2 sts. Repeat from * across, ending last repeat at ** with last st remaining. Sc in the last st. Turn. (48 sts and ch)
Row 4: Ch 1 and sc in the 1st st. Ch 2, skip next 2 sts. *Working over the chains and into the top of the sts from two rows previous, dc in each of the next two sts. Ch 2, skip the next 2 sts. Repeat from * until last st remains. Sc in the last st, finishing the st with the Color C. Drop last color to carry along the side. Turn. (48 sts and ch)
Rows 5 - 43: Repeat Rows 3 and 4, switching colors every 2 rows. If using 3 colors, Row 43 should be made with Color A.
Row 44: (Continuing with Color A) Ch 1, sc in the 1st 3 sts. *Working over the chains and into the top of the sts from two rows previous, dc in each of the next two sts. Sc in the next 2 sts. Repeat from * until last st remains. Sc in last st. Break yarn and weave in ends. (48 sts)
Instructions for the Back & Flap Piece: (Finished measurement: 13.5" wide x 24" long)
Rows 1 - 88: Repeat the directions for the Front Piece above, switching colors every 2 rows, with Row 88 the same as Row 44 above (the finishing row). If using 3 colors in the same pattern as the Front, Rows 87 and 88 should be made with Color B.
Instructions for the Sides & Bottom Piece: (Finished measurement: 3" wide x 37.5" long)
Row 1: With Color A, ch 14. Follow stitch pattern directions as above. (12 sts and ch)
Rows 2 - 134: Repeat the stitch pattern, switching colors every 2 rows, with Row 134 the same as Row 44/88 above (the finishing row). If using 3 colors in the same pattern as the Front, Rows 133 and 134 should be made with Color A.

Assembling the Crochet Pieces:
Using color(s) of choice, sc the Front and Back/Flap pieces to either side of the Sides/Bottom Piece. While crocheting, hold the WS of the pieces together, with the Front or Back facing you, and the Sides/Bottom facing away from you. Use stitch markers or paperclips to hold the pieces together so the stitching is even. Make sure to leave the Flap portion (the second half) of the Back free and unworked!
Instructions for the Lining and Handles:
Starting with a 41" x 17.5" piece of fleece or other non-raveling fabric, fold one end of the fabric up 14" from the bottom, so that 13" is left at the top. (The bottom becomes the pouch or bag lining, and the single layer top becomes the flap lining.)
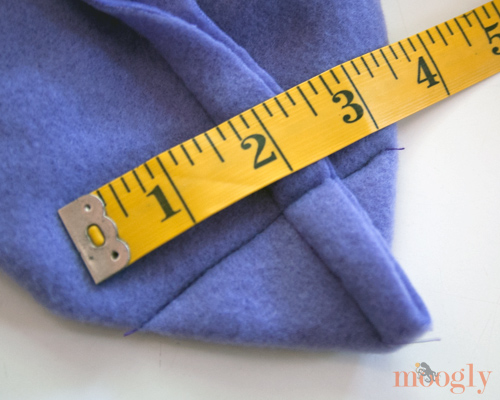
Sew a line ½" from the edge on both sides of the pouch, so that the seams are 16.5 inches apart. Then, fold the corners as shown below, so that the seam is in the middle of the triangle, and sew across the fabric where it is 3 " wide. This creates the flat bottom of the pouch.
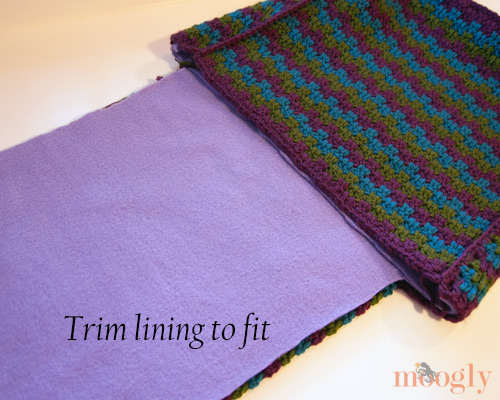
Insert the lining in the bag, and trim off the excess on either side of the flap, as shown below. Remove the lining from the bag.
If your strap is polyester or nylon, melt the raw edges of the strapping using a lighter or match. If it's natural fabric that frays, be sure to fold over and sew the ends securely. Sew the ends of the handle to either side of the outside of the pouch, along the seam line, as shown below. (Please ignore my messy hand stitching here!)
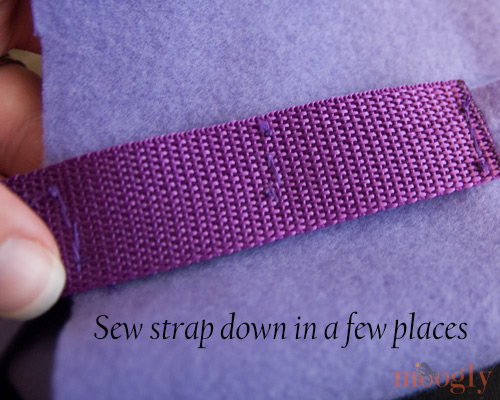
If you are using a strap adjuster, length isn't as important (as long as it's not too short), but if not be sure the strap is the right length before sewing it on. Cut the strap and add the strap adjuster according to package directions if desired.
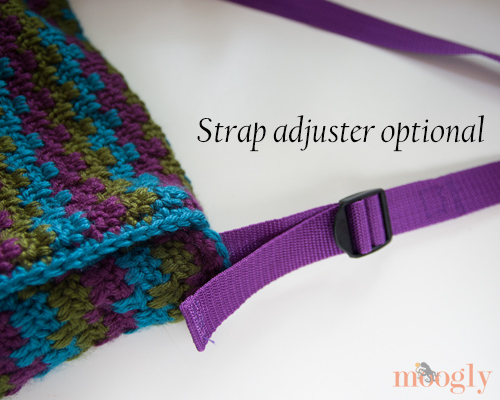
Assembling the Lining and Bag:
Sew around the entire opening and flap of the lining with the blanket stitch, using the tapestry or yarn needle and crochet thread. Skip over the handles. If you are unfamiliar with the blanket stitch, please view the tutorial here. You make wish to practice on a scrap of fabric first. Try to make the sts about as far apart as the crochet sts, but don't worry if it's not perfect - you can see mine aren't!
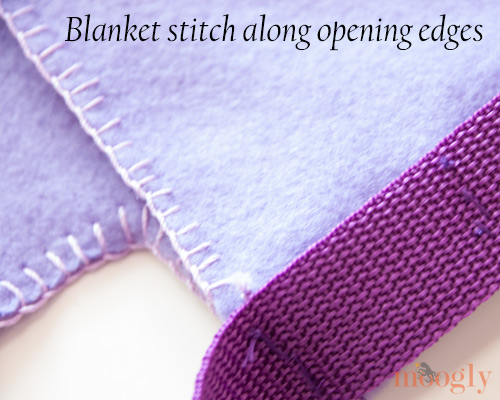
Place a stitch marker in the center of the end of the crocheted flap. Insert the lining in the bag. Sc all around the open edges evenly, being sure to go through a blanket stitch with each sc st.
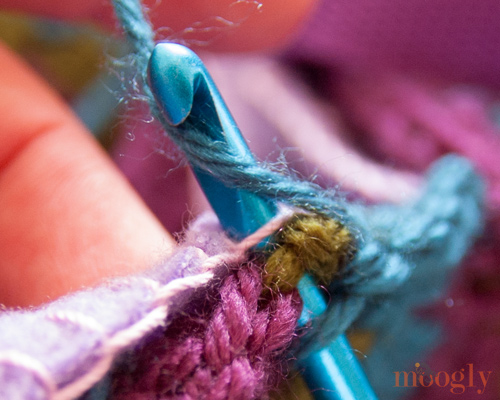
You can skip a blanket st occasionally if necessary to make sure it all lines up. Use stitch markers to hold the corners and halfway points together to help you stay on track!
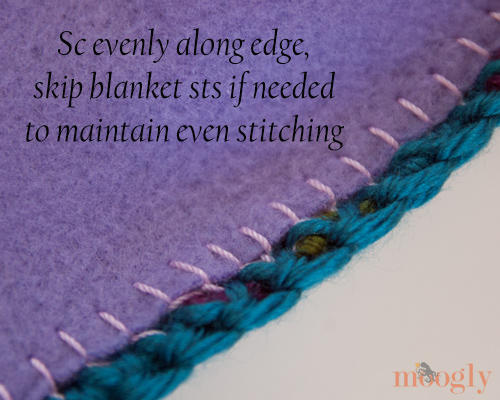
When you come to the stitch marker in the center of the end of the flap, sc in the marked st. Then ch 10 (or length needed to get around button you chose). Sc in the same st and then continue around the opening as before.
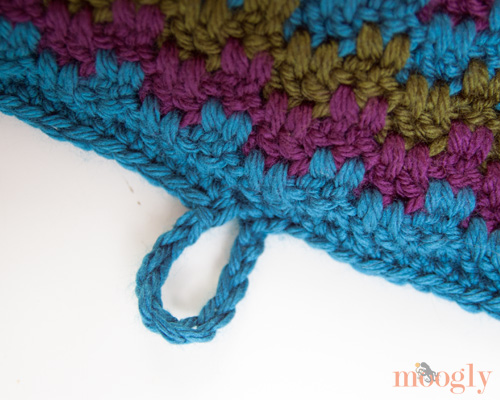
Sew the button to the front of the bag so that it lines up with the loop. Sew through the lining, handle, and crochet pieces on both sides to secure the handles all the way through the bag.
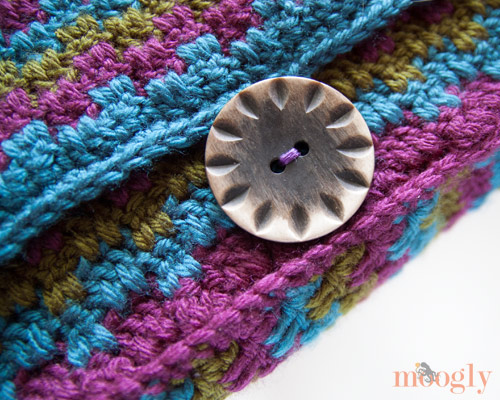
Tah dah! One Mesmerizing Messenger Bag! It's a lot of steps and a bit of work, but the result is a sturdy, well-padded bag that's big enough for several notebooks, sketchpads, binders, a small laptop - or diapers, wipes, toys, and a camera - or wallet, makeup and other essentials - almost anything! My daughter is very pleased, and I hope you will be too!
Written pattern copyright Tamara Kelly 2013. Please do not reprint or repost this pattern, but please do link to this page to share this pattern with others. If you wish to make items for sale from this pattern, please visit the About page for details.You can contact me via Facebook messages or at TamaraKelly@mooglyblog.com. To print this pattern, CLICK HERE.



Mary
I love this! It's gorgeous!
Tamara Kelly
Thank you so much Mary!
Patrice
The bag is lovely! and what a cool way to attach the lining. I'm going to have to give that technique a try. Thanks for sharing!
Maggi Wolf
Love this and have it in mind for a Christmas present for a certain favourite lass! Nice one Riley (and Tamara of course 😉 )
😀
Tamara Kelly
😀 Thank you Maggi!
Shirley
Love this, can hardly wait to try it. Thank so much
Ruth
This is the best way of attaching a lining I've ever seen. Beautiful color scheme. Kudos to Ri &you! Thank you so much for sharing!
Tamara Kelly
Thanks so much Ruth!
Paula
Beautiful and clever too! Lining looks like a breeze too. I just might try this.
Thanks,
Paula
Tamara Kelly
Thanks Paula!
Dee
Very nicely done and thanks for adding the photos.
Tamara Kelly
Thank you Dee!
Thesunroomuk
I just love this bag - the colour combination is fantastic and I really like the stitch pattern.
I have blogged about this great bag and linked directly back to your site.
Tamara Kelly
Thank you! 😀
Marrie
wow...wow...wow...wow...wow...wow...wow...wow...wow...wow...wow...wow...wow...wow...wow...wow...wow...wow...wow...wow...wow...wow...wow...wow...wow...wow...wow...wow...wow...wow...wow...wow...wow...wow...wow...wow...wow...wow...wow...wow...wow...wow...wow...wow...wow...wow...wow...wow...wow...wow...wow...wow...wow...wow...wow...wow...wow...wow...wow...wow...wow...wow...wow...wow...wow...wow...wow...wow...wow...wow...wow...wow...wow...wow...wow...wow...wow...wow...wow...wow...wow...wow...wow...wow...wow...wow...wow...wow...wow...wow...wow...wow...wow...wow...wow...wow...wow...wow...wow...wow...wow...wow...wow...wow...wow...wow...wow...wow...wow...wow...wow...wow...wow...wow...wow...wow...wow...wow...wow...wow...wow...wow...wow...wow...wow...wow...wow...wow...wow...wow...wow...wow...wow...wow...wow...wow...wow...wow...wow...wow...wow...wow...wow...wow...wow...wow...wow...wow...wow...wow...wow...wow...wow...wow...wow...wow...wow...wow...wow...wow...wow...wow...wow...wow...wow...wow...wow...wow...wow...wow...wow...wow...wow...wow...wow...wow...wow...wow...wow...wow...wow...wow...wow...wow...wow...wow...wow...wow...wow...wow...wow...wow...wow...wow...wow...wow...wow...wow...wow...wow...wow...wow...wow...wow...wow...wow...wow...wow...wow...
Tamara Kelly
LOL! So glad you like it!
Marrie
MY PLEASURE!
Leelou
Hi ! I stay with you, I'm beginning to crochet this pretty bag !! and I finish some yarns with the same colors to get accustomed to use this colors together....
It is BARGELLO stitch, I supposed... it's like... thanks thanks for sharing this pattern !! Leelou from France
(sorry for my bad english.....)
Tamara Kelly
😀 Merci Leelou!
Shami Immanuel
Thanks for sharing the pattern. I have made one and you can see it here:
http://shamiatcraft.blogspot.in/2013/11/crocheted-bag.html
Do have a look in your free time.
Tamara Kelly
Very pretty!:D
Kathleen
I was wondering if anyone had tried this with two strand held at once? I have carpal tunnel and have to crochet with a brace on. This makes single strand crocheting very loose. I am trying the pattern and if it works out I will post a pic and let u
you know! Thanks for the great pattern and tutorials!
Irene Rosa
Can you use the same stitch pattern to make a strap? Thank you.
Tamara Kelly
Absolutely! Crochet straps do tend to stretch though, so you may wish to crochet around a ribbon or something to keep it from stretching out if you plan on carrying heavier items.
Janice
I completed a messenger bag and loved it. The directions were clear, thank you very much, and the project was fun. this is a great project.
SHeRYL
Could you explain what the instructions in row 2, " working over the chains and into the unworked foundation chains below" mean?
I'm new-ish to crocheting and am a bit stumped as to how to do this.
Tamara Kelly
Hi Sheryl! I think this tutorial will help a lot: https://www.mooglyblog.com/leaping-stripes-blocks-blanket-tutorial/ 🙂
Kai
Hello! I love this bag, thank you for sharing it! I want to make it as a Christmas gift. I was wondering how to add a zipper closure. Do I attach a zipper after I've lined the bag or do I attach the zipper to the lining first? I was thinking that if I attached the zipper to the bag before sewing in the lining I could hide the zipper edges, but then I wouldn't be able to line the flap seamlessly (or should I just line the flap separately?)
I've never actually sewn a lining into a crocheted bag before much less a zipper. I was hoping you could help? Thank you! 🙂
Tamara Kelly
Sewing isn't my speciality, but I think this might help: http://plus3crochet.blogspot.fr/2013/09/cross-stitch-bag-pattern.html?m=1 🙂
Kai
I don't have a sharp crochet hook... but I think I can do that with a blanket stitch like in your tutorial. Thank you so much! 🙂
MERCEDES
ME ENCANTA ... LA HARE PARA MI...!!!!! ES UNA GRAN BENDICION TU PAGINA .UN BESO DESDE NASHVILLE..
justine
so love this i took the stitch pattern from the and made it into a blanket. if u were wondering i used a 5.5mm hook and started with ch.151 im guessing im going to have to go for about 200 rows, so thats 30 rows aday for 7 days so not so bad. happy hooking all
Kathy Russell
Love this pattern! Made one for my granddaughter, and she absolutely loves it! Thanks for creating these works of art!
Tamara Kelly
😀 Thank you so much Kathy!
suki
i love it. i will try out
Tamara Kelly
😀 Thank you Suki!
Jennifer
Thanks for the pattern and tutorial! I am going to give this a try for myself and my daughter as a gift. You always provide up to date and modern crochet items.
Tamara Kelly
😀 Thank you so much for saying so Jennifer!
jane
This is so pretty! I can't wait to make this!!!
Tamara Kelly
Thank you so much Jane! 😀
Kamie N
I made this pattern! I love it! i added extra buttons to close it in more places(in case it is to full!). Ii crocheted my strap! (I don't know that i like it but it does work!) this pattern is beautiful and easy to work up. I learned a lot about carrying yarn up and when not to. This pattern is easy to read! and so fun! Thank you SOOOO much it was exactly i was looking for!
Kamie
Tamara Kelly
Thank you so much Kamie! I'm so glad to hear you were able to make the bag just right for you! ♥
Michelle
This is great, Tamara. What I'm going to try & do is make two pannier bags for my bike from this pattern, just make the sides a bit wider & the height of the bag a bit shorter. This pattern will be perfect for that. I also love it just as it is, & I plan on making one just as shown here. 🙂
Tamara Kelly
Thank you so much, that sounds so cool!