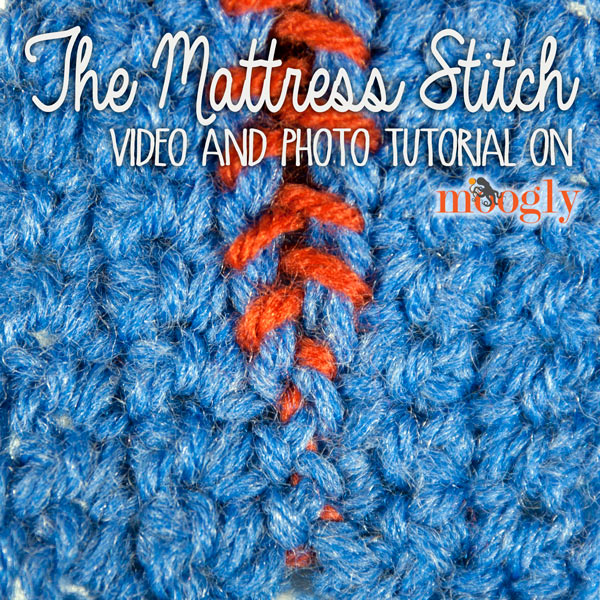
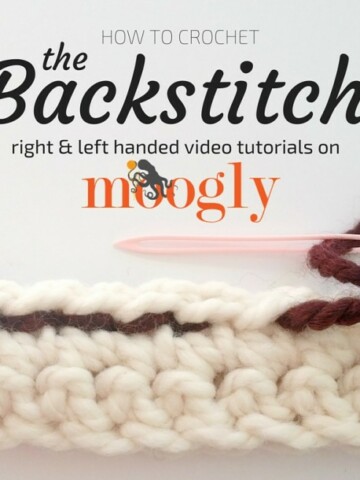
If you crochet (or knit) for long enough, eventually you're going to want to make something with seams. And while seamless patterns are great, seams can add a lot of structure, prevent stretching in the wrong places, and are important for the majority of motif projects. There are a variety of seaming techniques out there, but this tutorial focuses on the most invisible of seams - the Mattress Stitch! Here's how it's done.
Mattress Stitch Tutorial Video
Mattress Stitch Photo Tutorial and Written Instructions
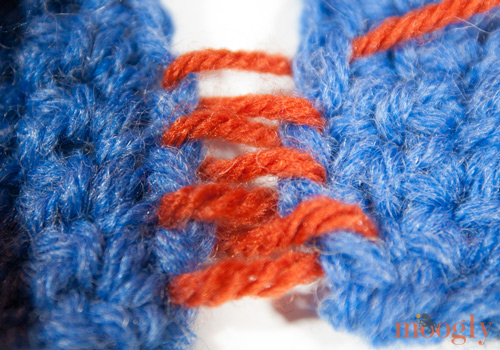
The mattress stitch brings together two pieces of fabric, crocheted or knitted. The key is to mirror what you do on one side or one piece with what you do on the other. If you're working into the top edges, as shown here, it's easy to keep things even because each stitch is clear. If you are working in the side edges, then go through the same part of the stitch on each side when you can, and just watch your spacing and be consistent when you cannot. And here's an important tip: when seaming a long section (particularly when working into the side edges), use stitch markers or clips to hold the pieces together in several places as you want them sewn, so you don't end up with one side shorter than the other!
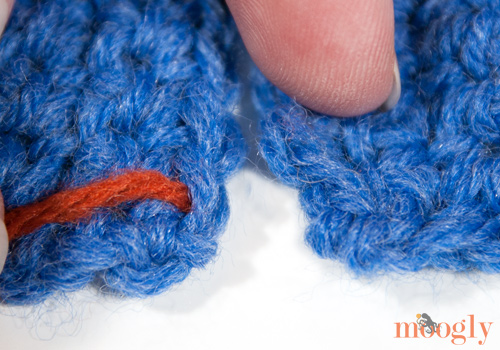
In this tutorial I'm using a contrasting yarn so you can see the stitches - but when you work this stitch for your project use a matching yarn for truly invisible stitching! This tutorial was made using Lion Brand Wool-Ease Worsted.
Step 1: Thread a yarn or tapestry needle with the yarn you'll use for seaming - a long tail end is perfect if you've got it! Bring it through the first stitch from the wrong side of the fabric to the right side.
Step 2: On the opposite side or other piece of fabric, sew through the first stitch from the back to the front - mirroring the stitch on the first side.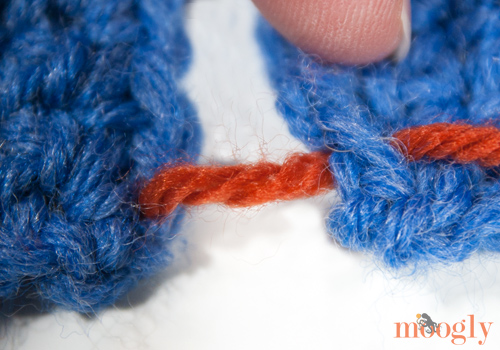
Continue with the next set of stitches, working each side back and forth, sewing from the back to the front, or wrong side to right side, keeping it even.
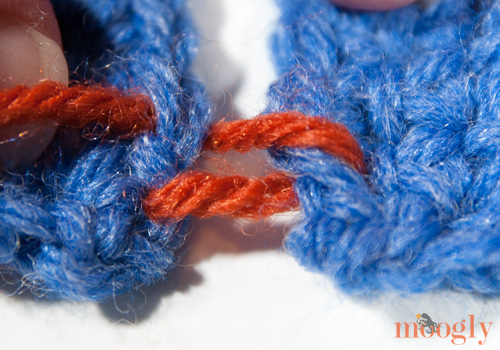

After you've worked several sets of stitches, start tightening up the first few. And watch them disappear!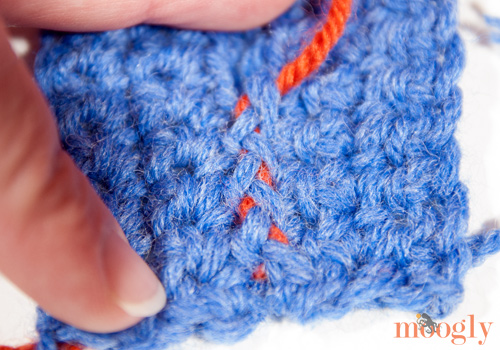
It even looks good from the back! Continue til you're done - that's all there is to it!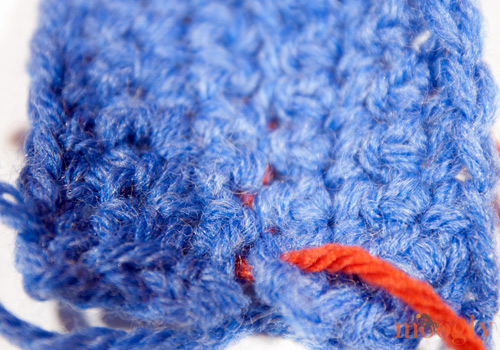
Seaming takes a bit of practice to be sure, but it's an important skill to add your arsenal, and adds so many more patterns to the list of things you can make! When you use the same color of yarn to make the seam as you did for the fabric, it really does disappear. And the resulting seam is flat and nearly invisible! I hope you'll give it a try!
Be sure to check out and like the moogly Facebook page to get the latest updates, links, and sneak peeks. Moogly is also on Pinterest, Twitter, Tumblr, Sulia, and Google+ – come join the fun! TamaraKelly@mooglyblog.com.

Penny says
That is awesome! Thank you so much for demonstrating this. I can't wait to use it!
Tamara Kelly says
😀 Thanks Penny!
Jane @ Handiworking says
I hate seaming, but you certainly made it simple and the end result is fantastic. I'll give it a try ... thanks!
Tamara Kelly says
😀 Thank you Jane! It can be a chore, but it's usually worth it!
DreAnna Plaisted says
Thanks Tamara, this stitch will be really useful for my new products! 😀
Tamara Kelly says
You're very welcome!
AJ says
I really like that the seaming just disappears with this stitch. Do you think it would be good to use when seaming afghan squares together?
Tamara Kelly says
Yes it would, as long as there are the same number of sts on each square (or close enough to fudge it) and more so if the squares are the same color in the border. 🙂
DM says
Excellent! Thank you for the tip!
Donna Telley says
This is awesome. I was making a sweater for my grandson and used this to stitch the shoulder seams for fitting. It really works! Thanks for sharing.
Tamara Kelly says
😀 So glad to hear it Donna! You're welcome!
Shauna says
I just can't say enough how much I love your blog! It's so helpful, I appreciate all the hard work and effort you have put into it! Thank you!
Tamara Kelly says
Thanks so much Shauna! 😀
Ali says
Love this seam Tamara - thanks very much for the tutorial - will be using it much more in the future!
Ali
Tamara Kelly says
🙂 Thank you Ali, glad you like it!
Emily R says
I love this video. it is the one i search for each time i have to join!
Tamara Kelly says
😀 Thank you Emily!
Anna U. says
Tamara, you may have saved my sanity AND my project!! 😉 Making my first pair of top-down crochet slippers, and they require seaming from all the way under the toes and up the back of the heel to the ankle. None of my attempts at seaming something invisible *and* comfortable were working, and I was getting more frustrated by the minute. This tutorial was the top result from my Google searches, and is absolutely the answer I needed. Thank you SO much for all the great work you share with us! <3
Tamara Kelly says
Oh that's great to hear Anna! I'm so glad - and thank you! 😀
Amber says
This is exactly what I was looking for! Do you have any suggestions for how to do this while stitching together squares of different colors, or even a different method to where the seem would still be as invisible as possible? I Have crocheted about 4-5 varying colors, mostly shades of green, to try putting together a Minecraft Creeper blanket for my son. I'm thinking of using the lime shade of green with the most amount of squares for this combination, and just praying it will come together invisible. Last, the border will be the same shade of lime green that has formed most of the squares. Lime green is the main shade, but there are also hunter green, grey, and a few white squares as well.
Any ideas or suggestions would be greatly appreciated. I wish I could attach a pic, but if you happen to see this and respond, you could simply Google Minecarft Creeper blanket. I'm a complet beginner and just want this to turn out as good as it possibly can, as I am very OCD also.
TIA - Nervous in Texas
Tamara Kelly says
Ah Minecraft! I have some obsessed sons myself. 😀 This is the most invisible seam I know of. For the border, it might be fun to hold two colors together while crocheting a simple sc border - skipping every other or every third stitch as needed, since the stitches will be thicker.
Nancy mcquade says
Hello Tamara,
I am in the process of finishing up a sweater and will need to put it together next. I have been looking at the tutorials for the various joining methods but don't know which is most suitable for putting together a sweater. What do you think?
Tamara Kelly says
Hi Nancy! For a sweater, I would use the mattress stitch, or if that didn't seem to work best, I'd go with a whip stitch. 🙂
Karen says
I've crocheted for over 50 years and I'm just now learning about this?! Cannot wait to try this out! Thank you!
Tamara Kelly says
😀 I'm so glad you like it, thank you Karen!
Beth says
How do you attach the beginning yarn tail?
Tamara Kelly says
Hi Beth! After I've finished sewing the seam, I come back to the tail hanging there at the beginning and after tightening up those first few stitches (if needed) I just weave it in as I would any other yarn tail. Just leave a good 6-12 inches hanging at the beginning, being careful not to pull it all the way through the first few stitches, and it should be fine to wait for you to come back to it later. And this way, if you make an error and need to pull out a few stitches, you aren't "locked in" til you're done. 🙂
Caroline says
A great set of simple, easy to follow instructions with nice clear photos. Thanks I can now confidently approach assembling the baby cardigan I'm making. ☺
Tamara Kelly says
I'm so glad it helped, thank you Caroline!
Claudia says
Began now joining baby blanket stripes with the mattress stitch. Great! Thanks.
Robin says
Thank you for sharing these excellent directions. I have to agree with the person above. I've crocheted for a long time but have avoided clothing. This helped me finish a sweater for my mother. Thank you, agsin.
Tamara Kelly says
I'm so glad, thank you, Robin!
Gay says
I’m like Karen, having knitted and crocheted for many years, with never a satisfying seaming method. Thanks so much for sharing your techniques.
Tamara Kelly says
I'm so glad you like it! ♥
Linda Dennis says
I am sending this comment to find out where I go for to print the pattern, which says the pattern is free..
Tamara Kelly says
Hi Linda! You've commented on a tutorial for the mattress stitch, so I don't know what pattern you are referring to. Can you email me at tkelly75@gmail.com with more info on what you are looking for?
Anita says
Looking forward to making market day cardigan.