moogly

menu icon
go to homepage
  • Patterns
  • Tutorials
  • MooglyCAL
  • Giveaways
  • Lives
    • Facebook
    • Instagram
    • Pinterest
    • TikTok
    • Twitter
    • YouTube
  • search icon
    Homepage link
    • Patterns
    • Tutorials
    • MooglyCAL
    • Giveaways
    • Lives
    • Facebook
    • Instagram
    • Pinterest
    • TikTok
    • Twitter
    • YouTube
  • ×
    Home

    All About My Craftours Trip to Ireland

    June 23, 2023 by Tamara Kelly 15 Comments

    Moogly's Trip to Ireland

    What an amazing adventure! Going to Ireland has always been a dream of mine, and to have it come true is almost too much to believe. The memories are ones I will cherish for a lifetime. Here's what we did! Thank you to Gloria Hole, Rita Sturiale, Nicole Hughes, Jessie Rayot, and Deidra Russel for sharing your photos, and capturing some of the moments I missed!

    DAY 1 - Saturday, June 3rd - I arrive in Dublin

    After a long, long, long day of travel, I arrived in Dublin! The Maldron Hotel was my refuge as I collapsed into sleep. I hadn't really been able to sleep on the plane over, and the night before that I was too nervous to sleep. So I was very grateful to the hotel for getting me in my room early so I could rest. I grabbed dinner at the hotel and went right back to bed. Well, I tried. Jet lag is real, ya'll!

    @mooglyblog♬ Irish and Celtic miscellaneous ethnic music(219916)

    DAY 2 - Sunday, June 4th - Everyone else arrives and we go to Galway

    After a quick (but pricey!) continental breakfast, I raced back to the airport to meet our tour guide Agnes and the rest of our travelers. There were 18 of us in total, and I couldn't have asked for a better group of people! I knew a few of them already, but over the next few days, they all became friends. Agnes and our bus driver Dom were phenomenal, and made hopping straight onto a bus way more fun than it sounds!

    We stopped for a quick lunch, then continued the 3-hour journey to Galway. Once there, we had a panoramic bus tour of the city and got to walk around for a bit. There was a maker's market happening in front of a medieval cathedral, and we got to visit Galway Cathedral as well. I found a few souvenirs for friends before landing at the Ardilaun Hotel for our welcome dinner that night. Then blessed sleep.

    Galway Cathedral
    Galway Cathedral

    The Corrib River

    Irish Naval Warship
    They say the Irish Navy is the only one that goes home for dinner every night!
    @mooglyblog♬ original sound - Moogly

    Day 3 - Monday, June 5th - It's all about the sheep... and castles!

    Good thing we got some rest because Monday was go go go! We started off our journey with a stop at a bog - like the kind where they found the famous bog bodies! It wasn't at all what I pictured - the water was clear and cool, and the scene was stunning. There were sheep dotting the fields around us, and you could see where they were cutting peat to burn later.

    An Irish Bog
    An Irish Bog
    Grazing Sheep
    Lambs near the bog
    Cutting Peat
    Cutting Peat
    Our group - such a wonderful bunch of people!
    Our group - such a wonderful bunch of people! Gloria Hole made Nash, the little amigurumi mascot to accompany our trip!

    Back in the bus and we were off to Kylemore Abbey and Gardens, which used to be Kylemore Castle. It was built in 1867, by Mitchell and Margaret Henry, and the public rooms feature their belongings, including a pair of delicate gloves that I'm pretty sure were crocheted! There is a Gothic cathedral on the grounds, and it all felt quite surreal. The Benedictine Nuns arrived in 1920, and they established a school that was open until 2010. Today, Kylemore Abbey is still run by the nuns - but where the visitors don't really see them.

    Kylemore Abbey
    Approaching Kylemore Abbey
    Crochet gloves spotted at Kylemore Abbey
    Crochet gloves spotted at Kylemore Abbey
    The Gothic Cathedral at Kylemore Abbey
    The Gothic Cathedral at Kylemore Abbey
    Overlooking the grounds at Kylemore Abbey
    Overlooking the grounds at Kylemore Abbey

    Back on the bus once more, we were off to the Connemara Sheep and Wool Centre, where we ate lunch, shopped, and saw spinning and weaving demos. A few of us tried out carding and spinning - but that loom was intense!

    The loom at Connemara Sheep and Wool Centre
    The loom at Connemara Sheep and Wool Centre
    Spinning demo at The loom at Connemara Sheep and Wool Centre
    Spinning demo at The loom at Connemara Sheep and Wool Centre

    Our final stop of the day was Killary Sheep Farm, where we got to get up close and personal with the yarn-on-the-hoof! This is a working farm overlooking the Killary Fjord, and I can't image a more beautiful setting to work in. We started off by hearing about how they train the dogs to herd the sheep - and then we got to see Rex the sheepdog in action! I was amazed at how well he listened, and how attuned he was to his master's voice. Then it was time to sheer a sheep, and feed and hold the baby lambs! Such a treat!

    The view of the fjord at Killary Farm
    The view of the fjord at Killary Farm
    Feeding and hugging the lambs at Killary Farm
    Feeding and hugging the lambs at Killary Farm
    The sheep at Killary Farm
    The sheep at Killary Farm

    After a quick dinner at the hotel, it was time for a talk and demonstration from the Headford Lace Project! Two wonderful volunteers showed us what makes Headford Lace unique, and how to make it. It kind of broke my brain - it's somehow simultaneously so simple... and impressively complex. It was fascinating hearing about how the woman and girls made the lace and did so much for their families - despite being paid a pittance. I purchased a print of one of the cottages in support of the group, and just have to decide where to hang it!

    Lace making with the Headford Lace Project
    Lace making with the Headford Lace Project
    Print from the Headford Lace Project - Abandoned Lacemakers Cottage
    Print from the Headford Lace Project - Abandoned Lacemakers Cottage
    @mooglyblog♬ original sound - Moogly

    Day 4 - Tuesday, June 6th - Time to rest and learn

    After such a busy day it was a relief to sit and stitch! We started off the morning with my first workshop, introducing the Irish Adventure Bag. Of course, I didn't get any pictures of that, I was busy teaching! But after a quick lunch in the hotel cafe, we were back in the classroom for a needle felting workshop taught by Belinda from Chasing Dreams Felt Art. The 3 hours just flew by, and everyone's projects were amazing!

    My dry felting project inspired by the Irish landscape
    My dry felting project inspired by the Irish landscape

    After class, we had the rest of the day and evening free, so it was time to get out and explore! Our first stop was a real Irish pub, Thirteen on the Green. I headed for this one specifically, as it was formerly known as Garvey's Pub - and one of their distant relatives is a close friend of mine here in Iowa! We saw lots of street art and had lots of fun wandering around. I finished the night with Dingle Sea Salt Ice Cream from Murphy's - delicious!

    Thirteen on the Green (formerly Garvey's Pub)
    Thirteen on the Green (formerly Garvey's Pub)
    Fun with street art in Galway
    Fun with street art in Galway
    Buttermilk Lane - just loved this alley sign!
    Buttermilk Lane - we were told the streets in Ireland are not on a grid because they were based on cow paths! The Romans never came to impose the grid system found elsewhere.
    Murphy's Ice Cream - Dingle Sea Salt flavor
    Murphy's Ice Cream - Dingle Sea Salt flavor
    @mooglyblog♬ Ireland

    Day 5 - Wednesday, June 7th - Cliffs and more castles

    This morning we said goodbye to Galway and headed back out on the bus, exploring the Irish countryside. Everyone says it's a beautiful country, and it really does look like the photos. Crumbling towers and castles dot the green fields marked by stone walls dating back centuries.

    Views of the Irish countryside
    Views of the Irish countryside
    Views of the Irish countryside
    Views of the Irish countryside
    Views of the Irish countryside
    Views of the Irish countryside

    Eventually, we stopped at the Cliffs of Moher! Featured in numerous artworks as well as movies, we were able to spot the caves where Harry Potter found a Horcrux as well as the Cliffs of Insanity from The Princess Bride. Even without the movie references, it was a stunning view worth the long hike up. (And there's a golf cart for those who can't make the trek.)

    Pretty flowers at the Cliffs of Moher
    Pretty flowers at the Cliffs of Moher
    One of the views of the Cliffs of Moher
    One of the views of the Cliffs of Moher - there were puffins waaayyyyy down there, too far away to capture!
    Another view of the Cliffs of Moher
    Another view of the Cliffs of Moher - do you see the face in the hillside?
    The view of the Cliffs of Moher as most often depicted in art and photographs
    The view of the Cliffs of Moher as most often depicted in art and photographs

    Back in the bus again, we headed to Bunratty Castle and Folk Park, which was straight out of a storybook. Here we explored the castle, which the MacNamara family built around 1425! It was occupied as a family home right up until 1804. Today it's full of authentic medieval furniture and tapestries, complete with tight and twisty (and slightly scary) staircases. The surrounding Folk Park features over 30 buildings - some set up to represent how people lived in ages past, and some filled with artisans selling their handmade wares. Many more souvenirs were purchased here! Lunch included some of the most delicious potato salad I've ever eaten (sorry, Mom!).

    Bunratty Castle exterior
    Bunratty Castle exterior
    Neolithic antlers found in a bog
    The Irish elk was the largest deer that ever lived. It went extinct between 8,000 and 6,000 years ago. This huge set of antlers was found in a bog and hung in Bunratty Castle.
    A medieval bedroom in Bunratty Castle - spy the spinning wheel and swift to the right!
    A medieval bedroom in Bunratty Castle - spy the spinning wheel and swift to the right!
    The "women's window" overlooking the main chamber in Bunratty Castle - their only view of the proceedings allowed.
    The view from the "women's window" overlooking the main chamber in Bunratty Castle - their only view of the proceedings allowed.
    Bunratty Fun Park - authentic thatched roof building
    Bunratty Fun Park - authentic thatched roof building
    Lunch at Bunratty Castle - I recommend the croque monsieur and potato salad!
    Lunch at Bunratty Castle - I recommend the croque monsieur and potato salad!

    Finally, we landed at the Brehon Hotel Killarney, which might have been my favorite hotel on the trip. (The Ardilaun was a strong second!) There I had some lovely Irish stew and tried a bit of Sticky Toffee Pudding. I spent that evening prepping for my next workshop in the morning!

    Brehon Hotel, Killarney
    Brehon Hotel, Killarney
    Irish stew - instead of chunked potato, it was served with mashed!
    Irish stew - instead of chunked potato, it was served with mashed!
    Sticky Toffee Pudding
    Sticky Toffee Pudding with ice cream
    A lovely dinner with fabulous people
    A lovely dinner with fabulous people
    @mooglyblog♬ Lisdoonvarna

    Day 6 - Thursday, June 8th - Yarny and Blarney

    This morning I taught my second and last workshop of the trip, going over some of the trickier bits of the Irish Adventure Bag. Our session flew by far too fast, but I know that many got the hang of it - and others are looking forward to the video tutorials along with the rest of you. Thank you to Gloria for getting a rare picture of me teaching! One of the best surprises came from Laura Jack, who told me that the front cable pattern of the bag is meant to represent the stone walls and fields of western Ireland. I wish I could say I planned it, but it was quite a happy coincidence!

    Teaching the Irish Adventure Bag
    Teaching the Irish Adventure Bag

    Then off we went to the surprise of the trip - a stop at the Hedgehog Fibers Showroom! This was a rare treat - and our group had so much fun shopping the beautiful hand-dyed yarns. Even Agnes, our tour guide (first row on the right), couldn't resist the allure of the pretty pretty colors. Of course, I got a couple myself - watch for them to show up in future projects!

    Doing our best to clean out the Hedgehog Fibers Showroom!
    Doing our best to clean out the Hedgehog Fibers Showroom!
    My Hedgehog Fibers purchases - patterns to come!
    My Hedgehog Fibers purchases - patterns to come!

    Our last official stop of the day was Blarney Castle and Woolen Mills. More shopping, and an opportunity to kiss the stone - though I'm not sure any of our group went through with that part. We took some photos of the castle (you can see a bit of it from the parking lot for free) and we wandered the grounds. I had a quiche for lunch - with still more amazing potato salad!

    Blarney Woolen Mill - knitted lamp shade
    Blarney Woolen Mill - knitted lamp shade
    Blarney Castle - from the cheap seats
    Blarney Castle - from the cheap seats
    Quiche and potato salad at Blarney Woolen Mills
    Quiche and potato salad at Blarney Woolen Mills

    That evening we were free to explore Killarney, and we had a fantastic dinner at The Porterhouse. I recommend the Crispy Chicken Wings and Parmesan and Garlic Fries, but I have it on good authority the Pork Belly was a great choice as well. And the signs on the bathroom doors were amusing enough to need photographing as well.

    Crispy wings and parmesan fries at The Porterhouse Killarney
    Crispy wings and parmesan fries at The Porterhouse Killarney
    Gents at The Porterhouse, Killarney
    Gents at The Porterhouse, Killarney
    Ladies at The Porterhouse, Killarney
    Ladies at The Porterhouse, Killarney
    @mooglyblog♬ Irishish music

    Day 7 - Friday, June 9th - Back to Dublin

    In shock that things were already winding down, we boarded the bus to head back to Dublin, where we would finish out our stay at the Hilton Kilmainham, the most "American style" of all our stays. It was a long day of driving, but on the way we made a couple of stops. The first was a visit to Adare Village, where we were able to grab a cuppa and wander down a street full of cottages featuring thatched roofs. Once the cheap way to roof a home, nowadays it's quite pricey - but still beautiful and oh-so picturesque.

    Thatched roof cottage in Adare Village
    Thatched roof cottage in Adare Village

    Up next we stopped at Springwools, the largest yarn store in Ireland! By American standards, it wasn't overly large, but I did of course find something to purchase - and some purchased enough that the shop agreed to mail it back for them. And one of the magazines in the shop featured a pattern by one of the members of our group, Andee Graves!

    Springwools Yarn Shop
    Springwools Yarn Shop
    Andee Graves and her featured work in Springwools
    Andee Graves and her featured work in Springwools

    That evening we were free to explore Dublin, having a drink at The Boar's Head and landing at a random restaurant for fish and chips - Friday night in Dublin is busy busy so we weren't picky! We finished our adventures with a much sought-after bubble waffle gelato cone from Cloud Nine. It was as tasty as I'd hoped, and we enjoyed our ice cream seated on a sidewalk bench listening to live Irish music. A passing elderly couple was astonished we were eating ice cream so late at night - but when it's light out until 10:30pm it doesn't feel that late!

    Walking around Dublin
    Walking around Dublin
    The Boar's Head Pub
    The Boar's Head Pub
    Random and delicious fish and chips... the mushy peas weren't for me...
    Random and delicious fish and chips... the mushy peas weren't for me...
    Bubble waffle and gelato at Cloud 9, Dublin
    Bubble waffle and gelato at Cloud 9, Dublin
    @mooglyblog♬ Summer day

    Day 8 - Saturday, June 10th - Oh deer, it's the last day

    Our final day of the trip started off with a panoramic bus tour of Dublin, dropping us off right near some of the biggest attractions. There were more historic buildings and sculptures and monuments than I could hope to keep track of, and on this day I just about walked my feet off! One of the most surprising sites was this large herd of deer, just chilling out in the park in the heart of Dublin! Even the locals were astonished, as they are usually more reclusive.

    So many deer - and in all different colors and patterns!
    So many deer - and in all different colors and patterns!
    A beautiful Dublin doorway
    A beautiful Dublin doorway
    Detail of a column, walking around Dublin
    Detail of a column, walking around Dublin
    Pretty sure this Davenport is older that the Davenport near me that's been in the news lately...
    Pretty sure this Davenport is older that the Davenport near me that's been in the news lately...
    Another beautiful Dublin doorway
    Another beautiful Dublin doorway

    Our first big stop was the National Museum of Ireland Archeology. There we saw prehistoric and neolithic artifacts, including some actual bog bodies. I've chosen not to share my photos here, as they are a bit graphic - but you can click here to see the photos on the museum website. There were displays on medieval life in Ireland, including the Vikings who came, and I spotted some weaving tools as well as ancient drop spindles!

    Decorated Stone, Kildare, 2500-1700 BC
    Decorated Stone, Kildare, 2500-1700 BC
    Information on one of the bog bodies
    Information on one of the bog bodies
    Long Dugout Boat, found in a bog near Galway, 2500 BC
    Long Dugout Boat, found in a bog near Galway, 2500 BC
    Medieval Viking Weaving Tablets
    Medieval Viking Weaving Tablets
    Medieval Viking Drop Spindles
    Medieval Viking Drop Spindles

    We lunched at Beshoff Bros, where I had the best fish and chips and the very best mushy peas of the whole trip! If you are gluten-free or traveling with someone who is, this is a must-stop on the itinerary. After lunch, we explored the courtyard of Dublin Castle, the scene of numerous historical events (and a spot you might recognize if you've watched the film, Michael Collins).

    Inside the courtyard at Dublin Castle
    Inside the courtyard at Dublin Castle
    Outside Dublin Castle
    Outside Dublin Castle
    Along the side of Dublin Castle
    Along the side of Dublin Castle

    Finally, it was time to see the Book of Kells at Trinity College. Photographing the book itself isn't allowed, but there is an informative exhibit before the book and lots of photo ops in the Long Room. Again, this might look familiar to Harry Potter movie fans!

    Display at the Book of Kells
    Display at the Book of Kells
    Another Display at the Book of Kells
    Another Display at the Book of Kells
    The Long Library at Trinity College, Dublin
    The Long Library at Trinity College, Dublin
    Side chamber in the Long Library at Trinity College, Dublin
    Side chamber in the Long Library at Trinity College, Dublin
    The longest surviving Irish harp, and the model for the Irish insignia, dating from the later middle ages.
    The longest surviving Irish harp, and the model for the Irish insignia, dating from the later middle ages.

    Thoroughly worn out, we joined our fellow travelers for a final farewell dinner back at the hotel. It was hard to believe it was all over, and that these strangers turned friends were no longer going to be the faces I saw every day, accompanying me on fantastic adventures.

    @mooglyblog♬ original sound - Moogly

    Day 9 - Sunday, June 11th - Fly away home

    A final bus ride took us to the Dublin airport, where we all boarded a flight to JFK. We were all sat together, continuing the good group feelings for just a few hours more. At the airport, there were group hugs and maybe a tear or two as we finally said our goodbyes. My final flights home weren't until Monday, so I spent the night at an airport hotel. As a final hurrah, dinner was at Neir's Tavern, where they filmed scenes from Goodfellas as well as Tower Heist. I can't say I've seen either film, but the burger was delicious!

    Neir's Famous Goodfellas Burger Deluxe
    Neir's Famous Goodfellas Burger Deluxe

    Getting home on Monday started way to early and ended way later than scheduled (gotta love unscheduled plane maintenance), and while I'm so glad it happened, I'm also glad to be home again. I am eternally grateful to all of my fellow travelers for making this an unforgettable experience I will treasure forever. And that includes my most special souvenirs - a book handmade by Jessie Rayot, and an original watercolor by Deidra Russel (they both made enough for the whole group - amazing!!).

    Handmade gifts from Jessie Rayot and Deirdra Russel
    Handmade gifts from Jessie Rayot and Deidra Russell

    And thank you too to all of you who have followed Moogly and given me this opportunity! Thank you to the amazing Agnes, the dashing Dom, and Craftours. It was the trip of a lifetime.

    Farewell Ireland! Til next time! ♥!
    Farewell Ireland! Til next time! ♥

    Thank you so much for reading about our journey! You can follow Moogly on Facebook, Twitter, Pinterest, TikTok, and Instagram! Here's a pin image in case you'd like to save this post to inspire your own trip to Ireland!

    Moogly's Trip to Ireland

    MooglyCAL2023 - Block 13

    June 22, 2023 by Tamara Kelly 7 Comments

    MooglyCAL2023 Block 13 Courtesy of Cocky Crocheter [Read more...]

    Loop Scoop 64: A Yarny Link Party!

    June 21, 2023 by Tamara Kelly Leave a Comment

    Loop Scoop 64 - Moogly

    [Read more...]

    The Hooktionary by Brenda K.B. Anderson Review and Giveaway

    June 19, 2023 by Tamara Kelly 57 Comments

    The Hooktionary by Brenda K.B. Anderson Review and Giveaway

    [Read more...]

    Irish Adventure Bag

    June 16, 2023 by Tamara Kelly 47 Comments

    Irish Adventure Bag - free crochet pattern on Moogly

    [Read more...]

    Moogly Got a Makeover! Let's Explore - Live

    June 15, 2023 by Tamara Kelly 1 Comment

    Moogly Got a Makeover! Let's Explore - Live!

    [Read more...]

    Farming Fresh Crochet Market Tote: Free Pattern and Tutorial

    June 14, 2023 by Tamara Kelly 2 Comments

    Farming Fresh Crochet Market Tote: Free Pattern and Tutorial on Moogly

    [Read more...]

    Moogly Crochet and Chat Live - June 13, 2023

    June 13, 2023 by Tamara Kelly 4 Comments

    Moogly Chat Live June 13 2023 [Read more...]

    Floral Farmhouse Crochet Coasters Tutorial

    June 9, 2023 by Tamara Kelly Leave a Comment

    Floral Farmhouse Crochet Coasters Tutorial on Moogly

    [Read more...]

    MooglyCAL2023 - Block 12

    June 8, 2023 by Tamara Kelly 3 Comments

    MooglyCAL2023 - Block 12 - Courtesy of Stitches n Scraps
    [Read more...]

    Loop Scoop 63: A Yarny Link Party!

    June 7, 2023 by Tamara Kelly Leave a Comment

    The Loop Scoop

    [Read more...]

    Floral Farmhouse Crochet Coasters

    June 1, 2023 by Tamara Kelly 1 Comment

    Floral Farmhouse Crochet Coasters - Free Crochet Pattern on Moogly

    The Floral Farmhouse Crochet Coasters are an easy. elegant, flower in a circle - and a free crochet pattern on Moogly! Featuring everyone's favorite cotton, Lily Sugar'n Cream, they add a pop of handmade texture, and make wonderful gifts! Kick off summer with some cool stash busting and whip some up today!

    Disclaimer: This post includes affiliate links; materials provided by Yarnspirations.

    Prefer an ad-free PDF? You've got options!

    Prefer the free blog version? Keep scrolling!

    100% Cotton... or Not?!

    I love using Lily Sugar'n Cream for anything kitchen or food related. It's easy to clean, comes in tons of colors, and is absorbent too! And if high heat is involved it won't melt - unlike 100% acrylic yarns. However, unless you drink your coffee boiling hot and still in the pot, you could really use whatever fiber you like for these.

    Floral Farmhouse Crochet Coasters - WIP

    Buuuutttt... the Floral Farmhouse Crochet Coasters, when made with Lily Sugar'n Cream (or Bernat Handicrafter) also make beautiful and eco-friendly face scrubbies! Although I'm sure there's someone out there who likes to wash their face with acrylic yarn...

    Floral Farmhouse Crochet Coasters - closeup

    Go Neutral, or Crochet a Rainbow!

    Lily Sugar'n Cream comes in over 75 colorways, each of which will give the Floral Farmhouse Crochet Coasters a unique look. I went with Ecru for an elegant Farmhouse style, but color makes all the difference here! This is a fantastic pattern for using up all your odds and ends, and creating your own custom look. Great for craft fairs, teachers gifts, hostess gifts, and all around the home!

    Floral Farmhouse Crochet Coasters - Free Crochet Pattern on Moogly


    Floral Farmhouse Crochet Coasters

    Add this pattern to your Ravelry Queue and Favorites

    US-H, 5.0 mm hook, Susan Bates

    24 yds Lily Sugar'n Cream (4-Medium; 100% cotton, 120 yds 109 m, 2.5 oz/71 g) per coaster
    Colorways Shown: Soft Ecru and Jute (1 ball is enough to make 5 coasters)

    Stitch Markers

    Gauge: Rounds 1-3 = 4” (10cm) in diameter

    Size: Approx 5” [12.5 cm] in diameter

    Floral Farmhouse Crochet Coasters with Lily Sugar'n Cream

    HELPFUL LINKS AND TUTORIALS

    Floral Farmhouse Crochet Coasters Tutorial

    Crochet Abbreviations

    Magic Circle

    CSDC - Chainless Starting Double Crochet

    Puff Stitch

    Seamless Finishing

    SPECIAL STITCHES:

    Beginning Puff Decrease (Beg Puff Dec): [Yo and insert hook, yo and pull up a loop to the height of a hdc st] twice in first st of round, yo and draw through 4 loops (2 loops remain on hook), skip next st, [yo and insert hook, yo and pull up a loop] twice in next st, yo and draw through 4 loops (3 loops remain on hook), yo and draw through all loops on hook.

    Puff Decrease (Puff Dec):  [Yo and insert hook, yo and pull up a loop to the height of a hdc st] twice in last st used by second half of last Puff Dec, yo and draw through 4 loops (2 loops remain on hook), skip next st, [yo and insert hook, yo and pull up a loop] twice in next st, yo and draw through 4 loops (3 loops remain on hook), yo and draw through all loops on hook.

    Floral Farmhouse Crochet Coasters Crochet Diagram:

    Floral Farmhouse Crochet Coasters Diagram

    Floral Farmhouse Crochet Coasters INSTRUCTIONS:

    Rnd 1: Create a Magic Circle. CSDC, 11 dc in the ring, join with slip st in first CSDC. (12 dc)

    Rnd 2: (CSDC, dc) in first st, 2 dc in each st around, join with slip st in first CSDC. (24 dc)

    Rnd 3: Ch 1, Beg Puff Dec over first 3 sts, ch 2, * Puff Dec, ch 2; repeat from * around, working second half of last Puff Dec in first st of previous round, join with slip st in first Beg Puff Dec. (12 Puff decs)

    Rnd 4: Ch 1, * hdc in next st, 3 hdc in next ch-2 sp; repeat from * around, join with slip st in first hdc. (48 hdc)

    Rnd 5: Loosely slip st in each st around. Cut yarn and seamless join. Weave in all loose ends.


    Thirsty for More?

    Ready for your next project? Check out the Moogly Free Patterns Page or Ravelry!

    Floral Farmhouse Crochet Coasters - WIP

    If this pattern inspires you to make your own project, tag me so I can check it out too! @mooglyblog or #mooglyblog

    The Fine Print

    Follow Moogly on Facebook, Twitter, Pinterest, TikTok, and Instagram! Thank you to Yarnspirations for providing the materials shown in this post. Thank you to Robyn Chachula for tech editing this pattern and creating the chart. Written pattern copyright Tamara Kelly 2023, all rights reserved. Please do not reprint or repost this pattern, but please do link to this page to share this pattern with others.

    If you wish to make items for sale from this pattern or translate it to another language, please visit the About page for details. 

    Heatherstone Shawl Tutorial

    May 31, 2023 by Tamara Kelly Leave a Comment

    Heatherstone Shawl Tutorial - Right and Left-handed Videos on Moogly

    [Read more...]

    Eye Love Knots: Designer Showcase

    May 30, 2023 by Tamara Kelly 1 Comment

    Eye Love Knots Designer Showcase on Moogly

    [Read more...]

    Crochet Southwest Spirit by Susan Kennedy Review and Giveaway

    May 29, 2023 by Tamara Kelly 33 Comments

    Crochet Southwest Spirit - Giveaway on Moogly

    [Read more...]

    Heatherstone Shawl

    May 26, 2023 by Tamara Kelly 7 Comments

    Heatherstone Shawl - Free Crochet Pattern on Moogly

    The Heatherstone Shawl is a light and lacy asymmetrical wrap! Featuring Caron Simply Soft, you can choose your favorite colors and make it your own! Perfect for gift-giving, it's a free crochet pattern on Moogly!

    Disclaimer: This post includes affiliate links; materials provided by Yarnspirations.

    Prefer an ad-free PDF? You've got options!

    This button leads to the pattern on Etsy

    Prefer the free blog version? Keep scrolling!

    Like Running Downhill - In a Good Way!

    The Heatherstone Shawl starts wide and narrows as it goes, decreasing in almost every row. Combined with an easy-to-memorize repeat, it feels like this pattern just speeds up as it goes, flying right off the hook!

    Heatherstone Shawl - Free Crochet Pattern on Moogly - WIP

    Crafted with Caron Simply Soft, it effortlessly drapes over your shoulders, providing a gentle warmth without weighing you down. Its airy and breathable design ensures year-round comfort, making it perfect for both casual outings and special occasions. And it's machine washable, making it practical for everyday wear!

    Heatherstone Shawl - Free Crochet Pattern on Moogly - Closeup

    Pick Your Colors and Make a Statement!

    The color combination of gray and white makes the Heatherstone Shawl a versatile accessory that complements any wardrobe. Whether paired with a classic black dress or layered over a casual top and jeans, it effortlessly enhances your personal style and adds a refined touch to your look. But Caron Simply Soft comes in over 60 colors - so you can customize this wrap for yourself and for those you'll gift it to, too!

    Heatherstone Shawl - Free Crochet Pattern on Moogly


    Heatherstone Shawl

    Add this pattern to your Ravelry Queue and Favorites

    US-J, 6.0 mm hook, Susan Bates

    720 yds Caron Simply Soft (4-medium; 100% acrylic; 170 g / 6 oz, 288 meters / 315 yards)
    Color A: Gray Heather (2 skeins)
    Color B: Off White (less than 1 skein)

    Stitch Markers

    Gauge: 2 pattern reps = 4" across

    Size: Approx 44" x 52" x 67" (see schematic below)Heatherstone Shawl Schematic

    HELPFUL LINKS AND TUTORIALS

    Heatherstone Shawl Tutorial 

    Crochet Abbreviations

    FDC - Foundation Double Crochet

    Hdc2tog - Hdc Decrease

    Join with sc

    Picot

    Seamless Finishing

    NOTES:

    If you prefer to avoid the FDC stitch, you can instead ch 135, skip the 2 chs closest to the hook (does not count as a st), and dc in each rem ch across. The important thing is to have 133 dc in the first row.

    To change or customize the size of this shawl, use a stitch multiple of 6, plus 1 for the first row.

    SPECIAL STICH

    Picot - ch 3, sl st in first ch made. (See the tutorial linked above.)

    Heatherstone Shawl - Free Crochet Pattern on Moogly - WIP

    Heatherstone Shawl INSTRUCTIONS:

    Row 1: With Color A, FDC 133; turn. (133 dc)

    Row 2: Ch 1, hdc in first 2 sts, ch 3, skip 3 sts, *hdc in next st, ch 1, skip 1 st, hdc in next st, ch 3, skip 3 sts; rep from * until 2 sts remain, hdc in last 2 sts, turn. (46 hdc)

    Row 3: Ch 1, sc in first st, ch 2, *3 dc in next ch-3 sp, ch 2, sc in next ch-1 sp, ch 2; rep from * until 1 ch-3 sp remains, 3 dc in ch-3sp, ch 2, sc in last hdc, turn. (66 dc, 23 sc)

    Row 4: Ch 5, *hdc in next dc st, ch 1, skip 1 st, hdc in next st, ch 3; rep from * until 3 dc remain, hdc in next dc, ch 1, skip 1 st, hdc2tog in last dc and ch-2 sp, turn. (44 hdc)

    Row 5: Ch 1, sc in next ch-1 sp, ch 2, *3 dc in next ch-3 sp, ch 2, sc in next ch-1 sp, ch 2; rep from * across, 2 dc in the ch-5 sp, turn. (65 dc, 22 sc)

    Row 6: Ch 1, hdc in first 2 sts, ch 3, *hdc in next dc, ch 1, skip 1 st, hdc in next st, ch 3; rep from * until 3 dc remain, hdc in next dc, ch 1, skip 1 st, hdc2tog in last dc and ch-2 sp, turn. (44 hdc)

    **Begin Repeat
    Note: Rows 8-10 are reps of Rows 4-6.

    Row 7: Ch 1, sc in next ch-1 sp, *ch 2, 3 dc in next ch-3 sp, ch 2,** sc in next ch-1 sp; rep from * across, finishing last repeat at **, sc in the last hdc, turn.

    Row 8: Ch 5, *hdc in next dc st, ch 1, skip 1 st, hdc in next st, ch 3; rep from * until 3 dc remain, hdc in next dc, ch 1, skip 1 st, hdc2tog in last dc and ch-2 sp, turn.

    Row 9: Ch 1, sc in next ch-1 sp, ch 2, *3 dc in next ch-3 sp, ch 2, sc in next ch-1 sp, ch 2; rep from * across, 2 dc in the ch-5 sp, turn.

    Row 10: Ch 1, hdc in first 2 sts, ch 3, *hdc in next dc, ch 1, skip 1 st, hdc in next st, ch 3; rep from * until 3 dc remain, hdc in next dc, ch 1, skip 1 st, hdc2tog in last dc and ch-2 sp, turn.

    End Repeat**

    Rows 11 – 85: Repeat Rows 7 – 10, ending on a Row 9 rep.

    Row 86: Ch 1, hdc in first 2 sts, ch 3, hdc in next dc, ch 1, skip 1 st, hdc2tog in last dc and ch-2 sp, turn. (4 hdc)

    Row 87: Ch 1, sc in next ch-1 sp, ch 2, 3 dc in next ch-3 sp, ch 2, sc in last st; turn. (3 dc, 2 sc)

    Row 88: Ch 4, hdc in next dc st, ch 1, hdc2tog in last dc and ch-2 sp, turn. (2 hdc)

    Row 89: Ch 1, sc in next ch-1 sp, ch 2, 2 dc in ch-4 sp; do not turn, do not break yarn. (1 sc, 2 dc) 

    Edging Section 1: Ch 1, turn the shawl 90 degrees to sc evenly across the straight edge (non-decreasing side) of rows. Break yarn.

    Edging Section 2: With Color A, join with sc and sc evenly across the angled edge (decreasing side) of rows; join to first st of Edging Section 1. Break yarn.

    Border

    Rnd 1: With Color B, join with sc to first st of Edging Section 1, sc in each st around, working ch 2 at each corner; join.

    Rnd 2: Ch 1, hdc in 1st st, *picot, skip 1 st, hdc in next st; repeat from * along all sides, working (hdc, picot, hdc) twice at the point/corner; join with a sl st and break yarn. (adjust as needed for stitch count)


    Wrap It Up with More Free Patterns!

    Ready for your next project? Check out the Moogly Free Patterns Page or Ravelry!

    Heatherstone Shawl - Free Crochet Pattern on Moogly

    If this pattern inspires you to make your own project, tag me so I can check it out too! @mooglyblog or #mooglyblog

    The Fine Print

    Follow Moogly on Facebook, Twitter, Pinterest, TikTok, and Instagram! Thank you to Yarnspirations for providing the materials shown in this post. Written pattern copyright Tamara Kelly 2023, all rights reserved. Please do not reprint or repost this pattern. Please do link to this page to share this pattern with others. If you wish to make items for sale from this pattern or translate it to another language, please visit the About page for details. 

    MooglyCAL2023 - Block 11

    May 25, 2023 by Tamara Kelly 5 Comments

    MooglyCAL2023 Block 11
    [Read more...]

    Woven Wheat Tote

    May 23, 2023 by Tamara Kelly Leave a Comment

    Woven Wheat Tote - Free Crochet Pattern on Moogly

    The Woven Wheat Tote is a cottony soft tote, in two great sizes! Originally featured as part of Stitch Up Chicago 2023, I can now share it here on Moogly!

    Disclaimer: Materials provided by Circulo. This post includes affiliate links.

    Prefer an ad-free PDF? You've got options!

    Prefer the free blog version? Keep scrolling!

    A Crochet Tote... with a Knit Alternative!

    I designed this bag to be easy enough for new crocheters, but interesting enough for those with more experience. However, at Stitch Up, it's also important to have a knit version! So Michele Costa, organizer of the event (and herself a knit and crochet designer), came up with a knit version - CLICK HERE to check it out! 

    Circulo Tote Bags
    photo courtesy of The Studio Chicago

    Both the crochet and knit versions have two sizes, and you can choose to make the handles, or purchase them! So many options!

    Make with Super Soft Circulo Inlove

    Circulo was one of the sponsors of Stitch Up 2023, and I was excited to get to try out their yarn! Circulo has a great smooth texture and is very soft. It's a very new yarn, with a smooth texture and lovely hand. Look for it at your local yarn store!

    Woven Wheat Tote - Free Crochet Patterns on Moogly


    Woven Wheat Tote

    Add this pattern to your Ravelry Queue and Favorites

    US - L, 8.0mm crochet hook

    Circulo In Love (Bulky; 100% cotton; 137 yds/125m; 100g)
    Colorway Shown: Castanha/Chestnut – 2 hanks (3 hanks)

    Stitch Markers

    Cocoknits Leather Handles (optional)

    Gauge: 8 sts x 11 rows = 4” in side split hdc

    Sizes:
    Small – 11.5” wide x 12” tall laid flat excluding handles (2 hanks)
    Large (shown) – 15.5” wide x 13.25” tall laid flat excluding handles (3 hanks)

    Helpful Tutorials and Links:

    https://tinyurl.com/crochet-abbreviations

    https://tinyurl.com/bag-bottoms

    https://tinyurl.com/side-split-hdc

    https://tinyurl.com/seamless-finishing

    Woven Wheat Tote - WIP with Hook

    SPECIAL STITCHES

    Side split hdc (right-handed) – yo, insert the hook under just the left vertical strand of the indicated stitch through to the back of the fabric, yo and pull up a loop, yo and pull through all 3 loops on hook.

    Side split hdc (left-handed) – yo, insert the hook under just the right vertical strand of the indicated stitch through to the back of the fabric, yo and pull up a loop, yo and pull through all 3 loops on hook.

    NOTES

    If you prefer not to start with a row of foundation stitches, instead ch one more than the listed number of sts, skip the ch closest to the hook, and hdc in each rem ch across for Row 1.

    The pattern is begun in rows and then converts to rounds. See the bag bottoms tutorial linked above for help with this if needed.

    The pattern includes instructions for two sizes. When different instructions are needed, they are written in the pattern as Small(Large).

    Woven Wheat Tote INSTRUCTIONS:

    Row 1: FHDC 20(28); turn. (20(28)sts)

    Row 2 – 4: Ch 1, sc in each st across; turn. (20(28)sts)

    Rnd 5: Ch 1, hdc in each st across, turn the corner and hdc 4 along the sides of the previous rows, turn the corner and hdc in each fhdc across, turn the corner and hdc 4 along the sides of the previous rows, join with a sl st in the first st of the rnd. (48 (64) sts)

    Rnd 6 – 34(39) (or to desired height): Ch 1, side split hdc in each st around; join. After Rnd 48, break yarn and weave in ends.

    Handles (optional):

    There should be enough yarn to add these handles, but if preferred you can use purchased handles. The tabs used here should work with a variety of handle styles.

    Tabs – Make 4:

    Row 1: Ch 12, skip the ch closest to the hook, sc in each rem ch across; turn. (11 sc)

    Row 2: Ch 1, sc in each st across. Break yarn leaving a long tail for sewing.

    Handles – Make 2:

    Inside: Ch for 32” or double desired handle length. Break yarn and tie ends of chain together. Position loop so that knot is in the middle.

    Outside: Starting 2” from the end, sc around both strands of the ch, and continue to sc around both strands to 2” from the other end. Break yarn and weave in ends to secure.

    Handles for Woven Wheat Tote

    Assembly:

    Note: Blocking the handles and tabs before assembly is recommended.

    1. Mark the four spots where you’d like to attach your handles.

    IF USING CROCHETED HANDLES:

    2. Insert the tabs into the loops at the ends of the handles.

    3. Sew the tabs to the bag to secure handles.

    Woven Wheat Tote - crocheted handles

    IF USING PURCHASED HANDLES:

    2. Follow the package instructions to add handles.

    Woven Wheat Tote - purchased handles


    Bag It Up with More Free Patterns!

    Ready for your next project? Check out the Moogly Free Patterns Page or Ravelry!

    Bags designed by Moogly

    If this pattern inspires you to make your own project, tag me so I can check it out too! @mooglyblog or #mooglyblog

    The Fine Print

    Follow Moogly on Facebook, Twitter, Pinterest, TikTok, and Instagram! Thank you to Circulo for providing the materials shown in this post. Written pattern copyright Tamara Kelly 2023, all rights reserved. Please do not reprint or repost this pattern, but please do link to this page to share this pattern with others.

    If you wish to make items for sale from this pattern or translate it to another language, please visit the About page for details. 

    Caron Simply Soft Summer Giveaway

    May 22, 2023 by Tamara Kelly 261 Comments

    Caron Simply Soft Summer Giveaway on Moogly [Read more...]

    Craftours and Moogly Trip to Ireland in 2023 - Supply List

    May 19, 2023 by Tamara Kelly Leave a Comment

    Are you coming on the trip? Here's what you'll want to bring for our crochet workshops!

    Ireland Supply List

    And here are links to the recommended yarns!

    Patons Classic Wool Worsted

    Red Heart Super Saver

    And be sure to read Craftours Know Before You Go Info!

    Can't wait to see you there!

    Honey Moon Bag Tutorial

    May 19, 2023 by Tamara Kelly 3 Comments

    Honey Moon Bag Tutorial - Moogly

    [Read more...]

    Loop Scoop 62: A Yarny Link Party!

    May 17, 2023 by Tamara Kelly Leave a Comment

    Loop Scoop 62 - Get 5 Fabulous Summer Ready Free Crochet Patterns on Moogly! [Read more...]

    Moogly Crochet and Chat Live - May 16, 2023

    May 16, 2023 by Tamara Kelly 1 Comment

    Moogly Chat Live May16 2023 [Read more...]

    Stitch Up Chicago 2023 Goodie Bags Giveaway

    May 15, 2023 by Tamara Kelly 20 Comments

    Stitch Up Chicago 2023 Giveaway on Moogly

    [Read more...]

    MooglyCAL2023 - Block 10

    May 11, 2023 by Tamara Kelly 4 Comments

    MooglyCAL2023 Block 10 Courtesy of Celtic Knot Crochet [Read more...]

    Tunisian Full Stitch Crochet Blanket: Free Pattern and Tutorial

    May 10, 2023 by Tamara Kelly Leave a Comment

    Tunisian Full Stitch Crochet Blanket: Free Pattern and Tutorial

    [Read more...]

    Honey Moon Bag

    May 9, 2023 by Tamara Kelly 16 Comments

    Honey Moon Bag - Free Crochet Pattern on Moogly

    The Honey Moon Bag is a textured, versatile, summery, and free crochet pattern on Moogly! Featuring Bernat Suede-ish, you'll want to make one in every color!

    Disclaimer: This post includes affiliate links; materials provided by Yarnspirations.

    Prefer an ad-free PDF? You've got options!

    This button leads to the pattern on Etsy

    Prefer the free blog version? Keep scrolling!

    Slip some Bernat Suede-ish on your hook!

    I've had some Bernat Suede-ish sitting on my shelves for a little bit now, waiting for just the right inspiration to strike. I knew I wanted to make a summery bag... And when I sat down with the yarn, this design just flew right off my hook!

    Honey Moon Bag - Free Crochet Pattern on Moogly

    I originally started working it up in one color, but soon realized it needed to be this bright sunny yellow for me. I loved the suggestion of Sunshine Smile from reader Julia E., but alas that name was taken, so Honey Moon it is - get it? Honeycomb colorway, shaped like a moon... Of course, Bernat Suede-ish comes in a great variety of colors, so you can get the look that's right for you!

    Honey Moon Bag - Free Crochet Pattern on Moogly

    Pick Your Handle(s), Pick Your Style!

    The Honey Moon Bag is designed to be versatile and worn however you like. With a shorter strap, it makes a great shoulder bag. Go longer and it's a crossbody - with a nod to how everyone is wearing their fanny packs these days as well. By adding metal rings to the tabs, you can switch out the handles every day, to fit your needs!

    Honey Moon Bag - Free Crochet Pattern on Moogly


    Honey Moon Bag

    Add this pattern to your Ravelry Queue and Favorites

    US-J, 6.0 mm hook, Susan Bates

    255 yds Bernat Suede-ish (5 - Bulky; 70% Polyester 30% Viscose; 100 g/3.5 oz, 164 m/179 yds)
    Colorway Shown: Honeycomb - 2 balls

    Stitch Markers

    Handle - purchased handle in desired length and style
    Shown: 23.6" handle

    Optional (if needed): Rings to sew into tabs

    Optional: fabric lining

    Gauge: 13 sts = 4" (gauge is not important for this pattern)

    Size: Approx 15.5" wide x 12.5" tall excluding tabs and handle

    Honey Moon Bag - Free Crochet Pattern on Moogly

    HELPFUL LINKS AND TUTORIALS

    Honey Moon Bag Tutorial 

    Crochet Abbreviations

    Magic Circle

    CSDC - Chainless Starting Double Crochet

    Post Stitches - fpdc and bpdc

    Seamless Finishing

    Whip Stitch Seaming

    NOTES:

    This pattern is made in two identical pieces. But don't break your yarn when you've finished the second piece!

    If you would like to block your bag, I recommend doing so prior to assembly.

    If you prefer the "WS" of the bag to the Right Side, then put that on the outside - make it your own!

    Honey Moon Bag INSTRUCTIONS:

    Make 2:

    Rnd 1 [RS]: Make a magic circle, CSDC, dc 11 in the ring, join. (12 sts)

    Row 2 [RS]: (CSDC, dc) in 1st st, 2 dc in next 8 sts, dc in next st; turn. (remaining sts unworked) (19 sts)

    Row 3 [WS]: Ch 1, sc in first st, *2 fpdc in next st, sc in next st; rep from * across, turn. (28 sts)

    Row 4 [RS]: CSDC in first st, dc in next 4 sts, *2 dc, dc 2; rep from * until 2 sts rem, dc in last 2 sts, turn. (35 sts)

    Row 5: CSDC, dc in next 6 sts, *2 dc in next st, dc in next 3 sts; rep from * until 4 sts rem, dc in last 4 sts, turn. (41 sts)

    Row 6: Ch 1, sc in first 5 sts, *2 fpdc in next st, sc in next 5 sts; rep from * to end, turn. (47 sts)

    Row 7: Ch 1, sc in first 5 sts, *bpdc in next 2 sts, sc in next 5 sts; rep from * across, turn.

    Row 8: CSDC in first st, dc in next st, *2 dc in next st, dc in next 6 sts; rep from * finishing last rep with just 2 dc, turn. (54 sts)

    Row 9: Ch 1, sc in first 2 sts, *fpdc in next 2 sts, sc in next st; rep from * until 1 st rem, sc in last st, turn.

    Row 10: CSDC, dc in next st, *2 dc in next st, dc in next 6 sts; rep from * across finishing last rep with just 2 dc, turn. (62 sts)

    Row 11: CSDC, dc in next 2 sts, *2 dc in next st, dc in next 6 sts; rep from *across finishing last rep with just 2 dc, turn. (71 sts)

    Row 12: Ch 1, sc in first 3 sts, *2 fpdc in next st, sc in next 6 sts; rep from * across finishing last rep with just 4 sc, turn. (81 sts)

    Row 13: Ch 1, sc in first 4 sts, *bpdc in next 2 sts, sc in next 6 sts; rep from *across finishing last rep with just 3 sc, turn.

    Row 14: CSDC, dc in next 4 sts, *2 dc in next st, dc in next 6 sts; rep from *across finishing last rep with just 5 dc, turn. (92 sts)

    Row 15: Ch 1, sc in first 2 sts, *fpdc in next 2 sts, sc in next st; rep from * across, turn.

    Row 16: Ch 1, sc in first 4 sts, 2 sc in next st, sc in next 6 sts, 2 hdc in next st, hdc in next 6 sts, [2 dc in next st, dc in next 6 sts] 8 times, 2 hdc in next st, hdc in next 6 sts, 2 sc in next st, sc in next 6 sts, 2 sc in next st, sc in last 3 sts, turn. (105 sts)

    Note: The next rnd is worked all the way around the piece, but is NOT joined!

    Rnd 17: Ch 8, skip ch closest to hook, sc in rem 7 chs (tab made), sc in next 15 sts, hdc in next 12 sts, dc in next 51 sts, hdc in next 12 sts, sc in last 15 sts, ch 2, sc evenly across ends of rows, sc in 7 sc of tab; turn. (do not join)

    Row 18: Ch 1, sc in ea sc across, sc in ch-2 sp, do NOT turn to work along curve. For Piece 1, break yarn and finish off. For Piece 2, do NOT break yarn.

    Honey Moon Bag - Free Crochet Pattern on Moogly

    Assembly:

    1. With RS facing out and WS together, use stitch markers to match up stitches along the curve. Be sure not to attach the 7 sts of each Tab. Tabs should be at opposite ends.Honey Moon Bag - Free Crochet Pattern on Moogly
    2. Continuing with active loop from Piece 2, sc through both layers of the bag, along the curve. Break the yarn and finish off.
    3. Cut 2 pieces of yarn, each approximately 24" long.
    4. Fold the tabs over the rings or over your handle (depending on chosen handle's style) towards the opposite side of the bag. Use the yarn pieces to whipstitch each tab along opposite side. Attach handle to rings if needed.Honey Moon Bag - Free Crochet Pattern on Moogly
    5. Optional: Line the bag with fabric if desired.

    Bag It Up with More Free Patterns!

    Ready for your next project? Check out the Moogly Free Patterns Page or Ravelry!

    Bags designed by Moogly

    If this pattern inspires you to make your own project, tag me so I can check it out too! @mooglyblog or #mooglyblog

    The Fine Print

    Follow Moogly on Facebook, Twitter, Pinterest, TikTok, and Instagram! Thank you to Yarnspirations for providing the materials shown in this post. Written pattern copyright Tamara Kelly 2023, all rights reserved. Please do not reprint or repost this pattern, but please do link to this page to share this pattern with others.

    If you wish to make items for sale from this pattern or translate it to another language, please visit the About page for details. 

    Timeless Textured Baby Crochet by Vita Apala Review and Giveaway

    May 8, 2023 by Tamara Kelly 34 Comments

    Timeless Textured Baby Crochet - Review and Giveaway on Moogly

    [Read more...]

    Bernat Macramé Wall Hanging: Free Pattern and Tutorial

    May 4, 2023 by Tamara Kelly 3 Comments

    Bernat Macrame Wall Hanging Free Pattern and Tutorial - Moogly

    [Read more...]

    Loop Scoop 61: A Yarny Link Party!

    May 3, 2023 by Tamara Kelly 1 Comment

    The Loop Scoop 61 on Moogly and Petals to Picots [Read more...]

    Moogly Crochet and Chat Live - May 2, 2023

    May 2, 2023 by Tamara Kelly Leave a Comment

    Moogly Chat Live May 2 2023 [Read more...]

    Crochet Your Way to a Buyer's Heart with Amigurumi - Review and Giveaway

    May 1, 2023 by Tamara Kelly 5 Comments

    rochet Your Way to a Buyer's Heart with Amigurumi - review and giveaway on Moogly

    [Read more...]

    Cat Squish Tutorial

    April 28, 2023 by Tamara Kelly 3 Comments

    Cat Squish Tutorial - Right and left-handed video tutorials on Moogly

    [Read more...]

    MooglyCAL2023 - Block 9

    April 27, 2023 by Tamara Kelly 3 Comments

    MooglyCAL2023 - Block 9 - Courtesy of Every Trick on the Hook [Read more...]

    Stitch and Hustle: Designer Showcase

    April 26, 2023 by Tamara Kelly Leave a Comment

    Stitch and Hustle: Designer Showcase on Moogly

    [Read more...]

    Red Heart Super Saver Big Giveaway

    April 24, 2023 by Tamara Kelly 306 Comments

    Red Heart Super Saver Giveaway on Moogly [Read more...]

    Bernat Macramé Keychains: Free Pattern and Tutorial

    April 20, 2023 by Tamara Kelly 3 Comments

    Bernat Macramé Keychains - Tutorial on Moogly

    [Read more...]

    Loop Scoop 60: A Yarny Link Party!

    April 19, 2023 by Tamara Kelly Leave a Comment

    Loop Scoop 60 - 5 Fabulous Free Crochet Patterns on Moogly [Read more...]

    The Moogly News and Upcoming Events - Live April 18, 2023

    April 18, 2023 by Tamara Kelly 2 Comments

    Moogly Apr 18 2023 Live [Read more...]

    Cat Squish

    April 17, 2023 by Tamara Kelly 56 Comments

    Cat Squish - Free Crochet Pattern on Moogly

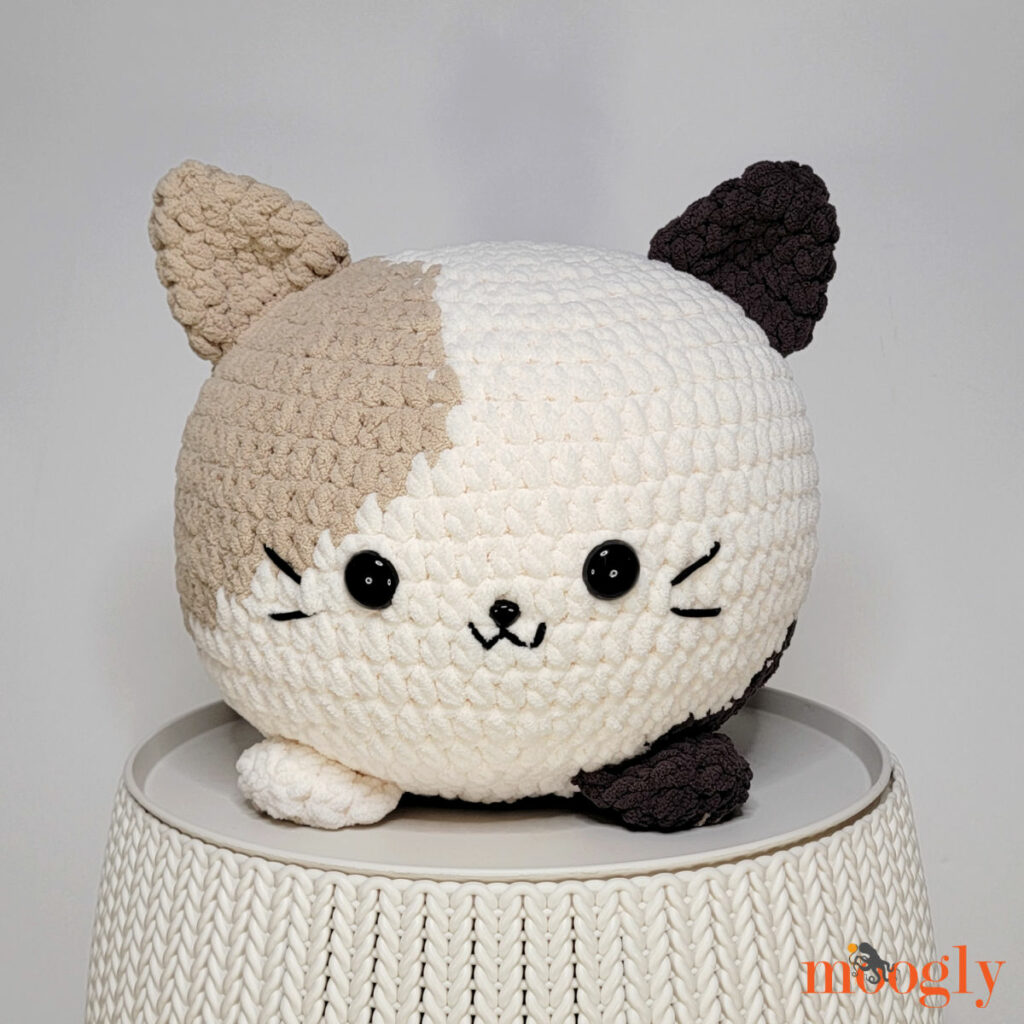
    The Cat Squish is a cuddly calico kitty, and a very squishy, free crochet pattern on Moogly! Featuring Bernat Blanket, this pattern will sink its claws right into you - in the most delightful way!

    Disclaimer: This post includes affiliate links; materials provided by Yarnspirations.

    Prefer an ad-free PDF? You've got options!

    Prefer the free blog version? Keep scrolling!

    Part of the 2023 Softie Crochet Along on #CALCentralCrochet!

    Softie CAL on Underground Crafter

    How the 2023 Softie CAL Works

    Every Monday from March 20 to June 26, 2023, we’ll share a free crochet pattern for a softie. You can make these softies to keep, for gifts, or to donate to charity while chatting with other crocheters in our groups and sharing your projects to win giveaway prizes!

    Don’t forget to enter the giveaway in this post on Underground Crafter by Sunday, July 2, 2023 at 11:59 p.m. Eastern.

    How To Join the 2022 Softie CAL

    • Sign up for Crochet Along updates and the Underground Crafter newsletter to get regular updates, including an update as each CAL pattern is released - and some amazing bonuses! 
    • You can join in by crocheting the patterns as you have time.
    • Share your progress and post pictures of your finished projects. Tag your projects and posts #CALCentralCrochet on all social media.
    • If you’d like to chat with other crocheters, join the CAL Central Facebook group or visit this thread in the CAL Central Ravelry group.

    Visit Underground Crafter to learn more about the prizes, enter the end-of-CAL giveaway, and to get links to each Softie CAL post as it is released.

    Grab that Bernat Blanket!

    I love using Bernat Blanket for my large amigurumi squishes, and the Cat Squish is no exception! For this one I used a standard skein of the white color, and then grabbed an O'Go for the other colors, which I needed just a bit of.

    Cat Squish - WIP

    Of course, you can use leftover bits of whatever colors you like to create your own custom cat! And any worsted or bulky weight yarn you have works great for the whisker and mouth details - but I think Bernat Maker Home Dec is purr-fect!

    Cat Squish - Free Crochet Pattern on Moogly

    Cute and Cuddly for Kids and Adults

    This crochet cat pillow is fun to make - and pet and squeeze! I used safety eyes, but this pattern has not been tested for safety for children under 3 years of age. If you are crocheting it for a baby or toddler, you may wish to embroider on the face and make sure that the pieces are sewn on quite securely. If using it as a photo prop, be sure not to leave the toy with a baby unattended.

    Cat Squish - Free Crochet Pattern on Moogly


    Cat Squish

    Add this pattern to your Ravelry Queue and Favorites

    8.0 mm hook, Susan Bates

    235 yds Bernat Blanket (6 - Super Bulky; 100% polyester; 300g/10.5 oz; 201 m/220 yds)
    A - Whipped Cream ( less than 1 ball) - white
    B - light brown (less than 1 ball)
    C - dark brown (less than 1 ball)
    Note: This pattern originally used Bernat Blanket O'Go for Colors B and C. This put-up is discontinued, but can be substituted with standard Bernat Blanket.

    2 yds Bernat Maker (5 - Bulky; 72% cotton, 28% nylon; 250g/8.8 oz; 317 yds/290 m)
    D - Black

    10" Microbead Pillow Ball or fiber fill

    2 Safety Eyes - 24mm

    Safety Nose – 15mm

    Stitch Markers

    White Felt (1.5" square)

    Gauge: 5"/10cm across after Rnd 3.

    Size: approx 10" across/tall excluding ears, feet, and tail

    Cat Squish - O'Go colors

    HELPFUL LINKS AND TUTORIALS

    Cat Squish Tutorial

    Crochet Abbreviations

    Magic Circle

    Working in a Spiral

    Hdc - half double crochet

    Hdc2tog - hdc decrease

    Seamless Finishing

    Whip Stitch Seaming

    NOTES:

    Rnds are worked in a spiral.

    Do not ch 1 at the beginning of a rnd or join any rnds with a sl st unless specifically directed in the pattern.

    Move a stitch marker along the first st of each rnd as you work to keep track of your progress.

    When changing colors, finish the last stitch of the previous color with the new color.

    Please note that some pieces switch between Rows and Rounds.

    Cat Squish - Free Crochet Pattern on Moogly

    CAT SQUISH INSTRUCTIONS:

    Body - Colors A, B, and C

    NOTE: For the Body, crochet OVER color A, but BREAK color B/C and rejoin for each round.

    Rnd 1: With A, make a magic circle, ch 1, sc in the ring, 9 hdc in the ring. (10 sts)

    Rnd 2: 2 hdc in each st around. (20 hdc)

    Rnd 3: *Hdc in the next st, 2 hdc in the next st; rep from * around. (30 hdc)

    Rnd 4: [2 hdc in the next st, hdc in the next 2 sts] 6 times, with B [2 hdc in the next st, hdc in the next 2 sts] 2 times, with A [2 hdc in the next st, hdc in the next 2 sts] 2 times. (40 hdc)

    Rnd 5: [Hdc in the next 3 sts, 2 hdc in the next st] 5 times, hdc in the next 3 sts, with B 2 hdc in the next st, [hdc in the next 3 sts, 2 hdc in the next st ] 2 times, hdc in the next st, with A hdc in the next 2 sts, 2 hdc in the next st, hdc in the next 3 sts, 2 hdc in the next st. (50 hdc)

    Rnd 6: [Hdc in the next st, 2 hdc in the next st, hdc in the next 3 sts] 5 times, hdc in the next st, 2 hdc in the next st, with B [hdc in the next 4 sts, 2 hdc in the next st] 3 times, with A hdc in the next 4 sts, 2 hdc in the next st, hdc in the next 3 sts. (60 hdc)

    Rnd 7: Hdc in the next 5 sts, 2 hdc in the next st, [hdc in the next 9 sts, 2 hdc in the next st] 2 times, hdc in the next 6 sts, with B hdc in the next 3 sts, 2 hdc in the next st, hdc in the next 9 sts, 2 hdc in the next st, hdc in the next 6 sts, with A hdc in the next 3 sts, 2 hdc in the next st, hdc in last 4 sts. (66 hdc)

    Rnd 8: [2 hdc in the next st, hdc in the next 10 sts] 3 times, 2 hdc in the next st, with B [hdc in the next 10 sts, 2 hdc in the next st] 2 times, hdc in the next 2 sts, with A hdc in the last 8 sts. (72 hdc)

    Rnd 9: Hdc in the next 8 sts, 2 hdc in the next st, hdc in the next 17 sts, 2 hdc in the next st, hdc in the next 11 sts, with B hdc in the next 6 sts, 2 hdc in the next st, hdc in the next 17 sts, 2 hdc in the next st, hdc in the next st, with A hdc in the last 8 sts. (76 hdc)

    Rnd 10: Hdc in the next 41 sts, with B hdc in the next 26 sts, with A hdc in the last 9 sts.

    Rnd 11: Hdc in the next 42 sts, with B hdc in the next 24 sts, with A hdc in the last 10 sts.

    Rnd 12: Hdc in the next 43 sts, with B hdc in the next 22 sts, with A hdc in the last 11 sts.

    Rnd 13: Hdc in the next 45 sts, with B hdc in the next 18 sts, with A hdc in the last 13 sts.

    Rnd 14: Hdc in the next 47 sts, with B hdc in the next 14 sts, with A hdc in the last 15 sts.

    Rnd 15: Hdc in the next 16 sts, with C hdc in the next 4  sts, with A hdc in the next 30 sts, with B hdc in the next 8 sts, with A hdc in the last 18 sts.

    Rnd 16: Hdc in the next 11 sts, with C hdc in the next 6 sts, hdc2tog, hdc in the next 6 sts, with A hdc in the next 11 sts, hdc2tog, [hdc in the next 17 sts, hdc2tog] 2 times. (72 sts) 

    Rnd 17: Hdc in the next 10 sts, with C hdc2tog, hdc in the next 10 sts, hdc2tog, hdc in the next st, with A hdc in the next 9 sts, hdc2tog, [hdc in the next 10 sts, hdc2tog] 3 times. (66 sts) 

    Rnd 18: Hdc in the next 5 sts, hdc2tog, with C hdc in the next 9 sts, hdc2tog, hdc in the next 8 sts, with A hdc in the next st, hdc2tog, [hdc in the next 9 sts, hdc2tog] 3 times, hdc in the last 4 sts. (60 sts) 

    Rnd 19: Sc in next st, sl st in next st, break yarn and finish off with seamless join.

    Tail - Color A and C

    Rnd 1: With C, make a magic circle, ch 1, 6 sc in the ring. (6 sts) 

    Rnd 2: Sc in each st around, finishing last st with A. Break C.

    Rnds 3 - 6: With A, sc in each st around.

    Rnds 7 - 9: Loosely sl st in next 2 sts, sc in next 4 sts. After Rnd 9, break yarn leaving a long tail for sewing, and seamless join.

    Cat Squish - Tail

    Ears (make 2) - Make 1 in B and 1 in C

    Rnd 1: Make a magic circle, ch 1, sc in the ring, 5 hdc in the ring. (6 sts)

    Rnd 2: *Hdc in the next st, 2 hdc in the next st; rep from * around. (9 sts)

    Rnd 3: *2 hdc in next st, hdc in next 2 sts; rep from * around. (12 sts)

    Rnd 4: *Hdc in the next st, 2 hdc in the next st, hdc in the next 2 sts; rep from * around. (15 sts)

    Rnd 5: *Hdc in the next 4 sts, 2 hdc in next st; rep from * around. (18 sts)

    Rnd 6: Sc in the next st, sl st in next st, break yarn leaving a long tail for sewing, and seamless join.

    Cat Squish - Ears

    Feet (make 4) - Make 3 in Color C and 1 in Color A, with Toe Beans in Color B

    Rnd 1: Make a magic circle, ch 1, sc in the ring, 6 hdc in the ring. (7 sts)

    Rnd 2: 2 hdc in each st around. (14 sts)

    Rnd 3:  Hdc in next st, sc in next 5 sts, hdc in next 2 sts, sc in the next 5 sts, hdc in next st. (14 sts) Secure active loop with a stitch marker and weave in your first end now.

    Add Toe Beans (optional): With Color B, cut a 12" length of yarn. Using a stitch marker, sew three small dashes on one side of the foot, as shown. Weave in ends.

    Cat Squish - Toe Beans

    Row 4: Fold piece flat, ch 1, sc through next st and last st, sc through next 6 sets of sts; break yarn and finish off.

    Cat Squish - Feet

    Cat Squish Belly - Colors C and A

    NOTE: For the Belly Rnds 4-6, crochet OVER color C, but BREAK color A and rejoin for each round. 

    Rnd 1 - 3: With Color C, rep Rnd 1 - 3 of Body. (30 hdc)

    Rnd 4: [2 hdc in the next st, hdc in the next 2 sts] 6 times, with A [2 hdc in the next st, hdc in the next 2 sts] 2 times, with C [2 hdc in the next st, hdc in the next 2 sts] 2 times. (40 hdc)

    Rnd 5: [Hdc in the next 3 sts, 2 hdc in the next st] 4 times, with A [hdc in the next 3 sts, 2 hdc in the next st] 5 times, with C hdc in the next 3 sts, 2 hdc in the last st. (50 hdc)

    Add Feet: Place stitch markers at st #3 and 9 (first foot - brown), 15 and 21 (second foot - brown), 28 and 34 (third foot - white), and 40 and 46 (fourth foot - brown). Use these stitch markers to attach the last row of each foot to the RS of the belly. Make sure the toe beans face the same direction as the belly.

    Cat Squish - Add Feet to Belly - 1 Cat Squish - Add Feet to Belly - 2

    Rnd 6: Working through both layers as needed, [hdc in the next st, 2 hdc in the next st, hdc in the next 3 sts] 3 times, hdc in the next st, 2 hdc in the next st, hdc in the next 2 sts, with A hdc in the next st, *hdc in the next st, 2 hdc in the next st, hdc in the next 3 sts; rep from * around, finishing last st with C. (60 hdc) Break A leaving a long tail for sewing.

    Rnd 7: With C, sc in next st, sl st in next st, break yarn and seamless join, leaving a long tail for sewing.

    Cat Squish - Add Feet to Belly - 3

    Ears, Face, and Tail to Body Assembly

    NOTE: Orient the Body so that Rnd 19 is in front. The sc st should be in the center front. 

    1 - Add Safety Eyes:  Add safety eyes to body, around Rnds 13 and 14. Use the sc to help with placement.

    Cat Squish - Face Details

    2 - Add Nose: Add safety nose to body, around Rnds Rows 14 and 15. Use the eyes to help with placement. Tip - if you find your safety nose wants to pull out of the fabric, try adding a small square of felt behind the Body, and before adding the backing.

    Cat Squish - Felt for Safety Nose

    3 - Add Whiskers and Mouth: Use Color D and a yarn needle to add whiskers and mouth to the face, as shown above.

    4 - Sew on Ears: Use the long tails to sew the Ears to opposite sides, around Rnds 5-8. Put the B ear on the same side as the B spot, and the C ear on the same side as the C spot. Sew them on "flat" so that they look like cat ears, with a slight curve if desired. See below for reference.

    Cat Squish - Ear PlacementCat Squish - Ear Closeup

    5 - Sew on Tail: Use the long tail to sew the Tail to back of the Body, around Rnd 17. See below for reference.

    Cat Squish - Tail assembly

    Final Cat Squish Assembly

    1 - Insert stuffing into body.

    2 - Use stitch markers to attach Belly to Body, with the colors mostly matched (A with A, C with C). Adjust as needed so feet look correctly oriented.

    Cat Squish - Prep for final seam

    3 - Using long tails of Belly, sew Belly to Body with whip stitch in matching colors.

    Cat Squish - Side View


    Meow you doin’?

    Ready for your next project? Check out the Moogly Free Patterns Page or Ravelry!

    Cat Squish - Bottom View

    If the Cat Squish pattern inspires you to make your own project, and you post a photo on social media, be sure to tag #CALCentralCrochet and me @mooglyblog or #mooglyblog so I can check it out too!

    The Fine Print

    Follow Moogly on Facebook, Twitter, Pinterest, TikTok, and Instagram! Thank you to Yarnspirations for providing the materials shown in this post. Written pattern copyright Tamara Kelly 2023, all rights reserved. Please do not reprint or repost this pattern, but please do link to this page to share this pattern with others.

    If you wish to make items for sale from this pattern or translate it to another language, please visit the About page for details. 

    « Previous Page
    Next Page »
    Tamara Kelly of Moogly

    Moogly is world-famous for fresh. modern, and approachable crochet designs - as well as a little knitting and crafting here and there. On Moogly, you'll find several new free patterns every month, top quality video tutorials, giveaways, and more!

    More about Moogly →

    Popular

    • MooglyCAL2026 Block 21
      MooglyCAL2026 Block 21
    • Crochet and Catch Up with Moogly - October 14, 2026
      Crochet and Catch Up with Moogly - October 14, 2026
    • Seamless Crochet Sweaters Review and Giveaway
      Seamless Crochet Sweaters - Review and Giveaway
    • Ghost Treat Basket Tutorial
      Ghost Treat Basket Tutorial
    gosadi
    I'm a Craftsy Instructor. Click to see my classes.
    I Like Crochet


    Footer

    ↑ back to top

    About

    • About
    • Privacy Policy

    Newsletter

    Contact

    Email Moogly

    As an Amazon Associate I earn from qualifying purchases.
    Copyright © 2026 Mooglyblog.com