Triangle crochet edging is a little pattern I came up with for edging blankets and... well, anything you want to put an edge on! It's used in the Go Team Colors Baby Blanket, and in the Go Team Colors Reversible Baby Hat (due out this Friday, I'll update with a link then).
The Hyperbolic Crochet Coral Reef - A Must See!
This weekend I got a chance to visit the Smithsonian Community Reef exhibit at the Putnam Museum in Davenport, Iowa. This is a satellite of the Hyperbolic Crochet Coral Reef Project. And of course I brought my camera!
Spooky and Crafty Crochet Halloween Decorations
Go Team Colors Baby Blanket
It's (American) football season, and even the smallest fans will be heading out to the games this fall. This reversible crocheted baby blanket, made in the colors of your favorite team, will keep the little ones warm and cozy - and show their team spirit off at the same time!
Crafty Coupon Roundup: Save Money on Yarn and Supplies! 9/27/12
Plan ahead and you can save money on yarn online and in person - something we're all interested in these days. Here are this week’s coupons and sales, to help you save money on yarn (and hooks, and needles, and all your other hobbies)!

Single Crochet (sc)
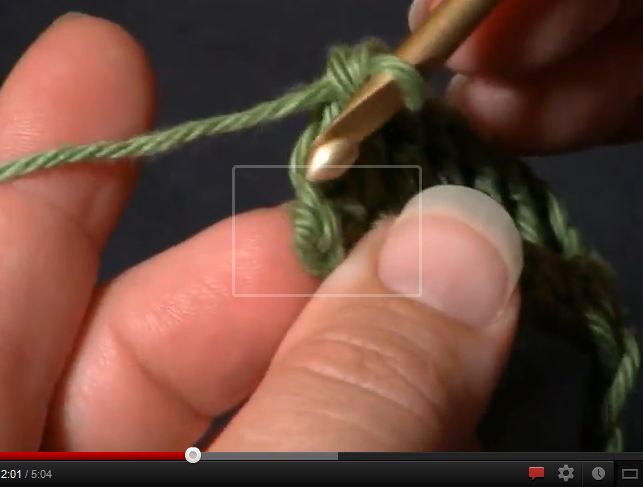
Learning to crochet doesn't have to be a struggle! Learning to chain is the first step, and learning to single crochet is step two!
How to Crochet the Single Crochet: Right Handed Version
How to Crochet the Single Crochet: Left Handed Version
When working a row of sc, you want to start with a chain that is one stitch longer than you want your finished project to be. In the video, I start with a chain of 11, skip the first stitch, and could make 10 single crochets - though I end up stopping at 6 for the sake of time. That turning chain at the start of each row is never worked into - it just hangs out there at the side, giving you the height for your stitches but never acting as a stitch itself.
Of course, by "never" I don't really mean never - there are always exceptions in crochet! Breaking the law, breakin' the law! Ahem. But it's VERY rare to work into that turning chain, so until you come across that rare exception, you can assume it's a hard fast never. Until it isn't. Isn't crochet fun?
If you find that your chains are hard to get the hook into, try relaxing your tension while chaining, keeping your stitches loose so they're not "tugging" off the hook. Another alternative is to use a larger hook size for the chains, and then switch to a smaller hook when starting the single crochets. Experiment and find what works best for you!
So now you've graduated from "snake" and "ribbon" projects! What can you do with just a single crochet and chains? Some great beginner projects would be a dishcloth, a simple pouch, or Tag It (a free pattern here on moogly). Just remember to count those stitches, and don't be afraid to pull them back out again!
Thanks so much for watching? Is there a video tutorial you'd like to see that isn't here on moogly? Let me know in the comments! I'm always adding to the list!
Be sure to check out and like the moogly Facebook page to get the latest updates, links, sneak peeks, and more! Moogly is also on Pinterest, Twitter, and now Tumblr – come join the fun!
Katkina háčkovaná čelenka (Catherine Crochet Headband)
I was contacted by Andrea at Klbkoviny about translating some moogly patterns into Slovak. She has finished the first translation, of the Catherine Crochet Headband, which you can view at her site, or below, right here on moogly. D'akujem Andrea!
Tento návod pre všetky dievčatá – mladé i staršie! Krásna ručne háčkovaná čelenka nepozná vekové obmedzenie. A keďže je horúce počasie, čokoľvek, čo udrží spotené vlasy pod kontrolou je dobrá vec!
10 Crochet Costumes and Patterns for Adults
Last week I covered some great crochet costumes for kids, so this week it's time for all the grown ups! I've gathered 10 costume ideas and 13 free patterns for men, women, and monsters, and time is ticking...so let's get started!
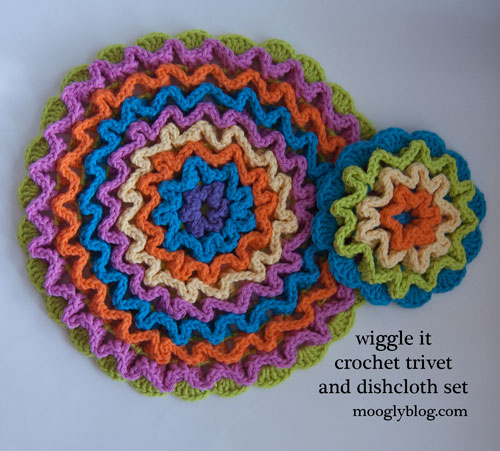
Wiggle It Crochet Trivet and Dishcloth Set

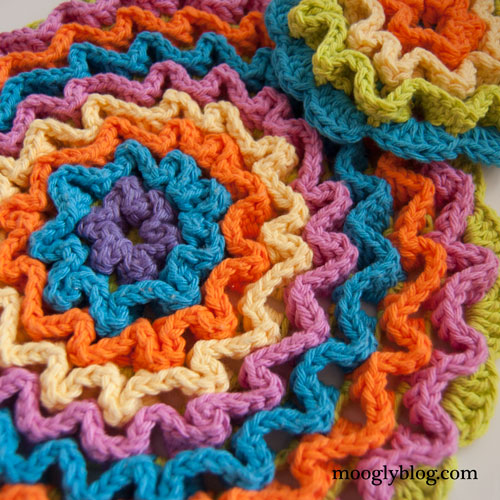
What goes around comes around, and wiggly crochet is definitely coming around again! It's popping up on Pinterest and Ravelry, in rugs and afghan squares. Usually worked in squares and rectangles, with a base mesh and ruffles worked on top, it's got a great 3D big pop look. But I wanted to play around with the idea and maybe take it a new direction - and the Wiggle It Crochet Trivet and Dishcloth Set is the result!
Prefer an ad-free PDF? You've got options!
Prefer the free blog version? Keep scrolling!
The trivet and dishcloth are essentially the same pattern; the trivet just keeps getting bigger! So if the trivet is too big for your needs, just stop increasing when you like the size and go to the finishing row of the base mesh. Go way bigger and add a non-skid backing, and you can make a gorgeous super luxurious plush rug!![]()
Wiggle It Crochet Trivet and Dishcloth Set
Add this pattern to your Ravelry Queue and Favorites
The Base Mesh is made all in one color, but then each round of ruffles is added separately - make them all the same color, alternate two colors, make each one different... it's up to you!
US - G, 4.00mm hook
Lily Sugar'n Cream (Worsted weight kitchen cotton, in 2 - 9 colors)
small amounts on up to 90 yds for base of trivet
Sizes:
Dishcloth: 5.5" finished diameter
Trivet: 11" finished diameter
Click HERE for the Video Tutorial!
Wiggle It Crochet Trivet and Dishcloth Set Instructions
Base Mesh Instructions:
Round 1: Make a magic circle, and sc 6 times in the ring. Join to the first sc with a sl st. (6sc)
Round 2: Ch 4 (counts as dc and ch 1), dc in the same st. *Ch 1, [dc, ch 1, dc] in the next st. Repeat from * to end. Ch 1 and join with a sl st into the ch 4 sp, (12 dc, 12 ch)
Round 3: Ch 4, dc in the same ch sp. Ch 1, dc in the next ch sp. *Ch 1, [dc, ch 1, dc] in the next ch sp. Ch 1, dc in the next ch sp. Repeat from * to end. Ch 1 and join with a sl st into the ch 4 sp, (18 dc, 18 ch)
Round 4: Ch 4, dc in the same ch sp. [Ch 1, dc in the next ch sp] twice. *Ch 1, [dc, ch 1, dc] in the next ch sp. [Ch 1, dc in the next ch sp] twice. Repeat from * to end. Ch 1 and join with a sl st into the ch 4 sp, (24 dc, 24 ch)
TO MAKE THE DISHCLOTH: Skip to "Finishing Round" of the Base Mesh.
TO MAKE THE TRIVET: Continue Base Mesh Instructions as written.
Round 5: Ch 4, dc in the same ch sp. [Ch 1, dc in the next ch sp] 3 times. *Ch 1, [dc, ch 1, dc] in the next ch sp. [Ch 1, dc in the next ch sp] 3 times. Repeat from * to end. Ch 1 and join with a sl st into the ch 4 sp, (30 dc, 30 ch)
Round 6: Ch 4, dc in the same ch sp. [Ch 1, dc in the next ch sp] 4 times. *Ch 1, [dc, ch 1, dc] in the next ch sp. [Ch 1, dc in the next ch sp] 4 times. Repeat from * to end. Ch 1 and join with a sl st into the ch 4 sp, (36 dc, 36 ch)
Round 7: Ch 4, dc in the same ch sp. [Ch 1, dc in the next ch sp] 5 times. *Ch 1, [dc, ch 1, dc] in the next ch sp. [Ch 1, dc in the next ch sp] 5 times. Repeat from * to end. Ch 1 and join with a sl st into the ch 4 sp, (42 dc, 42 ch)
Round 8: Ch 4, dc in the same ch sp. [Ch 1, dc in the next ch sp] 6 times. *Ch 1, [dc, ch 1, dc] in the next ch sp. [Ch 1, dc in the next ch sp] 6 times. Repeat from * to end. Ch 1 and join with a sl st into the ch 4 sp, (48 dc, 48 ch)
Round 9: Ch 4, dc in the same ch sp. [Ch 1, dc in the next ch sp] 7 times. *Ch 1, [dc, ch 1, dc] in the next ch sp. [Ch 1, dc in the next ch sp] 7 times. Repeat from * to end. Ch 1 and join with a sl st into the ch 4 sp, (54 dc, 54 ch)
Finishing Round: Ch 1, sc in the same ch sp. Dc 5 in next ch sp (scallop made). *Sc in next ch sp, 5 dc in next ch sp. Repeat from * to end. Break yarn and join to first sc using seamless join. (Dishcloth: 12 scallops, Trivet: 27 scallops)
Ruffles Instructions:
Ruffle 1: (click photos to embiggen!)
Working between dc sts from Round 2 of the Base Mesh, join with a sl st to the top of a Round 1 Base Mesh stitch.

Moving to the dc just to the left of the join, dc 2 around the post of the mesh dc, working toward the outer edge. 
Next, dc in the ch sp of the Round 2 mesh directly to the left of the dc you just worked around. Dc 2 around the next Round 2 mesh dc to the left, working back towards the center of the mesh. Dc in Round 1 of the mesh, to the left of the just worked dc.

Continue in this manner, working up and down the dcs of Round 2 of the mesh, working 2 dc around the post of each dc and one dc in the top and bottom of each turn.

At the end of the round, break yarn and seamless join to the first dc of the round. (36 dc, 6 petals)
This is what it should look like from behind at this point:
Ruffle 2:
Join yarn with a sl st in a ch sp of Round 2, between two of the dc of Round 3 of the mesh, between two of the petals of Ruffle 1, and ch 3. Moving to the dc to the left, dc 3 around the post, working toward the outer edge as before. 
Dc in the next ch sp to the left, then dc 3 around the next dc to the left, working back toward the middle. Dc in the next ch sp of Round 1 to the left. Continue the round, working up and down the dcs of Round 3, with 3 dc around each post and 1 dc at the top and bottom of each turn. At the end of the round, break yarn and seamless join to the first dc of the round. (72 dc, 9 petals)
Ruffle 3: Work as Ruffle 2, around the dc sts of Round 4 of the mesh. (96 dc, 12 petals)
TO MAKE THE DISHCLOTH: You're done! Enjoy your new dishcloth or tiny trivet!
TO MAKE THE TRIVET: Continue Ruffles Instructions as written.
Ruffle 4: Work as Ruffle 2, around the dc sts of Round 5 of the mesh. (120 dc, 15 petals)
Ruffle 5: Work as Ruffle 2, around the dc sts of Round 6 of the mesh. (144 dc, 18 petals)
Ruffle 6: Work as Ruffle 2, around the dc sts of Round 7 of the mesh. (168 dc, 21 petals)
Ruffle 7: Work as Ruffle 2, around the dc sts of Round 8 of the mesh. (192 dc, 24 petals)
Ruffle 8: Work as Ruffle 2, around the dc sts of Round 9 of the mesh. (216 dc, 27 petals)
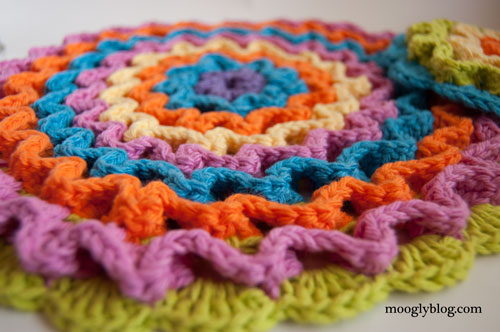
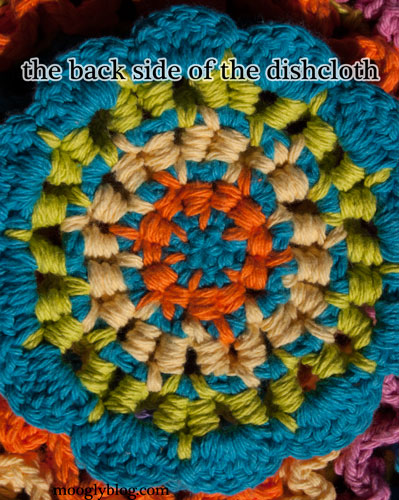
And now you're done with the Trivet! Here's a look at the back of the dishcloth, so you can get an idea of how they should look from underneath:

I hope these instructions are clear, and that the Wiggle It Crochet Trivet and Dishcloth Set are as fun for you to make as they were for me! Do you think you'd like to give it a try? Have you made wiggly crochet trivets or other wiggly patterns before?
The Fine Print
Be sure to Like the moogly Facebook page for the latest updates and have some fun with us! Written pattern copyright Tamara Kelly 2012. Please do not reprint or repost this pattern, but please feel free to link to this page to share this pattern with others.
Crafty Coupon Roundup: Save Money on Yarn and Supplies! 9/20/12
How do I save money on yarn? I’ll buy yarn just about anywhere, from grocery stores to the local yarn shops to online, and there are great opportunities to save at the big box craft stores. Here’s this week’s coupons and sales, to help you save money on yarn (and hooks, and needles, and all your other hobbies)!

- Michaels - Enter your zip code to get the coupons for the store closest to you. I got coupons for 40% off any one regularly priced item this week, as well as $5 of $25! Several of the Loops and Threads yarns are on sale, as well as Caron Simply Soft, Vanna's Choice, Homespun, and bunch of those new Ruffle yarns. I also noticed that Michaels has a mobile app with coupons now, so be sure to download that if you can!
- Jo-Ann Fabrics – Be sure to join their mailing list and get the app too! It’s Coupon Commotion right now – TONS of 50% off coupons! If you didn’t get the flyer, be sure to grab one of the flyers in the basket right inside the store, as those have the coupons too. If you want to make sure to have them in hand, you can print them out from the website too! I was just there yesterday and got my entire basket full of thread for half off! Sales going on now include Bernat Handicrafter, Deborah Norville Collection, and Sensations Yarns. Via email I received a several coupons for online purchases as well as still more Coupon Commotion coupons, so be sure you’re signed up on the email list as well! UPDATE: Jo-Ann has added a coupon for free shipping with a $25 online purchase, just use the code CART25 at checkout!
- Hobby Lobby – I Love This Cotton and Yarnology Knit and Crochet Tools and Notions are on sale this week, and they have the usual printable coupon for 40% off any regularly priced item. Last week I mentioned that there's an iPhone appas well - here's what one moogly fan had to say about it! Britane said:
Hey Moogly! Last time I checked, there wasn’t a Hobby Lobby app to go with my Michael’s and Joann apps. I downloaded it after seeing this post. From what I can tell, it’s a clean and organized app, and gives you an easy-to-navigate screen that lets you shop sales by department (only the two yarns you named are listed under Needle Arts, so whatever you’ve seen is accurate). I do like the front-page feature that lets you check gift card balances- I think this is unique to the HL app, since I haven’t found it on the other two.
Where Joann’s/Michael’s apps have varied coupons by the week, however, HL seems to only have their normal 40% available. Would love to see more variety from them. An interesting coupon will get me in a store!
- Herrschners – HUGE sale this week! Yarns up to 75% off, knit and crochet accessories up to 60% off, crochet and knit books up to 75% off, and more. There's a wide variety of Bernat yarns included in the sale, as well as Artful Yarns, Herrschners own brand, Premier, and a few Lion Brand selections as well.
- ACMoore – Enter your zip code to get the coupons for the store closest to you. I got a coupon for $5 off a 20 purchase, and another for 40% off one item. Sales listed include Lily Sugar 'n Cream, Red Heart Soft and Super Saver, Bernat Holiday Big Ball, Chunky and Worsted, and a "special selection of fashion yarns" that will vary by store.
Readers have been sharing some great ideas for stretching their yarn budgets! What are your best tips and tricks to save money on yarn? Please share them in the comments!
Be sure to check out and like the moogly Facebook page to get the latest updates, links, sneak peeks, and to order your own ooak moogly items – I’m taking commissions! Moogly is also on Pinterest, Twitter, and now Tumblr – come join the fun!
My Review: Custom Crocheted Sweaters: Make Garments That Really Fit
Recently I picked up a copy of Custom Crocheted Sweaters: Make Garments That Really Fit by Dora Ohrenstein at my local library. I hadn't heard of it before, but it was on the "New" shelf and caught my eye. And I'm SO glad it did!
10 Crochet Halloween Costumes for Kids
Halloween might seem far away, but if your kids are planning on handmade costumes, it'll be here faster than you think! Here are 10 crochet Halloween costumes and ideas for kids, including 14 free patterns. So let's get the creative juices flowing!
Rainbow Lanyard
Recently I was commissioned to make some rainbow striped lanyards. Simple enough, I thought, but truth be told, getting the right thickness and look took more thought and experimentation than you might expect! Luckily, they turned out rather well, and everyone was pleased!
Disclaimer: This post includes affiliate links.
Prefer an ad-free PDF? You've got options!
Prefer the free blog version? Keep scrolling!
Simple Enough - But Keep It Safe!
When all was said and done, the construction on these couldn't have been simpler - the only stitches used are chains and slip stitches! This technique means you can get 6 different colored stripes in less than an inch of width. The finished lanyards I made were about 27 inches long - they fit comfortably over the head, but aren't so long as to cause a problem at lunch. One word of caution - I would not recommend these for young children, unless you alter the pattern to include a safety breakaway buckle. This pattern also makes a great handle or strap for your handmade bags! Or to make them more official looking, add lanyard clips to the keyring!
Rainbow Lanyard
Add this pattern to your Ravelry Queue and Favorites
US-G, 4.00mm hook
5-10 yds each of 6 different colors worsted weight yarn (Recommended: Lily Sugar'n Cream)
1" Split Key Ring (or size desired)
Optional: safety breakaway buckle; lanyard clips
Helpful Links and Tutorials
Rainbow Lanyard Instructions
Row 1: With Color A (red), ch 140 or to desired length (will shrink up a lot on next rows). Break yarn and finish off.
Row 2: With Color B (orange), join to BLO of first ch of Row 1 with a sl st. Sl st in BLO of each ch to end. Break yarn and finish off.
Row 3: With Color C (yellow), join to BLO of first st of Row 2 with a sl st. Sl st in BLO of each ch to end. Break yarn and finish off.
Row 4: With Color D (green), join to BLO of first st of Row 3 with a sl st. Sl st in BLO of each ch to end. Break yarn and finish off.
Row 5: With Color E (blue), join to BLO of first ch of Row 4 with a sl st. Sl st in BLO of each ch to end. Break yarn and finish off.
Row 6: With Color F (purple), join to BLO of first ch of Row 5 with a sl st. Sl st in BLO of each ch to end. Break yarn and finish off.
Row 7: Turn work over to WS, so that Row 1 is on top. With Color A (red), join to first ch through both unused loops with a sl st. Sl st through both unused loops of each ch to end. Break yarn and finish off.
Assembly: Weave in all yarn ends on one end of lanyard. Slip the Split Key Ring over the lanyard and overlap the ends so that both RS ends face up when worn. Use the remaining ends of the rows to sew the ends of the lanyard together beneath the ring. If desired, use a little more yarn to sew the lanyard together above the ring as well.
And that's all there is to it! You don't have to make a rainbow, of course - use whatever colors you like. This pattern is great for sports teams, school spirit, conventions, and matching all your favorite outfits!
The Fine Print
Be sure to Like the moogly Facebook page for the latest updates and have some fun with us! Written pattern copyright Tamara Kelly 2012. Please do not reprint or repost this pattern, but please feel free to link to this page to share this pattern with others. For seller info, please see the About page.
Crafty Coupon Roundup: Save Money on Yarn and Supplies! 9/13/12
How do I save money on yarn? I’ll buy yarn just about anywhere, from grocery stores to the local yarn shops to online, and there are great opportunities to save at the big box craft stores. Here's this week's coupons and sales, to help you save money on yarn (and hooks, and needles, and...)!

- Michaels - Enter your zip code to get the coupons for the store closest to you. I got a coupon for 50% off any one regularly priced item this week! Several of the Loops and Threads yarns are on sale, as well as Lion Brand Wool Ease Thick and Quick.
- Jo-Ann Fabrics – Be sure to join their mailing list and get the app too! I just got a new flyer in the mail, and it's coupon commotion starting September 16th - TONS of 50% off coupons! If you don't get the flyer in time, be sure to check the flyers in the basket right inside the store, as you can often pick them up right there. Sales going on now include Red Heart Super Saver, Bernat Satin, Caron Simply Soft, and Lily Sugar & Cream Super Size. The current online printable is a coupon for free shipping with a $40 purchase when you shop online, and via email I received a coupon for $5 off a $25 online purchase, so be sure you're signed up on the email list as well!
- Hobby Lobby - Baby Bee Baby Yarns and Lion Brand Vanna's Choice are on sale this week, and they have the usual printable coupon for 40% off any regularly priced item! There's also an iPhone app, but I don't have an iPhone - let me know if you've checked it out and what you think!
- Herrschners – Big sale on baby yarns this week - store brand, Red Heart, and Bernat are all included!
- ACMoore – Enter your zip code to get the coupons for the store closest to you. I got a coupon for 25% off the entire purchase, one for 40% off one item, and another for 50% off one item! Sales listed include Caron One Pound, Lion Brand Pound of Love, and Lion Brand Vanna's Choice or Vanna's Choice Baby.
Last week we got two great recommendations from readers!
Rachel F. said:
I usually scour over sites clearance sections. Other people may not like certain colors or types that I do and I have saved a bundle this way. In fact that is the first spot I look at when cruising around online.
Maria LaLima said:
Another bonus from AC Moore: sign up for free for their membership and you rack up points with each purchase. 200 points = $10 certificate Score! :0)
What are your best tips and tricks to save money on yarn? Please share them in the comments!
Be sure to check out and like the moogly Facebook page to get the latest updates, links, sneak peeks, and to order your own ooak moogly items – I’m taking commissions! Moogly is also on Pinterest, Twitter, and now Tumblr – come join the fun!
Treble Crochet / Triple Crochet (tr)
In US crochet terms it's called the treble crochet or triple crochet stitch, abbreviated trc, or just tr. In the UK it's called the double treble, abbreviated dtr or dbl tr. No matter what you call it, it's a natural progression from the double crochet stitch.
How to Crochet the Treble Crochet Stitch: Right Handed Version
How to Crochet the Treble Crochet Stitch: Left Handed Version
In other words, to make a treble crochet stitch, wrap the yarn around the hook twice before inserting it in the next stitch. Then, insert the hook in the stitch, yarn over and pull up a loop through the stitch. At this point there are 4 loops/wraps on the hook.Yarn over and pull through 2 loops (3 loops remaining on hook), yarn over and pull through another 2 loops (2 loops remaining), and yarn over and pull through the last 2 loops on hook (1 working loop left on hook). An easy way to remember how to make a treble or triple crochet is to think that you start the stitch with 3 loops or wraps on the hook and then pull through 2 loops 3 times. Treble = triple = three!
If you are making rows of treble crochet, you will likely either start with a ch 4 which will count as your first stitch, or with a ch 3, which will not probably count as a stitch - but there are always exceptions, so read your patterns carefully. You will see trc a lot in afghan square patterns, where it often helps square up the corners of patterns that started off round, and in cable crochet, where it's length is used to create waves and lines that dance across the fabric.
Patterns here at moogly that use the trc include the Diamond Crochet Cowl and Riley Flower Square Motif, as well as the Cable Heart Gift Bag. I hope this video has helped you understand this stitch a bit better! It takes some practice to keep it even, but it's a great stitch to know and very handy indeed. Are there any stitches that are giving you trouble, or that you'd like to see in a moogly video? Let me know in the comments!
Be sure to check out and like the moogly Facebook page to get the latest updates, links, sneak peeks, and more! Moogly is also on Pinterest, Twitter, and now Tumblr – come join the fun! TamaraKelly@mooglyblog.com
Fall's Hot Trend: Free Knit and Crochet Skirt Patterns!
One trend I've noticed lately are handmade skirts, both knit and crochet. And it's not hard to see why they're popular right now! With the imminent return of fall, it's the perfect time for leggings, thick tights, tall sexy boots, and cute skirts. Here are ten free knit and crochet skirt patterns I found that might convince you to expand your own wardrobe!
Unpinning Pinterest 9/10/12
Zig Zag Zoom Version #2
The joy of having 3 kids who have supreme faith in your ability to knit and crochet anything is that you always have something you need to make "right now!" Occasionally, it's something like "can you make me a sweater today?" which.... um... no. Not today, heh. But luckily it's also things like "can you make me a new water bottle cover in my new favorite colors?" and that's a big YES! So within a week of making a Zig Zag Zoom Bottle Cozy for kid #1, kid #3 had a request for one for himself. With a couple of alterations, of course...
Bird's Nest Bowl Set
Kids have the funniest requests sometimes! My youngest was given a stuffed toy pelican recently, and just fell in love. Within the day he was insisting I make his new pal a nest. And every day until I got the chance to make it, he complained how very exhausted the bird was getting, without a chance to sleep! Finally, I made one... and then I couldn't resist making a few more! So here's the Bird's Nest Bowl Set!
Disclaimer: This post includes affiliate links.
Prefer an ad-free PDF? You've got options!
Prefer the free blog version? Keep scrolling!
Fast and Functional Fun!
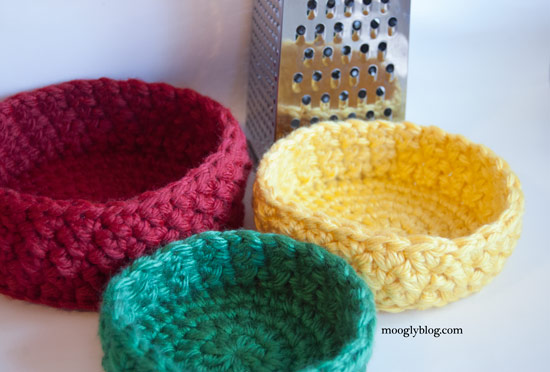
I whipped up the Bird's Nest Bowl Set in just an evening, and in three sizes that "nest" together they're good for lots more than stuffed animal sleeping quarters! They've got flat bottoms so they don't tip over, and made with super chunky yarn they're very nearly instant gratification. Simple stitches, with textured sides to keep them interesting (and dare I say "nest-ish"?), these bowls make a great gift, are a fun way to organize all that clutter, and add a pop of color wherever they go.
Bird's Nest Bowl Set
Add this pattern to your Ravelry Queue and Favorites
150 yards super bulky yarn (Hometown USA shown)
US-M/N, 9.00mm hook, or US-L, 8.00mm if needed to produce firm fabric
Yarn needle for thick yarn (regular yarn needles just can't handle the thick stuff!)
VIDEO TUTORIAL: Bird's Nest Bowl Set Video Tutorial
INSTRUCTIONS
SMALL BOWL: (5 inch diameter)
Round 1: Make a magic circle and hdc 9 times in the circle. Join with a sl st. (9 hdc)
Round 2: Ch 1, work 2 hdc in each st. Join. (18 hdc)
Round 3: Ch 1. [Hdc in the next st, then 2 hdc in the next st] 9 times. Join. (27 hdc)
Round 4: Ch 1. [Hdc in the next 2 sts, then 2 hdc in the next st] 9 times. Join. (36 hdc)
Round 5: Turn (the only turn) and ch 1. Sc even in BLO around. Join. (36 sc)
Round 6: Ch 1. *[Sc, dc] in the next st. Skip the next st. Repeat from * to end. Join. (36 sts)
Round 7: Repeat Round 6. Finish off with seamless join.
MEDIUM BOWL: (6 inch diameter)
Rounds 1-4: Repeat Rounds 1-4 of Small Bowl Instructions.
Round 5: Ch 1. [Work 2 hdc in the next st, then hdc in the next 3 sts] 9 times. Join. (45 hdc)
Round 6: Turn (the only turn) and ch 1. Sc in the BLO of each st AND in the turning ch. Join. (46 sc)
Rounds 7-9: Ch 1. *[Sc, dc] in the next st. Skip the next st. Repeat from * to end. Join. (46 sts) Finish off with seamless join.
LARGE BOWL: (7 inch diameter)
Rounds 1-5: Repeat Rounds 1-5 of Medium Bowl Instructions.
Round 6: Ch 1. [Hdc in the next 2 sts, then 2 hdc in the next st, then hdc in the next 2 sts] 9 times. Join. (54 hdc)
Round 7: Turn (the only turn) and ch 1. Sc even in BLO around. Join. (54 sc)
Round 8-11: Ch 1. *[Sc, dc] in the next st. Skip the next st. Repeat from * to end. Join. (54 sts) Finish off with seamless join.
EXTRA LARGE BOWL: (Approx. 8 inch diameter, not shown - added at reader request)
Rounds 1-6: Repeat Rounds 1-6 of Large Bowl Instructions.
Round 7: Ch 1. [Hdc in the next 5 sts, then 2 hdc in the next st] 9 times. Join. (63 hdc)
Round 8: Turn (the only turn) and ch 1. Sc even in BLO around. Join. (63 sc)
Round 9-13: Ch 1. *[Sc, dc] in the next st. Skip the next st. Repeat from * to end. Join. (63 sts) Finish off with seamless join.
I can't wait to make more of these! Filled with homemade treats, the Bird's Nest Bowl Set will be a welcome addition to any gift - and it's never too early to start thinking about the holidays. And how cute would they be filled with tiny yarn balls! They're so very fast to make there's no reason not to make dozens. Of course, you don't have to use super bulky yarn either. Made up in worsted with a G hook, you'd have sweet little trinket bowls - great for the nightstand or next to the sink. How do you plan on filling your Bird's Nest Bowl Set?
The Fine Print
Written pattern copyright and images Tamara Kelly 2012. Please do not reprint or repost this pattern, but please feel free to link to this page to share this pattern with others.
Crafty Coupon Roundup 9/6/12
I had a great question come into the moogly facebook page - how do I afford all this yarn? While I'll buy yarn just about anywhere, from Walmart to the local yarn shops to online, there are great opportunities to save at the big box craft stores. You don't even have to wait for sales - just print out the latest coupons!

- Michaels - Enter your zip code to get the coupons for the store closest to you. I got coupons for 40% off any one regularly priced item and 15% off the entire purchase excluding sale items.
- Jo-Ann Fabrics - Be sure to join their mailing list and get the app too! Right now there is a coupon for free shipping with a $40 purchase when you shop online.
- Hobby Lobby - I Love This Yarn is on sale this week, and there's a coupon for 40% off any regularly priced item!
- Herrschners - No coupons, but a huge sale on Red Heart products this week!
- ACMoore - Enter your zip code to get the coupons for the store closest to you. I got a coupon for 40% off one item and another for 50% off one item!
Where do you shop for yarn? What are your yarn budgeting secrets? Know of any secret deals or amazing sites out there? Please share them in the comments!
Be sure to check out and like the moogly Facebook page to get the latest updates, links, sneak peeks, and to order your own ooak moogly items – I’m taking commissions! Moogly is also on Pinterest, Twitter, and now Tumblr – come join the fun!
Basics of the Diamond Crochet Cowl and fptrc2tog
Fptrc2tog - it's a mouthful to say and not exactly a "standard" crochet stitch. What it is, is the foundation for the crochet cabling pattern in the Diamond Crochet Cowl! I've had several requests for a video, so without further ado...
I hope this video clears up any confusion about this stitch! It's the combination of it's parts - a treble crochet decrease as front post stitches. If you're overwhelmed, I recommend starting with my videos on post stitches and crochet cabling. (I'll have a video on treble crochet coming out soon, I hope!) Crochet cables are a lot of fun, and used in all sorts of patterns, including the Diamond Crochet Cowl, Cable Heart Gift Bag, and many more.
Be sure to check out and like the moogly Facebook page to get the latest updates, links, sneak peeks, and more! Moogly is also on Pinterest, Twitter, and Tumblr – come join the fun! You can contact me via Facebook messages or at TamaraKelly@mooglyblog.com.
Hope, Love, and Warmth: Crocheting for Charity
There are so many ways crocheters share their talents, and one of the most
inspirational ways is through giving crocheted items to charity. There are charity organizations centered specifically around crochet items, and there are charity events that accept crochet items for their fundraising efforts.
In the past I've donated crochet items to benefits for cancer patients, local schools, and Special Olympics. Most recently, I spent the past weekend making a little doggy coat for the local animal welfare center silent auction! It's my first time crafting for an animal, and it was lots of fun!
International Bacon Day in Crochet!
The Saturday before US Labor Day has been informally designated as International Bacon Day, celebrated in the United States, Canada, and even Japan! As this tasty tradition spreads, here are a few free crochet bacon treats to help you celebrate!
All Grown Up Arm Warmers

Arm warmers are awesome! Whether knit or crocheted, they're a great transition item for fall and spring, and a fantastic layering piece all winter long. And they're perfect for cold offices and classrooms.
Disclaimer: This post includes affiliate links.

Prefer an ad-free PDF? You've got options!
Prefer the free blog version? Keep scrolling!
Armwarmers and hats for all
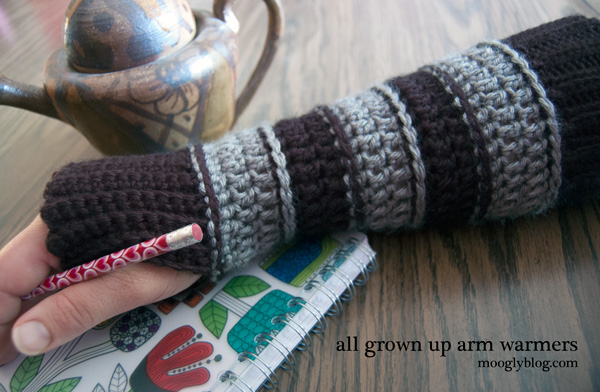
Earlier this year I designed both knit and crochet striped arm warmers for kids, but what about the grownups? A reader request prompted me into action, and a complete reworking of the pattern - this time for all the chilly adults. And now you can make it a set, with the All Grown Up Striped Slouch Hat, All Grown Up Ear Warmer, and All Grown Up Cowl!
All Grown Up Arm Warmers
Add this pattern to your Ravelry Queue and Favorites
US-I, 5.5mm hook
350 - 370 yds Caron Simply Soft (Worsted/"4"/US:10-12 ply)
Black and Grey Heather shown
Gauge: 13 dc = 4" wide (when working stripes); 12 sc = 3" (length of cuff)
Sizing
This crochet arm warmers pattern is offered in two sizes. The Small version is for people with forearms smaller than 12 inches around at the widest point, an inch or so before the elbow. The Large version is for people with forearms 12 inches or larger.
If in doubt, I'd recommend going with the larger version for comfort. The differences in the pattern are noted as Small(Large). Where there are no differences, only one number is listed. Please also note that the step by step pictures are from the child size pattern, so the number of stripes and stitch counts pictured are different, but the techniques shown are the same.
Helpful Links and Tutorials
Bpdc - Back Post Double Crochet
Dc2tog - Double Crochet Decrease
NOTE:
The post stitches used in this pattern are Shallow Post Stitches (tutorial HERE) - but some prefer standard post stitches! So give each a try and see which you like best - note that with standard post stitches it will be a bit shorter, so you may wish to add extra rows.
INSTRUCTIONS
Wrist/Hand Cuff:
Using Color A and leaving an 8″ tail, ch 13. Turn.
Row 1: Using Color A and leaving an 8″ tail, ch 13, working entire row in BLO, sc in the 2nd ch from the hook, and each ch to end; turn. (12 sc made)
Row 2 – 32(36): Ch 1, sc in BLO evenly across; turn. (12 sc)
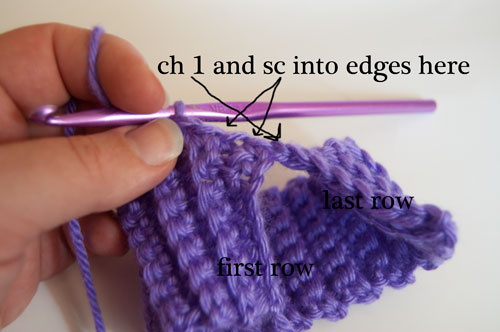
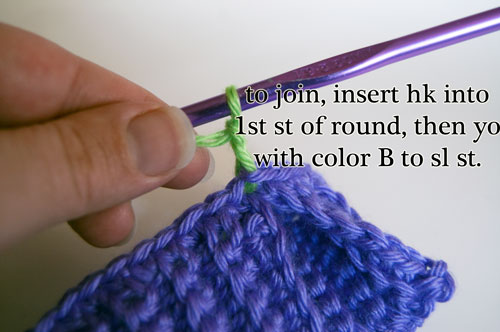
Row 33(37): Ch 1, turn to work into the side of the cuff, looping the piece into a ribbed cuff, so that the first and last row meet. Ch 1 and sc into the side of 1st row and each row around, as shown below, join to first st to work in the rnd with Color B. (32(36) sc)
Stripes Section:
Round 1: Ch 2, [bpdc in 2 sts, bpdc2tog] 8(9) times; join. (24(27) sts)
Round 2: Ch 2, [dc in 6(7) sts, dc2tog] 3 times; join. (21(24) sts)
Round 3: Ch 2, [dc in 8(10) sts, dc2tog] twice; join with Color A. Small size only: dc in last st. (19(22) sts)
Round 4: With Color A, ch 2, bpdc in each st around; join. (19(22) sts)
Round 5: Ch 2, dc in 1st st, (Large size only: 2 dc in the next st), dc each st to last st, dc 2 in last st; join. (20(24) sts)
Round 6: Ch 2, dc in each st around; join with Color B. (20(24) sts)
Round 7: With Color B, ch 2, bpdc in each st around; join. (20(24) sts)
Round 8: Ch 2, dc in the 1st st, 2 dc in the next st, dc in each st to last st, 2 dc in last st; join. (22(26) sts)
Round 9: Ch 2, dc in the 1st st, 2 dc in the next st, dc in each st to last st, 2 dc in last st; join with Color A. (24(28) sts)
Round 10: With Color A, ch 2, bpdc in each st around; join (24(28) sts)
Round 11: Ch 2, dc in the 1st st, 2 dc in the next st, dc in each st to last st, 2 dc in last st; join. (26(30) sts)
Round 12: Ch 2, dc in the 1st st, 2 dc in the next st, dc in each st to last st, 2 dc in last st; join with Color B. (28(32) sts)
Round 13: With Color B, ch 2, bpdc in each st around; join. (28(32) sts)
Round 14: Ch 2, dc in the 1st st, 2 dc in the next st, dc in each st to last st, 2 dc in last st; join. (30(34) sts)
Round 15: Ch 2, dc in the 1st st, 2 dc in the next st, dc in each st to last st, 2 dc in last st; join with Color A. (32(36) sts) Break Color B, leaving a long enough tail to weave in later.
Upper/Arm Cuff: (now with video tutorial!)
Setup Row: With Color A, ch 1, and bpsc in each st around; join. (32(36) sts)
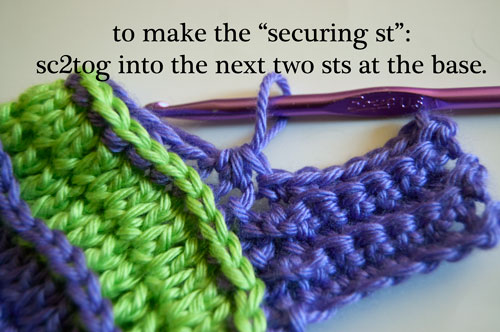
Row 1: Ch 13, BLO sc in the 2nd ch from hook and each ch. (12sc) Sc2tog in the next 2 setup row sts, as shown below. This is the “securing st” that attaches the vertical cuff rows to the horizontal setup row, turn.
Row 2: Skipping the securing st, BLO sc in each st across; turn. (12 sc)
Row 3: Ch 1, BLO sc in each st across. (12 sc) Make securing stitch; turn. 
Row 4 – 31(35): Repeat Rows 2 and 3.
Row 32(36): BLO sc in BLO each st; break yarn leaving a 12″ tail. (12 sc)
Assembly: Sew the arm cuff together with whip stitch, joining first and last rows. Be sure to work into the BLO of the last row to maintain the ribbed look.
Back at the Wrist/Hand Cuff, whip stitch the first 3 – 4 sts together, leaving a thumb hole, as shown in the picture below. Weave in all ends.
I hope you enjoy this pattern for All Grown Up Arm Warmers! Be sure to check out the matching patterns linked above!
If you enjoyed making this arm warmers pattern and you share a photo on social media, please tag me @mooglyblog or #mooglyblog so I can see it too - I love seeing what you make!
The Fine Print
Be sure to Like the moogly Facebook page for the latest updates and have some fun with us! Written pattern copyright Tamara Kelly 2012. Please do not reprint or repost this pattern, but please feel free to link to this page to share this pattern with others. Please see the About page for seller's info.
Half Double Crochet (hdc)
The half double crochet stitch is one of my favorites. Often overlooked, and in my opinion underutilized, the hdc stitch has some great properties. It creates a more solid fabric, without leaving as much open "lacy" space as taller stitches, but it's got much more drape and flexibility than single crochet. Even if you've never heard of it before, you can learn this simple stitch in seconds.
[Read more...]
Hexagons On Point in 10 Free Patterns
Hexagons are becoming more and more popular by the day! They're not just a yarny trend, they're a major theme in interior design too. There are several free hexagon motif patterns out there (future roundup anyone?), but the motif is just the starting point - it's what you do with those pretty shapes that counts. And as long as you make enough of them, in the "right" size for the pattern, the hexagons themselves are interchangeable! Here are some great free patterns for putting hexagons together in fabulous ways!

Zig Zag Zoom Bottle Cozy
This summer was all about the Stainless Steel Water Bottle Slings - they went with us everywhere! Then school started back up, and my oldest needed a new cozy - without the handle. So I broke out the mighty hook, of course! While I had a stainless steel water bottle in mind, I soon discovered that this pattern fits a standard size wine or liquor bottle just as well, making it a great wine gift bag for the holidays! And it works up in an afternoon - perfect for last minute invites (and the last night before school starts...) ZOOM!
Disclaimer: This post may contain affiliate links.
This pattern can be worked in as many as 17 different colors! The rainbow version in the pictures uses 17 different colors and at least 3 different brands of cotton and cotton blend yarns. The purple version uses just 3 colors of cotton yarn. This makes it a great pattern for using up tons of odds and ends - you don't need more than a few yards to make each stripe! For other size and finishing ideas for this pattern, check out Zig Zag Zoom Version #2 !
Zig Zag Zoom Bottle Cozy
Add this pattern to your Ravelry Queue
- US - H, 5.00 mm hook
- 150 yards or less of worsted weight yarn, in as many colors as desired (cotton odds and ends shown, from a variety of manufacturers)
Recommended Yarn: Lily Sugar'n Cream
Zig Zag Zoom Bottle Cozy Instructions
Round 1: With first color, make magic circle and work 6 sc into ring. Join to the first sc with a sl st. (6 sc)
Round 2: Ch 1, 2 sc in each st. Join with sl st. (12 sc)
Round 3: Ch 1. *Sc in next st, then 2 sc in next st. Repeat from * to end. Join with sl st. (18 sc)
Round 4: Ch 1. *Sc in next 2 sts, then 2 sc in next st. Repeat from * to end. Join with sl st. (24 sc)
Round 5: Ch 1. *Sc in next 3 sts, then 2 sc in next st. Repeat from * to end. Join with sl st. (30 sc)
Round 6: Ch 1. *Sc in next st, then 2 sc in next st. Sc in the next 3 sts. Repeat from * to end. Join with sl st. (36 sc) (The stitch for the increases is offset in Row 6 to create a more circular base rather than the hexagon seen at the end of Row 5 - see pics above and below.)
NOTE: After Round 6, the base was wide enough for a standard size water bottle (shown below) and just a touch narrower than a wine bottle, but it stretches to fit. If your water bottle is significantly wider, please continue with more rounds in the pattern established, increasing by 6 sts per round. Then continue with Round 7 below.
Round 7: Ch1, sc evenly around. Join with sl st. (36 sc, or as many as previous round)
Round 8: Ch 3 (counts as hdc and ch 1). Hdc in first st. *Skip next st, then [hdc, ch 1, hdc] in next st. Repeat from * to end, skipping last st. Join with sl st to the ch 3 sp, using second color, as seen below. (18 V-st made, or half the number of sts in previous round)
NOTE: If you are alternating 2-3 colors for the stripes, you can carry the colors along the inside of the cozy. If you are using 4 or more colors, I recommend breaking the yarn after each stripe.
Round 9: Ch 2 (does not count as a st). Dc3tog into ch sp. *Ch 1, skip next 2 sts, and dc3tog into the next ch sp. Repeat from * to end. Join with sl st to the top of first cluster, switching to next color. (18 dc3tog clusters made, or as many as there were V-st in previous round)
Round 10: Sl st into the next ch sp. Ch 3 (counts as hdc and ch 1). Hdc in same ch sp. *Skip cluster st, then [hdc, ch 1, hdc] in next ch sp. Repeat from * to end, skipping last st. Join with sl st to the ch 3 sp, using next color. (18 V-st made, or as many as in
previous V-st round)
Rounds 11 - 24: Repeat Rounds 9 and 10 seven times, continuing to switch colors every row. Add or subtract rows if needed to get to the top of your bottle. Do not switch colors at the end of the last round.
Round 25: Ch 1, 2 sc in each ch sp around. (36 sc, or same as Round 7) Break yarn and finish off using seamless join method. Weave in ends.
MAKE TIE: Holding 2 strands together, ch 90 (or to desired length). Break yarn and finish off. Weave through eyelets (created with Rounds 24 and 25) in top of cozy and trim or weave in ends.
Colorful, eh? The rainbow Zig Zag Zoom Bottle Cozy is my personal favorite, but I also love how a 3 color repeat looks with this stitch pattern. For the holidays it would be gorgeous in red, green and white, or bright blue and gold! Or you could have fun with some of the sparkly yarn that's out now. This pattern is perfect for using up all those cotton odds and ends. How many colors would you use?
The Fine Print
Follow Moogly on Facebook, Twitter, Pinterest, TikTok, and Instagram! Written pattern copyright Tamara Kelly 2012, all rights reserved. Please do not reprint or repost this pattern, but please do link to this page to share this pattern with others. If you wish to make items for sale from this pattern or translate it to another language, please visit the About page for details.
Auntie M's Abigail's Baby Sweater
Auntie M designed some amazing patterns, but for years they've only been available via the wayback machine. Now her pattern for Abigail's Sweater has a new home!
Recently, I was able to contact "Auntie M" via email, and she generously agreed to allow me to republish her pattern for Abigail's Baby Sweater! I have altered the formatting a little bit as the original formatting was lost in the transfer, but the wording and all instructions remain the same. Auntie M, aka Marsha, retains all rights to this pattern, including copyright. Please do not republish this pattern without her permission, and do not offer it for sale. Thank you, and many thanks to Auntie M!
[Read more...]
Tapestry Crochet
Today's video demonstrates how I work with Tapestry Crochet. Tapestry crochet is working with two or more colors of yarn to create pictures, letters, patterns, or geometric designs in your work. It can be very simple, or incredibly intricate. One of the first tapestry crochet projects I made was this improvised dice bag, done in black and white thread:

10 More Perfect Crochet Squares for Afghans
Back in February I did a roundup of 10 Perfect Crochet Squares for Fast Afghans, and that post was a real hit! It detailed some of the squares I used to make a large blanket, as part of a crochet along I did on Ravelry. It's been a couple of years since I made that blanket, and the surprisingly cool temps lately have me dreaming of another one. But it's not just the weather - it's all the beautiful new afghan square patterns coming out! Here are 10 of the hottest and newest free afghan squares right now.
Shark Time Pouch
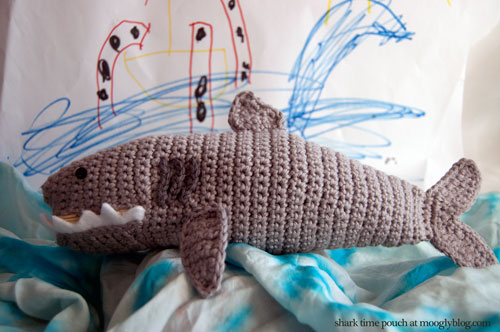
Fans of Discovery's Shark Week® have been glued to their televisions this week, and if we had that channel I'm sure my youngest would be among them. He's been a big fan of sharks ever since his first trip to an aquarium. He's also a big moogly fan... as long as I'm making things for him. So this week's project goes to him. And the pattern goes to all of you!
Double Crochet (dc)
Today's video is a viewer request! It shows the basics of making the double crochet stitch, and then really focuses on how to count dc stitches, and how to stack them in rows.
How to Crochet the Double Crochet Stitch: Right Handed Version
How to Crochet the Double Crochet Stitch: Left Handed Version
Written Instructions for the Double Crochet Stitch:
To make a dc, you yarn over (wrap the yarn around the hook), insert the hook into the next stitch, yarn over again, pull that loop through the stitch, yarn over again and pull that loop through the first two loops on the hook, and then finally yarn over once more and pull that through the last two loops on the hook.
Making rows of dc and knowing how many to chain and whether or not those chains count as a stitch... well, that all depends on the pattern! If it's something you're making up yourself, then it all depends on which you like better. Just remember, if it's counted as a stitch, treat it like a stitch and work into it in the next row. If it's not counted as a stitch, then ignore it on the next row.
I hope that helps some of you out - crochet is a lot of fun, and once you have the basics down, there are no limits to what you can do! Thanks for watching!
Be sure to check out and like the moogly Facebook page to get the latest updates, links, sneak peeks, and more! Moogly is also on Pinterest, Twitter, and Tumblr – come join the fun! You can contact my privately at TamaraKelly@mooglyblog.com.
My Review: Crochet Saved My Life
While there are a myriad of crochet sites out there, one of the real standouts is Crochet Concupisce
So when I heard that Kathryn had written a book, I was intrigued. When I heard it was called Crochet Saved My Life, I was excited! I know I'm not alone when I say that crochet has gotten me through some tough times. In this book, Kathryn relates her own battles with debilitating depression, and how crochet, along with medication and therapy, helped her climb her way out. In Kathryn's own words:
...by the time that I reached the desperate stage of readiness where I would accept any help of any kind (despite feeling certain that nothing could ever help) the problem was nearly out of control. I was barely functioning. I cried most of the day every day. I could hardly move. I could hardly breathe. The idea of trying to make doctors’ appointments or hold down “real” jobs was so far-fetched it may as well have filtered into my mind in another language. I couldn’t do almost anything and yet the one thing that I could do was to move a crochet hook back and forth through yarn, repeatedly pulling one loop through the next to create fabric out of air so thin I could barely breathe in it. Since it was one of the only things that I could do, it became imperative to my mental health that I go ahead and do it. When I first started to crochet, that feeling of temporary relief from the muted chaos of depression was the only reason I was crocheting.
Unpinning Pinterest 8/14/12
Where has the summer gone? Where has AUGUST gone? Time flies when you're having fun tracking down links from Pinterest, and figuring out just where all those good ideas really come from. Today I've got a great roundup of freebies, tips and tutorials, and a bonus recipe for a salad even my husband loved.
Hood / Hat + Scarf = 10 Free Scoodie Patterns
I was casting about (no pun intended) for an idea of what to blog about today, and decided to ask the moogly facebook fans... and hooded scarves were the answer! Also known as scoodies, it was too much of a coincidence to resist - moogly itself got it's start on a batch of commissioned scoodies made to look like octopi/squid! The rest is history, but scoodie patterns will always hold a special place in my heart. But enough about me, let's get on to the free patterns!
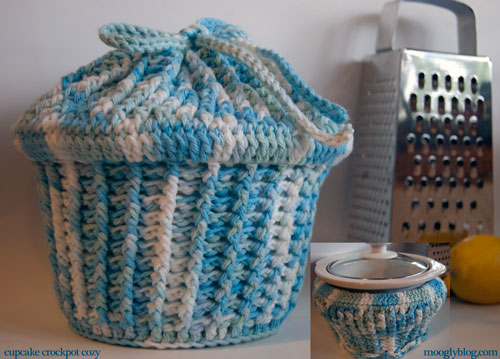
Cupcake Crockpot Cozy
Looking for a practical crochet project for your kitchen? This crochet slow cooker cozy is a fun way to keep your crock pot warm and protected while also making it much easier to transport. This free crochet crock pot cozy pattern includes instructions for a 1.5-quart slow cooker, along with tips for customizing the size to fit your own crock pot. It’s a clever, useful project that makes a great handmade gift, too!
Prefer an ad-free PDF? You've got options!
Prefer the free blog version? Keep scrolling!
Inspired and Designed for Real Life
This past weekend I attended a lovely potluck cookout at a friend's house, and as I so often do, I brought my little slow cooker, all preheated and filled with yummy goodness. In order to transport it with the lid on tight and keep it warm where I couldn't plug it in, I had it all wrapped up in dishtowels and rubber bands. Though it did the trick, I couldn't help but wish I had something better. Well, a bit of pondering and playing later...
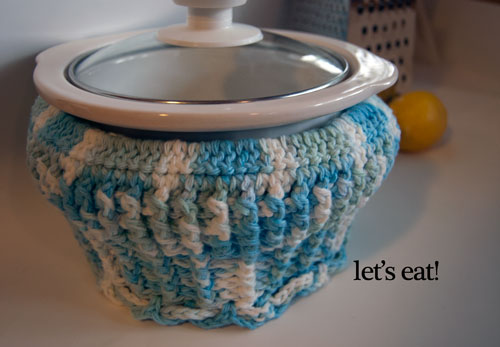
My family's reaction? "What's the giant yarn cupcake in the kitchen!?"
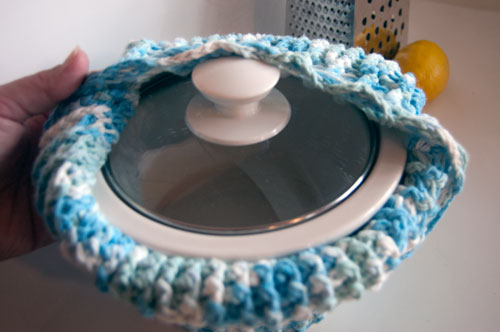
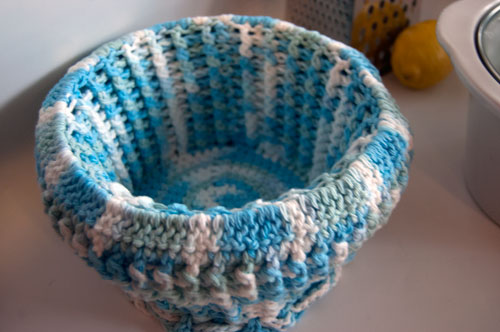
Haha! It's a crock-pot cozy, of course! The base is made using a double thick technique to protect your surfaces, and the sides are ribbed to keep it warm and safe. The top covers the lid and ties tight to keep it on, and when it's folded back for serving the sides become super thick to keep the contents toasty throughout the meal.
Now, the great thing about crock-pots and slow cookers is that they come in lots of different sizes. The downside is that it makes pattern writing a little trickier! So I've written up the pattern that I used to cover my 1.5 quart Rival Crockpot, which has a 5 inch wide bottom to the crock. In addition, I've included notes on how to continue up-sizing the pattern to make a custom cover for your own slow cooker. You'll want to keep your (clean and cold) crock and lid handy so you can try it on as you go and achieve a truly custom fit.
Cupcake Crockpot Cozy
Add this pattern to your Ravelry Queue
WARNING: Only use cotton or superwash wool for this pattern! Acrylic could melt from the heat, and it needs to be washable since it's used with food. Never ever use the cozy inside the heating base - only on the crock outside the base!
- 350+ yards of worsted weight 100% cotton yarn
- US - H, 5.00mm hook
Special Stitches
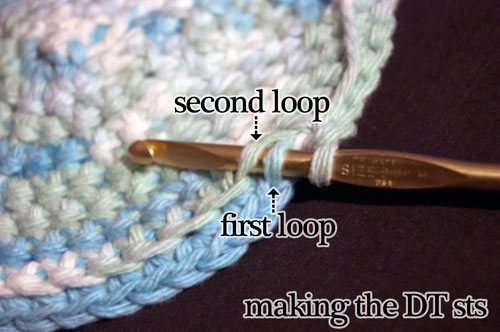
DT sc: The pattern is worked in the round, and the base is made using the double thick crochet potholder technique from Miss Abigail's Hope Chest. Please read the excellent photo tutorial there before starting this pattern. As described in the tutorial, each stitch goes under two loops - the first is the blo of the previous round, and the second is the remaining loop from two rows previous. To adapt this technique for making a circle, on odd numbered rows the second loop (from 2 rows previous) is sometimes used twice to complete stitches for two separate first loops. This is because there were fewer stitches two rows previous, so there are fewer loops available to work into.
DT dc: Combines the DT technique with double crochet. Yo before inserting the hook, insert under first and second loop, yo and pull up a loop, yo and pull through first two loops, yo again and pull through last two loops.
CROCKPOT COZY INSTRUCTIONS
Starting at the Bottom:
Round 1: Ch 7, leaving a 6 inch tail. Sc in the 2nd ch from the hook and remaining 5 ch. (6 sc) Join to first sc with sl st. Turn.
Round 2: Ch 1. DT sc 2 in ea st around. (12 DT sc) Join with sl st. Turn.
Round 3: Ch 1. Note: There are now 12 sts in the last row, and 6 loops for you to work the second loops of the DT sc sts in. Therefore, DT sc in ea st around, working one st in each first loop and two sts in ea second loop. (12 DT sc) Join with sl st. Turn.
Round 4: Ch 1. [DT sc in next st, then DT sc 2 in next st] 6 times. (18 DT sc) Join with sl st. Turn.
Round 5: Ch 1. [DT sc in next st, then DT sc in ea of the next 2 sts, sharing the second loop] 6 times. (18 DT sc) Join with sl st. Turn.
Round 6: Ch 1. [DT sc in next 2 sts, then DT sc 2 in next st] 6 times. (24 DT sc) Join with sl st. Turn.
Round 7: Ch 1. [DT sc in next st 2 sts, then DT sc in ea of the next 2 sts, sharing the second loop] 6 times. (24 DT sc) Join with sl st. Turn.
Round 8: Ch 1. [DT sc in next 3 sts, then DT sc 2 in next st] 6 times. (30 DT sc) Join with sl st. Turn.
Round 9: Ch 1. [DT sc in next st 3 sts, then DT sc in ea of the next 2 sts, sharing the second loop] 6 times. (30 DT sc) Join with sl st. Turn.
Round 10: Ch 1. [DT sc in next 4 sts, then DT sc 2 in next st] 6 times. (36 DT sc) Join with sl st. Turn.
Round 11: Ch 1. [DT sc in next st 4 sts, then DT sc in ea of the next 2 sts, sharing the second loop] 6 times. (36 DT sc) Join with sl st. Turn.
Round 12: Ch 1. [DT sc in next 5 sts, then DT sc 2 in next st] 6 times. (42 DT sc) Join with sl st. Turn.
Round 13: Ch 1. [DT sc in next st 5 sts, then DT sc in ea of the next 2 sts, sharing the second loop] 6 times. (42 DT sc) Join with sl st. Turn.
Round 14: Ch 1. [DT sc in next 6 sts, then DT sc 2 in next st] 6 times. (48 DT sc) Join with sl st. Turn.
Round 15: Ch 1. [DT sc in next st 6 sts, then DT sc in ea of the next 2 sts, sharing the second loop] 6 times. (48 DT sc) Join with sl st. Turn.
Round 16: Ch 1. [DT sc in next 7 sts, then DT sc 2 in next st] 6 times. (54 DT sc) Join with sl st. Turn.
Round 17: Ch 1. [DT sc in next st 7 sts, then DT sc in ea of the next 2 sts, sharing the second loop] 6 times. (54 DT sc) Join with sl st. Turn.
- For a 5" diameter, 1.5 quart crock, stop here and continue with instructions below.
- For a larger crock, continue increasing in the pattern above, until the circle is just slightly wider than the base of the crock, ending on an odd numbered row.
Continue Up the Sides:
Round 1: Ch 2. DT dc in each st around. (54 DT dc for 1.5 quart) Join with sl st and do not turn for remainder of the pattern.
Round 2: Ch 2. *Fpdc around next st, then bpdc around next st. Repeat from * to end. (27 fpdc and 27 bpdc for 1.5 quart) Join with sl st to top of first fpdc.
Round 3: Ch 2. *Fpdc around fpdc, then bpdc around bpdc. Repeat from * to end. Join with sl st to top of first fpdc.
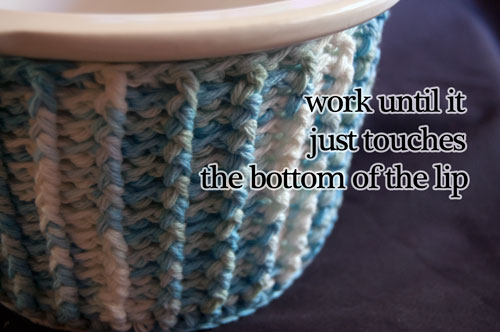
- Repeat Round 3 until the sides reach just to the underside of the lip of the crock. For my 1.5 quart size, I went to Round 12.
- Taller crocks will require proportionately more rounds. When the correct height is reached, continue with instructions below.
Create the Top:
Round 1: Ch 2. Dc 2 into each st around. (108 dc for 1.5 quart) Join with sl st to first dc.
Round 2: Ch 2. Dc in ea st around. Join with sl st to first dc.
Round 3 - 5: Ch 2. *Fpdc around next st, then bpdc around next st. Repeat from * to end. Join with sl st to first fpdc.
- For the 1.5 quart size crock, go to Round 6.
- For larger crocks, repeat Round 5 until it covers about half the radius of the lid when folded over the top. When this is complete, continue with Round 6 below.
Round 6: Ch 2. *Fpdc2tog over the next two fpdc sts, skipping the bpdc between them. Bpdc around the next bpdc. Repeat from * to end. (54 sts for 1.5 quart) Join with sl st.
- STOP HERE and check to make sure you can fold the top back over the lip. It should be snug, but do-able, peeling it back and folding it over carefully. I could just do it on the 1.5 quart I own, but be sure to try it out since lip sizes vary. If it is too tight to fold it over, try working *Fpdc2 tog over the first two fpdc, then bpdc around bpdc, fpdc around fpdc, bpdc around bpdc. Repeat from * to end. If this is still too tight, skip to Round 7.

Round 7 - 11: Ch 2. *Fpdc around next st, then bpdc around next st. Repeat from * to end. Join with sl st to first fpdc.
- For the 1.5 quart size, stop here and go to Round 12.
- For larger sizes, repeat Round 11 until the top just barely reaches the center of the lid when folded over and pulled tight. Then continue with Round 12 below.
Round 12: Ch 1 and sc in the first st. *Ch 3, skip the bpdc, and sc in the next fpdc. Repeat from * to end, ending with a sl st in the first sc. Break yarn and weave in ends, using the 6" tail at the beginning to tighten up the center of the bottom.
Make the Tie:
Ch as many sts as necessary to completely circle the widest part of the crock, plus about 5 inches. Sl st in the 2nd ch from the hook and each ch to end. Break yarn and finish off, weaving in ends. Weave the tie through the ch 3 loops of Round 12 and use to tie the lid on tight.
And That's It, Let's Eat!
Putting a hot crock in the cozy is easiest if you get the cozy set up with the sides folded over so it's standing on it's own, and you can just slip the crock in.
Do be careful though, those things get hot, and they're heavy when they're full! For this reason, I've opted not to add carrying handles - there's too much risk of the yarn tearing and someone getting hurt. Even with the cozy on, be careful not to burn yourself, and use appropriate precautions. Carry the crock by the bottom, use potholders as needed, and don't let it tip over.
Now I can't wait to see all the "giant cupcakes" you make! I keep imaging the bottom and sides in a light brown, and the top in a frothy pink... and now I'm hungry! What's your favorite slow cooker recipe? Do you take your crock to parties or cookouts? Share in the comments!
Be sure to Like the moogly Facebook page for the latest updates and have some fun with us! Written pattern copyright Tamara Kelly 2012. Please do not republish this pattern, but please do link to this page to share this pattern with others. For information on selling finished products made from this pattern, please see the All About Moogly page.
Circles: Rounds vs. Spirals
There are two basic ways to make a circle with crochet - rounds and spirals. Rounds are worked as distinct rows that are joined at the end, and then you chain up to get the height for the next row. Spirals are worked continuously, with the stitches for the new "row" worked right on top of the previous row without a join or chain up. Amigurumi is most often made with spirals, whereas rounds are used whenever you need a flat or even finished edge. The challenge with rounds is hiding the seam. The challenge with spirals is knowing where to stop! (I recommend a stitch marker.) Here's a short demonstration of both techniques:
Spirals have gotten a lot of attention on Pinterest lately, especially in the use of multiple colors. They look fantastic, but it's a tricky technique, so be sure to look for a tutorial that uses the same number of colors you want to use. Someone should gather all those in one place.... hm.... inspiration striking...
Be sure to check out and like the moogly Facebook page to get the latest updates, links, and sneak peeks! Moogly is also on Pinterest, Twitter, and now Tumblr – come join the fun!
Muppets From Yarn!
The Muppets and their friends on Sesame Street have a permanent place in most of our hearts. The shows, the movies, the characters, they've been around for over 30 years now, and they show no signs of stopping. I grew up watching both The Muppet Show and Sesame Street, and I'm glad they're still around for my kids to enjoy. There are some amazing free patterns out there featuring the characters in both knit and crochet, so let's take a look!
Chevron Lace Wrap

It's only August, but already the sunsets are earlier, the temps are dropping a little lower, and Autumn is surely on its way. Fend off the chill of overactive AC now and cool temps later with this Chevron Lace Wrap! Made with fingering weight cotton it's a not-too-warm shawl in the fall and spring, and a warm breathable scarf in the winter.
Prefer an ad-free PDF? You've got options!
Prefer the free blog version? Keep scrolling!
Easy to memorize for on the go!
Best of all it's made with a memorable and easy two line repeat - so once you've got a few rows down, you can curl up on the couch with a movie or take it on the road! It took me about three weeks to finish it in between other projects, and I took it halfway across the country with me on vacation - all I needed was the cone of yarn and a hook. But simple as it is, it still looks interesting and so modern!
Chevron Lace Wrap
Add this pattern to your Ravelry Queue and Favorites
- US - H, 5.0 mm hook
- 800 - 1000 yards of fingering weight cotton (shown: Article 984C, Honeysuckle Cotton)
- Size: 68" long and 14" wide
- VIDEO TUTORIAL: Basics of the Chevron Lace Wrap
- Clicca qui per la traduzione Italiana di Creazioni Art EC!
Stitch Multiple: Mult of 20, plus 11
Special Stitch:
dc cluster - With loop from previous stitch still on hook, yo and insert hook into next st. Yo and pull loop through st, yo, pull through first two loops on hook. (2 loops remain on hook.) Yo, and skipping the next 3 sts, insert hook into the next st, yo, pull loop through st, yo, pull through two loops on hook. (3 loops now on hook.) Yo and pull through all 3 loops on hook to finish stitch. (In other words, this is a dc2tog, skipping 3 sts between the two halves.)
Sample Charted Instructions

Chevron Lace Wrap Instructions
Row 1: FSC 91, turn. (If you prefer to avoid foundation stitches, you can ch 92, skip the first ch, and sc in the rest of the ch - 91 sc made.)
Row 2: Ch 3. Dc in the 3rd st. *[Ch 1, skip 1 st, dc in the next st] 3 times. Ch 1, skip 1 st, and work [dc, ch 3, dc] all in the next st. [Ch 1, skip 1 st, dc in the next st] 3 times. Ch 1, skip 1 st, work dc cluster. Repeat from * 3 times. [Ch 1, skip 1 st, dc in next st] 3 times. Ch 1, skip 1 st, and work [dc, ch 1, dc] in the last st of the row. Turn.
Row 3: Ch 3 (counts as first dc). Dc 2 times in the first st (the base of the ch 3). NOTE: For this row, work into and count the ch sps in the previous row as stitches. Dc in the next 7 sts (as per note, this includes 3 dc sts and 4 ch sps from the previous row). *Work dc cluster (skipping the next ch sp, top of previous dc cluster, and next ch sp). Dc in the next 6 sts. Working in the ch 3 sp [dc 2, ch 3, dc 2]. Dc in the next 6 sts. Repeat from * 3 times. Work dc2tog over the last two dc sts of the previous row, skipping the ch sp and turning ch. Turn.
Row 4: Ch 3. Dc in the 3rd st. *[Ch 1, skip 1 st, dc in the next st] 3 times. Ch 1, and working in the ch 3 sp [dc, ch 3, dc]. Ch 1, dc in the next st. [Ch 1, skip 1 st, dc in the next st] 2 times. Ch 1, skip 1 st, work dc cluster. Repeat from * 3 times. [Ch 1, skip 1 st, dc in next st] 3 times. Ch 1, skip 1 st, and work [dc, ch 1, dc] in the last st of the row. Turn.
Rows 5 - 108 (or until desired length is reached): Repeat Rows 3 and 4, being sure to end on a repeat of Row 4. Turn.
Row 109: Ch 1, and sc in each st and ch sp to end. Work a sc2tog (skipping ch sp, top of dc cluster, and ch sp) over each previous cluster, and work 3 sc into each ch 3 sp. Do not break yarn.
Edging: Sc again in last st of row, coming around to work up the side. Sc twice around each ch 3 and dc st for side edging. Continue to sc evenly around, working sc2tog clusters and 3 sc in sts where appropriate to maintain pattern. Come back up the other side as before, and work another sc row in pattern over the top of Row 109. Break yarn and use seamless finishing method to finish off.
Blocking: If using 100% cotton yarn, as shown, use wet towel method of blocking, placing wrap between dry towel and wet towel and pressing hot dry iron to wet towel. If using other fibers, block as appropriate.
What do you think? I used black because it's what I had on hand, and it's the most common color I wear, but I think this would look absolutely amazing with lots of color! Something with a long color repeat would be breathtaking. I can't wait to see what you all make with this pattern!
The Fine Print
Be sure to Like the moogly Facebook page for the latest updates and have some fun with us! Written pattern copyright Tamara Kelly 2012. Please do not reprint or repost this pattern, but please feel free to link to this page to share this pattern with others. For seller information please see the About page. You can contact me via Facebook messages or at TamaraKelly@mooglyblog.com.
All About Turning Chains
To crochet or not to crochet? When it comes to turning chains, the answer isn't always clear. Sometimes a turning chain is not just a turning chain - it can be a whole stitch! It all depends on the pattern you're using, but 9 times out of 10, the "rules" are the same - make the same number of chains as you have in the height of the next stitch. In other words, ch 1 for a sc row, ch 2 for a hdc row, ch 3 for a dc row, etc. This video should help explain a bit more.
There are always exceptions to the rule, of course. And being familiar with your own gauge means you can bend those rules and patterns to work with your own style. Some find that a ch 2 creates all the height they need for a dc row, while others stick with the traditional ch 3 - and the patterns they write will reflect their own personal tension. Don't be afraid to play around and see what works best for you, and what look you like best, regardless of what the pattern calls for. The key is to only count the turning chains as stitches that are being used as stitches.
I hope this video has helped you understand a bit more about the hows and whys of turning chains! There's a pattern to it all, but the "rules" of crochet are really more like guidelines - never be afraid to do what works best for you, or what you think looks better. There are no crochet police, and as long as you are getting the results you want, you're doing it right.
Once again, thanks for watching! And let me know if there are any videos, stitch tutorials, or questions you'd like to see me answer - I love to read your comments!
Be sure to check out and like the moogly Facebook page to get the latest updates, links, sneak peeks, and more! Moogly is also on Pinterest, Twitter, and Tumblr – come join the fun! You can contact me me via the Facebook page or at TamaraKelly@mooglyblog.com.


Disclaimer: This post includes affiliate links.