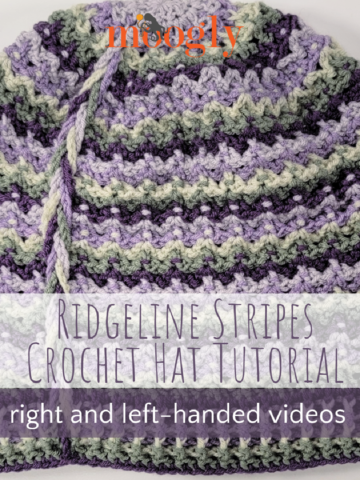
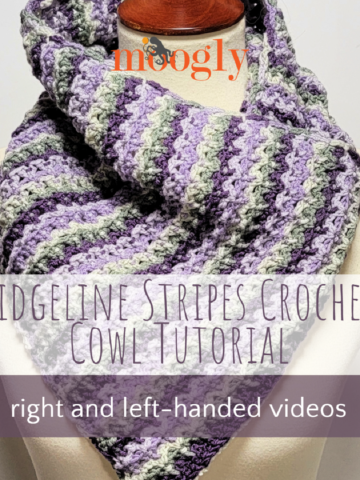
 If you've made the Sweet Striped Crochet Arm Warmers or matching Hats, or the All Grown Up Arm Warmers or matching Slouch Hats, you're already familiar with the way I made my crochet ribbing for brims and cuffs when they come at the end of a pattern. There is a video tutorial for working in the BLO, but there's a little more to making the brim/cuff, and it can be confusing. So here's a video of the first few rows, to help make it a little clearer!
How to make the Crochet Ribbing for Brims and Cuffs featured on Moogly Patterns:
The way I write this portion of the pattern varies a little bit in stitch/row count, depending on what is being made. Arm warmers have longer cuffs, so you start with more stitches, but they're smaller around, so there are fewer rows. But there's a sort of generic formula to it, as follows:
Row 1: Ch length desired, plus 1. Working in BLO, sc in the 2nd ch from hook and each ch, working back toward the set-up row (previous horizontal row). Sc2tog in the next 2 set-up row sts. This is the “securing st” that attaches the vertical brim rows to the horizontal setup row. Do NOT ch, turn.
Row 2: Skipping the securing st, sc in the BLO evenly. Turn.
Row 3: Ch 1, sc in BLO evenly. Make securing stitch. Turn.
Row 4 – number equal to however many sts you had in your setup row: Repeat Rows 2 – 3.
Sew the brim together using the whip stitch, joining first and last rows. Be sure to work into the BLO of the last row to maintain the ribbed look.
I hope that clears up any confusion! Be sure to snug down that securing stitch - it helps keep the ribs nice and lined up. I love this crochet ribbing technique, because I think it looks a little more polished than crocheting into the side of the rows, and because if you make the hat the right size leading up to it, then the brim will automatically be the right size as well! Plus it's got great stretch but holds it's shape. I hope you like it too!
 Be sure to check out and like the moogly Facebook page to get the latest updates, links, and sneak peeks. Moogly is also on Pinterest, Twitter, and Tumblr – come join the fun! TamaraKelly@mooglyblog.com

Susan says
Thanks so much for the tutorial! I decided to teach myself how to crochet after putting it away in frustration years ago. Being lefthanded has been a challenge but thanks to the internet and the magic of video, I've been able to figure out most stitches. I've been using front and back post stitches to create ribbing but this method is much nicer!
moogly says
I'm so glad you like it Susan - and that you've been able to give crochet another go! 😀
Melanie says
i myself am Lefthanded and find there are a lot of patterns that have me so stumped because the wording is for righthanders only i have to modify the patterns to work for me if i can't find a lefthanded pattern it's so nice to find people who understand we Lefties exist...:)
EclecticArts says
I love that. I've wanted something like that for ages. I don't crochet from patterns usually...just grab a hook and yarn and start to play and that is one thing I hadn't played around with to figure out. Thank you so much!
moogly says
You're very welcome EclecticArts!
Sara says
This is awesome! I've been looking for a good crochet ribbing method for a while now. Thank you!
Icey Clay says
thx you for sharing! you rock!!!
Carrie says
Thanks for the awesome tutorial. Can't wait to try this!
Joanne says
Thank you, thank you, thank you....Finished the hat and \
this brim is absolutely beautifully ribbed...wow...;)!!!!!
Took me a while to get all the way around...
First time crocheting a hat!!!
Thanks for ALL Your Help!!!! It was needed!!!
Yep You Rock!!!!
Tamara Kelly says
😀 I'm so glad! And thank you!!
Kathleen miller says
Reguarding your "all grown up striped slouch hat" I ve made two and they don't look like the picture. My rounds when I do the 2 bpdc in same stitch rounds the rounds stick out quite a bit. I know how to do bpdc. But the pattern requires 2 in a stitch. You do not have a tutorial with 2 bpdc in the same stitch. So when the patterns calls for 2 bpdc in the same stitch how exactly is it done , on top of each other or first bpdc then in front of that bpdc do the second bpdc, or right behind that first bpdc cones the second.
Tamara Kelly says
Hi Kathleen! The second bpdc is worked behind the first, with the loop around the post underneath the first. A bit of blocking helps flatten it out too. 🙂
Kaaren says
Is there a video for the making the brim?
Is so, it isn't loading.
Thanks,
Kaaren
Tamara Kelly says
Sorry for the trouble Karen, it's loading fine now. Sometimes youtube seems to have issues! It does take a minute to load up.
prayermama says
i love these short tutorials! you do a terrific job of showing the work you are doing and explaining it.
thank you very much! now to try this on your beanies!
Tamara Kelly says
🙂 Thank you so much!
Rebecca Plemons says
I love the pattern, but unfortunately it turned out too big. Is there a way to make it smaller without starting over?
Tamara Kelly says
Hi Rebecca! I'm not sure which pattern you're referring to?
S says
Thanks for the great tutorial! It really cleared things up for me. Just one question, is there a right side and wrong side to this ribbing, or is it reversible?
Tamara Kelly says
That's one of the great things about this one - it's reversible! 🙂 Thank you!
Sarah says
Hi, Is the video for the brim tutorial still available, please. I would really like to make the All Grown Up Slouchy Beanie.
Thanks
Marie says
Vos explications sont toujours super claires. Merci ! Bravo ! Encore !
Your explainations are very very clear. Thank you ! Clap clap (dunno how to translate with enthousiastic feeling) ! And go ahead and please share more !
Tamara Kelly says
😀 Thank you so much Marie! Merci beaucoup!
Laura says
I'm making the stripes and block hat and on the brim when I get to the end there is an extra single crochet. Not sure why and I've done it twice. Any suggestions.
Tamara Kelly says
Hi Laura! From the setup round? You can sc2tog in the last setup rnd sc and first st of the setup rnd, then blo sc in each brim stitch, and break the yarn there and sew back towards the hat.
Laura says
Thank you!
Laura says
Thank you?