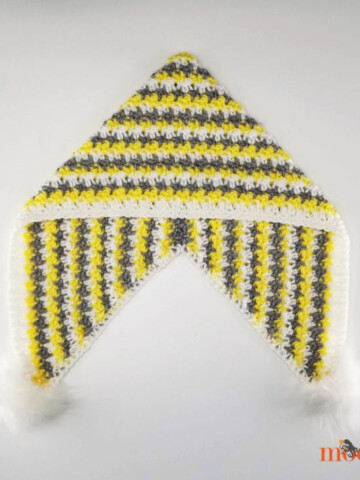
This past January I shared the pattern for the Sweet Striped Arm Warmers - a fun knit pattern for kids. It's popsicle season now, but cold weather is coming... eventually... and I've had a few requests to translate this pattern to crochet. So let's get a jump on fall, with a project that will keep the kids warm once the cold weather hits - but is small enough to keep you cool while you work on it! Here are the Sweet Striped Crochet Arm Warmers!


These arm warmers were designed for tweens and young teens, but it's easy to size these for a younger child: skip the last two stripes and go straight to the cuff! In other words, after finishing the 7th stripe, switch to color A, work 27 bpsc, and work rows 1-28 of the ribbed cuff pattern.
Sweet Striped Crochet Arm Warmers
Add this pattern to your Ravelry Queue and Favorites
- US-I, 5.5mm hook
- Worsted weight yarn, approximately 175 yards each of two colors (Caron Simply Soft in Limelight and Grape shown)
- A video tutorial for the upper cuffs is now available!
- Looking for the grownup version? Check out the All Grown Up Arm Warmers!
Wrist/Hand Cuff
Using Color A and leaving a 6" tail, ch 8. Turn.
Row 1: Working in BLO, sc in the 2nd ch from the hook, and each ch to end. (7sc) Ch 1 and turn.
Row 2 - 28: Sc in BLO evenly across. (7sc) Ch 1 and turn.
Row 29: Turn to work into the side of the cuff, looping the piece into a ribbed cuff, so that the first and last row meet. Ch 1 and sc into the side of 1st row and each row around, as shown below. (28sc) Do NOT join yet.
 Stripes Section
Round 1: Insert the hook into the 1st st of Row 29 (above), yo with Color B, and make sl st to join. Ch 2. [Bpdc in 2 sts, then bpdc2tog] 7 times. (21 sts) Join with sl st and ch 2. 
Round 2: [Dc in 5 sts, then dc2tog] 3 times. Do NOT join yet. (18 sts)
Round 3: With Color A, join the end of the previous row with a sl st. Ch 2, and bpdc in each st around. Join with sl st and ch 2.
Round 4: Dc in each st to last st. Dc 2 in last st. Do NOT join. (19 sts)
Round 5: With Color B, join the end of the previous row with a sl st. Ch 2, and bpdc in each st around. Join with sl st and ch 2. 
Round 6: Dc in the 1st st, then dc 2 in the next st. Dc in ea st to last st, then dc 2 in the last st. Do NOT join. (21 sts)
Round 7 - 8: Repeat Row 3 - 4. (22 sts made on Row 8.)
Round 9 - 10: Repeat Rows 5 - 6. (24 sts made on Row 10.)
Round 11 - 12: Repeat Row 3 - 4. (25 sts made on Row 12.)
Round 13 - 14: Repeat Rows 5 - 6. (27 sts made on Row 14.)
Round 15 - 16: Repeat Row 3 - 4. (28 sts made on Row 16.)
Round 17 - 18: Repeat Rows 5 - 6. (30 sts made on Row 14.) Break Color B, leaving a long enough tail to weave in later.
Upper/Arm Cuff
Setup Row: With Color A, join the end of the previous row with a sl st. Ch 1, and bpsc in each st around. (30 sc) Join with sl st.
Row 1: Ch 8. Working in BLO, sc in the 2nd ch from hook and each ch. (7sc) Sc2tog in the next 2 setup row sts, as shown below. This is the "securing st" that attaches the vertical cuff rows to the horizontal setup row. Do NOT ch, turn.
Row 2: Skipping the securing st, sc in the BLO evenly. (7 sc) Ch 1 and turn.
Row 3: Sc in BLO evenly. (7 sc) Make securing stitch. Turn.")
Row 4 - 29: Repeat Row 2 - 3.
Row 30: Sc in BLO evenly. (7 sc) Break yarn, leaving a 12" tail.
Sew the arm cuff together with whip stitch, joining Rows 1 and 30. Be sure to work into the BLO of Row 30 to maintain the ribbed look.
Back at the Wrist/Hand Cuff, you can whip stitch the entire cuff together to wear it on the wrist, or stitch just the first 3 - 4 sts together, leaving a thumb hole, as shown in the first picture. Weave in all ends. And then of course.... 
The Fine Print
I hope enjoy making your own Sweet Striped Crochet Arm Warmers! Written pattern copyright Tamara Kelly 2012. Please do not reprint or repost this pattern, but please feel free to link to this page to share this pattern with others.


Lisa Johnson says
I love your blog! Such creativity! Thank you!
moogly says
Wow, thank you for saying so! 😀
Kirsten says
Agreed ^^
Maggie says
This looks like a fabulous pattern, and the pictures are so helpful. Do you have a version of this sized for adults? I have several relatives who would love to receive these for Christmas if I can make them larger.
moogly says
Maggie, I do not, but I can certainly look at writing it up! Good idea!
núbia degan varjão says
por favor preciso de ajuda como são as legendas dos pontos po r exemplo pb ,pa, corr, por favor me ajudem fico aguardando
shaina82 says
I am new to crochet, teaching myself 🙂 I have made the gloves and am at row 2 of the upper/arm cuff. Am I supposed to sc into the blo of the set up row? I did that, turned, and made row 3 and I am afraid I am going to ende up without a ribbed pattern except for in on area on that end of the glove and ribs are going the wrong way. I am so confused!! 🙁
moogly says
Sorry shaina, I think I wasn't as clear there as I should have been. When you sc2tog in the setup row, work under both loops of those two sts. Then, when working back along the 7 sts of ribbing, work in the BLO of those sts. Remember that the back loop is the loop furthest away from you. When you do the sc2tog sts into the set up row, aka the securing stitches, go under both loops of the two sts that you sc together. Is that any clearer?
Michelle says
Hi, i was just wondering if there is any clue as to guage for this project? im making these for myself (I'm an adult with a 5 3/4" wrist) and want to make sure they will not be too snug. This is the best arm warmer pattern I have ever found and really would love a pair!
moogly says
Michelle, measuring it now I get 14 dc = 4 inches. Each row of dc is about 1.125" tall before post stitches. Hope that helps! Thanks for reading! 😀
Michelle says
Thanks! i should be able to fit these with a little adjusting of the cuffs! Thanks!!!
Mimi says
these are great! the only note i have is that they were actually too small for my 6-year-old cousin, so i ended up giving them to the 4 y/o instead. i'm making another set with a 6.5mm hook, and adding two rows.
but otherwise, thank you so much for this pattern! i look forward to making a pair for myself as well. 🙂
moogly says
Ah, we must have very different gauges - my copy still fits my 11 year old! Bumping up the hook size is definitely a good idea, and of course adding rows is easy enough. 🙂 I'm so glad you like the pattern!
Amy says
I have just finished making the first one of a pair of these arm warmers. They are sized for my 6 year old and fit great except for the upper arm cuff. It flares WAY out and doesn't fit her arm at all! What could be wrong? I did the upper arm cuff with the same hook as the cuff to go around her hand, but it is much larger.
moogly says
Hi Amy! Sorry to hear you're having trouble. There are a couple of possibilities that come to mind. One is that you ended up adding some extra rows in the upper cuff - there should be 30, maybe a few extra sneaked in? Another possibility is that you were way more relaxed while making the cuff, and it affected your tension - though that's a big effect to be sure. If the row count is correct, you could try going down a hook size or two to make it tighter - 6 year olds tend to have smaller upper arms than older kids to be sure, and a little extra snugness there would be handy anyway!
Lorelei - Craftsmumship says
Thanks for your free crochet arm warmer pattern. I made some for my 8 year old daughter and she loves them. I found your pattern very easy and clear
I've linked to you on my blog http://craftsmumship.com/2013/01/crochet-striped-arm-warmers/
Thanks again.
moogly says
Fantastic post Lorelei - your daughter is a doll! Thanks so much for sharing! 😀
Rachel says
Thank you so much for this pattern! My 9yo asked me to make her some fingerless mitts...I don't have a lot of time but how can I say no to that? 🙂 I think these will be perfect, so excited to get started! Found you on Ravelry...I'm applecake33. 🙂
-Rachel
Treasured says
I shared this version and the knit version here
http://www.scoop.it/t/needle-and-hook-patterns/p/3997302155/free-pattern-sweet-striped-crochet-arm-warmers
moogly says
That's great Treasured! I hadn't seen that site before, very cool! Thanks for including me!
Crystal B says
YEAH!!! Loved this pattern so much had to learn how to crochet! I have just finished my first pair for my daughter (who absolutely loved them!) and will be doing two more for my other daughters! Thank You for the pattern!!!!
Tamara Kelly says
😀 Awesome! Thanks Crystal, I'm so glad!
Janice says
This pattern is adorable! I haven't touched a crochet hook in over three years, and I've never used a pattern before... I also had no clue what any of the abbreviations meant...BUT...between your video tutorials, and other resources on the internet (and a little trial and error) I just finished one of the arm warmers in about 6 hours (I'm sure the second will go much faster). I used Caron Simply Soft in Limelight and Berry Blue, and it is adorable! The only mistake I made was carrying the yarn on the wrong side, but it plays nicely into the pattern. These will make a wonderful Christmas gift for my pre-teen cousin! Thank You!
Tamara Kelly says
😀 Thank you so much Janice! And welcome back to crocheting!
LeAnn says
I'm having the hardest time understanding this pattern. The directions say to work it in rows but it almost seems like it should be worked in rounds considering there is joining involved. Are there any more videos that may help me visualize how these arm warmers are stitched?
Tamara Kelly says
Hi LeAnn, sorry for the confusion! This is one of the first patterns I wrote, and you're right, it should say Rounds rather than Rows.
heather says
Have you considered doing a tutorial for these? I am just learning to read patterns. I just finished your all grown up slouch hat and it turned out great! But I can't for the life of me wrap my brain around this after I get the cuff done. Any help would be great. I have the right number of rows on the cuff but 29 is confusing and I end up with too many stitches.
Terra says
I think I ran into a problem working on these. I made the adult size first and don't think I had this problem with them. I hope I can phrase this correctly. So the pattern says on round 2, dc in 5 then dc2tog, 3 times. Then round 3 says bpdc in each st around. So on round 3 when I come to the stitches that are 2 tog should I just do one bpdc around both together? I am thinking the problem was that I worked around both stitches individually...?
Tamara Kelly says
Hi Terra! You would work them like a dc2tog, only going around the post rather than into the top of the stitch. 🙂
Candace says
I'm a bit stuck on the striped section switching from round 4 to round 5. Not sure if I need to be working behind the last row or not. Can you explain or show a picture or something please?
Tamara Kelly says
Hi Candace! Round 5 is back post double crochet (bpdc) stitches - you can see a tutorial for those if you click here. 🙂
Candace says
I'm sorry I confused the round I was on. It's when you switch back to color A on round 3 and go to round 4. I understand how to do the Bpdc I am just unclear if I go behind color B or right over top of it and DC
Tamara Kelly says
Hi Candace! You use CA to yarn over and pull through the slip stitch that finishes Round 2, and then start Round 3 with that. You bpdc around with Color A for Round 3, working around the posts from behind. Then Round 4 is just regular dc sts worked into the tops of Round 3.
Kay says
Hi I was wondering i u av a video tutorial of this pattern .
Tamara Kelly says
Just of the cuffs!