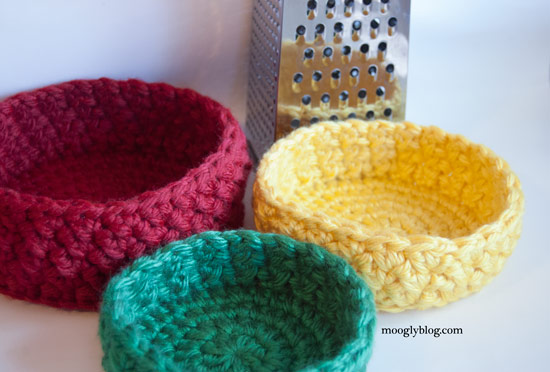
Kids have the funniest requests sometimes! My youngest was given a stuffed toy pelican recently, and just fell in love. Within the day he was insisting I make his new pal a nest. And every day until I got the chance to make it, he complained how very exhausted the bird was getting, without a chance to sleep! Finally, I made one... and then I couldn't resist making a few more! So here's the Bird's Nest Bowl Set!
Disclaimer: This post includes affiliate links.
I whipped up the Bird's Nest Bowl Set in just an evening, and in three sizes that "nest" together they're good for lots more than stuffed animal sleeping quarters! They've got flat bottoms so they don't tip over, and made with super chunky yarn they're very nearly instant gratification. Simple stitches, with textured sides to keep them interesting (and dare I say "nest-ish"?), these bowls make a great gift, are a fun way to organize all that clutter, and add a pop of color wherever they go.
Bird's Nest Bowl Set
Add this pattern to your Ravelry Queue and Favorites
- 150 yards super bulky yarn (Hometown USA shown)
- US-M/N, 9.00mm hook, or US-L, 8.00mm if needed to produce firm fabric
- Yarn needle for thick yarn (regular yarn needles just can't handle the thick stuff!)
- Bird's Nest Bowl Set Video Tutorial
SMALL BOWL: (5 inch diameter)
Round 1: Make a magic circle and hdc 9 times in the circle. Join with a sl st. (9 hdc)
Round 2: Ch 1, work 2 hdc in each st. Join. (18 hdc)
Round 3: Ch 1. [Hdc in the next st, then 2 hdc in the next st] 9 times. Join. (27 hdc)
Round 4: Ch 1. [Hdc in the next 2 sts, then 2 hdc in the next st] 9 times. Join. (36 hdc)
Round 5: Turn (the only turn) and ch 1. Sc even in BLO around. Join. (36 sc)
Round 6: Ch 1. *[Sc, dc] in the next st. Skip the next st. Repeat from * to end. Join. (36 sts)
Round 7: Repeat Round 6. Finish off with seamless join.
MEDIUM BOWL: (6 inch diameter)
Rounds 1-4: Repeat Rounds 1-4 of Small Bowl Instructions.
Round 5: Ch 1. [Work 2 hdc in the next st, then hdc in the next 3 sts] 9 times. Join. (45 hdc)
Round 6: Turn (the only turn) and ch 1. Sc in the BLO of each st AND in the turning ch. Join. (46 sc)
Rounds 7-9: Ch 1. *[Sc, dc] in the next st. Skip the next st. Repeat from * to end. Join. (46 sts) Finish off with seamless join.
LARGE BOWL: (7 inch diameter)
Rounds 1-5: Repeat Rounds 1-5 of Medium Bowl Instructions.
Round 6: Ch 1. [Hdc in the next 2 sts, then 2 hdc in the next st, then hdc in the next 2 sts] 9 times. Join. (54 hdc)
Round 7: Turn (the only turn) and ch 1. Sc even in BLO around. Join. (54 sc)
Round 8-11: Ch 1. *[Sc, dc] in the next st. Skip the next st. Repeat from * to end. Join. (54 sts) Finish off with seamless join.
EXTRA LARGE BOWL: (Approx. 8 inch diameter, not shown - added at reader request)
Rounds 1-6: Repeat Rounds 1-6 of Large Bowl Instructions.
Round 7: Ch 1. [Hdc in the next 5 sts, then 2 hdc in the next st] 9 times. Join. (63 hdc)
Round 8: Turn (the only turn) and ch 1. Sc even in BLO around. Join. (63 sc)
Round 9-13: Ch 1. *[Sc, dc] in the next st. Skip the next st. Repeat from * to end. Join. (63 sts) Finish off with seamless join.
I can't wait to make more of these! Filled with homemade treats, the Bird's Nest Bowl Set will be a welcome addition to any gift - and it's never too early to start thinking about the holidays. And how cute would they be filled with tiny yarn balls! They're so very fast to make there's no reason not to make dozens. Of course, you don't have to use super bulky yarn either. Made up in worsted with a G hook, you'd have sweet little trinket bowls - great for the nightstand or next to the sink. How do you plan on filling your Bird's Nest Bowl Set?
The Fine Print
Written pattern copyright and images Tamara Kelly 2012. Please do not reprint or repost this pattern, but please feel free to link to this page to share this pattern with others.



Sarah Boblit
Love cute and quick for a fast gift . Thanks so much.
Lorie
What a super idea to fill it with treats! Or maybe homemade soap... or cookies... the possibilities are endless!
Thanks for this super pattern! It is so cool that you offer up all of these for free, you are the best!!!!!!!
Cj
What a great idea!
moogly
Thanks all! 😀
Kelli
Thank you. I have made a set but cant figure out how ro add a round to make a bigger one. Any hints?
moogly
Sure Kelli! Each size adds another row which increases by another 9 stitches for the base, and then adds another row, worked evenly, on the sides. I'll add a quick set of directions for it to the original pattern! 😀
moogly
Ok, done! Look at the bottom of the pattern for the Extra Large Instructions. 🙂 Hope that helps!
Kelli
You are the best. thanks!
moogly
You are very welcome! 😀
Sara - My Merry Messy Life
So simple and easy, just my kind of crochet project! I love it and the story behind them is even better - a nest for your son's bird. So cute! Thanks for sharing at Hookin On Hump Day!
blissfulsewing
This is awesome!!!!!Thanks for sharing.
http://www.blissfulseeing.blogspot.com
Reshma
thanks for such a lovely and easy idea
Elayne
Can't wait to start making these...
Barb
What a clever idea. These will make for great Christmas gifts along with Dish Towels with towel toppers, crochet dishcloths, and crochet pot pads. Thanks!!!
moogly
Great idea Barb! And thanks for saying so!
Natasha F
HI!
I was searching for a pattern to make my supervisor a candy bowl, and came across your website.
Thanks to your pattern I made a large bowl in about 30 min. I'm so in love with your website. Can't wait to try the other patterns you posted.
moogly
Wow, thanks so much for saying so, Natasha! 😀 Glad you found it!
Jenn Kaye
Why arent mine fitting snug?! I don't know what im doing wrong!:(
moogly
I'm sorry Jenn - I'm not sure what you mean by snug. Do you mean in relation to each other? They aren't that snug to each other, there's a bit of room between them, though the photos may not show that. If you're referring to the sides not being stiff enough, then it's likely we just have different tensions/gauges - try going down a hook size or two and see if you like the results better!
Jenn Kaye
Thank you for the reply! Yes I mean in relation to eachother, thank you for letting me know that there is a little bit of room in between them, they are so cute thank you for the pattern!
moogly
Oh good! 😀
Vini
Cute idea! Thanks for the pattern and I really like your PDF generator. I look forward to making these after the holiday rush is over.
moogly
Thanks Vini!
Erica
My very first crochet project complete. Thank you so much for this fantastic project, it was really fun watching it form and turn into something usable. Again thanks it has really fuled the desire to delve into the world of crochet xx ps i loved the youtube links, would have been lost without them!
Tamara Kelly
That's so great to read Erica, I'm so glad! Thank you for commenting! 😀
Liz Hasler
Thank you! Great teacher gift with coasters!
nina stasiowski
********Very Important I am trying to make these this weekend for a party next week I love them so much.....
Hi, Can you send me instructions on how to turn my work in row 5 for the small bowl. I keep getting an uneven seem. Thanks
nina stasiowski
Hi, can you please send me directions on how to turn for row 5 on the small bowl. Thanks
Tamara Kelly
Hi nina! The turn in Round 5 is just flipping your work over to work from the other side - as if you were working back and forth in rows, instead of in the round. It keeps the right side of the bottom facing up. You don't actually have to turn here if you don't want to - it just means the WS of the sts will face up for the bowl. But if you're filling it, it doesn't really matter. 🙂
TM
I am ALWAYS leaving a mess of yarn bits wherever I crochet. There sill be a trail of yarn on my bed or on the floor next to my bed. I was looking for something to contain mu scrap pieces. I googles crochet yarn bowls and found your pattern. As I am at work I only had a small supply on hand, so I followed your pattern using an N hook and all three strands of the colors in my bag and came out with a terrific bowl!
A MILLION THANKS!!!
TM
If you send me your email I would love to send you a pic of my bowl. I don't know if its because I'm on my iPad , but I can't attach one to my comment.
Tamara Kelly
Unfortunately I'm not set up to take pics in the comments, but I'd love to see it! You can email me at TamaraKelly@mooglyblog.com!
Lori Johnson
Super cute, thanks for the pattern. I can't wait to make a few for Christmas gifts. I love your patterns, thanks for sharing.
Tamara Kelly
Thanks Lori!
Bobbit9
Just great and a big thank you for sharing.
Mary G
My daughter is getting ready to move out on her own. Soooo...to symbolize my empty nest syndrom (snif snif) I am making her a set of these in red and black, her favorite colors. She will love and hopefully think of me every time she uses them. Thank youso much for posting this pattern..
Tamara Kelly
<3 Aw, a congrats AND condolences moment! You are so welcome Mary, and thank you!
Marita
I am looking for a crochet pattern for baby birdnests. I knitted some but a friend only crochets. I am doing nests for this group.
https://www.mooglyblog.com/birds-nest-bowl-set-free-crochet-container-pattern/
The wall needs to be about 4 inches tall.
Tamara Kelly
I'm afraid I don't know much about actual crocheted birds nests. If this pattern would work then you'd just need to keep working up the sides to make it tall enough.
Bett Roberts
There is a pattern for real baby bird nests over at http://www.bevscountrycottage.com if anyone is still looking. I know this is a year late, but just now saw the request. Your bowls are very cute!
Tamara Kelly
Thank you Bett!
michelle
Great pattern, thank you! I made the small bowl and I love it! Only thing that I changed was adding crab stitch to the top. How do you seamlessly join/end a crab stitch anyway?That was the only thing that didn't turn out right.
Tamara Kelly
Pretty much like you do for a normal stitch, but of course going the other direction. It takes some playing around to get it to mimic the look. 🙂 Thank you Michelle!
Jimmye Dorman
Hi Tamara,
I have had this pattern saved for over a year and just started them t for my niece who is expecting her first baby. I am going to fill them with all of my favorite baby things: teething tables, gas drops, socks, teethers, etc.
I noticed what I think is an error in the large bowl instructions. Every row seems to increase by one stitch between the two hdc together. On Round 6 of the large bowl it says:
Round 6: Ch 1. [Hdc in the next 2 sts, then 2 hdc in the next st, then hdc in the next 2 sts] 9 times. Join. (54 hdc)
Shouldn't it say instead (Hdc in the next 4 sts, then 2 hdc in the next st, then hdc in the next 4 sts) 9 times?
Row 5 is 3 sts then 2 hdc, and row 7 is 5 sts then 2 hdc.
Just jumped out at me since I FINALLY figured out the formula for increasing, lol! I am using cotton yarn so my row count is much higher to achieve the same size.
Thank for you for another wonderful pattern. It really is adorable and super fast.
Jimmye
Tamara Kelly
Hi Jimmye! Thank you! The increases in that round are shifted over, so that it doesn't create an octagon shape. By moving the increases in one round, so they aren't lined up with the others, you get a more round bottom. The octagon-ness doesn't show up until you get several rounds in, so that's why it doesn't come up until the large size. 🙂
Cindy
X-Large bowl: Confused by the last set of rounds (9-13). If you sc/dc in every other stitch, that's an even number of stitches - how is it that you end up with 63 stitches? All of the other size bowls have an even number of stitches on the last set of rounds. Looking forward to your guidance.
Tamara Kelly
You can skip the last stitch of the repeat. 🙂
Robin
I just made these bowls...Very quick and easy!!! Took me 55 minutes to do all 3!!! Will definitely be making more in different colors.
Tamara Kelly
😀 I'm so glad you like them, thank you Robin!
Tracey petrass
Hi Tamara,
I love your site, so many great patterns and tips, thank you.
I have just finished the small birds nest basket, using bulky yarn and a 7mm hook (I thought it would be too loose and lose its shape if I used a bigger hook) and mine was much smaller than yours, at only 4inches diameter and just under 1 inch high.
I've only been crocheting a few months and am unsure how to adapt the wool I have at home (lots of 8ply DK and thinner acrylic) to your patterns along with hook sizes. I'm finding the most common and best range of colour here in Australia is 8 ply, and for anything more than DK the best choices are from online, often from overseas).
Can you please give me some advice/tips on using thinner wool for patterns and the hook sizes? If I double the yarn how do I determine the hook size to use?
I love the all grown up slouch hats I've made and the morrocon baskets, and am looking forward to making the birch basket when my wool arrives in a week or so. In the mean time I'd like to use the wool I have in my cupboard so I don't have to buy yet more wool lol.
Thanks again,
Tracey
Tamara Kelly
Hi Tracey! Thank you!
The tricky thing about bulky yarn is that it's a range - so you can have two bulky yarns of different thicknesses. Kind of annoying, I know!
One common way to adjust would be to make the larger size instructions with the thinner yarn, to end up with something closer to the smaller size basket.
Since thicker yarns are hard to get there, doubling up, or even tripling them, is another great option for sure! You can then use the hook size called for in the pattern, or if you are doing your own thing, you can try a few hooks and see what gives you the fabric you like - a bigger hook if you want something soft and drapey, a smaller hook if you want something stiff like a basket. A good starting point is to just "hook" the yarn(s) in the notch of your hook. They should mostly all fit in there. If you can't get the yarns inside the notch of the hook, you're going to need to move up in hook sizes until you get one that will allow you to work comfortably.
In the end, it's a bit of experimentation, but you always learn a lot in the process too! I hope this helps! 🙂
Denice
I am so happy that you posted this pattern!!!!! This year for Christmas presents, i made a trivet, dishcloth, scrubby and coasters with a holder. Well, my youngest daughter loves owls, iwas looking for something that would go with the owl theme, but yet could hold the coasters! I went higher on sides, and it works perfectly!! Thank you!!
Tamara Kelly
I'm so glad to hear it, thank you Denice!
Nancy
I just kind of glanced through the comments. Did not see where anyone did what I did. I made the sides of the nesting bowls a little higher, added a roll of half double crochet to the top. Then took ( depending on size of bowl) a plastic plant guard and pulled bowl up and over the top. Makes a great dish for many things. Plants, dips, rolls, etc. the ideas are endless!!
Tamara Kelly
😀 That sounds great Nancy! I'm so glad you've found this pattern useful!