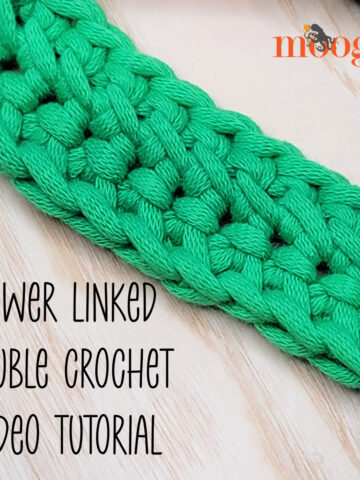
Fptrc2tog - it's a mouthful to say and not exactly a "standard" crochet stitch. What it is, is the foundation for the crochet cabling pattern in the Diamond Crochet Cowl! I've had several requests for a video, so without further ado...
I hope this video clears up any confusion about this stitch! It's the combination of it's parts - a treble crochet decrease as front post stitches. If you're overwhelmed, I recommend starting with my videos on post stitches and crochet cabling. (I'll have a video on treble crochet coming out soon, I hope!) Crochet cables are a lot of fun, and used in all sorts of patterns, including the Diamond Crochet Cowl, Cable Heart Gift Bag, and many more.

 on mooglyblog.com") Be sure to check out and like the moogly Facebook page to get the latest updates, links, sneak peeks, and more! Moogly is also on Pinterest, Twitter, and Tumblr – come join the fun! You can contact me via Facebook messages or at TamaraKelly@mooglyblog.com.
Be sure to check out and like the moogly Facebook page to get the latest updates, links, sneak peeks, and more! Moogly is also on Pinterest, Twitter, and Tumblr – come join the fun! You can contact me via Facebook messages or at TamaraKelly@mooglyblog.com.


Lori says
This is very helpful, thanks! I think I was doing it right, but I had abandoned the project when I got confused. I'll pick it back up again now that I have this handy tutorial for it.
Janety Yamashita says
Ditto to all.. I will practice more as well..
Francess Tindor says
Are you actually going into the 2nd stitch on row 1 ?
moogly says
Francess, if you are referring to Row 3, which is the first row demonstrated in the video, then I sc in the first 3 sts, then work the first half of the fptrc2tog around the 2nd fsc of Row 1, yes. I think that's what you're asking? Otherwise, if you mean the first row of the Cowl itself, that's made with Foundation Single Crochet stitches, which are demonstrated here: https://www.mooglyblog.com/2012/04/04/foundation-single-crochet-fsc/ I hope that helps!
Francess Tindor says
Thank you. That is what I was asking. Am going to have to make some practice pieces before I get started.
Diane says
Thank you for both the adorable cowl and the video!!! I was close, but just a little off so my diamonds looked a bit wonky! I do best when I have a tut or video to follow or at least the correct number of stitches at the end of the row. I'm excited about getting back to it now that I know what I am doing. Thank you again!
moogly says
You are very welcome Diane! It's a tricky stitch for sure, I just wish I'd been able to get the video up faster. 😀
DMarkey says
Mission accomplished! I love the way it looks. The video cleared up my confusion. I made the shorter version first and the longer one will come next.
As usual, I had to use a larger hook and add more single crochets in the beginning, as I tend to crochet tighter.
Funny, tho....here it is miserably hot... for what seems like foreverrrrrr, and I am on a cowl jag!
moogly says
Oh I'm so glad the video worked! I know what you mean about the heat - at least cowls are a lot cooler to work on than blankets!
Elaine says
THANKS VERY MUCH for the video and beautiful pattern! As with many others I was confused on how to start row 3. With your help I'm sure I won't have any problem in finishing the cowl. Have a great day!! Elaine.
moogly says
You are very welcome Elaine! 😀
Francess Tindor says
I haven't figured it out yet. I'm using Claret yarn and it is dark and hard to see the stitch I'm supposed to be crocheting into, I will get it yet, just as I have finally figured out the foundation single crochet. I'm just a little slow.
moogly says
I hear you on the dark yarns! I can't do anything with black yarn after the sun goes down anymore. I'm hoping to get an Ott light for my birthday, but in the meantime I struggle with it too.
Sylvia Reimers says
It has been years since I have done any intricate crocheting and this was going to be my first, so I thank you for the tutorial , it was very in formative.
moogly says
You're very welcome Sylvia - so glad it helped!
Nina says
Thank you again for this tutorial, I have to say I have tried this stitch so many times and failed. You made it so easy to follow. 😉
Karie {Girl Going Country} says
I can't wait to try this stitch! And I would have NEVER figured this out without the video, so THANK YOU for that!
Toni says
i have a quick question looking at the photos the diamond cowl looks as if there is a hood on it..is there? you have the owls sitting in one...thanks
moogly says
Hi Toni! No, there's no hood - the owls are standing in for a neck.
Sammy says
Love it and can't wait to try!!! If I were to want just the diamonds a different color what do you think would be the easiest way to do so? Carrying a color would have me worrying it'd show through but cutting and weaving ends in would have me tearing my hair out. Any suggestions?
moogly says
Sammy, I'm glad you like it! Doing the diamonds in a different color would look fantastic, but as far as I know, carrying the color along is the only way. To minimize it peeking through, enclose the yarn you are not currently using in each stitch, but hold it towards the back of the cowl as much as you can. Basically it would be like working tapestry crochet. I have a video on that technique if you're unfamiliar: https://www.mooglyblog.com/tapestry-crochet/
Jennie Gittens says
I'm making the Simple Chunky Cable Crochet Slippers, I'm on the left one what do you mean on round 3 when you say dc in next 9 with (3 ) st around beside it. I'm lost here.
moogly says
Directions are give for Average(Wide) in the instructions, so the 9 refers to the stitch count for the Average width, whereas the (3) refers to the Wide width instructions. Does that help?
Jennie Gittens says
I think so thank you.
KellyB says
THANK YOU for posting videos - especially this one for fptrc2tog. I would have NEVER gotten that on my own. You're the best! The pattern is so pretty and I cannot wait to try it now!
loulou says
heloo!
what about the hood?!
Tamara Kelly says
There is no hood on this pattern. If you look at the photo, it's on a standard sized hanger - that's just a fold in the front of the cowl. 🙂
Meredith says
OMG. Thank you so much for this video tutorial. I don't think I would ever have figured out this amazingly beautiful cowl without it. Much appreciated!!
Tamara Kelly says
So glad it helped Meredith! 😀
Hope says
Good morning my dear
I really appreciate your effort .. and the time you spend for these Tutorials .. I love you
I've been looking for this stitch and know one helped me even with the name of the stitch
God bless you
Hope
Saudi Arabia
Hope says
Good morning my dear
I really appreciate your effort .. and the time you spend for these Tutorials .. I love you
I’ve been looking for this stitch and no one helped me even with the name of the stitch
God bless you
Hope
Saudi Arabia
Read more at https://www.mooglyblog.com/basics-of-the-diamond-crochet-cowl-and-fptrc2tog/#SPtm7V5OzHwCCFCB.99
Tamara Kelly says
😀 Glad to help! Thank you!
Marrie says
Um... What is " fptrc2tog" meaning??? I didn't watched the video .. just tell me to mount my information abut crochet 😛
Tamara Kelly says
Front post treble crochet two together. 🙂
reva says
I would love to try this, but I am very unfamiliar with any of the crocheting, so I will need to know how to do this from the very first stitch thank you
Tamara Kelly says
Sorry Reva, this is an intermediate to advanced pattern!
Amy says
Hello! I am working this pattern and I am stuck on row 11, which is row 3. My first and last diamond are getting larger, and I am three stitches short at the end of the row. I've pullout the pattern 3 time, thinking I dropped a stitch or a diamond, but can't figure out what I'm doing wrong. Can you help me? Thanks!
Tamara Kelly says
Hi Amy! I'm afraid I can't really say where things are going wrong without being there to see your work. Have you watched the video?
Barbara Kuskie says
I would like to make the diamond crochet cowl but I don"t seem to be able to understand the fptrc2tog. I need to see it written down to follow the instructions. Is there a way I could have it so I can print the instructions? Thanks
Tamara Kelly says
A fptrc2tog is worked as follows:
Yo twice, insert hook around indicated stitch as for a front post stitch, pull up a loop, yo and pull through 2 loops, yo and pull through 2 loops (2 loops remain on hook), then yo twice and insert hook around next indicated stitch as for a front post stitch, pull up a loop, yo and pull through 2 loops, yo and pull through 2 loops (3 loops remain on hook), yo and pull through all 3 loops to finish stitch.
Johanna says
Hello Tamara !!
I’m working on a cardigan that uses the FPTrc2tog (not the diamond pattern though) and I have tension issues. The top loops are quite big (the ones between the legs of the stitch). So I’ve watched your video trying to first make sure I was doing it properly, and I was, second compare how you make it to how how do it. No matter what I do : holding all the loops on the hook, straightening them out, keeping my hook as close as possible to the work, I still end up with big top loops. The designer has a photo tutorial and her are quite tight. Do you have any clue on what’s happening Please ? Pretty please 🥺?
Tamara Kelly says
Hi Johanna! Be sure to also keep all the loops on the hook very close together, and as you work off the pairs of loops, try to pull through rather than up, and try to use your non-hook hand to "choke up" on the stitch at each yo and pull through to hold it as steady as possible! I hope that helps!
Johanna says
Thank you very much Tamara! I’ve worked out that the big loop under the V is caused by me feeding too much yarn between the 2 TR. I have managed at times to reduce it, but next stitch it was big again despite my best efforts at going slow and taking the time to re-do what I just did. As for the V on top I gather that that’s made from the original loop on the hook, before the first 2 YO? But I’m a bit baffled with that one since I’ve made sure to tightened it as much as possible, to the point that I couldn’t barely go through, but the top V always end up big *sight*
I know I tend to “yank” and just like you did, someone suggested to watch out for the way I go through the loops (that person is a yanker too and had that issue) but also which way I face the hook when I do so...
Sorry about the long message but this one has me baffled lol I’ve learnt to crochet with video tutorials and all the “bad little habits” I have now, from not having someone physically watching me and correcting me, are just popping up with one stitch haha
Tamara Kelly says
Okay, I've got another idea for you - fixing the loops after. Here's a video that might help: https://www.mooglyblog.com/tall-crochet-stitches/
Johanna says
Thank you Tamara 🙂 I’ve subscribed to the follow up comments but for some reason I don’t get the emails.. probably in my junk mail... any whoo I just seen your reply but I’ve since worked it out. I’m actually a lifter not a yanker lol
I’ll be writing down what I’ve got to do when making that stitch just in case it may help someone..
The first thing was, as I said before, that I was feeding too much yarn during my YO and pull through.
So the first step was to keep my hook straight. I was or lifting it up or pulling it down way too much making the Loops on the hook too big, despite my best efforts to tightened everything up.
Then I worked out to keep those loops AND the initial loop close to the mouth of the hook. I put my forefinger on the shaft to stop them from sliding down. THis helped a lot with stopping me from increasing the size of the initial loop.
Finally, after the very first “pull through 2 loops” I pinch the bottom of the stitches with my left fingers. But as the stitch gets taller I slide my fingers up to keep the hook straight and everything close together.
It’s been a slow process but oh so rewarding ! I’m about to start on overlay crochet, and that stitch gets used used a lot. My tension is even and spot on: nice and tight but with enough give that I can go through the loops easy.
Tamara Kelly says
Sounds perfect! I'm so glad you've got it! 🙂