This past weekend I attended a lovely potluck cookout at a friend's house, and as I so often do, I brought my little slow cooker, all preheated and filled with yummy goodness. In order to transport it with the lid on tight and keep it warm where I couldn't plug it in, I had it all wrapped up in dishtowels and rubber bands. Though it did the trick, I couldn't help but wish I had something better. Well, a bit of pondering and playing later...
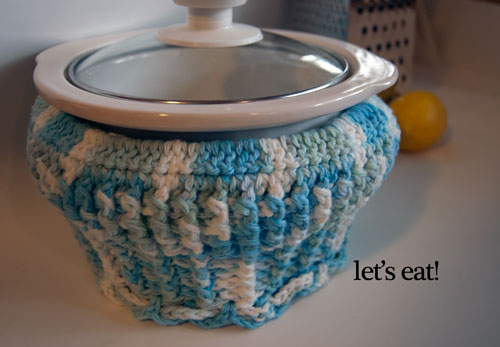
My family's reaction? "What's the giant yarn cupcake in the kitchen!?"
Haha! It's a crock-pot cozy, of course! The base is made using a double thick technique to protect your surfaces, and the sides are ribbed to keep it warm and safe. The top covers the lid and ties tight to keep it on, and when it's folded back for serving the sides become super thick to keep the contents toasty throughout the meal.
Now, the great thing about crock-pots and slow cookers is that they come in lots of different sizes. The downside is that it makes pattern writing a little trickier! So I've written up the pattern that I used to cover my 1.5 quart Rival Crockpot, which has a 5 inch wide bottom to the crock. In addition, I've included notes on how to continue up-sizing the pattern to make a custom cover for your own slow cooker. You'll want to keep your (clean and cold) crock and lid handy so you can try it on as you go and achieve a truly custom fit.
Cupcake Crockpot Cozy
Add this pattern to your Ravelry Queue
WARNING: Only use cotton or superwash wool for this pattern! Acrylic could melt from the heat, and it needs to be washable since it's used with food. Never ever use the cozy inside the heating base - only on the crock outside the base!
- 350+ yards of worsted weight 100% cotton yarn
- US - H, 5.00mm hook
Special Stitches: 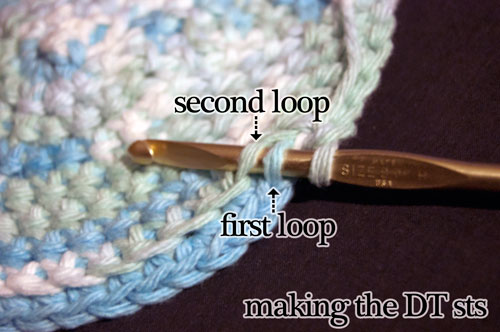 DT sc: The pattern is worked in the round, and the base is made using the double thick crochet potholder technique from Miss Abigail's Hope Chest. Please read the excellent photo tutorial there before starting this pattern. As described in the tutorial, each stitch goes under two loops - the first is the blo of the previous round, and the second is the remaining loop from two rows previous. To adapt this technique for making a circle, on odd numbered rows the second loop (from 2 rows previous) is sometimes used twice to complete stitches for two separate first loops. This is because there were fewer stitches two rows previous, so there are fewer loops available to work into.
DT dc: Combines the DT technique with double crochet. Yo before inserting the hook, insert under first and second loop, yo and pull up a loop, yo and pull through first two loops, yo again and pull through last two loops.
Starting at the Bottom:
Round 1: Ch 7, leaving a 6 inch tail. Sc in the 2nd ch from the hook and remaining 5 ch. (6 sc) Join to first sc with sl st. Turn.
Round 2: Ch 1. DT sc 2 in ea st around. (12 DT sc) Join with sl st. Turn.
Round 3: Ch 1. Note: There are now 12 sts in the last row, and 6 loops for you to work the second loops of the DT sc sts in. Therefore, DT sc in ea st around, working one st in each first loop and two sts in ea second loop. (12 DT sc) Join with sl st. Turn.
Round 4: Ch 1. [DT sc in next st, then DT sc 2 in next st] 6 times. (18 DT sc) Join with sl st. Turn.
Round 5: Ch 1. [DT sc in next st, then DT sc in ea of the next 2 sts, sharing the second loop] 6 times. (18 DT sc) Join with sl st. Turn.
Round 6: Ch 1. [DT sc in next 2 sts, then DT sc 2 in next st] 6 times. (24 DT sc) Join with sl st. Turn.
Round 7: Ch 1. [DT sc in next st 2 sts, then DT sc in ea of the next 2 sts, sharing the second loop] 6 times. (24 DT sc) Join with sl st. Turn.
Round 8: Ch 1. [DT sc in next 3 sts, then DT sc 2 in next st] 6 times. (30 DT sc) Join with sl st. Turn.
Round 9: Ch 1. [DT sc in next st 3 sts, then DT sc in ea of the next 2 sts, sharing the second loop] 6 times. (30 DT sc) Join with sl st. Turn.
Round 10: Ch 1. [DT sc in next 4 sts, then DT sc 2 in next st] 6 times. (36 DT sc) Join with sl st. Turn.
Round 11: Ch 1. [DT sc in next st 4 sts, then DT sc in ea of the next 2 sts, sharing the second loop] 6 times. (36 DT sc) Join with sl st. Turn.
Round 12: Ch 1. [DT sc in next 5 sts, then DT sc 2 in next st] 6 times. (42 DT sc) Join with sl st. Turn.
Round 13: Ch 1. [DT sc in next st 5 sts, then DT sc in ea of the next 2 sts, sharing the second loop] 6 times. (42 DT sc) Join with sl st. Turn.
Round 14: Ch 1. [DT sc in next 6 sts, then DT sc 2 in next st] 6 times. (48 DT sc) Join with sl st. Turn.
Round 15: Ch 1. [DT sc in next st 6 sts, then DT sc in ea of the next 2 sts, sharing the second loop] 6 times. (48 DT sc) Join with sl st. Turn.
Round 16: Ch 1. [DT sc in next 7 sts, then DT sc 2 in next st] 6 times. (54 DT sc) Join with sl st. Turn.
Round 17: Ch 1. [DT sc in next st 7 sts, then DT sc in ea of the next 2 sts, sharing the second loop] 6 times. (54 DT sc) Join with sl st. Turn.
- For a 5" diameter, 1.5 quart crock, stop here and continue with instructions below.
- For a larger crock, continue increasing in the pattern above, until the circle is just slightly wider than the base of the crock, ending on an odd numbered row.
Continue Up the Sides:
Round 1: Ch 2. DT dc in each st around. (54 DT dc for 1.5 quart) Join with sl st and do not turn for remainder of the pattern.
Round 2: Ch 2. *Fpdc around next st, then bpdc around next st. Repeat from * to end. (27 fpdc and 27 bpdc for 1.5 quart) Join with sl st to top of first fpdc.
Round 3: Ch 2. *Fpdc around fpdc, then bpdc around bpdc. Repeat from * to end. Join with sl st to top of first fpdc.
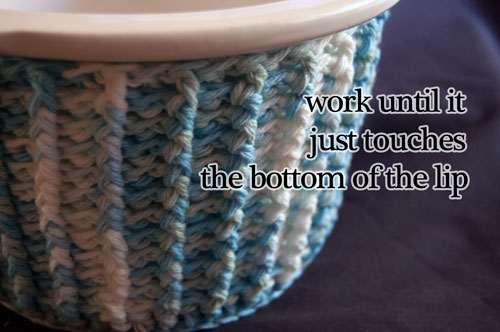
- Repeat Round 3 until the sides reach just to the underside of the lip of the crock. For my 1.5 quart size, I went to Round 12.
- Taller crocks will require proportionately more rounds. When the correct height is reached, continue with instructions below.
Create the Top:
Round 1: Ch 2. Dc 2 into each st around. (108 dc for 1.5 quart) Join with sl st to first dc.
Round 2: Ch 2. Dc in ea st around. Join with sl st to first dc.
Round 3 - 5: Ch 2. *Fpdc around next st, then bpdc around next st. Repeat from * to end. Join with sl st to first fpdc.
- For the 1.5 quart size crock, go to Round 6.
- For larger crocks, repeat Round 5 until it covers about half the radius of the lid when folded over the top. When this is complete, continue with Round 6 below.
Round 6: Ch 2. *Fpdc2tog over the next two fpdc sts, skipping the bpdc between them. Bpdc around the next bpdc. Repeat from * to end. (54 sts for 1.5 quart) Join with sl st.
- STOP HERE and check to make sure you can fold the top back over the lip. It should be snug, but do-able, peeling it back and folding it over carefully. I could just do it on the 1.5 quart I own, but be sure to try it out since lip sizes vary. If it is too tight to fold it over, try working *Fpdc2 tog over the first two fpdc, then bpdc around bpdc, fpdc around fpdc, bpdc around bpdc. Repeat from * to end. If this is still too tight, skip to Round 7.
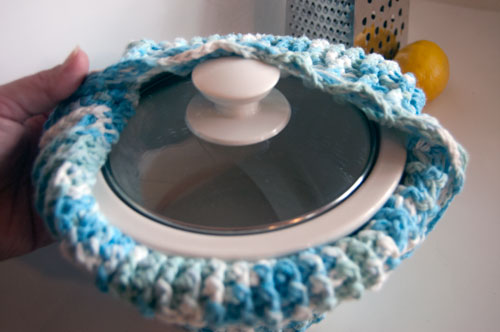
Round 7 - 11: Ch 2. *Fpdc around next st, then bpdc around next st. Repeat from * to end. Join with sl st to first fpdc.
- For the 1.5 quart size, stop here and go to Round 12.
- For larger sizes, repeat Round 11 until the top just barely reaches the center of the lid when folded over and pulled tight. Then continue with Round 12 below.
Round 12: Ch 1 and sc in the first st. *Ch 3, skip the bpdc, and sc in the next fpdc. Repeat from * to end, ending with a sl st in the first sc. Break yarn and weave in ends, using the 6" tail at the beginning to tighten up the center of the bottom.
Make the Tie:
Ch as many sts as necessary to completely circle the widest part of the crock, plus about 5 inches. Sl st in the 2nd ch from the hook and each ch to end. Break yarn and finish off, weaving in ends. Weave the tie through the ch 3 loops of Round 12 and use to tie the lid on tight.
Putting a hot crock in the cozy is easiest if you get the cozy set up with the sides folded over so it's standing on it's own, and you can just slip the crock in.
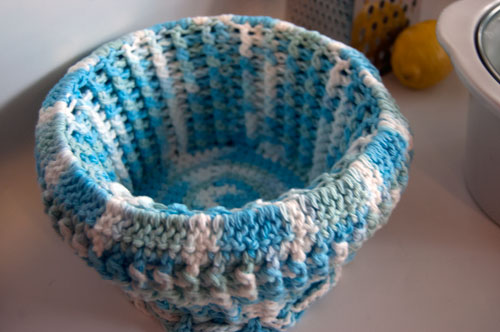 Do be careful though, those things get hot, and they're heavy when they're full! For this reason, I've opted not to add carrying handles - there's too much risk of the yarn tearing and someone getting hurt. Even with the cozy on, be careful not to burn yourself, and use appropriate precautions. Carry the crock by the bottom, use potholders as needed, and don't let it tip over.
Now I can't wait to see all the "giant cupcakes" you make! I keep imaging the bottom and sides in a light brown, and the top in a frothy pink... and now I'm hungry! What's your favorite slow cooker recipe? Do you take your crock to parties or cookouts? Share in the comments!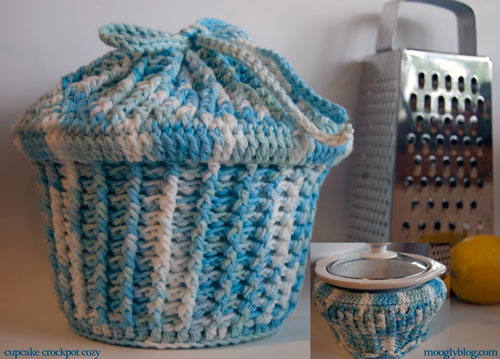
Be sure to Like the moogly Facebook page for the latest updates and have some fun with us! Written pattern copyright Tamara Kelly 2012. Please do not republish this pattern, but please do link to this page to share this pattern with others. For information on selling finished products made from this pattern, please see the All About Moogly page. You can contact me via Facebook messages or at TamaraKelly@mooglyblog.com.




Danielle Branch
Love it! I made a much longer post on the facebook.
moogly
So glad you do Danielle! 😀
Erin
I love it! Turned out great.
moogly
Thanks Erin! 😀
Ann
What a great idea! I love it! Gives us another use for the technique used in the double thick crochet potholder from "Miss Abigail’s Hope Chest". Humm...that gives me another idea, it could be sized, shaped and used to cover those casseroles we all love to take along to picnics and parties. Thanks for this wonderful pattern.
moogly
Absolutely Ann! 😀 And you're very welcome!
Wobbler
Thank you so very much for sharing 🙂 Everybody will be getting one of these for christmas.
moogly
Glad you like it! 🙂
Barb Tvrdik
Wobbler, can I be an honorary family member this year? lol
RIO
What a GREAT idea, thank you so much for sharing, I will be trying to convert this to my 5 & 6 quart crock pots!! I love the color you chose too!
moogly
Thank you RIO! 😀
Susan
Did you figure out how to adapt it? I have a large oval crockpot that I would love to make a cozy for!
moogly
Susan, for ovals the basic technique would of course be the same, but I'd do the increases as in this oval tutorial at Bukisa: http://www.bukisa.com/articles/264537_how-to-crochet-an-oval
Hope that helps!
Darlene 'Dee' Bishop @Frugal Fancy
So creative! I wouldn't have thought to make this, but now I want one for my HUGE crockpot! I like the idea of using it to keep the lid intact which is always an issue when traveling. Great job!
labrige
Oh ... I have a large oval crockpot and I'll look to adapt the system !!! Wonderfull ideas !!!
freckleface78
I make yogurt in my crockpot and have to wrap it up with towels. I was thinking that there had to be a better way and there I could probably whip up a crockpot cozy with some work. I did a quick Ravelry search first and found your pattern. I love it! Yours is so much more creative then what I would have come up with. I have to admit; I want to make it in cupcake colors, too! 😀
Tamara Kelly
😀 Thank you! I wish I'd had cupcake colors on hand, but I was doing some stashbusting. I hope you post pics on Ravelry when you're done, I'd love to see it!
freckleface78
Here's a link to my finished crockpot cover in cupcake colors. 🙂 I ran out of pink "frosting" and topped it off with white "whipped cream". I like the effect it gives with how my crockpot has a peak in the middle where the handle is. I also added a red pompom cherry to the tie cord. 🙂
Tamara Kelly
I love it! That looks awesome! <3
freckleface78
Thank you! And thank you for creating this wonderful pattern!
freckleface78
I found a video for the DT sc! She calls it the thermal stitch: http://youtube.com/watch?v=Tu2GzJHCgwE
Tamara Kelly
Ah, well that's a good name for it!
rosa elena poque
maravilloso me encanto este trabajo espero ver muchos mas y poder hacer algunos felicitaciones por su creaciones
Linda Beck
OMG - I just found this pattern and I really needed it last November! I was transporting turkey gravy in my small crock pot, and the sucker tipper over in the trunk of my car. What a mess that was. I'm gonna make this right now, and next time I have to take anything anywhere in that pot, I'll feel a bit more secure with it.
Tamara Kelly
Oh no, what a mess! I do still recommend securing the crockpot so it stays upright - this will help with jostling, but if the whole thing tips over I'm not sure anything will work! A small cardboard box and some dishtowels for padding would be good!
Linda T.
Would you possibly have a pattern for an oval crockpot?
Tamara Kelly
I'm afraid I didn't write up an oval one because there are just so many different dimensions for the oval ones out there. However, if you follow a basic oval pattern while making the same sts you'll be able to create a custom fit for your crockery.
Marrie
wow Tamara!..its amazingly brilliant..♥
Maria
I have been looking and looking for something like this.... But in knit! I can't crochet.
🙁
Tamara Kelly
In knit I would use bulky yarn and slightly smaller needles than called for, work a circle on DPNs, and then do a chunky rib evenly up the sides, then add a drawstring to close up the top! 🙂
Cecelia mercer
Love this pattern Tamara and hope to make the first one for my small round crock pot. But I really need 2 or 3 to fit the oval 6 qt. crock pots as those are the ones I use most often.
Phyllis Reiplinger
Every time I use cotton yarn it eventually stretches out of shape = tops, totes, lanyards, etc. Is there a solution?
Tamara Kelly
Washing and drying with blocking can be a big help, but otherwise the best option for bags is a fabric lining. For straps, I like to sew in a pretty ribbon!