Fans of Discovery's Shark Week® have been glued to their televisions this week, and if we had that channel I'm sure my youngest would be among them. He's been a big fan of sharks ever since his first trip to an aquarium. He's also a big moogly fan... as long as I'm making things for him. So this week's project goes to him. And the pattern goes to all of you!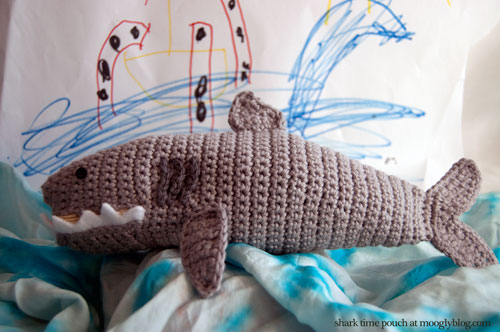
Shark Time Pouch
Add this pattern to your Ravelry Queue 
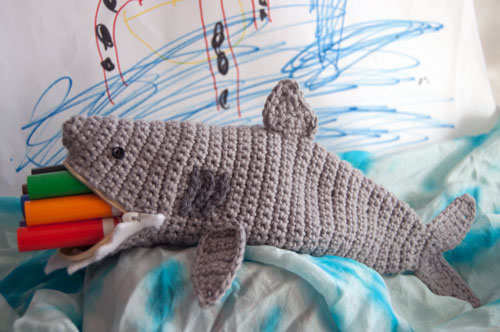
This pattern is sized just right for pencils, markers, or whatever you need to get through your own Shark Week. Ahem.
- US - G/6 hook, 4.25 mm
- Main color: 100 yards of Sport or Worsted Weight gray yarn, any fiber
- Gill slit color: 2 yards of Sport or Worsted Weight darker gray yarn, any fiber
- Thread: gray to match main color, black, and white, a few yards of each
- 2 black buttons or toy/doll eyes
- 6" white zipper
- 7" x 1" piece of white felt
- Klik hier voor de Nederlandse vertaling, met dank aan Annemarie Scheffer!
Body (main color):
For the body, the pattern starts by working in the round, then switches to rows, then back to working in the round. For the sake of continuity, both rounds and rows will be referred to as rows here, and the work is turned at the end of each.
Row 1 (RS): Using the magic circle, work 6sc into the ring. Join with a sl st and turn. (6 sc)
Row 2 (WS): Ch1. [Sc in the next st, sc 2 in the next st] 3 times. Join with sl st and turn. (9 sc)
Row 3: Ch1. [Sc in the next 2 sts, sc 2 in the next st] 3 times. Join with sl st and turn. (12 sc)
Row 4: Ch1. [Sc in the next 3 sts, sc 2 in the next st] 3 times. Join with sl st and turn. (15 sc)
Row 5: Ch1. [Sc in the next 4 sts, sc 2 in the next st] 3 times. Join with sl st and turn. (18 sc)
Row 6: Ch1. [Sc in the next 5 sts, sc 2 in the next st] 2 times. Sc in the next 3 sts. Leave remaining sts unworked. Turn. (17 sc)
Row 7: Ch1. [Sc in the next 6 sts, sc 2 in the next st] 2 times. Sc in the next 3 sts. Turn. (19 sc)
Row 8: Ch1, and sc evenly across. Turn. (19 sc)
Row 9: Ch1. [Sc in the next 7 sts, sc 2 in the next st] 2 times. Sc in the next 3 sts. Turn. (21 sc)
Row 10: Ch1, and sc evenly across. Turn. (21 sc)
Row 11: Ch1. [Sc in the next 8 sts, sc 2 in the next st] 2 times. Sc in the next 3 sts. Turn. (23 sc)
Row 12: Ch1, and sc evenly across. Turn. (23 sc)
Row 13: Ch1. [Sc in the next 9 sts, sc 2 in the next st] 2 times. Sc in the next 3 sts. Turn. (25 sc)
Row 14: Ch1, and sc evenly across. Turn. (25 sc)
Row 15: Ch1. [Sc in the next 10 sts, sc 2 in the next st] 2 times. Sc in the next 3 sts. Turn. (27 sc)
Row 16: Ch1, and sc evenly across. Ch 9 and join with sl st to first st of row. Turn. (36 sts)
Row 17: Ch1. [Sc in the next 11 sts, sc 2 in the next st] 3 times. Join with sl st and turn. (39 sc)
Row 18 - 33: Ch1, and sc evenly across. Join with sl st and turn. (39 sc)
Row 34: Ch1. [Sc in the next 11 sts, sc2tog] 3 times. Join with sl st and turn. (36 sc)
Row 35 - 36: Ch1. Sc evenly across. Join with sl st and turn. (36 sc)
Row 37: Ch1. [Sc in the next 7 sts, sc2tog] 4 times. Join with sl st and turn. (32 sc)
Row 38 - 39: Ch1. Sc evenly across. Join with sl st and turn. (32 sc)
Row 40: Ch1. [Sc in the next 6 sts, sc2tog] 4 times. Join with sl st and turn. (28 sc)
Row 41 - 42: Ch1. Sc evenly across. Join with sl st and turn. (28 sc)
Row 43: Ch1. [Sc in the next 5 sts, sc2tog] 4 times. Join with sl st and turn. (24 sc)
Row 44 - 45: Ch1. Sc evenly across. Join with sl st and turn. (24 sc)
Row 46: Ch1. [Sc in the next 4 sts, sc2tog] 4 times. Join with sl st and turn. (20 sc)
Row 47 - 48: Ch1. Sc evenly across. Join with sl st and turn. (20 sc)
Row 49: Ch1. [Sc in the next 3 sts, sc2tog] 4 times. Join with sl st and turn. (16 sc)
Row 50 - 51: Ch1. Sc evenly across. Join with sl st and turn. (16 sc)
Row 52: Ch1. [Sc in the next 2 sts, sc2tog] 4 times. Join with sl st and turn. (12 sc)
Row 53: Ch1. Sc evenly across. Join with sl st and turn. (12 sc)
Row 54: Ch 1. Pinch sides together vertically and sc the seam closed, working through both sides in each stitch. (6 sc) "Base sts" made. Do not break yarn. Move to Tail instructions below.
Tail:
Row 1: Ch 8. Sl st in the 2nd ch from the hook. Work hdc in the next 2 sts, dc in the next 2 sts,  trc in the next 2 sts. Then in the base sts, work dc in next st, hdc in next st, sc in next st, sl st loosely in next 3 sts.
Row 2: Now at the opposite side of the base, ch 8. Sl st in the 2nd ch from the hook. Work hdc in the next 2 sts, dc in the next 2 sts, trc in the next 2 sts. Then in the base sts, work dc in next st, hdc in next st. Break yarn and use seamless join to finish off.
Row 3: Join yarn at base of tail with a sl st. Sc around entire tail, working 2 sc into each of the points of the fins. Break yarn and finish off. Weave in ends.
Jaw:
Row 1: Join the yarn with a sl st to the unworked side of the chains from Row 16 of the Body. Ch1 and sc evenly across. Turn. (9 sc)
Row 2: Ch1. Sc in next 3 sts, sc2tog, sc in last 4 sts. Turn. (8 sc)
Row 3: Ch1. Sc evenly across. Turn. (8sc)
Row 4: Ch1. Sc in next 3 sts, sc2tog, sc in last 3 sts. Turn. (7 sc)
Row 5: Ch1. Sc evenly across. Turn. (7 sc)
Row 6: Ch1. Sc in next 3 sts, sc2tog, sc in last 2 sts. Turn. (6 sc)
Row 7: Ch1. Sc evenly across. Turn. (6 sc)
Row 8: Ch1. Sc in next 2 sts, sc2tog, sc in last 2 sts. Turn. (5 sc)
Row 9: Ch1. Sc evenly across. Turn. (5 sc)
Row 10: Ch1. Sc2tog, sc in next st, sc2tog. Turn. (3 sc)
Row 11: Ch1. Sc evenly across. Break yarn and weave in ends. (3 sc)
Row 12: Join yarn at right jaw corner and sc evenly around bottom jaw. Break yarn and weave in ends.
Teeth:
Cut top half of felt strip in zig zag "teeth" pattern, leaving bottom half uncut. Using white thread, sew the uncut side of the felt to the bottom half of the zipper fabric, with the felt teeth slightly covering the zipper teeth.
 Using a gray thread that matches the Body color, sew zipper into the mouth opening of the shark. Teeth may point up or down, it's just personal preference.
Eyes:
Using black thread, sew eyes (or buttons) to body as shown.
 Top (Dorsal) Fin:
Row 1: Leaving a 6" tail, ch 6. Sc in the 2nd ch from hook and in each ch to end. Turn. (5 sc)
Row 2: Ch1. Sc2tog, sc even in remaining sts. Turn. (4 sc)
Row 3: Ch1. Sc in the first 2 sts, then sc2tog. Turn. (3 sc)
Row 4: Ch1. Sc2tog, sc in last st. Turn. (2 sc)
Row 5: Ch1. Sc2tog. Turn. (1 sc)
Row 6: Ch1. Sc in top st, then turning work clockwise, sc around all 3 sides of the triangle, working 2 sc in each point. Break yarn and use seamless join to finish off in the first st of the round. Sew to top of shark and weave in ends.
Side (Pectoral) Fins (make 2):
 Row 1: Ch 2. Sc in the 2nd ch from the hook. Turn. (1 sc)
Row 2: Ch1. Work 2 sc into st. Turn. (2 sc)
Row 3: Ch1. Sc in next st, sc 2 in last st. Turn. (3 sc)
Row 4: Ch1. Sc in next st, sc 2 in next st, sc in last st. Turn. (4 sc)
Row 5 - 9: Ch1. Sc evenly across. Turn. (4 sc)
Row 10: Ch1. Sc evenly across, then working 2 sc in the last st, turn work clockwise and continue to sc around sides. Work 2 sc in each point. Break yarn, leaving a 6" tail, and sew to each side of Body.
Gill Slits (darker gray) (make 6):
Leaving a 4" tail, ch 6. Break yarn and finish off. Sew 3 gill slits to each side of shark, curving them slightly as shown in photos.
Duuun dun duuun dun dun dun dun dun dun dun BOM BOM dun dun dun dun dun dun doo dedoo doo dedoo dede doo... Oh sorry, got a little carried away there. As I was saying, that's all there is to it! I did stiffen the tail with a bit of water and school glue, but that's optional. And now you have a Shark Time Pouch - for Shark Week® or any week! Do you have any shark fans in your house?
Be sure to Like the moogly Facebook page for the latest updates and have some fun with us! Written pattern copyright Tamara Kelly 2012. Please do not republish this pattern, but please do link to this page to share this pattern with others.



Emily
Awesome does not even begin to describe this!
val
love it!
val
oops.....I forgot to say YES to your question! I grew up in Fort Walton Beach Florida. I saw my first shark at 10 when it swam by my sister and I in deep water. We had just moved back to the states (Florida) and had NO idea of the dangers. She unceremoniously DUMPED me off the raft and jumped on in my place. It was awful and I simply FROZE in terror as it swam by...it was about 4 feet long so I was lucky not to be on the menu. We laugh about it now (thank goodness!) That being said, whenever I tell the story, I still get goosebumps!
I was 15 when Jaws came out and the line was 2 hours long! They filmed Jaws 2 off the coast of where I lived and several of my friends and my sister were extras in the movie.....I wouldn't get in the water past my knees! In the 80's they had a huge school of hammerheads come through our area and stay for 2 weeks. It was very unusual. Everyone in town went to the local pier to check it out. I watch shark week EVERY year and love it!!!!!
Melanie
Hi! we live in Navarre! My son wants to be a shark scientist when he grows up. Good to hear someone from this area is awsome at making crochet patterns!
Tamara Kelly
Thanks awesome! And thank you! 😀
MCD
I also knit and crochet. When this pattern was featured in Crochet Me on Facebook, another reader's comment made me curious if I could come up with a knit version. If it looks good when I'm done, would you like to have the pattern? Not asking anything in return, just thought it might be a nice addition to your collection of patterns.
moogly
MCD I'd love to host it here on moogly! And give you full credit and copyright, of course! 😀 Thanks so much!! I can't wait!
Debora Alves
Hi!
I loved the shark pouch and made one for my son (who loved it too): http://deboracroche.blogspot.com.br/2012/08/estojo-tubarao-crocheted-shark-pouch.html
As soon as I posted the pouch on my blog, many people wrote to me!
All loved the shark, but don't understand English (I'm brazilian). I wonder if I could translate your pattern into Portuguese (obviously giving all credit to you).
Thank you for your time!
Debora
moogly
Debora that would be wonderful! If I could also post the Portuguese translation here, with full credit and links to you, that would be perfect. Please email me the link at mooglystore@gmail.com when it's ready! 😀 Thanks so much!
Debora Alves
great! I'm fishing! =)
Alicia Meseguer
Me encanto este proyecto , felicidades , está increíble y es la delicia de los pequeños.
Gracias por el patrón .
Su amiga.
Alicia Meseguer
eulalia
I've been trying to do this pattern for a while now but I can't seem to get it right.. when I work 6 sc in the magic circle and join with a slip stitch, I always get one more sc than I'm supposed to. I tried to just continue with the project but this happens every time. Can you tell me what I'm doing wrong please?
moogly
Hi eulalia! It sounds like maybe you're working into the slip stitch instead of skipping it?
Mary P.
Hi! Love this pattern!! Do you allow someone to sell sharks made from your pattern (with credit to you as the pattern designer)? At the moment, I will be making one for my daughter & probably my nephews, but it seems to me it would be a good seller as well. 🙂 Thanks!
Tamara Kelly
Hi Mary! Thank you, and yes! See the About page for details!
Megan Harrison
Just wanted to let you know this was featured on the At Play Blog (www.atplayonline.com) today.
http://atplayonline.com/2013/08/08/shark-week-finds/
Thanks
Megan
Tamara Kelly
Thanks so much Megan! 😀
Becky
I absolutely loved making this shark pouch for my son's school supplies. He packed his markers inside the shark. I used nylon crochet thread, and the end result is a sturdy pouch. Hopefully snag free throughout the school year. Thank you for posting this pattern!
Becky
http://www.luedtkeland.blogspot.com/2013/07/school-supplies_25.html
Tamara Kelly
Oh good idea on the nylon! Love it!
Carol
I do not like the magic ring. I would greatly appreciate it if people writing patterns would also offer the old style of a beginning. I do thank-you for the free pattern and will be making this!!
Tamara Kelly
I try to write it out as I made it, so as to not misrepresent the photo, but starting with a ch 4 ring is always as option!
MCD
In general, the magic ring can be replaced by either: ch2 followed by however many sc are in the first round done up in the second ch from hook, then joining to the first sc; or by making a chain-stitch ring of no more than half the sc in the first round (i.e., if the first round is 8 sc, then ch 4 and join into a ring). The ch2 method gives you a much tighter 'circle', but may be hard to fit any more than 8 sc into it.
Ronda
Hello!
Thanks so much for posting this pattern! I'm having trouble understanding what to do at row 18. Do I continue to work around the chain for rows 18-33?
Ronda
Tamara Kelly
In Rows 18-33 you sc in each st of the previous row. The ch 1 at the beginning is just to get the right height for the stitches. The join and turn is so that you are working in the round, but not having a slant to the seam.
Shelby
I love love love the shark! I added a red satin lining to mine and then some polyfill between the lining and the crochet outer layer to make him more "fleshy". Great pattern!
Tamara Kelly
Sounds amazing Shelby!
Rebekah
This is so cute, I'm going to make this my first venture outside of blanket world in crochet. Thanks for sharing it!
Melisa
Hi,
I was wondering if anyone came up with a knit version of this pattern? Love the shark but I can't crochet 🙁
Thank You!!!!
Diane
Lovely !! I made a few this week (holidays) I already received a lot of compliments !! thank you for sharing this pattern.
A few hobby friends would like to make this also, (one french speaking, and one dutch speaking) can i translate your pattern and sell this with my other pattern i made for kids (small bags, like mouse bag, bear bag etc)
i would also mention of course where i found this lovely pattern from
If you need more information let me know
Diane
Tamara Kelly
Hi Diane! Selling finished items is fine! For translations, I'm happy to host them here at moogly as downloadable PDFs, and include a link to the translator's site or shop along with it. If you're interested in doing this, please email me at TamaraKelly@mooglyblog.com! 🙂
Diane
Hello Tamara, Thanks a lot ! I will make the translation and will send this to you ..
I cannot promis that it will be done this week but i'll will keep you informed
diane
Tamara Kelly
Thank you so much Diane! 😀 No rush at all!
Emily
Hi! This is the pattern that convinced me to learn to crochet! I knit, but I just had to have this! Can anyone tell me the difference between the joins in this pattern? What is the difference between the 3 different ways join is stated in the pattern? IS there a difference??
Row 1: Join with a sl st and turn.
Row 2: Join with and turn.
Row 3: Join and turn.
I understand how to slip stitch, but I am uncertain how to read the pattern. Thanks a lot!
-Emily
Tamara Kelly
Hi Emily! Join with sl st and turn and Join and Turn are the same thing - but I can definitely see how that would be confusing to new crocheters, so I've edited the pattern to make it clearer! On Row 2 that was just a typo - and you're the first person to let me know, so that's fixed now too. Thanks for letting me know! 🙂 And welcome to crocheting!
Emily
thank you for such a quick response!
debbie
Hello: love the shark. Having trouble with the tail. when it says to dc in the base stitch i am lost. I am on row one and have just finished the trc and need to dc in base stitch. don't know what that means
Tamara Kelly
Hi Debbie! If you look at the instructions for Row 54, you'll see "(6 sc) “Base sts” made." Those 6 sc of Row 54 are the base sts that the tail is worked into after you've worked the first line of instructions into the ch 8. Does that help?
LP
I just wanted to thank you for posting the pattern. I just finished making a Shark Pouch for nephew for Christmas and I'm super pleased with the end result. I will post a photo of it on Ravelry 🙂
Tamara Kelly
😀 I'm so glad you liked it! And I love seeing the finished pics on Rav!
misty
Thank you so much for this pattern! I really enjoyed making this shark! I made it for my son and he loves it! Now he wants me to try changing colors and making an Orca whale. I'll just have to change the direction of the tail. This was my first time making any kind of animal. The pattern is written perfectly and super easy to follow. Great job writing it! Thank you!
Tamara Kelly
Thank you so much Misty! <3 What a wonderful thing to read this morning, thank you for commenting!
Rhonda
I am wondering how big this shark pouch measures around, and the length ....I am at row 23 and seems may be quite large. My 6 yr. old !nephew will be the proud owner !! I love your wonderful work!!. thank you
Tamara Kelly
Hi Rhonda! I'm afraid my son ran off with it last year before I could get exact measurements, but it was around a foot long. Size doesn't matter so much as making sure the stitches are tight. 🙂
wendy dailey
Traveling from Florida to Denver I asked my daughter what she wanted me to bring when I visited. She said 'the beach'. I made this shark pouch and filled it with a starfish,shells, tiny blanket, dolls beach hat, tiny glass that looked like it had a relaxing beverage, and of course a baggie filled with beach sand. ( Note, when travelling TSA will ransack your luggage when a fairly large baggie with a powdery looking substance is inside.) Needless to say, it was a big hit when she took it to work and layed it out on her desk for a day at the beach.
Tamara Kelly
😀 That's so fun Wendy!
Karen
I love your clever patterns! You explain everything, including good assembly instructions! This shark pouch is awesome!
Tamara Kelly
😀 Thank you so much Karen!
Irice
Hello! I featured your shark pouch pattern on my blog today!
Here is the link if you would like to check it out:
http://niftycliffts.com/weekly-wrangle-1-back-to-school-pencil-pouches/
Have a great day!
dianazazueta
Excuse me, im new trying to crochet things, and i really really want to do this one, but the thing is that i dont really understend what does ch1/2/3, sc, st, (and all those things) mean, i really need your help, thanks a lot :), this is really cool!
Tamara Kelly
Hello, and congratulations on learning to crochet! You can learn about the abbreviations used in crochet patterns on the Crochet Abbreviations page! 🙂
Tatiana Diaz
I LOVE this pattern and my husband even more. I want to make it for him but he wants something much bigger like small pillow sized. Any tips on how i can adjust the pattern to make it much bigger. I thought about quadrupling it but I am new to crochet and while I can get around most patterns, upsizing is something I have never tried before.
Thank You!
Tamara Kelly
Thank you! I think the easiest way would be to use several strands of yarn held together and a bigger hook!
Justine
Thank you so much for this pattern! I finished it, and it looks great. The only thing is I'm having trouble sewing the zipper into the mouth. Do you have any tips on how to start? The thing that's throwing me off is how it's curved. Any tips would be greatly appreciated. Thanks again!!
Eve
Hi!
I'm really excited to start making this! but I have one question regarding the pattern. When starting a row, do you crochet into the slip stitch, as this tutorial http://notsogranny.com/2014/03/how-to-create-a-neat-join-crochet-in-the-round.html
Or do you skip the slip stitch and go to the first stitch as this tutorial http://www.futuregirl.com/craft_blog/2009/1/tutorial-seamless-single-crochet-better.aspx
Sorry, I am quite a new crocheter so its a bit confusing to me!
Thank you!
Tamara Kelly
I skip the sl st and do not crochet into it or count it as a stitch. You can do it however you prefer though, as long as you maintain the stitch count! 🙂
Kathy
I have two questions:
One, I have started the pattern three times and my snout is not as pointed as it shows in the pictures, what am I doing wrong?
Two, what do you do with the skipped stitches back on row 6? The "leaving remaining sts unworked? From the pictures I can not tell and by the pattern the are not stitched in, ever that I can tell, or again what am I doing wrong?
Thanks for your help.
Tamara Kelly
Hi Kathy!
1. Pulling the magic circle very tight, and then poking it forward, should give it more of a point.
2. Those remain unworked, becoming the top of the mouth, where the pouch opens. 🙂
Alejandra
Hola! Soy de Chile, hablo español por lo que me ha costado un poco entender el patrón y traducirlo. Me encantaría que tuviera imagen del paso a paso en la creación del tiburón, estoy realizando este proyecto porque mi hijo de 3 años tiene que exponer en su jardín acerca de él. Aún no entiendo como agrego el cierre, porque la forma de la cabeza es algo grande respecto de la foto inicial que usted muestra del tiburón.
Atenta a su respuesta, gracias!!
Tamara Kelly
¡Hola! Usted cose la cremallera en la abertura de la boca , simplemente ajustando según sea necesario . Lo siento no puedo ser de más ayuda , no hablo español .
Stephanie
You are a genius!!!!! Love, love, love! Ok so I have been working in the round for so long that I'm having trouble with the sl st each round ch 1. Is the chain 1 to bring your yarn back level with the sc st? Or is there another reason for the ch 1? Does it work in the round?
Tamara Kelly
Hi Stephanie! Yes, the ch 1 is to bring you up to the height of the new row. It works in the round, but you wouldn't do it if you were working in a spiral. 🙂
Annemarie
Hi,
I'm making your wonderful shark pouch now, kids love to take it with them to school!
I was wondering if there is already a Dutch translation. I saw it in the comments but this is a while ago and I couldn't find it on your site. The Portuguese one I did see.
I would love to translate the pattern in Dutch and send it to you. I would also like to bring it to my blog, with ofcourse all thanks to you and the link to your site.
Annemarie
Tamara Kelly
Hello Annemarie! Thank you, I'm so glad you like it! You can see my translation policy on the About page: https://www.mooglyblog.com/about-moogly/
Annemarie
Hi Tamara,
Thank you. I just read it and okay I will send you the pdf.
Have a wonderful weekend.
Annemarie
Hello Tamara, I did send you the translation into Dutch by e-mail.
Annemarie
Nina
Tamara,
thank you for this pattern. i am a fairly new crocheter and having trouble with your instructions. I have only used the magic circle without turning - and you slip to join and then turn after each row. Then you do another ch1 - this leaves me with two additional stitches each row - I am so confused! Do you maybe have a video for how you work the end and beginning of each row? It could be very short, just so that I get the gist of it...
Thank you so much!
Nina
Tamara Kelly
Thank you Nina! Congrats on learning to crochet! 😀
The slip stitch and ch-1 do not count as stitches. To make turning in rounds easier, I recommend putting a stitch marker in the lst stitch of each round as you crochet. Then, when you turn, the first stitch to crochet into is marked! You can see it in action here: https://www.mooglyblog.com/pampering-massage-soap-saver-tutorial/
Does that help?
Nina
Hello Tamara,
thank you! I think I got it, but the join looks extremely noticeable and not nearly as nice then if I worked in the round the usual way - is this the way it supposed to be? Why do you work this way in this pattern?
Thanks,
Nina
Tamara Kelly
Hi Nina! I find that if you pull the sl st nice and tight, it's actually less noticeable. It also keeps the join line from angling, so that the rows line up straight instead of the natural lean that comes from working in the round.
Nina
Hi Tamara, I think it was the yarn in combination with the hook size I used! I tried a different yarn and hook and it looks much better 🙂 Thank you!! May I ask one last thing though: In row 17, when you work into the 9 chain stitches, do you work into the bottom loop of these like you usually do when starting a project, or do you work into both front and back loop?
Nina
Tamara Kelly
I'm so glad! You can work into whatever part of the chain you like best. 🙂
Priscilla Pey
Hello,
i am new to Crochet and would love to do this for my son. But i find it hard to follow and understand the line by line instruction, 🙁
is there any where i can find a video of this?
Tamara Kelly
Hi Priscilla, I'm sorry - there isn't a video for this pattern currently available. But if you'd like to learn to read patterns, I'd be happy to answer any questions you have!
Hazel Furst
I LOVE this pattern! CGOA posted it as a favorite back-to-school crochet pattern about 2 days after I had seen a fabric version for sale for over $40! I made a bunch for the younger members of my family and when I presented them, I was asked to make more. I made a double chain for row 16 which made the jaw seam almost invisible. I also followed suggestion to double fins and tail when using thinner yarn. I spray-blocked fins and tail with thicker yarn.
Tamara Kelly
😀 That's awesome, thank you Hazel!
Ruchi
Thanks for the wonderful shark pouch pattern. Made one today.
Tamara Kelly
I'm so glad you liked it, thank you!
Valerie
I just found the pattern and I want to thank you so much! The pattern ist amazing, and to give it away for free is extremly kind! Thanks a lot!!
Tamara Kelly
😀 Thank you so much!
Beth Courchesne
I just made this for my son, but I made a stuffy version but making a white teeth band to put in place of the zipper.
Sandy
Me encanto pero tendra la traduccion al español por favor me gustaria hacer unos para mis niños
Lyyne
Love this pattern! My grandson will too! You said you used a glue and water mixture to stiffen the tail. Please give the instructions for this. Thank you for the free pattern.
Tamara Kelly
Hi Lynne! One part white school glue to 2 or 3 parts water, mixed and dipped and let dry! 🙂
Lunne
I am searching for sea creatures in appliques to crochet for a large Afghan I have made for my grandson. I especially need a large orca and shark. Do you have patterns for appliques such as these? Thanks.
Tamara Kelly
I don't personally, but here are some I found!
https://kerriscrochet.com/shark-crochet-applique-pattern/
https://raffamusadesigns.com/crochet-whale-applique/ (close as i could find of an orca)
You might also want to check out this book: https://www.mooglyblog.com/crochet-a-b-sea-giveaway/
Robin
Hello and Thank you for this wonderful pattern. I am a little confused on Row 16: Ch1, and sc evenly across. Ch 9 and join with **(sl st to first st of row.) ** Turn. (36 sts): is that the first st in that row or ? in the 2nd st from the chain 9?
HELP!! so confused!
Tamara Kelly
Hi Robin! You sl st to the first sc made in that row, before you chain. 🙂
Emily
end of row 16 is so confusing to me, i chain 9 and sl st into the first stich of the row which creates a weird loop then row 17 says to Ch1. Sc in the next 11 sts, does the chain 9 now count as stiches or do i skip over it? what does the loop become. im confused, think maybe ive done it wrong. any help would be appreciated 🙂
Tamara Kelly
Hi Emily! At the end of Row 16, we chain and join to the first sc of the row. This enables us to start working in the round. So for Row 17, you sc in each of the 9 chs, sc in the next 2 sts, then work 2 sc in the next st. Then, you Sc in the next 11 sts, sc 2 in the next st, then Sc in the next 11 sts, sc 2 in the last st. Finally, join to the first sc of the rnd. Does that help?
Marcela
I need help, I’m stuck on the tail row 1. What does it mean when it says “Then in the base sts, work…”
Tamara Kelly
Hi Marcela! If you go back and look at Row 54 of the body, you'll see a note that those are the Base Stitches. 🙂
Tim
I made 1 of these along with several other pencil cases for my sister to hand out as rewards in here classroom. I have to say this is the most popular pattern, I've made additional sets twice and I'm starting on another set. The kids compete to try to get these. Thank you so much for the creative pattern, it's making a lot of kids happy and helping motivate them to earn higher grades.
Tamara Kelly
♥ Thank you so much, Tim! That's amazing!!! Thank you for all you do!