
This year I got to meet the creators of Unicorn Fibre care products, and I'm so excited to tell you about their fantastic products - and to give some away!

It's Time to Enter the Craftys!
It's Craftys time again! The crafting awards that offers cash and prizes - up to $1000!

Totes McGoats
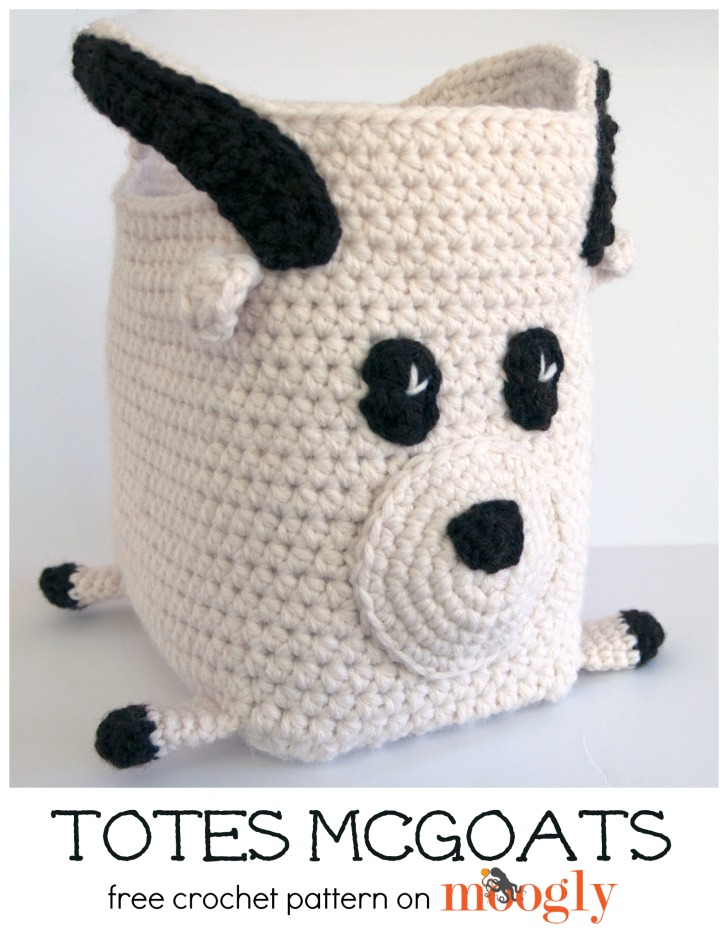 Inspiration comes from funny places sometimes. A photo, a mood, a yarn... and sometimes a silly saying! Introducing Totes McGoats... the goat tote!
Disclaimer: This post includes affiliate links.
Prefer an ad-free PDF? You've got options!


Prefer the free blog version? Keep scrolling!
Crochet Goats for All!
Totes McGoats makes a great all purpose tote for goat fans, meme lovers, goat farmers, and people with that certain sense of humor. And it makes a great Halloween treat bag or basket too!
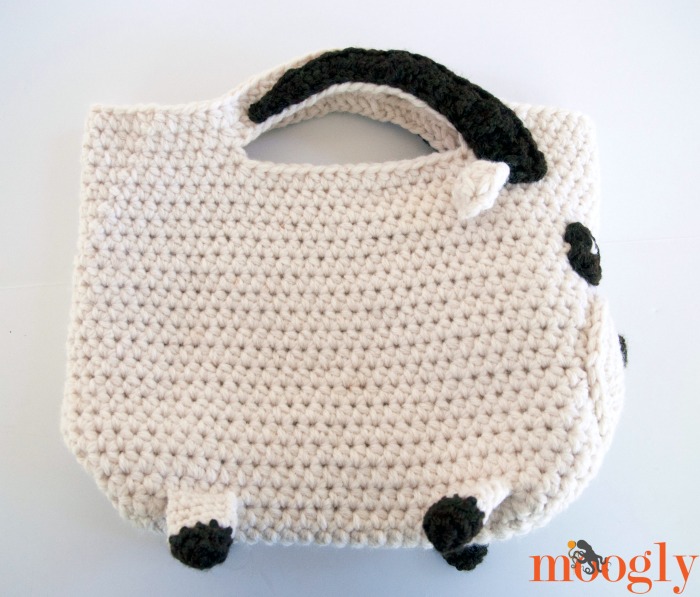
It makes a great yarn basket too - it can hold 6 skeins of Vanna's Choice with room left over for your notions pouch! Of course, if you like the bag, but aren't a goat fan, the bag instructions alone make a fantastic sturdy tote!

Totes McGoats
Add this pattern to your Ravelry Queue and Favorites
US - I, 5.5 mm hook - Furls Fiberarts
US - K, 6.5 mm hook - Clover Jumbo
Lion Brand Wool-Ease Chunky (discontinued) (Bulky/yarn symbol "5"; 153 yds/140 m; 4.94 oz)
Color A: Fisherman - 4 balls; 500 yds
Color B: Walnut - 1 ball; 40 yds
This yarn has been discontinued. Recommended substitutes include Lion Brand Hue + Me, Premier Yarns Serenity Chunky Tweeds, Plymouth Yarn Encore Chunky, Mary Maxim Titan, and Berroco Chunky
Clover Lock Ring Stitch Markers
Yarn/Tapestry Needle
Gauge: 10 sts x 8.5 rows = 4" in hdc with yarn doubled and larger hook
Finished Size: 10" wide excluding muzzle; 7" wide excluding legs; 9.5" tall before handles
Helpful Links and Video Tutorials
Special Stitches:
sc/hdc2tog - insert hook in indicated stitch, yo and pull up a loop, yo and insert hook in next st, yo and pull up a loop, yo and pull through all loops on hook.
hdc/sc2tog - yo and insert hook in indicated stitch, yo and pull up a loop, insert hook in next st, yo and pull up a loop, yo and pull through all loops on hook.
Note: In some parts of the bag, the yarn is held doubled, and two different hook sizes are used - be sure to read the instructions carefully! Make the parts in the following order.
INSTRUCTIONS
LEGS: Using the smaller hook and yarn held single, make 4.
Round 1: With Color B, make a magic circle, work 5 sc into the ring; join with a sl st in first sc to work in the round. (5 sts)
Round 2: Ch 1, 2 sc in each st around; join with a sl st. (10 sts)
Round 3: Ch 1, sc in each st around; join with a sl st and break yarn. (10 sts)
Round 4: With Color A, join to any st of previous row, ch 1, sc in each st around; join with a sl st. (10 sts_
Round 5 - 7: Ch 1, sc in each st around; join with a sl st. (10 sts)
Row 8: Folding leg flat, ch 1, sc through both layers closing up leg; break yarn and finish off. (5 sts)
BAG: Using the larger hook and yarn held doubled, make 1.
Row 1: With Color A, ch 24, skip the ch closest to the hook, hdc in each of the remaining chs; turn. (23 sts)
Row 2 - 12: Ch 1, hdc 23; turn. (23 sts)
Round 13: Ch 1, hdc 23, turn work 90°, hdc 14 along sides of previous rows, turn work 90°, hdc 23 along foundation chain, turn work 90°, hdc 14 along sides of previous rows; join to first hdc of round with a sl st. (74 sts) Place stitch markers on sts #1, 19, 39, and 56.
Round 14: Ch 1, hdc in the first 5 sts working through the sts of one leg and the sts of the previous round (hold so that the hook goes through the leg before the stitch), *hdc to next st marker, hdc 5 working through the sts of one leg and the sts of the previous round; rep from * 3 times, hdc in last 14 sts; join with a sl st. (74 sts)
Rounds 15 - 31: Ch 1, hdc in each st around; join with a sl st. (74 sts) Place stitch markers on sts #15, 31, 52, and 68 - make sure these line up as they will be the handle openings.
Round 32: Ch 1, hdc to 1st st marker, *hdc in marked st, ch 20, skip 15 sts, hdc in next marked st, hdc to next marked st; rep from *, ending with hdc in last st, join with a sl st. (44 hdc, 40 chs)
Round 33: Ch 1, hdc in each st and ch around; join with a sl st. (84 sts)
Round 34: Ch 1, hdc in each st around; join and break yarn. (84 sts)
MUZZLE: Using the larger hook and yarn held doubled, make 1.
Round 1: With Color A, make a magic circle, work 6 sc into the ring; join with a sl st in the first sc to work in the round. (6 sc)
Round 2: Ch 1, 2 sc in each st around; join with a sl st. (12 sts)
Round 3: Ch 1, *sc in the next st, 2 sc in the next st; rep from *, join with a sl st. (18 sts)
Round 4: Ch 1, *sc in the next 2 sts, 2 sc in the next st; rep from *, join with a sl st. (24 sts)
Round 5: Ch 1, *sc in the next 3 sts, 2 sc in the next st; rep from *, join with a sl st. (30 sts)
Round 6: Ch 1, sc in each st around; join and break yarn leaving a long tail for sewing. (30 sts)
NOSE: Using the smaller hook and yarn held single, make 1.
Row 1: With Color B, ch 6, skip the ch closest to the hook, sc in each remaining ch; turn. (5 sts)
Row 2: Ch 1, sc2tog, sc in the next st, sc2tog; turn. (3 sts)
Row 3: Ch 1, sc3tog; break yarn leaving long tail for sewing. (1 st)
Sew nose to muzzle as shown, then sew muzzle to bag as shown.
EYES: Using the smaller hook and yarn held single, make 2.
Round 1: With Color B, make a magic circle, then working into the ring sc 2, hdc, dc 3, hdc, sc 2, hdc, dc 3, hdc; join and break yarn, leaving a long tail for sewing.
Add "twinkle" with Color A and a yarn needle, then sew to bag as shown.
EARS: Using the larger hook and yarn held doubled, make 2.
Row 1: (Leave long tail at beginning for sewing.) With Color A, ch 4, skip the ch closest to the hook, 2 sc in the next ch, hdc in the next ch, 2 sc in the last ch; turn. (5 sts)
Row 2: Ch 1, sc in the 1st st, hdc in the next 3 sts, sc in the last st; turn. (5 sts)
Row 3: Ch 1, sc/hdc2tog, dc in the next st, hdc/sc2tog; break yarn and finish off. (3 sts)
Sew to bag as shown.
HORNS: Using the smaller hook and yarn held single, make 2.
Row 1: (Leave long tail at beginning for sewing.) With Color B, ch 29, skip the ch closest to the hook, sl st in the next 4 chs, sc in the next 4 chs, 2 sc in the next ch, hdc in the next 5 chs, 2 dc in the next ch, dc in the next 5 chs, 2 tr in the next ch, tr in the last 7 chs; turn. (31 sts)
Row 2: Ch 1, sc in the first 27 sts, sl st in the last 4 sts; break yarn and finish off, leaving long tail for sewing. (31 sts)
Sew to basket as shown, going from next to/above the ears and along the handles.
And that's that! Relatively simple, for a bag that looks like a goat! And it's a great practical bag too - making the main part with the yarn held doubled means it's strong, sturdy, and ready for action, and doesn't need a lining unless you're filling it with super small stuff! I hope you enjoy this free crochet pattern - I do, Totes McGoats!
The Fine Print
Written pattern copyright Tamara Kelly 2015, all rights reserved. Please do not reprint or repost this pattern, but please do link to this page to share this pattern with others. If you wish to make items for sale from this pattern, or translate it to another language, please visit the About page for details. Thank you to Lion Brand Yarn for providing the yarn for this pattern!
The 2015 Moogly Afghan CAL: Block #21!
Block #21 is here, and we only have 3 more left to go after this one. If ou're just now getting started, don't worry - you'll find links to all the previous posts for the CAL in the schedule below! Plus, they'll stay free forever, so you can catch up into 2016, 2017... whenever you like. If this is the first you've heard of the 2015 Moogly Afghan CAL, please CLICK HERE to read how it works! In summary, every 2 weeks I'll share a new free 12" crochet block pattern, and we'll all make them together. All the patterns will be free all year long, and we'll get to visit a variety of fantastic crochet blogs along the way!

Fortune's Wrap Tutorial - C2C Decreases
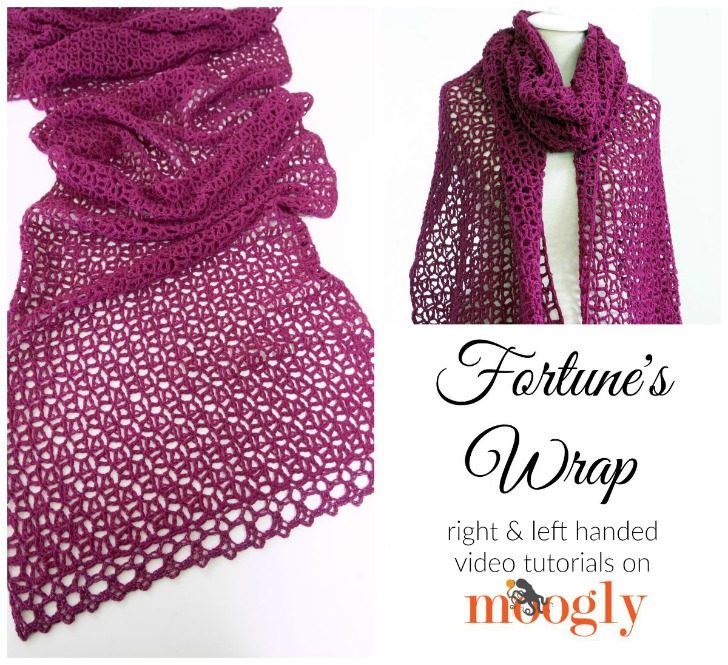
Fortune's Wrap is a corner to corner pattern with little twist that makes it light and lacy! If you aren't familiar with corner to corner (commonly abbreviated C2C) or diagonal box stitch patterns, then the way they come together can be a little confusing at first. The Fortune's Wrap Tutorial is here to help!
Get Ready for I Love Yarn Day 2015!
I Love Yarn Day is taking place this year on October 17th, 2015 - this Saturday! It's time to celebrate your love of yarn and all it can do - here's what this special day is all about!

Win a Free Class at Annie's Craft Festival - on Moogly!
Have you heard the news? Annie's is starting their own Craft Festival! It's being held in Fort Wayne, Indiana, from October 30–November 1. And they are giving away a free class to one lucky winner on Moogly!

Hello Gnome Mittens
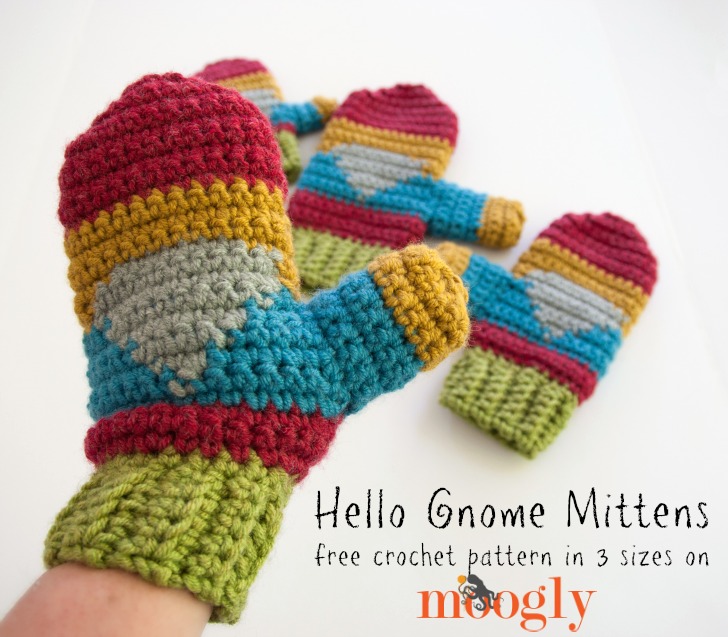
I've always had a soft spot for gnomes, and marrying into a Scandinavian family meant learning all about nisses! So when Sonya of Blackstone Designs asked me to participate in the Crochet Mitten Drive Blog Hop, I took my inspiration from their iconic look!
Disclaimer: This post includes affiliate links.
Prefer an ad-free PDF? You've got options!


Prefer the free blog version? Keep scrolling!
Warm Enough for Any Garden
Indeed, the nisse is the bearer of gifts, and the gnome is usually seen outside in the garden, so using them as inspiration was perfect, as the goal of this Blog Hop is to provide free mitten patterns so that mittens can be made for people in need! Be sure to check out the Crochet Mitten Drive Blog Hop page for more information!
For this pattern I used Lion Brand Woolspun, which is thick, warm, squishy, and easy to care for. I hope you enjoy making this free crochet mitten pattern, and that the Hello Gnomes wave their greetings on hands everywhere this winter!

Hello Gnome Mittens
Add this pattern to your Ravelry Queue and Favorites
US - K, 6.5mm hook (Clover Amour Jumbo Hook recommended)
110-225 yds Lion Brand Lion's Pride Woolspun (Bulky/12 ply/"5"; 127 yds/116 m; 3.53 oz) (This yarn has been discontinued.)
Color A: Avocado
Color B: Cranberry
Color C: Aquamarine
Color D: Oxford Grey
Color E: Honey
Gauge: 14 rows x 12 sts = 4" in sc
Sizing: Child: 7.5" cuff to fingertip, 3.5" wide at palm; Teen/Adult Small: 9.5" cuff to fingertip, 4.25" wide at palm; Adult Large: 10.5" cuff to fingertip, 5" wide at palm
Helpful Links and Tutorials:
NOTES:
This pattern utilizes both rows and rounds, and the rounds are often turned - be sure to read the directions for each row/round carefully. Using a stitch marker in the first st of the turned rounds and counting stitches will help you stay on track.
The cuff is worked side to side, and then the rest of the mitten is built off the cuff, from the bottom up.

CHILD SIZE
Left Hand:
Cuff:
Row 1: With Color A, leaving a 12" tail before the slip knot, ch 6, skip the ch closest to the hook, sc in the next ch, sc in blo to last ch, sc in last ch; turn. (5 sts)
Row 2 - 14: Ch 1, sc in 1st st, sc in blo to last st, sc in last st; turn. (5 sts)
Row 15: Repeat Row 2, do not turn. (5 sts)
Round 1: Turning cuff 90 degrees in order to work along sides of previous rows, ch 1, sc 17 evenly along sides of Rows 15 - 1; join with a sl st in the 1st sc to work in the round, break yarn. Use long tail to sew first and last rows of cuff together. (17 sts)
Before the thumb (the pants):
Round 1: With Color B, join to 1st st of previous round, ch 1, 2 sc in the 1st st, *sc in next 3 sts, 2 sc in the next st; repeat from * to end, join with a sl st, do not turn, break yarn. (22 sts)
Creating the rows where the thumb will attach later (beginning the shirt and beard):
NOTE: When crocheting with Color D here, work over Color C or E; when crocheting with Color C or E, let Color D hang in place waiting for your return.
**Row 1: With Color C, join to 1st st of previous row, ch 1, sc 4 finishing last st with Color D, sc 3 with Color D finishing last st with Color C, sc with Color C in last 15 sts; do not join, turn. (22 sts)
Row 2: Ch 1, sc 14 finishing last st with Color D, sc 5 with Color D finishing last st with Color C, sc with Color C in last 3 sts; do not join, turn. (22 sts)
Row 3: Ch 1, sc 2 finishing last st with Color D, sc 7 with Color D finishing last st with Color C, sc with Color C in last 13 sts; do not join, turn. (22 sts)
Row 4: Ch 1, sc 12 finishing last st with Color D, sc 9 with Color D finishing last st with Color C, sc with Color C in last st; do not join, break Color C, turn. (22 sts)
The upper palm/fingers (finishing the beard and creating the head/hat):
Round 1: With Color E, join to last st of previous row, ch 1, sc in 1st st finishing with Color D, sc 9 with Color D finishing last st with Color E, sc with Color E in last 12 sts; join with a sl st to 1st sc in round, turn. (22 sts)
Round 2: Ch 1, sc 12 finishing last st with Color D, sc 9 with Color D finishing last st with Color E, sc with Color E in last st; join, turn. (22 sts)
Round 3: Ch 1, sc 2 finishing last st with Color D, sc 7 with Color D finishing last st with Color E, sc with Color E in last 13 sts; join, break Color D, turn. (22 sts)
Round 4 - 5: Ch 1, sc in each st around; join, turn. (22 sts)
Round 6: Ch 1, sc in each st around, join, break Color E, turn. (22 sts)
Round 7: With Color B, join to last st of previous round, sc in each st around; join and turn. (22 sts)
Round 8 - 10: Ch 1, sc in each st around; join, turn. (22 sts)
Round 11: Ch 1, sc2tog, sc 7, sc2tog twice, sc 7, sc2tog; join, turn. (18 sts)
Round 12: Ch 1, sc2tog, sc 5, sc2tog twice, sc 5, sc2tog; join, turn. (14 sts)
Round 13: Ch 1, sc2tog, sc 3, sc2tog twice, sc 3, sc2tog; join, turn. (10 sts)
Round 14: Ch 1, sc2tog, sc in next st, sc2tog twice, sc in next st, sc2tog; join, break yarn leaving a 12" tail. (6 sts) Use long tail to seam top of mitten so that it lays flat as shown.
Thumb:
Round 1: With Color C, join to side of **Row 1 above (thumb opening in side of mitten), ch 1, sc 10 sts around opening evenly; join, turn. (10 sts)
Round 2 - 3: Ch 1, sc in each st around; join, turn. (10 sts)
Round 4: Ch 1, sc in each st around; join, break Color C, turn. (10 sts)
Round 5: With Color E, join to last st of previous round, ch 1, sc in each st around; join, turn. (10 sts)
Round 6: Ch 1, sc in each st around; join, turn. (10 sts)
Round 7: Ch 1, sc2tog 7 times; join, break Color E leaving long tail. (5 sts) Use long tail to gather end of thumb, weave in ends.
Right Hand:
Repeat the Left Hand Instructions for Cuff through Pants, then:
Creating the rows where the thumb will attach later (beginning the shirt and beard):
NOTE: When crocheting with Color D, work over Color C or E; when crocheting with Color C or E, let Color D hang in place waiting for your return.
**Row 1: With Color C, join to 1st st of previous row, ch 1, sc 15 finishing last st with Color D, sc 3 with Color D finishing last st with Color C, sc with Color C in last 4 sts; do not join, turn. (22 sts)
Row 2: Ch 1, sc 3 finishing last st with Color D, sc 5 with Color D finishing last st with Color C, sc with Color C in last 14 sts; do not join, turn. (22 sts)
Row 3: Ch 1, sc 13 finishing last st with Color D, sc 7 with Color D finishing last st with Color C, sc with Color C in last 2 sts; do not join, turn. (22 sts)
Row 4: Ch 1, sc in 1st st finishing st with Color D, sc 9 with Color D finishing last st with Color C, sc with Color C in last 12 sts; do not join, break Color C, turn. (22 sts)
The upper palm/fingers (finishing the beard and creating the head/hat):
Round 1: With Color E, join to last st of previous row, ch 1, sc in 12 sts finishing with Color D, sc 9 with Color D finishing last st with Color E, sc with Color E in last st; join with a sl st to 1st sc in round, turn. (22 sts)
Round 2: Ch 1, sc in 1st st finishing st with Color D, sc 9 with Color D finishing last st with Color E, sc with Color E in last 12 sts; join, turn. (22 sts)
Round 3: Ch 1, sc 13 finishing last st with Color D, sc 7 with Color D finishing last st with Color E, sc with Color E in last 2 sts; join, break Color D, turn. (22 sts)
Go back to instructions for Left Hand for remainder of pattern, beginning with Round 4 of the same section.
Repeat the Left Hand Instructions for the Thumb.

TEEN/ADULT SMALL SIZE
Left Hand:
Cuff (the grass):
Row 1: With Color A, leaving a 12" tail before the slip knot, ch 7, skip the ch closest to the hook, sc in the next ch, sc in blo to last ch, sc in last ch; turn. (6 sts)
Row 2 - 18: Ch 1, sc in 1st st, sc in blo to last st, sc in last st; turn. (6 sts)
Row 19: Repeat Row 2, do not turn. (6 sts)
Round 1: Turning cuff 90 degrees in order to work along sides of previous rows, ch 1, sc 21 evenly along sides of Rows 19 - 1; join with a sl st in the 1st sc to work in the round, break yarn. Use long tail to sew first and last rows of cuff together. (21 sts)
Before the thumb (the pants):
Round 1: With Color B, join to 1st st of previous round, ch 1, 2 sc in the 1st st, *sc in next 4 sts, 2 sc in the next st; repeat from * to end, join with a sl st, turn. (26 sts)
Round 2: Ch 1, sc in each st around; join with a sl st, turn. (26 sts)
Round 3: Ch 1, sc in each st around; join with sl st, do not turn, break yarn. (26 sts)
Creating the rows where the thumb will attach later (beginning the shirt and beard):
NOTE: When crocheting with Color D, work over Color C or E; when crocheting with Color C or E, let Color D hang in place waiting for your return.
**Row 1: With Color C, join to 1st st of previous round, ch 1, sc in each st around; do not join, turn. (26 sts)
Row 2: Ch 1, sc 19 finishing last st with Color D, sc with Color D in next st finishing st with Color C, sc with Color C in last 6 sts; do not join, turn. (26 sts)
Row 3: Ch 1, sc 5 finishing last st with Color D, sc 3 with Color D finishing last st with Color C, sc with Color C in last 18 sts; do not join, turn. (26 sts)
Row 4: Ch 1, sc 17 finishing last st with Color D, sc 5 with Color D finishing last st with Color C, sc with Color C in last 4 sts; do not join, turn. (26 sts)
Row 5: Ch 1, sc 3 finishing last st with Color D, sc 7 with Color D finishing last st with Color C, sc with Color C in last 16 sts; do not join, turn. (26 sts)
Row 6: Ch 1, sc 15 finishing last st with Color D, sc 9 with Color D finishing last st with Color C, sc with Color C in last 2 sts; do not join, break color C, turn. (26 sts)
The upper palm/fingers (finishing the beard and creating the head/hat):
Round 1: With Color E, join to last st of previous row, ch 1, sc in 1st st finishing with Color D, sc 11 with Color D finishing last st with Color E, sc with Color E in last 14 sts; join with a sl st to 1st sc in round, turn. (26 sts)
Round 2: Ch 1, sc 14 finishing last st with Color D, sc 11 with Color D finishing last st with Color E, sc with Color E in last st; join, turn. (26 sts)
Round 3: Ch 1, sc 3 finishing last st with Color D, sc 7 with Color D finishing last st with Color E, sc with Color E in last 16 sts; join, break Color D, turn. (26 sts)
Round 4 - 5: Ch 1, sc in each st around; join, turn. (26 sts)
Round 6: Ch 1, sc in each st around, join, break Color E, turn. (26 sts)
Round 7: With Color B, join to last st of previous round, sc in each st around; join and turn. (26 sts)
Round 8 - 11: Ch 1, sc in each st around; join, turn. (26 sts)
Round 12: Ch 1, sc2tog, sc 9, sc2tog twice, sc 9, sc2tog; join, turn. (22 sts)
Round 13: Ch 1, sc2tog, sc 7, sc2tog twice, sc 7, sc2tog; join, turn. (18 sts)
Round 14: Ch 1, sc2tog, sc 5, sc2tog twice, sc 5, sc2tog; join, turn. (14 sts)
Round 15: Ch 1, sc2tog, sc 3, sc2tog twice, sc 3, sc2tog; join, turn. (10 sts)
Round 16: Ch 1, sc2tog, sc in next st, sc2tog twice, sc in next st, sc2tog; join, break yarn leaving a 12" tail. (6 sts) Use long tail to seam top of mitten so that it lays flat as shown.
Thumb:
Round 1: With Color C, join to side of **Row 1 above (thumb opening in side of mitten), ch 1, sc 14 sts around opening evenly; join, turn. (14 sts)
Round 2 - 4: Ch 1, sc in each st around; join, turn. (14 sts)
Round 5: Ch 1, sc in each st around; join, break Color C, turn. (14 sts)
Round 6: With Color E, join to last st of previous round, ch 1, sc in each st around; join, turn. (14 sts)
Round 7 - 8: Ch 1, sc in each st around; join, turn. (14 sts)
Round 9: Ch 1, sc2tog 7 times; join, break Color E leaving long tail. (7 sts) Use long tail to gather end of thumb, weave in ends.
Right Hand:
Repeat the Left Hand Instructions for Cuff through Pants, then:
Creating the rows where the thumb will attach later (beginning the shirt and beard):
NOTE: When crocheting with Color D, work over Color C or E; when crocheting with Color C or E, let Color D hang in place waiting for your return.
**Row 1: With Color C, join to 1st st of previous round, ch 1, sc in each st around; do not join, turn. (26 sts)
Row 2: Ch 1, sc 6 finishing last st with Color D, sc with Color D in next st finishing st with Color C, sc with Color C in last 19 sts; do not join, turn. (26 sts)
Row 3: Ch 1, sc 18 finishing last st with Color D, sc 3 with Color D finishing last st with Color C, sc with Color C in last 5 sts; do not join, turn. (26 sts)
Row 4: Ch 1, sc 4 finishing last st with Color D, sc 5 with Color D finishing last st with Color C, sc with Color C in last 17 sts; do not join, turn. (26 sts)
Row 5: Ch 1, sc 16 finishing last st with Color D, sc 7 with Color D finishing last st with Color C, sc with Color C in last 3 sts; do not join, turn. (26 sts)
Row 6: Ch 1, sc 2 finishing last st with Color D, sc 9 with Color D finishing last st with Color C, sc with Color C in last 15 sts; do not join, break color C, turn. (26 sts)
The upper palm/fingers (finishing the beard and creating the head/hat):
Round 1: With Color E, join to last st of previous row, ch 1, sc in 1st 14 sts finishing with Color D, sc 11 with Color D finishing last st with Color E, sc with Color E in last st; join with a sl st to 1st sc in round, turn. (26 sts)
Round 2: Ch 1, sc in 1st st finishing last st with Color D, sc 11 with Color D finishing last st with Color E, sc with Color E in last 14 sts; join, turn. (26 sts)
Round 3: Ch 1, sc 16 finishing last st with Color D, sc 7 with Color D finishing last st with Color E, sc with Color E in last 3 sts; join, break Color D, turn. (26 sts)
Go back to instructions for Left Hand for remainder of pattern, beginning with Round 4 of the same section.
Repeat the Left Hand Instructions for the Thumb.

ADULT LARGE SIZE
Left Hand:
Cuff (the grass):
Row 1: With Color A, leaving a 12" tail before the slip knot, ch 7, skip the ch closest to the hook, sc in the next ch, sc in blo to last ch, sc in last ch; turn. (6 sts)
Row 2 - 22: Ch 1, sc in 1st st, sc in blo to last st, sc in last st; turn. (6 sts)
Row 23: Repeat Row 2, do not turn. (6 sts)
Round 1: Turning cuff 90 degrees in order to work along sides of previous rows, ch 1, sc 25 evenly along sides of Rows 23 - 1; join with a sl st in the 1st sc to work in the round, break yarn. Use long tail to sew first and last rows of cuff together. (25 sts)
Before the thumb (the pants):
Round 1: With Color B, join to 1st st of previous round, ch 1, 2 sc in the 1st st, *sc in next 5 sts, 2 sc in the next st; repeat from * to end, join with a sl st, turn. (30 sts)
Round 2 - 4: Ch 1, sc in each st around; join with a sl st, turn. (30 sts)
Round 5: Ch 1, sc in each st around; join with sl st, do not turn, break yarn. (30 sts)
Creating the rows where the thumb will attach later (beginning the shirt and beard):
NOTE: When crocheting with Color D, work over Color C or E; when crocheting with Color C or E, let Color D hang in place waiting for your return.
**Row 1: With Color C, join to 1st st of previous round, ch 1, sc in each st around; do not join, turn. (30 sts)
Row 2: Ch 1, sc 22 finishing last st with Color D, sc with Color D in next st finishing st with Color C, sc with Color C in last 7 sts; do not join, turn. (30 sts)
Row 3: Ch 1, sc 6 finishing last st with Color D, sc 3 with Color D finishing last st with Color C, sc with Color C in last 21 sts; do not join, turn. (30 sts)
Row 4: Ch 1, sc 20 finishing last st with Color D, sc 5 with Color D finishing last st with Color C, sc with Color C in last 5 sts; do not join, turn. (30 sts)
Row 5: Ch 1, sc 4 finishing last st with Color D, sc 7 with Color D finishing last st with Color C, sc with Color C in last 19 sts; do not join, turn. (30 sts)
Row 6: Ch 1, sc 18 finishing last st with Color D, sc 9 with Color D finishing last st with Color C, sc with Color C in last 3 sts; do not join, break Color C, turn. (30 sts)
The upper palm/fingers (finishing the beard and creating the head/hat):
Round 1: With Color E, join to last st of previous row, ch 1, sc 2 finishing last st with Color D, sc 11 with Color D finishing last st with Color E, sc with Color E in last 17 sts; join with a sl st to 1st sc in round, turn. (30 sts)
Round 2: Ch 1, sc 17 finishing last st with Color D, sc 11 with Color D finishing last st with Color E, sc with Color E in last 2 sts; join, turn. (30 sts)
Round 3: Ch 1, sc 4 finishing last st with Color D, sc 7 with Color D finishing last st with Color E, sc with Color E in last 19 sts; join, break Color D, turn. (30 sts)
Round 4 - 5: Ch 1, sc in each st around; join, turn. (30 sts)
Round 6: Ch 1, sc in each st around, join, break Color E, turn. (30 sts)
Round 7: With Color B, join to last st of previous round, sc in each st around; join and turn. (30 sts)
Round 8 - 12: Ch 1, sc in each st around; join, turn. (30 sts)
Round 13: Ch 1, sc2tog, sc 11, sc2tog twice, sc 11, sc2tog; join, turn. (26 sts)
Round 14: Ch 1, sc2tog, sc 9, sc2tog twice, sc 9, sc2tog; join, turn. (22 sts)
Round 15: Ch 1, sc2tog, sc 7, sc2tog twice, sc 7, sc2tog; join, turn. (18 sts)
Round 16: Ch 1, sc2tog, sc 5, sc2tog twice, sc 5, sc2tog; join, turn. (14 sts)
Round 17: Ch 1, sc2tog, sc 3, sc2tog twice, sc 3, sc2tog; join, turn. (10 sts)
Round 18: Ch 1, sc2tog, sc in next st, sc2tog twice, sc in next st, sc2tog; join, break yarn leaving a 12" tail. (6 sts) Use long tail to seam top of mitten so that it lays flat as shown.
Thumb:
Round 1: With Color C, join to side of **Row 1 above (thumb opening in side of mitten), ch 1, sc 14 sts around opening evenly; join, turn. (14 sts)
Round 2 - 5: Ch 1, sc in each st around; join, turn. (14 sts)
Round 6: Ch 1, sc in each st around; join, break Color C, turn. (14 sts)
Round 7: With Color E, join to last st of previous round, ch 1, sc in each st around; join, turn. (14 sts)
Round 8 - 10: Ch 1, sc in each st around; join, turn. (14 sts)
Round 11: Ch 1, sc2tog 7 times; join, break Color E leaving long tail. (7 sts) Use long tail to gather end of thumb, weave in ends.
Right Hand:
Repeat the Left Hand Instructions for Cuff through Pants, then:
Creating the rows where the thumb will attach later (beginning the shirt and beard):
NOTE: When crocheting with Color D, work over Color C or E; when crocheting with Color C or E, let Color D hang in place waiting for your return.
**Row 1: With Color C, join to 1st st of previous round, ch 1, sc in each st around; do not join, turn. (30 sts)
Row 2: Ch 1, sc 7 finishing last st with Color D, sc with Color D in next st finishing st with Color C, sc with Color C in last 22 sts; do not join, turn. (30 sts)
Row 3: Ch 1, sc 21 finishing last st with Color D, sc 3 with Color D finishing last st with Color C, sc with Color C in last 6 sts; do not join, turn. (30 sts)
Row 4: Ch 1, sc 5 finishing last st with Color D, sc 5 with Color D finishing last st with Color C, sc with Color C in last 20 sts; do not join, turn. (30 sts)
Row 5: Ch 1, sc 19 finishing last st with Color D, sc 7 with Color D finishing last st with Color C, sc with Color C in last 4 sts; do not join, turn. (30 sts)
Row 6: Ch 1, sc 3 finishing last st with Color D, sc 9 with Color D finishing last st with Color C, sc with Color C in last 18 sts; do not join, break Color C, turn. (30 sts)
The upper palm/fingers (finishing the beard and creating the head/hat):
Round 1: With Color E, join to last st of previous row, ch 1, sc 17 finishing last st with Color D, sc 11 with Color D finishing last st with Color E, sc with Color E in last 2 sts; join with a sl st to 1st sc in round, turn. (30 sts)
Round 2: Ch 1, sc 2 finishing last st with Color D, sc 11 with Color D finishing last st with Color E, sc with Color E in last 17 sts; join, turn. (30 sts)
Round 3: Ch 1, sc 19 finishing last st with Color D, sc 7 with Color D finishing last st with Color E, sc with Color E in last 4 sts; join, break Color D, turn. (30 sts)
Go back to instructions for Left Hand for remainder of pattern, beginning with Round 4 of the same section.
Repeat the Left Hand Instructions for the Thumb.
And that's it for the Hello Gnomes Mittens patterns! I hope you enjoy making them - and the way they seem to wave hello at you while you wear them! One skein of each of the colors listed above should make 2 pairs of any size, so do consider giving a pair to the charity of your choice this winter!
The Fine Print
Written pattern copyright Tamara Kelly 2015, all rights reserved. Please do not reprint or repost this pattern, but please do link to this page to share this pattern with others. If you wish to make items for sale from this pattern, please visit the About page for details. Thank you to Lion Brand Yarn for providing the yarn for this pattern!
Cast Off Chemo (with a Giveaway on Moogly)!
When I went to TNNA earlier this year I was very impressed to learn about Cast Off Chemo! It's a charity organization with a unique mission - funding a nonprofit effort to raise funds for a clinical trial for a cancer treatment that wouldn’t involve chemotherapy. And to help spread the word, I've got a giveaway here on Moogly!

The Complete Beginners Guide to Knitting!
Tom from Clippers Ireland has sent me another fantastic graphic to share with you all! If you're in the market for sheep shearing equipment, be sure to check out his site. And enjoy this fantastic Beginners Guide to Knitting - perfect for your Pinterest board!

Hookin On Hump Day #104: Link Party for the Yarny Arts!
Thank you for joining myself, and my cohost Kara from Petals to Picots, for another round of HOHD, where we share the best crochet and knit projects from around the web from the last 2 weeks! Hookin on Hump Day is hosted here on Moogly, as well as on Petals to Picots - and the winners each round are featured on both our sites and social media shares! Here are the projects that your clicks and Kara put together this round!

"Baby & Me Knits" #Giveaway on Moogly!
Baby & Me Knits is a new book by Celeste Young - featuring "20 timeless knitted designs for baby and mom!" And I love Celeste's twist on this idea... and that I get to give a copy away!

Stripes and Blocks Scarf

The Leaping Stripes and Blocks stitch pattern has been very popular here at Moogly, and I've had several requests for a scarf - and you know I love requests! I think this pattern is perfect for menswear, so I designed the Stripes and Blocks scarf in masculine colors - but it would look lovely in bright rainbows, jewel tones, soft pastels, you name it! It's perfectly unisex!
Disclaimer: This post includes affiliate links.
Prefer an ad-free PDF? You've got options!
Prefer the free blog version? Keep scrolling!
Customize the Size with Ease!
The Stripes and Blocks Scarf is about 6 feet long, but if you want it longer or shorter, that's easy enough - just stop when you're done, or keep going in the pattern - it's up to you! There's enough leftover Lion Brand Heartland to make it a lot longer if that's what you're looking for - or to make 2 for the kids! You could even whip stitch the ends together for an infinity scarf... or add fringe! I can't wait to see how you all make your own versions!

Stripes and Blocks Scarf
Add this pattern to your Ravelry Queue and Favorites
US -J, 6.0mm hook - Furls
475 yds Lion Brand Heartland (Aran/10 ply; 251 yds/230 m; 5.01 oz)
Color A: Great Smoky Mountains - 1 skein; 175 yds
Color B: Olympic - 1 skein; 150 yds
Color C: Katmai - 1 skein; 150 yds
Gauge: 14 sts x 10 rows = 4" in pattern
Finished Size: 7" wide x 70" long
Click HERE for a video tutorial for this stitch pattern.
Click HERE for the matching hat pattern.
INSTRUCTIONS
Row 1: With Color A, ch 26, dc in the 4th ch from hook (the 3 skipped chs count as the first dc), then dc in the next ch,*ch 2, skip 2 ch, dc in next 2 ch; repeat from * until last ch remains, dc in the last ch, turn. (14 dc, 10 ch)
Row 2: Ch 1 and sc in the 1st st, ch 2, skip next 2 sts, *working over the chains and into the unworked foundation chains below, dc in each of the next two foundation chs (the chains from Row 1 are enclosed within these dc sts), ch 2, skip the next 2 sts; repeat from * until last st remains, sc in the last st (top of ch 3), finishing the st with Color B, drop Color A, turn. (10 dc, 12 ch, 2 sc)
Row 3: With Color B, ch 1 and sc in the 1st st, *working over the chains and into the top of the sts from the row before the previous row, dc in each of the next two sts,** ch 2, skip the next 2 sts; repeat from * across, ending last repeat at ** with last st remaining, sc in the last st, turn. (12 dc, 10 ch, 2 sc)
Row 4: Ch 1 and sc in the 1st st, ch 2, skip next 2 sts, *working over the chains and into the top of the sts from the row before the previous row, dc in each of the next two sts, ch 2, skip the next 2 sts; repeat from * until last st remains, sc in the last st, finishing the st with Color C, drop Color B, turn. (10 dc, 12 ch, 2 sc)
Rows 5 - 174: Repeat Rows 3 - 4, alternating through all 3 colors, switching colors every two rows, and carrying the yarn along the side.
Row 175: With next color, repeat Row 3.
Row 176: Ch 1, sc in first 3 sts, *working over the chains and into the top of the sts from the row before the previous row, dc in each of the next two sts, sc in the next 2 sts; repeat from * until last st remains, sc in last st, turn. (14 sc, 10 dc) Do not break yarn.
Edging: Ch 1, sc evenly around scarf, working (sc, ch 1, sc) in each corner; join and break, weave in ends.
And that's the Stripes and Blocks Scarf! Easy, fun, and perfect for both men and women. This pattern would be great crocheted in your favorite school or team colors, and you can use as many colors as you like - over 3 and you may wish to cut the yarn between stripes though, as the floats along the sides tend to get a little bulky. I hope you enjoy this free crochet scarf pattern!
Written pattern copyright Tamara Kelly 2015, all rights reserved. Please do not reprint or repost this pattern, but please do link to this page to share this pattern with others. If you wish to make items for sale from this pattern, please visit the About page for details. Thank you to Lion Brand Yarn for providing the yarn for this pattern!
The 2015 Moogly Afghan CAL: Block #20!
Block #20 is here, and we're officially in the home stretch! Even if you haven't gotten started yet, there's *still* time to join in, as blocks work up fast, and you'll find links to all the previous posts for the CAL in the schedule below! Plus, they'll stay free forever, so you can catch up into 2016. If this is the first you've heard of the 2015 Moogly Afghan CAL, please CLICK HERE to read how it works! In summary, every 2 weeks I'll share a new free 12" crochet block pattern, and we'll all make them together. All the patterns will be free all year long, and we'll get to visit a variety of fantastic crochet blogs along the way!
"Yarn Happy": #Knit Book Giveaway!
Yarn Happy is a new book by Turid Lindeland - featuring "30 Traditional Norwegian Designs for Modern Knit & Crochet"! If you love modern knitting, or if you love Norwegian design, this book is a must have for your yarny bookshelf!

Edward's Menagerie: Birds - #Crochet Book Giveaway!
You may have already spotted Edward's Menagerie by Kerry Lord - full of patterns for 40 gorgeous softies. Well, now she's written a colorful new followup - Edward's Menagerie: Birds!

Marie Segares of Underground Crafter: Designer Showcase!
It’s time for September’s Designer Showcase! I like to wrap up each month by having one of my favorite designers share a bit about themselves, and then I follow it up by sharing my 5 favorite free patterns that they've designed! This month I’m excited to share some things from the clever Marie Segares - the blogger and designer behind Underground Crafter and the smartie behind the Creative Yarn Entrepreneur Podcast!

Fortune's Wrap

Fortune's Shawlette, and your requests, are the inspiration for Fortune's Wrap! While the Shawlette is small and dainty, looking lovely as a light summer layer on the shoulders or as a cozy cowl, Fortune's Wrap is oversize, cozy, crazy versatile... with a little bit of bling!
Disclaimer: This post includes affiliate links. Yarn provided by Lion Brand, hook provided by Clover.
Prefer an ad-free PDF?
Prefer the free blog version? Keep scrolling!
With (Optional) Bling!
The bling on the ends of the Fortune's Wrap come from a bit of Kreinik Twist held together with the yummy Lion Brand Superwash Merino. It's optional of course, but it's a great way to dress up your wrap, and your look!

The wrap itself is nicely long and wide - my friend Kim Guzman called it a "Goddess Wrap"! I love that! This means it'll fit everyone, plus-sized or no.
Wear it over your shoulders with a little black dress, wrap it around your neck as a gorgeous scarf, pin it at the shoulder for the perfect fall look. And make one for a friend who needs an extra hug.

Fortune's Wrap
Add this pattern to your Ravelry Queue and Favorites
US - L, 8.0 mm hook (Clover Amour recommended)
900 yds Lion Brand Superwash Merino (3 skeins; 100% merino; DK / 8 ply; 306 yds /280 m; 3.53 oz) in Wild Berry
Optional: Kreinik Twist Blending Filament in Berry (less than 1 cone used)
Stitch Markers (Clover Lock Ring Markers recommended)
Gauge (after blocking): 5 blocks = 4" as measured along a straight edge
Finished Size (after blocking): 20" x 93"
VIDEO TUTORIAL: Click HERE to go to the video tutorial
Fortune's Wrap Instructions
Row 1: Ch 6, dc in 4th ch from hook, ch 1, skip next ch, dc in last ch; turn. (1 block)
Row 2: Ch 6, dc in 4th ch from hook, ch 1, skip next ch, dc in last ch, (slip st, ch 3, dc, ch 1, dc) in ch-3 sp of previous row; turn. (2 blocks)
Row 3: Ch 6, dc in 4th ch from hook, ch 1, skip next ch, dc in last ch, [(slip st, ch 3, dc, ch 1, dc) in next ch-3 sp of previous row] twice; turn. (3 blocks)
Row 4: Ch 6, dc in 4th ch from hook, ch 1, skip next ch, dc in last ch, [(slip st, ch 3, dc, ch 1, dc) in next ch-3 sp of previous row] 3 times; turn. (4 blocks)
Row 5 – 25: Continue as above, increasing 1 block on each row until there are 25 blocks across. (25 blocks)
Begin to Work Even:
Row 26: Ch 6, dc in 4th ch from hook, ch 1, skip next ch, dc in last ch, [(slip st, ch 3, dc, ch 1, dc) in next ch-3 sp of previous row] 24 times, sl st in next ch-3 sp, (last block does not have a new block added to it); turn. (25 blocks)
Row 27: Sl st in next dc, sl st in ch sp, sl st in next dc, [(slip st, ch 3, dc, ch 1, dc) in next ch-3 sp of previous row] 25 times; turn. (25 blocks)
Row 28 - 85: Repeat Rows 26 - 27. (For a shorter wrap, stop at after any odd numbered row and go to instructions for Row 86.)
Begin to Decrease To Finish off the Rectangle:
Row 86: Sl st in next dc, sl st in ch sp, sl st in next dc, [(slip st, ch 3, dc, ch 1, dc) in next ch-3 sp of previous row] 24 times (last block does not have a new block added to it); sl st in next ch-3 sp, turn. (24 blocks)
Row 87 - 109: Repeat Row 86, decreasing by one block with every row, until there is only one block made on Row 109. Do not turn after Row 109.
Edging Round: Ch 1, sc 444 sts evenly around wrap as follows: 170 sts along each long side, 50 sts along each short side, with one extra st in each corner. Place stitch markers in each of these extra corner sts; join and break yarn. (444 sc sts)
Trim
(Repeat on each short end of wrap, holding blending filament along with the yarn if desired):
Row 1: Join to a marked stitch (remove marker), ch 2 (does not count as a st here or throughout), (dc, ch 1, dc) in the 1st st, skip the next 2 sts, *(dc, ch 2, dc) in the next st, skip the next 2 sts; repeat from * until 1 st remains, (dc, ch 1, dc) in the last st, turn. (18 V sts)
Row 2: Ch 2, dc in the first st, dc in the next ch-1 sp, ch 2, skip the next 2 sts, *dc 2 in the next ch-2 sp, ch 2, skip the next 2 sts; repeat from * until there is one V st left, dc in the ch-1 sp, dc in the last st, turn. (36 dc sts)
Row 3: Sl st in 1st st, ch 3, sl st in next st, *ch 2, skip ch-2 sp, sl st in next st, ch 3, sl st in next st; repeat from * to end, break yarn and finish off. (18 ch-3 loops)
And scene! That wraps up the Fortune's Wrap! You will want to weave in the ends (not too many!) and block the finished wrap. You'll need a fair bit of floor space, or a long dining table. Lucky for me I have my grandmother's 10 seater! But blocking really is worth it, as it opens up the lace pattern beautifully.
I hope you enjoy the free Fortune's Wrap crochet pattern, and make one for yourself to wear - and then maybe another as a gift!
The Fine Print
Written pattern copyright Tamara Kelly 2015, all rights reserved. Please do not reprint or repost this pattern, but please do link to this page to share this pattern with others. If you wish to make items for sale from this pattern, please visit the About page for details. Thank you to Lion Brand Yarn for providing the yarn for this pattern!
Heidi Boyd Whimsy Kit #Giveaway on Moogly!
And now for something completely different! If you crochet or knit, odds are you love crafting - and trying new things! Well, when I was at TNNA earlier this year, I saw a booth that pulled me right in, because everything in it was so crazy cute! And that's when I met Heidi Boyd and her Whimsy Kits!

Seaming Crochet with Lindsey Stephens: Craftsy Class Review!
I had the pleasure of meeting Lindsey at TNNA earlier this year - and her Craftsy class has just debuted! I'm so happy for her, and I couldn't wait to watch it, and tell you all about it!

"Scarves in the Round" by Heather Walpole: a #Knit Book Review & Giveaway!
Hey knitters, and wanna-be knitters - if you love infinity scarves and cowls, I've got the book you've been waiting for: Scarves in the Round, by Heather Walpole!

Loopy Love Children's Slippers
Ah, child sizes are ready! Thank you for all the requests - and the patience! Here are the Loopy Love Children's Slippers - in 5 sizes!
 Disclaimer: This post includes affiliate links. [Read more...]
The 2015 Moogly Afghan CAL: Block #19!
Block #19 is here, and it's a jaw dropper! Even if you haven't gotten started yet, there's *still* time to join in, as blocks work up fast, and you'll find links to all the previous posts for the CAL in the schedule below! If this is the first you've heard of the 2015 Moogly Afghan CAL, please CLICK HERE to read how it works! In summary, every 2 weeks I'll share a new free 12" crochet block pattern, and we'll all make them together. All the patterns will be free all year long, and we'll get to visit a variety of fantastic crochet blogs along the way!
Athena's Elements Deluxe Crochet Kit #Giveaway on Moogly!
Moogly Facebook fans might have spotted these gorgeous kits on the page recently... they are so pretty they're hard to forget! And now I get to give away THREE of Athena's Elements Deluxe Crochet Kits here on Moogly!

Hookin On Hump Day #103: Link Party for the Yarny Arts!
Thank you for joining myself, and my cohost Kara from Petals to Picots, for another round of HOHD, where we share the best crochet and knit projects from around the web from the last 2 weeks! Hookin on Hump Day is hosted here on Moogly, as well as on Petals to Picots - and the winners each round are featured on both our sites and social media shares! Here are the projects that your clicks and Kara put together this round!

Fun with Kreinik Carry Along Threads!

Madly In Love Hat
I shared the Madly in Love infinity scarf a while back - and it's been crying out for a matching hat ever since! So at long last, here it is - the Madly In Love Hat, in 3 sizes!
 Disclaimer: This post includes affiliate links. [Read more...]
The YarnIt: a Moogly Giveaway!
The giveaway is over, and the winner of the free YarnIt has been picked... but there are no losers with the YarnIt - only winners! If you followed the instructions below and filled out the form on the YarnIt website during the giveaway period, then watch your email for a coupon code that will give you a special discount on a YarnIt purchase for a limited time! Thank you so much The YarnIt company for being so generous!
~~~
I've been eagerly waiting for this giveaway - I love the YarnIt, and have been wanting to share it with all of you. But gosh darn it, they're just so fantastic, they kept selling out! Now we've finally got a couple set aside - and the YarnIt Giveaway is go!

Split Bullion Stitch
When designing Squish, a fab one skein cowl, I came up with a brand new stitch - at least, it's new to me! It creates a ton of texture, and a light, springy, but solid fabric. And I'm calling it the Split Bullion Stitch!

Gleener #Giveaway on Moogly!
Time to share some more of that sweet sweet TNNA swag! Up today, is the award winning "Ultimate Fuzz Remover" - the Gleener!

Squish
I love one skein projects, I love cowls, and combining the two makes me so happy! Add a fun new stitch and voila - it's Squish!
 Disclaimer: This post includes affiliate links. [Read more...]
The 2015 Moogly Afghan CAL: Block #18!
Block #18 is here, and it's a fun one! Even if you haven't gotten started yet, there's still time to join in, as blocks work up fast, and you'll find links to all the previous posts for the CAL in the schedule below! If this is the first you've heard of the 2015 Moogly Afghan CAL, please CLICK HERE to read how it works! In summary, every 2 weeks I'll share a new free 12" crochet block pattern, and we'll all make them together. All the patterns will be free all year long, and we'll get to visit a variety of fantastic crochet blogs along the way!
Center Single Crochet AKA Waistcoat Stitch
I love how adventurous and versatile crochet is - there's always something new to learn, and readers who are quick to ask for video tutorials for those things! And one thing I've gotten a lot of requests for is a special stitch that looks a whole lot like knitted stockinette, known as Center Single Crochet, sometimes called the Waistcoat Stitch!
 Disclaimer: This post includes affiliate links. [Read more...]
Hookin On Hump Day #102: Link Party for the Yarny Arts!
Thank you for joining myself, and my cohost Kara from Petals to Picots, for another round of HOHD, where we share the best crochet and knit projects from around the web from the last 2 weeks! Hookin on Hump Day is hosted here on Moogly, as well as on Petals to Picots - and the winners each round are featured on both our sites and social media shares! Here are the projects that your clicks and I put together this round!

Flash Giveaway Blog Hop!
Let's liven up Tuesday with something extra fun - a Flash Giveaway Blog Hop, where you can collect 8 FREE patterns! But it's for a limited time only!

Stacey Williams of Busting Stitches: Designer Showcase!
It’s time for August’s Designer Showcase! I like to wrap up each month by having one of my favorite designers share a bit about themselves, and then I follow it up by sharing my 5 favorite free patterns that they've designed! This month I’m excited to share some things from the super fun Stacey Williams - the blogger and designer behind Busting Stitches!

Autumn 2015 Moogly Mini Crochet-Along Part 2: Boardwalk Bag
Time for the 2nd half of the Moogly Autumn 2015 Mini CAL! Let's finish up our beautiful handbags featuring Lion Brand Landscapes!

Work-In-Progress Hook Markers Giveaway on Moogly!
Have you ever returned to a crochet WIP (that's work in progress!) with no recollection of what size hook you were using? If this happens to you, worry no more... I've found just the solution!

How to Crochet Bag Handles
Whether or not the pattern calls for them, crocheted handles are always a fun option for any crocheted tote, bag, or purse! And they are easy to make too - here's how to crochet bag handles!
 Disclaimer: This post includes affiliate links. [Read more...]
Love + Leche Lotion Bar #Giveaway on Moogly!
What am I doing talking about lotion bars on a crochet and knitting blog? Well, anyone who's yarned their way through a dry winter will tell you - dry hands are a real problem! So I'm excited to share a fantastic solution: Love + Leche Lotion Bars!
