Crochet projects don't have to be solid blocks of color - there are lots of great ways to add color to a pattern! And switching colors in the middle of a row is one of the most common methods. This allows you to make everything from simple geometric patterns to complex pictures. Here's the best way I know to switch colors in the middle of a row or round of crochet.
How to Change Colors in the Middle of a Row
The written instructions:
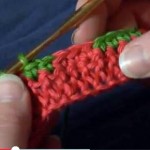
When you are ready to introduce a new color in the next stitch, you start with the previous stitch. Make the stitch as you normally would, but stop when there are two loops left on the hook (three for hdc sts), right before you would normally yarn over and pull through to finish the stitch. At this point, yarn over with the new color, Color B, and pull this new color loop through the loops on the hook. Let the unused original color, Color A, fall behind your work. Continue crocheting with Color B until you are ready to introduce a new color or switch back to Color A.
This method works with any kind of stitch. If you are making short color changes with only two or at most three colors of yarn, you have the option of enclosing the unused yarn in your stitches as you work, as in tapestry crochet, or you can leave the strands loose (though not too loose) on the back of your work, picking them up again as they get used. However, if you are working with lots of color changes or long stretches of one color before the first color gets used again, breaking the yarn and starting it over again with each change may be the better option.
Have you used this method for switching colors in the middle of a row or round before? What other tips or tutorials would you like to see videos for here on moogly? Let us know in the comments!
 Be sure to check out and like the moogly Facebook page to get the latest updates, links, and sneak peeks. Moogly is also on Pinterest, Twitter, and Tumblr – come join the fun! TamaraKelly@mooglyblog.com


Carla
Thanks for the video!
moogly
You're very welcome Carla!:D
Ivor
What does the back look like because you have to do a return?
Tamara Kelly
If you have cut the yarn, it will be a clean color change. If not, there might be a little jog where you pull up the first color, but the shorter the stitch, the less noticeable it will be.
ruth mcconaghy
i will do it at the end of a row. and work in the ends.
Jenny
Thanks for the tip, but what does the back look like? will it have a clean finish as well?
moogly
Jenny, that depends on what you do with the ends. For the cleanest finish, cut the yarn every time and weave in the ends. Otherwise, the stitch itself will look just as good!
Angela Fenton
Thank you so much! I have always wondered how to do that. how did you start it with two colors? do you have a video that shows it?
moogly
Angela, you're very welcome! You just add the new color by pulling up a loop of it for the "yo and pull through" that ends the stitch. Leave the tail hanging behind your work, and weave it in when you're done. It's just as simple as it sounds. 🙂
Barbara Epperson
What about the back of the work? What happens there? Thank you.
moogly
Hi Barbara! Here's what I said above to Jenny: that depends on what you do with the ends. For the cleanest finish, cut the yarn every time and weave in the ends. Otherwise, the stitch itself will look just as good!
DeBbie
I understand about cutting the color used in the change, but it's for a popcorn type accent and weaving it in would show. Could I cut and tie it off?
Tamara Kelly
Tying knots is always super risky, as they have a way of coming undone. You would need to weave in the end back in the section of the same color to hide it.
susan M Jensen
I really helped me. appreciate the video
Tamara Kelly
So glad to hear it Susan! 🙂
Carmen
SO helpful! I've just begun to crochet a chart, and it wouldn't look nearly as nice without this tutorial. Thank you!
Kate
Thank you Moogly. I actually used the principal for adding a new color at the beginning of a row, and figured it out myself. I did exactly as you instruct, using the tapestry weave for the ends. Thanks again for getting back to me.
Ramona
Thanks so much for the great video! I am crocheting a Barbie dress that has 1 main colour, with a contrast colour up the side of the dress. I crochet 20 stitches, change colours for 2, then back to 11 main colour stitches, then back to 2 contrast colours. What is the best way to do this? Leave the contrast colour hanging and pick up as needed? Thanks!
Tamara Kelly
Thanks Ramona! You can do it two ways - "float" the unused color along the back, or crochet right over it. If you crochet over it, it might peek through, but floating it requires watching the tension and might catch on barbie's toes... It's up to you which you prefer!
Ramona
Thanks Tamara!
Pat
The tutorials are awesome. When I finished the explanation of what I wanted to learn, I understood it completely.Thanks Moogly.
Tamara Kelly
Thanks so much Pat!
Clare
This tutorial was so helpful for me when I was first learning to change colours!
Tamara Kelly
😀 I'm so glad to hear it Clare!
Helen
Thank you so much for your turturial's they are so helpful
Tamara Kelly
Thank you so much Helen!
Judy
Tamara, help! I am working a shawl that changes color on the diagonal. I've single-crocheted 5 inches of Color A and now am switching to Color B to begin the diagonal. The starting row of the color change is, essentially, 1 stitch color B, 99 stitches color A; Row 2, 2 stitches color B, 98 stitches color A, and so on. As the color changes are in the same location, I can just drop the yarn and pick it up when I get to the same point in the next row. I'm making the color changes as your video demonstrates, but I must not be picking up the yarn the right way because the color changes don't look the same on both sides. Do I need to, say, bring Color A OVER Color B on one side and bring Color A UNDER Color B on the next row so the two sides match? Please help me end the frogging. 🙂
Thank you, too, for your wonderful site, patterns, and helpful instructions.
Tamara Kelly
Hi Judy! Getting them to look the same on both sides is the hardest part! It will definitely take some experimenting. Moving color B to the front of your work when you drop it, instead of leaving it hanging off the back, is one way to deal with this. Also, crocheting over Color A for one extra stitch to prep for the next row. This video might help: CLICK HERE
Judy
Brilliant! The video was very helpful--not just for the how-to but for the "theory" behind it. Knowing what to do in crochet is pretty easy--it's knowing "why" that separates artists like you from the practitioners like me. Thank you!
Tamara Kelly
😀 I'm so glad I could help!
Lorraine
I'm currently making an afghan that has several rows of a one color (honeydew) and, then one row of Aran, one row of Spring Green, one row of Aran, and then back to several rows of Honeydew. . I thought of just carrying the Honeydew along, but I was afraid I wouldn't have enough of the Honeydew if I did that. How would you do it?
Tamara Kelly
Well, I think the best way to avoid cutting it, while maximizing the yardage, would be to "float" it along the side. So don't cut the yarn after the last honeydew row, but when you come back along with the spring green, catch it in the last stitch, then do the same with the other colors, until it's time to crochet with the honeydew again. Then you cover up the float with a border/blanket edging! The trick is making sure that the other colors create an even number of rows, so that the honeydew is in the right place to start again. Otherwise the next honeydew section will start with a row going the same direction as the last aran stripe.
Mary
Thank you for a very informative video. I finally learned how to change colors mid-row. My question now is how do you change colors at the beginning and the end of a row?
Tamara Kelly
Hi Mary! There are several ways you can do it - and much depends on whether you are cutting the old color or carrying it along the side. But you'll always get a nice color break with this technique: https://www.mooglyblog.com/video-tutorialswitching-colors-for-striped-patterns/
dianne mccoy
could you show us when you are making one stich change in the middle of yoir project ???? I tried this way but no matter how much I tried that stitch seems to always get lost. thanks I advance
Tamara Kelly
Hi Dianne! I'm not sure what you mean - when you change colors for just one stitch? You should be able to find it because that top "v" will be in the second color.
Diane
How do you line up your change of color stitches in the following rows so that they don’t lean? You mentioned in your tapestry video ( which I found to be so wonderful, thank you), when you changed color, in the next row the same color will lean slightly.
Tamara Kelly
The only way I know of to really best fight the lean is to turn your work every row/round - like working in rows, even if you're in the round. This way the leans cancel each other out. 🙂
Diane
Hi, thank you so much for your quick response. I will try this.
Judy
If you're doing tapestry crochet, the other way to eliminate the lean is to work in the back loops only. You'll get a different textured fabric, but the stitches will align nicely.
Tamara Kelly
Great tip Judy, thank you!
Ellie
Hi moogly if you are creating a c2c Afghan would you recommend carrying over colours and if so would you cut the ends every time you turn your work?
Tamara Kelly
It depends on the design, but if it was the situation where I would be coming back to that color in the next row, I would leave it there in a bobbin. Where you cut your yarn just depends on how you want your colors to go!