I've always had a soft spot for gnomes, and marrying into a Scandinavian family meant learning all about nisses! So when Sonya of Blackstone Designs asked me to participate in the Crochet Mitten Drive Blog Hop, I took my inspiration from their iconic look!
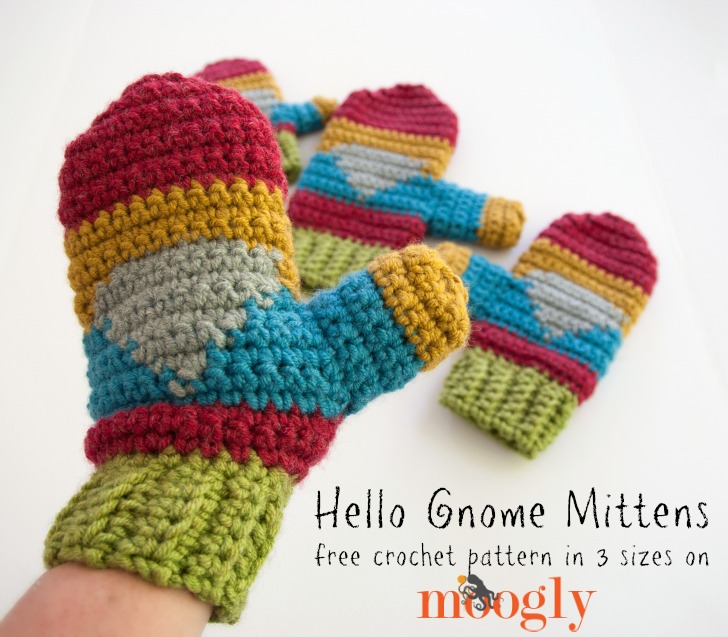
Indeed, the nisse is the bearer of gifts, and the gnome is usually seen outside in the garden, so using them as inspiration was perfect, as the goal of this Blog Hop is to provide free mitten patterns so that mittens can be made for people in need! Be sure to check out the Crochet Mitten Drive Blog Hop page for more information!
For this pattern I used Lion Brand Woolspun, which is thick, warm, squishy, and easy to care for. I hope you enjoy making this free crochet mitten pattern, and that the Hello Gnomes wave their greetings on hands everywhere this winter!
 Disclaimer: This post includes affiliate links.
Hello Gnome Mittens
Add this pattern to your Ravelry Queue and Favorites
- US - K, 6.5mm hook (Clover Amour Jumbo Hook recommended)
- 110-225 yds Lion Brand Lion's Pride Woolspun (Bulky/12 ply/"5"; 127 yds/116 m; 3.53 oz) (This yarn has been discontinued.)
Color A: Avocado
Color B: Cranberry
Color C: Aquamarine
Color D: Oxford Grey
Color E: Honey - Gauge: 14 rows x 12 sts = 4" in sc
- Includes 3 sizes: Child: 7.5" cuff to fingertip, 3.5" wide at palm; Teen/Adult Small: 9.5" cuff to fingertip, 4.25" wide at palm; Adult Large: 10.5" cuff to fingertip, 5" wide at palm
- Click for helpful tutorials: BLO - Back Loop Only; Tapestry Crochet; Switching Colors
NOTES:
- This pattern utilizes both rows and rounds, and the rounds are often turned - be sure to read the directions for each row/round carefully. Using a stitch marker in the first st of the turned rounds and counting stitches will help you stay on track.
- The cuff is worked side to side, and then the rest of the mitten is built off the cuff, from the bottom up.
CHILD SIZE
Left Hand:
Cuff:
Row 1: With Color A, leaving a 12" tail before the slip knot, ch 6, skip the ch closest to the hook, sc in the next ch, sc in blo to last ch, sc in last ch; turn. (5 sts)
Row 2 - 14: Ch 1, sc in 1st st, sc in blo to last st, sc in last st; turn. (5 sts)
Row 15: Repeat Row 2, do not turn. (5 sts)
Round 1: Turning cuff 90 degrees in order to work along sides of previous rows, ch 1, sc 17 evenly along sides of Rows 15 - 1; join with a sl st in the 1st sc to work in the round, break yarn. Use long tail to sew first and last rows of cuff together. (17 sts)
Before the thumb (the pants):
Round 1: With Color B, join to 1st st of previous round, ch 1, 2 sc in the 1st st, *sc in next 3 sts, 2 sc in the next st; repeat from * to end, join with a sl st, do not turn, break yarn. (22 sts)
Creating the rows where the thumb will attach later (beginning the shirt and beard):
NOTE: When crocheting with Color D here, work over Color C or E; when crocheting with Color C or E, let Color D hang in place waiting for your return.
**Row 1: With Color C, join to 1st st of previous row, ch 1, sc 4 finishing last st with Color D, sc 3 with Color D finishing last st with Color C, sc with Color C in last 15 sts; do not join, turn. (22 sts)
Row 2: Ch 1, sc 14 finishing last st with Color D, sc 5 with Color D finishing last st with Color C, sc with Color C in last 3 sts; do not join, turn. (22 sts)
Row 3: Ch 1, sc 2 finishing last st with Color D, sc 7 with Color D finishing last st with Color C, sc with Color C in last 13 sts; do not join, turn. (22 sts)
Row 4: Ch 1, sc 12 finishing last st with Color D, sc 9 with Color D finishing last st with Color C, sc with Color C in last st; do not join, break Color C, turn. (22 sts)
The upper palm/fingers (finishing the beard and creating the head/hat):
Round 1: With Color E, join to last st of previous row, ch 1, sc in 1st st finishing with Color D, sc 9 with Color D finishing last st with Color E, sc with Color E in last 12 sts; join with a sl st to 1st sc in round, turn. (22 sts)
Round 2: Ch 1, sc 12 finishing last st with Color D, sc 9 with Color D finishing last st with Color E, sc with Color E in last st; join, turn. (22 sts)
Round 3: Ch 1, sc 2 finishing last st with Color D, sc 7 with Color D finishing last st with Color E, sc with Color E in last 13 sts; join, break Color D, turn. (22 sts)
Round 4 - 5: Ch 1, sc in each st around; join, turn. (22 sts)
Round 6: Ch 1, sc in each st around, join, break Color E, turn. (22 sts)
Round 7: With Color B, join to last st of previous round, sc in each st around; join and turn. (22 sts)
Round 8 - 10: Ch 1, sc in each st around; join, turn. (22 sts)
Round 11: Ch 1, sc2tog, sc 7, sc2tog twice, sc 7, sc2tog; join, turn. (18 sts)
Round 12: Ch 1, sc2tog, sc 5, sc2tog twice, sc 5, sc2tog; join, turn. (14 sts)
Round 13: Ch 1, sc2tog, sc 3, sc2tog twice, sc 3, sc2tog; join, turn. (10 sts)
Round 14: Ch 1, sc2tog, sc in next st, sc2tog twice, sc in next st, sc2tog; join, break yarn leaving a 12" tail. (6 sts) Use long tail to seam top of mitten so that it lays flat as shown.
Thumb:
Round 1: With Color C, join to side of **Row 1 above (thumb opening in side of mitten), ch 1, sc 10 sts around opening evenly; join, turn. (10 sts)
Round 2 - 3: Ch 1, sc in each st around; join, turn. (10 sts)
Round 4: Ch 1, sc in each st around; join, break Color C, turn. (10 sts)
Round 5: With Color E, join to last st of previous round, ch 1, sc in each st around; join, turn. (10 sts)
Round 6: Ch 1, sc in each st around; join, turn. (10 sts)
Round 7: Ch 1, sc2tog 7 times; join, break Color E leaving long tail. (5 sts) Use long tail to gather end of thumb, weave in ends.
Right Hand:
Repeat the Left Hand Instructions for Cuff through Pants, then:
Creating the rows where the thumb will attach later (beginning the shirt and beard):
NOTE: When crocheting with Color D, work over Color C or E; when crocheting with Color C or E, let Color D hang in place waiting for your return.
**Row 1: With Color C, join to 1st st of previous row, ch 1, sc 15 finishing last st with Color D, sc 3 with Color D finishing last st with Color C, sc with Color C in last 4 sts; do not join, turn. (22 sts)
Row 2: Ch 1, sc 3 finishing last st with Color D, sc 5 with Color D finishing last st with Color C, sc with Color C in last 14 sts; do not join, turn. (22 sts)
Row 3: Ch 1, sc 13 finishing last st with Color D, sc 7 with Color D finishing last st with Color C, sc with Color C in last 2 sts; do not join, turn. (22 sts)
Row 4: Ch 1, sc in 1st st finishing st with Color D, sc 9 with Color D finishing last st with Color C, sc with Color C in last 12 sts; do not join, break Color C, turn. (22 sts)
The upper palm/fingers (finishing the beard and creating the head/hat):
Round 1: With Color E, join to last st of previous row, ch 1, sc in 12 sts finishing with Color D, sc 9 with Color D finishing last st with Color E, sc with Color E in last st; join with a sl st to 1st sc in round, turn. (22 sts)
Round 2: Ch 1, sc in 1st st finishing st with Color D, sc 9 with Color D finishing last st with Color E, sc with Color E in last 12 sts; join, turn. (22 sts)
Round 3: Ch 1, sc 13 finishing last st with Color D, sc 7 with Color D finishing last st with Color E, sc with Color E in last 2 sts; join, break Color D, turn. (22 sts)
Go back to instructions for Left Hand for remainder of pattern, beginning with Round 4 of the same section.
Repeat the Left Hand Instructions for the Thumb.

TEEN/ADULT SMALL SIZE
Left Hand:
Cuff (the grass):
Row 1: With Color A, leaving a 12" tail before the slip knot, ch 7, skip the ch closest to the hook, sc in the next ch, sc in blo to last ch, sc in last ch; turn. (6 sts)
Row 2 - 18: Ch 1, sc in 1st st, sc in blo to last st, sc in last st; turn. (6 sts)
Row 19: Repeat Row 2, do not turn. (6 sts)
Round 1: Turning cuff 90 degrees in order to work along sides of previous rows, ch 1, sc 21 evenly along sides of Rows 19 - 1; join with a sl st in the 1st sc to work in the round, break yarn. Use long tail to sew first and last rows of cuff together. (21 sts)
Before the thumb (the pants):
Round 1: With Color B, join to 1st st of previous round, ch 1, 2 sc in the 1st st, *sc in next 4 sts, 2 sc in the next st; repeat from * to end, join with a sl st, turn. (26 sts)
Round 2: Ch 1, sc in each st around; join with a sl st, turn. (26 sts)
Round 3: Ch 1, sc in each st around; join with sl st, do not turn, break yarn. (26 sts)
Creating the rows where the thumb will attach later (beginning the shirt and beard):
NOTE: When crocheting with Color D, work over Color C or E; when crocheting with Color C or E, let Color D hang in place waiting for your return.
**Row 1: With Color C, join to 1st st of previous round, ch 1, sc in each st around; do not join, turn. (26 sts)
Row 2: Ch 1, sc 19 finishing last st with Color D, sc with Color D in next st finishing st with Color C, sc with Color C in last 6 sts; do not join, turn. (26 sts)
Row 3: Ch 1, sc 5 finishing last st with Color D, sc 3 with Color D finishing last st with Color C, sc with Color C in last 18 sts; do not join, turn. (26 sts)
Row 4: Ch 1, sc 17 finishing last st with Color D, sc 5 with Color D finishing last st with Color C, sc with Color C in last 4 sts; do not join, turn. (26 sts)
Row 5: Ch 1, sc 3 finishing last st with Color D, sc 7 with Color D finishing last st with Color C, sc with Color C in last 16 sts; do not join, turn. (26 sts)
Row 6: Ch 1, sc 15 finishing last st with Color D, sc 9 with Color D finishing last st with Color C, sc with Color C in last 2 sts; do not join, break color C, turn. (26 sts)
The upper palm/fingers (finishing the beard and creating the head/hat):
Round 1: With Color E, join to last st of previous row, ch 1, sc in 1st st finishing with Color D, sc 11 with Color D finishing last st with Color E, sc with Color E in last 14 sts; join with a sl st to 1st sc in round, turn. (26 sts)
Round 2: Ch 1, sc 14 finishing last st with Color D, sc 11 with Color D finishing last st with Color E, sc with Color E in last st; join, turn. (26 sts)
Round 3: Ch 1, sc 3 finishing last st with Color D, sc 7 with Color D finishing last st with Color E, sc with Color E in last 16 sts; join, break Color D, turn. (26 sts)
Round 4 - 5: Ch 1, sc in each st around; join, turn. (26 sts)
Round 6: Ch 1, sc in each st around, join, break Color E, turn. (26 sts)
Round 7: With Color B, join to last st of previous round, sc in each st around; join and turn. (26 sts)
Round 8 - 11: Ch 1, sc in each st around; join, turn. (26 sts)
Round 12: Ch 1, sc2tog, sc 9, sc2tog twice, sc 9, sc2tog; join, turn. (22 sts)
Round 13: Ch 1, sc2tog, sc 7, sc2tog twice, sc 7, sc2tog; join, turn. (18 sts)
Round 14: Ch 1, sc2tog, sc 5, sc2tog twice, sc 5, sc2tog; join, turn. (14 sts)
Round 15: Ch 1, sc2tog, sc 3, sc2tog twice, sc 3, sc2tog; join, turn. (10 sts)
Round 16: Ch 1, sc2tog, sc in next st, sc2tog twice, sc in next st, sc2tog; join, break yarn leaving a 12" tail. (6 sts) Use long tail to seam top of mitten so that it lays flat as shown.
Thumb:
Round 1: With Color C, join to side of **Row 1 above (thumb opening in side of mitten), ch 1, sc 14 sts around opening evenly; join, turn. (14 sts)
Round 2 - 4: Ch 1, sc in each st around; join, turn. (14 sts)
Round 5: Ch 1, sc in each st around; join, break Color C, turn. (14 sts)
Round 6: With Color E, join to last st of previous round, ch 1, sc in each st around; join, turn. (14 sts)
Round 7 - 8: Ch 1, sc in each st around; join, turn. (14 sts)
Round 9: Ch 1, sc2tog 7 times; join, break Color E leaving long tail. (7 sts) Use long tail to gather end of thumb, weave in ends.
Right Hand:
Repeat the Left Hand Instructions for Cuff through Pants, then:
Creating the rows where the thumb will attach later (beginning the shirt and beard):
NOTE: When crocheting with Color D, work over Color C or E; when crocheting with Color C or E, let Color D hang in place waiting for your return.
**Row 1: With Color C, join to 1st st of previous round, ch 1, sc in each st around; do not join, turn. (26 sts)
Row 2: Ch 1, sc 6 finishing last st with Color D, sc with Color D in next st finishing st with Color C, sc with Color C in last 19 sts; do not join, turn. (26 sts)
Row 3: Ch 1, sc 18 finishing last st with Color D, sc 3 with Color D finishing last st with Color C, sc with Color C in last 5 sts; do not join, turn. (26 sts)
Row 4: Ch 1, sc 4 finishing last st with Color D, sc 5 with Color D finishing last st with Color C, sc with Color C in last 17 sts; do not join, turn. (26 sts)
Row 5: Ch 1, sc 16 finishing last st with Color D, sc 7 with Color D finishing last st with Color C, sc with Color C in last 3 sts; do not join, turn. (26 sts)
Row 6: Ch 1, sc 2 finishing last st with Color D, sc 9 with Color D finishing last st with Color C, sc with Color C in last 15 sts; do not join, break color C, turn. (26 sts)
The upper palm/fingers (finishing the beard and creating the head/hat):
Round 1: With Color E, join to last st of previous row, ch 1, sc in 1st 14 sts finishing with Color D, sc 11 with Color D finishing last st with Color E, sc with Color E in last st; join with a sl st to 1st sc in round, turn. (26 sts)
Round 2: Ch 1, sc in 1st st finishing last st with Color D, sc 11 with Color D finishing last st with Color E, sc with Color E in last 14 sts; join, turn. (26 sts)
Round 3: Ch 1, sc 16 finishing last st with Color D, sc 7 with Color D finishing last st with Color E, sc with Color E in last 3 sts; join, break Color D, turn. (26 sts)
Go back to instructions for Left Hand for remainder of pattern, beginning with Round 4 of the same section.
Repeat the Left Hand Instructions for the Thumb.

ADULT LARGE SIZE
Left Hand:
Cuff (the grass):
Row 1: With Color A, leaving a 12" tail before the slip knot, ch 7, skip the ch closest to the hook, sc in the next ch, sc in blo to last ch, sc in last ch; turn. (6 sts)
Row 2 - 22: Ch 1, sc in 1st st, sc in blo to last st, sc in last st; turn. (6 sts)
Row 23: Repeat Row 2, do not turn. (6 sts)
Round 1: Turning cuff 90 degrees in order to work along sides of previous rows, ch 1, sc 25 evenly along sides of Rows 23 - 1; join with a sl st in the 1st sc to work in the round, break yarn. Use long tail to sew first and last rows of cuff together. (25 sts)
Before the thumb (the pants):
Round 1: With Color B, join to 1st st of previous round, ch 1, 2 sc in the 1st st, *sc in next 5 sts, 2 sc in the next st; repeat from * to end, join with a sl st, turn. (30 sts)
Round 2 - 4: Ch 1, sc in each st around; join with a sl st, turn. (30 sts)
Round 5: Ch 1, sc in each st around; join with sl st, do not turn, break yarn. (30 sts)
Creating the rows where the thumb will attach later (beginning the shirt and beard):
NOTE: When crocheting with Color D, work over Color C or E; when crocheting with Color C or E, let Color D hang in place waiting for your return.
**Row 1: With Color C, join to 1st st of previous round, ch 1, sc in each st around; do not join, turn. (30 sts)
Row 2: Ch 1, sc 22 finishing last st with Color D, sc with Color D in next st finishing st with Color C, sc with Color C in last 7 sts; do not join, turn. (30 sts)
Row 3: Ch 1, sc 6 finishing last st with Color D, sc 3 with Color D finishing last st with Color C, sc with Color C in last 21 sts; do not join, turn. (30 sts)
Row 4: Ch 1, sc 20 finishing last st with Color D, sc 5 with Color D finishing last st with Color C, sc with Color C in last 5 sts; do not join, turn. (30 sts)
Row 5: Ch 1, sc 4 finishing last st with Color D, sc 7 with Color D finishing last st with Color C, sc with Color C in last 19 sts; do not join, turn. (30 sts)
Row 6: Ch 1, sc 18 finishing last st with Color D, sc 9 with Color D finishing last st with Color C, sc with Color C in last 3 sts; do not join, break Color C, turn. (30 sts)
The upper palm/fingers (finishing the beard and creating the head/hat):
Round 1: With Color E, join to last st of previous row, ch 1, sc 2 finishing last st with Color D, sc 11 with Color D finishing last st with Color E, sc with Color E in last 17 sts; join with a sl st to 1st sc in round, turn. (30 sts)
Round 2: Ch 1, sc 17 finishing last st with Color D, sc 11 with Color D finishing last st with Color E, sc with Color E in last 2 sts; join, turn. (30 sts)
Round 3: Ch 1, sc 4 finishing last st with Color D, sc 7 with Color D finishing last st with Color E, sc with Color E in last 19 sts; join, break Color D, turn. (30 sts)
Round 4 - 5: Ch 1, sc in each st around; join, turn. (30 sts)
Round 6: Ch 1, sc in each st around, join, break Color E, turn. (30 sts)
Round 7: With Color B, join to last st of previous round, sc in each st around; join and turn. (30 sts)
Round 8 - 12: Ch 1, sc in each st around; join, turn. (30 sts)
Round 13: Ch 1, sc2tog, sc 11, sc2tog twice, sc 11, sc2tog; join, turn. (26 sts)
Round 14: Ch 1, sc2tog, sc 9, sc2tog twice, sc 9, sc2tog; join, turn. (22 sts)
Round 15: Ch 1, sc2tog, sc 7, sc2tog twice, sc 7, sc2tog; join, turn. (18 sts)
Round 16: Ch 1, sc2tog, sc 5, sc2tog twice, sc 5, sc2tog; join, turn. (14 sts)
Round 17: Ch 1, sc2tog, sc 3, sc2tog twice, sc 3, sc2tog; join, turn. (10 sts)
Round 18: Ch 1, sc2tog, sc in next st, sc2tog twice, sc in next st, sc2tog; join, break yarn leaving a 12" tail. (6 sts) Use long tail to seam top of mitten so that it lays flat as shown.
Thumb:
Round 1: With Color C, join to side of **Row 1 above (thumb opening in side of mitten), ch 1, sc 14 sts around opening evenly; join, turn. (14 sts)
Round 2 - 5: Ch 1, sc in each st around; join, turn. (14 sts)
Round 6: Ch 1, sc in each st around; join, break Color C, turn. (14 sts)
Round 7: With Color E, join to last st of previous round, ch 1, sc in each st around; join, turn. (14 sts)
Round 8 - 10: Ch 1, sc in each st around; join, turn. (14 sts)
Round 11: Ch 1, sc2tog 7 times; join, break Color E leaving long tail. (7 sts) Use long tail to gather end of thumb, weave in ends.
Right Hand:
Repeat the Left Hand Instructions for Cuff through Pants, then:
Creating the rows where the thumb will attach later (beginning the shirt and beard):
NOTE: When crocheting with Color D, work over Color C or E; when crocheting with Color C or E, let Color D hang in place waiting for your return.
**Row 1: With Color C, join to 1st st of previous round, ch 1, sc in each st around; do not join, turn. (30 sts)
Row 2: Ch 1, sc 7 finishing last st with Color D, sc with Color D in next st finishing st with Color C, sc with Color C in last 22 sts; do not join, turn. (30 sts)
Row 3: Ch 1, sc 21 finishing last st with Color D, sc 3 with Color D finishing last st with Color C, sc with Color C in last 6 sts; do not join, turn. (30 sts)
Row 4: Ch 1, sc 5 finishing last st with Color D, sc 5 with Color D finishing last st with Color C, sc with Color C in last 20 sts; do not join, turn. (30 sts)
Row 5: Ch 1, sc 19 finishing last st with Color D, sc 7 with Color D finishing last st with Color C, sc with Color C in last 4 sts; do not join, turn. (30 sts)
Row 6: Ch 1, sc 3 finishing last st with Color D, sc 9 with Color D finishing last st with Color C, sc with Color C in last 18 sts; do not join, break Color C, turn. (30 sts)
The upper palm/fingers (finishing the beard and creating the head/hat):
Round 1: With Color E, join to last st of previous row, ch 1, sc 17 finishing last st with Color D, sc 11 with Color D finishing last st with Color E, sc with Color E in last 2 sts; join with a sl st to 1st sc in round, turn. (30 sts)
Round 2: Ch 1, sc 2 finishing last st with Color D, sc 11 with Color D finishing last st with Color E, sc with Color E in last 17 sts; join, turn. (30 sts)
Round 3: Ch 1, sc 19 finishing last st with Color D, sc 7 with Color D finishing last st with Color E, sc with Color E in last 4 sts; join, break Color D, turn. (30 sts)
Go back to instructions for Left Hand for remainder of pattern, beginning with Round 4 of the same section.
Repeat the Left Hand Instructions for the Thumb.
And that's it for the Hello Gnomes Mittens patterns! I hope you enjoy making them - and the way they seem to wave hello at you while you wear them! One skein of each of the colors listed above should make 2 pairs of any size, so do consider giving a pair to the charity of your choice this winter!
Written pattern copyright Tamara Kelly 2015, all rights reserved. Please do not reprint or repost this pattern, but please do link to this page to share this pattern with others. To print this pattern for personal use, please use the green Print Friendly button at the bottom of the pattern. If you wish to make items for sale from this pattern, please visit the About page for details. Thank you to Lion Brand Yarn for providing the yarn for this pattern!



Michelle
I think these are soooo cute! I have not made mittens yet. But I think I may try these.
Thank you for shring the pattern with us.
Tamara Kelly
😀 Thank you Michelle!
Brenda
These are so cute. But I'm not too good on changing colors. Do you think I can follow this just using one color or do you have a similar solid color pattern? Thank you!
Tamara Kelly
You can absolutely make these without the color changes! 🙂
Mary
I did make baby mittens before...these look like they would be fun to make...thanks for sharing...
Tamara Kelly
🙂 Thank you Mary!
Eleonora from coastal crochet
Thanks so much for sharing. I LOVE these mittens 🙂
Tamara Kelly
Thank you Eleonora! 🙂
Anntatfl
I just don't see the pants, shirt and beard, am I blind? Should there be eyes added somewhere?
Tamara Kelly
Eyes are optional, I chose not to add them, but you're welcome to do so. The parts are labeled in the pattern.
Deborah
Thank you for sharing your wonderful talent; I just know my grandchildren will love their mittens this winter!
Tamara Kelly
Thank you so much Deborah!
Jan Gadsby
I'd love to make these mittens, but I'm a knitter, not a crocheter. Can anyone tell me how to convert the directions for knitting?
Tamara Kelly
Hi Jan! Unfortunately there isn't a straight conversion.
terra tinder
You should totally make a matching one instead of a beard, an apron for a woman gnome! That would be sooo cute! <3
Tamara Kelly
😀 That would be cute!
terra tinder
Would I need to hold the yarn doubled with worsted weight?
Kerry
I am not great at changing patterns for different sizes and I love this pattern but I am looking for a toddler size. Any chance of getting a revised pattern for a toddler?
Thanks
Tamara Kelly
I would recommend making the child size with a thinner yarn/smaller hook.