moogly

menu icon
go to homepage
  • Patterns
  • Tutorials
  • MooglyCAL
  • Giveaways
  • Lives
    • Facebook
    • Instagram
    • Pinterest
    • TikTok
    • Twitter
    • YouTube
  • search icon
    Homepage link
    • Patterns
    • Tutorials
    • MooglyCAL
    • Giveaways
    • Lives
    • Facebook
    • Instagram
    • Pinterest
    • TikTok
    • Twitter
    • YouTube
  • ×
    Home

    Furls Streamlines Warm Up Winter Giveaway!

    January 28, 2019 by Tamara Kelly 17 Comments

    It's a cold one out there as I write this - but my hand is nice and warm on my hooks because they are Furls Streamlines! Lightweight, ergonomic, wood, they may just change the way you crochet - and I get to give away 3 Furls Streamline crochet hooks here on Moogly! And this giveaway is open worldwide!

    Furls Streamlines Giveaway on Moogly - main imageDisclaimer: This post includes affiliate links and was sponsored by Furls, but all opinions are my own.

    [Read more...]

    Galaxy Cardigan

    January 25, 2019 by Tamara Kelly 31 Comments

    Galaxy Cardigan on Moogly - laid flat, slightly open

    A bit smaller than the Cosmos Cardigan, the Galaxy Cardigan has the same great easy fit, construction, and sparkle - but in girls sizes 2 to 16! Quick and cozy, the Galaxy Cardigan is a free crochet pattern here on Moogly!

    Disclaimer: This post includes affiliate links; materials provided by Red Heart Yarns & Furls Crochet.

    Prefer an ad-free PDF? You've got options!

    This button leads to the pattern on Etsy

    Prefer the free blog version? Keep scrolling!

    Now a Mommy and Me Set!

    I loved making and wearing the Cosmos Cardigan, and was so happy to get requests for a matching girls' version! I've now translated this pattern into 4 new sizes - 2/4, 6/8, 10/12, and 14/16!

    I made the size 2/4, shown here (alas, I don't have a spare 2-year-old laying about to model it for us)! With an oversized fit, the sizing is based on the Craft Yarn Council Standards for Child/Youth Sizing.

    Galaxy Cardigan on Moogly - full sweater laid flat

    I've simplified the basic pattern a little bit more in creating the Galaxy Cardi, making this an even faster pattern to crochet. Featuring Red Heart Hygge Charm, it still sparkles the same - and is just as soft and warm!

    Galaxy Cardigan Tutorial on Mooglyblog - long pin image


    Galaxy Cardigan

    Add this pattern to your Ravelry Queue and Favorites

    US-J, 6.0mm – Furls Crochet Hook

    700-1700 yds Red Heart Hygge Charm (4 – Medium/Worsted/UK: 10-12 ply; 432yds (395 m); 7oz. (198g))
    Colorway Shown: Meteor (2/4 - 2 balls; 6/8 and 10/12 - 3 balls; 14/16 - 4 balls)

    Clover Stitch Markers

    Galaxy Cardigan on Moogly, with Red Heart Hygge Charm yarn and hook
    Click the image to snag some Red Heart Hygge Charm!

    Gauge: 14 sts x 6.5 rows = 4″/10cm in main st pattern

    Sizes: Child/Youth 2/4, 6/8, 10/12, 14/16

    Helpful Links & Tutorials:

    Galaxy Cardigan Tutorial & Cosmos Cardigan Tutorial 

    Crochet Abbreviations

    FDC – Foundation Double Crochet

    FLO and BLO – Front Loop Only and Back Loop Only

    Exhdc – Extended Half Double Crochet

    CSDC – Chainless Starting Double Crochet

    Join with Half Double Crochet

    Mattress Stitch Seaming

    Ribbed Hem and Cuff Tutorial

    Sc2tog and Dc2tog – decreases

    SCHEMATIC OF BACK AND FRONT PIECES:

    Galaxy Cardigan Schematic on Moogly

    NOTES:

    Pattern instructions for the sizes are written as 2/4(6/8, 10/12, 14/16) when different numbers are required.

    The Odd Rows of the Back and Front Pieces are on the Right Side (outside) of the garment.

    There is no required stitch multiple for this pattern, so feel free to adjust stitch counts and row counts to customize the sizing further.

    I recommend using stitch markers when sewing the seams together, and when making the sleeves to mark the first and last stitch of each round. They are worked in turned rounds, or joined rows – you join with a slip stitch as for a Round, but turn as for a Row, working every other Round from the “inside” of the sleeve. Using stitch markers will help maintain proper stitch count and avoid working into the slip stitch on accident.

    INSTRUCTIONS:

    BACK PIECE INSTRUCTIONS:

    Row 1: FDC 49(57, 63, 71); turn. (49(57, 63, 71) sts)

    Row 2 – 25(31, 39, 41): CSDC in first st, flo exhdc across until 1 st remains, dc in last st; turn. (49(57, 63, 71) sts)

    Row 26(32, 40, 42): (This row is worked in two parts, creating a neck opening.) CSDC in first st, flo exhdc in next 18(21, 24, 27) sts; break yarn. Skip next 11(13, 13, 15) sts, join to next st with flo exhdc, flo exhdc across until 1 st remains, dc in last st; break yarn. (19(22, 25, 28) sts/19(22, 25, 28) sts)

    FRONT PIECE INSTRUCTIONS (Make 2):

    Row 1: FDC 19(22, 25, 28); turn. (19(22, 25, 28) sts)

    Row 2 – 26(32, 40, 42): CSDC in first st, flo exhdc across until 1 st remains, dc in last st; turn. Break yarn after last row. (19(22, 25, 28) sts)

    ASSEMBLY INSTRUCTIONS:

    Using the mattress stitch, sew one side of each front piece to the back, WS together, from Row 1 to Row 16(21, 27, 29).

    Then, sew the shoulders together along their respective Row 26(32, 40, 42) sts.

    BOTTOM RIBBED HEM INSTRUCTIONS:

    Row 1: From Right Side of sweater, join to first st of bottom hem (Row 1, left front for right-handed, Row 1, right front for left-handed), ch 7, blo sc in the 2nd ch from hook and each remaining ch, sc2tog in the next 2 Row 1 sts; turn. (7 sts)

    Row 2: Skipping the sc2tog, blo sc in each remaining st across; turn. (6 sts)

    Row 3: Ch 1, sc in blo sc in each st across, sc2tog in the next 2 Row 1 sts; turn. (7 sts)

    Repeat Rows 2 and 3 to end, finishing with a Row 2 repeat; turn to make the Collar, do not break yarn after last row.

    COLLAR INSTRUCTIONS:

    Row 1: Ch 1, sc evenly around entire front opening (front piece side, then neck opening, then other front piece side) stopping at the opposite (Row 1) corner; turn.

    Row 2 – 4(6, 8, 10): Ch 1, flo hdc in each st across; turn. Do not break yarn after last row.

    FINAL EDGING (This row is worked in two parts):

    Ch 1, sc evenly across collar, ch 2, sc across bottom of Collar Rows, sl st to first row of Bottom Ribbed Hem, break yarn. Join with sl st to opposite/last row of Bottom Ribbed Hem, sc across bottom of Collar Rows, ch 2, join to first st of Final Edging and break yarn.

    SLEEVE INSTRUCTIONS (Repeat for each arm):

    Rnd 1: From Right Side of sweater, join to bottom of arm opening, ch 1, sc evenly around arm opening working 2 sc in the side of each row; join and turn. (40(44, 52, 52) sts)

    Rnd 2 – 17(21, 25, 25): Ch 2 (does not count as a st), flo exhdc around until 2 sts remain, flo dc2tog in last 2 sts; join and turn. (Stitch count decreases by 1 every round, for (24(24, 28, 28) sts in the last round)

    SIZE 14/16 ONLY - Rnd 26 and 27: Ch 2 (does not count as a st), flo exhdc in each st around; join and turn. (28 sts)

    Rnd 18(22, 26, 28): Ch 1, sc in each st around; join but do not turn.

    RIBBED CUFF INSTRUCTIONS (Repeat for each sleeve):

    Row 1: Ch 7, blo sc in the 2nd ch from hook and each remaining ch, sc2tog in the next 2 Sleeve sts; turn. (7 sts)

    Row 2: Skipping the sc2tog, blo sc in each remaining st across; turn. (6 sts)

    Row 3: Ch 1, sc in blo sc in each st across, sc2tog in the next 2 Sleeve sts; turn. (7 sts)

    Repeat Rows 2 and 3 until 1 Sleeve st remains.

    Repeat Row 2.

    Next Row: Ch 1, sc in blo sc in each st across, sc2tog in the last and first Sleeve sts; turn. (7 sts)

    Final Row: Skipping the sc2tog, blo sc in each remaining st across; break yarn leaving a 12″ tail. (6 sts)

    Sew the Cuff edges together using the whip stitch, joining first and last rows. Be sure to work into the BLO of the last row to maintain the ribbed look.


    And that's the Galaxy Cardigan! Are there any other recent Moogly sweater patterns you'd like to see in girls' sizes? It might be time to get a boy's pattern up too - what do you think?

    Galaxy Cardigan - laid flat, closed and angled

    If this pattern does inspire you to make your own crochet cardigan, and you post a photo on social media, be sure to tag me @mooglyblog or #mooglyblog so I can check it out too! I love seeing what you make!

    The Fine Print

    Follow Moogly on Facebook, Twitter,  Pinterest, Instagram, and TikTok! Thank you to Red Heart Yarns and Furls Crochet for providing the materials shown in this post. Written pattern copyright Tamara Kelly 2019, all rights reserved. Please do not reprint or repost this pattern, but please do link to this page to share this pattern with others. If you wish to make items for sale from this pattern or translate it to another language, please visit the About page for details. 

    MooglyCAL2019 – Afghan Block #2

    January 24, 2019 by Tamara Kelly 9 Comments

    The second square for MooglyCAL2019 is courtesy of Linda Dean Crochet! It's a beautiful block with unique yet simple stitching - get the pattern and all the details below!

    MooglyCAL2019 Block #2Disclaimer: This post includes affiliate links; materials provided by Red Heart Yarns, Furls Crochet, and Chetnanigans. [Read more...]

    OttLite LED Mini Flip Light Giveaway

    January 21, 2019 by Tamara Kelly 19 Comments

    It's dark times - the middle of winter! Early evenings are perfect for cozying up with crochet and knitting projects - but you need a good, bright, light to stitch by. Enter the OttLite LED Mini Flip Light! It's the tiniest OttLite, perfect for crafting by, no matter where you settle down to work. And we're giving away 3 OttLite LED Mini Flip Lights on Moogly!

    OttLite LED Mini Flip Giveaway on Moogly - Jan 2019 - SM
    Disclaimer: This giveaway was sponsored by OttLite, but all opinions are my own.

    [Read more...]

    Quick Cricut Craft: "Shh... I'm Counting" Socks

    January 18, 2019 by Tamara Kelly 4 Comments

    I know I'm not the only yarny who has resorted to aggressively counting at my kids and spouse from time to time!

    With the "Shh... I'm Counting Socks", you can get your message across without losing your place - and you can make your own with this Quick Cricut Craft on Moogly!

    Quick Cricut Craft - Shh I'm Counting SocksDisclaimer: This post includes affiliate links. Moogly is part of the Cricut Core Blogger Program. 

    [Read more...]

    Italian Elegance Cowl Tutorial

    January 16, 2019 by Tamara Kelly 2 Comments

    The Italian Elegance Cowl Tutorial will take you through every stitch you need to know for this easy and quick project - in right and left-handed video tutorials!

    Italian Elegance Cowl Tutorial on MooglyDisclaimer: This post includes affiliate links; materials provided by Red Heart Yarn.

    [Read more...]

    Hookin On Hump Day #183: A Yarny Link Party!

    January 15, 2019 by Tamara Kelly 7 Comments

    Time for another wonderful round of Hookin On Hump Day - this time we've got 4 free crochet patterns for you, as well as feel good story! What more could you want? Read on to get all the links and add your own to this crochet and knit link party on Moogly and Petals to Picots!

    Hookin On Hump Day 183 - on Moogly and Petals to Picots

    [Read more...]

    Rows of Love Blanket

    January 11, 2019 by Tamara Kelly 32 Comments

    The Rows of Love Blanket features 3D puff stitch hearts and pretty stripes, and even post stitches - for a ton of texture, and a gorgeous blanket you can make in any size!

    Rows of Love Blanket - on chair,Disclaimer: This post includes affiliate links; materials provided by Red Heart Yarns and Furls Crochet.

    [Read more...]

    MooglyCAL2019 – Afghan Block #1

    January 10, 2019 by Tamara Kelly 29 Comments

    It's time to kick off the MooglyCAL2019 with Block #1, courtesy of Jessie At Home! Read on for all the details on this year's Crochet Along - and this beautiful first pattern!

    MooglyCAL2019 Block #1 - get the entire CAL on MooglyDisclaimer: This post includes affiliate links; materials provided by Red Heart Yarns, Furls Crochet, and Chetnanigans. [Read more...]

    Yarn Love: Red Heart Soft

    January 9, 2019 by Tamara Kelly 5 Comments

    Red Heart Soft is a "versatile worsted weight yarn... appropriate for all projects!" So let's take a closer look at this classic yarn in this month's Moogly Yarn Love yarn review - and get some free patterns to make with it!

    Yarn Love- Red Heart SoftDisclaimer: This post was sponsored by Red Heart Yarn, but all opinions are my own.
    This post includes affiliate links.

    [Read more...]

    Red Heart Soft Giveaway

    January 7, 2019 by Tamara Kelly 23 Comments

    Red Heart Soft is a silky smooth yarn that's perfect for a wide variety of knit, crochet, and craft projects! It's been a favorite for a long time, so I'm excited to get to give away 9 skeins of Red Heart Soft here on Moogly!

    Red Heart Soft Giveaway on MooglyDisclaimer: This post was sponsored by Red Heart Yarn, but all opinions are my own; this post includes affiliate links.

    [Read more...]

    Italian Elegance Cowl

    January 4, 2019 by Tamara Kelly 17 Comments

    Italian Elegance Cowl - Free Crochet Pattern on Moogly

    The Italian Elegance Cowl combines a relaxing stitch pattern and luxurious Italian yarn for a pretty and practical piece that works up in an afternoon - with just one skein!

    Disclaimer: Materials provided by Red Heart and Furls Crochet; this post includes affiliate links.

    Prefer an ad-free PDF? You've got options!

    This button leads to the pattern on Etsy

    Prefer the free blog version? Keep scrolling!

    Relaxed Stitches Just for You

    When you've finished all those projects for others, it's time to make something special just for you! And Red Heart An Italian Story Luce is the perfect yarn for that sort of project. A touch of mohair and sequins  - yes, please!

    Make the Italian Elegance Cowl with the free crochet pattern on Moogly and Red Heart Italian Story Luce!

    The Italian Elegance Cowl is surprisingly light and soft, perfect to wear out in 3 seasons, and inside all year long. The open stitch pattern is simple and stress-free, and you can finish your own cowl in just a couple of hours, with just one ball of yarn - treat yourself!

    The Italian Elegance Cowl is the perfect indulgence - easy to crochet, and full of sparkle! Get the free crochet pattern on Mooglyblog.com!


    Italian Elegance Cowl

    Add this pattern to your Ravelry Queue and Favorites

    US - K, 6.5mm hook - Furls Crochet

    200 yds Red Heart An Italian Story Luce (4 - Medium/Worsted/UK: 10-12 ply; 218 yd/199 m; 3.5 oz./100 g)
    Colorway Shown: Granito (1 ball)

    This yarn has been discontinued. Recommended substitutions include: Lana Gatto Venus, Artyarns Beaded Mohair & Sequins, and any art yarn or medium weight yarn.

    Gauge: 10 sts x 6 rows = 4"/10cm in main cluster st pattern

    Finished Size: 30" around (15" laid flat) x 10" wide

    Helpful Links & Tutorials:

    Italian Elegance Cowl Tutorial

    Crochet Abbreviations

    Special Stitch:

    Cluster - dc2tog worked into just one stitch or space (no decrease made)

    NOTE:

    To join the bottom of the first rnd, use the tail before the slip knot to sew the bottom of the first stitch to the bottom of the last stitch.

    INSTRUCTIONS:

    Rnd 1: Ch 86, skip 2 chs closest to the hook, dc in each rem st across; without twisting, join to first st made to work in the rnd. (84 sts)

    Rnd 2: Ch 2 (does not count as a st), dc in same st, ch 1, skip next st, *cluster in next st, ch 1, skip next st; rep from * around and join. (42 clusters)

    Rnd 3 - 14: Sl st into next ch sp, ch 2, dc in same ch sp, ch 1, skip next cluster, *cluster in next ch sp, ch 1, skip next cluster; rep from * around and join. (42 clusters)

    Rnd 15: Ch 2, dc in each st and ch sp around; join and break yarn. (84 sts)


    Italian Elegance Cowl laid flat - get the free crochet pattern on Mooglyblog!

    If this pattern does inspire you to make your own Italian Elegance Cowl, and you post a photo on social media, be sure to tag me @mooglyblog or #mooglyblog so I can check it out too! I love seeing what you make!

    The Fine Print

    Follow Moogly on Facebook, Twitter, Pinterest, Instagram, and Tiktok! Thank you to Red Heart Yarns and Furls Crochet for providing the materials shown in this post. Written pattern copyright Tamara Kelly 2019, all rights reserved. Please do not reprint or repost this pattern, but please do link to this page to share this pattern with others. If you wish to make items for sale from this pattern or translate it to another language, please visit the About page for details. 

    How to Crochet a Temperature Blanket

    January 3, 2019 by Tamara Kelly 21 Comments

    How to Crochet a Temperature Blanket - guest post by Stitching in the Woods on Moogly!

    Hello Moogly readers! I'm super excited to share a guest post by Margaret McLaren, who's blog Stitching in the Woods is the go-to site for Temperature Blanket info! Not sure what that even is? Read on to learn all about this fun crochet trend - and how you can make your own custom creation!

    Disclaimer: This post includes affiliate links. Content copyright Margaret McLaren, used with permission. 

    You may have heard a lot of other crafters talking about temperature blankets lately. This talk often starts to really pick up around December and January every year. Now that we’ve gotten through the craziness of the holidays you’re curious as to what all the talk is about. That’s why I’m here to help!

    What is a Temperature Blanket?

    At its simplest, a temperature blanket is a visual representation of a year’s worth of temperatures. You create a temperature blanket by crocheting a row of stitches or a motif each day based on the day’s temperature. A temperature blanket is a project that’s really easy to customize and therefore really easy to personalize. They’re also really addictive!

    I’m going to now delve a bit deeper into each of these statements. Except the last. You’ll pick up on why they’re addictive as we go.

    A Year’s Worth of Temperatures

    A majority of temperature projects are done with a year’s worth of temperatures. These temperatures are usually collected from January 1st to December 31st of the current year. You could also use the temperatures just from one season or for half the year.

    The temperatures don’t have to be from the current year, however. You could do some research and find temperatures from a special year in your life or in the life of someone you know. You could even do the temperature on a certain date over a long span of time.

    This and other variations could come from what you want your blanket to commemorate. Keep in mind, you actually don’t have to do a full year’s worth of temperatures. I’m currently doing a blanket to document the temperatures during my current pregnancy.

    Baby rings temperature rings

    A Row a Day

    The standard form of temperature blanket has you crocheting a row or motif for each day’s temperature. This will give you 365 rows or motifs (366 on a leap year) if you do a January 1st to December 31st blanket. That seems like a lot, and it is, but keep in mind it’s getting broken down over the whole year.

    What color you crochet in each day is determined by that day’s temperatures. Before you start your project you assign a color to each range of temperatures. Then each day you find where that day’s temperature fell and use that color to crochet your row or motif.

    What do I mean by a color range? It’s best explained with a picture, so here’s an example, featuring Red Heart With Love!

    Red Heart With Love Temperature Range

    If you can’t crochet every day, you can plan on collecting your temperatures to catch up later. I have a handy sheet for this on my blog, but you could also use a piece of paper, notecard, or note-taking app or program. My recommendation is you find time at minimum once a week to stay caught up on your blanket. Creating a habit of doing it will help greatly on getting it done.

    A lot of crafters take the summer months off because they are spending more time outside and don’t want to work on such a large, warm project. I would still try to get at least something done on your blanket during these months, perhaps on a cool night. It’ll make it easier to get back into the swing of things when the temperatures cool off again. (It’ll also make it easier if you don’t get behind on your Moogly CAL squares and other projects during the summer months like I do!!)

    Super saver and temperature card

    Easy to Customize

    Temperature blankets lend themselves very well to customization. At the minimum, two people could use the exact same color scheme and come up with two very different blankets due to living in two different areas. But living in different areas isn’t the only way to customize your blanket by any means.

    Even working from the same pattern there are several variables you can change to make your blanket your own:

    • Temperatures: using both the high and low, using the day’s average, using a week’s average, doing only part of a year
    • Colors: doing different grades of one shade, picking only cool or warm colors, picking random colors from your stash
    • Stitches: doing a different stitch each month, doing a variation on your stitch each month
    • Yarns: using yarn of a different weight, using yarn of a different brand (Red Heart is my favorite for temperature blankets!)

    Pregnancy yarn and temperature tracker sheet

    Where to Go From Here

    I hope by this point you have a pretty good grasp of what a temperature blanket is and how the process of making one works. I understand that you may still have questions, too.

    If you’re ready to start on your project right away then head over to my blog, Stitching in the Woods, to get your temperature tracking sheet. That way you can start getting your temperatures down while you’re planning your color scheme and all. To help with your planning, you can go through my Demystifying Temperature Blankets series.

    I also have a low-cost e-book, 5 Easy Steps to Plan Your Temperature Blanket, to walk you through the process if you need a little more help. (Moogly readers get a $4 discount when you click through the above link.) The e-book comes with a companion worksheet to gather all your planning in one place and color range charts to fill in with your colors and ranges.

    I hope you have a fun, crochet-filled year!  


    What a fantastic look at Temperature Blankets - thank you so much, Margaret! I just love this idea - it's at least a little crochet consolation for the extreme temps when you end up with a more colorful blanket! 

    How to Crochet a Temperature Blanket - guest post by Stitching in the Woods on Moogly!

    Be sure to check out all of Margaret's links above - and happy crocheting all year long!

    Follow Moogly on Facebook, Twitter, Pinterest, Instagram, and TikTok! Thank you to Stitching in the Woods for writing this fabulous guest post!

    Hookin On Hump Day #182: A Yarny Link Party!

    January 1, 2019 by Tamara Kelly 7 Comments

    Hookin On Hump Day is back for 2019, and we're kicking off the new year with a fantastic collection of crochet and knit patterns to inspire you! Get all the links in the latest HOHD on Moogly and Petals to Picots!

    Hookin On Hump Day 182 - crochet and knit link party

    [Read more...]

    Big Fast Pocket Scarf Tutorial

    December 31, 2018 by Tamara Kelly 6 Comments

    The Big Fast Pocket Scarf Tutorial is my first knit tutorial for Moogly! I'm excited to share just how simple this basic knit pattern is - in right and left-handed video tutorials!

    Big Fast Pocket Scarf TutorialDisclaimer: This post includes affiliate links; materials provided by Red Heart Yarn.

    [Read more...]

    Finishing MooglyCAL2018 & Announcing MooglyCAL2019

    December 28, 2018 by Tamara Kelly 196 Comments

    It's time to reveal my finished MooglyCAL2018 blanket - and share the details for MooglyCAL2019! Here's what you can expect in the 6th year of this fantastic Crochet Along!

    Disclaimer: Materials provided by Red Heart, Furls Crochet, and Chetnanigans; this post includes affiliate links.

    [Read more...]

    Big Fast Pocket Scarf

    December 21, 2018 by Tamara Kelly 13 Comments

    Big Fast Pocket Scarf - flat

    The Big Fast Pocket Scarf is just what it says on the label - supersized, super fast, and super handy! Make your own today with this free knit scarf pattern on Moogly!

    Disclaimer: Materials provided by Red Heart; this post includes affiliate links.

    Prefer an ad-free PDF? You've got options!

    This button leads to the pattern on Etsy

    Prefer the free blog version? Keep scrolling!

    Fastest Scarf in the Midwest!

    I try to design at least one knit pattern a year - I enjoy knitting, but it takes me so. much. longer. than crochet. This year, I made it all the way to the end and still hadn't knit anything - but who has extra time in December?! Not this lady!

    Big Fast Pocket Scarf - hands are warm!

    Well, with the Big Fast Pocket Scarf, no "extra" time was needed! Made with 3 balls of Red Heart Irresistible and giant 25mm knitting needles, you can make one of these handy scarves in just a few hours if you're an experienced knitter. And if you're just learning to knit, it's easy enough for you too!

    But why a pocket scarf? They're just plain "handy!" Not just to keep your hands warm, but to use as - ya know - pockets! Great for stashing your cell phone, or for holding a spare ball of yarn for crocheting or knitting on the go!

    Big Fast Pocket Scarf - phone storage too

    The hardest part of making this scarf was picking the buttons - they are purely decorative, but really finish it off. And the button you choose can really affect the look!

    Picking the buttons for the Big Fast Pocket Scarf

    The Big Fast Pocket Scarf curls in on itself a big in the scarf section for close warm fit, with great big pockets you can dress up however you like - here's how to make it!

    Big Fast Pocket Scarf - free crochet pattern on Moogly!


    Big Fast Pocket Scarf

    Add this pattern to your Ravelry Queue and Favorites

    US - 50, 25mm knitting needles

    3 balls Red Heart Irresistible (7 - Jumbo; 31 yd/28 m; 283 g/10 oz. ball)
    Colorway used: Oatmeal

    This yarn has been discontinued. Recommended substitute is Bernat Blanket Extra Thick - only 2 skeins needed.

    2 buttons (optional)

    large yarn needle

    Gauge: 3 sts x 4 rows = 4"/10cm in stockinette

    Finished Size: 66" long or custom length x 8.5" wide

    Helpful Links:

    Big Fast Pocket Scarf Tutorial

    Standard Knitting Abbreviations

    How to Substitute Yarn Weights

    Whip Stitch Seaming

    NOTE:

    For a custom fit, work the Scarf Section below to the wearer's height minus 16".

    Place a st marker or tie a length of yarn to the RS of Row 1 to mark the odd-numbered rows side.

    INSTRUCTIONS:

    Make the First Pocket:

    CO 7 sts using long tail cast-on or desired cast on.

    Row 1: Sl1k, k to end.

    Row 2: Sl1p, p to end.

    Repeat Rows 1 and 2 until scarf measures 8" - this is the flap that will fold up to become the pocket.

    Repeat last row made, then resume pattern (so that odd-numbered rows side is now p, and even-numbered rows side is now k) and work until scarf measures 16" total - now you have the fold up pocket and the section that will be covered by it/aka the back of the pocket.

    Make the Scarf Section: 

    Maintaining knit/purl sides respectively, work knit and purl rows as follows until scarf measures 66" total (or desired length minus 16"):

    Knit Rows: Sl1p, k to last st, p last st.

    Purl Rows: Sl1p, p to end.

    Make the Second Pocket:

    Repeat Rows 1 and 2 from First Pocket until scarf measures 74" total - these 8 inches are the back of the second pocket.

    Repeat last row made, then resume pattern (so that even numbered rows side is now p, and odd numbered rows side is now k) and work until scarf measures 82" total - final 8" made are the fold up portion of the second pocket.

    BO as desired.

    Big Fast Pocket Scarf - fold end up at row change for pockets

    Assembly: Sew 8" of each end along sides of scarf so that the knit side is on the outside of each pocket. Add decorative buttons if desired.

    Big Fast Pocket Scarf - pocket closeup


    Simple and fast - the only way I tend to knit! It's so much fun playing with these giant needles and yarn - I hope you'll give the Big Fast Pocket Scarf a try yourself!

    Big Fast Pocket Scarf - hold yarn in the pocket

    If this pattern inspires you to make your own Big Fast Pocket Scarf, and you post a photo on social media, be sure to tag me @mooglyblog or #mooglyblog so I can check it out too! I love seeing what you make!

    The Fine Print

    Follow Moogly on Facebook, Twitter, Pinterest, Instagram, and TikTok! Thank you to Red Heart Yarns for providing the materials shown in this post. Written pattern copyright Tamara Kelly 2018, all rights reserved. Please do not reprint or repost this pattern, but please do link to this page to share this pattern with others. If you wish to make items for sale from this pattern or translate it to another language, please visit the About page for details. 

    Plaid Mood Mobius Tutorial

    December 20, 2018 by Tamara Kelly 1 Comment

    The Plaid Mood Mobius Tutorial demonstrates the clever color changes and special stitches used to create this simple and bold piece that can be worn as both a cowl and a wrap - in right and left-handed video tutorials on Moogly!

    Plaid Mood Mobius Tutorial on MooglyDisclaimer: This post includes affiliate links; materials provided by Red Heart Yarn and Furls.

    [Read more...]

    Facebook Live and YouTube Live: December 2018

    December 19, 2018 by Tamara Kelly 3 Comments

    It's time to start wrapping up 2018 on Moogly! This month's Facebook Live shares all the latest Moogly projects, giveaways, and sneak peeks. And on YouTube, I'll be crocheting this year's teacher holiday gift LIVE - so grab your yarn and join the fun! Watch the December Moogly Lives now live - or in the embedded videos below!

    Moogly LIVES for December 2018!Disclaimer: This post is sponsored by Red Heart Yarn, and may contain affiliate links. 

    [Read more...]

    Hookin On Hump Day #181: A Yarny Link Party!

    December 18, 2018 by Tamara Kelly 3 Comments

    It's the last Hookin On Hump Day for 2018! But no worries, we'll be back in 2019 with more fantastic projects and pattern roundups to share. This round, we're finishing up with a fan favorite - 5 FREE crochet patterns!

    HOHD 181 - Link Party on Moogly and Petals to Picots

    [Read more...]

    The Furls December 2018 Crochet Along: The Snow Charming Cape Part 2!

    December 18, 2018 by Tamara Kelly 7 Comments

    Time to finish up the Snow Charming Cape, and the Furls December 2018 Crochet Along! Today on Furls, get the rest of this pretty pattern!

    Snow Charming Cape by Tamara KellyDisclaimer: This post is sponsored by Furls Crochet, and may contain affiliate links.

    [Read more...]

    Corner to Corner Crochet Giveaway

    December 17, 2018 by Tamara Kelly 18 Comments

    Corner to Corner Crochet: 15 Contemporary C2C Projects is a fab new book by Jess Coppom - a talented designer, as well as someone I'm happy to call my friend! Get a peek inside, and enter to win your own copy on Moogly!

    Corner to Corner Crochet Giveaway on Moogly - SM
    Disclaimer: This giveaway is sponsored by Sew and So Publishing.
    This post includes affiliate links.
    [Read more...]

    Plaid Mood Mobius

    December 14, 2018 by Tamara Kelly 2 Comments

    Plaid Mood Mobius - cowl style

    The Plaid Mood Mobius is very on trend - tartan and plaid crochet are hot hot hot! And this free plaid crochet pattern will keep you warm too - whether you wear it as a wrap or a cowl!

    Disclaimer: This post includes affiliate links; materials provided by Red Heart and Clover USA.

    Prefer an ad-free PDF? You've got options!

    Prefer the free blog version? Keep scrolling!

    Pining for Plaid?

    Crochet seems to be in a "plaid mood" these days - have you spotted all the plaid and tartan patterns out lately?! Most seem to use the buffalo or more checked plaid, so I wanted to do something a little different - and I just love how it turned out!

    Plaid Mood Mobius - wrap style

    I love the little bits of fringe, for two reasons - #1, no ends to weave in!! And #2, I think it helps give that "woven" look that is such a part of plaid fabrics.

    While I found that the Plaid Mood Mobius pulls down over my (size Large) shoulders as a wrap quite well, if you wear a larger size it may be a bit snug. I strongly recommend using stitch markers to pin your ends together and try it on before sewing the seam.

    You can easily add more rows in the pattern at that point to make it bigger - or eliminate some if needed to make it smaller! Because each row is worked individually, it's easy to adjust.

    I used the gorgeous Red Heart Chic Sheep by Marly Bird to make the Plaid Mood Mobius, and it is really lovely to work with - and available in lots of JoAnns and Hobby Lobbys now! But if you need something without any wool or more widely available, then Red Heart With Love would make a great substitute!

    Plaid Mood Mobius - Free pattern on Moogly!


    Plaid Mood Mobius

    Add this pattern to your Ravelry Queue and Favorites

    12mm Clover Amour crochet hook

    875 yds Red Heart Chic Sheep by Marly Bird (100% Washable Merino Wool; Medium/UK: 10-12 ply; 186 yds/170m; 3.5oz./100g)
    Color A: Mimosa (4 balls)
    Color B: Stiletto (1 ball)
    Color C: Linen (1 ball)

    Clover Stitch Markers

    Gauge: 8 sts x 4 rows = 4'/10cm in flo dc

    Finished Size: 21" wide x 42" long, laid flat before seaming

    Helpful Links & Tutorials:

    Plaid Mood Mobius Tutorial

    Crochet Abbreviations

    Butterfly Bobbins

    Standing Double Crochet (see note below on how to modify this stitch for this pattern)

    Switching Colors in the Middle of a Row

    FLO - Front Loop Only

    Mattress Stitch Seaming

    Special Stitch:

    MSTDC - Modified Standing Double Crochet: make a slip knot on your hook, yo, insert hook in indicated stitch, yo and pull up a loop, yo and pull through 2 loops twice

    NOTES:

    Make 2 bobbins of Color B and 1 bobbin of Color C before you begin - then leave those bobbins attached and hanging at the back of your work so they are ready when you come back to that color change. Use a Color B bobbin for each vertical black stripe, and use the Color C bobbin for both Color C vertical stripes, working over Color C for the 2 Color A stitches in between.

    The yarn is held doubled throughout the pattern. When 2 strands of Color A are used, the row is labeled CA/CA. When a strand each of Color A and Color B are used, the row is labeled CA/CB. When a strand each of Color A and Color C are used, the row is labeled CA/CC.

    Switches in the middle of the row involve just one of the two strands - swap out the bobbin color for one of the CA strands, and work over the unused CA strand so you can switch back to CA/CA when indicated.

    Both strands of yarn are cut at the end of each row. Be sure to knot or fasten off the yarn so it cannot come undone. Leave as much length as desired for your fringe, plus a bit extra to trim off later to even it up. Shown is a final fringe length of 1 inch.

    INSTRUCTIONS:

    Setup Row: CA/CA - Ch 42, break yarn and finish off; turn. (42 ch)

    Row 1: CA/CA - MSTDC in first st, dc in next 7 sts, CA/CB dc 2, CA/CA dc 8, CA/CC dc 2, CA/CA dc 2, CA/CC dc 2, CA/CA dc 8, CA/CB dc 2, CA/CA dc 8; break yarn and finish off, turn. (42 sts in every row)

    Row 2: CA/CA - Working all sts in FLO, MSTDC in first st, dc in next 7 sts, CA/CB dc 2, CA/CA dc 8, CA/CC dc 2, CA/CA dc 2, CA/CC dc 2, CA/CA dc 8, CA/CB dc 2, CA/CA dc 8; break yarn and finish off, turn.

    Row 3: CA/CB - Working all sts in FLO, MSTDC in first st, dc in next 7 sts, CB/CB dc 2, CA/CB dc 8, CB/CC dc 2, CA/CB dc 2, CB/CC dc 2, CA/CB dc 8, CB/CB dc 2, CA/CB dc 8; break yarn and finish off, turn.

    Row 4 - 8: Rep Row 2.

    Row 9: CA/CC - Working all sts in FLO, MSTDC in first st, dc in next 7 sts, CB/CC dc 2, CA/CC dc 8, CC/CC dc 2, CA/CC dc 2, CC/CC dc 2, CA/CC dc 8, CB/CC dc 2, CA/CC dc 8; break yarn and finish off, turn.

    Row 10: Rep Row 2.

    Row 11: Rep Row 9.

    Row 12 - 14: Rep Row 2.

    Row 15: Rep Row 2.

    Row 16 - 28: Rep Rows 2 - 14.

    Row 29 - 42: Rep Rows 15 - 28.

    Finishing and Assembly: 

    Trim all fringe to desired length and block flat.

    Plaid Mood Mobius - blocking

    When dry, twist or flip one end over, and then sew the last row to the first row using the mattress stitch.

    Plaid Mood Mobius - Flip one end over Plaid Mood Mobius - Bring ends together


    Okay, I know all those letters in there look intimidating, but if you use the Print Friendly button to print out a copy of this pattern so you can mark off each section as you make it, I think you'll see the pattern of it pretty quickly - and you'll be off and running, knowing what comes having to only check the written pattern for the beginning of each row.

    Plaid Mood Mobius - wrap, back

    If this pattern does inspire you to make your own Plaid Mood Mobius, and you post a photo on social media, be sure to tag me @mooglyblog or #mooglyblog so I can check it out too! I love seeing what you make!

    The Fine Print

    Follow Moogly on Facebook, Twitter, Pinterest, Instagram, and YouTube! Thank you to Red Heart Yarns and Clover USA for providing the materials shown in this post. Written pattern copyright Tamara Kelly 2018, all rights reserved. Please do not reprint or repost this pattern, but please do link to this page to share this pattern with others. If you wish to make items for sale from this pattern or translate it to another language, please visit the About page for details. 

    Cosmos Cardigan Tutorial

    December 12, 2018 by Tamara Kelly 13 Comments

    The Cosmos Cardigan Tutorial will walk you through both the special stitches and the simple shaping for this gorgeous sweater - in right and left-handed video tutorials on Moogly!

    Cosmos Cardigan Tutorial - MooglyDisclaimer: This post includes affiliate links; materials provided by Red Heart Yarn and Furls.

    [Read more...]

    The Furls December 2018 Crochet Along: The Snow Charming Cape

    December 11, 2018 by Tamara Kelly 4 Comments

    I am so excited to finally be able to share the Snow Charming Cape - the new crochet pattern for the Furls December 2018 Crochet Along! Read on to get a closer look - and the link to the first part of the pattern!

    Snow Charming Cape by Tamara Kelly - Furls December 2018 Crochet Along - Back ViewDisclaimer: This post is sponsored by Furls Crochet, and may contain affiliate links.

    [Read more...]

    Athena's Elements Mega Holiday Giveaway

    December 10, 2018 by Tamara Kelly 37 Comments

    If you shop for crochet accessories on Amazon, you may well have come across the fun and colorful Athena's Elements! They offer some great products that make crocheting even better - and this year, they are giving away 3 of their best products to 1 very lucky winner here on Moogly, in the Athena's Elements Mega Holiday Giveaway!

    Athena's Elements Mega Holiday Giveaway - on Moogly!Disclaimer: This post is sponsored by Athena's Elements and includes affiliate links.

    [Read more...]

    Cosmos Cardigan

    December 7, 2018 by Tamara Kelly 45 Comments

    Cosmos Cardigan - flatlay, DIR

    The Cosmos Cardigan is an oversized and subtly sparkly sweater that's so cozy that you'll want to throw it on every day this season! Make your own with this free crochet sweater pattern on Moogly - both Misses and Plus sizes included!

    Disclaimer: This post includes affiliate links; materials for this pattern provided by Red Heart Yarns and Furls Crochet.

    Prefer and ad-free PDF? You've got options!

    This button leads to the pattern on Etsy

    Prefer the free blog version? Keep scrolling!

    Simple, Oversized, Extra Cozy

    The Cosmos Cardigan is a design that blends super simple shaping and a spectacular yarn with an unusual (but easy) stitch for one fantastic and very wearable sweater.

    Cosmos Cardigan - flat, web

    It would qualify as Easy to Intermediate I think - and I'll be creating a video tutorial to walk you through it as well! It's so much simpler than it looks!

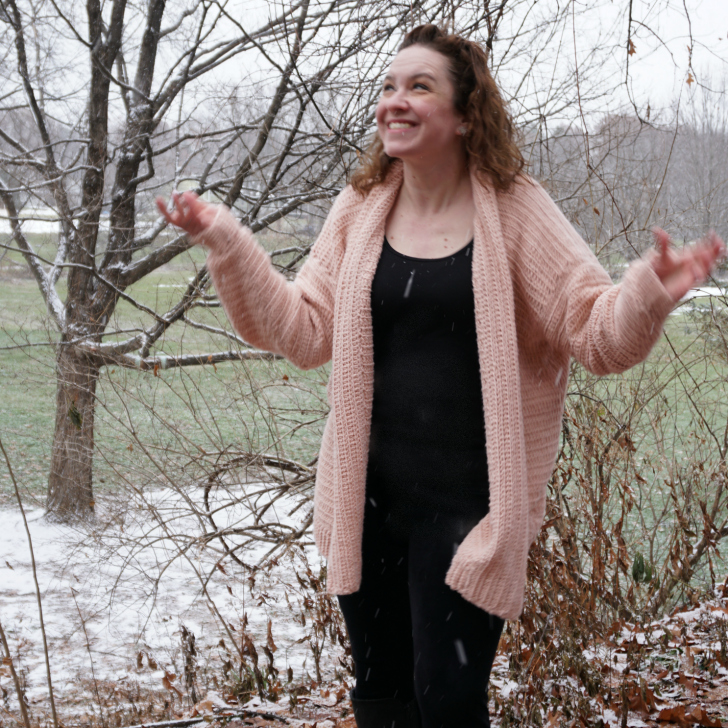
    Cosmos Cardigan - snowing, DIR 3

    Made with Red Heart Hygge Charm, the Cosmos Cardi sparkles in the light - but the yarn is soft as can be, with no scratchy metallic thread to itch you. It's lightly brushed, but the texture of the stitches still stands out for a simple, modern look.

    Cosmos Cardigan - at neck, DIR 2

    The Cosmos Cardigan is perfect with jeans or leggings, or even at the office - and you can create it in 16 different colors of Hygge Charm for a whole wardrobe of easy wearing choices!

    Cosmos Cardigan - PINSTA


    Cosmos Cardigan

    Add this pattern to your Ravelry Queue and Favorites

    US-J, 6.0mm - Furls Crochet Hook

    1600-2400 yds Red Heart Hygge Charm (4 - Medium/Worsted; 432yds/395 m; 7oz/198g)
    Colorway Shown: Meteor (Misses - 4 balls; Plus - 6 balls)

    Clover Stitch Markers

    Gauge: 14 sts x 6 rows = 4"/10cm in main st pattern

    Sizes: Misses - S to L(Plus - XL to 5x)

    Helpful Links & Tutorials:

    Cosmos Cardigan Tutorial

    Crochet Abbreviations

    FDC - Foundation Double Crochet

    FLO and BLO - Front Loop Only and Back Loop Only

    Exhdc - Extended Half Double Crochet

    CSDC - Chainless Starting Double Crochet

    Join with Half Double Crochet

    Mattress Stitch Seaming

    Ribbed Hem and Cuff Tutorial

    Sc2tog and Dc2tog - decreases

    SCHEMATIC OF BACK AND FRONT PIECES:

    Cosmos Cardigan Schematic - Free Crochet Pattern on Moogly

    NOTES:

    Pattern instructions for the sizes are written as Misses(Plus) when different numbers are required.

    The Odd Rows of the Back and Front Pieces are on the Right Side (outside) of the garment.

    There is no required stitch multiple for this pattern, so feel free to adjust stitch counts and row counts to suit your frame.

    I recommend using stitch markers when sewing the seams together, and when making the sleeves to mark the first and last stitch of each round. They are worked in turned rounds, or joined rows - you join with a slip stitch as for a Round, but turn as for a Row, working every other Round from the "inside" of the sleeve. Using stitch markers will help maintain proper stitch count and avoid working into the slip stitch on accident.

    INSTRUCTIONS:

    BACK PIECE INSTRUCTIONS:

    Row 1: FDC 91(133); turn. (91(133) sts)

    Row 2 - 30(32): CSDC in first st, flo exhdc across until 1 st remains, dc in last st; turn. (91(133) sts)

    Row 31(33): Sl st in first 5(8) sts, CSDC in same st as last sl st, flo exhdc until 5(8) sts remain, dc in next st; turn. (83(119) sts)

    Row 32(34) - 44(48): Repeat Row 2. (83(119) sts)

    Row 45(49): (This row is worked in two parts, creating a neck opening.) CSDC in first st, flo exhdc in next 29(45) sts; break yarn. Skip next 23(27) sts, join to next st with flo exhdc, flo exhdc across until 1 st remains, dc in last st; break yarn. (30(46) sts/30(46) sts)

    LEFT FRONT PIECE INSTRUCTIONS (Right Front for Left-Handed Crocheters):

    Row 1: FDC 34(53); turn. (34(53) sts)

    Row 2 - 30(32): CSDC in first st, flo exhdc across until 1 st remains, dc in last st; turn. (34(53) sts)

    Row 31(33): Sl st in first 5(8) sts, CSDC in same st as last sl st, flo exhdc until 1 st remains, dc in last st; turn. (30(46) sts)

    Row 32(34) - 45(49): Repeat Row 2; break yarn after last row. (30(46) sts)

    RIGHT FRONT PIECE INSTRUCTIONS (Left Front for Left-Handed Crocheters):

    Row 1: FDC 34(53); turn. (34(53) sts)

    Row 2 - 30(32): CSDC in first st, flo exhdc across until 1 st remains, dc in last st; turn. (34(53) sts)

    Row 31(33): CSDC in first st, flo exhdc in next 28(44) sts, dc in next st; turn. (30(46) sts)

    Row 32(34) - 45(49): Repeat Row 2; break yarn after last row. (30(46) sts)

    ASSEMBLY INSTRUCTIONS:

    Using the mattress stitch, sew the sides of the fronts to the back, WS together, from Row 1 to Row 30(32).

    Then, sew the shoulders together along their respective Row 45(49) sts.

    Cosmos Cardigan - Assembly

    BOTTOM RIBBED HEM INSTRUCTIONS:

    Row 1: From Right Side of sweater, join to first st of bottom hem (Row 1, left front for right-handed, Row 1, right front for left-handed), ch 9, blo sc in the 2nd ch from hook and each remaining ch, sc2tog in the next 2 Row 1 sts; turn. (9 sts)

    Row 2: Skipping the sc2tog, blo sc in each remaining st across; turn. (8 sts)

    Row 3: Ch 1, sc in blo sc in each st across, sc2tog in the next 2 Row 1 sts; turn. (9 sts)

    Repeat Rows 2 and 3 to end, finishing with a Row 2 repeat; turn to make the Collar, do not break yarn after last row.

    COLLAR INSTRUCTIONS:

    Row 1: Ch 1, sc evenly around entire front opening (front piece side, then neck opening, then other front piece side) stopping at the opposite (Row 1) corner; turn.

    Row 2 - 12(14): Ch 1, flo hdc in each st across; turn. Do not break yarn after last row.

    FINAL EDGING (This row is worked in two parts):

    Ch 1, sc evenly across collar, ch 2, sc across bottom of Collar Rows, sl st to first row of Bottom Ribbed Hem, break yarn. Join with sl st to opposite/last row of Bottom Ribbed Hem, sc across bottom of Collar Rows, ch 2, join to first st of Final Edging and break yarn.

    SLEEVE INSTRUCTIONS (Repeat for each arm):

    Rnd 1: From Right Side of sweater, join to 5th(8th) st at bottom of arm opening (Row 31(33)), ch 1, sc evenly around arm opening working a sc2tog in last st of Row 31(33) and side of Row 32(34), and again in the side of Row 32(34) and the first st at the bottom of arm opening (Row 31(33)); join and turn. (66(80) sts)

    Rnd 2 - 27(29): Ch 2 (does not count as a st), flo exhdc around until 2 sts remain, flo dc2tog in last 2 sts; join and turn. (Stitch count decreases by 1 every round, for (40(52) sts in the last round)

    Rnd 28(30): Ch 2, flo exhdc in first 2(3) sts, flo dc2tog, *flo exhdc in next 2(3) sts, flo dc2tog; rep from * around until 0(2) sts remain, flo exhdc in last 0(2) sts, join and turn. (30(42) sts)

    Rnd 29(31): Ch 1, sc in each st around; join but do not turn.

    RIBBED CUFF INSTRUCTIONS (Repeat for each sleeve):

    Row 1: Ch 9, blo sc in the 2nd ch from hook and each remaining ch, sc2tog in the next 2 Sleeve sts; turn. (9 sts)

    Row 2: Skipping the sc2tog, blo sc in each remaining st across; turn. (8 sts)

    Row 3: Ch 1, sc in blo sc in each st across, sc2tog in the next 2 Sleeve sts; turn. (9 sts)

    Repeat Rows 2 and 3 until 1 Sleeve st remains.

    Repeat Row 2.

    Next Row: Ch 1, sc in blo sc in each st across, sc2tog in the last and first Sleeve sts; turn. (9 sts)

    Final Row: Skipping the sc2tog, blo sc in each remaining st across; break yarn leaving a 12" tail. (8 sts)

    Sew the Cuff edges together using the whip stitch, joining first and last rows. Be sure to work into the BLO of the last row to maintain the ribbed look.


    And that's the Cosmos Cardigan! It's a step forward in design for me - and I just love the fit! I hope you enjoy making and wearing your own too.

    Cosmos Cardigan - modeled, DIR 1

    If this pattern does inspire you to make your own cardigan, and you post a photo on social media, be sure to tag me @mooglyblog or #mooglyblog so I can check it out too! I love seeing what you make!

    The Fine Print

    Follow Moogly on Facebook, Twitter, Pinterest, Instagram, and TikTok! Thank you to Red Heart Yarns and Furls Crochet for providing the materials shown in this post. Written pattern copyright Tamara Kelly 2018, all rights reserved. Please do not reprint or repost this pattern, but please do link to this page to share this pattern with others.

    If you wish to make items for sale from this pattern or translate it to another language, please visit the About page for details. 

    Moogly CAL 2018 – Afghan Block #24

    December 6, 2018 by Tamara Kelly 3 Comments

    Moogly CAL 2018 Block 24 is here - and it's the last one for the year! Thank you to Linda Dean for designing our final square - read on for the link, and the final date for this year!

    MooglyCAL2018 Block 24 MainDisclaimer: This post includes affiliate links; materials provided by Red Heart Yarns, Furls Crochet, and Chetnanigans. [Read more...]

    Yarn Love: Red Heart Hygge Charm

    December 5, 2018 by Tamara Kelly Leave a Comment

    Red Heart Hygge Charm is "light as air brushed yarn with an added strand of matching metallic" - and it's absolutely gorgeous! Let's take a closer look at Hygge Charm in this month's Moogly Yarn Love yarn review!

    Yarn Love- Red Heart Hygge Charm - on MooglyDisclaimer: This post was sponsored by Red Heart Yarn, but all opinions are my own.
    This post includes affiliate links.

    [Read more...]

    Hookin On Hump Day #180: A Yarny Link Party!

    December 4, 2018 by Tamara Kelly Leave a Comment

    Hookin On Hump Day is back with 5 more fantastic freebies! This round, we have a beautiful mix of crochet and knit patterns - and a chance to be featured in the next round!

    Hookin On Hump Day #180 - get all these patterns (and more!) on Moogly! [Read more...]

    Red Heart Hygge Charm Giveaway

    December 3, 2018 by Tamara Kelly 31 Comments

    Red Heart Hygge Charm is a subtly sparkly, slightly fuzzy yarn that's full of fun and cozy possibilities! And this month totally feeling those comfy-bling vibes - I've designed two new patterns in this yarn, I have a video yarn review on the way, and top it all off, I'm giving away 5 skeins of Red Heart Hygge Charm here on Moogly! (And there's more... read on!)

    Red Heart Hygge Charm Giveaway on Moogly!Disclaimer: This post was sponsored by Red Heart Yarn, but all opinions are my own.

    [Read more...]

    Deflecto Washi Tape (and More!) Storage Cube Giveaway

    November 30, 2018 by Tamara Kelly 3 Comments

    Every December, I find myself wanting to get organized for the new year - and Deflecto products are always a huge help with that! So today I'm excited to share the new Deflecto Washi Tape Storage Cube with you all - and give one away on Moogly!

    Deflecto Washi Tape (and More!) Storage Cube Giveaway on Moogly! open to US addresses only!Disclaimer: This post was sponsored by Deflecto but all opinions are my own. This post includes affiliate links.

    [Read more...]

    Waterlily Throw Tutorial

    November 29, 2018 by Tamara Kelly 14 Comments

    The Waterlily Throw Tutorial will walk you through this beautiful multi-colored blanket - all the special stitches you need to know are covered in right and left-handed video tutorials on Moogly!

    Waterlily Throw Tutorial - SMDisclaimer: This post includes affiliate links; materials provided by Red Heart Yarn and Furls.

    [Read more...]

    Facebook Live and YouTube Live: November 2018

    November 28, 2018 by Tamara Kelly Leave a Comment

    Happy Holidays! This month's lives share all the Moogly news and sneak peeks. And on YouTube, I'll have special tips to keep you crocheting and knitting comfortably this busy season! Watch the November Moogly Lives now live - or in the embedded videos below!

    Moogly Live November 2018Disclaimer: This post is sponsored by Red Heart Yarn, and may contain affiliate links. 

    [Read more...]

    EzPacking Holidays Giveaway

    November 26, 2018 by Tamara Kelly 9 Comments

    It's travel season - and crochet and knitting season! These are the days of running around like crazy and squeezing in more crafting time than ever. So make it a bit easier (and more organized!) with the EzPacking Holidays Giveaway on Moogly!

    EzPacking Holidays GiveawayDisclaimer: This post was sponsored by EzPacking but all opinions are my own.

    [Read more...]

    Waterlily Throw

    November 23, 2018 by Tamara Kelly 22 Comments

    Waterlily Throw - on chair, DIR

    The Waterlily Throw is a circular afghan with lots of color and texture, ready for cozying up with this winter! And it's a free crochet blanket pattern here on Moogly!

    Disclaimer: This post includes affiliate links; materials provided by Red Heart Yarns and Brittany.

    Prefer an ad-free PDF? You've got options!

    This button leads to the pattern on Etsy

    Prefer the free blog version? Keep scrolling!

    Doodling with Yarn

    The Waterlily Throw was sort of a "doodling" pattern for me. I picked a color scheme and decided I wanted a round afghan... and just started crocheting, letting the stitch pattern develop as I went, listening to how the stitches and colors worked together.

    Waterlily Throw - flat, closeup, DIR

    Speaking of colors, I was inspired by the Waterlily colorway of Red Heart With Love! These lovely hues create a beautiful palette - and changing them will lead to lots of different looks with this pattern, which is half the fun! Red Heart With Love has dozens of colors and stripes and multis to choose from, and it's family friendly and easy care - perfect for gift giving!

    Waterlily Throw - PINSTA


    Waterlily Throw

    Add this pattern to your Ravelry Queue and Favorites

    US-K, 6.5mm hook - Brittany Hooks

    1400 yds Red Heart With Love (100% Acrylic; “4”/Medium/Worsted/Aran/UK: 10-12 ply)
    A: Waterlily (3 skeins)
    B: Cornsilk (1 skein)
    C: Lettuce (1 skein)
    D: Iced Aqua (1 skein)
    E: Lilac (1 skein)
    F: Tan (1 skein)

    Clover Stitch Markers

    Gauge: 4.5" across after Rnd 3

    Size: 54" across

    Helpful Links and Tutorials:

    Waterlily Throw Tutorial

    Crochet Abbreviations

    Magic Circle

    Post Stitches

    Join with dc (Standing dc)

    Join with sc (Standing sc)

    BLO (Back Loop Only)

    SPECIAL STITCHES & ABBREVIATIONS:

    cluster - dc2tog in the same st

    fpdc2tog - front post double crochet two together decrease

    pm - place stitch marker

    NOTES:

    Unless otherwise directed, do not work into the top of the same st as a post st is worked around - that st is already considered "worked."

    INSTRUCTIONS:

    Rnd 1: With Color A, make a magic circle, ch 2 (does not count as a st), dc 12 into the ring; join with sl st in first dc. (12 dc)

    Rnd 2: Ch 2 (does not count as a st), cluster in the first st, ch 1, *cluster in the next st, ch 1; rep from * and join. (12 clusters, 12 ch-1)

    Rnd 3: Ch 2, dc in next st, 2 dc in next ch-1 sp, *dc in next st, 2 dc in next ch-1 sp; rep from * and join. (36 dc)

    Rnd 4: Sl st into next st, ch 2, *cluster in next st, ch 1, cluster in next st, ch 1, skip next st; rep from * and join. (24 clusters, 24 ch-1)

    Rnd 5: Ch 2, dc in the first st, 2 dc in the next ch-1 sp, dc in the next st, dc in the next ch sp, *dc in the next st, 2 dc in the next ch-1 sp, dc in the next st, dc in the next ch sp; rep from * around, join and break yarn. (60 dc)

    Rnd 6: With Color B, join to first st of previous rnd, *fptr in Rnd 4 cluster directly below, blo sc in next 2 sts, fptr in next Rnd 4 cluster, 2 blo sc in next st; rep from * and join. (72 sts)

    Rnd 7: Ch 1, hdc in first st, hdc in next st, ch 1, *hdc in next 3 sts, ch 1; rep from * around, hdc in last st, join and break yarn. (72 hdc)

    Rnd 8: With Color C, join to any ch-1 sp with dc, 2 dc in same ch-1 sp, fptr in next Rnd 6 post st, *3 dc in next ch-1 sp, fptr in next Rnd 6 post st; rep from * around, join and break. (96 sts)

    Rnd 9: With Color D, join to any center dc with sc, *(fpdc, 2 sc, fpdc) in next post st, sc in next center dc; rep from * around, (fpdc, 2 sc, fpdc) in last post st, join. (120 sts)

    Rnd 10: Ch 1, *fpdc2tog around previous and next post sts, 2 sc in each of next 2 sts; rep from * around, join and break. (120 sts)

    Rnd 11: With Color E, join to blo of any post st with dc, blo dc in same st, *blo dc in next 4 sts, 2 blo dc in next post st; rep from * around, blo dc in last 4 sts, join and break. (144 sts)

    Rnd 12: With Color F, join to any 2nd dc of a pair with sc, ch 1, skip next st, *sc in next st, ch 1, skip next st; rep from * around, join and break.  (72 sc, 72 ch-1)

    Rnd 13: With Color A, join to second ch-1 sp made in previous rnd and ch 2, cluster in same sp, ch 1, skip next st, [cluster in next ch-1 sp, ch 1, skip next st] 10 times, (cluster, ch 1) twice in next ch-1 sp, pm in first of these two ch-1 sps made, skip next st, *[cluster in next ch-1 sp, ch 1, skip next st]) 11 times, (cluster, ch 1) twice in next ch-1 sp, pm in first of these two ch-1 sps made, skip next st; rep from * around and join.  (78 clusters, 78 ch-1)

    Rnd 14: Sl st in next ch-1 sp, ch 2, work 2 dc in each ch-1 sp and 3 dc in each marked ch-1 sp, pm in center dc of each set of 3; join. (162 sts)

    Rnd 15: Ch 2, [cluster, ch 1, skip next st] 11 times, [(cluster, ch 1) next st] twice, skip next st, *[cluster, ch 1, skip next st] 12 times, [(cluster, ch 1) in next st] twice, skip next st; rep from * around until 2 sts rem, cluster in next st, ch 1, skip last st and join. (84 clusters, 84 ch-1)

    Rnd 16: Ch 2 *[dc in next st, dc in next ch sp] 6 times, dc in next st, 2 dc in next ch sp; rep from * around, join and break. (180 sts)

    Rnd 17: With Color B, join to blo of first st of previous rnd with sc, blo sc in next st, fptr in Rnd 15 cluster directly below, [blo sc in next 3 sts, fptr in Rnd 15 cluster below] twice, blo sc in next 3 sts, fptr around previous Rnd 15 cluster, blo sc in st behind post st just made, *blo sc in next 2 sts, fptr around Rnd 15 cluster directly below, [blo sc in next 3 sts, fptr around Rnd 15 cluster below] twice, blo sc in next 3 sts, fptr around previous Rnd 15 cluster, blo sc in st behind post st just made; rep from * around, join. (192 sts)

    Rnd 18: Sl st in next st, ch 1, *hdc in next 3 sts, ch 1, skip next st; rep from * around, join and break. (192 sts inc ch-1s)

    Rnd 19: With Color C, join to any ch-1 sp with dc, 4 dc in same ch-1 sp, fptr around next Rnd 17 post st, *5 dc in next ch-1 sp, fptr around next Rnd 17 post st; rep from * around, join and break. (288 sts)

    Rnd 20: With Color D, join to any center dc of a group of 5 with sc, fptr around next post st, sc in next 3 sts, fptr around same post st, *sc in next center dc of a group of 5, fptr around next post st, sc in next 3 sts, fptr around same post st; rep from * around and join. (288 sts)

    Rnd 21: Ch 1, *fpdc2tog around previous and next post sts, sc in next 2 sts, 2 sc in next st; rep from * around, join and break. (240 sts)

    Rnd 22: With Color E, join to blo of any st with dc, blo dc in each rem st around; join and break. (240 sts)

    Rnd 23: With Color F, join to any st with sc, ch 1, skip next st, *sc in next st, ch 1, skip next st; rep from * around, join and break. (120 sc, 120 ch-1)

    Rnd 24: With Color A, join to any ch-1 sp and ch 2, cluster in same sp, ch 1, skip next st, *cluster in next ch-1 sp, ch 1, skip next st; rep from * around and join.  (120 clusters, 120 ch-1)

    Rnd 25: Sl st in next ch-1 sp, ch 2, 2 dc in each ch-1 sp around; join. (240 sts)

    Rnd 26: Ch 2, *cluster, ch 1, skip next st; rep from * around and join. (120 clusters, 120 ch-1)

    Rnd 27: Ch 2, dc in each st and ch-1 sp around, join and break. (240 sts)

    Rnd 28: With Color B, join to first st of previous rnd and ch 1, fptr in Rnd 26 cluster directly below, blo sc in next 3 sts, *fptr around next Rnd 26 cluster, blo sc in next 3 sts; rep from * around and join. (240 sts)

    Rnd 29: Ch 1, hdc in first 2 sts, *ch 1, skip next st, hdc in next 3 sts; rep from * around, finishing last rep with 1 hdc in last st, join and break. (240 sts inc ch-1s)

    Rnd 30: With Color C, join to any ch-1 sp with dc, 4 dc in same ch-1 sp, fptr around next Rnd 28 post st, *5 dc in next ch-1 sp, fptr around next Rnd 28 post st; rep from * around, join and break. (360 sts)

    Rnd 31: Rep Rnd 20. (360 sts)

    Rnd 32 - 40: Rep Rnd 21 - 29. (300 sts per rnd, inc chs when present)

    Rnd 41: With Color C, join to any ch-1 sp with dc, 4 dc in same ch-1 sp, fptr around next Rnd 39 post st, *5 dc in next ch-1 sp, fptr around next Rnd 39 post st; rep from * around, join and break. (450 sts)

    Rnd 42: Rep Rnd 20. (450 sts)

    Rnd 43: Rep Rnd 21. (375 sts)

    Rnd 44: With Color E, join to blo of any st with dc, blo dc in same st, blo dc in each rem st around; join and break. (376 sts)

    Rnd 45: Rep Rnd 23. (188 sc, 188 ch-1) 


    And that's the Waterlily Throw! I decided not to add a "different" edging - I really like the way it looks ending on the Color F rnd. However, this is a great last round to add your own special edgings or touches to, too! And there's plenty of each color left over to do just that.

    Waterlily Throw - back of chair, DIR

    If this pattern inspires you and you post a photo on social media, be sure to tag me @mooglyblog or #mooglyblog! I love seeing what you make!

    The Fine Print

    Follow Moogly on Facebook, Twitter, Pinterest, Instagram, and TikTok! Thank you to Red Heart Yarns and Brittany for providing the materials shown in this post. Written pattern copyright Tamara Kelly 2018, all rights reserved. Please do not reprint or repost this pattern. Please do link to this page to share this pattern with others. If you wish to make items for sale from this pattern or translate it to another language, please visit the About page for details. 

    Moogly CAL 2018 – Afghan Block #23

    November 21, 2018 by Tamara Kelly 2 Comments

    Moogly CAL 2018 Block 23 is coming to you one day "early" due to American Thanksgiving - and it's a square to be grateful for! So a big thanks to Kirsten Holloway Designs for contributing the gorgeous Magnolia Square - and Happy Thanksgiving!

    MooglyCAL2018 Block #23, courtesy of Kirsten Holloway Designs!Disclaimer: This post includes affiliate links; materials provided by Red Heart Yarns, Furls Crochet, and Chetnanigans. [Read more...]

    Hookin On Hump Day #179: A Yarny Link Party!

    November 20, 2018 by Tamara Kelly Leave a Comment

    Hookin On Hump Day is having a hat week - must be autumn! This round, all 5 featured patterns are free - and crochet! And ideal for taking along on your holiday travels!

    HOHD 179 - get all these crochet patterns free on Moogly! [Read more...]

    Crochet A-B-Sea by Pony Tate: Giveaway!

    November 19, 2018 by Tamara Kelly 8 Comments

    Crochet A-B-Sea is a fun new book by Pony McTate, full of delightful sea creatures - all alphabetically arranged in a beautiful blanket! Get a peek inside, and enter to win your own copy on Moogly!

    Crochet A-B-Sea Giveaway - on Moogly!
    Disclaimer: Materials for this giveaway were provided by Pony McTate.
    This post includes affiliate links.
    [Read more...]

    Pompadoodle Christmas Tree: Guest Pattern by Winding Road Crochet

    November 16, 2018 by Tamara Kelly 2 Comments

    I have something special for you today - a pattern guest post! Lindsey from Winding Road Crochet approached me with a fantastic holiday idea for Red Heart Pomp-a-doodle - a Pompadoodle Christmas Tree! And it turned out so cute - read on to find out how to make your own on Moogly! Both written instructions and a video are included!

    Pompadoodle Christmas Trees - SMDisclaimer: This post includes affiliate links.

    [Read more...]

    « Previous Page
    Next Page »
    Tamara Kelly of Moogly

    Moogly is world-famous for fresh. modern, and approachable crochet designs - as well as a little knitting and crafting here and there. On Moogly, you'll find several new free patterns every month, top quality video tutorials, giveaways, and more!

    More about Moogly →

    Popular

    • MooglyCAL2026 Block 21
      MooglyCAL2026 Block 21
    • Crochet and Catch Up with Moogly - October 14, 2026
      Crochet and Catch Up with Moogly - October 14, 2026
    • Seamless Crochet Sweaters Review and Giveaway
      Seamless Crochet Sweaters - Review and Giveaway
    • Ghost Treat Basket Tutorial
      Ghost Treat Basket Tutorial
    gosadi
    I'm a Craftsy Instructor. Click to see my classes.
    I Like Crochet


    Footer

    ↑ back to top

    About

    • About
    • Privacy Policy

    Newsletter

    Contact

    Email Moogly

    As an Amazon Associate I earn from qualifying purchases.
    Copyright © 2026 Mooglyblog.com