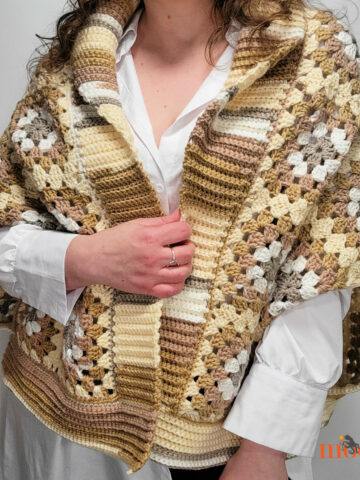
The Cosmos Cardigan is an oversized and subtly sparkly sweater that's so out of this world cozy, you'll want to throw it on every day this season! Make your own with this free crochet sweater pattern on Moogly - both Misses and Plus sizes included!
 Disclaimer: This post includes affiliate links; materials for this pattern provided by Red Heart Yarns and Furls Crochet.
The Cosmos Cardigan is a design that blends super simple shaping and a spectacular yarn with an unusual (but easy) stitch for one fantastic and very wearable sweater.

It would qualify as Easy to Intermediate I think - and I'll be creating a video tutorial to walk you through it as well! It's so much simpler than it looks!
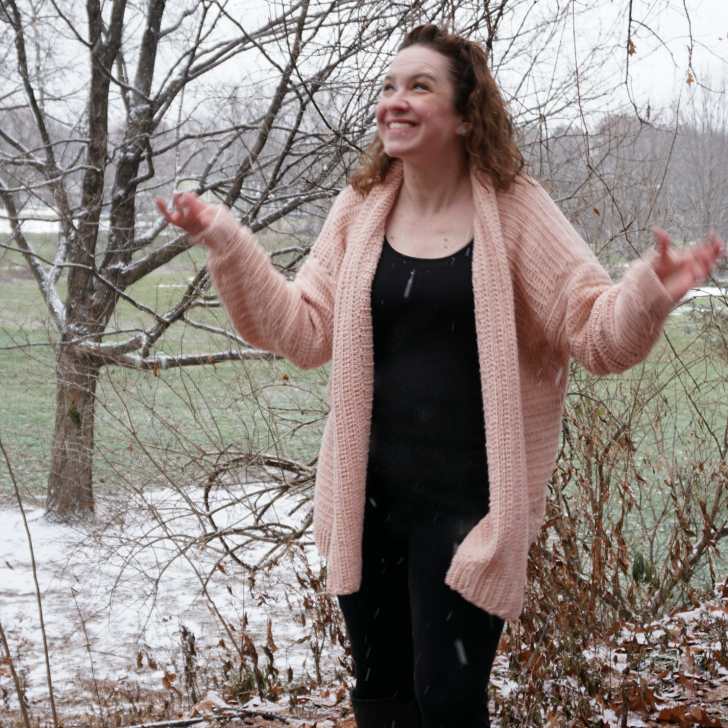
Made with Red Heart Hygge Charm, the Cosmos Cardi sparkles in the light - but the yarn is soft as can be, with no scratchy metallic thread to itch you. It's lightly brushed, but the texture of the stitches still stands out for a simple, modern look.

The Cosmos Cardigan is perfect with jeans or leggings, or even at the office - and you can create it in 16 different colors of Hygge Charm for a whole wardrobe of easy wearing choices!

Cosmos Cardigan
Add this pattern to your Ravelry Queue and Favorites
US-J, 6.0mm - Furls Crochet Hook
1600-2400 yds Red Heart Hygge Charm (4 - Medium/Worsted/UK: 10-12 ply; 432yds (395 m); 7oz. (198g))
Colorway Shown: Meteor (Misses - 4 balls; Plus - 6 balls)
Gauge: 14 sts x 6 rows = 4"/10cm in main st pattern
Sizes: Misses - S to L(Plus - XL to 5x)
Helpful Links & Tutorials:
FDC - Foundation Double Crochet
FLO and BLO - Front Loop Only and Back Loop Only
Exhdc - Extended Half Double Crochet
CSDC - Chainless Starting Double Crochet
SCHEMATIC OF BACK AND FRONT PIECES:

NOTES:
Pattern instructions for the sizes are written as Misses(Plus) when different numbers are required. I'd recommend using the Print Friendly button to create a paper copy of this pattern for personal use, and circling or highlighting the correct numbers for your size before you begin.
The Odd Rows of the Back and Front Pieces are on the Right Side (outside) of the garment.
There is no required stitch multiple for this pattern, so feel free to adjust stitch counts and row counts to suit your frame.
I recommend using stitch markers when sewing the seams together, and when making the sleeves to mark the first and last stitch of each round. They are worked in turned rounds, or joined rows - you join with a slip stitch as for a Round, but turn as for a Row, working every other Round from the "inside" of the sleeve. Using stitch markers will help maintain proper stitch count and avoid working into the slip stitch on accident.
INSTRUCTIONS:
BACK PIECE INSTRUCTIONS:
Row 1: FDC 91(133); turn. (91(133) sts)
Row 2 - 30(32): CSDC in first st, flo exhdc across until 1 st remains, dc in last st; turn. (91(133) sts)
Row 31(33): Sl st in first 5(8) sts, CSDC in same st as last sl st, flo exhdc until 5(8) sts remain, dc in next st; turn. (83(119) sts)
Row 32(34) - 44(48): Repeat Row 2. (83(119) sts)
Row 45(49): (This row is worked in two parts, creating a neck opening.) CSDC in first st, flo exhdc in next 29(45) sts; break yarn. Skip next 23(27) sts, join to next st with flo exhdc, flo exhdc across until 1 st remains, dc in last st; break yarn. (30(46) sts/30(46) sts)
LEFT FRONT PIECE INSTRUCTIONS (Right Front for Left-Handed Crocheters):
Row 1: FDC 34(53); turn. (34(53) sts)
Row 2 - 30(32): CSDC in first st, flo exhdc across until 1 st remains, dc in last st; turn. (34(53) sts)
Row 31(33): Sl st in first 5(8) sts, CSDC in same st as last sl st, flo exhdc until 1 st remains, dc in last st; turn. (30(46) sts)
Row 32(34) - 45(49): Repeat Row 2; break yarn after last row. (30(46) sts)
RIGHT FRONT PIECE INSTRUCTIONS (Left Front for Left-Handed Crocheters):
Row 1: FDC 34(53); turn. (34(53) sts)
Row 2 - 30(32): CSDC in first st, flo exhdc across until 1 st remains, dc in last st; turn. (34(53) sts)
Row 31(33): CSDC in first st, flo exhdc in next 28(44) sts, dc in next st; turn. (30(46) sts)
Row 32(34) - 45(49): Repeat Row 2; break yarn after last row. (30(46) sts)
ASSEMBLY INSTRUCTIONS:
Using the mattress stitch, sew the sides of the fronts to the back, WS together, from Row 1 to Row 30(32).
Then, sew the shoulders together along their respective Row 45(49) sts.

BOTTOM RIBBED HEM INSTRUCTIONS:
Row 1: From Right Side of sweater, join to first st of bottom hem (Row 1, left front for right-handed, Row 1, right front for left-handed), ch 9, blo sc in the 2nd ch from hook and each remaining ch, sc2tog in the next 2 Row 1 sts; turn. (9 sts)
Row 2: Skipping the sc2tog, blo sc in each remaining st across; turn. (8 sts)
Row 3: Ch 1, sc in blo sc in each st across, sc2tog in the next 2 Row 1 sts; turn. (9 sts)
Repeat Rows 2 and 3 to end, finishing with a Row 2 repeat; turn to make the Collar, do not break yarn after last row.
COLLAR INSTRUCTIONS:
Row 1: Ch 1, sc evenly around entire front opening (front piece side, then neck opening, then other front piece side) stopping at the opposite (Row 1) corner; turn.
Row 2 - 12(14): Ch 1, flo hdc in each st across; turn. Do not break yarn after last row.
FINAL EDGING (This row is worked in two parts):
Ch 1, sc evenly across collar, ch 2, sc across bottom of Collar Rows, sl st to first row of Bottom Ribbed Hem, break yarn. Join with sl st to opposite/last row of Bottom Ribbed Hem, sc across bottom of Collar Rows, ch 2, join to first st of Final Edging and break yarn.
SLEEVE INSTRUCTIONS (Repeat for each arm):
Rnd 1: From Right Side of sweater, join to 5th(8th) st at bottom of arm opening (Row 31(33)), ch 1, sc evenly around arm opening working a sc2tog in last st of Row 31(33) and side of Row 32(34), and again in the side of Row 32(34) and the first st at the bottom of arm opening (Row 31(33)); join and turn. (66(80) sts)
Rnd 2 - 27(29): Ch 2 (does not count as a st), flo exhdc around until 2 sts remain, flo dc2tog in last 2 sts; join and turn. (Stitch count decreases by 1 every round, for (40(52) sts in the last round)
Rnd 28(30): Ch 2, flo exhdc in first 2(3) sts, flo dc2tog, *flo exhdc in next 2(3) sts, flo dc2tog; rep from * around until 0(2) sts remain, flo exhdc in last 0(2) sts, join and turn. (30(42) sts)
Rnd 29(31): Ch 1, sc in each st around; join but do not turn.
RIBBED CUFF INSTRUCTIONS (Repeat for each sleeve):
Row 1: Ch 9, blo sc in the 2nd ch from hook and each remaining ch, sc2tog in the next 2 Sleeve sts; turn. (9 sts)
Row 2: Skipping the sc2tog, blo sc in each remaining st across; turn. (8 sts)
Row 3: Ch 1, sc in blo sc in each st across, sc2tog in the next 2 Sleeve sts; turn. (9 sts)
Repeat Rows 2 and 3 until 1 Sleeve st remains.
Repeat Row 2.
Next Row: Ch 1, sc in blo sc in each st across, sc2tog in the last and first Sleeve sts; turn. (9 sts)
Final Row: Skipping the sc2tog, blo sc in each remaining st across; break yarn leaving a 12" tail. (8 sts)
Sew the Cuff edges together using the whip stitch, joining first and last rows. Be sure to work into the BLO of the last row to maintain the ribbed look.
And that's the Cosmos Cardigan! It's a step forward in design for me - and I just love the fit! I hope you enjoy making and wearing your own too.

If this pattern does inspire you to make your own cardigan, and you post a photo on social media, be sure to tag me @mooglyblog or #mooglyblog so I can check it out too! I love seeing what you make!
Follow Moogly on Facebook, Twitter, G+, Pinterest, Instagram, and Tumblr! Thank you to Red Heart Yarns and Furls Crochet for providing the materials shown in this post. Written pattern copyright Tamara Kelly 2018, all rights reserved. Please do not reprint or repost this pattern, but please do link to this page to share this pattern with others.
To print or download, use the Print Friendly button below, or go to PrintFriendly.com, or right-click to copy and paste it into a word processing document if those options do not work for you (please note that Print Friendly is a free outside website that the button links to, and you can click here for a tutorial on how to use it, but I cannot provide additional technical support for this service). If you wish to make items for sale from this pattern or translate it to another language, please visit the About page for details.



DebbieW
Pretty sweater, looks lovely on too.
Tamara Kelly
Thank you so much Debbie!
Aidah Hartmann
Yup finished and it came out beautiful! I really like the collar, can’t tell it’s crochet. This one’s a keeper.
Tamara Kelly
♥ I'm so glad you like it Aidah! Thank you!
Leslie Mansfield
Such a pretty sweater. I saw the hygge yarn at Michael's the other day and it is the softest yarn can't wait to get the hygge charm in the store.
Tamara Kelly
Thank you so much Leslie! 😀
Lyn DeFehr
I’m just finishing a very similar cardigan in Bernat Velvet but still want to add pockets & perhaps a tie belt or zipper closure. Lovely when something works out, isn’t it. ......very nice.
Patti
Thank you for including instructions for us left-handed crocheters. I really appreciate it.
Tamara Kelly
🙂 I'm so glad it's helpful, thank you Patti!
Julie
It looks absolutely gorgeous and something that I could wear. Except. I really, REALLY like pockets. LOL Any suggestions on how to go about modifying the pattern for them? Maybe something like inserting a chain, so far up on the side pieces, and then continue the pattern? And then crochet an attached pocket, slightly bigger, to the inside? I don't know if a sewn on pocket would suit this pattern. Do you think this would work? Thank you very much for sharing your patterns!
Tamara Kelly
Hi Julie! I went back and forth on pockets while I was designing it, I totally get it! 🙂 I would just add patch pockets myself, like I did in the Riverbend Cardi - but of course, with this pattern's stitch pattern. https://www.mooglyblog.com/riverbend-cardigan/ I haven't used the method you describe, but it sure sounds promising!
Julie
I guess I will just get to figure it out myself! LOL Thinking about it, I am not sure which way to go. Inside or outside pocket. I'll let you know what I do. This looks like a sweater that may actually fit me and not look too bad on me, as I am quite 'matronly'. 🙂
Tamara Kelly
I can't wait to see! 😀
Maria Sanyshyn
I just finished my 32 rows and went to the video tutorial only to realize that what I thought was the front post is actually (I think) the first stitch of the extended hdc. So I can’t tell the wrong or right side because there is a “stripe” every two rows! Oh well!!! Still looks pretty and in case anyone is wondering, THIS YARN IS AWESOME!
Happy New Year, Tamara. Thank you for all you do!
Tamara Kelly
Hi Maria! The right/wrong side doesn't matter so much except for lining up the sides and the back so they match! Beyond that, it's pretty reversible. 🙂 I'm so glad you like it!
joan murphy
This is exactly the pattern I'vesu been looking for in all the various knitting & crocheting books I've subsri!bed to. Problem is my copier us broken. Is there anyway you could make a copy of send it to me via mail? I am willing to pay the cost for doing this. Please et me know - my Email address is "nanamurphy1@AOL.com" (Joan Mur[hy - 414 Woodburne Drl, Utica, NY 13502) Thank you so much - Joan
Juls
Oh my goodness; I cannot wait to make this one! Question -- Is there another yarn I can sub out -- or recommendations for weight yarn to sub with? I have an overabundance of #3 and #4 yarn already!
Tamara Kelly
You should be able to use a 4 from your stash! 🙂
Emily Jones
This is gorgeous! I would love to make it for my mom. Is it an oversized fit? She normally wears a L so wondering if I should make a L or drop down to a M. Thanks so much for your help and great patterns!
Tamara Kelly
Thank you so much Emily! This is definitely an oversized fit, so you'd want to make the smallest of the two sizes. That's my size, and I'm the model, and that's the size I made. 🙂
Robin Zipp
I’m working on my second cosmo sweater the first one I did in the navy or supernova colorway. I love it oversized comfy sweater so I wanted another. Everything about this pattern was so perfect and details make it like cuffs and bottom with the collar. The only problem I had was evenly spacing the collar I didn’t do enough stitches. Next one I’ll work out the kinks better. Would have loved a guesstimate on the collar stitches so I could try to even them out better. Thank you so much for another great pattern.
Tamara Kelly
Hi Robin! I'm so glad you liked it! When working into the edge of a dc (or equivalent height row), I find 2 sts per row works out pretty well. Since these sts are a hair taller, an extra one here and there would be okay too - the main thing is that it just looks nice! 🙂
`Nancy
Hi!
I'm making this for my sister. Looking at the hygge yarn. She found the color she likes in hygge bulky 5. This is my first big project. How does it compare to the hygge charm.?
Nancy
Tamara Kelly
They are very different yarns, though lovely in their own ways! Hygge is fuzzy and bulky and grows quite a bit after being crocheted or knitted. Hygge Charm is smoother, sparkly, a worsted weight, and it doesn't grow quite as much. You can compare the drape a big between this sweater and the Hygge Cocoon Cardigan, which used Hygge.
Nancy
My sister, My daughter like the Cosmos. Me too! she choose Yarn Bee Soft Secret. For me, its to soft and I am not happy with the rows. I went down in crochet hook size to 5.0. It looks a little better , but I am still not happy with it. She loves the color, "Rose Bud". I will have to get her to change colors. I want this to look good. Its my first big project..... Thanks
Debbie
VERY VERY PRETTY!!! I'm going to be making this for my oldest granddaughter, she loves long cardigans!!! I love love love the color as well!!! Thank You for the share!!!! Happy Crocheting DEB 🙂
Tamara Kelly
Thank you so much Debbie!
Kathy Burt
when you do the sleeve you say join and turn. Is that so that you get a straight seam?? If you just join and keep going you get a diagonal seam? Is that true all the time?
Tamara Kelly
It has a dual purpose - it does keep a straight seam, but it also maintains the look of the stitches. The rest of the sweater is worked in rows, so if you make the sleeves in just rounds without turning, the fabric will have a very different look as you'll only see the front sides of the stitches.
Margaret
I really want to do this but l hate the half double crochet. Well l don't hate it, my hands do. There's something about pulling through 3 loops that really bothers my hand. Enough of that. Could l do a double crochet instead with close to the same results?
Tamara Kelly
Hi Margaret! You could, though you might want to eliminate a few rows to get closer to the schematic. 🙂
Kate
Hi, thanks for this pattern. I am having trouble with the first row (foundation double crochet) at 91 stitches it is wayyy to long! 38 inches instead of the 26 in the schematic. I have tried decreasing hook size several times, and even with a 4.5 mm hook, it was too long. The gauge swatch was fine with the 6.0 hook. I am baffled and wondered if you had any thoughts. Thanks so much!
Tamara Kelly
Hi Kate, you are very welcome! ♥ That is strange! Hm... Did you use the FDC in the swatch too?
If not, perhaps just go ahead and start with a chain and dc 91 sts the "standard" way - the FDC is more fun for me, but it isn't required!
Nina
Hi I would love to make this sweater for myself & maybe family later. I am confused about the direction sizes. Could you mail me the sizes for 44 probably a 2x. I am willing to pay copy and mailing fees. If you could do that you will make this 73 yr old very happy. I am a self taught crocheter the past 5 yrs but always did afghans scarf and hats. My first attempt at a sweater. I read all your post and would appreciate any help you can give me thank you so much Nina I wil be waiting for your reply
Michelle
Thank you, Tamara, for sharing your wonderful, clear patterns. It's nice to have someone you can trust to provide all the information you need for a beautiful outcome. So often I have started a pattern and realized the instructions are not reliable. I'm an experienced crocheter and I really appreciate the care and creativity you put into your work. Thanks again.
Tamara Kelly
Thank you so much, Michelle! ♥ I try to do my best!
Katelynn MacDougal
I like this pattern but seem to be struggling a little. How many inches long should it be for a 3x cardigan? Thank you for your help.
Tamara Kelly
Hi Katelynn! The Plus sizes are the measurements within parentheses in the schematic above!
Rosalie
I loved making this pattern.
I also made two back pieces and made a pullover too!
Tamara Kelly
♥ That's awesome! I'm so glad you like it!!
Debra Fourdraine
This pattern was so well written and I liked the design so much that I went from the free pattern page to Ravelry to purchase it. Good designer!
Tamara Kelly
Thank you so much, Debra! ♥
Heidi Folger
I finished the FDC with the 91 sts and completed the first 2 rows but when I measured it, it’s 30 inches long instead of the 26 inches for the Misses size. I’m using the 6.0 mm hook. If I “take off” the extra stitches to match the length I need for the back will this mess up my measurements for the rest of the pattern? Or will it be ok as long my measurements of the back and front pieces match your measurements? Thanks in advance. This is only the second sweater I’ve made for myself and the first one is wayyy too big for me.
Tamara Kelly
Hi Heidi! Sounds like we have different gauges. No problem with this one! You can definitely just make your pieces to the same measurements and you'll be fine! 🙂
Heidi Folger
Thanks Tamara!