The Cozy Couch & Bedside Organizer Caddy Tutorial will demonstrate how to create your own handy bed pocket - in right and left-handed video tutorials!
 Disclaimer: This post includes affiliate links; materials provided by Red Heart and Brittany.

The Cozy Couch & Bedside Organizer Caddy Tutorial will demonstrate how to create your own handy bed pocket - in right and left-handed video tutorials!
Disclaimer: This post includes affiliate links; materials provided by Red Heart and Brittany.
March might be known for "madness" - but it's been all good on Moogly this month! This month's Facebook Live shares all the latest Moogly projects, giveaways, and sneak peeks. And later on YouTube, I'm telling you all about the world's only crochet-only conference - happening this summer!
 Disclaimer: This post is sponsored by Red Heart Yarn, and may contain affiliate links.
I've had the pleasure of working with Unicorn Fibre products for several years now, and they are the only products I use for blocking and washing my crochet and knit items. So I'm thrilled to be giving away a set of their Fibre Rinse, Fibre Wash, and Power Scour on Moogly!
 Disclaimer: This giveaway is sponsored by Unicorn Fibre but all opinions are my own.
March is National Crochet Month - and National Craft Month! And I've been having a great time combining the two, using Leisure Arts Diamond Art Kits! It's also been wonderful doing a takeover of Leisure Arts' social media this weekend - including this Diamond Art giveaway!
 Disclaimer: This post is sponsored by Leisure Arts and includes affiliate links.
Up next at number 6 for MooglyCAL2019 is a fun geometric block by Mary Beth Temple of Hooked for Life! There are so many fantastic color possibilities and a bit of texture too - get all the details below!
 Disclaimer: This post includes affiliate links; materials provided by Red Heart Yarns, Furls Crochet, and Chetnanigans. [Read more...]
The Pixie Shawlette Tutorial will show you how to turn just one ball of Red Heart Croquette into a lovely shawl - in right and left-handed video tutorials!
 Disclaimer: This post includes affiliate links; materials provided by Red Heart and Brittany.
Want to know what's Hot Right Now? We've got the answers on Hookin On Hump Day - and this round, it's all about the cozy crochet! Check out all these gorgeous designs - and then add your own to the HOHD link party on Moogly and Petals to Picots!

The Cozy Couch and Bedside Organizer Caddy is perfect for your favorite chair, sofa, or right in the bedroom - and ready to hold everything you like to keep close at hand, safe and organized! And it's a free pattern on Moogly featuring Red Heart With Love!
Disclaimer: This post includes affiliate links; materials provided by Red Heart and Brittany Hooks.
Prefer an ad-free PDF? You've got options!


Prefer the free blog version? Keep scrolling!
This crochet Bedside Organizer is very simple, featuring the half double crochet stitch almost exclusively - perfect for beginners! So if you're a more advanced crocheter, feel free to play with the numbers and details to customize your project.

The Cozy Couch & Bedside Organizer Caddy is part of the Hygge Home Crochet Along, hosted by Underground Crafter and sponsored by Red Heart Yarns! Click the image below to check out all the gorgeous free home decor patterns that are part of the collection!

Made with Red Heart With Love, the first section of the Bedside Organizer slips between the mattress and box springs (or along the inside of the couch) to hold it in place. To adjust this for a set of bunk beds, you can add a couple crochet chains to tie the first row and the fold line together! It really is handy all over the house!

Add this pattern to your Ravelry Queue and Favorites
US-I, 5.5mm hook - Brittany Hooks
400 yds Red Heart With Love (100% Acrylic; “4”/Medium/Worsted/Aran/UK: 10-12 ply)
Color A: White (1 skein)
Color B: Pewter (1 skein)
Gauge: 12 sts x 9 rows = 4"/10 cm in hdc
Finished Size: 16" wide x 25" long
Cozy Couch and Bedside Organizer Caddy Tutorial
Switching Colors at the End of a Row
Beginning with Row 58, carry or "float" the unused color along the side to avoid additional ends to weave in - click here for a tutorial on this technique.
Row 1: With Color A, ch 49, skip the chs closest to the hook, hdc in each rem ch across; turn. (48 hdc in every row of the pattern)
Row 2 - 29: Ch 1, hdc in each st across; turn. At the end of Row 29, finish last st with Color B, and break Color A.
Row 30 - 58: Rep Row 2. At the end of Row 58, finish last st with Color A.
Row 59: Ch 1, blo hdc in each st across; turn.
Row 60 - 62: Rep Row 2. At the end of Row 62, finish last st with Color B.
Row 63: Rep Row 59.
Row 64 - 66: Rep Row 2. At the end of Row 66, finish last st with Color A.
Row 67: Rep Row 59.
Row 68 - 70: Rep Row 2. At the end of Row 70, finish last st with Color B.
Row 71: Rep Row 59.
Row 72 - 74: Rep Row 2. At the end of Row 74, finish last st with Color A.
Row 75: Repeat Row 59.
Row 76 - 78: Rep Row 2. At the end of Row 78, finish last st with Color B, and break Color A.
Row 79: Ch 1, blo sc in each st across; break yarn.
Step1: With odd numbered rows facing out, fold at Row 59. Rows 59 - 79 will form the front of the pocket.

Step 2: Use stitch markers to hold pocket in place.

With Color B, join to the side of Row 59 with a sl st, ch 1, and sc through front *and* back layers of pocket, enclosing any yarn carried along the side.
Continue to sc along side of Color B section, switching to Color A to crochet along the side of the Color A rows.
At the corner, ch 2, and sc across the foundation chain. Then, ch 2 again, and sc along the other side, switching to Color B for that section.
Sc through front and back layers of opposite side of pocket, finishing this row at the opposite end of Row 59.

Step 3: Use stitch markers to plan your pocket divisions.

This is a custom feature - place the lines where you want them so that the pockets are the right size for the items you want to keep in the caddy.

Once marked, use surface crochet (tutorial linked above) to crochet along the line, from Row 59 to Row 79, going through both layers of the pocket, switching colors to match the stripes as desired.

Ready to make your own Cozy Couch and Bedside Organizer Caddy? If this free crochet bed pocket pattern does inspire you to make your own organizer caddy, and you post a photo on social media, be sure to tag me @mooglyblog or #mooglyblog so I can check it out too! I love seeing what you make!

Follow Moogly on Facebook, Twitter, Pinterest, Instagram, and TikTok! Thank you to Red Heart Yarns and Brittany for providing the materials shown in this post. Written pattern copyright Tamara Kelly 2019, all rights reserved. Please do not reprint or repost this pattern, but please do link to this page to share this pattern with others.
If you wish to make items for sale from this pattern or translate it to another language, please visit the About page for details.

The Pixie Shawlette is a light and lively free crochet shawl pattern on Moogly that uses just one ball of Red Heart Croquette - and is full of sparkle!
Disclaimer: This post includes affiliate links; materials provided by Red Heart and Brittany Hooks.
Prefer the free blog version? Keep scrolling!
A simple 10-row repeat is the featured stitch pattern in the Pixie Shawlette - it shows off the yarn so beautifully! I went with the neutral toned Stonehenge colorway, but Red Heart Croquette comes in a bunch of gorgeous colors to choose from, each of which will give a different look. And with just one skein per shawlette, you can try them all!

The Pixie Shawlette is a "shawlette" size, as you can see in the schematic below. I love this size for a light spring/summer accessory, and the fingering weight yarn is perfect for this too - plus it kept it as a one skein pattern! But if you prefer a bigger shawl, that's no problem at all - just see the Notes below and pick up an extra ball or two of Red Heart Croquette!

Add this pattern to your Ravelry Queue and Favorites
US-G, 4.0mm hook - Brittany Hooks
1 ball Red Heart Croquette (1 - Super Fine/UK: 4 ply; 239 yds/219 m; 1.5 oz/45 g)
Colorway Shown: Stonehenge
Stitch Markers
Gauge: 15 sts x 9 rows = 4"/10 cm in dc
Size/Schematic (shown on the blocking board, measured point to point):

CSDC - Chainless Starting Double Crochet
Dc2tog - Double Crochet Two Together decrease
CSDC/dc2tog - Make a CSDC in the first st but stop with 2 loops left on the hook, insert hook in next st, yo and pull up a loop, yo and pull through 2 loops, yo and pull through all remaining loops on hook.
This pattern can be made as large as desired by adding more 10-row repeats (Rows 4-13). This will require additional yarn, and the stitch count will always be the number of the row +2.
If you prefer not to use the CSDC stitch, you can substitute a ch 3 or whatever dc substitute you prefer.
This pattern begins with a magic circle, but do NOT close the magic circle after Row 1 - insert 1 or 2 stitch markers to hold it open to be worked into for the edging.
Row 1: Make a magic circle, CSDC in the ring, 2 dc in the ring; turn, do NOT close ring completely. (3 dc)
Row 2: CSDC/dc2tog, 3 dc in the last st; turn. (4 sts)
Row 3: (CSDC, 2 dc) in the first st, dc in the next st, dc2tog; turn. (5 sts)
Row 4: CSDC/dc2tog, dc across until 1 st remains, 3 dc in the last st; turn. (6 sts)
Row 5: (CSDC, 2 dc) in the first st, dc across until 2 sts rem, dc2tog; turn. (7 sts)
Row 6 and 7: Rep Rows 4 and 5.
Row 8: Rep Row 4.
Row 9: (CSDC, ch 1, dc) in first st, *ch 1, skip next st, dc in next st; rep from * until 3 sts rem, ch 1, skip next st, dc2tog, turn. (11 sts including chs)
Row 10: CSDC/dc2tog in first st and ch sp, dc in each st and ch sp until 1 st rem, 3 dc in last st; turn. (12 sts)
Row 11: Rep Row 9.
Row 12: Repeat Row 10.
Row 13: Repeat Row 5.
Row 14 - 73: Repeat Rows 4-13 seven times.
Edging: Ch 1, sc in each st across last row until 1 st rem, (sc, ch 1, sc) in last st, [*ch 2, sc in top of next row; rep from * until 1 row rem], ch 2, (sc, ch 1, sc) in magic circle, rep from [ to ], ch 2, sc in side of first st of last row, ch 1, join. Close magic circle and weave in ends.
I can’t wait to see your Pixie Shawlettes! If this free crochet shawl pattern does inspire you to make your own Pixie, and you post a photo on social media, be sure to tag me @mooglyblog or #mooglyblog so I can check it out too! I love seeing what you make!

Follow Moogly on Facebook, Twitter, Pinterest, Instagram, and TikTok! Thank you to Red Heart Yarns and Brittany for providing the materials shown in this post. Written pattern copyright Tamara Kelly 2019, all rights reserved. Please do not reprint or repost this pattern, but please do link to this page to share this pattern with others.
If you wish to make items for sale from this pattern or translate it to another language, please visit the About page for details.
The Diamond Crochet Hat Tutorial demonstrates how to make both sizes of this fantastic crochet beanie or slouch - in right and left-handed video tutorials!
 Disclaimer: This post includes affiliate links; materials provided by Red Heart and Laurel Hill.
Getting older happens to every one of us if we're lucky - and for most, that eventually includes reading glasses! I've recently started using them myself, and I can really see how it helps my stitching (no pun intended)! So I reached out to Readers.com to share the love - with a review and giveaway here on Moogly!
 Disclaimer: This post includes affiliate links; materials and code provided by Readers.com; all opinions are my own.

The Diamond Crochet Hat is the companion to the Diamond Crochet Cowl - and a reader request! With its super stretchy brim and classic look, you're sure to love this free crochet hat pattern on Moogly!
Disclaimer: This post includes affiliate links; materials provided by Red Heart and Laurel Hill.
Prefer an ad-free PDF? You've got options!


Prefer the free blog version? Keep scrolling!
The Diamond Crochet Cowl was one of my first crochet patterns - and a rather ambitious one for me as a new designer! But it's become a favorite over the years, and inspired requests for a matching hat. So the Diamond Crochet Hat has been added - in sparkly Red Heart Hygge Charm!

The yarns I originally used to design the Diamond Crochet Cowl have been discontinued for some time now, so I wanted to find a great substitute. Red Heart Hygge Charm was a perfect one - or you could use Red Heart Soft if you prefer this hat without the sparkle. (Ed Note: Charm has also been discontinued - but Red Heart Soft is still a great substitute!)
I'm also excited to say that the Diamond Crochet Hat is part of the 2019 International Crochet Month Celebration hosted by Underground Crafter! CLICK HERE to check out all the fantastic freebies in this year's blog hop! ♥

The Diamond Crochet Hat pattern features a very stretchy brim, so there are 2 sizes: Teen/Adult Small and Adult Large. The patterns are written up separately so they are easier to follow. While I made the "slouch" version of the Teen/Adult Small, instructions are included for a tighter fitting "beanie" version as well, for a truly custom fit for each person!

Add this pattern to your Ravelry Queue and Favorites
US - I, 5.5mm hook - Laurel Hill
150 - 200 yds Red Heart Hygge Charm (4 – Medium/Worsted/UK: 10-12 ply; 432yds (395 m); 7oz. (198g))
Colorway Shown: Supernova
Yarn Substitution Recommendation: Red Heart Soft
Snap-on Faux Fur Pom Pom (optional)
Matching thread and sewing needle (optional)
Gauge: 3 diamond pattern reps x 10 rows = 4"
Sizes: Teen/Adult Small (20-22" head) and Adult Large (22-24" head)
CSDC - Chainless Starting Double Crochet
Fpdc - front post double crochet
Matching Pattern: Diamond Crochet Cowl
This pattern is worked from the top down. Be sure to follow the instructions for your size.
If you prefer to avoid the CSDC, you can substitute a ch 3 or whatever dc substitute you prefer.

Rnd 1: Make a magic circle, CSDC in the ring, 11 dc in the ring; join. (12 dc)
Rnd 2: (CSDC, dc) in the first st, 2 dc in each rem st around; join. (24 dc)
Rnd 3: Ch 1, *[2 sc in the next st, fpdc around the next st] 3 times, sc in the next st, 2 fpdc around the next st; rep from * around, join. (36 sts)
Rnd 4: (CSDC, dc) in the first st, dc in the next 2 sts, *2 dc in the next st, dc in the next 2 sts; rep from * around, join. (48 dc)
Rnd 5: Ch 1, sc in the first st, fptr around the last post st 2 rows below, [sc in the next 3 sts of previous row without skipping any behind post st, fptr around next post st 2 rows below] 4 times, skip next st of previous rnd, *[sc in the next 3 sts of previous row without skipping any behind post st, fptr around next post st 2 rows below] 5 times, skip next st of previous rnd; rep from * once, sc in last 2 sts of previous rnd, join. (60 sts in each rem rnd until brim)
Rnd 6: CSDC in the first st, dc in each rem st around; join.
Rnd 7: Ch 1, sc in the first 3 sts, fptr2tog around the first 2 post sts 2 rows below, skip next st of previous rnd, *sc in next 3 sts, fptr2tog around previous post st and next post st, skip next st of previous rnd; rep from * around, join.
Rnd 8: Rep Row 6.
Rnd 9: Ch 1, sc in the first st, fptr2tog around the last and first fptr2tog sts 2 rows below, skip next st of previous rnd, *sc in next 3 sts, fptr2tog around previous and next fptr2tog sts, skip next st of previous rnd; rep from * around until 2 sts rem, sc in last 2 sts, join.
Rnd 10 - 17: Repeat Rnds 6-9; if making beanie version go straight to Brim Instructions.
Rnd 18 - 21 (Slouch Version Only): Repeat Rnds 6-9, then go to Brim Instructions.
Rnd 1: Make a magic circle, CSDC in the ring, 15 dc in the ring; join. (16 dc)
Rnd 2: (CSDC, dc) in the first st, 2 dc in each rem st around; join. (32 dc)
Rnd 3: Ch 1, *2 sc in the next st, fpdc around the next st; rep from * around, join. (48 sts)
Rnd 4: (CSDC, dc) in the first st, dc in the next 2 sts, *2 dc in the next st, dc in the next 2 sts; rep from * around, join. (64 sts in each rem rnd until brim)
Rnd 5: Ch 1, sc in the first st, fptr2tog around the last and first fpdc sts 2 rows below, skip next st of previous rnd, *sc in next 3 sts, fptr2tog around the last and first fpdc sts 2 rows below, skip next st of previous rnd; rep from * around until 2 sts rem, sc in last 2 sts, join.
Rnd 6: CSDC in the first st, dc in each rem st around; join.
Rnd 7: Ch 1, sc in the first 3 sts, fptr2tog around the first 2 post sts 2 rows below, skip next st of previous rnd, *sc in next 3 sts, fptr2tog around previous post st and next post st, skip next st of previous rnd; rep from * around, join.
Rnd 8: Rep Row 6.
Rnd 9: Ch 1, sc in the fist st, fptr2tog around the last and first fptr2tog sts 2 rows below, skip next st of previous rnd, *sc in next 3 sts, fptr2tog around previous and next fptr2tog sts, skip next st of previous rnd; rep from * around until 2 sts rem, sc in last 2 sts, join.
Rnd 10 - 17: Repeat Rnds 6-9; if making beanie version go on to Brim Instructions.
Rnd 18 - 21 (Slouch Version Only): Repeat Rnds 6-9.
Row 1: Ch 8, blo sc in the 2nd ch from hook and each remaining ch, sc2tog in the next 2 sts of the last rnd; turn. (8 sts)
Row 2: Skipping the sc2tog, blo sc in each remaining st across; turn. (7 sts)
Row 3: Ch 1, sc in blo sc in each st across, sc2tog in the next 2 sts of the last rnd; turn. (8 sts)
Repeat Rows 2 and 3 until 1 st of the last rnd of the hat remains.
Repeat Row 2.
Next Row: Ch 1, sc in blo sc in each st across, sc2tog in the last and first last rnd sts; turn. (8 sts)
Final Row: Skipping the sc2tog, blo sc in each remaining st across; break yarn leaving a 12″ tail. (7 sts)
Sew the Brim edges together using the whip stitch, joining first and last rows. Be sure to work into the BLO of the last row to maintain the ribbed look.
Optional: Sew Pom snap to top of hat centered on Rnd 1.
Now I can’t wait to see your Diamond Crochet Hats! If this free crochet hat pattern does inspire you to make your own slouch or beanie, and you post a photo on social media, be sure to tag me @mooglyblog or #mooglyblog so I can check it out too! I love seeing what you make!
Follow Moogly on Facebook, Twitter,Pinterest, Instagram, and YouTube! Thank you to Red Heart Yarns and Laurel Hill for providing the materials shown in this post. Written pattern copyright Tamara Kelly 2019, all rights reserved. Please do not reprint or repost this pattern, but please do link to this page to share this pattern with others. If you wish to make items for sale from this pattern or translate it to another language, please visit the About page for details.
The fifth block for MooglyCAL2019 is courtesy of KatiDCreations! It includes a number of options to give it a unique look - get all the details below!
 Disclaimer: This post includes affiliate links; materials provided by Red Heart Yarns, Furls Crochet, and Chetnanigans. [Read more...]
Red Heart Croquette is a yarn unlike any other! So let's get up close and personal with this new yarn in this month's Moogly Yarn Love yarn review - and get some free patterns to make with it!
 Disclaimer: This post was sponsored by Red Heart Yarn, but all opinions are my own.
This post includes affiliate links.
How about a round of freebies? It's your clicks that tell us the top projects for each Hookin On Hump Day - and this round, they all just so happen to be free! Even better, we've got a bit of variety, so read on to get all the fab links - and then add your own to the HOHD link party on Moogly and Petals to Picots!
March is National Crochet Month, and at Furls, that means fantastic deals all month long - and giveaways too! Read on for details!
 Disclaimer: This post was sponsored by Furls but all opinions are my own; this post includes affiliate links.
Red Heart Croquette is a brand new super fine yarn with amazing yardage, long striping repeats, and a touch of sparkle - and I get to give away 10 adorable cakes of it here on Moogly!

Disclaimer: This post was sponsored by Red Heart Yarn, but all opinions are my own.
There are so many fantastic patterns out now featuring colorwork - but managing multiple colors of yarn at the same time can be a tangled mess! Make it easier with Sheep Yarn Bobbins, a Quick Cricut Craft on Moogly!
 Disclaimer: This post includes affiliate links. Moogly is part of the Cricut Core Blogger Program.
The Cool Hand Pocket Scarf Tutorial shows just how fun and easy it is to crochet with nothing but your hands and the yarn - in right and left-handed video tutorials!
 Disclaimer: This post includes affiliate links; materials provided by Red Heart.
February is the shortest month of the year - which means it's been *packed* full of crochet goodness! This month's Facebook Live shares all the latest Moogly projects, giveaways, and sneak peeks. And later on YouTube, I'm tackling a topic I've been getting a lot of questions about lately - maintaining your stitch count and keeping your edges straight!
 Disclaimer: This post is sponsored by Red Heart Yarn, and may contain affiliate links.
The Blue Elephants Make It Happen Collection is a brand new collection of three printable ebooks that were created to help makers do more, and do it more easily! And I'm giving away one set to one very lucky maker right here on Moogly!
 Disclaimer: Materials provided by The Blue Elephant but all opinions are my own; this post includes affiliate links.
After I designed the knit Big Fast Pocket Scarf, I was deluged with requests for a crochet version! Well, that would've taken a great big hook - so I used my fingers to create the Cool Hand Pocket Scarf with the same great look!
 Disclaimer: This post includes affiliate links, materials provided by Red Heart Yarn.
The fourth block for MooglyCAL2019 is courtesy of ReCrochetions! It's has a unique construction, and is absolutely brilliant - and fun! Get the link and all the details you need for success below!
 Disclaimer: This post includes affiliate links; materials provided by Red Heart Yarns, Furls Crochet, and Chetnanigans. [Read more...]
The Simple Home Basket Tutorial will show you just how fun and easy this basket is to crochet - in right and left-handed video tutorials!
 Disclaimer: This post includes affiliate links; materials provided by Red Heart Yarn and Brittany Needles.
Who's ready for some hot new projects and designs? You're in the right place with Hookin On Hump Day - where we share the most popular new crochet and knit projects every two weeks. This round, we've got 5 fantastic new crochet projects to share - read on to get all the fab links - and then add your own to the HOHD link party on Moogly and Petals to Picots!

Stitch markers are an indispensable tool for every crocheter - so why not use ones that are cute and fun!? And some of the most adorable stitch markers out there are made by KoPoUK - and she is very generously giving away a set to one very lucky winner on Moogly!
 Disclaimer: Giveaway sponsored by KoPoUK but all opinions are my own. This post includes affiliate links.
The Final Frost Scarf Tutorial will walk you through each row of this fun and elegant cable crochet scarf pattern - in right and left-handed video tutorials!
 Disclaimer: This post includes affiliate links; materials provided by Red Heart Yarn and Brittany Needles.
There are so many amazing crochet designers and teachers out there, I like to take the chance to highlight them when I can - so today I'm sharing a guest tutorial by my good friend and amazing crocheter Linda Dean!

Recently I shared a Quick Cricut Craft: “Shh… I’m Counting” Socks. They are a lot of fun, but of course, not everyone owns a Cricut - so I'm giving away premade iron-on sheets to 5 very lucky winners here on Moogly!
 Disclaimer: Materials provided by Cricut but all opinions are my own.
They say that on St. Patrick's Day, everyone's Irish - and to be sure, there's much to celebrate about the green isle that so popularized the art of crochet! And the cutest way I've seen to celebrate is with the Pat E O'Lucky Shawl Pin from LickinFlames... so let's give one away on Moogly! (And there's a discount code too!!)
 Disclaimer: Materials provided by LickinFlames but all opinions are my own.
The Simple Home Basket is big, sturdy, and perfect in any room of the home! Pick out the two colors of Red Heart Sweet Home that fit your decor and whip one up with this free crochet basket pattern on Moogly!
 Disclaimer: This post includes affiliate links; materials provided by Red Heart, Brittany, Marvy Uchida, and Cricut.
The third block for MooglyCAL2019 is courtesy of Cre8tion Crochet! It's a stunning square with lots of interest - get the pattern and all the details below!
 Disclaimer: This post includes affiliate links; materials provided by Red Heart Yarns, Furls Crochet, and Chetnanigans. [Read more...]
Red Heart Sweet Home is a "chenille-style yarn that is made for cozy home décor and more!" So let's get cozy with this new yarn in this month's Moogly Yarn Love yarn review - and get some free patterns to make with it!
 Disclaimer: This post was sponsored by Red Heart Yarn, but all opinions are my own.
This post includes affiliate links.
Welcome all to Hookin On Hump Day - where we share the most popular new crochet and knit projects every two weeks. This round, we've got 5 gorgeous crochet projects to share - read on to get all the fab links - and then add your own to the HOHD link party on Moogly and Petals to Picots!

Red Heart Sweet Home is a fuzzy, chenille-style Super Bulky weight yarn that is perfect for anything cuddly and cozy! It's new to Red Heart, but patterns are popping up all over - and I get to give away 4 great big balls of it here on Moogly!
 Disclaimer: This post was sponsored by Red Heart Yarn, but all opinions are my own; this post includes affiliate links.
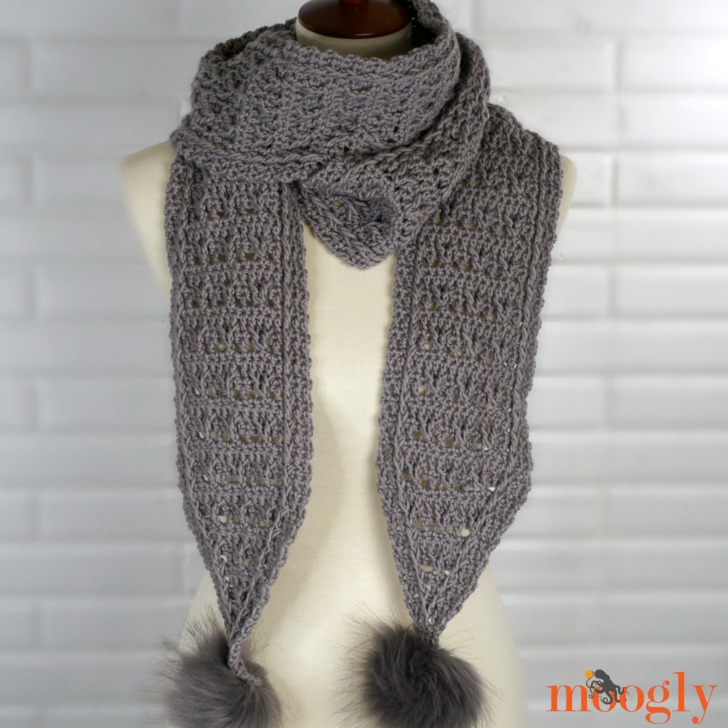
The Final Frost Scarf is long, cozy, fun, and the perfect match for the Final Frost Beanie! Make it in any length desired, with this free crochet scarf pattern!
Disclaimer: This post includes affiliate links; materials provided by Red Heart Yarns and Brittany Needles.
Prefer an ad-free PDF? You've got options!
Prefer the free blog version? Keep scrolling!
The Final Frost Scarf features the same cable pattern as the Final Frost Beanie and is once again made with Red Heart Chic Sheep by Marly Bird. This yarn is so warm and cozy, it's washable merino is a great choice for chilly climates - and it's been plenty chilly here lately!

Worked from the center out, the Final Frost Scarf has two perfectly balanced ends, topped off by (optional) faux fur pom poms - to match the pom on the hat of course! While the stitch pattern might look complicated, it's mostly an easy 4-row repeat - and there is now a video tutorial too!

Add this pattern to your Ravelry Queue and Favorites
US-I, 5.5mm Brittany Crochet Hook
300-550 yds Red Heart Chic Sheep by Marly Bird (100% Merino Wool; Medium/UK: 10-12 ply; 186 yds/170m; 3.5oz./100g)
Colorway: Sterling (3 balls for length shown)
Two Snap-on Faux Fur Pom Pom (optional)
Matching thread and sewing needle (optional)
Gauge: 12 rows = 4" in pattern
Size: 5" wide x any length (100" shown)
Chainless Starting Double Crochet - CSDC
Foundation Double Crochet - FDC
Front Post Double Crochet (fpdc)
Matching Pattern: Final Frost Beanie
CSDC - see linked tutorial above
CSDC/dc2tog – work as for a standard CSDC, stopping with 2 loops left on the hook, yo and insert hook in next st, yo and pull up a loop, yo and pull through 2 loops, yo and pull through all remaining loops on hook
CSDC/dc3tog - work as for a standard CSDC, stopping with 2 loops left on the hook, [yo and insert hook in next st, yo and pull up a loop, yo and pull through 2 loops] twice, yo and pull through all remaining loops on hook
FDC - see linked tutorial above
split fpdc – yo and insert hook around post of next st 2 rows below (the dc st beneath the next sc stitch) from front to back, yo and pull up a loop, yo and pull through 2 loops (2 loops remain on hook), skip the next st, yo and insert hook around post of next st from front to back, yo and pull up a loop, yo and pull through 2 loops (3 loops remain on hook), yo and pull through all 3 loops to finish stitch
This pattern is worked in two halves so that the decreases and cables point the same direction towards the two ends. The second half is worked directly into the foundation chain of the first half, so there is no need for seaming.
You can make this scarf in any length desired - work one half of the scarf until nearly half the length desired, finish that rep and then go to the decreases (beginning in Row 134). Join and work the same number of repeats for the other half.
The CSDC stitch is used to give the scarf a finished edge that does not require a further edging or border. If a chain 3 substitute is used, you may wish to add an additional border to the scarf, which may require additional yarn.
If you prefer not to use the FDC stitch, begin with a ch 21, skip the first 2 chs closest to the hook (skipped chs do not count as a st), and dc in each remaining chain across. Then continue with Row 2 instructions.
Pull the yo and pull through loop of the "fpdc in dc below next st" up to the height of the active row before finishing the stitch.
Row 1: FDC 19; turn. (19 sts)
Row 2: Ch 1, sc in each st across; turn. (19 sts)
Row 3: CSDC in first st, dc in next st, fpdc in st below next st, dc in next st, *ch 1, split fpdc, ch 1, skip 3 sts behind the split fpdc, dc in next st; rep from * twice, fpdc in st below next st, dc in last 2 sts; turn. (19 sts including chs)
Row 4: Ch 1, sc in each st and ch-sp across; turn. (19 sts)
Row 5: CSDC in first st, dc in next st, fpdc in post st below next st, dc in next 13 sts, fpdc in post st below next st, dc in last 2 sts; turn. (19 sts)
Rows 6 - 133: Rep Rows 2-5.
Row 134: Rep Row 2.
Row 135: CSDC/dc2tog, dc in next st, fpdc in first post st 2 rows below, ch 1, split fpdc, ch 1, skip 4 sts behind split fpdc, dc in next st, ch 1, split fpdc, ch 1, skip 3 sts behind split fpdc, dc in next st, ch 1, split fpdc, ch 1, fpdc in post st below next st, skip 4 sts behind split fpdc, dc in next st, dc2tog in last 2 sts; turn. (17 sts)
Row 136: Rep Row 4. (17 sts)
Row 137: CSDC/dc2tog, dc in next st, fpdc in first post st 2 rows below, dc in next 9 sts, fpdc in next post st 2 rows below, dc in next st, dc2tog in last 2 sts; turn. (15 sts)
Row 138: Rep Row 2. (15 sts)
Row 139: CSDC/dc2tog, dc in next st, split fpdc working first half in first post st 2 rows below and second half in st after the next st, ch 1, skip 2 sts behind split fpdc, dc in next st, ch 1, split fpdc, ch 1, skip 3 sts behind split fpdc, dc in next st, ch 1, split fpdc working first half in next st and second half in the last post st 2 rows below, skip 2 sts behind split fpdc, dc in next st, dc2tog in last 2 sts; turn. (13 sts)
Row 140: Rep Row 4. (13 sts)
Row 141: CSDC/dc2tog, dc in next st, fpdc in first split fpdc st 2 rows below, dc in next 5 sts, fpdc in last split fpdc st 2 rows below, dc in next st, dc2tog in last 2 sts; turn. (11 sts)
Row 142: Rep Row 2. (11 sts)
Row 143: CSDC/dc2tog, dc in next st, fpdc in first post st 2 rows below, ch 1, split fpdc, ch 1, fpdc in next post st 2 rows below, skip 5 sts behind split fpdc, dc in next st, dc2tog in last 2 sts; turn. (9 sts)
Row 144: Rep Row 4. (9 sts)
Row 145: CSDC/dc2tog, dc in next st, fpdc in first post st 2 rows below, dc in next st, fpdc in last post st 2 rows below, dc in next st, dc2tog in last 2 sts; turn. (7 sts)
Row 146: Rep Row 4. (7 sts)
Row 147: CSDC/dc2tog, dc in next st, split fpdc working first half in first post st 2 rows below and second half in last post st 2 rows below, skip 1 sts behind split fpdc, dc in next st, dc2tog in last 2 sts; turn. (5 sts)
Row 148: Rep Row 4. (5 sts)
Row 149: CSDC/dc2tog, dc in next st, dc2tog in last 2 sts; turn. (3 sts)
Row 150: CSDC/dc3tog; break yarn and finish off. (1 st)
Row 1: From Wrong Side (back of cables), join to foundation chain of Row 1 of First Half, ch 1, sc in each st across; turn. (19 sts)
Row 2: CSDC in first st, dc in next st, fpdc in post st below next st, dc in next 13 sts, fpdc in post st below next st, dc in last 2 sts; turn. (19 sts)
Continue with First Half of the Scarf Instructions beginning with Row 2.
Add Pom Poms (optional): Sew poms to each pointed end of the scarf. I recommend using the poms linked above, as they are removable for washing.
I went extra long for my Final Frost Scarf - so I could do lots of cozy wrapping, and because I'm a little taller than most. But as described above, you can customize this free crochet pattern for any size needed! Just be sure to read through all the notes and instructions first so you understand how it all comes together.

Now I can’t wait to see your Final Frost Scarves! If this pattern does inspire and you post a photo on social media, tag me @mooglyblog so I can check it out too! I love seeing what you make!
Follow Moogly on Facebook, Twitter, Pinterest, Instagram, and YouTube! Thank you to Red Heart Yarns and Brittany Needles for providing the materials shown in this post. Written pattern copyright Tamara Kelly 2019, all rights reserved. Please do not reprint or repost this pattern. Please do link to this page to share this pattern with others. For more info, visit the About page for details.
The Galaxy Cardigan Tutorial will walk you through the small changes that turn the Cosmos Cardigan into this simple child size crochet sweater pattern - in right and left-handed video tutorials!
 Disclaimer: This post includes affiliate links; materials provided by Red Heart Yarn.
Let's kick off another year of Moogly fun! This month's Facebook Live shares all the latest Moogly projects, giveaways, and sneak peeks. And later on YouTube, I've been challenged to share 10 Things You Didn't Know About Me - not related to crochet!
 Disclaimer: This post is sponsored by Red Heart Yarn, and may contain affiliate links.
The Rows of Love Blanket Tutorial is full of color and post stitches and puff stitches - oh my! Learn how to make it in any size, in right and left-handed video tutorials on Moogly!
 Disclaimer: This post includes affiliate links; materials provided by Red Heart Yarn.
It's a cold one out there as I write this - but my hand is nice and warm on my hooks because they are Furls Streamlines! Lightweight, ergonomic, wood, they may just change the way you crochet - and I get to give away 3 Furls Streamline crochet hooks here on Moogly! And this giveaway is open worldwide!
 Disclaimer: This post includes affiliate links and was sponsored by Furls, but all opinions are my own.

