The Rows of Love Blanket features 3D puff stitch hearts and pretty stripes, and even post stitches - for a ton of texture, and a gorgeous blanket you can make in any size!
 Disclaimer: This post includes affiliate links; materials provided by Red Heart Yarns and Furls Crochet.

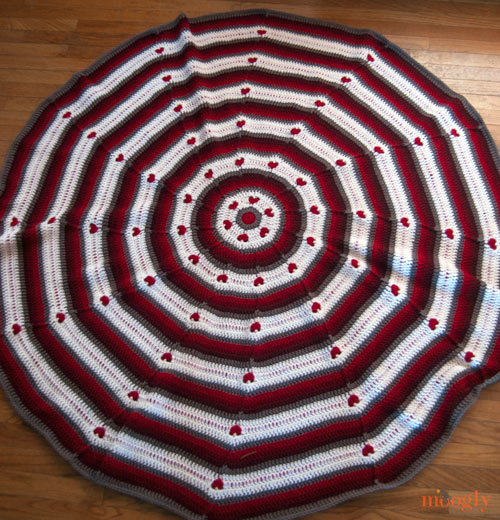
A few years ago, I shared my pattern for the Circle of Love Afghan - a fun round throw with hearts and stripes. Since then, I've had several requests for a rectangular version. I made a few changes, but it was certainly the inspiration!
One of the biggest features of the Rows of Love Blanket is the hearts! Made with puff stitches, they have a ton of texture. But if you aren't a fan of puff stitches, you could easily substitute a pair of popcorn stitches instead!

To make this project, I used Red Heart Soft - it's 100% acrylic and machine washable/dryable, so it's great for kids, pets, and gifting. The silky smooth finish lets the stitches here really pop!

Rows of Love Blanket
Add this pattern to your Ravelry Queue and Favorites
US - J, 6.0mm - Furls Crochet Hook
1385-10,906 yds Red Heart Soft (100% Acrylic; Worsted/Medium-4/UK: 10-12 ply)
Color A: Lilac
Color B: Light Grey Heather
Color C: White
Color D: Fantasy
Gauge: 13 sts x 8.5 rows = 4"/10cm in pattern

Helpful Links and Tutorials:
FDC - Foundation Double Crochet
STDC - Standing Double Crochet
CSDC - Chainless Starting Double Crochet
Twisted Sc - Twisted Single Crochet
Sizes
Refer to this chart for your first-row stitch count and final row count (before the border), as well as the yarn amounts required. To determine how many balls of yarn you will need, divide the yardage given below by the yards in one skein of yarn in your choice of color. Note that Red Heart Soft Solids is 256 yds per ball, while Heathers and Prints are 204 yds per ball.
Baby (shown) - 36" x 37": FDC 119, 78 rows
Total Yarn Needed: 1385 yds
Color A: 226 yds
Color B: 354 yds
Color C: 641 yds
Color D: 164 yds
Lapghan - 36" x 47": FDC 119, 99 rows
Total Yarn Needed: 1795 yds
Color A: 293 yds
Color B: 459 yds
Color C: 830 yds
Color D: 213 yds
Throw - 50" x 70": FDC 167, 148 rows
Total Yarn Needed: 3638 yds
Color A: 593 yds
Color B: 930 yds
Color C: 1684 yds
Color D: 431 yds
Twin - 70" x 90": FDC 233, 190 rows
Total Yarn Needed: 6555 yds
Color A: 1068 yds
Color B: 1675 yds
Color C: 3035 yds
Color D: 777 yds
Queen - 90" x 94": FDC 299, 197 rows
Total Yarn Needed: 8807 yds
Color A: 1435 yds
Color B: 2251 yds
Color C: 4077 yds
Color D: 1044 yds
King/Cal King - 105" x 100": FDC 347, 211 rows
Total Yarn Needed: 10,906 yds
Color A: 1777 yds
Color B: 2787 yds
Color C: 5049 yds
Color D: 1293 yds
Stitch Multiple for Custom Sizing: mult of 6, +5
Row Multiple for Custom Sizing: mult of 7, plus 1
Special Stitches:
bptr - back post treble crochet, right-handed version: yo twice and from the back, insert hook from right to left around the post of the indicated st, yo and pull up a loop, [yo and pull through 2 loops] 3 times
bptr - back post treble crochet, left-handed version: yo twice and from the back, insert hook from left to right around the post of the indicated st, yo and pull up a loop, [yo and pull through 2 loops] 3 times
fptr - front post treble crochet, right-handed version: yo twice and from the front, insert hook from right to left around the post of the indicated st, yo and pull up a loop, [yo and pull through 2 loops] 3 times
fptr - front post treble crochet, left-handed version: yo twice and from the front, insert hook from left to right around the post of the indicated st, yo and pull up a loop, [yo and pull through 2 loops] 3 times
puff - [yo and insert hook in indicated st, yo and pull up a loop] 3 times, yo and pull through all 7 loops on hook
CSDC/dc2tog - work as for a standard CSDC, stopping with 2 loops left on the hook, yo and insert hook in next st, yo and pull up a loop, yo and pull through 2 loops, yo and pull through all remaining loops on hook
bpsc - back post single crochet, right-handed version: from the back, insert hook from right to left around the post of the indicated st, yo and pull up a loop, yo and pull through both loops
bpsc - back post single crochet, left-handed version: from the back, insert hook from left to right around the post of the indicated st, yo and pull up a loop, yo and pull through both loops
Notes:
In Row 3 repeats, use a stitch marker to secure the active loop at the end until you are ready to reinsert your hook in the Row 5 repeat.
The stitch count for every row (except for Row 4 repeats) will be the same as the number of stitches in Row 1.
This pattern begins with FDC sts, which means there is no starting chain. If you prefer not to use the FDC stitch, you can chain and dc into the chain for however many sts needed for your size.
If you prefer not to use CSDC and STDC sts, substitute a ch 3.
Instructions
Row 1: With Color A, FDC for size desired; break yarn and turn.
Row 2: With Color B, STDC in first st, dc in next 4 sts, *bptr around next st, dc in next 5 sts; rep from * to end, break yarn and turn.
Row 3: With Color C, STDC in first st, dc in next st, hdc in next st, dc in next 2 sts, *fptr around next st, dc in next 2 sts, hdc in next st, dc in next 2 sts; rep from * to end, pull up loop and remove hook, do NOT turn.
Row 4: With Color D, join with sl st to first hdc, ch 2, (puff, ch 1, puff) in same st, *ch 3, skip 5 sts, (puff, ch 1, puff) in next st; rep from * across finishing last rep in last hdc of previous row, break Color D yarn and turn.
Row 5: Reinsert hook in active loop of Color C, CSDC/dc2tog in first 2 sts of previous Color C row, bpsc around next Color D puff st, hdc in next ch-1 sp, bpsc around next Color D puff st, dc2tog in next 2 Color C sts enclosing the Color D ch-3, *bptr in next Color C post st, dc2tog in next 2 Color C sts, bpsc around next Color D puff st, hdc in next ch-1 sp, bpsc around next Color D puff st, dc2tog in next 2 Color C sts enclosing the Color D ch-3; rep from * to end, turn.
Row 6: CSDC in first st, dc in next 4 sts, *fptr in next st, dc in next 5 sts; rep from * to end, break yarn and turn.
Row 7: With Color B, repeat Row 2.
Row 8: With Color A, STDC in first st, dc in next 4 sts, *fptr around next st, dc in next 5 sts; rep from * to end, break yarn and turn.
Repeat Rows 2 - 8 until total row count matches size desired.
Edging Rnd 1: With desired color (Color A shown), sc evenly around the entire blanket, working a ch 2 at each corner; join and break yarn.
Edging Rnd 2: Join to any st with desired color (Color C shown), twisted sc in each st around blanket, working (twisted sc, ch 2, twisted sc) in each ch-2 space; join and break yarn.
Now I can't wait to see what colors and sizes you all make with the Feel the Love Blanket pattern! If this pattern does inspire you to make your own cozy afghan, and you post a photo on social media, be sure to tag me @mooglyblog or #mooglyblog so I can check it out too! I love seeing what you make!
Follow Moogly on Facebook, Twitter, G+, Pinterest, Instagram, and Tumblr! Thank you to Red Heart Yarns and Furls Crochet for providing the materials shown in this post. Written pattern copyright Tamara Kelly 2019, all rights reserved. Please do not reprint or repost this pattern, but please do link to this page to share this pattern with others.
To print or download, use the Print Friendly button below, or go to PrintFriendly.com, or right-click to copy and paste it into a word processing document if those options do not work for you (please note that Print Friendly is a free outside website that the button links to, and you can click here for a tutorial on how to use it, but I cannot provide additional technical support for this service). If you wish to make items for sale from this pattern or translate it to another language, please visit the About page for details.


Kyriosity says
Oooh! I've been pondering an afghan for my newest great-niece. Her sister's is a heartsy pattern, but I didn't want to do the same one over, so this might be just the ticket! 😃
Tamara Kelly says
😀 Thank you, I'm so glad you like it!
Rose says
This is so beautiful. The colours blend so well.
Tamara Kelly says
Thank you so much, Rose! ♥
Marny CA says
I see only 6 sizes ... what is the 7th? This is lovely!
Tamara Kelly says
Thank you! That would be the custom sizing - any size you like! 🙂
MichEle says
This blanket it cute! I got through rows 1-4 ok. But I am going to need the video tutorial for row 5! 🙂
Tamara Kelly says
It's in the works! It should go live on the 23rd. 🙂
Leslie Bachman says
Awesome cuz I'm stumped at Row 5 also!!! LOVE this pattern!
Leslie Bachman says
I need some help with this row as well! Will you be doing a video to explain further? Thanks!
Tamara Kelly says
Yes, I'm sorry, it was supposed to go up this week, but I ended up trapped in an airport due to winter storms! It will go up next week. 🙂
Leslie Bachman says
Totally understand! Looking forward to continuing with this beauty!
Bella Sparkles says
Just the sort of project I need! Really lovely. I have a feeling some of your post stitch instructions need amending? They look the same for left-handed as for right-handed...
Tamara Kelly says
Whoops, thank you for the heads up, Bella! 🙂 All fixed! I hope you enjoy it!
Jennifer says
This looks really cute. I was just wondering what the back of the blanket looks like?
Tamara Kelly says
There's a definite wrong and right side - I will be sure to show it in the video tutorial! 🙂
Geraldine Pelletier says
this is beautiful..will definitlly make one for my 2 great grands daughters.for their Christmas this year.
Tamara Kelly says
Thank you so much, Geraldine! ♥
BethAnn Lee says
I bet this could be worked into a chemo hat pattern!! --Next project?--
Tamara Kelly says
♥ I do have a couple heart hat patterns, but I like that idea!
Alicemoreno says
⁰where can I find the heart hat patterns? Our group makes beanies and scarfs for the homeless ,I think I would like this pattern.Thanks Alicemoreno
I just signed up
Tamara Kelly says
Hello! THank you! You can find all my hat patterns at https://www.mooglyblog.com/category/free-moogly-patterns/hats/ 🙂
Margie says
I'm lousy at printed patterns, but I'm excited to hear you're going to do a youtube tutorial!!! I've been wanting to do a Valentines blanket and couldn't settle on a pattern I liked, but I think I want to try this in varying shades of white/pink/red. 😀
Tamara Kelly says
Thank you Margie! It *should* be up tomorrow if we can get the weather and tech to cooperate! 😀
Jennifer Coleman says
How many FDC do I make for the California King size?
Tamara Kelly says
King/Cal King – 105″ x 100″: FDC 347, 211 rows
Guineal Redman says
You have something called an STDC, but it is not listed in your special stitches.
Tamara Kelly says
Hi Guineal! That's because it has it's own tutorial video - it's linked above under Helpful Links and Tutorials. 🙂
Kirsten says
I can't find a 6 mm hook in the brand that I like. The closest thing I can get is a 5.75 mm. I am planning on making the throw size of this pattern. Do you think the hook difference will affect anything in a noticeable way? I imagine that I will use up less yarn with the smaller hook, but not quite sure. I'm still a little new at figuring out gauge and hook sizes, and the final product.
Thanks!
Tamara Kelly says
Hi Kirsten! It depends on your personal tension level - if you get the same gauge I did with a 6mm when you use a 5.75mm because you naturally work a little looser, then that's the hook you should use anyway! However, if your tension level is the same or tighter than mine, it's possible that it could end up a little "denser" in the fabric and therefore a little smaller overall. The bigger the size you are making, the more noticeable this size difference will be. 🙂
Anne Vergona says
Hi Tamara, really love this pattern and just finished making my version using 8ply (DK) yarn and a 4mm hook. Mine is in purples, pinks and white and I'm quite happy with how it turned out. Would like to include a pic but don't know how to do that.
Tamara Kelly says
Thank you so much! I am afraid there isn't a way to share photos here in the comments, but I'd love to see it, and I do share photos in the newsletter! My email is tamarakelly@mooglyblog.com ! 🙂