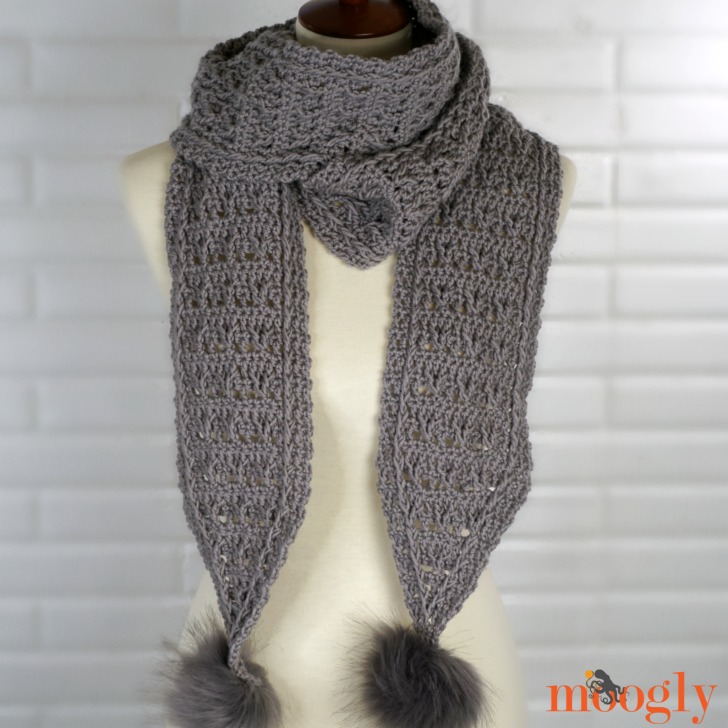
The Final Frost Scarf is long, cozy, fun, and the perfect match for the Final Frost Beanie! Make it in any length desired, with this free crochet scarf pattern!
Disclaimer: This post includes affiliate links; materials provided by Red Heart Yarns and Brittany Needles.
Prefer an ad-free PDF? You've got options!


Prefer the free blog version? Keep scrolling!
Make It A Set
The Final Frost Scarf features the same cable pattern as the Final Frost Beanie and is once again made with Red Heart Chic Sheep by Marly Bird. This yarn is so warm and cozy, it's washable merino is a great choice for chilly climates - and it's been plenty chilly here lately!

Worked from the center out, the Final Frost Scarf has two perfectly balanced ends, topped off by (optional) faux fur pom poms - to match the pom on the hat of course! While the stitch pattern might look complicated, it's mostly an easy 4-row repeat - and there is now a video tutorial too!

Final Frost Scarf
Add this pattern to your Ravelry Queue and Favorites
US-I, 5.5mm Brittany Crochet Hook
300-550 yds Red Heart Chic Sheep by Marly Bird (100% Merino Wool; Medium/UK: 10-12 ply; 186 yds/170m; 3.5oz./100g)
Colorway: Sterling (3 balls for length shown)
Two Snap-on Faux Fur Pom Pom (optional)
Matching thread and sewing needle (optional)
Gauge: 12 rows = 4" in pattern
Size: 5" wide x any length (100" shown)
Helpful Links & Tutorials:
Chainless Starting Double Crochet - CSDC
Foundation Double Crochet - FDC
Front Post Double Crochet (fpdc)
Matching Pattern: Final Frost Beanie
Special Stitches:
CSDC - see linked tutorial above
CSDC/dc2tog – work as for a standard CSDC, stopping with 2 loops left on the hook, yo and insert hook in next st, yo and pull up a loop, yo and pull through 2 loops, yo and pull through all remaining loops on hook
CSDC/dc3tog - work as for a standard CSDC, stopping with 2 loops left on the hook, [yo and insert hook in next st, yo and pull up a loop, yo and pull through 2 loops] twice, yo and pull through all remaining loops on hook
FDC - see linked tutorial above
split fpdc – yo and insert hook around post of next st 2 rows below (the dc st beneath the next sc stitch) from front to back, yo and pull up a loop, yo and pull through 2 loops (2 loops remain on hook), skip the next st, yo and insert hook around post of next st from front to back, yo and pull up a loop, yo and pull through 2 loops (3 loops remain on hook), yo and pull through all 3 loops to finish stitch
NOTES:
This pattern is worked in two halves so that the decreases and cables point the same direction towards the two ends. The second half is worked directly into the foundation chain of the first half, so there is no need for seaming.
You can make this scarf in any length desired - work one half of the scarf until nearly half the length desired, finish that rep and then go to the decreases (beginning in Row 134). Join and work the same number of repeats for the other half.
The CSDC stitch is used to give the scarf a finished edge that does not require a further edging or border. If a chain 3 substitute is used, you may wish to add an additional border to the scarf, which may require additional yarn.
If you prefer not to use the FDC stitch, begin with a ch 21, skip the first 2 chs closest to the hook (skipped chs do not count as a st), and dc in each remaining chain across. Then continue with Row 2 instructions.
Pull the yo and pull through loop of the "fpdc in dc below next st" up to the height of the active row before finishing the stitch.
INSTRUCTIONS
First Half of the Scarf:
Row 1: FDC 19; turn. (19 sts)
Begin Row Repeat
Row 2: Ch 1, sc in each st across; turn. (19 sts)
Row 3: CSDC in first st, dc in next st, fpdc in st below next st, dc in next st, *ch 1, split fpdc, ch 1, skip 3 sts behind the split fpdc, dc in next st; rep from * twice, fpdc in st below next st, dc in last 2 sts; turn. (19 sts including chs)
Row 4: Ch 1, sc in each st and ch-sp across; turn. (19 sts)
Row 5: CSDC in first st, dc in next st, fpdc in post st below next st, dc in next 13 sts, fpdc in post st below next st, dc in last 2 sts; turn. (19 sts)
End Row Repeat
Rows 6 - 133: Rep Rows 2-5.
Row 134: Rep Row 2.
Row 135: CSDC/dc2tog, dc in next st, fpdc in first post st 2 rows below, ch 1, split fpdc, ch 1, skip 4 sts behind split fpdc, dc in next st, ch 1, split fpdc, ch 1, skip 3 sts behind split fpdc, dc in next st, ch 1, split fpdc, ch 1, fpdc in post st below next st, skip 4 sts behind split fpdc, dc in next st, dc2tog in last 2 sts; turn. (17 sts)
Row 136: Rep Row 4. (17 sts)
Row 137: CSDC/dc2tog, dc in next st, fpdc in first post st 2 rows below, dc in next 9 sts, fpdc in next post st 2 rows below, dc in next st, dc2tog in last 2 sts; turn. (15 sts)
Row 138: Rep Row 2. (15 sts)
Row 139: CSDC/dc2tog, dc in next st, split fpdc working first half in first post st 2 rows below and second half in st after the next st, ch 1, skip 2 sts behind split fpdc, dc in next st, ch 1, split fpdc, ch 1, skip 3 sts behind split fpdc, dc in next st, ch 1, split fpdc working first half in next st and second half in the last post st 2 rows below, skip 2 sts behind split fpdc, dc in next st, dc2tog in last 2 sts; turn. (13 sts)
Row 140: Rep Row 4. (13 sts)
Row 141: CSDC/dc2tog, dc in next st, fpdc in first split fpdc st 2 rows below, dc in next 5 sts, fpdc in last split fpdc st 2 rows below, dc in next st, dc2tog in last 2 sts; turn. (11 sts)
Row 142: Rep Row 2. (11 sts)
Row 143: CSDC/dc2tog, dc in next st, fpdc in first post st 2 rows below, ch 1, split fpdc, ch 1, fpdc in next post st 2 rows below, skip 5 sts behind split fpdc, dc in next st, dc2tog in last 2 sts; turn. (9 sts)
Row 144: Rep Row 4. (9 sts)
Row 145: CSDC/dc2tog, dc in next st, fpdc in first post st 2 rows below, dc in next st, fpdc in last post st 2 rows below, dc in next st, dc2tog in last 2 sts; turn. (7 sts)
Row 146: Rep Row 4. (7 sts)
Row 147: CSDC/dc2tog, dc in next st, split fpdc working first half in first post st 2 rows below and second half in last post st 2 rows below, skip 1 sts behind split fpdc, dc in next st, dc2tog in last 2 sts; turn. (5 sts)
Row 148: Rep Row 4. (5 sts)
Row 149: CSDC/dc2tog, dc in next st, dc2tog in last 2 sts; turn. (3 sts)
Row 150: CSDC/dc3tog; break yarn and finish off. (1 st)
Second Half of the Scarf:
Row 1: From Wrong Side (back of cables), join to foundation chain of Row 1 of First Half, ch 1, sc in each st across; turn. (19 sts)
Row 2: CSDC in first st, dc in next st, fpdc in post st below next st, dc in next 13 sts, fpdc in post st below next st, dc in last 2 sts; turn. (19 sts)
Continue with First Half of the Scarf Instructions beginning with Row 2.
Add Pom Poms (optional): Sew poms to each pointed end of the scarf. I recommend using the poms linked above, as they are removable for washing.
I went extra long for my Final Frost Scarf - so I could do lots of cozy wrapping, and because I'm a little taller than most. But as described above, you can customize this free crochet pattern for any size needed! Just be sure to read through all the notes and instructions first so you understand how it all comes together.

Now I can’t wait to see your Final Frost Scarves! If this pattern does inspire and you post a photo on social media, tag me @mooglyblog so I can check it out too! I love seeing what you make!

Follow Moogly on Facebook, Twitter, Pinterest, Instagram, and YouTube! Thank you to Red Heart Yarns and Brittany Needles for providing the materials shown in this post. Written pattern copyright Tamara Kelly 2019, all rights reserved. Please do not reprint or repost this pattern. Please do link to this page to share this pattern with others. For more info, visit the About page for details.


Rita Miller says
R135 of the written pattern at the end says "fpdc in post st below next st, skip 4 sts behind split fpdc, dc2tog in last 2 sts" but in the video, you're doing a dc BEFORE the dc2tog in last 2 sts. I'm guessing the video is correct, since that matches the beginning of the row.?
Tamara Kelly says
Hi Rita! Thank you, I just fixed it! 🙂