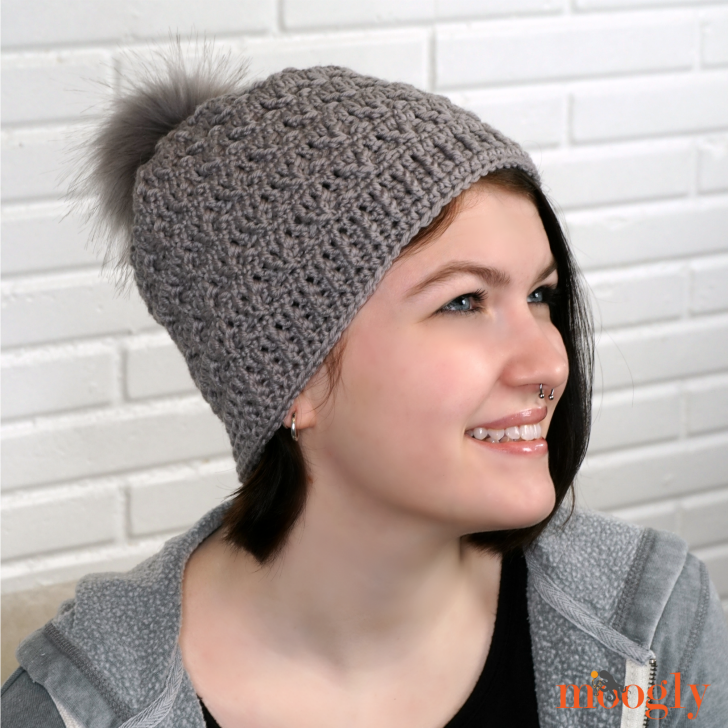
When spring is right around the corner but no one has told the thermostat, you need something new to cheer you up and keep you warm - introducing the Final Frost Beanie!
Disclaimer: This post includes affiliate links; material provided by Red Heart and Brittany Needles.
Prefer an ad-free PDF? You've got options!

 Prefer the free blog version? Keep scrolling!
So Warm, So Chic!
The Final Frost Beanie features gorgeous Chic Sheep by Marly Bird yarn, which I love for wearables! It's so soft, with great stitch definition, and tons of stretch - perfect for a textured cap.
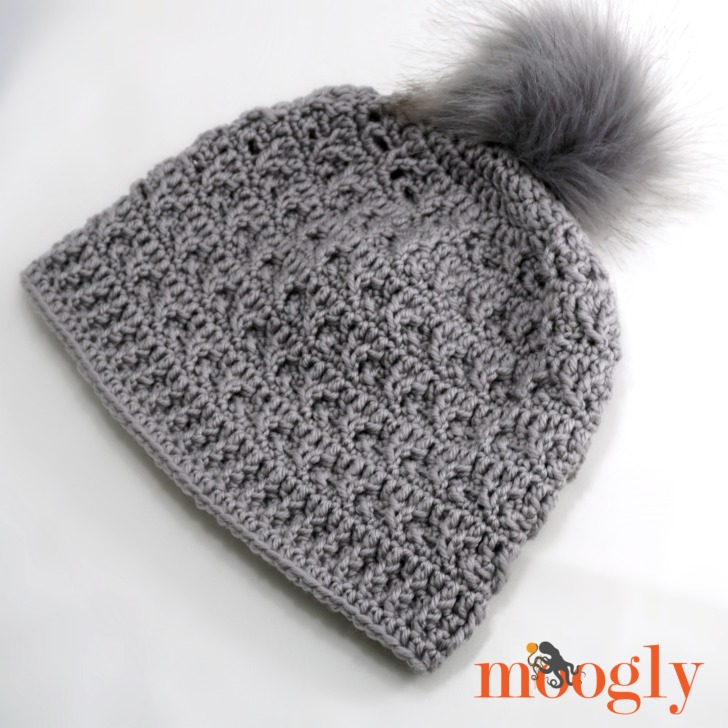
One fun feature of this hat is the snap-on faux fur pom pom! I love this style because I can remove the pom pom to wash the hat, and even switch colors of pom poms to match different outfits.

Whether it's the verge of spring or the depths of winter, this gorgeous hat is cozy, comfy, stylish, and fun!

Final Frost Beanie
Add this pattern to your Ravelry Queue and Favorites
US-I, 5.5mm Brittany Crochet Hook
Red Heart Chic Sheep by Marly Bird (100% Mercerized Merino Wool; Medium/UK: 10-12 ply; 186 yds/170m; 3.5oz./100g)
Colorway: Sterling
Size Small - 1 ball
Size Large - 2 balls
Snap-on Faux Fur Pom Pom (optional)
Matching thread and sewing needle (optional)
Gauge: Hat measures 3" across after Rnd 3
Sizes: Small (20-22", shown); Large (22-24")
Stitch Multiple: mult of 4
Helpful Links & Tutorials:
Final Frost Beanie Tutorial Videos and Charts
Front Post Double Crochet (fpdc)
Special Stitch:
split fpdc - yo and insert hook around post of next st 2 rows below, from front to back, yo and pull up a loop, yo and pull through 2 loops (2 loops remain on hook), skip the next st, yo and insert hook around post of next st from front to back, yo and pull up a loop, yo and pull through 2 loops (3 loops remain on hook), yo and pull through all 3 loops to finish stitch
NOTES:
If preferred, begin Rnd 6 with a Chainless Starting Double Crochet and ch 2 instead of Ch 5.
If preferred, begin Rnd 10 with a Chainless Starting Double Crochet and ch 1 instead of Ch 4.
PONYTAIL VERSION: To turn this pattern into a ponytail beanie or messy bun hat, work 36 dc around an elastic hair band, join, and then work the pattern as written below beginning with Rnd 4.
SLOUCH VERSION: To turn this pattern into a slouch hat, repeat Rows 10 - 13 as many times (2-3 recommended) as desired.
INSTRUCTIONS
Size Small
Rnd 1: Make a magic circle, ch 2 (does not count as a st), dc 12 in the ring; join. (12 dc)
Rnd 2: Ch 2, 2 dc in each st around; join. (24 dc)
Rnd 3: Ch 2, 2 dc in the first st, dc in the next st, *2 dc in the next st, dc in the next st; rep from * around, join. (36 dc)
Rnd 4: Ch 2, 2 dc in the first st, dc in the next 2 sts, *2 dc in the next st, dc in the next 2 sts; rep from * around, join. (48 dc)
Rnd 5: Ch 1, sc in each st around; join. (48 sc)
Rnd 6: Ch 5 (counts as dc and ch 2), split fpdc, ch 2, *skip the 3 sc behind the split fpdc, dc in the next st, ch 2, split fpdc, ch 2; rep from * around, join. (12 dc, 12 split fpdc)
Rnd 7: Ch 1, sc in the first st, 3 sc in the next ch-2 sp, sc in the next st, 2 sc in the next ch-2 sp, *sc in the next st, 3 sc in the next ch-2 sp, sc in the next st, 2 sc in the next ch-2 sp; rep from * around, join. (84 sc)
Rnd 8: Ch 2, dc in each st around; join. (84 dc)
Rnd 9: Ch 1, sc in each st around; join. (84 sc)
Rnd 10: Ch 4 (counts as dc and ch 1), split fpdc, ch 1, *skip the 3 sc behind the split fpdc, dc in the next st, ch 1, split fpdc, ch 1; rep from * around, join. (21 dc, 21 split fpdc)
Rnd 11: Ch 1, sc in each st and ch-1 sp around; join. (84 sc)
Rnd 12: Ch 2, dc in each st around; join. (84 dc)
Rnd 13: Ch 1, sc in each st around; join. (84 sc)
Rnds 14 - 25: Repeat Rnds 10 - 13.
Rnds 26 - 28: Repeat Rnds 10 - 12.
Rnds 29 and 30: Ch 1, fpdc in the first st, hdc in the next st, *fpdc in the next st, hdc in the next st; rep from * around. join. (42 fpdc, 42 hdc)
Rnd 31: Ch 1, hdc in each st around; join and break yarn. (84 hdc)
Sew snap for pom pom to center top of hat if desired.

Size Large
Rnd 1: Make a magic circle, ch 2 (does not count as a st), dc 12 in the ring; join. (12 dc)
Rnd 2: Ch 2, 2 dc in each st around; join. (24 dc)
Rnd 3: Ch 2, 2 dc in the first st, dc in the next st, *2 dc in the next st, dc in the next st; rep from * around, join. (36 dc)
Rnd 4: Ch 2, 2 dc in the first st, dc in the next 2 sts, *2 dc in the next st, dc in the next 2 sts; rep from * around, join. (48 dc)
Rnd 5: Ch 1, sc in the first each st around; join. (48 sc)
Rnd 6: Ch 5 (counts as dc and ch 2), split fpdc, ch 2, *skip the 3 sc behind the split fpdc, dc in the next st, ch 2, split fpdc, ch 2; rep from * around, join. (12 dc, 12 split fpdc)
Rnd 7: Ch 1, sc in the first st, 3 sc in the next ch-2 sp, sc in the next st, 2 sc in the next ch-2 sp, *sc in the next st, 3 sc in the next ch-2 sp, sc in the next st, 2 sc in the next ch-2 sp; rep from * around, join. (84 sc)
Rnd 8: Ch 2, dc in the first 20 sts, 2 dc in the next st, *dc in the next 20 sts, 2 dc in the next st; rep from * around; join. (88 dc)
Rnd 9: Ch 1, sc in each st around; join. (88 sc)
Rnd 10: Ch 4 (counts as dc and ch 1), split fpdc, ch 1, *skip the 3 sc behind the split fpdc, dc in the next st, ch 1, split fpdc, ch 1; rep from * around, join. (22 dc, 22 split fpdc)
Rnd 11: Ch 1, sc in each st and ch-1 sp around; join. (88 sc)
Rnd 12: Ch 2, dc in each st around; join. (88 dc)
Rnd 13: Ch 1, sc in each st around; join. (88 sc)
Rnds 14 - 29: Repeat Rnds 10 - 13.
Rnds 30 - 32: Repeat Rnds 10 - 12.
Rnds 33 -35: Ch 1, fpdc in the first st, hdc in the next st, *fpdc in the next st, hdc in the next st; rep from * around. join. (44 fpdc, 44 hdc)
Rnd 36: Ch 1, hdc in each st around; join and break yarn. (88 hdc)
Sew snap for pom pom to center top of hat if desired.
And that's the Final Frost Beanie! It's such a fun stitch pattern, and I love the texture and warmth of this free crochet hat pattern. I hope you like it too!
If you do make your own Final Frost Beanie, I’d love to see a photo. So if you share it on social media, be sure to tag me @mooglyblog or #mooglyblog – and happy crocheting!
Written pattern copyright Tamara Kelly 2018, all rights reserved. Please do not reprint or repost this pattern, but please do link to this page to share this pattern with others. If you wish to make items for sale from this pattern or translate it to another language, please visit the About page for details. Thank you to Red Heart Yarns and Brittany Needles for providing the materials for this pattern.


Judy says
The stitch pattern makes this hat truly unique. Love it! Thank you for sharing the pattern. (And, omigosh, your daughter is all grown up and lovely, too!)
Tamara Kelly says
😀 Thank you Judy! And yes... sigh.. ♥
Jean J says
Thanks for sharing this pattern, it's now on my to-do list. I'm interested in where you found the snap on pom poms? I've never seen them before. Thanks for any info you can provide in purchasing them.
Tamara Kelly says
Hi Jean! I found them on Amazon - and linked them above below the yarn and hook info! 🙂
Donna says
As usual, you've created a beautiful design and made it free for us crocheters on a fixed income! Very stylish and I love the snap on pomppom! I've hesitated putting handmade faux fur pompoms on hats because of not being able to wash them. I actually tested a pompom, washed it and played it flat to air dry. Notta. Took the fluff out of it and even drying it in the dryer on air dry setting cooked the ends of the pompom. So thx for all that you do for us! God bless!
Tamara Kelly says
Thank you Donna! I'm so glad you like it! ♥
Jen says
Gorgeous hat! I cannot wait to make this! Will the small size work for a child? I want to make a hat set for my sister and niece!!
Tamara Kelly says
Most kids have a 20" head by around age 10 or so, so it just depends on age! Smaller than that, I'd just try going down a hook size! 🙂 Thank you!
Martha says
This pattern is an answer to a prayer! I love, love, love that you also included instructions on how to make it a messy bun!
My niece will love this one. She is graduating high school this spring and going into nurse practitioner training, combined with college.
I'll make it using her school's colors:)
'Excited for her and getting started on the pattern.
Thank you!!!
Tamara Kelly says
Hi Martha! Thank you so much, I'm so glad you like it! 😀 And congratulations to your niece, such a great goal! ♥
Martha Mayo says
A wee bit behind in beginning the hat for my niece - oops. Still love the pattern and am wondering whether a "newsboy type brim" could be added.
Ir yes, would you be so kind as to describe how to do it.
I also crochet chemo hats and would love to add a brim to them - a little bit of pizzaaaaa!
Your daughter is stunning!
Tamara Kelly says
Thank you so much! I've not done a newsboy brim myself, but I think this pattern looks like it would mesh well with this one: https://www.ravelry.com/patterns/library/slouchy-faux-cable-hat-optional-brim
Martha says
Thank you so much Tamara! Your suggestion is spot on!
'Will give it a go! and report back.
All the best,
Martha
Soffity says
Dear Tamera. I posted a comment a while ago now about yarn weights and how they have different names in different countries. I wanted to say how pleased I am that you're including the range of names in your patterns now, it's so helpful and very much appreciated. Worsted weight yarn is very scarce in Australia. I had a look in my local haberdashery store and there were shelves upon shelves of 'light worsted' or 'DK' or '8ply' as it's called here in Australia but only a few balls of 'worsted weight' or '10 ply' . So when I'm following a pattern of yours I use my 8 ply and a 4mm hook and try to change it where needed. Thanks again for you consideration,
Tamara Kelly says
😀 I'm so glad it helps! Thank you!
Soffity says
The spell checker has spelt your name incorrectly...sorry.
Alice Riggle says
Please stop sending me e-mails
Tamara Kelly says
You have already unsubscribed, there's nothing more I can do.
valerie says
Oh... My... Gosh.... I simply LOVE this Pattern... I used Red Heart Super Saver OMBRE in Purple... and the Size Large Pattern Instructions...
(I Like Big Loose Hats )
It is so Freakin' Wonderful...
Thank you so much for being able to Share Your Creativity with others...
I Am A Happy Girl...
(Well... should I say... Senior Citizen... LOL ; )
: ) Valerie ~ from Asheville NC
Tamara Kelly says
Thank you so much Valerie! 😀 Have a wonderful week!
vALERIE says
I've already made 4 in a week and mailed one to a friend... : )
Tamara Kelly says
Thank you, I'm so glad you like it!
Martha Mayo says
One more question before I begin...
Could a brim, newsboy style, be added?
I love crocheting hats for chemo patients. Would love to add a small brim
to the hats to add a bit of pizazz and change them up a bit.
Thanks so much for sharing your talents so freely!
Martha
Tamara Kelly says
Hi Martha! I would think so - it would just be a matter of finding the right proportions! 🙂
Martha Mayo says
Thanks for the encouragement, Tamara. Sounds like a project to work on!!
Nikki says
Am I missing where you say that the split front post double crochet should be two rows down? I finally broke down and watched your video when I realized mine was more lacy and less textured than your picture seemed to be and I realized we are doing the front post on a double crochet and not the round of single crochet. I’m just wondering where I managed to miss that detail in the written pattern (I prefer words to charts and videos personally)... I’ve read and reread the pattern and can’t find it!! 🙁 In case it isn’t there, maybe you can clarify that somewhere so others don’t need to pull out as much work as I have!! Thanks for the beautiful pattern and clear video (once I broke down and watched it! 😉 haha!).
deb says
Thank you! Thank you!!
This pattern made zero sense to me until I read your comment.
Ris says
Sounds like I'll need to make myself sit down and watch the video tomorrow. I'm usually better with written patterns, but I keep getting lost in rnd 7 and I'm wondering if I made a mistake in 6, after all. I'm relatively new to making clothing, even hats, and it takes me a while to figure out where I'm going wrong (crocheting toys is relatively easy in comparison. I just go around and around in circles of single crochets...)
Laura Blanton says
How would I adjust this for toddler size?
Destiny L Williquette says
With your gauge of 3 inches is that 3 inches for the total circle or would it be 3 inches for rows 1-3 making the circle 6inch total?
Tamara Kelly says
That would be 3" for the diameter of the circle.
Taryn Duncan says
I'm not sure what I did, but this came out comically massive and floppy. Haha. Not at all the gorgeous texture and shape that I see in the pattern. I have a feeling my tension is just looser and I'm going to try a smaller hook. I love the look of this hat!
Tamara Kelly says
Oh dear! Going down a hook size should help!