
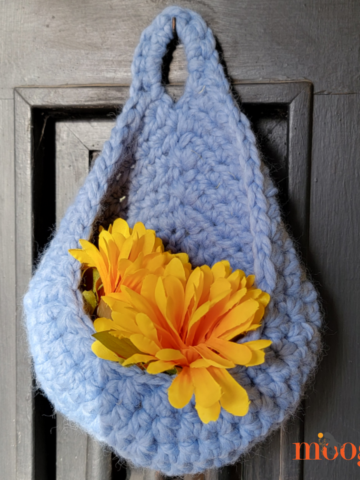
The Cozy Couch and Bedside Organizer Caddy is perfect for your favorite chair, sofa, or right in the bedroom - and ready to hold everything you like to keep close at hand, safe and organized! And it's a free pattern on Moogly featuring Red Heart With Love!
Disclaimer: This post includes affiliate links; materials provided by Red Heart and Brittany Hooks.
Prefer an ad-free PDF? You've got options!


Prefer the free blog version? Keep scrolling!
Beginner Friendly and Oh So Handy!
This crochet Bedside Organizer is very simple, featuring the half double crochet stitch almost exclusively - perfect for beginners! So if you're a more advanced crocheter, feel free to play with the numbers and details to customize your project.

The Cozy Couch & Bedside Organizer Caddy is part of the Hygge Home Crochet Along, hosted by Underground Crafter and sponsored by Red Heart Yarns! Click the image below to check out all the gorgeous free home decor patterns that are part of the collection!

Made with Red Heart With Love, the first section of the Bedside Organizer slips between the mattress and box springs (or along the inside of the couch) to hold it in place. To adjust this for a set of bunk beds, you can add a couple crochet chains to tie the first row and the fold line together! It really is handy all over the house!

Cozy Couch and Bedside Organizer Caddy
Add this pattern to your Ravelry Queue and Favorites
US-I, 5.5mm hook - Brittany Hooks
400 yds Red Heart With Love (100% Acrylic; “4”/Medium/Worsted/Aran/UK: 10-12 ply)
Color A: White (1 skein)
Color B: Pewter (1 skein)
Gauge: 12 sts x 9 rows = 4"/10 cm in hdc
Finished Size: 16" wide x 25" long
Helpful Links & Tutorials:
Cozy Couch and Bedside Organizer Caddy Tutorial
Switching Colors at the End of a Row
NOTE:
Beginning with Row 58, carry or "float" the unused color along the side to avoid additional ends to weave in - click here for a tutorial on this technique.
INSTRUCTIONS:
Row 1: With Color A, ch 49, skip the chs closest to the hook, hdc in each rem ch across; turn. (48 hdc in every row of the pattern)
Row 2 - 29: Ch 1, hdc in each st across; turn. At the end of Row 29, finish last st with Color B, and break Color A.
Row 30 - 58: Rep Row 2. At the end of Row 58, finish last st with Color A.
Row 59: Ch 1, blo hdc in each st across; turn.
Row 60 - 62: Rep Row 2. At the end of Row 62, finish last st with Color B.
Row 63: Rep Row 59.
Row 64 - 66: Rep Row 2. At the end of Row 66, finish last st with Color A.
Row 67: Rep Row 59.
Row 68 - 70: Rep Row 2. At the end of Row 70, finish last st with Color B.
Row 71: Rep Row 59.
Row 72 - 74: Rep Row 2. At the end of Row 74, finish last st with Color A.
Row 75: Repeat Row 59.
Row 76 - 78: Rep Row 2. At the end of Row 78, finish last st with Color B, and break Color A.
Row 79: Ch 1, blo sc in each st across; break yarn.
Assembly:
Step1: With odd numbered rows facing out, fold at Row 59. Rows 59 - 79 will form the front of the pocket.

Step 2: Use stitch markers to hold pocket in place.

With Color B, join to the side of Row 59 with a sl st, ch 1, and sc through front *and* back layers of pocket, enclosing any yarn carried along the side.
Continue to sc along side of Color B section, switching to Color A to crochet along the side of the Color A rows.
At the corner, ch 2, and sc across the foundation chain. Then, ch 2 again, and sc along the other side, switching to Color B for that section.
Sc through front and back layers of opposite side of pocket, finishing this row at the opposite end of Row 59.

Step 3: Use stitch markers to plan your pocket divisions.

This is a custom feature - place the lines where you want them so that the pockets are the right size for the items you want to keep in the caddy.

Once marked, use surface crochet (tutorial linked above) to crochet along the line, from Row 59 to Row 79, going through both layers of the pocket, switching colors to match the stripes as desired.

Ready to make your own Cozy Couch and Bedside Organizer Caddy? If this free crochet bed pocket pattern does inspire you to make your own organizer caddy, and you post a photo on social media, be sure to tag me @mooglyblog or #mooglyblog so I can check it out too! I love seeing what you make!


The Fine Print
Follow Moogly on Facebook, Twitter, Pinterest, Instagram, and TikTok! Thank you to Red Heart Yarns and Brittany for providing the materials shown in this post. Written pattern copyright Tamara Kelly 2019, all rights reserved. Please do not reprint or repost this pattern, but please do link to this page to share this pattern with others.
If you wish to make items for sale from this pattern or translate it to another language, please visit the About page for details.


Carol says
Beautiful and so practical! Thanks 😀
Dawn says
Are you going to do a to Torio on the bedside caddy?
Tamara Kelly says
Yes, it came out today! I'll link it now! 🙂
Dawn says
How do you keep it from stretching when you put something heavy in there?
Tamara Kelly says
Using a non-stretchy yarn helps, but you could also line the back with fabric if desired. 🙂
Sherrie says
Can you make this wider to hold more remotes 🙄 there has got to be 4 at least sitting around, always getting knocked off the table. My hubby also has a tablet for his game playing/book reading that lats about.
Tamara Kelly says
Absolutely! The width is totally up to you - there's no particular stitch repeat! 🙂
Virginia Kasselman says
I'm planning on making the bedside organizer but when reading through the instructions I was confused on row 76-78. Instructions say to rep row 2 than to finish the last stitch with color B at the end of the row74 shouldn’t that be row 78? Could be a type error but I need to know before I start . This is a beautiful caddy and want to make it for a family member for Christmas Happy Hooking Virginia in Arkansas
Tamara Kelly says
Whoops, that does look like a transcription error! Thank you for bringing it to my attention, I have edited the post!
Bridget says
Hi,
I just wanted to ask please, how much longer do you think it would need to be in order to fit over a couch comfortably and for allowing enough to tuck under a seat cushion? I am making some of these for Christmas presents, so can't measure how long other peoples couches are to know, but if you have a suggestion that would be really helpful.
Thanks 🙂
Tamara Kelly says
Hi Bridget! Looking at similar items available for purchase, I'd go about 34-36" long. 🙂