
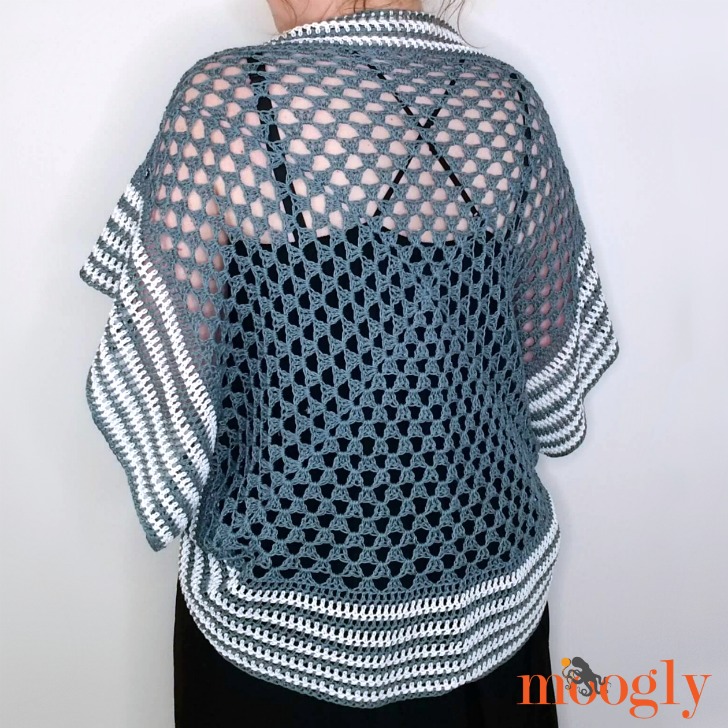
The Handkerchief Cocoon is a super easy summer weight free crochet topper pattern on Moogly, in sizes XS to 6X! Graphic, and modern but made with the most traditional of stitches, you'll love throwing this on for that little extra layer!
Disclaimer: This post includes affiliate links; materials provided by Yarnspirations and Furls.
Prefer an ad-free PDF? You've got options!


Prefer the free blog version? Keep scrolling!
Part of the Marly Bird Mother's Day Designer Blog Hop!
I'm excited to share my pattern for the Mother's Day Designer Blog Hop, hosted by Marly Bird! There have been 15 days of fantastic free patterns - check them all out here!

Simple Construction
The majority of the Handkerchief Cocoon is made with a granny square - one I've "improved" with lots of special touches that keep it looking it's best.
Then, a few rounds of solid stitching create a sort of "pinched box" shape with flared corners. Two short and simple seams and it's done - the border is built right in!
Easy Sizing in Any Yarn
The Handkerchief Cocoon is made with Patons Grace, which grows several inches when you block it. However, since I know substitutions will always be made, this pattern works just as well when you use a yarn that doesn't grow at all!
The dimensions shown in the schematic below are for the unblocked size, right off the hook. These measurements create a great looking cocoon that still has several inches of positive ease but is a closer fit. If you want a very loose fit and are using a yarn that won't grow, you can go up a size.

Handkerchief Cocoon
Add this pattern to your Ravelry Queue and Favorites
US-I, 5.5mm hook - Furls
550 - 1325 yds Patons Grace (3-Light/UK: 8 ply; 100% mercerized cotton; 50 g/1.75 oz, 125 m/136 yds)
Color A: Citadel - 3 (4, 5, 6, 7) balls
Color B: Snow - 2 (2, 2, 3, 3) balls
Gauge: 8 rows = 4" in granny st
Sizes: XS/S (M/L, XL/2X, 34X/4X, 5X/6X)
Sizes are based on the Craft Yarn Council Women's Sizing Standards, with positive ease
Helpful Links and Tutorials
CSDC - Chainless Starting Double Crochet
Schematic
Dimensions shown are BEFORE blocking. If you use the suggested yarn, the finished item will be several inches larger after blocking. If you use a yarn that does not grow with blocking it will still fit, but be a slimmer/closer fit.

NOTES:
There are several "tricks" used here to make the traditional granny square the best it can be.
Instead of a ch 3 for the first dc, the CSDC is used. If you prefer another dc substitute, use that one.
Instead of joining the end of each granny st rnd with a sl st, a hdc stitch is worked into the first st of the rnd. This puts the hook in the middle of that corner "ch sp" to create a more balanced look.
Though this pattern is worked in the round, DO turn at the end of each rnd to work in the opposite direction. Instructions for this are included. This prevents the "swirl" you can get with granny squares.
The Right Side of the project is the same side that the very last rnd of the project is worked on - whether this is odd or even depends on size. It would be reversible, but looks a bit better to have that final rnd facing out.
The interior granny stitch section is square, but the solid border rnds do flair out and increase at the corners. This is intentional and part of the fit of the piece.
Instructions
Granny Rnds
Rnd 1: With Color A, make a magic circle, CSDC, 2 dc, (ch 2, 3 dc) 3 times, ch 1, hdc in the CSDC; turn. (12 dc)
Rnd 2: (CSDC, 2dc) in the same ch sp, ch 1, skip the next 3 sts, [(3 dc, ch 2, 3 dc) in the ch-2 sp, ch 1, skip the next 3 sts] 3 times, 3 dc in first ch sp, ch 1, hdc in the CSDC; turn. (24 dc)
Rnd 3: (CSDC, 2dc) in the same ch sp, ch 1, skip the next 3 sts, 3 dc in the next ch-1 sp, ch 1, skip the next 3 sts, *(3 dc, ch 2, 3 dc) in the ch-2 sp, ch 1, skip the next 3 sts, 3 dc in the next ch-1 sp, ch 1, skip the next 3 sts; rep from * to first ch sp, 3 dc in first ch sp, ch 1, hdc in the CSDC; turn. (36 dc)
Rnd 4 - 15 (17, 19, 21, 23) : (CSDC, 2dc) in the same ch sp, [ch 1, skip the next 3 sts, 3 dc in the next ch-1 sp] to next ch-2 sp, *(3 dc, ch 2, 3 dc) in the ch-2 sp, [ch 1, skip the next 3 sts, 3 dc in the next ch-1 sp] to next ch-2 sp; rep from * to first ch sp, 3 dc in first ch sp, ch 1, hdc in the CSDC; turn.
Border Rnds
Rnd 1: (CSDC, 2 dc) in the same ch sp, *dc in each st and ch-1 sp to next ch-2 sp,** (3 dc, ch 2, 3 dc) in ch-2 sp; rep from * around finishing last rep at **, 3 dc in first ch sp, ch 1, hdc in the CSDC finishing st with Color A; turn.
Rnd 2: (CSDC, 2 dc) in same ch sp, *dc in each st to next ch-2 sp,** (3 dc, ch 2, 3 dc ) in ch-2 sp; rep from * finishing last rep at **, 3 dc in first ch sp, ch 1, hdc in the CSDC finishing last st with Color B; turn.
Rnd 3 - 8 (10, 11, 12, 13): Rep Rnd 2, switching color ever rnd. After last rnd, break both colors leaving a 24" tail of the final color used.
Assembly
If blocking, block before seaming. Do not overstretch fabric.
Fold piece in half, matching up the corners. Direction doesn't matter as the sides are all the same length, but do have the last rnd facing out.
Using the Mattress Stitch, seam from each corner toward the fold for 4 (5, 5.5, 6, 6.5)". Use the long tail for the one side, and then cut a piece of the same color yarn to sew the other side. See the squiggly lines on the schematic for seaming guidance.

And that's how to crochet the Handkerchief Cocoon! The colors and striping remind me a bit of a traditional blue bandana handkerchief so I took the name inspiration from there. But of course, you can use any color or colors you like!

Looking for more free crochet sweater and top patterns? Check out the Cuff to Cuff Colorblock Cardigan, Cupcake Tee, Paloma Cardigan, Cosmos Cardigan, Hygge Cocoon Cardigan, Easy Cold Shoulder V-Neck Top, Seaglass Summer Cardi, and Saturday Sweater!

If this pattern inspires you to make your own project, and you post a photo on social media, be sure to tag me @mooglyblog or #mooglyblog so I can check it out too!
THE FINE PRINT
Follow Moogly on Facebook, Twitter, Pinterest, Instagram, and TikTok! Thank you to Yarnspirations for providing the materials shown in this post. Written pattern copyright Tamara Kelly 2020, all rights reserved. Please do not reprint or repost this pattern. Please do link to this page to share this pattern with others.
If you wish to make items for sale from this pattern or translate it to another language, please visit the About page for details.


Chris Lopez says
Love this!! 🤩
Tamara Kelly says
Thank you so much, Chris!
Pamela says
I love,love,love, the look of this cocoon ,but I can't get my code to wor to get the free pdf.. I have been trying since just after midnight PST to get the pattern on Ravelry with no luck.
Tamara Kelly says
Hi Pamela! It expired just after midnight I'm afraid! The PDF is now available for purchase, or you can use Print Friendly to create your own printable PDF. 🙂
Pamela says
I actually started trying at about 11:45 and it told me the coupon had expired. With the quarantine I'm getting the dates so mixed up! So I waited until midnight and tried again and still didn't work. I understand it to be good until 12:15 PST on 04/21/20. Oh, well. I did download it with the printer friendly button. Thank you!