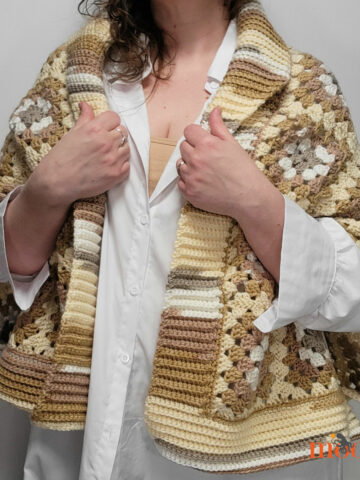
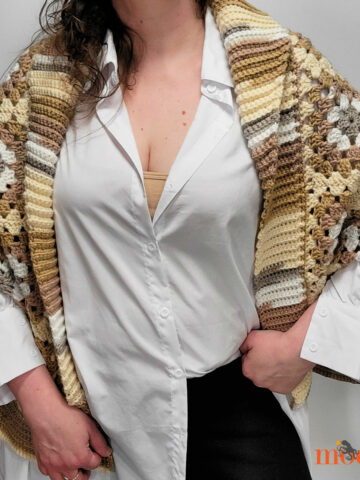
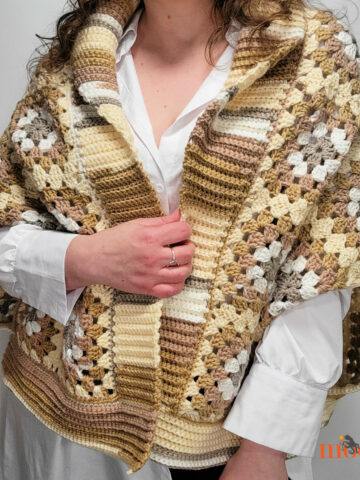
The Cuff to Cuff Colorblock Cardigan is an oversized crochet sweater worked cuff to cuff, almost exclusively in rows. It's cozy, modern, and a free crochet pattern on Moogly!
 Disclaimer: This post includes affiliate links; materials provided by Yarnspirations.
Featuring Patons Norse
The Cuff to Cuff Colorblock Cardigan is made with Patons Norse, a super bulky yarn with a beautiful brushed halo effect in gorgeous heathered shades.
It's a blended wool, so if you need a non-animal fiber yarn, I recommend Bernat Softee Chunky as an acrylic alternative!

Cuff to Cuff
I'd never made a cuff to cuff sweater before, but I got a reader request and thought it sounded like a great idea!
Basically, it's just how it sounds - you start at one cuff, then work all the way up the sleeve, across the body, and down the other sleeve to the opposite cuff.
Two quick seams and a bit of edging, and you're done!

Make It Your Own
I decided I liked the look of the Cuff to Cuff Colorblock Cardigan with a belt and side vents, but you can add your own touches here! The belt and belt loops are very optional, and you can leave the sides as open or closed as you like.
If you prefer a longer or shorter sweater, you can do that too - when you Begin the Body, just be sure to add or subtract the same number of stitches from each side of the sleeve. There's no stitch multiple to worry about!
And of course, you can pick your own favorite colors, or just make it all one color! If you prefer an un-cuffed, open style sleeve, just FDC 44 (44, 44, 48, 48, 48, 52, 52, 52) sts and work even to the Body!

Cuff to Cuff Colorblock Cardigan
Add this pattern to your Ravelry Queue and Favorites
US - L, 8.0 mm hook - Clover USA
1117 - 2433 yds Patons Norse ("6" - Super Bulky/ UK 14-16 ply; 54% Acrylic, 28% Wool, 18% Polyester; 100 g/3.5 oz, 193 m/211 yds)
Color A: Gray Pearl - 3 (4, 4, 4, 5, 5, 6, 6, 6) balls
Color B: Cream - 2 (2, 2, 3, 3, 3, 3, 4, 4) balls
Stitch Markers - Clover USA
Gauge: 9 sts x 6 rows = 4" in main st pattern
Sizes: XS (S, M, L, XL, 2X, 3X, 4X, 5X)
Sizes are based on Craft Yarn Council Sizing Standards
Schematic
The dashed line represents the fold line for assembly. Block to dimensions shown for your size.

Helpful Links & Tutorials
FDC - Foundation Double Crochet
Fpdc/Bpdc - Front Post Double Crochet/Back Post Double Crochet
Exhdc - Extended Half Double Crochet
Extending a Row with Foundation Stitches
Special Stitch:
fexhdc (foundation extended half double crochet): yo and insert hook into st or chain at bottom of previous st, (yo and pull through 1 loop) 3 times, yo and pull through 3 loops to finish the st.
Notes:
The ch 1 or ch 2 at the beginning of each row does NOT count as the first st. Do not skip the first st unless specifically instructed.
The row counts restarts several times through the pattern, at the start of each new Section.
Instructions:
First Sleeve - Section 1
Row 1: With Color A, FDC 16 (16, 16, 18, 18, 18, 20, 20, 20); turn. (16 (16, 16, 18, 18, 18, 20, 20, 20 sts)
Row 2: Ch 1, *bpdc in next st, hdc in next st; rep from * across, turn.
Row 3: Ch 1, *hdc in next st, fpdc in next st; rep from * across, turn.
Row 4 - 6: Rep Rows 2 and 3, ending on a Row 2 rep.
Row 7: Ch 1, 2 sc in each st across; turn. (32 (32, 32, 36, 36, 36, 40, 40, 40 sts)
Sizes XS - M Row 8: Ch 2, *exhdc in next 3 sts, 2 exhdc in next st, [exhdc in next st, 2 exhdc in next st] twice; rep from * across, turn. (44 sts)
Sizes L - 2X Row 8: Ch 2, *exhdc in next 2 sts, 2 exhdc in the next st; rep from * across, turn. (48 sts)
Sizes 3X - 5X Row 8: Ch 2, *exhdc in next 3 sts, 2 exhdc in next st, [exhdc in next 2 sts, 2 exhdc in next st] twice; rep from * across, turn. (52 sts)
Row 9: Ch 1, sc in each st across; turn. (44 (44, 44, 48, 48, 48, 52, 52, 52) sts)
Row 10: Ch 2, flo exhdc in each st across; turn.
Row 11 - 31 (31, 31, 33, 33, 33, 35, 35, 35): Rep Rows 9 and 10, ending on a Row 9 rep.
Begin Body of Sweater - Section 2
Row 1: Ch 54 (54, 54, 57, 57, 57, 59, 59, 59), skip the 2 chs closest to the hook, exhdc in next 52 (52, 52, 55, 55, 55, 57, 57, 57) chs, flo exhdc in each st across, fexhdc 52 (52, 52, 55, 55, 55, 57, 57, 57) sts; turn. (148 (148, 148, 158, 158, 158, 166, 166, 166) sts)
Row 2: Ch 1, sc in each st across; turn.
Row 3: Ch 2, flo exhdc in each st across; turn.
Row 4 - 4 (4, 4, 4, 6, 6, 6, 6, 8): Rep Rows 2 and 3, ending on a Row 2 rep. After last row, break Color A.
Begin Center of Body of Sweater - Section 3
Row 1: With Color B, join to first st, ch 2, exhdc in each sc across; turn.
Row 2: Ch 1, sc in each st across; turn.
Row 3: Ch 2, flo exhdc in each st across; turn.
Row 4 - 8 (10, 12, 12, 12, 14, 14, 16, 16): Rep Rows 2 and 3, ending on a Row 2 rep.
Body Opening - Section 4
Row 1: Ch 2, flo exhdc in first 70 (70, 70, 72, 72, 72, 74, 74, 74) sts; turn. (70 (70, 70, 72, 72, 72, 74, 74, 74) sts)
Row 2: Ch 1, sc in each st across; turn.
Row 3: Ch 2, flo exhdc in each st across, then ch 79 (79, 79, 87, 87, 87, 93, 93, 93); turn. (70 (70, 70, 72, 72, 72, 74, 74, 74) sts plus 79 (79, 79, 87, 87, 87, 93, 93, 93) chs)
Continue Center of Body - Section 5
Row 1: Skip the ch closest to the hook, sc in each rem ch and st across; turn. (148 (148, 148, 158, 158, 158, 166, 166, 166) sts)
Row 2: Ch 2, flo exhdc in each st across; turn.
Row 3: Ch 1, sc in each st across; turn.
Row 4 - 8 (10, 12, 12, 12, 14, 14, 16, 16): Rep Rows 2 and 3, ending on a Row 2 rep. After last row, break Color B.
Finish Body of Sweater - Section 6
Row 1: With Color A, join to first st, ch 1, sc in each st across; turn.
Row 2: Ch 2, flo exhdc in each st across; turn.
Row 3: Ch 1, sc in each st across; turn.
Rows 4 - 4 (4, 4, 4, 6, 6, 6, 6, 8): Rep Rows 2 and 3, ending on a Row 2 rep. Place a stitch marker in st # 96 (96, 96, 103, 103, 103, 109, 109, 109) of last row, then break yarn.
Begin Second Sleeve - Section 7
Row 1: Join to marked st, ch 1, sc in next 44 (44, 44, 48, 48, 48, 52, 52, 52) sts; turn. (44 (44, 44, 48, 48, 48, 52, 52, 52) sts)
Row 2: Ch 2, flo exhdc in each st across; turn.
Row 3: Ch 1, sc in each st across; turn.
Row 4 - 23 (23, 23, 25, 25, 25, 27, 27, 27): Rep Rows 2 and 3.
Finish Second Sleeve - Section 8
XS - M Row 1: Ch 2, *flo exhdc in next 3 sts, flo dc2tog, [flo exhdc in next st, flo dc2tog] twice; rep from * across, turn. (32 sts)
L - 2X Row 1: Ch 2, *flo exhdc in next 2 sts, flo dc2tog; rep from * across, turn. (36 sts)
3X - 5X Row 1: Ch 2, *flo exhdc in next 3 sts, flo dc2tog, [flo exhdc in next 2 sts, flo dc2tog] twice; rep from * across, turn. (40 sts)
Row 2: Ch 1, sc2tog across; turn. (16 (16, 16, 18, 18, 18, 20, 20, 20) sts)
Row 3: Ch 2, dc in each st across; turn.
Row 4: Ch 1, *hdc in next st, fpdc in next st; rep from * across, turn.
Row 5: Ch 1, *bpdc in next st, hdc in next st; rep from * across, turn.
Rows 6 - 8: Rep Rows 4 and 5, finishing on a Row 4 rep. Break yarn.
Belt Loops (Make 2)
With Color A, ch 6, break yarn.
Belt
Row 1: With Color A, FDC 46 (50, 56, 64, 72, 80, 88, 92, 98)" or to desired length, do not turn.
Edging: Ch 1, 2 sc in side of last FDC made, ch 2, sc across bottom of fdc sts, ch 2, 2 sc in side of first FDC made, ch 2, sc in each FDC across, ch 2; join to first sc and break yarn.
Assembly
Block the piece before assembly. A strong blocking may be necessary - I used steam.
Fold piece in half, cuff to cuff, so that the textured side is facing out. Seam each side from the cuff to the bottom hem of each side, leaving 6 (6, 6, 7, 7, 7, 8, 8, 8)" unseamed at the bottom if desired (shown).

Using the tails of the belt loops, sew the loops into the side seams at waist - this is approximately 16.5 (17, 17.25, 17.5, 17.75, 18, 18, 18.5, 18.5)" down from the fold at the top of the sweater, but can be adjusted for a personalized fit.
Collar and Edging
Row 1: With Color A, join to bottom edge st of Body Opening from RS, ch 1, sc around front opening; turn.
Row 2 - 5: Ch 2, exhdc in each st across; turn.
Edging Rnd: Ch 1, sc across Row 5, ch 2, sc across bottom of sweater switching colors as needed to match the sts being worked into, and breaking and rejoining on either side of the side vents, ch 2, join to first sc and break yarn.

I hope you enjoy making the Cuff to Cuff Colorblock Cardigan! Looking for more free crochet sweater patterns? Be sure to check out the Paloma Cardigan, Cosmos Cardigan, Hygge Cocoon Cardigan, and Seaglass Summer Cardi!

If this pattern inspires you to make your own project, and you post a photo on social media, be sure to tag me @mooglyblog or #mooglyblog so I can check it out too!
THE FINE PRINT
Follow Moogly on Facebook, Twitter, Pinterest, Instagram, and Tumblr! Thank you to Yarnspirations and Furls for providing the materials shown in this post. Written pattern copyright Tamara Kelly 2020, all rights reserved. Please do not reprint or repost this pattern, but please do link to this page to share this pattern with others.
To print or download, use the Print Friendly button below, or go to PrintFriendly.com, or right-click to copy and paste it into a word processing document if those options do not work for you (please note that Print Friendly is a free outside website that the button links to, and you can click here for a tutorial on how to use it, but I cannot provide additional technical support for this service).
If you wish to make items for sale from this pattern or translate it to another language, please visit the About page for details.


Patty
I wish I could see the sides. Are they left open or seamed.
Tamara Kelly
They seaming instructions below explain that bit! 🙂 I'll add a photo too!
Smamtha
This looks so lovely, I need pockets in everything, so of course I'm now thinking about how I could sew on pockets to this.
Michelle
Awesome! Pinning!
Michelle
http://mybijoulifeonline.com
Tamara Kelly
Thank you so much, Michelle!
Dee
Hello Tamara, I love your patterns. Thank you for creating this lovely cardigan.
I’m a little confused about how to do the fexhdc special stitch. I’m unclear where the bottom of the stitch is. I’m in row 8, and I’m not sure where to the put the fexhdc., in the previous row of single crochet. Is it possible to post a short video or a diagram? Thank you for your time.
Tamara Kelly
Hi Dee! Hopefully this will help. It's a different stitch, but the same technique: https://www.mooglyblog.com/extending-rows-fsc/
Goldie Printe
I just want to say THANK YOU THANK YOU. FINALLY someone came up with a pattern I have been thinking of for years! I can't wait to make one. Could a collar be added to this without having to make adjustments. My husband is wanting a sweater with a big shawl collar? All the patterns you find however, are all knitted.
Tamara Kelly
Thank you so much, Goldie! ♥ Yes, just add more rows to the collar already there til you have the width you're looking for! 🙂
Nancy
definitely want to make this but I am confused about section 2 of the instructionsCh 54 (54, 54, 57, 57, 57, 59, 59, 59), skip the 2 chs closest to the hook, exhdc in next 52 (52, 52, 55, 55, 55, 57, 57, 57) chs, flo exhdc in each st across, fexhdc 52 (52, 52, 55, 55, 55, 57, 57, 57) sts; turn
the second part of this where it says "Flo exhdc in each st across" - is this the FLO of the chain?
thanks for any help
Tamara Kelly
Hi Nancy! The FLO stitches are worked across the previous row, so it's the FLO of those stitches. 🙂
Nancy
thank you!
Jeri
I love this sweater so much that I shared it with my daughter. When we get together we’ll decide on color.
Thank you for the pattern!
Tamara Kelly
Thank you so much! ♥
Sarah F.
Thank you for this pattern, I love it! I'm starting it now, but I have a couple of questions. In Row 1, for the first sleeve, does the chain 3 count as the first FDC?
And then for row 2, also for the first sleeve, does the first bpdc go into the first FDC from row 1, or do we skip that one and go into the second FDC ?
Tamara Kelly
Hi Sarah! Thank you! The ch3 does not count as the first st. In Row 2, the bpdc goes into the first fdc. 🙂
Sally Dickens
Hi. Do you think this pattern would work in chunky? Found some gorgeous wool that I think would work, and could i still use size 8 hook?
Tamara Kelly
I think so but you'd need to be careful of gauge! 🙂
Dena Stilwell
Can I use any kind that I prefer?
Tamara Kelly
As long as you like the fabric and get gauge! 🙂
Dena Stilwell
Thank you so very much
Jamie M
For some reason I am super stuck here, in section 1:
Sizes 3X – 5X Row 8: Ch 2, *exhdc in next 3 sts, 2 exhdc in next st, [exhdc in next 2 sts, 2 exhdc in next st] twice; rep from * across, turn. (52 sts)
I keep coming up with 53 stitches instead of 52! (And I am NOT counting the ch2)
I think I am somehow messing up the repeat, any tips or clarification on that row? Much appreciated!!
Tamara Kelly
Hi Jaime!
This repeat is worked a total of 4 times:
exhdc in next 3 sts - 3 sts (in 3 sts)
2 exhdc in next st - 2 sts (in 1 st)
exhdc in next 2 sts - 2 sts (in 2 sts)
2 exhdc in next st - 2 sts (in 1 st)
exhdc in next 2 sts - 2 sts (in 2 sts)
2 exhdc in next st - 2 sts (in 1 st)
That is 13 sts total worked into 10 sts, and 13 x 4 is 52, worked into 40 sts.
It's a lot, so it's easy to mix up, I hope that helps!
Jamie M
That makes more sense, I think it was the word "twice" that was throwing me off. Thanks so much for the clarification!
Tamara Kelly
So glad I could help! 🙂
Buffianna
Hey, I'm crocheting this for my dad for Christmas 2022, and I'm unsure about the first sleeve. Was it "flat" (I hope that makes sense), or in like a tube when made before going onto the body part of the cardigan? Also, is there a tutorial for making the cardigan?
Thank you,
Buffianna
Tamara Kelly
It's flat! 🙂 If you look at the schematic above, that represents one layer of fabric. There is no video tutorial for this pattern.
Buffianna
Ok, thank you! 🙂
Buffianna
And another question, I don't quite understand "flo exhdc in each st across, fexhdc 52 (52, 52, 55, 55, 55, 57, 57, 57) sts; turn. (148 (148, 148, 158, 158, 158, 166, 166, 166) sts)" in row one the section two. I did the first part of the row, but I'm not sure how to do the FLO exhdc, etc.
Blessings,
Buffianna
Tamara Kelly
Hello! There are tutorials for flo and exhdc are linked above. The fexhdc is explained in the special stitch section. 🙂