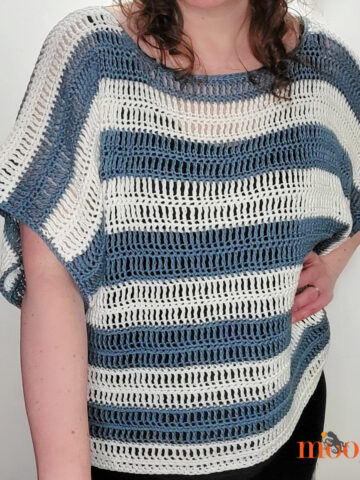
The Cupcake Tee is an easy crochet top pattern featuring a cool mesh fabric and a gorgeous cowl neckline - in sizes Extra Small through 5X, all free on Moogly!
 Disclaimer: This post includes affiliate links; materials provided by Red Heart Yarn and Clover USA.
The Cupcake Tee is made with Red Heart It's A Wrap Sprinkles, a lightweight cotton-acrylic blend that's perfect for warmer weather. The mesh stitch pattern makes it super breathable, and the cowl neck adds a flattering touch - and keeps the neck cooler too!

While I made the Cupcake Tee hip length, you can easily make it longer (or shorter) by adding more rows (any multiple of 5) to the back and front waist - it's a simple repeat, and very customizable! You can even add a quick tie belt with your leftover yarn if you like - Easy as cake!

I wear a Size 12 or 14, and in these photos, I am modeling the XL size, for an oversized fit. This pattern is quite drapey and flowy, so while the garment laid flat looks a bit short, it grows when you put it on! If you prefer a closer fit in your garments, you may want to go down a size. I like to wear it with a belt - how would you style the Cupcake Tee?

Cupcake Tee
Add this pattern to your Ravelry Queue and Favorites, or purchase the Ad-Free PDF!
US - G, 4.0mm hook - Clover Amour
575-1475 yds Red Heart It's A Wrap Sprinkles (50% cotton, 50% acrylic; 2 - Fine/UK: 5 ply; 5.29oz/150g; 623yds/570m)
Colorway Shown: Cupcake (2 balls size XS - 3X; 3 balls size 4X - 5X)
Gauge: 21 sts x 11 rows = 4"/10cm in main st pattern, measured flat and unblocked
Sizes: XS (S, M, L, XL, 2X, 3X, 4X, 5X) Based on Craft Yarn Council Standards with 4" of positive ease in the chest
Schematic measurements are given on unblocked gauge.
Helpful Links & Tutorials
SCHEMATIC

ERRATA: The D (Side Seams) above should read:
D (Side Seams): 9(10.5, 10, 9.5, 9, 10.5, 10, 11.5, 11)"
NOTES
Start with a new cake for each half of the top. If you need a second cake to one part of the top, pull from the matching color end.
Before beginning the Front Chest, place a stitch marker in the side of the last row of the Front Waist so that you can easily restart counting your rows.
If desired, remove a small portion of the center color before making the Back to use for the bottom hem edge (Assembly Step 3).
If desired, begin each row with a CSDC instead of a ch 3 for the first dc - click here for a tutorial.
INSTRUCTIONS:
BACK:
Row 1: Ch 91 (101, 113, 123, 133, 143, 155, 165, 175), dc in the 4th ch from the hook (skipped 3 chs count as first dc), dc in each rem ch across; turn. (89 (99, 111, 121, 131, 141, 153, 163, 173) dc)
Row 2: Ch 4 (counts as first dc and ch 1), skip next st, dc in next st, *ch 1, skip next st, dc in next st; rep from * to end. (45 (50, 56, 61, 66, 71, 77, 82, 87 dc)
Row 3 - 5: Ch 4 (counts as first dc and ch 1), skip next ch sp, dc in next st, *ch 1, skip next ch sp, dc in next st; rep from * to end. (45 (50, 56, 61, 66, 71, 77, 82, 87 dc)
Row 6: Ch 3, *dc in next ch sp, dc in next st; rep from * across; turn. (89 (99, 111, 121, 131, 141, 153, 163, 173) dc)
Row 7 - 51 (56, 56, 56, 56, 61, 61, 66, 66): Rep Rows 2 - 6; break yarn.
FRONT WAIST:
Row 1: Ch 91 (101, 113, 123, 133, 143, 155, 165, 175), dc in the 4th ch from the hook (skipped 3 chs count as first dc), dc in each rem ch across; turn. (89 (99, 111, 121, 131, 141, 153, 163, 173) dc)
Row 2: Ch 4 (counts as first dc and ch 1), skip next st, dc in next st, *ch 1, skip next st, dc in next st; rep from * to end. (45 (50, 56, 61, 66, 71, 77, 82, 87 dc)
Row 3 - 5: Ch 4 (counts as first dc and ch 1), skip next ch sp, dc in next st, *ch 1, skip next ch sp, dc in next st; rep from * to end. (45 (50, 56, 61, 66, 71, 77, 82, 87 dc)
Row 6: Ch 3, *dc in next ch sp, dc in next st; rep from * across; turn. (89 (99, 111, 121, 131, 141, 153, 163, 173) dc)
Row 7 - 15 (20, 20, 20, 20, 25, 25, 30, 30): Rep Rows 2 - 6, ending on a Row 5 rep. Do not break yarn, continue with Front Chest.
FRONT CHEST:
Row 1: Ch 3, dc in first st, dc in next ch sp, *dc in next st, dc in next ch sp; rep from * until 1 st rem, 2 dc in last st; turn. (91 (101, 113, 123, 133, 143, 155, 165, 175) dc)
Row 2: Ch 4, dc in next st, *ch 1, skip next st, dc in next st; rep from * until 1 st rem, ch 1, dc in last st; turn. (93 (103, 115, 125, 135, 145, 157, 167, 177) sts including chs)
Row 3: Ch 3, dc in first st, ch 1, skip ch sp, dc in next st; rep from * until 1 ch sp and 1 st rem, ch 1, skip last ch sp, 2 dc in last st; turn. (95 (105, 117, 127, 137, 147, 159, 169, 179) sts including chs)
Row 4: Ch 4, dc in next st, *ch 1, skip next ch sp, dc in next st; rep from * until 1 st rem, ch 1, dc in last st; turn. (97 (107, 119, 129, 139, 149, 161, 171, 181) sts including chs)
Row 5: Rep Row 3. (99 (109, 121, 131, 141, 151, 163, 173, 183) sts including chs)
Row 6: Rep Row 1. (101 (111, 123, 133, 143, 153, 165, 175, 185) dc)
Row 7: Ch 3, dc in first st, ch 1, skip next st, dc in next st; rep from * until 2 sts rem, ch 1, skip next st, 2 dc in last st; turn. (103 (113, 125, 135, 145, 155, 167, 177, 187) sts including chs)
Row 8: Rep Row 4. (105 (115, 127, 137, 147, 157, 169, 179, 189) sts including chs)
Row 9: Rep Row 3. (107 (117, 129, 139, 149, 159, 171, 181, 191) sts including chs)
Row 10: Rep Row 4. (109 (119, 131, 141, 151, 161, 173, 183, 193) sts including chs)
Row 11: Rep Row 1. (111 (121, 133, 143, 153, 163, 175, 185, 195) dc)
Row 12 - 36: Rep Rows 2 - 11; break yarn. (161 (171, 183, 193, 203, 213, 225, 235, 245) sts in Row 36)
ASSEMBLY
Step 1: Seam the sides as shown in the Schematic above (measurement D), leaving the bottom 2" unsewn, and measuring up from those 2".
Step 2: Seam the shoulders as shown in the Schematic above (measurement C), measuring in from the outer edge of both the Back and Front.
Step 3: Work sc edgings around the bottom hem, sleeve openings, and neckline.

And that's how to make the Cupcake Tee! There are so many wonderful colorways of It's A Wrap Sprinkles and It's a Wrap Rainbow (which is also perfect for this pattern) - I can't wait to see your versions! If this free crochet top pattern does inspire you, and you post a photo on social media, be sure to tag me @mooglyblog or #mooglyblog so I can check it out too!
Follow Moogly on Facebook, Twitter, Pinterest, Instagram, and Tumblr! Thank you to Red Heart Yarns and Clover USA for providing the materials shown in this post. Written pattern copyright Tamara Kelly 2019, all rights reserved. Please do not reprint or repost this pattern, but please do link to this page to share this pattern with others.
To print or download, use the Print Friendly button below, or go to PrintFriendly.com, or right-click to copy and paste it into a word processing document if those options do not work for you (please note that Print Friendly is a free outside website that the button links to, and you can click here for a tutorial on how to use it, but I cannot provide additional technical support for this service). If you wish to make items for sale from this pattern or translate it to another language, please visit the About page for details.


Lisa M
This looks so comfortable! I can't wait to try making this. I love that it can be made close fitting or more flowy. Thanks for another beautiful pattern.
Tamara Kelly
Thank you so much Lisa, I hope you enjoy it! ♥
DebbieW
Tamara, this is lovely.
Tamara Kelly
Thank you so much, Debbie! ♥
Erin
I love it! Will you do a video for it? I can’t follow written patterns due to a traumatic brain injury so videos are my crochet bread and butter. Lol
Tamara Kelly
Yes! We filmed it yesterday, so if all goes to plan (always iffy with technology lol), it will go live on May 15th. Thank you so much! ♥
Lyn
I love this top and am so glad it includes directions for XS. I love so many of your sweaters but have not come across any in size XS. Thanks for your videos. I have learned a lot!
Tamara Kelly
Thank you so much, Lyn! ♥
Elizabeth Rivera
This looks so delicate and pretty, I will be anxious on trying this project. Thanks for your creativity.
Tamara Kelly
Thank you so much, Elizabeth!
Lisa
I love this! Thank you for the free pattern!
Joy Indermuhle
Another beautiful pattern, Tamara! I love your patterns. I am wondering if I can use It's a Wrap yarn for this pattern since it's weight is #1 Super Fine rather than the recommended yarn that is #2 Fine?
Tamara Kelly
Hi Joy! If you can get gauge (or real close) I think it will work just fine! 🙂 Thank you so much!
Kerry Williamson
Would this cotton yarn be suitable for this lovely top? I have the fifth one shown in the thumbnails https://www.spotlightstores.com/craft-hobbies/yarn-needle-art/yarn/cotton-blends/kartopu-love-cotton-prints-yarn/BP80460951 even though we are coming into our Winter, this would be lovely to make for ME since I am making so many things for others 😀
Tamara Kelly
I'm afraid I'm not familiar with that particular yarn!
Hellen fisher
So I can get the colours matched correctly, the back is made from the top down and the front is made from the bottom up? so waist first then chest?
Tamara Kelly
Hi Hellen! Both are made from the bottom up, so you start each piece with a new cake. 🙂
Toni L Peterson
I am working on this tee now, in size M. I have 111 dc in my foundation row. However, my stitch count for row 3 is 57, not 53. Is 53 correct, or am I doing something wrong? If my math is correct, half of 110 is 55, which means 53 could not be correct. Very pretty pattern; I'm sure it will work out either way as long as I have the same amount of stitches in each panel, but I was just curious. Thanks!
Tamara Kelly
Hi Toni! That was an error on my part, and I've edited the pattern. Thank you so much for letting me know! You should have 56 double crochets: [(111-1)/2]+1=56
Luz
Love this , I started making it. Thanks.
Stephanie
Hello. Thank you so much for the pattern. This is my next project. I would like to make longer sleeves, what would be best way of doing it? Any suggestions? Thank you
Tamara Kelly
Hi Stephanie, and thank you! To add long sleeves, instead of just adding an edging, make rows or rounds until you have the sleeve length desired! 🙂
Luz
Hi I started to crochet the back and I’m using 3 dk yarn. , my size is xl but I notice is so big for me , just did a trial and error till I measure what size do I need since I’m using different yarn, so I’m doing the Xs. Hopefully it will work,
I’ll let you know the outcome. Thank you.
Tamara Kelly
Hi Luz! I don't know your gauge or measurements, so it's impossible for me to guess. But I have a solution! I would recommend using the long chain method to work to your desired width (you can even use a shirt in your closet if you like) and seeing what size that seems to best correspond to. Here's a tutorial on that: https://www.mooglyblog.com/long-starting-chains-made-easy/
Sara
So I have this odd problem that I make gauge horizontally but my stitches are too tall... I think in this case I'll be able to move to the next part of the pattern whenever I reach the correct length, but I do wonder what kind of weird left-handed thing I must do to have that problem! 🙂 Thanks for this pattern, Tamara!
Tamara Kelly
Hi Sara! It sounds like a golden loop issue - this might explain: https://www.mooglyblog.com/moogly-live-september-2018/
Sara
Oh my gosh, my mind is completely blown. I think I'm a lifter! Thank you so much!! I googled around when I was trying to figure it out a while ago and couldn't find a thing, so i thought I was crazy. 🙂
Tamara Kelly
I'm so glad it resonated for you! 😀 I hope it helps!
Luz
Hi Tamara,
Yay I finished my top. I'm so happy with the outcome. Thank you.
Tamara Kelly
Thank you so much Luz, I'm so glad to hear it!! ♥
Julie
Love the concept, love the colors, love the top! Thanks for sharing with all of us!
Tamara Kelly
Thank you so much!!
Arla
Hi Tamara,
I was looking at the chart with all the measurements on it and noticed that in all but one of the measurements listed that there are 9 given, However, in the side seam measurement list there are only 8.
Is one of the measurements the same as another one, or was it missed from input?
I love this pattern and the fact that you have included instructions for super-sized gals!
Bless you for all your work!!!
Tamara Kelly
Oh dear, right you are! I'll add a note with all of them here just as soon as I find my notes so I can fix it. Thank you so much for letting me know! ♥
And thank you so much!
Anita
I just completed the cupcake tee using Its a wrap Rainbow in the nautical. I have taken some pictures, but don’t see a way to post them. So many complaints. Love it!
Tamara Kelly
Hi Anita! I hope they were compliments, not complaints... I'd love to see a photo though, you can email me at tamarakelly@mooglyblog.com or share it on the Moogly Facebook page! 🙂
Anita
Yes, Compliments lol
Mary
Love the pattern. This is my next project! I am going to use a blue/gray Shawl in a Ball yarn for this. Thank you for sharing your pattern.
Tamara Kelly
Thank you so much, Mary!
Janet Alexander
I tried to buy this yarn online from Red Heart, only to find they are now part of Yarnspirations. I can't buy the yarn from them because they can't ship it to the U.S.. And the yarn is not available in stores. What other yarn can I make it out of that will be similar?
Albertine
Hi Tamara,
I'm wondering what kind of stitch you used to put it all together. I did the shoulder seams with a slip stitch, but that is a lot harder to do with the side seams. You did say to sew the seams, but it needs to be a bit stretchier (although the sides don't stretch as much as the shoulders).
Thank you for this pattern. Simple but effective!
Tamara Kelly
I believe I used the mattress stitch! 🙂 Thank you so much!
Albertine
Thank you! And then through the double crochets or around them? 😁
Tamara Kelly
Usually through, but it's just whatever looks best for you! 🙂
Albertine
Thank you! And then through the double crochets or around them? 😁
Tona
So excited to start this project. I plan on making it much longer to use as a beach coverup, but would also like to add 3/4 sleeves. Any suggestions on easiest way to do that? Thanks!
Tamara Kelly
Hi Tona! Probably the easiest would be the crochet around the arm openings, to the length desired! 🙂 Thank you!
Michelle
Hello,
Is it possible to use a less lacy, more solid pattern to make this top? I would like to wear it by itself, not with a tank or cami underneath. Thank you.
Tamara Kelly
Yes, just replace the ch 1 skip 1s with dc sts! 🙂
Rachel
Do you remember if this used all of both cakes of yarn? I have a gradient cake of cotton yarn that is 935 yard in total. The colorwork would come out differently, which is fine, but I’m wondering if that’s enough yardage based on the two cakes you listed for the pattern.
Tamara Kelly
It depends on which size you are making - the larger the size, the more of the balls used.
Mariela
Sorry, i know this post is a few yrs old. I am a bit confused with the yarn and the hook size. Is the hook being used a G? Or should I be using a 2.5mm hook? Also, this yarn is no longer available, could you recommend a substitute?
Tamara Kelly
Hi Mariela! You should use whatever hook gets you to gauge - I used a G hook. Here are some substitutions from yarnsub.com - it's a really helpful website to bookmark! 🙂 https://yarnsub.com/yarns/red_heart/its_a_wrap