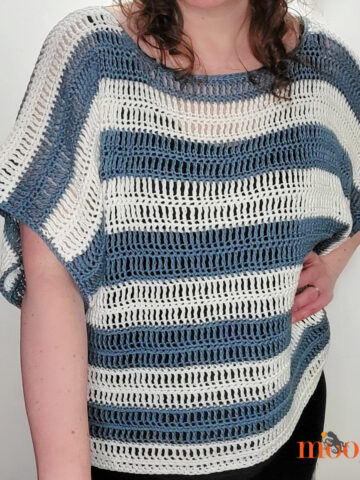
The Easy Cold Shoulder V-Neck Top combines all the features you've been looking for - simple stitching, a flattering neckline, sleeves that reveal and hide all the right spots - and all this in 8 sizes! Excited? I am!
 Disclaimer: This post includes affiliate links; materials provided by Red Heart Yarns, Brittany Needles, and Clover USA.
I am so happy I finally decided to try my hand at designing adult garments - and I'm thrilled with Red Heart It's a Wrap yarn! It creates such amazing drape in this pattern, and it's the perfect weight for summer, or for layering year round.

I've tried to keep this pattern as simple as possible, and I hope it's a great next step for some of you who have just started making garments too! It's easy to adjust the length if you like your tops a bit longer (or shorter).

And if you don't like cold-shoulders, it's no problem - just finish seaming the whole shoulder! The bottom of each sleeve is left open, for a unique and flattering bit of flutter (that leaves a nice breeze in hotter weather)!

Easy Cold Shoulder V-Neck Top
Add this pattern to your Ravelry Queue and Favorites
US - D, 3.25mm hook - Brittany Needles
Red Heart It's a Wrap (50% Cotton/50% Acrylic; "1 "- Super Fine/Fingering/UK: 1-3 ply; 1,100 yd (1,006 m); 7 oz. (200g))
Colorway Shown: Thriller (S/M: 1 cake; L/XL/2XL: 2 cakes; 3XL/4XL/5XL: 3 cakes)

Gauge: 20 sts x 12 rows = 4" in mesh pattern
Sizes/Bust as written in pattern: Small/34"(Medium/38", Large/42", XL/46", 2X/50", 3X/54", 4X/58", 5X/62")
Helpful Links & Tutorials
Easy Cold Shoulder V-Neck Top - Tutorial Coming Soon!
Foundation Double Crochet - FDC
Chainless Starting Double Crochet - CSDC
Dc2tog - Double Crochet Two Together Decrease
Standing Double Crochet - STDC
SCHEMATIC:

NOTES:
The first row of each piece is the Right Side (RS). Place a stitch marker on one side to mark this if needed.
Please print this pattern and then mark the numbers and instructions for the size you are making.
If preferred, substitute "chain 3" for the CSDC sts in the pattern.
If preferred, substitute "join with sl st and chain 3" for the STDC sts in the pattern.
This pattern uses turned rounds or joined rows beginning with the second color. If preferred, you can skip turning, but be aware that this will create an angle in the seam.
INSTRUCTIONS:
FIRST FRONT SHOULDER ALL SIZES (Start with the center color of the cake)
Row 1: FDC 42 (46, 51, 61, 65, 71, 81, 85); turn. (42 (46, 51, 61, 65, 71, 81, 85) sts)
SIZES SMALL AND MEDIUM ONLY:
Row 2: CSDC, *ch 1, skip next st, dc in next st; rep from * until 1 st rem, ch 1, dc in last st; turn. (22 (24, X, X, X, X, X, X) sts)
Row 3: CSDC, dc in 1st st, *dc in next ch sp, dc in next st; rep from * across, turn. (44 (48, X, X, X, X, X, X) sts)
Row 4 - 20: Rep Rows 2 and 3, ending on a Row 2 rep, break yarn and set piece aside. (31 (33, X, X, X, X, X, X) sts)
SIZES LARGE TO 3X ONLY:
Row 2: CSDC, *ch 1, skip next st, dc in next st; rep from * across; turn. (X (X, 26, 31, 33, 36, X, X) sts)
Row 3: CSDC, *dc in next ch sp, dc in next st; rep from * across; turn. (X (X, 51, 61, 65, 71, X, X) sts)
Row 4: Repeat Row 2.
Row 5: CSDC, dc in 1st st, *dc in next ch sp, dc in next st; rep from * across, turn. (X (X, 52, 62, 66, 72, X, X) sts)
Row 6: CSDC, *ch 1, skip next st, dc in next st; rep from * until 1 st rem, ch 1, dc in last st; turn. (X (X, 28, 33, 34, 38, X, X) sts)
Row 7 - 24: Rep Rows 5 and 6, break yarn and set piece aside. (X (X, 36, 41, 43, 46, X, X) sts)
SIZES 4X AND 5X ONLY:
Row 2: CSDC, *ch 1, skip next st, dc in next st; rep from * across; turn. (X (X, X, X, X, X, 41, 43) sts)
Row 3: CSDC, *dc in next ch sp, dc in next st; rep from * across; turn. (X (X, X, X, X, X, 81, 85) sts)
Row 4 - 8: Rep Rows 2 - 3, ending on a Row 2 rep.
Row 9: CSDC, dc in 1st st, *dc in next ch sp, dc in next st; rep from * across, turn. (X (X, X, X, X, X, 82, 86) sts)
Row 10: CSDC, *ch 1, skip next st, dc in next st; rep from * until 1 st rem, ch 1, dc in last st; turn. (X (X, X, X, X, X, 43, 45) sts)
Row 11 - 28: Rep Rows 9 and 10, break yarn and set piece aside. (X (X, X, X, X, X, 51, 53) sts)
SECOND FRONT SHOULDER (Continue with the center color of the cake)
ALL SIZES
Row 1: FDC 42 (46, 51, 61, 65, 71, 81, 85); turn. (42 (46, 51, 61, 65, 71, 81, 85) sts)
SIZES SMALL AND MEDIUM ONLY:
Row 2: CSDC, ch 1, dc in next st, *ch 1, skip next st, dc in next st; rep from * across, turn. (22 (24, X, X, X, X, X, X) sts)
Row 3: CSDC, *dc in next ch sp, dc in next st; rep from * across until 1 st rem, 2 dc in last st; turn. (44 (48, X, X, X, X, X, X) sts)
Row 4 - 20: Rep Rows 2 - 3, ending on a Row 2 rep, ending on a Row 2 rep. (31 (33, X, X, X, X, X, X) sts)
SIZES LARGE TO 3X ONLY:
Row 2: CSDC, *ch 1, skip next st, dc in next st; rep from * across; turn. (X (X, 26, 31, 33, 36, X, X) sts)
Row 3: CSDC, *dc in next ch sp, dc in next st; rep from * across; turn. (X (X, 51, 61, 65, 71, X, X) sts)
Row 4: Repeat Row 2.
Row 5: CSDC, *dc in next ch sp, dc in next st; rep from * across until 1 st rem, 2 dc in last st; turn. (X (X, 52, 62, 66, 72, X, X) sts)
Row 6: CSDC, ch 1, dc in next st, *ch 1, skip next st, dc in next st; rep from * across, turn. (X (X, 28, 33, 35, 38, X, X) sts)
Row 7 - 24: Rep Rows 5 and 6. (X (X, 36, 41, 43, 46, X, X) sts)
SIZES 4X AND 5X ONLY:
Row 2: CSDC, *ch 1, skip next st, dc in next st; rep from * across; turn. (X (X, X, X, X, X, 41, 43) sts)
Row 3: CSDC, *dc in next ch sp, dc in next st; rep from * across; turn. (X (X, X, X, X, X, 81, 85) sts)
Row 4 - 8: Rep Rows 2 - 3, ending on a Row 2 rep.
Row 9: CSDC, *dc in next ch sp, dc in next st; rep from * across until 1 st rem, 2 dc in last st; turn. (X (X, X, X, X, X, 82, 86) sts)
Row 10: CSDC, ch 1, dc in next st, *ch 1, skip next st, dc in next st; rep from * across, turn. (X (X, X, X, X, X, 43, 45) sts)
Row 11 - 28: Rep Rows 9 and 10. (X (X, X, X, X, X, 51, 53) sts)
JOIN FRONT SHOULDERS ALL SIZES (Continue with the center color of the cake)
Row 1: CSDC, dc in next ch sp, *dc in next st, dc in next ch sp; rep from * until 1 st rem, dc2tog in last st and last st of final row of First Shoulder, ^dc in next ch sp, dc in next st; rep from ^ across; turn. (121 (129, 141, 161, 169, 181, 201, 209) sts)
SIZES SMALL - 2X ONLY: Break yarn and set piece aside.
SIZES 3X - 5X ONLY:
Row 2: CSDC, *ch 1, skip next st, dc in next st; rep from * across, turn. (X (X, X, X, X, 91, 101, 105) sts)
SIZES 3X AND 4X ONLY: Break yarn and set piece aside.
SIZE 5X ONLY:
Row 3: CSDC, *dc in next ch sp, dc in next st; rep from * across, break yarn and set piece aside. (X (X, X, X, X, X, X, 209) sts)
BACK SHOULDER ALL SIZES (Continue with the center color of the cake)
Row 1: FDC 121 (129, 141, 161, 169, 181, 201, 209); turn. (121 (129, 141, 161, 169, 181, 201, 209) sts)
Row 2: CSDC, *ch 1, skip next st, dc in next st; rep from * across; turn. (61 (65, 71, 81, 85, 91, 101, 105) sts)
Row 3: CSDC, *dc in next ch sp, dc in next st; rep from * across; turn. (121 (129, 141, 161, 169, 181, 201, 209) sts)
Row 4 - 21 (21, 25, 25, 25, 26, 30, 31): Rep Rows 2 and 3, break yarn.
PREP BOTH FRONT AND BACK SHOULDER PIECES
Place stitch markers on the stitches of the last row of both front and back piece, as follows for each size:
Small: #23 and #99
Medium: #23 and #107
Large: #23 and 119
XL: #31 and 131
2XL: #31 and #139
3XL: #31 and #151
4XL: #38 and #164
5XL: #38 and #172
JOIN FRONT AND BACK ALL SIZES (Switch to the second color of the cake)
Rnd 1: STDC in the first marked st on the Back Shoulder Piece from the RS, dc in each st across to second marked st, dc in second marked st, ch 15 (15, 15, 20, 20, 20, 25, 25), dc in first marked st on the Front Shoulder Piece from the RS, dc in each st across to second marked st, dc in second marked st, ch 15 (15, 15, 20, 20, 20, 25, 25); join to first st of rnd, turn. (154 (170, 194, 202, 218, 242, 254, 270) dc)
Rnd 2: CSDC, dc in each remaining st and ch around; join and turn. (184 (200, 224, 240, 258, 282, 304, 320) sts)
Rnd 3 - 20 (20, 19, 19, 19, 21, 19, 19): Repeat Rnd 2; break yarn.
CONTINUE LAST STRIPE ALL SIZES (Switch to the outer color of the cake)
Rnd 1: STDC in last st of previous rnd, dc in each remaining st and ch around; join and turn. (184 (200, 224, 240, 258, 282, 304, 320) sts)
Rnd 2: CSDC, dc in each remaining st and ch around; join and turn. (184 (200, 224, 240, 258, 282, 304, 320) sts)
Rnd 3 - 20 (20, 19, 19, 19, 20, 18, 19): Repeat Rnd 2.
Final Rnd (work on RS, do not turn after previous rnd if needed): Ch 1, sc in each st around; join and break yarn.
ASSEMBLY AND FINISHING:
Match up the Front and Back Shoulders, working from the arm-edge of each piece. Using the mattress stitch and center color of yarn, seam for 2" on each side of the neckline and 1" at each side of the arm opening.
Join yarn and sc evenly around neckline and around the arm openings with matching colored yarn. Weave in all ends.
And that's the Easy Cold Shoulder V-Neck Top! I haven't physically crocheted all 8 sizes myself, so you get to help test this free crochet pattern! If you make it, please let me know what size, and if you encountered any errors. I've checked and double checked my math, but another set of eyes is always better, and we're all only human. ♥

I hope to show off my Easy Cold Shoulder V-Neck Top at the CGOA Chainlink Conference this summer! If you make the Easy Cold Shoulder V-Neck Top I’d love to see it! So if you share it on social media, be sure to tag me @mooglyblog or #mooglyblog – and happy crocheting!
Written pattern copyright Tamara Kelly 2018, all rights reserved. Please do not reprint or repost this pattern, but please do link to this page to share this pattern with others. To print or download, use the Print Friendly button below, or go to PrintFriendly.com, or right-click to copy and paste it into a word processing document if those options do not work for you (please note that Print Friendly is a free outside website that the button links to, and you can click here for a tutorial on how to use it, but I cannot provide additional technical support for this service). If you wish to make items for sale from this pattern or translate it to another language, please visit the About page for details. Thank you to Red Heart Yarn, Brittany Needles, and Clover USA for providing the materials for this pattern.



Lindsey
I love the subtle details to this top like the open bottom of the sleeve and how the sleeve attaches at the top. This top is very unique, but looks pretty simple to make. Another wonderful design!
Tamara Kelly
Thank you so very much! 😀
DavetteB
If I wanted to make the sleeves longer, like elbow length, how could I go about that? I love the sweater style
Tamara Kelly
Thank you! You could add however many stitches desired to the starting chains for the shoulders, or you could add afterthought sleeves by crocheting around the arm opening.
Lindsey
Nice yarn is very different from what I have worked with before. How is was it to work with? I have a skein that I bought a while ago and I plan on making a shawl with it.
Daisy Dianne Bromlow
When I looked at it I thought ulk but...... with it on I absolutely LOVE the fit , the way it drapes , everything ! I have arthritis in both hands that causes excruciating pain but I am going to make this. Love love love it !!! Thanks for sharing and not charging for your patterns. I'm on disability and a very small fixed income so I really appreciate the free patterns.
Tamara Kelly
Thank you so much Daisy! ♥ I hope you have an ergonomic hook to help you - the bigger the handle, the better. I hope you enjoy making it!
Gigi
Love the look of this top! Will there be a left-handed tutorial, please?
Tamara Kelly
Yes, both right and left-handed tutorials should go up this coming week! 😀 Thank you!
JENNIFER WIXOM
I am probably being dense, but where is row 1 of second front shoulder?
Tamara Kelly
Oh gosh, I'm sorry that was missing - it's identical to the first row of the first shoulder. I'll edit it now!
Chloe
I have a skien of it's a wrap my aunt gave me. I know have something to make it with. Just finished making the Saturday sweater. Love your patterns and thank you for sharing your creative
Tamara Kelly
Thank you so much! 🙂
Kathy Burt
gauge is going to be the death of me. I went down to a size 0 hook and I still get 5 inches in 12 rows of mesh stitches. Any ideas ????
Tamara Kelly
Oh wow! And you are using the recommended yarn (or at least the same weight)?
Kathy Burt
I used the exact same yarn. I bought a C hook and am crocheting really tight and I get the correct row count now. I know I watched you do this in a video and I can't find the video anywhere???
Cheryl Wallace
I'm also having a miserable time trying to get gauge. I've been tried 5 hooks in different materials, tried modifying my stitch style, even measured hung gauge. Always too many stitches if I match the number of rows
Tamara Kelly
My best suggestion would be to work the first row to the width in the schematic for your size, count how many stitches that is, and then see which size is closest. Then you can use the stitch counts for that size, while using the row counts for your original size. It might take a little fudging here and there, but that's the best I can think of right now. :/
Cheryl Wallace
I'll try that. Thank you, Tamara.
Kathy Burt
found the video. and posted twice. can't figure out how to delete or edit posts. sorry
Tamara Kelly
No worries, thank you Kathy, I'm glad you found it!
Jennifer Eldridge
So I've been sooo looking forward to this pattern and I'm sad to say in having a tiny issue. In doing the 3x size and on row 6 my count isn't adding up to 38..I keep getting 37.. I fudged it to make it match but in afraid I'll mess up the sizing. Any help would be appreciated.
Tamara Kelly
Hi Jennifer!
I assume you have the correct number on Row 5? (72 dc)
If so, are you counting the first ch3/csdc as your first stitch?
Do you have an extra stitch at the end to work that last dc into that might be hiding? (Sometimes they like to hide)
Jennifer Eldridge
Yes previous row stitch count is fine. No hiding stitches either. I just can't seem to figure out where im going wrong.. I'm gonna frog one more time and try it again...
Tamara Kelly
Well, barring all other options... you can just add another stitch on there! 😛
Jennifer Eldridge
Welp I just went ahead and added a stitch cuz my math isn't working out.
Im increasing by 1 on row 5.. from 71 to 72.... and increasing again BY ONE on row 6... so how does that add up to an increase of 2 in row 6?
72 ÷2=36
36+1=37
Either way im trucking along and loving how it's coming out!
Tamara Kelly
The only thing I can think is that you're misreading the instructions at the increase. I'm going to try to make a rudimentary chart here to show what I mean. The T's are dc, and o's are chains:
ToToToToT
TTTTTTTT
You can see with an even number of sts in the first row, when you work the second row, there is one more stitch left - so you chain one and dc in that last stitch. Does that help at all?
Jennifer Eldridge
I soo appreciate your efforts. My brain gave up lol. I fudged it to 38 then once I got to the end of row 24 I had 47 stitches instead of 46. Darned if I'm frogging anything more lol. Sooo I just adjusted the stitch count for my size, on my pattern pages. I doubt a few extra stitches will make much difference in the grand scheme of things. Onward to finishing this gorgeous top. So I can get to the scubbie yarn market bag lol.
Tamara Kelly
Well heck, if you can make it work, then that's a win in my book! 😀
Chelin
Hi,
I made the top and wore it last week. I got so many compliments on it. It is so comfortable. Thanks for the free pattern.
Tamara Kelly
Oh that's wonderful to hear, thank you Chelin! 😀
Denise Gall
Hi Tamara! I love this pattern so much. I made one and am working on my second. I'm thinking with this one I would like to have the cold shoulder part but not the opening under the arm. Any tips for doing that? Thanks so much!
Tamara Kelly
You would need to add some rows to be able to close up the bottom. 🙂 Thank you!
Katie
Help! I keep coming up short on row 6 on the first front shoulder for 2xl size. On row 5 i have 66 stiches but I keep geting 34 stiches in row 6.
Katie
Help! I keep coming up short on row 6 on the first front shoulder for 2xl size. On row 5 i have 66 stiches but I keep geting 34 stiches in row 6. Where am I going wrong?
Tamara Kelly
I think that was an error on my part, my apologies, I will edit the pattern.
Cathy
HiTamara
Just have one quick question, do u have to use the foundation chain? I’d rather not if it’s not absolutely necessary.
Tamara Kelly
You don't have to - you can just chain a bit extra and work across that, as long as you get the same stitch count. It will have a bit less give and stretch though.
Samantha
Hi Tamara - Thank you for so many wonderful patterns! They are so appreciated 🙂 I wanted to ask if the size that you’re wearing so beautifully in the picture is S/M? Thanks so much!
Tamara Kelly
Thank you so much Samantha! I am wearing a Large here. 🙂
Samantha
Perfect! I’ll make the large and I hope that it fits me as well as it does you ☺️
Bridget
When I click on your yarn, the link is broken.
Tamara Kelly
Thank you so much, I'm updating it now!