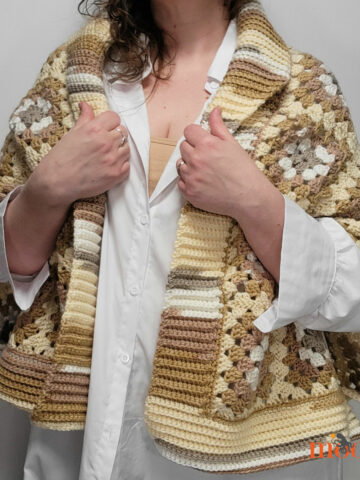
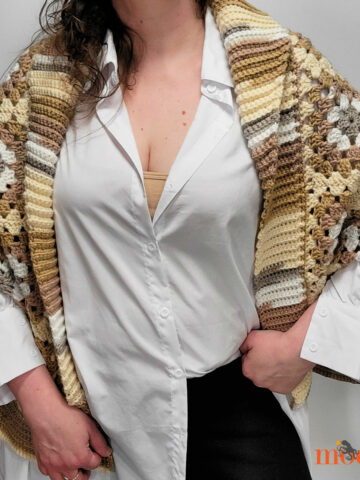
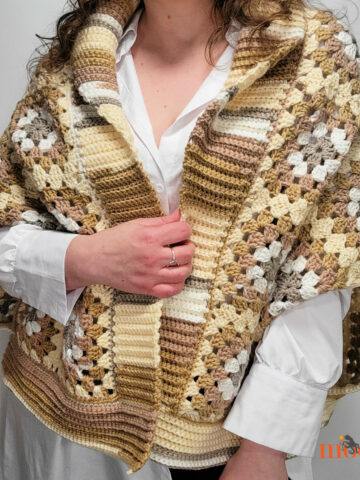
The Paloma Cardigan is a jacket style sweater with three quarter length sleeves and mesh shoulders that stretch down the sleeves to make this free crochet cardi pattern perfect year round!
 Disclaimer: This post includes affiliate links; materials provided by Red Heart Yarns & Clover USA.
Made with Red Heart Amore Yarn (so soft!) and a Clover Amour crochet hook (so comfy!), the Paloma Cardigan is a quick and easy topper that you can throw on over jeans and a tank or a pretty dress - any time you need a little extra warmth.

This free crochet cardigan pattern features a V stitch mesh over the shoulders that is tapered in the sleeves and carried right down to the cuff. This adds a little extra breathability to the pattern - great for days that are all about layers!

The Paloma Cardigan is made with positive ease, but it's not bulky or super oversized - great for active days, running errands, or even a night out on the town!

The Paloma Cardigan crochet pattern includes instructions for sizes Small to 5X, and can be made in a week - or a long weekend!

Paloma Cardigan
Add this pattern to your Ravelry Queue and Favorites or purchase the Ad-Free PDF!
US - I, 5.5mm Clover Amour Crochet Hook
875-1675 yds Red Heart Amore (“4”/Worsted/ UK: 10-12 ply; 198 yds/181 m; 3.5 oz/100 g)
Colorway Shown: Chamomile (5(6, 8, 9) balls)
Gauge: 14 sts x 8 rows = 4"/10cm in flo exhdc
Sizes: Small/Medium (Large/XL; 2X/3X; 4X/5X)
Sizing is based on the Craft Yarn Council Standards, Large/XL shown
Helpful Links and Tutorials:
FDC - Foundation Double Crochet
Exhdc - Extended Half Double Crochet
CSDC - Chainless Starting Double Crochet
How to Extend a Row with Foundation Sts
How to Join with dc (Standing Double Crochet)
Fpdc/Bpdc - Front Post/Back Post Double Crochet
Special Stitch:
V st - (dc, ch 1, dc) in the indicated stitch or ch sp
NOTES:
When the instructions for the sizes are different, they are listed as Small/Medium (Large/XL; 2X/3X; 4X/5X). It is recommended that you print a copy of this pattern and circle or highlight correct numbers for your size.
For ease of use, the Row/Rnd numbers restart with each new sweater section.
If you prefer not to use Foundation Stitches, you can begin with a chain that you dc into for the first row.
If you prefer not to use the CSDC stitch, you can substitute a ch 3 and use that as the first dc.
The sleeves (not including the cuffs) are worked in turned rounds, so even numbered rows will be worked from "inside" the sleeve. This is important to maintain the look of the stitches and to keep the joining seam under the arm straight.
INSTRUCTIONS
BACK WAIST:
Row 1 (Wrong Side): FDC 74(89, 101, 116); turn. (74(89, 101, 116) sts)
Row 2 - 20(20, 22, 22): CSDC in the first st, FLO exhdc across until 1 st rem, dc in the last st; turn. (74(89, 101, 116) sts)
BACK SHOULDERS:
Row 1: Sl st in the first 4(4, 7, 7) sts, CSDC in the same st as the last sl st, FLO exhdc until 4(4, 7, 7) sts rem, dc in next st, rem sts left unworked; turn. (68(83, 89, 104) dc)
Row 2 - 7(9, 11, 13): CSDC in the first st, FLO exhdc across until 1 st rem, dc in the last st; turn. (68(83, 89, 104) dc)
BACK MESH:
Row 1: CSDC in the first st, skip the next st, FLO V st in next st, *skip 2 sts, FLO V st in next st; rep from * across until 2 sts rem, skip the next st, dc in the last st; turn. (22(27, 29, 34) V sts)
Row 2 - 10: CSDC in the first st, V st in the ch-1 sp of each V st across, dc in the last st; turn. (22(27, 29, 34) V sts) Place st marker in dc # 22(28, 30, 34) of the last row.
LEFT FRONT MESH (will be Right Front if Left-Handed):
Row 1: CSDC in the first st, V st in the ch-1 sp of the first 10(13, 14, 16) V sts, skip the next dc (last part of V st just crocheted into), dc in the next dc, rem sts left unworked; turn. (10(13, 14, 16) V sts)
Row 2 - 10: CSDC in the first st, V st in the ch-1 sp of each V st across, dc in the last st; turn. (10(13, 14, 16) V sts)
LEFT FRONT SHOULDER:
Row 1: CSDC in the first st, FLO exhdc in each st and ch across until 1 st rem, dc in the last st; turn. (32(41, 44, 50) sts)
Row 2 - 7(9, 11, 13): CSDC in the first st, FLO exhdc across until 1 st rem, dc in the last st; turn. (32(41, 44, 50) sts)
LEFT FRONT WAIST:
Row 1: CSDC in the first st, FLO exhdc across previous row, extend row with 3(3, 6, 6) FDC; turn. (35(44, 50, 56) sts)
Row 2 - 20(20, 22, 22): CSDC in the first st, FLO exhdc across until 1 st rem, dc in the last st; turn. (35(44, 50, 56) sts) Break yarn after last row.
RIGHT FRONT MESH (will be Left Front if Left-Handed):
Row 1: Join with dc in marked st of Back Mesh Row 10, V st in the ch-1 sp of each rem V sts across, dc in the last st; turn. (10(13, 14, 16) V sts)
Row 2 - 10: CSDC in the first st, V st in the ch-1 sp of each V st across, dc in the last st; turn. (10(13, 14, 16) V sts)
RIGHT FRONT SHOULDER:
Row 1: CSDC in the first st, FLO exhdc in each st and ch across until 1 st rem, dc in the last st; turn. (32(41, 44, 50) sts)
Row 2 - 7(9, 11, 13): CSDC in the first st, FLO exhdc across until 1 st rem, dc in the last st; turn. (32(41, 44, 50) sts)
RIGHT FRONT WAIST:
Row 1: Ch 5(5, 8, 8), dc in 3rd ch from the hook (skipped chs do not count as a st), exhdc in each rem ch, FLO exhdc across previous row until 1 st rem, dc in last st; turn. (35(44, 50, 56) sts)
Row 2 - 20(20, 22, 22): CSDC in the first st, FLO exhdc across until 1 st rem, dc in the last st; turn. (35(44, 50, 56) sts) Break yarn after last row.
SEAM THE SIDES:
Using the mattress stitch, seam the sides of the rows in the Waist sections, leaving the Shoulders and Mesh unsewn for the armholes.

SLEEVES (REPEAT FOR BOTH ARMHOLES):
Rnd 1: From Right Side of sweater, join to bottom center of armhole opening, exhdc in each st, 2 exhdc in the side of each FLO exhdc row, V st in the side of every other V st row, 2 exhdc in the side of each FLO exhdc row, exhdc in each st; join and turn. (10 V sts)
Rnd 2 - 5: Ch 2 (does not count as a st), FLO exhdc in each exhdc st, 3 exhdc in ch-1 sp of first V st, V st in the ch-1 sp of each V st across until 1 V st rem, 3 exhdc in ch-1 sp of last V st, FLO exhdc in each rem exhdc st until 1 st rem, skip the last st; join to first exhdc and turn.
Rnd 6: Ch 2, FLO exhdc in each exhdc st, V st in the ch-1 sp of each V st, FLO exhdc in each rem exhdc st until 1 st rem, skip the last st; join and turn.
Rnd 7 - 24(24, 26, 26): Rep Rnd 6.
CUFF (REPEAT FOR BOTH SLEEVES):
Rnd 1: Ch 1, sc in each st and ch around; join, do NOT turn.
Rnd 2: Ch 1, *fpdc in next st, bpdc in next st; rep from * around, if 1 st rem, skip it; join.
Rnd 3: Ch 1, *fpdc in next st, sc in next st; rep from * around and join.
Rnd 4: Sl st in each st around; join and break yarn.
BOTTOM HEM:
Row 1: From Right Side of sweater, join to first st at bottom edge with dc, dc in each rem st across last row of Front Waist, foundation chain of Back Waist, and last row of Front Waist; turn.
Row 2: Ch 1, sc in the first st, *bpdc in the next st, fpdc in the next st; rep from * across until 1-2 sts rem; if 1 st rem, sc in last st and turn; if 2 sts rem, bpdc in next st, sc in last st, and turn.
Row 3 and 4: Ch 1, sc in first st, maintain post st pattern to last st, sc in last st; turn.
FINAL EDGING:
Rnd 1: Ch 1, sc across the previous row, ch 2, sc in side of each Bottom Hem row, *ch 1, sc in the side of the next row; rep from * across entire front opening to opposite side of Bottom Hem rows, sc in side of each Bottom Hem row, ch 2, join to first sc.
Rnd 2: Ch 1, sc each st to corner, (sc, ch 2, sc) in ch-2 sp, sc in each st and ch-1 sp across front opening to next corner, (sc, ch 2, sc) in ch-2 sp; join and break yarn.
And that's how to crochet the Paloma Cardi! It's really pretty simple, with lots of possibilities for customization - like making the V st mesh in a contrasting color! I hope you like it!

Ready to make your own Paloma Cardigan? If this free crochet cardigan pattern does inspire you, and you post a photo on social media, be sure to tag me @mooglyblog or #mooglyblog so I can check it out too! I love seeing what you make!
Follow Moogly on Facebook, Twitter, Pinterest, Instagram, and Tumblr! Thank you to Red Heart Yarns and Clover USA for providing the materials shown in this post. Written pattern copyright Tamara Kelly 2019, all rights reserved. Please do not reprint or repost this pattern, but please do link to this page to share this pattern with others.
If you wish to make items for sale from this pattern or translate it to another language, please visit the About page for details.


Debbiew
Pretty sweater, like the detail on the sleeve, always good to have a shorty sweater or two w/ longer ones, 3/4 sleeves are my favorite.
Tamara Kelly
Thank you so much, Debbie!
ELIZABETH RIVERA
Adorable I love it with the jeans. Your friendly print button not working, used my print option.
Tamara Kelly
Thank you so much, I'm so happy to hear it!! It looks like the button is glitching right now, I'll have to have my web guy take a look. In the meantime, you can try the Clean Print plugin or copying and pasteing to a document. Hopefully we'll get it figured out soon - it seems to just be affecting this one post. :/
Lori
It won't work for me either! :/
Thank You for the pattern in advance!! 😉
Rajeshwari Karthikeyan
Hello Tamara
Thankyou so much for the beautiful pattern! I tried both your print friendly button and printfriendly.com but both the times, it does print beyond the how to print instructions! I am not sure if it is at my end or yours!
Tamara Kelly
Hi Rajeshwari! It looks like the button is glitching right now, I'll have to have my web guy take a look. In the meantime, you can try the Clean Print plugin or copying and pasteing to a document. Hopefully we'll get it figured out soon - it seems to just be affecting this one post. :/
Aida Hartmann
This one is defiantly a keeper! Looking forward to the tutorial....how about a CAL as well?
Tamara Kelly
Thank you so much! There will definitely be a video - I'll have to ponder on a CAL! 😀
Teri
If I wanted to make the jacket a bit longer, can you tell me where I would add additional rows?
Tamara Kelly
Hi Teri! You can add more Row 2 repeats in the Back Waist section, and then be sure to add the same number of rows in both Front Waist sections. And if you find you'd like it a little longer still, you can just add more exhdc rows to the bottom, working all across, before switching to the Bottom Hem section. 🙂
Teri Kyler
Amazing, thank you!
Chrissy
How “tall” is this sweater without adding repeats? I’m trying to decide if i need to add them before ordering buying yarn.
Tamara Kelly
Hi Chrissy! From the shoulder, it should be approximately 20(21, 23, 24) inches long, laid flat. 🙂
Eleanor
What a nice pattern. It looks wearable, practical, and clever..
Do you have a schematic or a word on measurements?
Tamara Kelly
Hi Eleanor! I don't at this time, but I have linked to the sizing standards I used.
Dane
sympa ce petit gilet printanier a souhait merci du partage bisous
Joyce Swensson
I'm making this one for me! I just prefer full length sleeves and it might have to be a bit shorter as I am only 5'2". I sure appreciate your creative patterns.
Tamara Kelly
I'm so glad you like it Joyce! 🙂 Thank you! I go over how to change the body and sleeve length a bit in the tutorial too if you need extra help there. 🙂
louise
There is NO print friendly marker on this pattern
Tamara Kelly
Yes, we're struggling with this now - there is some issue preventing it from working on just this one page and we haven't been able to figure it out. Please use one of the other many options - Clean Print, cut and paste to a document, screenshots, etc.
Clara
Thank you!!
Debbie Yackanicz
Print button is still not working.
Tamara Kelly
Yes, unfortanately we haven't been able to come up with a solution for this one page of the site - even the print friendly people are flummoxed! Please use one of the many alternate printing methods that are available out there.
Soffity
I’ve been following Moogly for years. You are terrific. I’m Australian and it’s mostly dk weight yarns in my stash as a result, would this work in dk with 4mm hook if I just did a bigger size than needed or doesn’t it work that way.
Kathy
Thanks for the pattern. I'm looking forward to wearing it.
I'm working on the sleeves. Just curious how many EHDC stitches are in each row, or how many are in the last row of the sleeve. I think my sleeves are tapering too much before I add the cuff.
thanks.
Tamara Kelly
Hi Kathy! Stitch count depends on what size you are making. You should decrease by 1 stitch each round, starting with Rnd 2 of the sleeve. However, if you prefer a straight sleeve, you can definitely do that - just don't skip that last stitch!