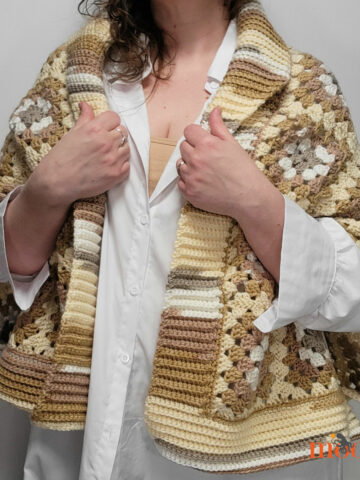
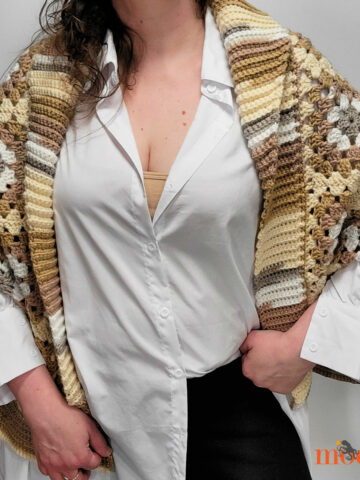
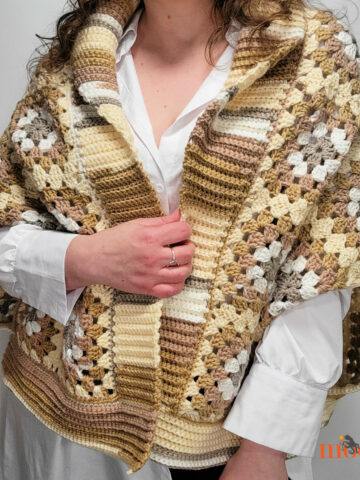
The Bellevue Cardigan is comfy, easy to crochet, and includes sizes XS to 6X. But most of all, it's a dramatic yet wearable topper that is sure to add something very special to any outfit! You can be the drama in the very best way with this free crochet pattern on Moogly!
Please note that I know that this is a divisive design - some people love it, and some people hate it. As an artist, I wanted to explore what I could do with these stitches in a new and unique way. I just ask that you be kind, and if it's not for you, there are lots of other free crochet patterns for you to explore!
 Disclaimer: Materials for this pattern were provided by Yarnspirations; this post includes affiliate links.
Featuring Bernat Forever Fleece
Usually, if you hear the phrase "fleece cardigan," you'll think of something very different! But the Bellevue Cardigan takes this soft, delicious bulky yarn and turns it into a piece full of fashion and flair!

I am so in love with Bernat Forever Fleece, for everything from home decor to wearables. It feels decadent and fluffy, yet machine washable. And it comes in so many beautiful colors! As you can see, there's some color variation here too, giving it a lovely almost hand-dyed look!

Crocheted from the Top Down - with Flair!
The Bellevue Cardigan is crocheted raglan style, from the top down. Then when it hits the shoulder line, pleats are added for *all* the crochet drama!

This flared look continues into a wide, bell-sleeved, cropped cardi, that's finished off with just enough of a waistline to give it shape.

And it's easy to adjust this one for your personal preferences - just be sure to try it on as you go!

Want a longer cardi? Add more rows in pattern, it's easy! Prefer to make a capelet instead of a cardi? Stop before adding the waist (on a right side row) and you're done!

I didn't add a buttonhole because I wanted to be able to use a variety of shawl pins, broaches, and pins to secure it. And I wanted to be able to move them around, for different looks! I can't wait to see your versions!

Bellevue Cardigan
Add this pattern to your Ravelry Queue and Favorites
US-N, 10.0 mm hook - Susan Bates
580-970 yds Bernat Forever Fleece
(6 - Super Bulky; 100% polyester; 280 g/9.9 oz, 177 m/194 yds)
Colorway Shown: Juniper (3(4, 4, 5, 5 balls)
Gauge: 9 hdc = 5"; 11 rows = 8"
Finished Sizes: XS/S(M/L; XL/2X; 3X/4X; 5X/6X)
These sizes are based on the Craft Yarn Council Sizing Standards. To determine your best size, use the Cross Back (4) measurement.
Helpful Links and Tutorials:
FSC - Foundation Single Crochet
Note:
If you would prefer to avoid using the FSC stitch, you can instead chain one more stitch than called for, skip the ch closest to the hook, and sc in each rem ch across, so that you have the same stitch total for Row 1. Continue the pattern as written from there with Row 2.
Sizes are listed in the pattern as XS/S(M/L; XL/2X; 3X/4X; 5X/6X) - be sure to follow the numbers for your size. When only one number is given, it applies to all sizes.
Be sure to note the Special Stitches below!
Special Stitches:
Corner - (hdc, dc, place stitch marker in dc just made, hdc) in indicated stitch.
Back Pleat - flo hdc in next 3 sts, turn, flo hdc in same 3 sts, turn, bpdc in same 3 sts
Forward Pleat - bpdc in next 3 sts, turn, flo hdc in same 3 sts, turn, flo hdc in same 3 sts
Bellevue Cardigan Instructions:
Make the Yoke:
Row 1 (WS): FSC 44(47, 50, 53, 56); turn. (44(47, 50, 53, 56) sc)
Row 2 (RS): Ch 2, hdc in first 6(6, 6, 6, 7) sts, corner in next st, hdc in next 7(8, 8, 9, 9) sts, corner in next st, hdc in next 11(12, 13, 14, 15) sts, corner in next st, hdc in next 7(8, 8, 9, 9) sts, corner in next st, hdc in last 9(9, 11, 11, 12) sts; turn. (52(55, 58, 61, 64) sts)
Row 3 - 5(7, 7, 7, 9): Ch 1, [hdc to marked st, corner in marked st] 4 times, hdc in each rem st across; turn. (76(95, 98, 101, 120) sts)
Add Pleats:
Row 1 (RS): Ch 1, hdc in first 10(12, 12, 12, 15) sts, corner in next st, *hdc in next 4(7, 7, 7, 9) sts, back pleat in next 3 sts, hdc in next 1(0, 0, 1, 1) st, front pleat in next 3 sts, hdc in next 4(7, 7, 7, 9) sts, corner in next st**, hdc in next 6(9, 9, 10, 12) sts, back pleat in next 3 sts, hdc in next 1(0, 1, 0, 1) st, front pleat in next 3 sts, hdc in next 6(9, 9, 10, 12) sts, corner in next st, rep * to **, hdc in last 13(15, 17, 17, 20) sts; turn. (120(139, 142, 145, 164) sts)
Row 2 - 16: Ch 1, [hdc to marked st, corner in marked st] 4 times, hdc in each rem st across; turn. (240(259, 262, 265, 284) sts)

Add Waist:
Setup: Fold piece so that first stitch marker meets second stitch marker, and third stitch marker meets fourth stitch marker, as shown below. Count in 10 sts from the marked corners, and mark for bottom of sleeve, through both layers. Try on to test waist size - move st markers back for a bigger fit, in for a closer fit.

Row 1 (RS): Ch 1, hdc in first 18(18, 18, 18, 19) sts, skip next 81(86, 86, 87, 91) sts (st marker to st marker), hdc in next 43(48, 49, 50, 55) sts, skip next 81(86, 86, 87, 91) sts (st marker to st marker), hdc in last 21(21, 23, 23, 24) sts; turn. (82(87, 90, 91, 98) sts)
Row 2 (WS): Ch 1, hdc in each st across; turn.
Edging Rnd: Ch 1, sc in each st across, ch 2, sc evenly along front opening, ch 2, sc 8(8, 10, 10, 11) along neckline, sc3tog, *sc in next 5(6, 6, 7, 7) sts, sc3tog,** sc in next 9(10, 11, 12, 13) sts, sc3tog, rep * to **, hdc in next 5(5, 5, 5, 6) sts, ch 2, sc evenly along front opening, ch 2, join to first st of rnd.
Sleeve Finishing:
Use the mattress stitch to seam the bottom of each sleeve, from corner to waist.

LOOKING FOR MORE?
Are you looking for more free crochet sweater patterns? You can browse all my patterns on Moogly or Ravelry - and check out some of my most recent designs: Summer Staple Sweater, Batwing Lace Sweater, Handkerchief Cocoon, Cuff to Cuff Colorblock Cardigan, and Paloma Cardigan.

If the Bellevue Cardigan pattern inspires you and you post a photo on social media, be sure to tag me @mooglyblog or #mooglyblog so I can check it out too! And send in your finished photos to tamarakelly@mooglyblog.com to have them featured in the Moogly email newsletter!
THE FINE PRINT
Follow Moogly on Facebook, Twitter, Pinterest, and Instagram! Thank you to Yarnspirations for providing the materials shown in this post. Written pattern copyright Tamara Kelly 2022, all rights reserved. Please do not reprint or repost this pattern, but please do link to this page to share this pattern with others.
To print or download, use the Print Friendly button below, or go to PrintFriendly.com, or right-click to copy and paste it into a word processing document if those options do not work for you (please note that Print Friendly is a free outside website that the button links to, and you can click here for a tutorial on how to use it, but I cannot provide additional technical support for this service).
If you wish to make items for sale from this pattern or translate it to another language, please visit the About page for details.


Leave a Reply