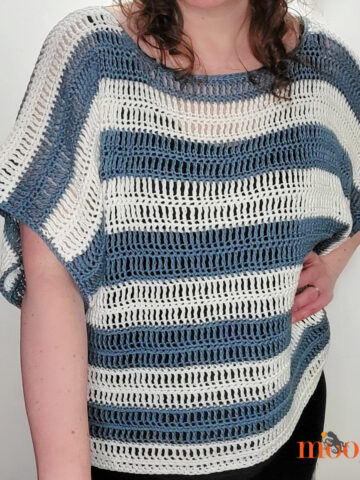
The Batwing Lace Sweater is a fun and modern crochet pattern that features simple stitching combined with interesting lace shoulders that run from neck to wrist! Get cozy with this easy free crochet sweater pattern on Moogly!
 Disclaimer: This post includes affiliate links; materials provided by Yarnspirations.
Extra Coze with Red Heart Heat Wave
Red Heart Heat Wave is a great worsted weight acrylic with a special ability - it gets warmer than other yarns when exposed to UV light! This makes for an extra cozy top you can wear out in the cold or at home on the couch. And if you prefer to substitute, Red Heart With Love is a great choice!

Customize it Just for You
While I picked gray and white, you can of course make this crochet pullover pattern in your own choice of colors. Self-striping yarn would be amazing for either the front/back or the lace bits! Or try using stripes for the front and back, or making them in two different colors for a reversible top with two looks!

This sweater works up quite quickly and is a great "relaxing" pattern for movie nights. The oversized fit takes care of any sizing worries for gifting too!

Batwing Lace Sweater
Add this pattern to your Ravelry Queue and Favorites
7.0 mm - Clover Amour
1090-1500 yds Red Heart Heat Wave (4-Medium/Worsted; 181 m/198 yds; 100 g/3.5 oz)
Color A: Passport - 5 (6, 6, 6, 7, 7, 7, 8) balls
Color B: Sandy Shores - 1 ball all sizes
Gauge: 11 dc = 4"/10cm; 4 rows = 3"
Size: XS (S, M, L, XL, 2X, 3X, 4X/5X)
These sizes are based on the Standards from the Craft Yarn Council.
Shown in Size L.
Helpful Links & Tutorials
FSC - Foundation Single Crochet
CSDC - Chainless Starting Double Crochet
Exdc - Extended double crochet
NOTES:
FSC - If you prefer to avoid this stitch, chain one more that the number called for in your size for Row 1, skip the first ch, and sc in each st across.
CSDC - If you prefer to avoid this stitch, you can ch 3 and count that as your first stitch, or use your own preferred first dc substitute.
The front and back pieces of this sweater are identical, and the finished sweater is reversible. To make assembly easier, they are referred to as piece 1 and 2.
Please print a copy of this pattern and circle the numbers for your size before you begin.
BATWING LACE SWEATER INSTRUCTIONS:
FRONT AND BACK - MAKE 2 WITH COLOR A
Row 1 [RS]: FSC 80 (84, 90, 92, 98, 98, 100, 104); turn. (80 (84, 90, 92, 98, 98, 100, 104) sts)
Rows 2 - 23 (24, 24, 25, 25, 25, 25, 26): (CSDC, flo dc) in first st, flo dc in across until 1 st rem, (flo dc, exdc) in last st; turn. (124 (130, 136, 140, 140, 146, 148, 150) sts in the last row)
Next 3 (3, 3, 3, 4, 4, 4, 4) Rows: CSDC in first st, flo dc across until 1 st rem, exdc in last st; turn. After last row, break Color A.
SHOULDER ASSEMBLY - COLOR B
FIRST SHOULDER - BOTH PIECES
Row 1: From WS, join with dc to first st of last row. flo dc in next 50 (52, 56, 58, 58, 60, 62, 62) sts; turn. (51 (53, 57, 59, 59, 61, 63, 63) sts)
Row 2: Ch 1, sc in first st, *ch 3, skip next st, sc in next st; rep from * across, break yarn.
SECOND SHOULDER - FIRST PIECE
Row 1: From WS, join with flo dc to st # 74 (78, 80, 82, 82, 86, 86, 88) of last row, flo dc across until 1 st rem, dc in last st; turn. (51 (53, 57, 59, 59, 61, 63, 63) sts)
Prep for Assembly: Match up the first and second pieces, WS together, so that the finished first shoulders are on opposite sides. You will be joining the pieces at the shoulder while making Row 2, joining to the ch-3 sps that lay directly opposite the ones you are making.
Row 2: Ch 1, sc in first st, *ch 1, remove hook from loop, insert hook in ch-3 sp of second piece, reinsert hook in loop, ch 2, skip next st, sc in next st; rep from * to end, break yarn.
SECOND SHOULDER - SECOND PIECE
Row 1: From WS, join with flo dc to st # 74 (78, 80, 82, 82, 86, 86, 88) of last row, flo dc across until 1 st rem, dc in last st; turn. (51 (53, 57, 59, 59, 61, 63, 63) sts)
Row 2: Ch 1, sc in first st, *ch 1, remove hook from loop, insert hook in ch-3 sp of second piece, reinsert hook in loop, ch 2, skip next st, sc in next st; rep from * to end, break yarn.
SIDE SEAMING - COLOR A
Using the Mattress Stitch, seam from Row 1 up to Row 23 (24, 24, 25, 25, 25, 25, 26) along each side.
NECKLINE EDGING - COLOR A
Rnd 1: From RS, join to any st of piece 1 or 2 at neck opening, ch 1, *sc in each st to Color B section, 2 sc in the side of the dc row, sc in the side of the sc, ch 4, sc in side of next sc, 2 dc in side of next dc row; rep from * around, sc in each remaining st of neck opening, join and break yarn.


SLEEVE CUFFS - COLOR A, REPEAT FOR EACH SLEEVE
Set-Up Rnd 1: Join to side of row after the side seam, ch 1, 2 sc in side of same row, 2 sc in side of each dc row, sc in side of sc row, ch 3, sc in side of sc row, 2 sc in side of each rem dc around; join. (18 (18, 18, 18, 22, 22, 22, 22) sc and 3 chs)
Set-Up Rnd 2: Ch 1, sc in each sc, blo sc in each ch; join. (21 (21, 21, 21, 25, 25, 25, 25) sc)
Row 1: Ch 8, skip ch closest to the hook, sc in each rem ch, slst2tog in next 2 Set-Up Rnd sts; turn. (7 sc)
Row 2: Skip the slst2tog, blo sc in each sc across; turn.
Row 3: Ch 1, blo sc in each sc across, slst2tog in next 2 Set-Up Rnd sts; turn.
Repeat Rows 2 and 3 around entire sleeve opening.
Sew the first and last rows together using the whip stitch, joining first and last rows.

BOTTOM RIBBING - COLOR A
Set-Up Rnd: Join to any st along bottom edge, ch 1, sc in each st around; join. (160 (168, 180, 184, 196, 196, 200, 108) sc)
Row 1: Ch 5, skip ch closest to the hook, sc in each rem ch, slst2tog in next 2 Set-Up Rnd sts; turn. (4 sc)
Row 2: Skip the slst2tog, blo sc in each sc across; turn.
Row 3: Ch 1, blo sc in each sc across, slst2tog in next 2 Set-Up Rnd sts; turn.
Repeat Rows 2 and 3 around entire bottom hem opening.
Sew the first and last rows together using the whip stitch, joining first and last rows.


LOOKING FOR MORE?
Are you looking for more free crochet sweater patterns? I have a few now! You can browse them all here on Moogly or search my patterns on Ravelry. Some of my recent designs include the Handkerchief Cocoon, Cuff to Cuff Colorblock Cardigan, Retro Cropped Cardi, Paloma Cardigan, and Cosmos Cardigan!

If the Batwing Lace Sweater pattern inspires you to make your own project, and you post a photo on social media, be sure to tag me @mooglyblog or #mooglyblog so I can check it out too!
THE FINE PRINT
Follow Moogly on Facebook, Twitter, Pinterest, and Instagram! Thank you to Yarnspirations for providing the materials shown in this post. Written pattern copyright Tamara Kelly 2020, all rights reserved. Please do not reprint or repost this pattern, but please do link to this page to share this pattern with others.
To print or download, use the Print Friendly button below, or go to PrintFriendly.com, or right-click to copy and paste it into a word processing document if those options do not work for you (please note that Print Friendly is a free outside website that the button links to, and you can click here for a tutorial on how to use it, but I cannot provide additional technical support for this service).
If you wish to make items for sale from this pattern or translate it to another language, please visit the About page for details.


Josette De Lette-Serna
Good afternoon. Do you have date when the tutorial for the Batwing LaceSweater tutorial will be out? I learn by watching. Loving it, thank you!.
Tamara Kelly
I hope to get it published on December 10 - this Thursday!
LMBlancher
Please share the finished measurements for your size L. This looks like a very generous fit and I many not have to go to the largest size. Thank you.
Tamara Kelly
The waist is about 67" around (33.5" laid flat) and it's about 54" wrist to wrist. 🙂
Barb
How can I make this longer? More like tunic length.
Thank you!
Tamara Kelly
Hi Barb! Yes, just work rows the same length as the first row even (without increases) until you have the length you'd like to add, then start up with the pattern in Row 2. 🙂
Barb
Thank you for such a prompt reply.
Kate
I love the look of this pattern but I'm just up to the end of row 4 and I don't think it's going to be anywhere near long enough - it must be to do with my tension! Please would you be able to share the approximate length of rows 1-26 of the front (so the front without the shoulder panels and bottom ribbing) and possibly the approximate height of one of your rows of flo dc? Just so I can try and adjust the pattern according to my tension? Thanks so much!
Tamara Kelly
Hi Kate! Do keep in mind that crochet fabric stretches with gravity - it's a lot longer worn than laying flat!
With the gauge listed above: "11 dc = 4″/10cm; 4 rows = 3″" you can figure out those measurements and check your tension. 🙂
Kate
Thanks so much for the reply! I completely missed that you'd already put the gauge in the post 🤦🏻♀️ looking forward to getting started on it properly now. Thanks again!
Tamara Kelly
Happy to help, I hope you enjoy it!
Kayla
On the bottom ribbing, it doesn’t say to start with right side or wrong side facing. Does it matter?
Love your patterns and share your website every chance I get.
Thank you
Tamara Kelly
Oh, sorry about that! From the right side. 🙂
Kayla
Thank you 😊
Naomi Neill
Hi
What is knitting tension of recommendEd yarn please?
Tamara Kelly
Hi Naomi! The crochet gauge for this project is 11 dc = 4″/10cm; 4 rows = 3″, while the knitted gauge listed on this yarn label is 4” x 4” (10 cm x 10 cm) 18 sts and 24 rows with a 4.5 mm (U.S. 7) knitting needle
Naomi Neill
Hi I purchased pattern, changed it a little to suit the yarn I have and am attempting to do long ribbing for forearms/writ's. It's not going well, do u have any tips/suggestions on how to crochet long cuffs in ribbing for sleeves?
Tamara Kelly
Hi Naomi! You can use this ribbing method to make any length of cuffs - in Row 1 of the sleeve cuffs, just chain as long as you'd like the cuffs to be. If it's too much BLO (long cuffs can get tedious with this method, I know), you can try the method I used in this sweater (minus the decreasing - just do a rnd of dc to set up): https://www.mooglyblog.com/hygge-cocoon-cardigan/
Naomi Neill
Awesome, thanks!😊 Beautiful pattern!
Naomi Neill
Hi again how can I produce this in toddler/child sizes please. Is that poss? I assume the actual body would be fairly straightforward, just not sure re the lace. Hope u can help😊.
Jacqui
Hello, I’ve been staring at this patter for a couple weeks now and I can’t wait to get started. Would there be a possibility to adjust the pattern for a 3 weight yarn? I mistakenly gotten the wrong weight and disability hinders my chances of exchanging it for the correct weight.
Tamara Kelly
Hi, and thank you so much! The easiest way would be to hold the "3" weight yarn doubled and see if that get you to gauge! Otherwise you can try to make it to the same dimensions, but getting the angles right might be tricky.
Carmen
Muchas gracias Tamara