
Loop Scoop #25 is a wonderful way to kick off November! Full of seasonal delight and cozy inspiration, be sure to check out all our featured patterns, as well as the new patterns and links at the bottom, to help determine what gets featured next round!

Cushy Crochet Cube Storage Bin Tutorial
The Cushy Crochet Cube Storage Bin Tutorial will show you how to crochet this DIY cube basket pattern - in both right and left-handed video tutorials! Follow along with the free written crochet pattern on Moogly!

Disclaimer: This post includes affiliate links; materials provided by Yarnspirations.
MooglyCAL2021 - Block #22
We're down to the final three - it's time for block 22 in the MooglyCAL2021! This lovely square is courtesy of Cre8tion Crochet - the Jager Square features some clever stitches and gorgeous colorwork - get all the details for this free crochet along, as well as the free pattern links below!
 Disclaimer: This post includes affiliate links; materials provided by Yarnspirations and Furls. [Read more...]
Crochet Gauge Tips and Tricks with Moogly
Crochet gauge is a tricky subject, and I was so glad to get the chance to dive in for a solid hour! Get all my best crochet gauge tips and tricks in this class recording, and get all the links below!
 Disclaimer: Materials provided by Yarnspirations and Michaels.
How to Crochet the Perfect Party Pennant Garland - and More, Live!
You can celebrate any holiday or special event with a fun pennant garland! On Facebook, I'll share the latest news. Then on YouTube, I'll show you how to crochet the Perfect Party Pennant Garland! And don't miss all the other lives I'm doing in the next few weeks - sign up for all my free classes and showcases below too!
 Disclaimer: This post contains affiliate links. Live videos are unscripted, unedited, occasionally weird, and all opinions are my own. This post is sponsored by Yarnspirations.
Caron Big Donut O'Go Giveaway
Caron Big Donut O'Go is a wonderful new color-blocked yarn that's tangle-free from start to finish! This worsted weight yarn features unique colorways and endless possibilities - take a closer look and enter to win 4 O'Gos of Caron Big Donut on Moogly!

Disclaimer: This post was sponsored by Yarnspirations and includes affiliate links; all opinions are my own.
[Read more...]
Cushy Crochet Cube Storage Bin

Cube storage is in so many homes and offices these days - and the baskets are a great way to keep all your stuff organized. So I designed the Cushy Crochet Cube Storage Bin so you can make your own super-quick crochet storage baskets in your favorite home decor colors!
Disclaimer: Materials for this pattern were provided by Yarnspirations.
Prefer an ad-free PDF? You've got options!


Prefer the free blog version? Keep scrolling!
Featuring Bernat Blanket Extra Thick
To make the Cushy Crochet Cube Storage Bin I used Bernat Blanket Extra Thick - and it made this basket so quick to crochet. Only 187 stitches are needed - and that includes the foundation chain! The resulting bin is soft but sturdy, with gorgeous texture and convenient handles. With 2 balls, you can make 2 baskets with yarn left over.

If you're having trouble finding Bernat Blanket Extra Thick, you can also use Bernat Blanket Big to make this pattern.
DIY Custom Cube Storage Bins
There are lots of styles of cube storage bins out there, so I thought there ought to be a crochet version too! And I just love the squishy look that the jumbo yarn gives the Cushy Crochet Cube Storage Bin. I made mine with two shades for a color-blocked look, but this simple pattern is ready for your own customization.

Match them to your own decor, with stripes or solids, whatever you like! And this pattern makes a great gift basket too - one they'll have a place ready and waiting for!

Cushy Crochet Cube Storage Bin
Add this pattern to your Ravelry Queue and Favorites
60 yds Bernat Blanket Extra Thick or Bernat Blanket Big
(7 - Jumbo; 100% polyester; 600 g/21.2 oz; 66 m/72 yds)
Color A: Dark Gray (40 yds)
Color B: Gold (20 yds)
Finished Size: Approx 11" L x 11" W x 10" H - fits most cube storage shelves
Helpful Links and Tutorials:
Cushy Crochet Cube Storage Bin Tutorial
Joining (and Weaving In) Jumbo Yarns
Note:
This pattern begins with rows, and moves to rounds - see the tutorial linked above if needed.
When working in rounds, use stitch markers to mark the first and last stitch of each round.
Instructions:
Row 1: With Color A, ch 7, skip ch closest to hook, sc in each rem ch across; turn. (6 sc)
Row 2 - 6: Ch 1, sc in each st across; turn.
Rnd 7: Ch 1, sc in each st across, sc 6 evenly along side of square, sc in bottom of each foundation ch, sc 6 evenly along last side of square; join with sl st. (24 sc)
Rnd 8 - 9: Ch 1, sc in each st around; join. After Rnd 9, break yarn and finish off.
Rnd 10: With Color B, join with sc to first st of previous rnd, sc in each rem st around; join.
Rnd 11: Ch 1, sc in each st around; join.
Rnd 12: Ch 1, sc in first 8 sts, ch 3, skip 3 sts, sc in next 9 sts, ch 3, skip 3 sts, sc in last st; join and finish off.
LOOKING FOR MORE?
Are you looking for more crochet container patterns? I have a bunch! You can browse all my patterns on Moogly or Ravelry - and check out some of my most recent designs: Cord Nesting Bowls, Striped Hourglass Basket, Emergency Basket, Bobble Stripe Basket, and Super Sturdy Basket!

If the Cushy Crochet Cube Storage Bin pattern inspires you and you post a photo on social media, be sure to tag me @mooglyblog or #mooglyblog so I can check it out too! And send in your finished photos to tamarakelly@mooglyblog.com to have them featured in the Moogly email newsletter!
THE FINE PRINT
Follow Moogly on Facebook, Twitter, Pinterest, and Instagram! Thank you to Yarnspirations for providing the materials shown in this post. Written pattern copyright Tamara Kelly 2021, all rights reserved. Please do not reprint or repost this pattern, but please do link to this page to share this pattern with others. If you wish to make items for sale from this pattern or translate it to another language, please visit the About page for details.
I Love Yarn Q and A with Marly Bird and Moogly
I Love Yarn Day is such a fun annual event - and this year I got to spend it with my friend Marly Bird hosting an I Love Yarn Day Q and A for the Michael's Community Classroom! It was a lot of fun, and we answered so many questions - watch it for yourself below!

Disclaimer: Materials provided by Yarnspirations and Michaels.
The Loop Scoop #24: A Yarny Link Party!
Loop Scoop #24 is a gorgeous seasonal collection of fall crochet patterns! Celebrate autumn with our featured patterns, and then check out the new patterns and links at the bottom as well, to help determine what gets featured next round!

Clover Sweet 'n Sharp Macaron Review and Giveaway
Clover Sweet 'n Sharp Macarons are adorable magnetic needle sharpeners - a truly sweet addition to any crafter's notions bag! Take a closer look, and enter to win your own Clover Sweet 'n Sharp Macaron on Moogly!

Disclaimer: This post includes affiliate links; giveaway sponsored by Clover USA.
Caron Cakes + Stitch N Win Virtual Showcase with Moogly and Marly
I love when I get a chance to work with my friend Marly Bird - and recently we got to co-host a Michael's Community Classroom Showcase! I shared all the 2021 Bernat Stitch N Win fun, and Marly told us all about the new Caron Cakes! Watch the class and get all the links below!

Disclaimer: Materials provided by Yarnspirations and Michaels.
MooglyCAL2021 - Block #21
Kicking off the final four for 2021, we have a beautiful bobble block by Andee Graves of Mamas 2 Hands! Block 21 features pretty 3D hearts and lots of opportunities for color play. Read on for all the details, and for the link to Block #21 in this free year-long crochet along!

Disclaimer: This post includes affiliate links; materials provided by Yarnspirations and Furls. [Read more...]
How to Crochet a Witch's Hat (or Princess Hat, or Construction Cone...etc!)
It's spooky season, and the Witch's Hat is a classic costume starter! And the crochet cone formula opens up a world of costume and design possibilities too. Learn how to crochet a witch's hat - and several other projects - and get all the links below!

Disclaimer: Materials provided by Yarnspirations.
How to Join Jumbo Yarns - and More, Live!
Bernat Blanket comes in several sizes - and the biggest can be tricky to join together in a project! On Facebook, I'll share the latest news and walk you through the Bernat Blanket line of yarns. Then on YouTube, I'll show you how to join jumbo yarns! And don't miss all the other lives I'm doing in the next few weeks - sign up for all my free classes and showcases below too!

Disclaimer: This post contains affiliate links. Live videos are unscripted, unedited, occasionally weird, and all opinions are my own. This post is sponsored by Yarnspirations.
Yarnspirations Mystery Bag Giveaway
Did you know that Yarnspirations sells Mystery Bags of yarn?! How fun! It's a great way to try yarns that are new to you at a bargain price, and get a fun surprise at the same time! So to make it extra fun, we're giving away one Yarnspirations Mystery Bag of Yarn on Moogly!

Disclaimer: This post was sponsored by Yarnspirations; all opinions are my own.
[Read more...]
The O'Go Virtual Showcase with Moogly and Seema
Recently I got to work with Yarnspirations Designer Seema Persaud to host an O'Go Virtual Showcase in the Michaels Community Classroom! Learn about their newest yarns for the fall and get inspired with project ideas. Watch the class and get all the links below!
 Disclaimer: Materials provided by Yarnspirations and Michaels.
Lavender Kisses Beanie Tutorial
The Lavender Kisses Beanie Tutorial will show you how to crochet this one skein slouch hat - in both right and left-handed video tutorials! Follow along with the free pattern here on Moogly!
 Disclaimer: This post includes affiliate links; materials provided by Yarnspirations.
The Loop Scoop #23: A Yarny Link Party!
Loop Scoop #23 includes five free crochet patterns that are perfect for gift giving! Cozy up your own life or get a jump on your holiday to-do list here, and then remember to check out the new patterns and links at the bottom as well, to help determine what gets featured next round!

Knitter's Pride Big Giveaway: Wool Winder, Knit Blockers, and Row Counter Ring
Knitter's Pride has so many lovely crochet and knit accessories and tools - and today I get to share three of them with you here on Moogly! Learn more about the Signature Wool Winder, Rainbow Knit Blockers, and Row Counter Ring, and enter to win each below!

Disclaimer: Giveaway sponsored by Knitter's Pride; I received materials for review. This post includes affiliate links.
Lavender Kisses Beanie

Soft, feminine, delicate, warm, and pretty – the Lavender Kisses Beanie is the perfect match to the Lavender Kisses Cowl and a free one skein crochet pattern on Moogly!
Disclaimer: Materials for this pattern were provided by Yarnspirations.
Prefer an ad-free PDF? You've got options!
Prefer the free blog version? Keep scrolling!
Featuring Red Heart Unforgettable
Red Heart Unforgettable is one of my favorite Red Heart yarns of all time. I've used it in several designs, and it's always a joy to return to it! It's a thick and thin roving style yarn that adds a gorgeous high-end look to any project. And there are several beautiful colorways to choose from!

A Gift Set that Fits Most Teens and Adults
The Lavender Kisses Beanie, like the matching cowl, is sized to fit just about anyone over 12 years old. The brim of this crochet hat stretches from 20 inches all the way up to 24 inches!

The main portion of the hat is crocheted with a large hook - the same size used in the cowl. However, for the brim, I switched to a smaller hook for a better fit. If you need to adjust the brim size, just change the hook size - smaller for a tighter fit, larger for a looser fit!

Lavender Kisses Beanie
Add this pattern to your Ravelry Queue and Favorites
US-M, 9.0mm hook - Susan Bates
US-J, 6.0mm hook - Susan Bates
135 yds Red Heart Unforgettable
(4 - Worsted; 100% acrylic; 100 g/3.5 oz, 247 m/270 yds)
Colorway shown: Pearly
Gauge: 10 sts x 5 rows = 4″/10 cm in main st pattern with larger hook
Finished Size: 20-24" head circumference (fits most teens/adults)
Helpful Links:
Lavender Kisses Beanie Tutorial
Lavender Kisses Cowl - Matching Pattern
Instructions:
Rnd 1: With larger hook, make a magic circle, ch 3 (counts as first dc here and throughout), work 11 dc in the ring; join. (12 dc)
Rnd 2: Ch 3, dc in first st, 2 dc in each rem st around; join. (24 dc)
Rnd 3: Ch 3, 2 dc in first st, skip next st, *3 dc in next st, skip next st; rep from * around, join. (36 dc)
Rnd 4: Ch 4 (does not count as a st here and throughout), skip first 2 sts, tr in next st, ch 2, working in front of tr just made, tr in first skipped st, *skip next 2 sts, tr in next st, ch 2, working in front of tr just made, tr in first skipped st; rep from * around, join to first tr. (24 tr)
Rnd 5: Sl st into first ch sp, ch 3, 4 dc in same ch sp, 5 dc in each rem ch sp around, join. (60 dc)
Rnd 6: Ch 4, skip the first 2 sts, tr in the next st, ch 1, working in front of tr just made, tr in first skipped st, *skip 2 sts, tr in next st, ch 1, working in front of tr just made, tr in first skipped st; rep from * around, join to first tr. (40 tr)
Rnd 7: Sl st into first ch sp, ch 3, 2 dc in same ch sp, 3 dc in each rem ch sp around, join. (60 dc)
Rnd 8 - 10: Rep Rnd 6 and 7, then 6 again.
Rnd 11 (Begin Brim): With smaller hook, rep Rnd 7.
Rnd 12 - 14: Ch 1, fpdc around first st, bpdc around next st, *fpdc around next st, bpdc around next st; rep from * around, join. After Rnd 14, break yarn and weave in ends.
LOOKING FOR MORE?
Are you looking for more crochet hat patterns? I have a bunch! You can browse all my patterns on Moogly or Ravelry - and check out some of my most recent designs: Venti Hood, Alpine Stripe Beanie, Rustic Diamond Hat, Smokestack Hat, and Trenta Hood!

If the Lavender Kisses Beanie pattern inspires you and you post a photo on social media, be sure to tag me @mooglyblog or #mooglyblog so I can check it out too! And send in your finished photos to tamarakelly@mooglyblog.com to have them featured in the Moogly email newsletter!
THE FINE PRINT
Follow Moogly on Facebook, Twitter, Pinterest, and Instagram! Thank you to Yarnspirations for providing the materials shown in this post. Written pattern copyright Tamara Kelly 2021, all rights reserved. Please do not reprint or repost this pattern, but please do link to this page to share this pattern with others. If you wish to make items for sale from this pattern or translate it to another language, please visit the About page for details.
MooglyCAL2021 - Block #20
We're down to the final handful of squares for MooglyCAL2021! Block 20 is a lovely modern block by Meladora's Creations! The Reverb Granny Square features post stitches and lovely stripes. and is a relaxing make. Read on for all the details, and for the link to Block #20 in this free year-long crochet along!
 Disclaimer: This post includes affiliate links; materials provided by Yarnspirations and Furls. [Read more...]
How to Crochet the Plush Puff Pumpkin Stem and Vines - and More, Live!
It's a whole smorgasbord of crochet goodness today! Get all the latest links, patterns, and Moogly news on Facebook, and then learn how to crochet the Plush Puff Pumpkin Stem and Vines live on YouTube. And don't miss all the other lives I'm doing in the next few weeks - sign up for all my free classes and showcases below too!
 Disclaimer: This post contains affiliate links. Live videos are unscripted, unedited, occasionally weird, and all opinions are my own. Materials provided by Yarnspirations, Furls, and WeCrochet.
Bernat Blanket Extra Thick Yarn Giveaway
Bernat Blanket Extra Thick is the new, super jumbo, giant skein of ultra-plush yarn you've dreamed of! Take a look at this super squishy yarn and enter to win 2 big skeins of Bernat Blanket Extra Thick on Moogly!
 Disclaimer: This post was sponsored by Yarnspirations and includes affiliate links; all opinions are my own.
[Read more...]
Plush Puff Pumpkin

The Plush Puff Pumpkin is a fun fall decor piece that features the puff stitch! Celebrate autumn and all things squishy squashy with this free Moogly pattern!
Disclaimer: This post includes affiliate links; materials provided by WeCrochet.
Prefer an ad-free PDF? You've got options!
Prefer the free blog version? Keep scrolling!
Part of the 2021 Puff
the Magic Stitch Blog Hop

This pattern is part of the Puff the Magic Stitch Blog Hop hosted by Stitch & Hustle! CLICK HERE to learn more about the blog hop and to enter the "Win All the Yarn to Make This" giveaway! The giveaway is open worldwide, and ends 10/8/21.
And be sure to check out all the fab, free patterns included in the hop, linked below!
Maryjane's Puff Socks by ACCROchet
Yuba Cowl by The Unraveled Mitten
Snowbank Infinity Scarf by Desert Blossom Crafts
Puff Star Afghan Hexagon by Mamas2Hands
Olivia Puff Stitch Hat by Oombawka Design Crochet
Polka Dot Puffs Cowl by Salty Pearl Crochet
Strut Your Puff Cowl by The Loopy Lamb
Puff Stitch Stripes Blanket by 5 Little Monsters
Crochet Sunburst Bag by Designs by Phanessa
Talara Hooded Duster by Crystalized Designs
Pufftastic Bandana Cowl by Underground Crafter
Aqueduct Puff Stitch Mittens by Hooked for Life
Azalea Puff Stitch Hat by The Stitchin' Mommy
Gables Wrap n' Shawl by Stitch & Hustle
Winter Minty Wrap Design by 2 Bossay Knits by Michelle Renee
To Felt... or not to Felt?
I had originally planned to felt this pattern - Wool of the Andes is very feltable! However, I found that I didn't like the way the puff stitches looked in the sample I felted in my top load washer. So if you'd like a tighter fabric for your pumpkin, you can go down a hook size! Feel free to customize the Plush Puff Pumpkins however you like - make them match your decor!

Plush Puff Pumpkin
Add this pattern to your Ravelry Queue and Favorites
US-I, 5.5mm crochet hook - Furls
200 yds WeCrochet Wool of the Andes Bulky (5/Bulky; 100% wool; 100g; 137 yds)
Color A: Masala (2 hanks)
Color B: Lumberjack (1 hank)

Gauge: Gauge for this pattern is unimportant, just make sure your fabric is tight.
Finished Size: Approx 9" wide
Helpful Links and Tutorials:
SPECIAL STITCHES
puff - [yo and insert hook, yo and pull up a loop] in indicated stitch 4 times, yo and pull through all 9 loops on hook to finish the stitch.
dc/puff2tog - yo and insert hook in next st, yo and pull up a loop, yo and pull through first 2 loops on hook (2 loops rem on hook), [yo and insert hook, yo and pull up a loop] in next stitch 3 times (all in same st), yo and pull through all 8 loops on hook to finish the stitch.
puff/dc2tog - [yo and insert hook, yo and pull up a loop] in next stitch 3 times (all in same st), yo and insert hook in next st, yo and pull up a loop, yo and pull through first 2 loops on hook, yo and pull through all 8 loops on hook to finish the stitch.

INSTRUCTIONS:
PUMPKIN - COLOR A
Rnd 1: Make a magic circle, ch 1, work 10 sc in the ring; join with sl st in first st. (10 sts)
Rnd 2: Ch 1, *2 sc in next st, 2 dc in next st; rep from * around, join. (20 sts)
Rnd 3: Ch 1, sc in first st, *(sc, puff) in next st, dc in next st, (puff, dc) in next st,** sc in next st; rep from * around finishing last rep at **, join. (30 sts)
Rnd 4: Ch 1, sc in first 2 sts, *(dc, puff) in next st, dc in next st, puff in next st, (dc, puff) in next st,** sc in next 2 sts; rep from * around finishing last rep at **, join. (40 sts)
Rnd 5: Ch 1, sc in first 2 sts, *puff in next st, (dc, puff) in next st, dc in next st, puff in next st, dc in next st, (puff, dc) in next st,** sc in next 2 sts; rep from * around finishing last rep at **, join. (50 sts)
Rnd 6: Ch 1, sc in first 2 sts, *dc in next st, puff in next st, (dc, puff) in next st, [dc in next st, puff in next st] twice, (dc, puff) in next st,** sc in next 2 sts; rep from * around finishing last rep at **, join. (60 sts)
Rnd 7: Ch 1, sc in first 2 sts, *puff in next st, dc in next st, puff in next st, (dc, puff) in next st, [dc in next st, puff in next st] twice, dc in next st, (puff, dc) in next st,** sc in next 2 sts; rep from * around finishing last rep at **, join. (70 sts)
Rnd 8: Ch 1, sc in first 2 sts, *[dc in next st, puff in next st] twice, (dc, puff) in next st, [dc in next st, puff in next st] 3 times, (dc, puff) in next st,** sc in next 2 sts; rep from * around finishing last rep at **, join. (80 sts)
Rnd 9: Ch 1, sc in first 2 sts, *[puff in next st, dc in next st] 7 times,** sc in next 2 sts; rep from * around finishing last rep at **, join.
Rnd 10: Ch 1, sc in first 2 sts, *[dc in next st, puff in next st] 7 times,** sc in next 2 sts; rep from * around finishing last rep at **, join.
Rnd 11 - 13: Rep Rnds 9 and 10, ending on a Rnd 9 rep.
Rnd 14: Ch 1, sc in first 2 sts, *[dc in next st, puff in next st] twice, dc/puff2tog, [dc in next st, puff in next st] 3 times, dc/puff2tog** sc in next 2 sts; rep from * around finishing last rep at **, join. (70 sts)
Rnd 15: Ch 1, sc in first 2 sts, *puff in next st, dc in next st, puff in next st, dc/puff2tog, [puff in next st, dc in next st] twice, puff in next st, dc/puff2tog** sc in next 2 sts; rep from * around finishing last rep at **, join. (60 sts)
Rnd 16: Ch 1, sc in first 2 sts, *dc in next st, puff in next st, dc/puff2tog, [dc in next st, puff in next st] twice, dc/puff2tog** sc in next 2 sts; rep from * around finishing last rep at **, join. (50 sts)
Rnd 17: Ch 1, sc in first 2 sts, *puff in next st, dc/puff2tog, dc in next st, puff in next st, dc in next st, dc/puff2tog** sc in next 2 sts; rep from * around finishing last rep at **, join. (40 sts)
Rnd 18: Ch 1, sc in first 2 sts, *dc/puff2tog, puff in next st, dc in next st, puff/dc2tog** sc in next 2 sts; rep from * around finishing last rep at **, join. (30 sts) NOTE: Start stuffing the pumpkin now.
Rnd 19: Ch 1, sc in first st, *sc2tog, puff in next st, dc/puff2tog** sc in next st; rep from * around finishing last rep at **, join. (20 sts) NOTE: Finish stuffing the pumpkin now.
Rnd 20: Ch 1, sc2tog 10 times; join. (10 sts) Break yarn leaving a long tail. Use this tail to gather the top of the pumpkin closed. Then, run the needle through the bottom center of the pumpkin and back to the top center to add shaping. Weave in ends.
STEM AND VINES - COLOR B

Row 1: Ch 20, skip ch closest to hook, 2 sc in each of next 9 chs, ch 7, skip ch closest to hook, sc in next 6 chs; turn. (24 sc - first vine made)
Row 2 – 4: Ch 1, sc in first 6 sts; turn. (6 sc)
Row 5: Fold so that Row 4 meets last 6 sc of Row 1, sl st through both layers across. (6 sl sts - stem made)
Row 6: Work 2 sc in each rem unworked ch of Row 1 to end. (20 sc - second vine made) Break yarn leaving a long tail. Use this tail to sew the bottom of the stem to the center top of the pumpkin.

SHARE YOUR FINISHED PROJECTS WITH US!
If the Plush Puff Pumpkin pattern inspires you to make your own project, and you post a photo on social media, be sure to tag me @mooglyblog or #mooglyblog so I can check it out too! And send your photos in to tamarakelly@mooglyblog.com to see them featured in the Moogly email newsletter!
THE FINE PRINT
Follow Moogly on Facebook, Twitter, Pinterest, Instagram, and Tumblr! Thank you to WeCrochet and Furls for providing the materials shown in this post. Written pattern copyright Tamara Kelly 2021, all rights reserved. Please do not reprint or repost this pattern, but please do link to this page to share this pattern with others.
To print or download, use the Print Friendly button below, or go to PrintFriendly.com, or right-click to copy and paste it into a word processing document if those options do not work for you (please note that Print Friendly is a free outside website that the button links to, and you can click here for a tutorial on how to use it, but I cannot provide additional technical support for this service).
If you wish to make items for sale from this pattern or translate it to another language, please visit the About page for details.
Crochet Cord Nesting Bowls Tutorial
The Crochet Cord Nesting Bowls Tutorial will show you how to crochet over Bernat Macramé to make a bowl or basket - of any size! Follow along with the free pattern here on Moogly!
 Disclaimer: This post includes affiliate links; materials provided by Yarnspirations.
The Loop Scoop #22: A Yarny Link Party!
Loop Scoop #22 features lovely home decor, a great fall bag, and even amigurumi - and four out of five are free crochet patterns! After you check out these fab new projects, remember to check out the new patterns and links at the bottom as well, to help determine what gets featured next round!

Winnie's Picks Paint by Number Review and Giveaway
As much as I love to crochet, I love exploring other crafts as well. Winnie's Picks Paint by Number Kits are a fun way to create a work of art and practice your painting skills - and improve your fine motor skills too! Take a closer look, and enter to win your own Paint by Number Kit on Moogly - and save 15%!
 Disclaimer: Giveaway sponsored by Winnie's Picks; I received materials for review.
Crochet Cord Nesting Bowls
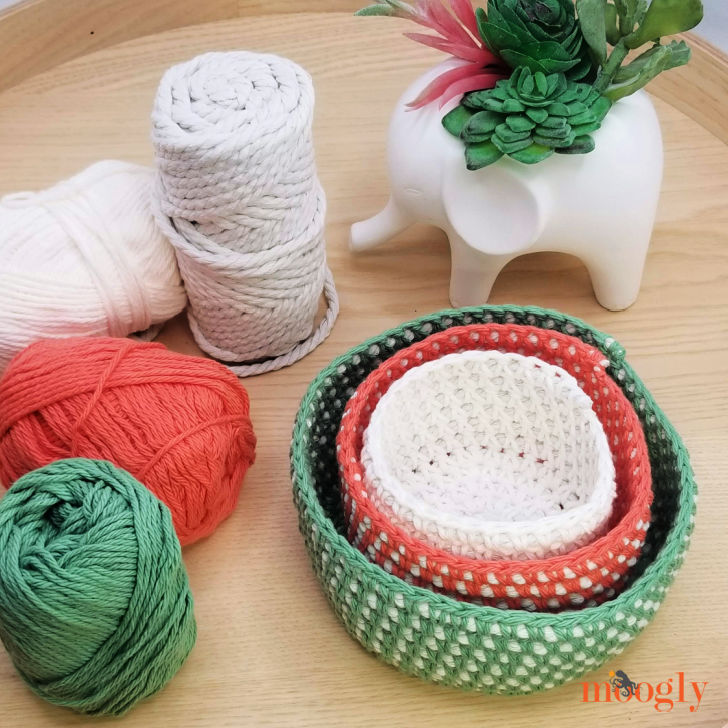
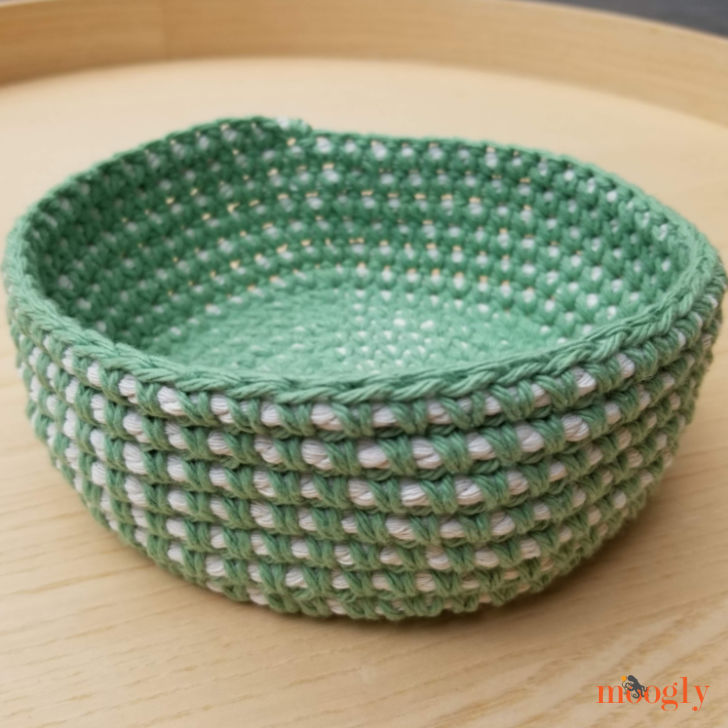
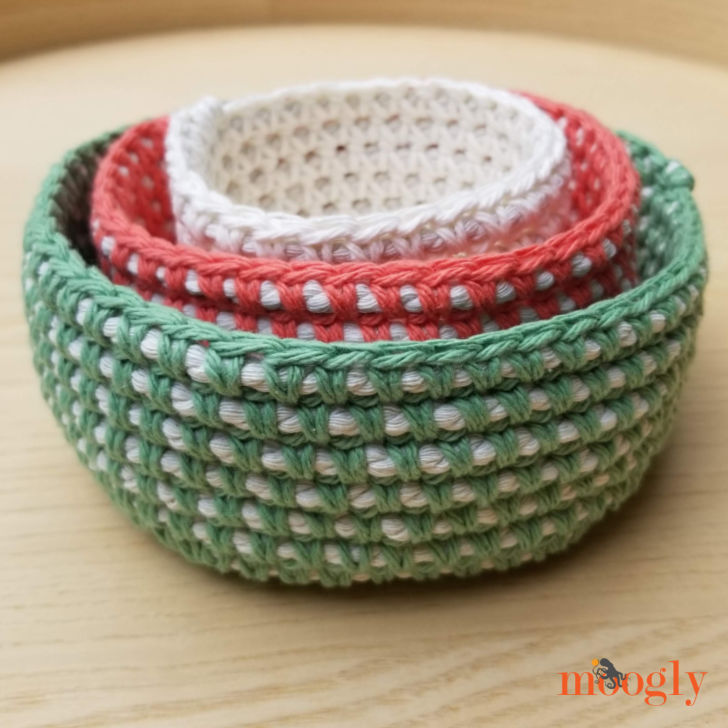
Crochet Cord Nesting Bowls are great for organizing your home and office - and they make a fantastic housewarming gift or craft fair item! With your favorite colors of cotton yarn and a coordinating roll of Bernat Macramé, you can make your own nesting bowls with this free crochet pattern on Moogly!
Disclaimer: Materials for this pattern were provided by Yarnspirations; this post includes affiliate links.
Prefer an ad-free PDF? You've got options!
Prefer the free blog version? Keep scrolling!
Featuring Bernat Macramé and Lily Sugar'n Cream or Bernat Handicrafter
I've been wanting to try making a crochet cord bowl or basket for a long time - and have gotten a lot of requests for tutorials! So when Yarnspirations came out with Bernat Macramé, I knew just what I wanted to use it for first!
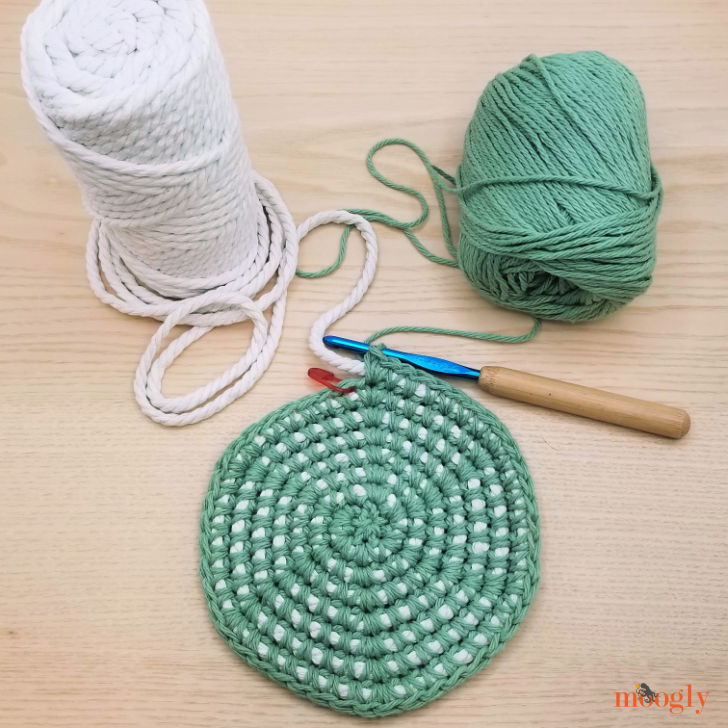
To pull the whole thing together, I chose Lily Sugar'n Cream because it's what I had on hand. It's strong, easy to use, and the cotton compliments the Bernat Macramé well. Bernat Handicrafter would be a great substitute too - either work!
I couldn't decide which color combo to use - both Macramé and Sugar'n Cream come in so many, and there are hundreds of possible pairings. So I picked three - one matching, two contrasting. I can't wait to see what color combos you choose!
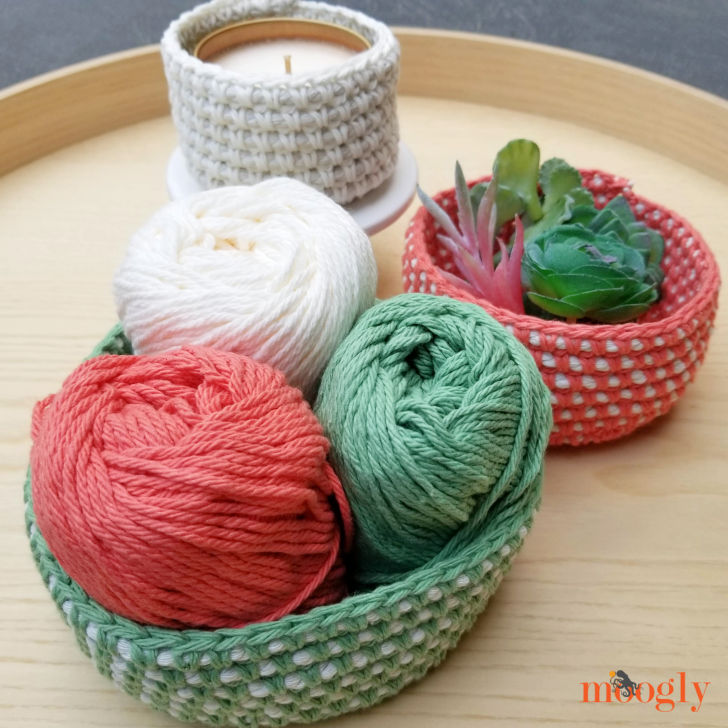
Make Crochet Cord Nesting Bowls in Any Size!
Learning how to crochet over cord is a new skill, so I kept this pattern as simple as can be. The increases all line up creating a nice patterning on the bottom, and there are no color changes or yarn changes needed. But don't let this limit you!
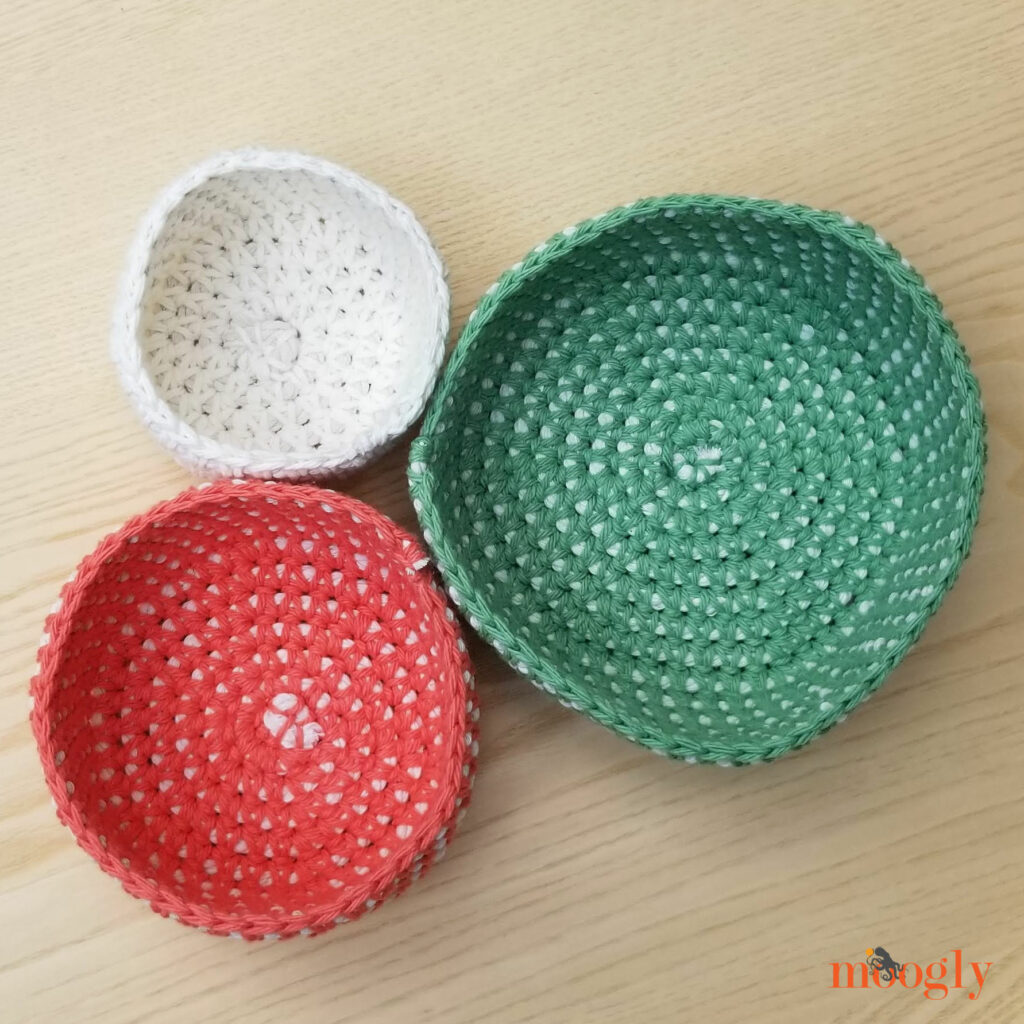
If you're new to crochet, take a close look at the lines of instruction for the increasing rows. See the number that goes up by one each round? You can keep on increasing just like that to make a bigger bowl base. Then, keep crocheting straight up the sides to make it as tall as you like! Change colors, use a self-striping yarn, make it your own!
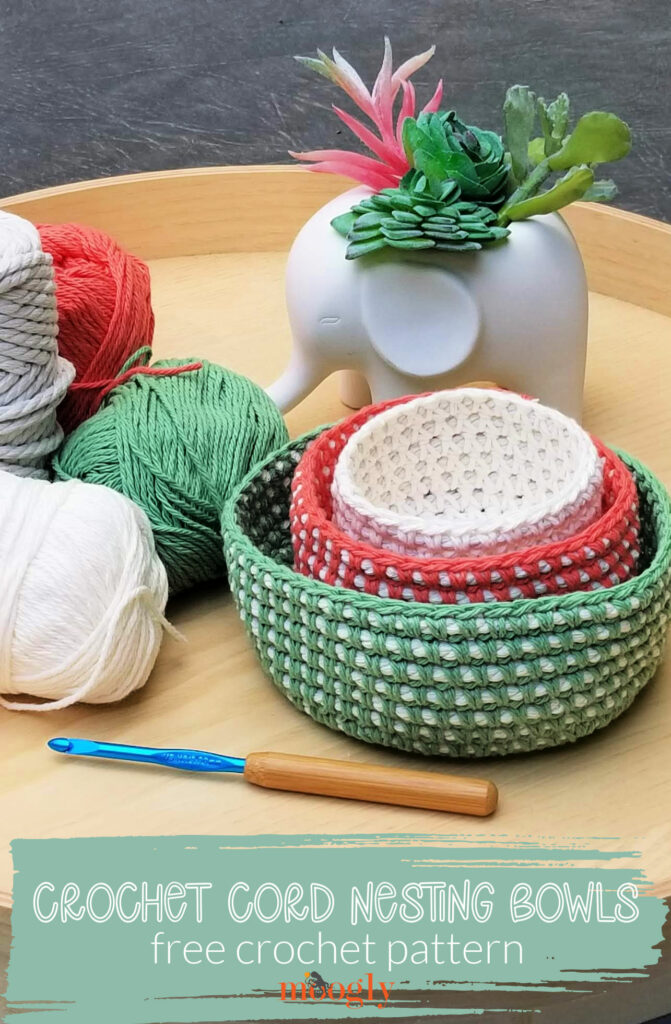
Crochet Cord Nesting Bowls
Add this pattern to your Ravelry Queue and Favorites
US-H, 5.0mm hook - Susan Bates
115 yds Lily Sugar'n Cream or Bernat Handicrafter
(4 - Worsted; 100% cotton; 71g/2.5 oz, 109 m/120 yds)
A: Colorways shown: Soft Ecru (Small - 25 yds), Tangerine (Medium - 35 yds), Meadow (Large - 55 yds)
15 yds Bernat Macramé
(6 - Super Bulky; 57% cotton, 39% viscose polyester, 4% other fibers; 250 g/8.8 oz; 40 m/44 yds)
B: Colorway shown: Natural - less than 1 skein makes all 3 bowls
Gauge: 1" across after Rnd 2
Sizes: Small - 3.25" diameter; Medium - 4.5" diameter; Large - 6" diameter; all bowls approx 2.5 " tall
Helpful Links:
Crochet Cord Nesting Bowls Tutorial
Enclosing Chains and Stitches (in this pattern it's the macramé cord)
Notes:
Wrap the end of the macramé cord in a piece of tape to stop it from fraying as you crochet the bowls.
To make larger bows, continue to increase in pattern and then work as many even rows as desired.
This pattern is worked in a spiral - do not join at the end of the rnd, but do use a stitch marker to mark the first st of each rnd.
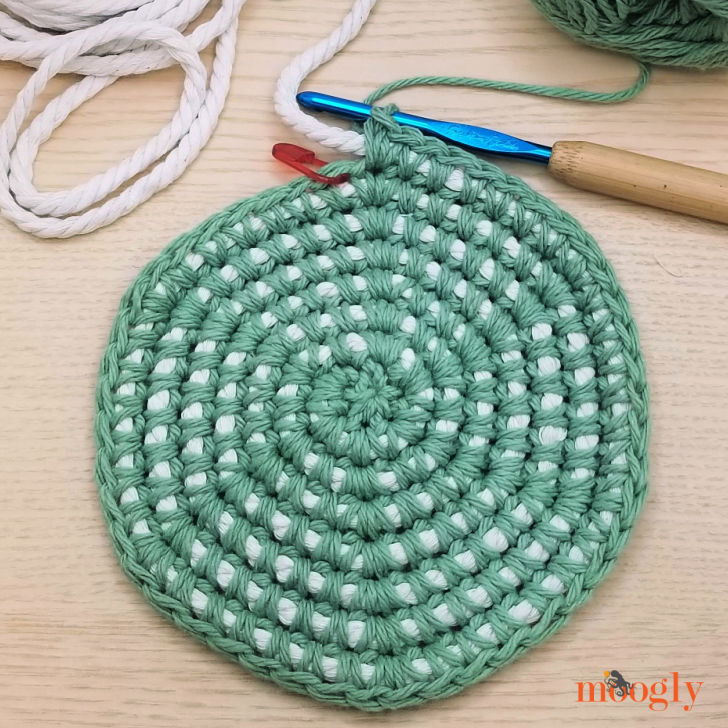
Crochet Cord Nesting Bowls
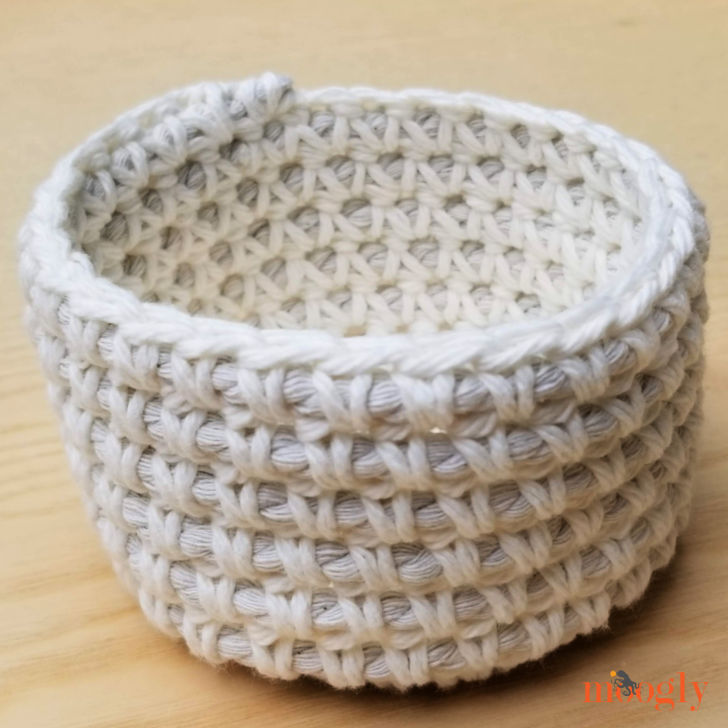
Small - 3.25" diameter
Rnd 1: With A and leaving a 12" tail, make a magic circle, ch 1, work 6 sc in the circle. (6 sc)
Rnd 2: Laying B over A so as to crochet over it, work 2 sc with A in each st around, enclosing B. (12 sc)
Rnd 3: Continuing to enclose B in each st, *1 sc in the next st, 2 sc in the next st; rep from * around. (18 sc)
Rnd 4: Continuing to enclose B in each st, *1 sc each of the next 2 sts, 2 sc in the next st; rep from * around. (24 sc)
Rnd 5: Continuing to enclose B in each st, *1 sc each of the next 3 sts, 2 sc in the next st; rep from * around. (30 sc)
Rnd 6 - 11: Continuing to enclose B in each st, work 1 sc in each st around. (30 sc)
Finishing: Cut A and B. Use a bit of glue to secure the cut end of B. Use the end of A to sew down B in next st. Use glue and beginning tail of A to secure beginning of B at bottom of bowl.
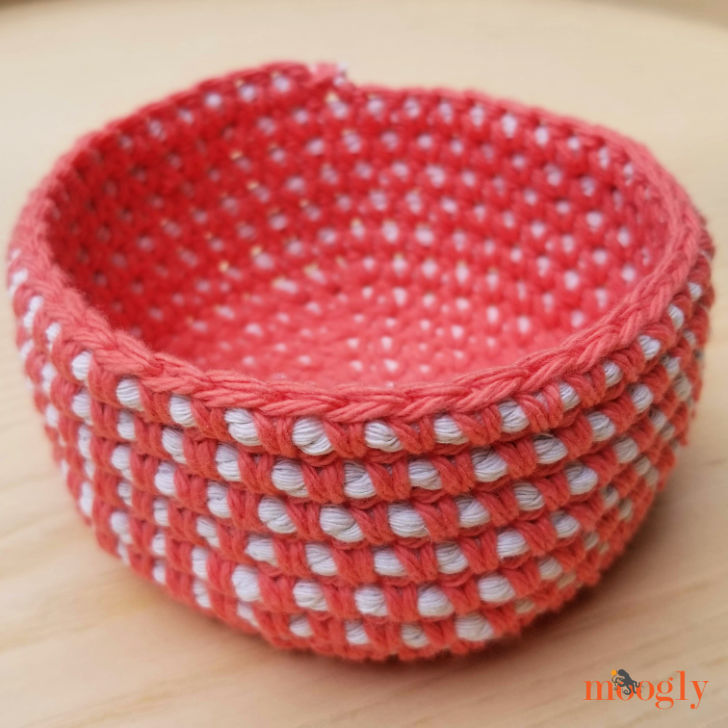
Medium - 4.5" diameter
Rnd 1 - 5: Rep Rnds 1 - 5 of Small.
Rnd 6: Continuing to enclose B in each st, *1 sc each of the next 4 sts, 2 sc in the next st; rep from * around. (36 sc)
Rnd 7: Continuing to enclose B in each st, *1 sc each of the next 5 sts, 2 sc in the next st; rep from * around. (42 sc)
Rnd 8 - 13: Continuing to enclose B in each st, work 1 sc in each st around. (42 sc)
Finishing: Cut A and B. Use a bit of glue to secure the cut end of B. Use the end of A to sew down B in next st. Use glue and beginning tail of A to secure beginning of B at bottom of bowl.
Large - 6" diameter
Rnd 1 - 7: Rep Rnds 1 - 7 of Medium.
Rnd 8: Continuing to enclose B in each st, *1 sc each of the next 6 sts, 2 sc in the next st; rep from * around. (48 sc)
Rnd 9: Continuing to enclose B in each st, *1 sc each of the next 7 sts, 2 sc in the next st; rep from * around. (54 sc)
Rnd 10 - 15: Continuing to enclose B in each st, work 1 sc in each st around. (54 sc)
Finishing: Cut A and B. Use a bit of glue to secure the cut end of B. Use the end of A to sew down B in next st. Use glue and beginning tail of A to secure beginning of B at bottom of bowl.
LOOKING FOR MORE?
Are you looking for more crochet container patterns? I have so many! You can browse all my patterns on Moogly or Ravelry - and check out some of my most recent designs: Striped Hourglass Basket, Emergency Basket, Bobble Stripe Basket, Super Sturdy Basket, and Button Up Basket.
If the Crochet Cord Nesting Bowls pattern inspires you and you post a photo on social media, be sure to tag me @mooglyblog or #mooglyblog so I can check it out too! And send in your finished photos to tamarakelly@mooglyblog.com to have them featured in the Moogly email newsletter!
THE FINE PRINT
Follow Moogly on Facebook, Twitter, Pinterest, and Instagram! Thank you to Yarnspirations for providing the materials shown in this post. Written pattern copyright Tamara Kelly 2021, all rights reserved. Please do not reprint or repost this pattern, but please do link to this page to share this pattern with others. If you wish to make items for sale from this pattern or translate it to another language, please visit the About page for details.
MooglyCAL2021 - Block #19
MooglyCAL2021 Block 19 is a stunning textural design by Maria Bittner of Pattern Paradise! The Copenhagen Square features popcorn stitches, layering, and is just beautiful! Read on for all the details, and for the link to Block #19 in this free year-long crochet along!
 Disclaimer: This post includes affiliate links; materials provided by Yarnspirations and Furls. [Read more...]
How to Increase and Decrease Crochet Foundation Stitches - Live
As long as you don't have to skip any chains, you can start a project with foundation stitches - even when you have to increase and decrease! Today, I'll share the latest Moogly news on Facebook, and then I'll head over to YouTube so I can show you how to increase and decrease crochet foundation stitches of any height!
 Disclaimer: This post is sponsored by Yarnspirations, and contains affiliate links. Live videos are unscripted, unedited, occasionally weird, and all opinions are my own.
Halloween Monster Candy Bucket Tutorial
The Halloween Monster Candy Bucket Tutorial will show you how to crochet your own spooky trick or treat tote! Follow along, in both right and left-handed videos, with the free pattern here on Moogly!
 Disclaimer: This post includes affiliate links; materials provided by Yarnspirations.
Halloween Monster Candy Bucket

The Halloween Monster Candy Bucket is a fun crochet candy tote pattern that works up quickly and easily in Bernat Blanket! Celebrate spooky season and trick or treat in style with this free Moogly pattern!
Disclaimer: This post includes affiliate links; materials provided by Yarnspirations.
Prefer an ad-free PDF? You've got options!


Prefer the free blog version? Keep scrolling!
Part of the 2021 Halloween CAL on CAL Central

Visit Underground Crafter to see the other free crochet patterns that were included in this Halloween crochet along!

Featuring Bernat Blanket O'Go - and You!
The Halloween Monster Candy Bucket is made with Bernat Blanket O'Go! It's the same Bernat Blanket you know and love, but with a completely tangle-free experience! There are 19 different colorways to choose from, or you can use up some of your own Bernat Blanket odds and ends. This yarn is discontinued, so you can use your favorite shades of Bernat Blanket!

Once you've got your colors, you can dress it up however you like. Add button tentacle suckers, a funny face - or a creepy face! - it's totally up to you, and a great way to personalize your project, maybe even getting the kids involved!

Do Those Tentacles Look Familiar?
We've got a theme going here! Be sure to check out the Halloween Tentacle Candy Bowl for another creepy, free crochet pattern this season!

Why Just Carry a Plastic Bag?
The Halloween Monster Candy Bucket is a great way to finish off their costume - and you can use it year after year! Make one for all the kids in their favorite colors, and they might just make a second appearance in the spring as whimsical Easter Baskets. I tested it out - it can hold over 3lbs of candy!

Halloween Monster Candy Bucket
Add this pattern to your Ravelry Queue and Favorites
US-K. 6.5mm crochet hook - Susan Bates
300 yds Bernat Blanket O'Go (6/Super Bulky; 100% polyester; 300g/10.5 oz; 201 m/220 yds)
Colorway Shown: Agave (2 balls)
This yarn has been discontinued, but Bernat Blanket is the perfect substitute!

2 large buttons - 2 ½" shown (optional)
Stitch Markers - Susan Bates
Gauge: 4″/10cm across after Rnd 3 of Underbelly
Finished Size: Approx 9" tall excluding handles
Helpful Links and Tutorials:
Halloween Monster Candy Bucket Tutorial
FSC - Foundation Single Crochet
FHDC - Foundation Half Double Crochet
NOTES:
Most of the rnds in this pattern are worked in a spiral - do not ch at the beginning of a rnd or join with a sl st unless instructed.
Move a stitch marker along the first st of each rnd as you work to keep track of your progress.
You can make the pieces in any order, and mix up the colors for your own custom creation!
INSTRUCTIONS:
UNDERBELLY - COLOR C
Rnd 1: Make a magic circle, ch 1, sc in the ring, 9 hdc in the ring. (10 sts)
Rnd 2: 2 hdc in each st around. (20 hdc)
Rnd 3: *Hdc in the next st, 2 hdc in the next st; rep from * around. (30 hdc)
Rnd 4: *2 hdc in the next st, hdc in the next 2 sts; rep from * around. (40 hdc)
Rnd 5: *Hdc in the next 3 sts, 2 hdc in the next st; rep from * around. (50 hdc)
Rnd 6: *(Hdc in next 7 sts, 2 hdc in the next st) twice, hdc in next 8 sts, 2 hdc in the next st; rep from * around. (56 hdc) – DO NOT BREAK YARN.
UNDER-TENTACLES - COLOR C
Under-Tentacle #1:
Row 1: Hdc in next 7 sts; turn (rem sts left unworked). (7 hdc)
Rows 2 – 4: Ch 1, hdc in each st across; turn.
Row 5: Ch 1, hdc2tog, hdc in the next 4 sts, 2 hdc in the last st; turn.
Row 6: Ch 1, 2 hdc in the first st, hdc in next 2 sts, hdc2tog twice; turn. (6 hdc)
Row 7: Ch 1, hdc2tog twice, hdc in the next st, 2 hdc in the last st; turn. (5 hdc)
Row 8: Ch 1, hdc2tog, hdc in next st, hdc2tog; turn. (3 hdc)
Row 9: Ch 1, hdc2tog, hdc in the last st; turn. (2 hdc)
Row 10: Ch 1, hdc2tog; break yarn and finish off. (1 hdc)
Under-Tentacles #2 – 8:
Row 1: Join to next st of Rnd 18, ch 1, hdc in same st and next 6 sts; turn. (7 hdc)
Rows 2 – 10: Rep as for Under-Tentacle #1. Weave in all ends.
TOP OF BUCKET - COLORS A and B
Rnd 1: With Color A, FSC 1, FHDC 55. (56 sts) Use tail to sew bottom of rnd closed.
Rnds 2 - 9: Hdc in each st around. Finish last st of Rnd 9 with Color B.
Rnds 10 - 12: Rep Rnd 2 – DO NOT BREAK YARN, continue with Tentacles below.
TENTACLES - COLOR B
Tentacle #1:
Row 1: Hdc in next 7 sts; turn (rem sts left unworked). (7 hdc)
Rows 2 – 4: Ch 1, hdc in each st across; turn.
Row 5: Ch 1, 2 hdc in the first st, hdc in the next 4 sts, hdc2tog; turn.
Row 6: Ch 1, hdc2tog twice, hdc in next 2 sts, 2 hdc in the last st; turn. (6 hdc)
Row 7: Ch 1, 2 hdc in the first st, hdc in the next st, hdc2tog twice; turn. (5 hdc)
Row 8: Ch 1, hdc2tog, hdc in next st, hdc2tog; turn. (3 hdc)
Row 9: Ch 1, hdc in the first st, hdc2tog; turn. (2 hdc)
Row 10: Ch 1, hdc2tog; break yarn and finish off. (1 hdc)
Tentacles #2 – 8:
Row 1: Join to next st of Rnd 18, ch 1, hdc in same st and next 6 sts; turn. (7 hdc)
Row 2 – 10: Rep as for Tentacle #1. Weave in all ends. Set piece aside.
ADD HANDLE
Rnd 1: Using Color A, join to back of bucket in bottom of foundation stitches, ch 1, hdc in each st around; join and fasten off. (56 sts) Place stitch markers for handles, marking 4 sts on either side of the bucket opening.

Row 2: Join to first marked st, ch 1, hdc in same st, hdc in next 3 sts; turn. (4 hdc)
Row 3 - 23 (or to desired handle length): Ch 1, hdc in each st across; turn. After last row, break yarn leaving a long tail.

Sew: Using the whip stitch, sew the Row 23 to the marked 4 sts on the opposite side of the bucket. Be sure not to twist the handle.
ASSEMBLY
Add details to if desired: Sew on buttons or safety eyes or embroider on a face - dress up your candy bucket to your own taste before assembly. Be sure to center the face opposite the color change.

Assemble Bucket: Using Color B, sc through Tentacles and Under-Tentacles from the Top of Bucket side of the project, working evenly around the entire body. Use Seamless Finishing to join, break yarn and weave in ends.

SHARE YOUR FINISHED PROJECTS WITH US!
If the Halloween Monster Candy Bucket pattern inspires you to make your own project, and you post a photo on social media, be sure to tag me @mooglyblog or #mooglyblog so I can check it out too! And send it in to tamarakelly@mooglyblog.com to see it featured in the Moogly email newsletter!

THE FINE PRINT
Follow Moogly on Facebook, Twitter, Pinterest, Instagram, and TikTok! Thank you to Yarnspirations for providing the materials shown in this post. Written pattern copyright Tamara Kelly 2021, all rights reserved. Please do not reprint or repost this pattern, but please do link to this page to share this pattern with others.
If you wish to make items for sale from this pattern or translate it to another language, please visit the About page for details.
The Loop Scoop #21: A Yarny Link Party!
Loop Scoop #21 features a beautiful autumnal collection of free crochet patterns - these photos just ooze coziness! After you check out these wonderful new projects, be sure to check out the new patterns and links at the bottom as well, to help determine what gets featured next round!

MooglyCAL2021 - Block #18
MooglyCAL2021 Block 18 is a clever floral design by Julie Yeager Designs! The Chaplet Afghan Square features post stitches, puff stitches, and so many pretty stitches! Read on for all the details, and for the link to Block #18 in this free year-long crochet along!
 Disclaimer: This post includes affiliate links; materials provided by Yarnspirations and Furls. [Read more...]
How to Combine Crochet Foundation Stitches - Moogly Live August 31, 2021
Foundation stitches are a great way to start many crochet projects - and you don't have to have a simple first row to use them! Today, I'll share the latest Moogly news on Facebook, and then I'll head over to YouTube so I can show you how to combine crochet foundation stitches, and answer your foundation stitch questions!
 Disclaimer: This post is sponsored by Yarnspirations, and contains affiliate links. Live videos are unscripted, unedited, occasionally weird, and all opinions are my own.
O'Go by Yarnspirations Giveaway
O'Go by Yarnspirations is a whole new way to wind yarn! Tangle-free with amazing color options, learn more about these yarns, and enter to win a skein of each of these fab new on Moogly!
 Disclaimer: This post was sponsored by Yarnspirations and includes affiliate links; all opinions are my own.
[Read more...]
Granny Hex Tote Assembly Tutorial
The Granny Hex Tote Assembly Tutorial will show you how to put together your own crochet hexagon handbag! Follow along with the free pattern here on Moogly!
 Disclaimer: This post includes affiliate links; materials provided by Yarnspirations.
Granny Hex Tote

The Granny Hex Tote is traditional and modern, and so quick and fun to make! With your favorite handles and just one skein of Caron Colorama O'Go, you can make your own fun hexie handbag with this free crochet pattern on Moogly!
Disclaimer: Materials for this pattern were provided by Yarnspirations; this post includes affiliate links.
Prefer an ad-free PDF? You've got options!
Prefer the free blog version? Keep scrolling!
Featuring Caron Colorama O'Go
Caron Colorama O'Go is one of my new favorites - I've used it on three designs in a row now (the others will debut in a couple months elsewhere). I love that you can go with the flow and work right through the skein, or take it apart for color play and intentional design!

For the Granny Hex Tote, I decided to use the colors individually. But I still recommend that you work through them as they lay in the skein! Since the pieces are made and then joined, you can simply make the motif that you wish to make in the first color of the skein.
Then, cut off the leftover bit of that yarn and set it aside for joining. Move to the next section, and work your way through the skein. This will keep any possibility of tangles to virtually nothing!

Make a Granny Hex Tote in Every Colorway!
The Granny Hex Tote is fun in solids, stripes, and as a stash buster - but it really was inspired by the yarn. Caron Colorama O'Go features many great colorways to choose from, and each one will give you a unique look for your tote.

Want to mix up the order and colors used? Make the pieces in whatever color you like - just make the 2 half hexagons in the same color so you have enough yarn.

I love the size of the Granny Hex Tote and I hope you do too. Not too small, not too big, with handles just long enough to fit over my shoulder - so hard to find in shops! If you like longer or shorter handles, feel free to adjust the length to suit you. Just be sure that if you're going a lot longer that you have a bit of extra yarn on hand.

Granny Hex Tote
Add this pattern to your Ravelry Queue and Favorites
US-J, 6.0mm hook - Susan Bates
215 yds Caron Colorama O'Go (5 - Bulky; 100% acrylic; 180g/ 6.4 oz, 208 m/ 228 yds)
Colorway shown: First Blush
A: orange
B: yellow
C: pink
D: white
E: green
Gauge: Hexagon = approx 8" across (straight edge to straight edge)
Size: Finished bag is 8" tall x 18" wide (at top) excluding handles
Helpful Links:
Special Stitches:
Beginning cluster: (ch 2, dc2tog) in the indicated ch sp
Half Cluster: dc2tog in the indicated st or ch sp
Cluster: dc3tog in the indicated ch sp
Notes:
If you would prefer to start the hexagon with a magic circle, do not pull it all the way closed before weaving in your ends.
Substitute a CSDC - Chainless Starting Double Crochet and ch 1 for the Ch 4 start in Rows 2 and 4 of the Half Hexagon if desired.
Feel free to customize your bag with alternative joining methods for the hexagons, and other styles of handles.
Granny Hex Tote
Hexagon - Make 3, One Each in A, B, and C
Rnd 1: Ch 6, sl st in first ch made to form ring. Working into the ring, beginning cluster, [ch 3, cluster] 5 times, ch 1; join with hdc in beginning cluster. (6 clusters)
Rnd 2: Beginning cluster in ch-1/hdc ch sp, (ch 3, cluster, ch 3, cluster) in each of next 5 ch-3 sps, ch 3, cluster in ch-1/hdc ch sp, ch 1; join with hdc in beginning cluster. (12 clusters)
Rnd 3: Beginning cluster in ch-1/hdc ch sp, *(ch 3, cluster, ch 3 cluster) in next ch sp,** ch 3, cluster in next ch sp; rep from * around finishing last rep at **, ch 1; join with hdc in beginning cluster. (18 clusters)
Rnd 4: Beginning cluster in ch-1/hdc ch sp, *ch 3, cluster in next ch sp, (ch 3, cluster, ch 3 cluster) in next ch sp,** ch 3, cluster in next ch sp; rep from * around finishing last rep at **, ch 1; join with hdc in beginning cluster. (24 clusters)
Rnd 5: Ch 1, sc in ch1/hdc ch sp, *3 sc in each of next 2 ch sps, (2 sc, ch 2, 2 sc) in next ch sp,** 3 sc in next ch sp; rep from * around finishing last rep at **, 2 sc in beg ch1/hdc ch sp; join and fasten off. (78 sc)
Half Hexagon - Make 2, in D
Row 1: Ch 3 (does not count as a st), (dc, [ch 3, cluster] twice, ch 3, half cluster) in 3rd ch from hook; turn. (2 clusters)
Row 2: Ch 4 (counts as dc and ch 1), [(cluster, ch 3) twice in next ch sp] 2 times, (cluster, ch 3, cluster) in next ch sp, ch 1, dc in last dc; turn. (6 clusters)
Row 3: Ch 2 (does not count as a st), dc in ch-1 sp, [ch 3, cluster in next ch sp, ch 3, (cluster, ch 3, cluster) in next ch sp] twice, ch 3, cluster in next ch sp, ch 3, dc2tog in ch-1 sp and top of ch-3; turn. (7 clusters)
Row 4: Ch 4 (counts as dc and ch 1), [(cluster, ch 3) in each of next 2 ch sps, (cluster, ch 3, cluster, ch 3) in next ch sp] twice, cluster in next ch sp, ch 3, cluster in last ch sp, ch 1, dc in last st; turn. (10 clusters)
Rnd 5: Ch 1, sc in first st, sc in ch-1 sp, *3 sc in each of next 2 ch sps,** (2 sc, ch 2, 2 sc) in next ch sp, 3 sc in next ch sp; rep from * around finishing last rep at **, sc in ch-1 sp, sc in last st, ch 2, sc 16 evenly across the straight edge of the piece, ch 2; join and fasten off. (33 sc)
Assemble Hexagons
Layout Body pieces as shown below.

Using the mattress stitch and matching yarn colors, sew the pieces together along the seams as shown below, working through the BLO of each piece. Note that the side of the half hexagon are shorter than the side of the full hexagons, so there will be leftover stitches there.

Add Handles - Use E
Rnd 1 (RS): Join with sc to first st at top of either half hexagon (not the ch 2), *sc in each rem st across half hexagon, sc in ch-2 sp, sc in each st of next hexagon, working 2 sc in each ch-2 sp, sc in next half hexagon ch-2 sp; rep from * around, join to first sc.

Rnd 2: Ch 1, sc in each st around, join and fasten off. Place stitch markers where you'd like the handle openings to begin (see photo below).

Rnd 3: Join with sc to the st before a marked st before a half hexagon, *sc in marked st, ch 50 (or to desired handle length), sc in next marked st (skip all sts in between), sc in each st to next marked st; rep from * around, join to first sc.

Rnd 4: Ch 1, sc in each st and ch around; join.
Rnd 5: Ch 1, sc in each st around; join and fasten off. Weave in ends.
LOOKING FOR MORE?
Are you looking for more crochet bag patterns? I have so many! You can browse all my patterns on Moogly or Ravelry - and check out some of my most recent designs: Ring Rose Bag, Cinch Stripes Backpack, Rainbow Bobble Bag, Sherbet Stripes Tote, and Perfect Summer Clutch!

If the Granny Hex Tote pattern inspires you and you post a photo on social media, be sure to tag me @mooglyblog or #mooglyblog so I can check it out too!
THE FINE PRINT
Follow Moogly on Facebook, Twitter, Pinterest, and Instagram! Thank you to Yarnspirations for providing the materials shown in this post. Written pattern copyright Tamara Kelly 2021, all rights reserved. Please do not reprint or repost this pattern, but please do link to this page to share this pattern with others. If you wish to make items for sale from this pattern or translate it to another language, please visit the About page for details.
Get a Head Start on Your Holiday Crochet Here!
Fall is nearly here with its cooler weather, changing colors, and (maybe?) the kids back in school. But you know what I like best about autumn? It’s crochet weather! We always say we’re going to get a head start on our cold-weather projects – this new bundle will help us get there with a Head Start on the Holidays!
 Disclaimer: This post includes affiliate links.
Athena's Elements Yarn Bowl Giveaway
Yarn bowls are a great way to keep your yarn clean and neat and in one spot while you knit and crochet. And Athena's Elements Yarn Bowl is a gorgeous, rainbow-hued bowl that livens up any craft session! Take a closer look, and enter to win your own Athena's Elements Yarn Bowl on Moogly (and snag a discount code too)!
 Disclaimer: This post includes affiliate links; giveaway sponsored by Clover USA.