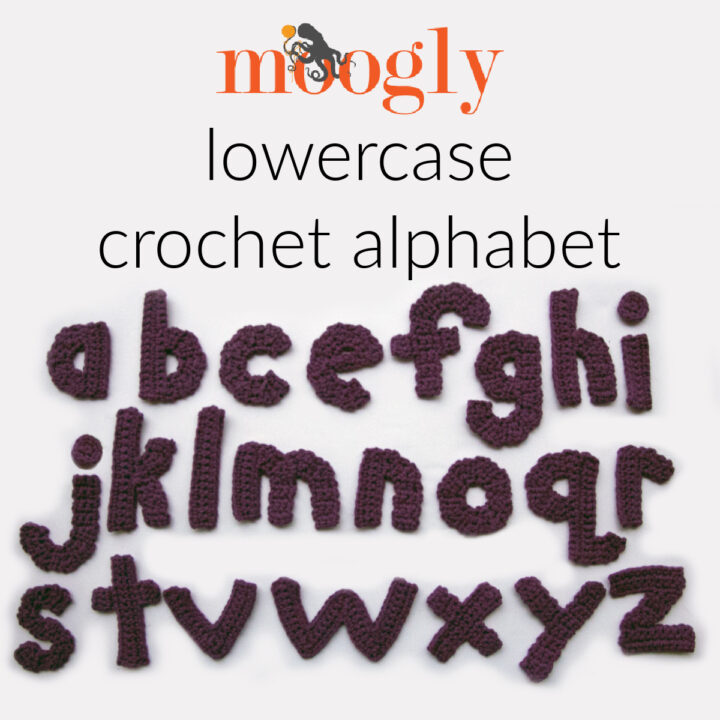
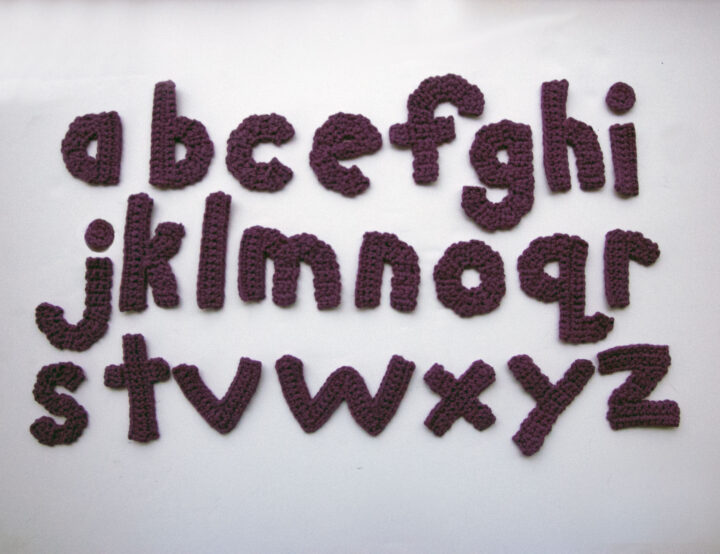
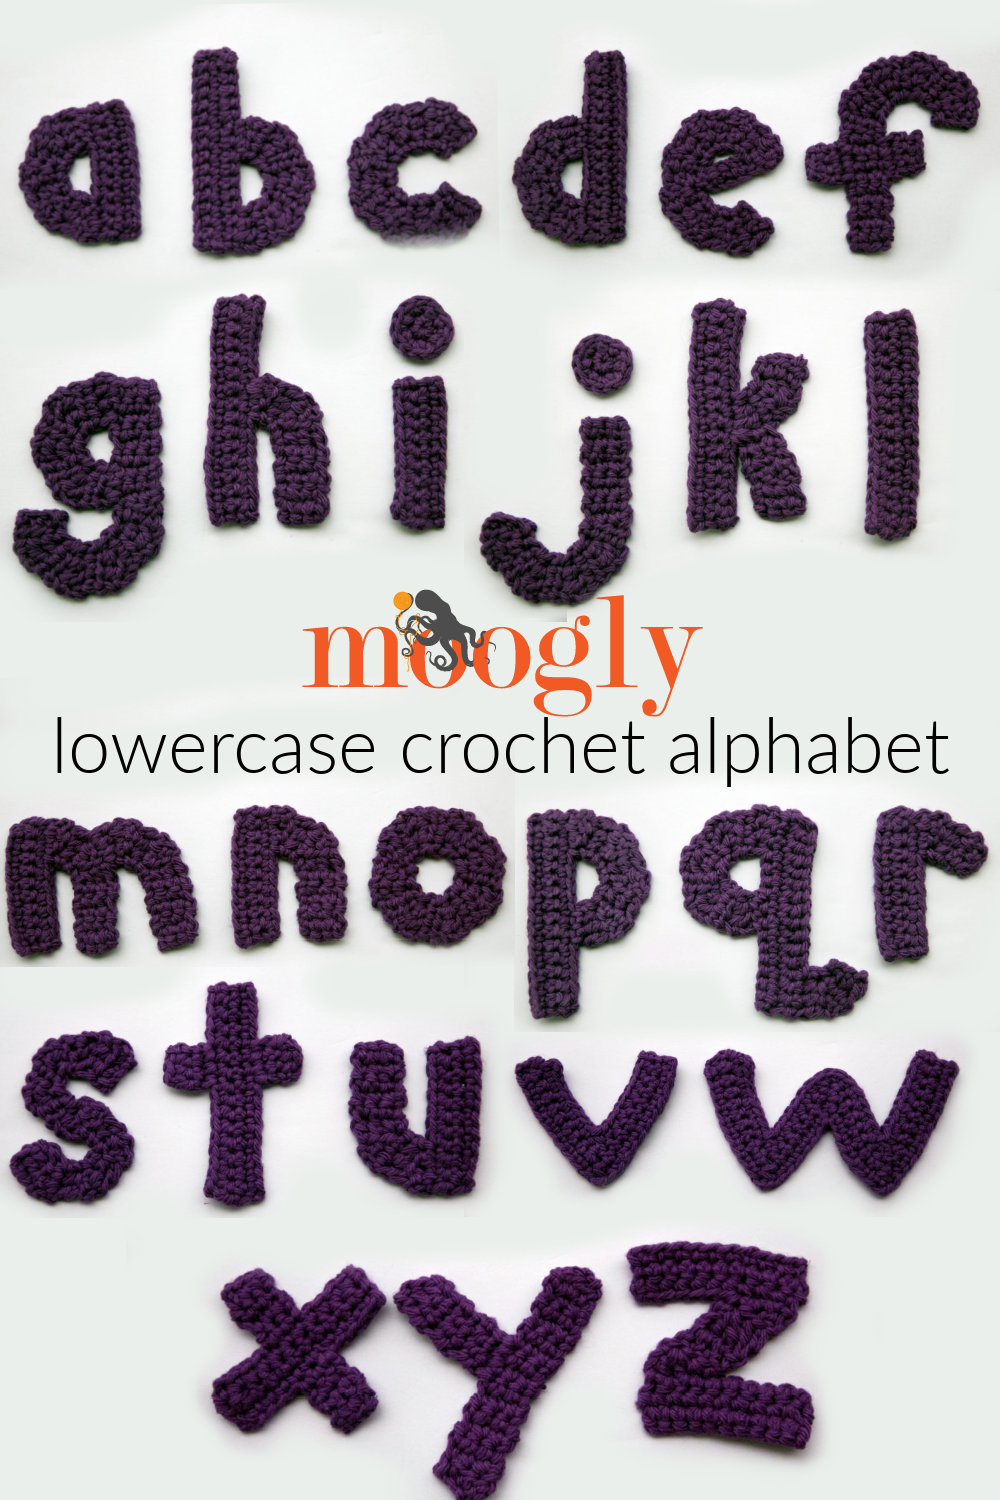
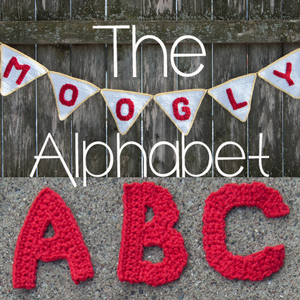
So now you're looking for free crochet lowercase letter patterns? The Moogly Crochet Lowercase Alphabet is here to help! This collection features all 26 lowercase crochet letters in an easy applique style that’s quick to stitch, beginner-friendly, and perfect for customizing blankets, baby gifts, pillows, totes, wall hangings, and more. Spell out names, create sweet sayings, add monograms, or make your own crochet signage with these versatile alphabet appliques. Keep reading to see the refreshed 2026 update, complete with professionally created charts for each letter!
Prefer an ad-free PDF? It's a Re-launch Special!
Newly tech edited and updated with a professionally made chart for each letter! Get the ad-free PDF for The Moogly Crochet Lowercase Alphabet for only $4.99 US through May 27th, 2026!


Newly Updated for 2026 and Beyond
I originally designed this set of letters in 2014, specifically to mix and match with the Moogly Crochet Uppercase Alphabet! While updating the Uppercase letters, I decided it made sense to do the Lowercase ones too! I hired Lindsey Stephens to professionally tech edit all 26 lowercase letters and to create stitch diagrams for each one. I've completely rewritten and formatted this post, and created an ad-free PDF. In that PDF, each letter gets its own page, so you can print just what you need!
So now, I feel confident that this lowercase alphabet is also the best it can be - and ready to head into the future, and help you say whatever you want to say!
Matching Crochet Alphabet Applique Sets and Symbols
Be sure to check out the rest of the matching Moogly Crochet Alphabet sets, too! You can mix and match all of these sets, created for the same scale:
Mix and match the sets to create custom names, phrases, banners, monograms, and personalized crochet projects for every occasion!
How to Use These Crochet Lowercase Letters
These crochet lowercase letters are made as individual appliques, making them easy to use for nearly any project you can imagine. Since each letter is crocheted separately, you can arrange and rearrange them to create whatever you like. One of my favorite tricks is to use stitch markers or pins to hold the letters in place first, so you can adjust spacing, double-check spelling, and make sure everything lines up neatly before sewing.
When it’s time to attach your crochet alphabet letters, you’ve got several easy options. A simple whip stitch with a yarn needle works great for adding letters to any fabric, while a backstitch can give extra durability for pieces that will see lots of use. If you’re using the letters for craft projects, fabric glue, fusible webbing, or even hook-and-loop fasteners can work well too, especially for banners, classroom decor, or interactive displays.
And these little crochet letters aren’t limited to applique projects! They’re also wonderful for hands-on learning for beginning readers. Add magnets to the backs for a fun fridge activity, or use them as lightweight embellishments for party decor, scrapbook pages, and more!
Sizing and Customizing Your Crochet Letters
Frequently Asked Questions
Can beginners make these crochet letters?
Yes, these lowercase letters are designed to be beginner-friendly and use basic stitches in an easy appliqué style.
What yarn works best for crochet letters?
For the clearest stitch definition, a smoother yarn will give you crisper edges, while a softer or fluffier yarn will create a more textured, decorative look. If you are attaching the letters to a blanket or garment, make sure that the fibers are all compatible for washing and drying!
Do I need to block the letters?
Blocking is optional, but it can help even out edges and make your finished letters lie flatter, especially for display pieces. I like to use spray starch on cotton letters to help them hold their shape!

The Moogly Crochet Lowercase Alphabet
Add this pattern to your Ravelry Queue and Favorites
US - F, 3.75 mm hook
Any worsted-weight yarn
Size: Finished letters in this yarn measure approx 3.5” tall. For larger or smaller letters, use thicker or thinner yarn and a hook size that gives you a solid fabric.
HELPFUL LINKS AND TUTORIALS
FSC – Foundation Single Crochet
FSC - Extending a Row with Foundation Single Crochet
SPECIAL STITCHES & TECHNIQUES:
Wide sc2tog (wide single crochet 2 together) over next 3 sts: insert hook in first st, yo, pull up a loop, skip next st, insert hook in third st, yo, pull up a loop, yo, pull through all 3 loops on hook.
Sc2tog (single crochet 2 together): insert hook in first st, yo, pull up a loop, insert hook in next st, yo, pull up a loop, yo, pull through all 3 loops on hook.
Hdc2tog (half double crochet 2 together): Yo, insert hook in first st, yo, pull up a loop, insert hook in next st, yo, pull up a loop, yo, pull through all 4 loops on hook.
Dc2tog (double crochet 2 together): Yo, insert hook in first st, yo, pull up a loop, yo, pull through 2 loops on hook, yo, insert hook in next st, yo, pull up a loop, yo, pull through 2 loops on hook, yo, pull through all 3 loops on hook.
FSC (Foundation single crochet): (see tutorial linked above) Insert in base of last st made, yo, pull up a loop, yo, pull through 1 loop on hook, [yo, pull through 2 loops] twice.
NOTES:
Chain 2 at the beginning of a row does not count as a stitch throughout.
Chain 1 at the beginning of a row does not count as a stitch throughout.
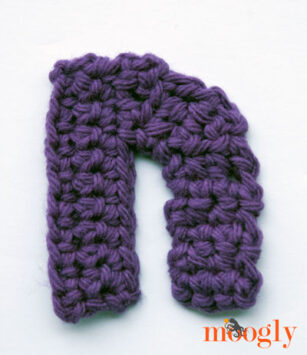
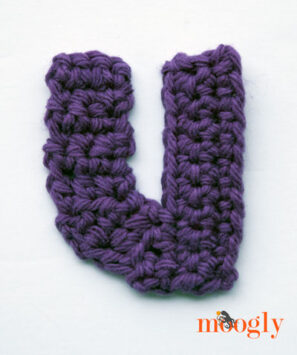
Please note that the instructions for letters B, D, and P are the same, as are the instructions for N and U. For the letter D, see the instructions for the letter B, and flip it over when finished. To make the letter P, see the instructions for the letter B, and flip it over and give it a spin when finished. For the letter U, see the instructions for letter N and spin it around when finished!
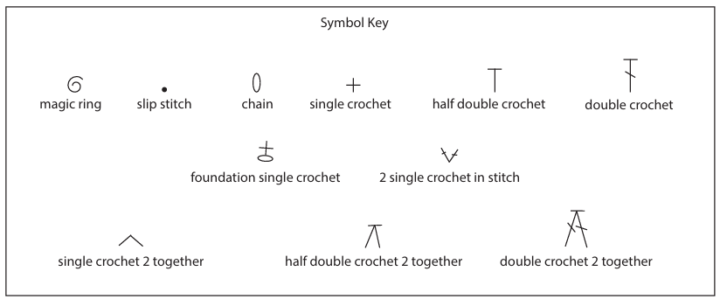
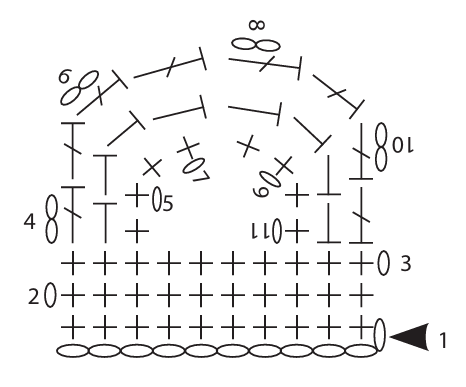
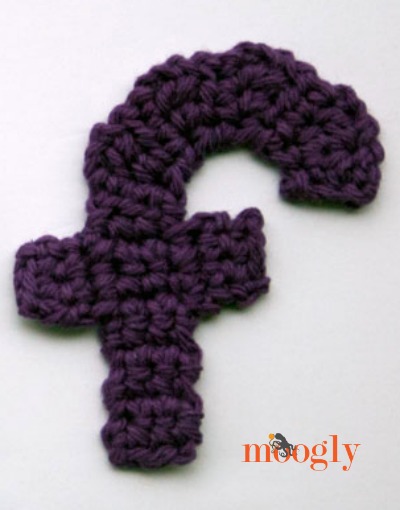
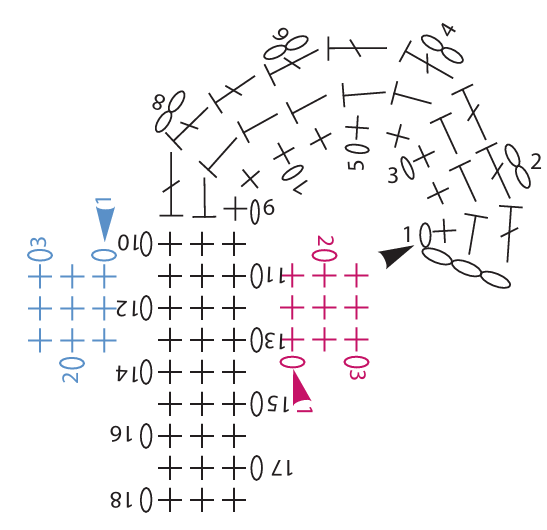
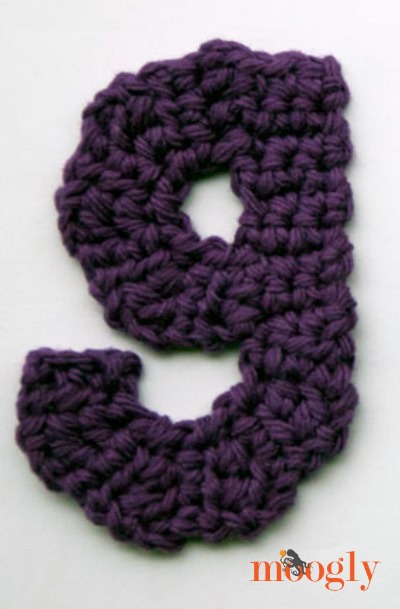
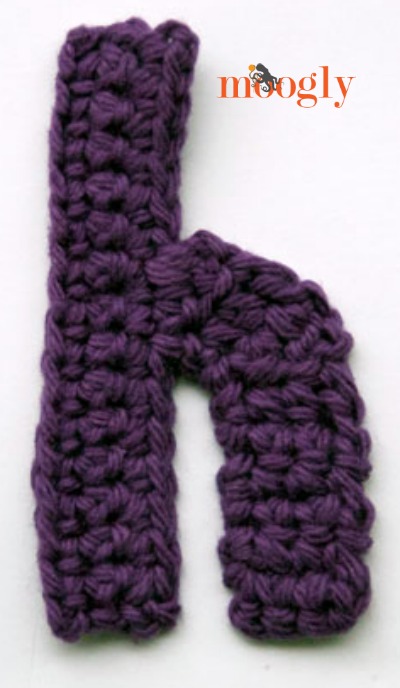
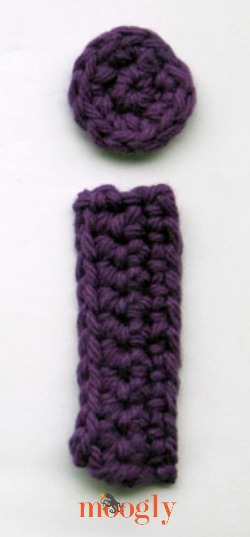
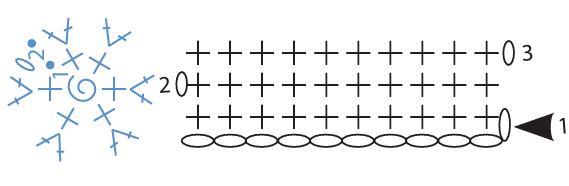
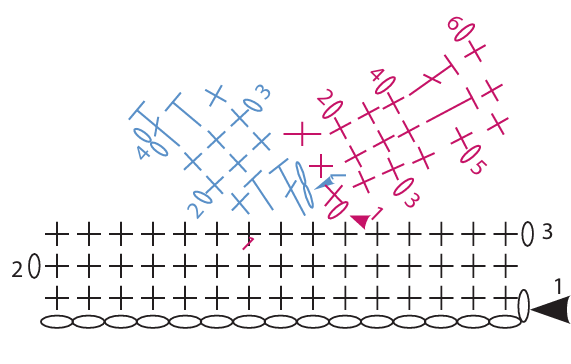
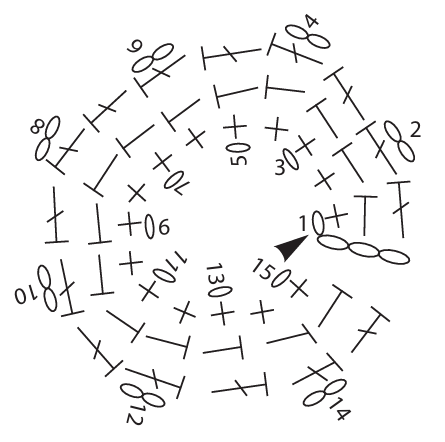
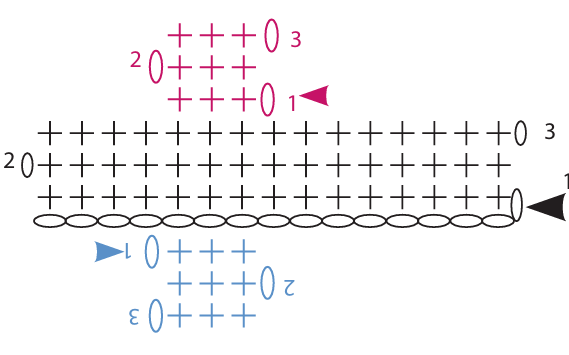
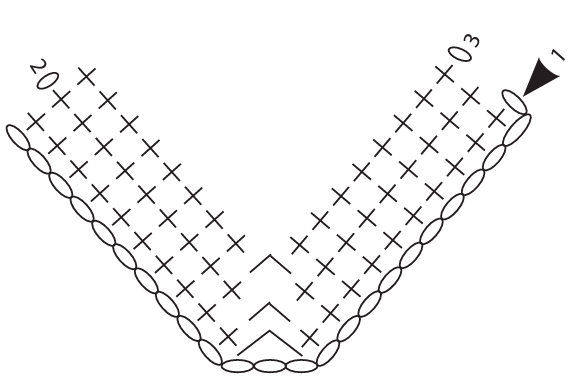
Each letter includes a photo of the finished letter made in worsted-weight yarn, followed by written instructions, followed by the crochet symbol diagram for that letter.
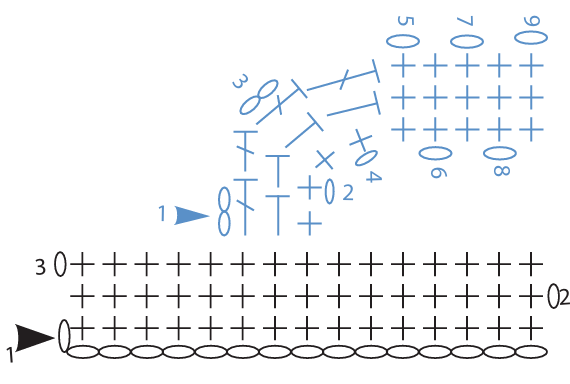
CROCHET DIAGRAM STITCH KEY
A grey/black arrow shows the beginning of the first row or round into the foundation chain.
When a letter is composed of multiple parts, the latter parts are shown in a different color for clarity. A new arrow means the yarn is rejoined to start the next section.
The Moogly Crochet Lowercase Alphabet Instructions
THE LETTER a
Row 1: Ch 11, sc in 2nd ch from hook, sc in each remaining ch. Turn. (10 sts)
Rows 2 - 3: Ch 1, sc in each st. Turn. (10 sts)
Row 4: Ch 2, dc in first st, hdc in next st, sc in last st. Turn, leaving remaining sts unworked. (3 sts)
Row 5: Ch 1, sc in first st, hdc in next st, dc in last st. Turn. (3 sts)
Row 6: Ch 2, dc in first st, hdc in next st, sc in last st. Turn. (3 sts)
Rows 7 - 10: Repeat Rows 5 - 6.
Row 11: Repeat Row 5.
Finish off. Use end to whip stitch Row 11 to Row 3.
THE LETTERS b, d, and p
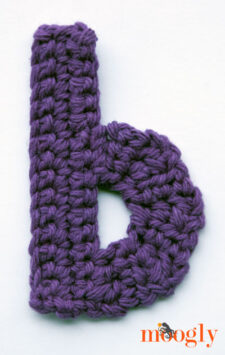
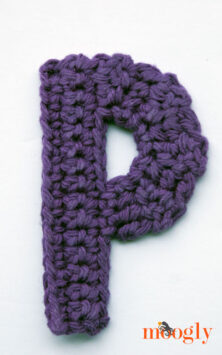
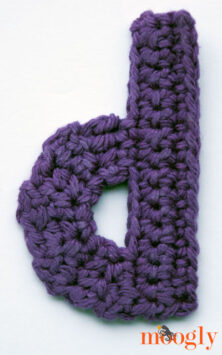
Row 1: Ch 16, sc in 2nd ch from hook, sc in each remaining ch. Turn. (15 sts)
Rows 2 - 3: Ch 1, sc in each st. Turn. (15 sts)
Row 4: Ch 2, dc in first st, hdc in next st, sc in last st. Turn, leaving remaining sts unworked. (3 sts)
Row 5: Ch 1, sc in first st, hdc in next st, dc in last st. (3 sts)
Row 6: Ch 2, dc in first st, hdc in next st, sc in last st. Turn. (3 sts)
Rows 7 - 10: Repeat Rows 5 - 6.
Row 11: Repeat Row 5.
Finish off. Use end to whip stitch Row 11 to Row 3.
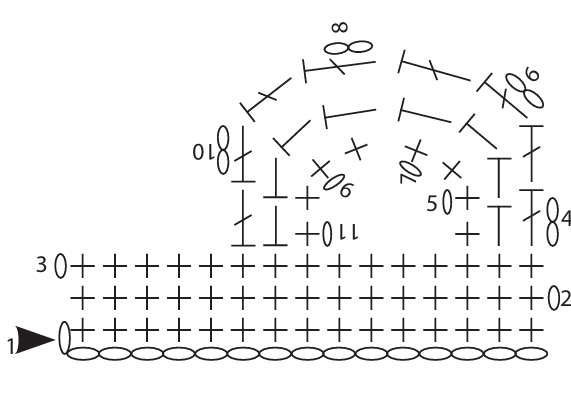
THE LETTER c
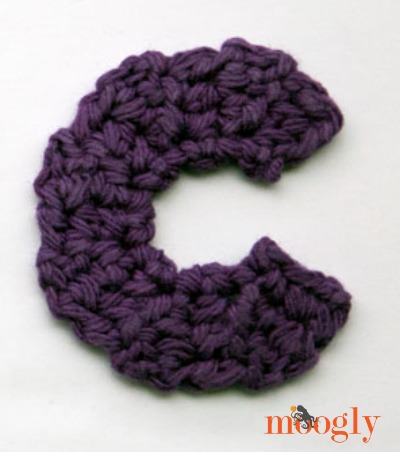
Row 1: Ch 4, sc in 2nd ch from hook, hdc in next ch, dc in last ch. Turn. (3 sts)
Row 2: Ch 2, dc in first st, hdc in next st, sc in last st. Turn. (3 sts)
Row 3: Ch 1, sc in first st, hdc in next st, dc in last st. Turn. (3 sts)
Rows 4 - 13: Repeat Rows 2 - 3.
Finish off.
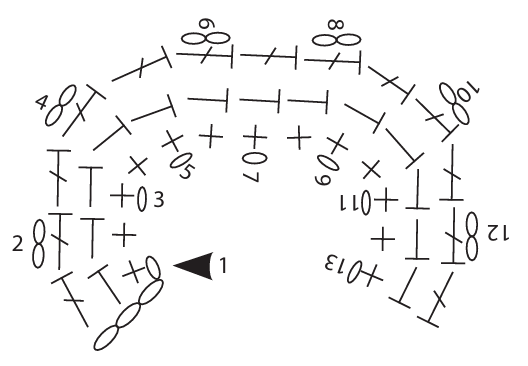
THE LETTER e
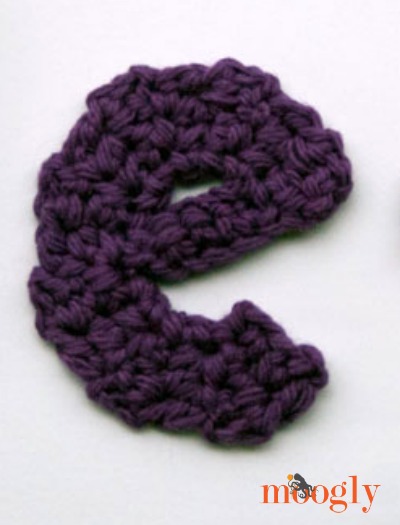
Row 1: Ch 4, sc in 2nd ch from hook, hdc in next ch, dc in last ch. Turn. (3 sts)
Row 2: Ch 2, dc in first st, hdc in next st, sc in last st. Turn. (3 sts)
Row 3: Ch 1, sc in first st, hdc in next st, dc in last st. Turn. (3 sts)
Rows 4 - 13: Repeat Rows 2 - 3.
Row 14: Repeat Row 2.
Row 15: Ch 5, sc in 2nd ch from hook, sc in each remaining ch.
Finish off. Sew end of 4-sc crossbar in place.
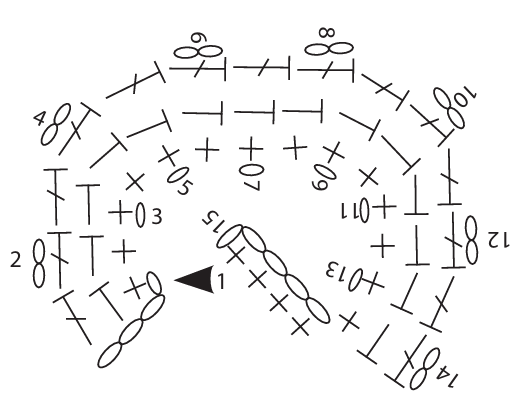
THE LETTER f
Row 1: Ch 4, sc in 2nd ch from hook, hdc in next ch, dc in last ch. Turn. (3 sts)
Row 2: Ch 2, dc in first st, hdc in next st, sc in last st. Turn. (3 sts)
Row 3: Ch 1, sc in first st, hdc in next st, dc in last st. Turn. (3 sts)
Rows 4 - 9: Repeat Rows 2 - 3.
Rows 10 - 18: Ch 1, sc in each st. Turn. (3 sts)
Finish off.
Crossbar
Row 1: With RS facing, rejoin yarn with a sl st to side as shown. Sc in this row edge and next 2 row edges. Turn. (3 sts)
Row 2 - 3: Ch 1, sc in each st. Turn. (3 sts)
Finish off.
Repeat instructions for Crossbar on opposite side.
THE LETTER g
Row 1: Ch 4, sc in 2nd ch from hook, hdc in next ch, dc in last ch. Turn. (3 sts)
Row 2: Ch 2, dc in first st, hdc in next st, sc in last st. Turn. (3 sts)
Row 3: Ch 1, sc in first st, hdc in next st, dc in last st. Turn. (3 sts)
Rows 4 - 9: Repeat Rows 2 - 3.
Rows 10 - 18: Ch 1, sc in each st. Turn. (3 sts)
Row 19: Rotating to work along the left side of Rows 18 - 16, ch 2, dc in first row edge, hdc in next row edge, sc in next row edge. Turn. (3 sts)
Row 20: Ch 1, sc in first st, hdc in next st, dc in last st. Turn. (3 sts)
Row 21: Ch 2, dc in first st, hdc in next st, sc in last st. Turn. (3 sts)
Rows 22 - 25: Repeat Rows 20 - 21.
Row 26: Repeat Row 20.
Finish off. Whip stitch Row 26 in place as shown.
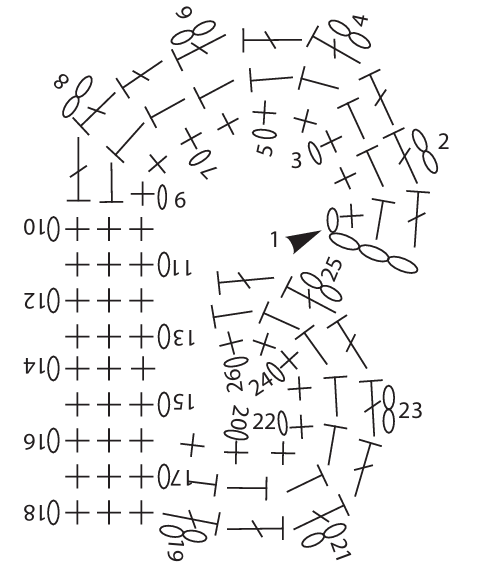
THE LETTER h
Row 1: Ch 16, sc in 2nd ch from hook sc in each remaining ch. Turn. (15 sts)
Rows 2 - 3: Ch 1, sc in each st. Turn. (15 sts)
Finish off.
Side Leg
Row 1: Join yarn in 6th st from edge, ch 2, dc in same st, hdc in next st, sc in next st. Turn. (3 sts)
Row 2: Ch 1, sc in first st, hdc in next st, dc in last st. Turn. (3 sts)
Row 3: Ch 2, dc in first st, hdc in next st, sc in last st. Turn. (3 sts)
Row 4: Repeat Row 2.
Rows 5 - 9: Ch 1, sc in each st. Turn.
Finish off.
THE LETTER i
Row 1: Ch 11, sc in 2nd ch from hook, sc in each remaining ch. Turn. (10 sts)
Rows 2 - 3: Ch 1, sc in each st. Turn. (10 sts)
Finish off.
Dot
Round 1: Working into a magic ring, 6 sc into ring. Join with a sl st in first st. (6 sts)
Round 2: Ch 1, 2 sc in each st around. Join with a sl st in first st. (12 sts)
Finish off.
THE LETTER j
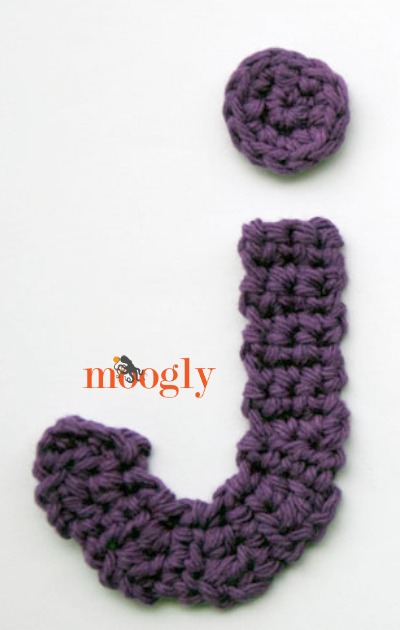
Row 1: Ch 4, sc in 2nd ch from hook, hdc in next ch, dc in last ch. Turn. (3 sts)
Row 2: Ch 2, dc in first st, hdc in next st, sc in last st. Turn. (3 sts)
Row 3: Ch 1, sc in first st, hdc in next st, dc in last st. Turn. (3 sts)
Rows 4 - 9: Repeat Rows 2 - 3.
Rows 10 - 17: Ch 1, sc in each st. Turn. (3 sts)
Finish off.
Dot
Round 1: Working into a magic ring, 6 sc into ring. Join with a sl st in first st. (6 sts)
Round 2: Ch 1, 2 sc in each st around. Join with a sl st in first st. (12 sts) Finish off.
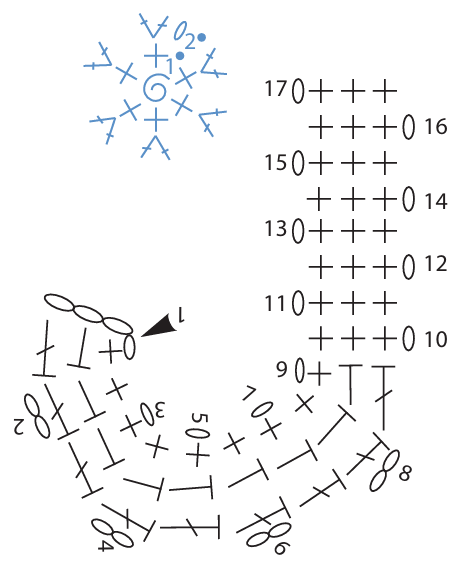
THE LETTER k
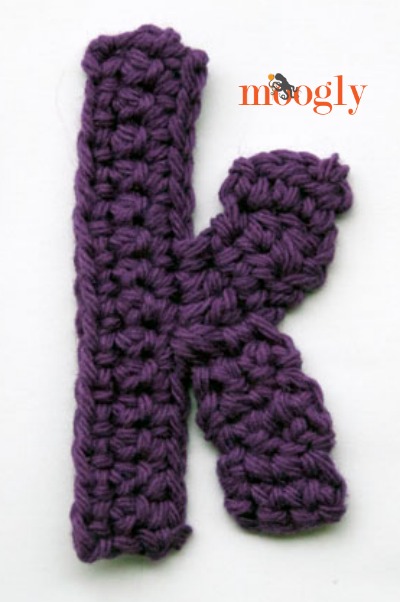
Row 1: Ch 16, sc in 2nd ch from hook, sc in each remaining ch. Turn. (15 sts)
Rows 2 - 3: Ch 1, sc in each st. Turn. (15 sts)
Finish off.
Upper Diagonal Bar
Row 1: With RS facing, join to 7th st of previous row, ch 2, dc in same st, hdc in next st, sc in next st, turn. (3 sts)
Rows 2 - 3: Ch 1, sc in each st. Turn. (3 sts)
Row 4: Ch 1, sc in first st, hdc in next st, dc in last st.
Finish off.
Lower Diagonal Bar
Row 1: Join to same st as joined to for Upper Diagonal Bar, ch 1, sc in same st, work 2 sc in sides of Rows 1 and 2 of Upper Diagonal Bar. Turn. (3 sts)
Rows 2 - 4: Ch 1, sc in each st. Turn. (3 sts)
Row 5: Ch 1, sc in first st, hdc in next st, dc in last st. Turn. (3 sts)
Row 6: Ch 1, sc in each st. (3 sts) Finish off.
THE LETTER l (L)
Row 1: Ch 16, sc in 2nd ch from hook, sc in each remaining ch. Turn. (15 sts)
Rows 2 - 3: Ch 1, sc in each st. Turn. (15 sts)
Finish off.
THE LETTER m
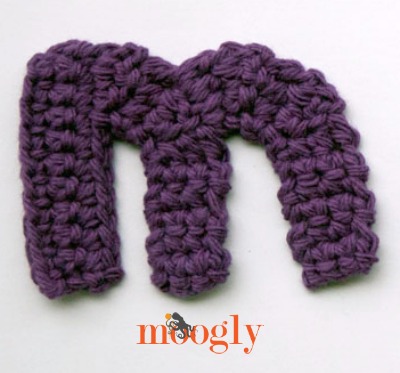
Row 1: Ch 11, sc in 2nd ch from hook, sc in each remaining ch. Turn. (10 sts)
Rows 2 - 3: Ch 1, sc in each st. Turn. (10 sts)
Row 4: Ch 2, dc in first st, hdc in next st, sc in next st. Turn, leaving remaining sts unworked. (3 sts)
Row 5: Ch 1, sc in first st, hdc in next st, dc in last st. Turn. (3 sts)
Row 6: Ch 2, dc in first st, hdc in next st, sc in last st. Turn. (3 sts)
Row 7: Repeat Row 5.
Rows 8 - 12: Ch 1, sc in each st. Turn. Finish off.
Hump
Row 1: With RS facing, join yarn to side of curve on Row 7 as shown, ch 1, sc in first row edge, (hdc, dc) in next row edge. Turn. (3 sts)
Row 2: Ch 2, dc in first st, hdc in next st, sc in last st. Turn. (3 sts)
Row 3: Ch 1, sc in first st, hdc in next st, dc in last st. Turn. (3 sts)
Rows 4 - 5: Repeat Rows 2 - 3.
Rows 6 - 10: Ch 1, sc in each st. Turn. (3 sts) Finish off.
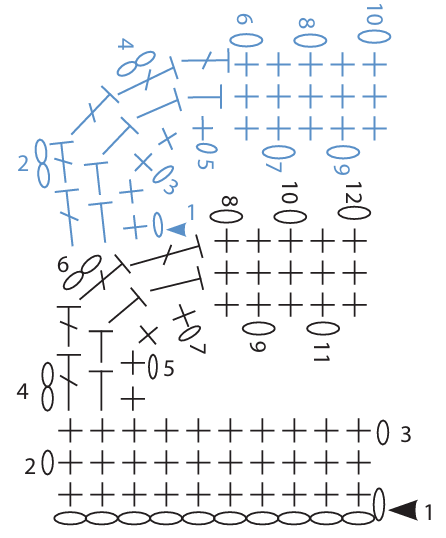
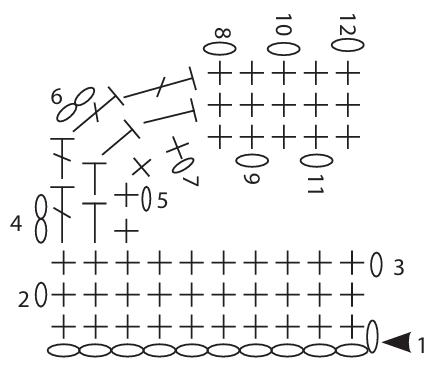
THE LETTERS n AND u
Row 1: Ch 11, sc in 2nd ch from hook, sc in each remaining ch. Turn. (10 sts)
Rows 2 - 3: Ch 1, sc in each st. Turn. (10 sts)
Row 4: Ch 2, dc in first st, hdc in next st, sc in next st. Turn, leaving remaining sts unworked. (3 sts)
Row 5: Ch 1, sc in first st, hdc in next st, dc in last st. Turn. (3 sts)
Row 6: Ch 2, dc in first st, hdc in next st, sc in last st. Turn. (3 sts)
Row 7: Repeat Row 5.
Rows 8 - 12: Ch 1, sc in each st. Turn.
Finish off.
THE LETTER o
Row 1: Ch 4, sc in 2nd ch from hook, hdc in next ch, dc in last ch. Turn. (3 sts)
Row 2: Ch 2, dc in first st, hdc in next st, sc in last st. Turn. (3 sts)
Row 3: Ch 1, sc in first st, hdc in next st, dc in last st. Turn. (3 sts)
Rows 4 - 15: Repeat Rows 2 - 3.
Finish off and whip stitch ends together.
THE LETTER q (Q)
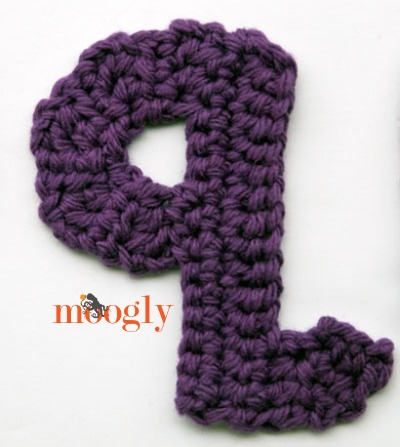
Row 1: Ch 4, sc in 2nd ch from hook, hdc in next ch, dc in last ch. Turn. (3 sts)
Row 2: Ch 2, dc in first st, hdc in next st, sc in last st. Turn. (3 sts)
Row 3: Ch 1, sc in first st, hdc in next st, dc in last st. Turn. (3 sts)
Row 4: Ch 1, sc in each st, make 12 FSC. Turn. (15 sts)
Rows 5 - 6: Ch 1, sc in each st. Turn. (15 sts)
Row 7: Ch 2, dc in first st, hdc in next st, sc in last st. Turn, leaving remaining sts unworked. (3 sts)
Row 8: Ch 1, sc in first st, hdc in next st, dc in last st. Turn. (3 sts)
Row 9: Ch 2, dc in first st, hdc in next st, sc in last st. Turn. (3 sts)
Rows 10 - 13: Repeat Rows 8 - 9.
Row 14: Repeat Row 8.
Finish off and whip stitch Row 14 to side of Row 6.

THE LETTER r
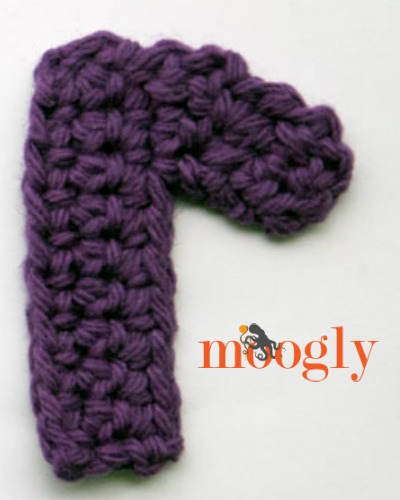
Row 1: Ch 11, sc in 2nd ch from hook, sc in each remaining ch. Turn. (10 sts)
Rows 2 - 3: Ch 1, sc in each st. Turn. (10 sts)
Row 4: Ch 2, dc in first st, hdc in next st, sc in next st. Turn, leaving remaining sts unworked. (3 sts)
Row 5: Ch 1, sc in first st, hdc in next st, dc in last st. Turn. (3 sts)
Row 6: Ch 2, dc in first st, hdc in next st, sc in last st. Turn. (3 sts)
Finish off.
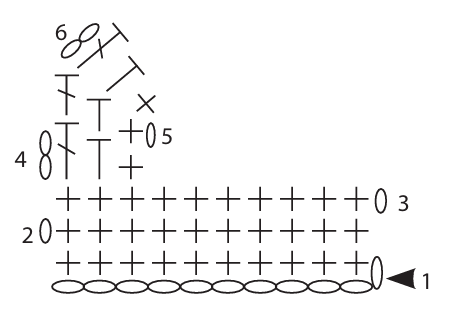
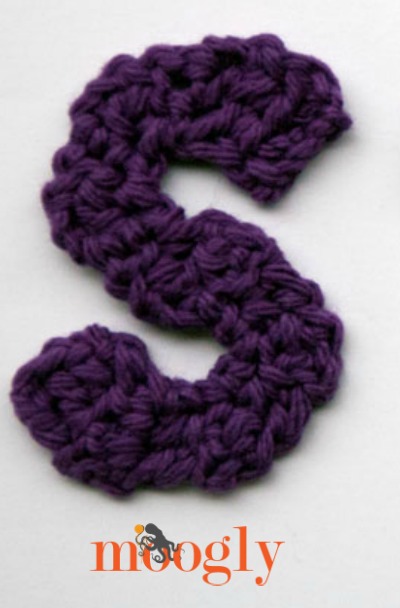
THE LETTER s
Row 1: Ch 4, sc in 2nd ch from hook, hdc in next ch, dc in last ch. Turn. (3 sts)
Row 2: Ch 2, dc in first st, hdc2tog in next 2 sts. Turn. (2 sts)
Row 3: Ch 1, sc in first st, dc in last st. Turn. (2 sts)
Row 4: Ch 2, dc in first st, sc in last st. Turn. (2 sts)
Rows 5 - 8: Repeat Rows 3 - 4.
Row 9: Repeat Row 4.
Rows 10 - 13: Repeat Rows 3 - 4.
Row 14: Repeat Row 3.
Row 15: Ch 2, dc in first st, 2 hdc in last st. Turn. (3 sts)
Row 16: Ch 1, sc in first st, hdc in next st, dc in last st. Turn.
Finish off.
THE LETTER t
Row 1: Ch 16, sc in 2nd ch from hook, sc in each remaining ch. Turn. (15 sts)
Rows 2 - 3: Ch 1, sc in each st. Turn. (15 sts)
Finish off.
Crossbar
Row 1: With RS facing, join yarn to side as shown. Sc in this row edge and next 2 row edges. Turn. (3 sts)
Row 2 - 3: Ch 1, sc in each st. Turn. (3 sts)
Finish off.
Repeat instructions for Crossbar on opposite side.
THE LETTER v
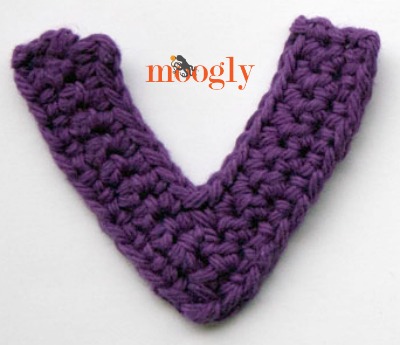
Row 1: Ch 24, sc in 2nd ch from hook, sc in next 9 chs, wide sc2tog over next 3 sts. Sc in remaining 10 chs. Turn. (21 sts)
Row 2: Ch 1, sc in first 9 sts. Wide sc2tog over next 3 sts. Sc in remaining 9 sts. Turn. (19 sts)
Row 3: Ch 1, sc in first 8 sts. Wide sc2tog over next 3 sts. Sc in remaining 8 sts. Turn. (17 sts)
Finish off.
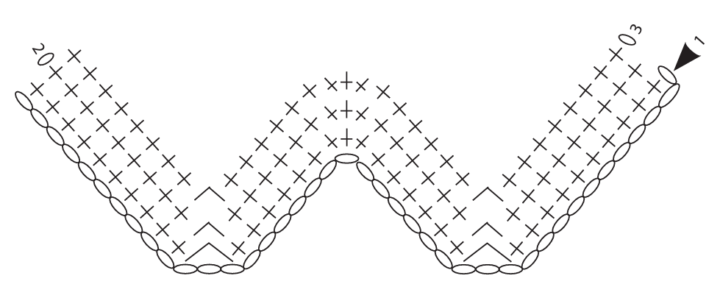
THE LETTER w
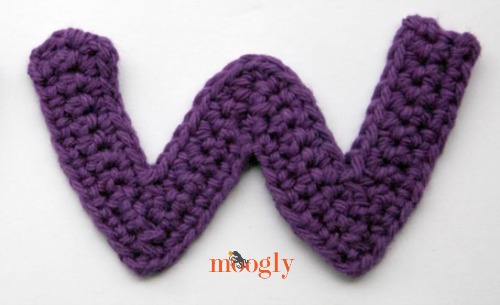
Row 1: Ch 40, sc in 2nd ch from hook, sc in next 9 chs, wide sc2tog over next 3 sts. Sc in 6 chs, 3 sc in next ch, sc in next 6 chs. Wide sc2tog over next 3 sts. Sc in remaining 10 chs. Turn. (37 sts)
Row 2: Ch 1, sc in first 9 sts. Wide sc2tog over next 3 sts. Sc in next 6 sts. 3 sc in next st. Sc in next 6 sts. Wide sc2tog over next 3 sts. Sc in remaining 9 sts. Turn. (35 sts)
Row 3: Ch 1, sc in first 8 sts. Wide sc2tog over next 3 sts. Sc in next 6 sts. 3 sc in next st. Sc in next 6 sts. Wide sc2tog over next 3 sts. Sc in remaining 8 sts. Turn. (33 sts)
Finish off.
THE LETTER x
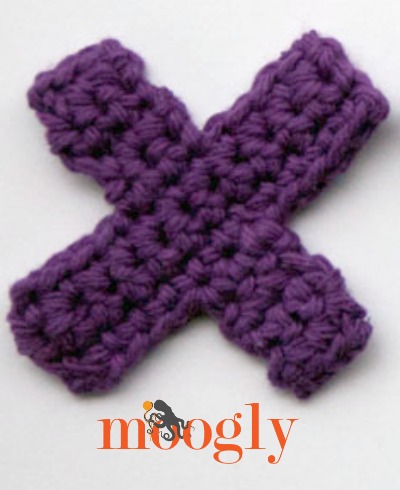
Row 1: Ch 12, sc in 2nd ch from hook, sc in each remaining ch. Turn. (11 sts)
Rows 2 - 3: Ch 1, sc in each st. Turn.
Finish off.
Crossbar
Row 1: With RS facing, rejoin yarn with a sl st in 5th st. Ch 1, sc in same st and next 2 sts. Turn. (3 sts)
Row 2 - 4: Ch 1, sc in each st. Turn. (3 sts)
Finish off.
Repeat instructions for Crossbar on opposite side.
THE LETTER y
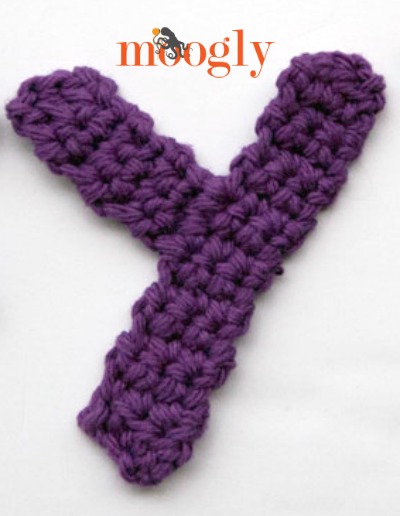
Row 1 (WS): Ch 4, sc in 2nd ch from hook, hdc in next ch, dc in last ch. Turn. (3 sts)
Rows 2 - 14: Ch 1, sc in each st. Turn. (3 sts)
Row 15: Ch 1, sc in first st, hdc in next st, dc in last st. (3 sts)
Finish off.
Diagonal Bar
Row 1: Join yarn to side of left side of Row 7, ch 1, working in sides of rows make 3 sc. Turn. (3 sts)
Rows 2 - 7: Ch 1, sc in each st. Turn. (3 sts)
Row 8: Ch 1, sc in first st, hdc in next st, dc in last st. (3 sts)
Finish off.
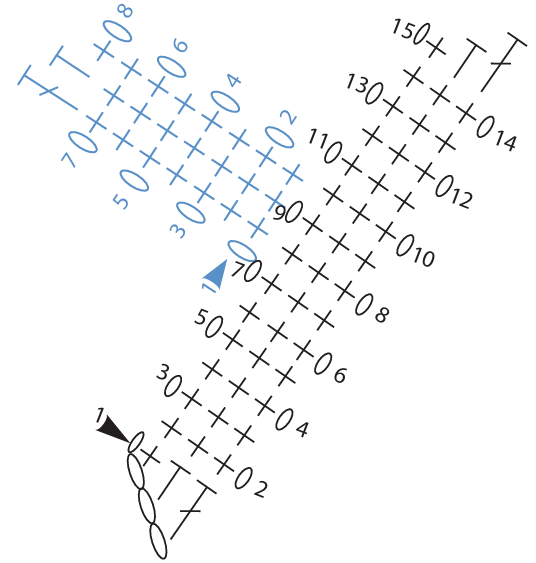
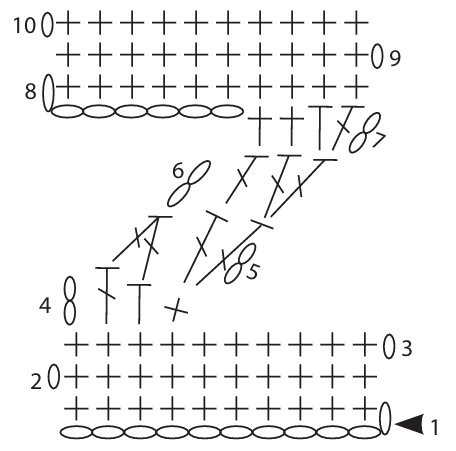
THE LETTER z
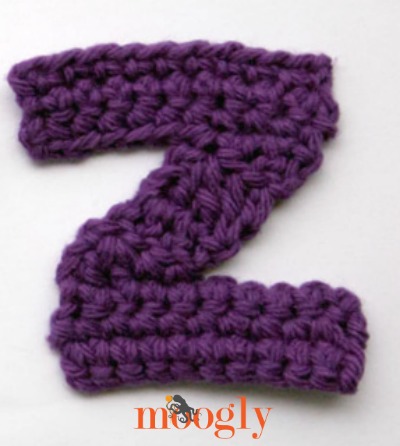
Main Bar
Row 1: Ch 18, sc in 2nd ch from hook, sc in each remaining ch. Turn. (17 sts)
Rows 2 - 3: Ch 1, sc in each st. Turn. (17 sts) At the end of Row 3, finish off.
Upper Diagonal Bar
Row 1: Rejoin yarn with a sl st in 8th st from left edge on either long side. Sc in this st and next 2 sts. Turn. (3 sts)
Row 2 - 7: Ch 1, sc in each st. Turn. (3 sts)
Finish off.
Lower Diagonal Bar
Repeat instructions for Upper Diagonal Bar on opposite long edge of Main Bar.
I hope you enjoy using the Moogly Crochet Lowercase Alphabet to personalize your life! If you share on socials, I would love to see it! You can always tag me @mooglyblog!
The Fine Print
Follow Moogly on YouTube, Facebook, Twitter, Pinterest, TikTok, and Instagram! Written pattern copyright Tamara Kelly 2026, all rights reserved. Please do not reprint or repost this pattern. Please do link to this page to share this pattern with others. If you wish to make items for sale from this pattern or translate it to another language, please visit the About page for details.

Jessica S says
Love it! I think I might need to make a name sign to hang above my daughters crib!
Bridget says
This is wonderful, I want to make a baby blanket with words, and have been struggling with how to crochet within the blanket and get everything spaced properly. This will be perfect!! You are so talented!!
Misha says
Thank you for sharing this! I've been searching the internet for crochet alphabet patterns that are simple and easy to follow. Good thing we have you and this blog. Continue to inspire people.
If you're celebrating Christmas: Merry Christmas!
If not: Happy Holidays!
Tamara Kelly says
Thank you so much Misha! Happy Holidays to you and yours as well!
Lucretia says
What size is the letters? Hight?
Tamara Kelly says
They are proportionate with the Uppercase letters. A lot depends on gauge, hook, and yarn, but the uppercase letters are approx about 3 ½" tall with the yarn and hook shown.
Mary says
Thanks a million, just in time for a few gifts I needed to put names on. I appreciate you sharing all of these wonderful patterns.
Tamara Kelly says
😀 Thank you Mary!
Pat says
Thank you for sharing! I'd like the capital letters too pls!!! I crochet family names for the public!!! Love it!
Tamara Kelly says
Hi Pat! Thank you! You'll find the capital letters HERE. 🙂
laraine Paschal says
I am looking for the uppercase alphabet
can someone help me now where to find it
thank you in advance
Tamara Kelly says
It's linked in the first paragraph, or you can click here. 🙂
Teresa says
Really nice work and thanks for making it free!
Tamara Kelly says
Thank you Teresa!
Jacquie says
I have been hoping you'd release these soon. I am making a blanket with a quote appliqued on it and I am so glad that I'll be able to do lower case letters now! Thank you, thank you, thank you!
Tamara Kelly says
😀 Thanks Jacquie!
Donna says
Hello I like the The Moogly Crochet Alphabet but I was wondering if you can please do a Diagram on the Small Letter m so I can see where to join it at please. I did a small letter m but it did not turn out that good , I think I should had went down some more on the side. You have a big Letter M diagram , we just need a little m diagram and for it to say join here . Please and Thank you Donna 🙂
Tamara Kelly says
Hi Donna! You'd join at about Row 7 of the "n" - does that help?
kristine says
I was making the "s" and I dont know if I did something wrong or your pattern is goofy but I made a "c" using your "s" pattern...
Tamara Kelly says
It sounds like you missed one of the sc 3 rows in the middle. That can make all the difference!
niru says
hi
i would like to thank you so much for these!
a friend of mine has a 3 year old boy. (and she's pregnant with twins too!!)
i made the numbers and lower case letters for the boy.
they turned out great and i hope she would love them too.
i did have a question while i was on letter 'e' (lower case).
after i did the sc-4, i did not know where to sew the end of the cross bar. i was also unsure if the sc-4 was the cross bar indeed.
i however did it..but i thought i could do it if you gave me some clarification.
thanks
Tamara Kelly says
Hi Niru! Sewing on the crossbar is just by eye, so that it looks like an "e" 🙂
niru says
oh..ok.
thanku so much tamara 🙂
i wanted to say again, i'm so in love with your work.
Tamara Kelly says
Thank you Niru!
angeline says
HOW DO YOU JOIN AND SC 3 FOR 3 ROWS IN LETTER T? OR DO YOU DO IT SEPARATELY THEN SEW IT TOGETHER? LIKE CHAIN 3 THEN 3 SC?? OR WAT? 🙂 THANKS FOR THE AWESOME PATTERNS BTW:)
I DONT KNOW HOW TO DO A SC WHEN THE YARN IS NOT CONNECTED 🙂
Tamara Kelly says
Hi Angeline! If you look at the photo, you can see the crossbars worked right onto the vertical portion - you just sc right into the vertical bar where you want the crossbar to be. No chaining needed. 🙂
Angeline says
what do you mean sc right into the vertical bar? 🙂 how can i do that without a starting loop? since the yarn is cut already? 🙂 im sorry hehe 🙂
Tamara Kelly says
There are a couple of different methods, but the most basic is to slip stitch into the stitch you want to join to. 🙂
Angeline says
Hi im sorry but i really dont get what you mean by sc 3 across for 3 rows huhu 🙁
Tamara Kelly says
Sorry Angeline! This means that you make 3 rows of 3 sc each. So sc 3, turn, and then do that twice more. 🙂
Angeline says
so does that mean i have to do the 3 rows of 3 sc separately before joining it with the vertical part of the t? 🙂
Tamara Kelly says
No, you work the first row right onto the side of the vertical part of the t. 🙂
davida willmann says
CAN THE LETTERS AND NUMBERS BE MADE LARGE ENOUGH SO THAT MAGNETS CAN BE GLUED AND POSSIBLE CONNECTED IN THE PATTERN. MAGNETS THAT ARE GLUED HAVE THE POTENTIAL OF FALLING OFF SO IT WOULD LIMIT THE MINIMUM AGE.
Tamara Kelly says
With worsted weight yarn they are about 3" high, so if you want them bigger, bulky yarn would be a great choice! 🙂
Tara Pierce says
You could make 2 letters and put the magnet between them & stitch them together
Tamara Kelly says
Great idea!
Katie says
I am making a baby blankets and want to put their names on it. I have successfully made the capital A for one and the capital I for the other. I've also successfully made the lowercase a but I made the lowercase s and it's the same size as the I instead of the a. I tried using a smaller hook but the height was the same still.
Tamara Kelly says
Hi Katie! I'm not sure why that is the case, you may be able to sew it so that lays smaller.
Chas Lanee says
This may seem like a really basic question, but how would one apply these to a blanket. I'm working up the Loopy Love Blanket (https://www.mooglyblog.com/loopy-love-blanket/) in a solid color with a boucle yarn and I'd like to add the baby's name to one corner. I want it to look good from both sides without having to add a backing to the blanket. Would I just slip stitch around the outside of each letter onto the blanket as best I can?? I'm not at total novice to crochet, but also not that experienced. Thank you so much!!
Tamara Kelly says
Hi Chas!
The Loopy Love Blanket is a tricky one, as it's kinda lacy and open. For that one in particular, I might recommend doing two of each letter, and sandwiching the blanket between them, then sewing the letters together. Generally speaking though, I would recommend sewing them on with a needle, going through just the strands of yarn on the side you are sewing too. It's fiddly, but the best method I know.
Daisy hernandez says
Hi. I love the alphabet patterns that you made but is it possible to downsize the letters? I'm having a hard time adjusting it. Can you help me? Thank you!
Tamara Kelly says
Hi Daisy! The best way to downsize them is a smaller hook and thinner yarn. Otherwise it's a new font and new designs!
Carol Stroud says
It has been such fun making these letters, and more so that you have shared for free. I'm new to crochet. Learning from you tube. Thanks so much
Tamara Kelly says
Thank you so much, Carol! I'm so glad you're learning to crochet!
Shoalbear says
I am having issues....I followed the directions for the "e" and I think I read something wrong or just am missing something. It just isn't coming together properly. It looks like a c with a string of 4 sc dangling from the bottoming of the top of the c....if that makes sense.Did I do it wrong, or am I just not seeing it?
Tamara Kelly says
Did you Sew end of 4-sc crossbar in place?
Shoalbear says
That's where I am confused. No matter how I try, it doesn't look like an e is forming. This is the only letter I am having issues with, so I know it's just me! LOL
Jessica says
I was just wondering if there are diagrams for the lower case alphabet, numbers and punctuations
Tamara Kelly says
Not at this time, it's a long term project. 🙂
Diane says
Brilliant pattern instructions. Thank you so much 🧶
Tamara Kelly says
♥ Thank you so much!
Jessica says
Ok I was just wondering because I'm a little confused about the fsc in the lower case "q"
Tamara Kelly says
I'm happy to answer any questions that I can! 🙂
Anna Smith says
I’m crocheting a name on an Easter basket. The problem is making the lower case b. It didn’t turn out right. I did it 2 times. Thank you
Tamara Kelly says
Hi Anna! I'd be happy to try to help, if you can tell me where you're having trouble?
Michelle says
Hi Tamara, I just found out your website and I love your lowercase ‘e’. However, I have a few questions regarding row 4-14 we repeat row 2-3 please if you can help me (‘:
1. Are we doing 3 sts each row for row 4-14?
2. Are we doing the chain for each row?
I’m sorry if the questions sound silly, the reason why I’m asking you it’s because instead of being curvy the right way, since row 4 my ‘e’ is curving to other way ): thanks in advance!
Michelle
Tamara Kelly says
Hi Michelle! ♥
1. yes
2. yes
make sure for row 4 you are repeating row 2! all even numbered rows here start with the tall st (dc) and odd numbered rows start with the short st (sc)
Melissa Weiss says
Thanks so much for adding diagrams— I picked this pattern back up recently and am obsessed:) I’m seeing some random gaps between rows at the dc edges and can’t figure out why, do you have any suggestions?
Tamara Kelly says
Thank you so much! Blocking helps a lot with these letters to get them looking the way you'd like! The other possibility is that your dc stitches are a little shorter than mine - try making sure you pull each loop up nice and tall before you finish the stitch, and that might do it too!