Arm warmers are awesome! Whether knit or crochet, they're a great transition item for fall and spring, and a fantastic layering piece all winter long. And they're perfect for cold offices and classrooms.
Armwarmers and hats for all
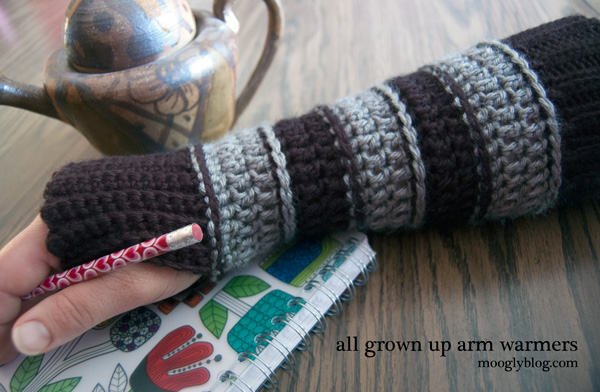
Earlier this year I designed both knit and crochet striped arm warmers for kids, but what about the grownups? A reader request prompted me into action, and a complete reworking of the pattern - this time for all the chilly adults. And now you can make it a set, with the All Grown Up Striped Slouch Hat, All Grown Up Ear Warmer, and All Grown Up Cowl!
Two sizes to choose from
This crochet arm warmers pattern is offered in two sizes. The Small version is for people with forearms smaller than 12 inches around at the widest point, an inch or so before the elbow. The Large version is for people with forearms 12 inches or larger.
If in doubt, I'd recommend going with the larger version for comfort. The differences in the pattern are noted as Small(Large). Where there are no differences, only one number is listed. Please also note that the step by step pictures are from the child size pattern, so the number of stripes and stitch counts pictured are different, but the techniques shown are the same.
All Grown Up Arm Warmers
Add this pattern to your Ravelry Queue and Favorites
US-I, 5.5mm hook
185 yards each of two colors Caron Simply Soft (Worsted/"4"/US:10-12 ply)
Black and Grey Heather shown
Gauge: 13 dc = 4" wide (when working stripes); 12 sc = 3" (length of cuff)
NOTE: The post stitches used in this pattern are Shallow Post Stitches (tutorial HERE) - but some prefer standard post stitches! So give each a try and see which you like best - note that with standard post stitches it will be a bit shorter, so you may wish to add extra rows.
INSTRUCTIONS
Wrist/Hand Cuff:
Using Color A and leaving an 8″ tail, ch 13. Turn.
Row 1: Using Color A and leaving an 8″ tail, ch 13, working entire row in BLO, sc in the 2nd ch from the hook, and each ch to end; turn. (12 sc made)
Row 2 – 32(36): Ch 1, sc in BLO evenly across; turn. (12 sc)
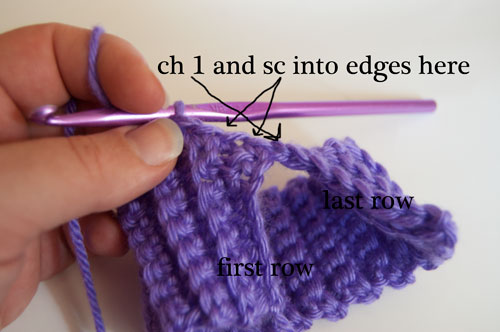
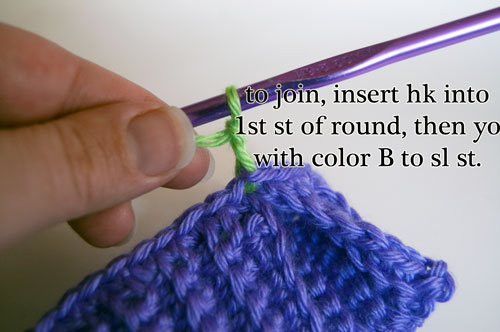
Row 33(37): Ch 1, turn to work into the side of the cuff, looping the piece into a ribbed cuff, so that the first and last row meet. Ch 1 and sc into the side of 1st row and each row around, as shown below, join to first st to work in the rnd with Color B. (32(36) sc)
Stripes Section:
Round 1: Ch 2, [bpdc in 2 sts, bpdc2tog] 8(9) times; join. (24(27) sts)
Round 2: Ch 2, [dc in 6(7) sts, dc2tog] 3 times; join. (21(24) sts)
Round 3: Ch 2, [dc in 8(10) sts, dc2tog] twice; join with Color A. Small size only: dc in last st. (19(22) sts)
Round 4: With Color A, ch 2, bpdc in each st around; join. (19(22) sts)
Round 5: Ch 2, dc in 1st st, (Large size only: 2 dc in the next st), dc each st to last st, dc 2 in last st; join. (20(24) sts)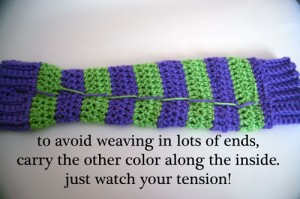
Round 6: Ch 2, dc in each st around; join with Color B. (20(24) sts)
Round 7: With Color B, ch 2, bpdc in each st around; join. (20(24) sts)
Round 8: Ch 2, dc in the 1st st, 2 dc in the next st, dc in each st to last st, 2 dc in last st; join. (22(26) sts)
Round 9: Ch 2, dc in the 1st st, 2 dc in the next st, dc in each st to last st, 2 dc in last st; join with Color A. (24(28) sts)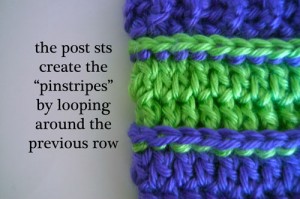
Round 10: With Color A, ch 2, bpdc in each st around; join (24(28) sts)
Round 11: Ch 2, dc in the 1st st, 2 dc in the next st, dc in each st to last st, 2 dc in last st; join. (26(30) sts)
Round 12: Ch 2, dc in the 1st st, 2 dc in the next st, dc in each st to last st, 2 dc in last st; join with Color B. (28(32) sts)
Round 13: With Color B, ch 2, bpdc in 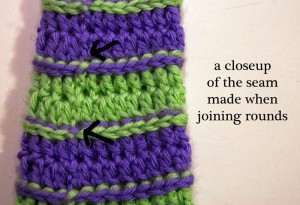 each st around; join. (28(32) sts)
Round 14: Ch 2, dc in the 1st st, 2 dc in the next st, dc in each st to last st, 2 dc in last st; join. (30(34) sts)
Round 15: Ch 2, dc in the 1st st, 2 dc in the next st, dc in each st to last st, 2 dc in last st; join with Color A. (32(36) sts) Break Color B, leaving a long enough tail to weave in later.
Upper/Arm Cuff: (now with video tutorial!)
Setup Row: With Color A, ch 1, and bpsc in each st around; join. (32(36) sts)
Row 1: Ch 13, BLO sc in the 2nd ch from hook and each ch. (12sc) Sc2tog in the next 2 setup row sts, as shown below. This is the “securing st” that attaches the vertical cuff rows to the horizontal setup row, turn.
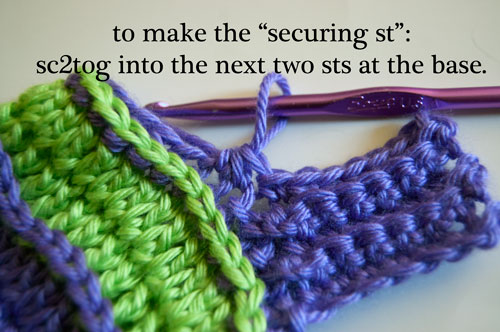 Row 2: Skipping the securing st, BLO sc in each st across; turn. (12 sc)
Row 3: Ch 1, BLO sc in each st across. (12 sc) Make securing stitch; turn. 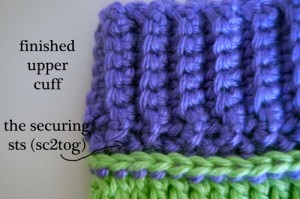
Row 4 – 31(35): Repeat Rows 2 and 3.
Row 32(36): BLO sc in BLO each st; break yarn leaving a 12″ tail. (12 sc)
Assembly: Sew the arm cuff together with whip stitch, joining first and last rows. Be sure to work into the BLO of the last row to maintain the ribbed look.
Back at the Wrist/Hand Cuff, whip stitch the first 3 – 4 sts together, leaving a thumb hole, as shown in the picture below. Weave in all ends.
I hope you enjoy this pattern for All Grown Up Arm Warmers! Be sure to check out the matching patterns linked above!
If you enjoyed making this arm warmers pattern and you share a photo on social media, please tag me @mooglyblog or #mooglyblog so I can see it too - I love seeing what you make!
The Fine Print
Be sure to Like the moogly Facebook page for the latest updates and have some fun with us! Written pattern copyright Tamara Kelly 2012. Please do not reprint or repost this pattern, but please feel free to link to this page to share this pattern with others. Please see the About page for seller's info. The Print Friendly button is provided as a courtesy, and enables you to create a printable and downloadable PDF for personal use. Please see this tutorial for additional help if needed.



Maggie
Thanks so much for the re-sized pattern! Can't wait to get these made!
mona
At the end do you turn or keep going?
Tamara Kelly
For the cuff you turn, for the "arm" portion it's worked in rounds without turning.
Louise thurman
Thank you for the pattern share! Just what I was needing to find a little inspiration. I modified a bit using three colors, using white for the BP rows, and green and blue for the others. Just what I needed for my friend the Seahawks fan!
Sara - My Merry Messy Life
Ooo I love this! Great with cold weather around the corner. I'm so glad you've joined my link party as I've loved your blog for quite a while. Great to have you! Thanks for sharing at Hookin On Hump Day!
moogly
Thanks for the invitation! It's been fun - hope I can join up again!
Madge
I'm out of league here. Too much brain power on dipyals!
Per Enström
Is there any chance that you can upload some more pictures of this, I'm not really sure about some parts. And some pictures of the cuff, especially the join, would help 🙂
Awesome pattern though!
moogly
Thank you Per Enström! I will see if I have some more photos from the child size to add!
moogly
Ok, they are added - I hope they help!
Per Enström
Sweet, thank you very much!
smk
Thank you so much for sharing such a great pattern. I'm wondering tho, if you could clarify rows 9 & 12 in the stripes section. "Join with sl st and ch 2." Then rows 10 & 13, with other color "join the end of the previous row with a sl st. Ch 2..." Your time and generosity are appreciated. 🙂
moogly
Thank you for saying so smk! And I see I made a mistake! I'll go edit the pattern now. Thank you so much for letting me know there's a problem!
Michele
I love this pattern! Do you know how to make slippers?
moogly
I do, but I haven't designed any of my own (yet!). Were you looking for something to match?
Doris
I have utilized several of your free patterns and just wanted to thank you for having updated designs, a great eye for color and some very easy to follow along patterns...quite frankly...I think you rock! :o)
moogly
Wow, thanks so much! 😀
Anne
Can you post what the abbreviations are please ? 🙂
moogly
Sure thing Anne! I'll go in and add those now!
moogly
Ok, I think they're all there - let me know if there are any I missed! 🙂
tori
hey i love this pattern but could you please clarify the 2nd and 3rd row im not sure how many rows to work and what to do on the 3rd row
moogly
Hi tori! Are you referring to the first cuff? Basically, you're working rows of 12 single crochet stitches in the back loop only, turning after each row. This creates the "ribbed" look. You do this for 32 total rows for the small size, and 36 total rows for the larger size.
Ody
I am a crafter and am loving your stuff!
Thank you for sharing your lovely imaginations with all of us out here.
Lee Ann Steinmetz
When we turn the cuff on it's side, are we supposed to BLO in each row of the cuff or use the whole stitch in the side of the cuff. I don't think I made that very clear. I mean on row 33. Thanks!
Lee Ann Steinmetz
On row 33, are we supposed to use BLO or the whole SC stitch on each row of the cuff? Thanks.
moogly
Hi Lee! Yes, on Row 33 (and all the cuff rows), work in the BLO, except when making the securing stitch at the base.
Lee Ann Steinmetz
Thanks so much!
Lee Ann Steinmetz
When you turn the cuff, it looks like you are joining the first row to the last row before you SC around the new top. But then you say say "do not join. Could you please explain that a little more clearly please?
Lee Ann Steinmetz
When you turn the cuff, it looks like you are joining the first row to the last row before you SC around the new top. But then you say say “do not join. Could you please explain that a little more clearly please? Thanks
Lee Ann
moogly
Lee Ann, you are referring to the hand/wrist cuff? You use the sc to "join" the first and last rows into a cuff, though the actual cuff will be seamed up at the very end. The "do not join" refers to (not) joining the first and last sc of Row 33(37). The reason you do not join just yet is because you use color B to make the joining slip stitch, as directed in Row 1 of the Stripes section. I hope that makes it a bit clearer.
Lee Ann Steinmetz
Thanks so much.
Lee Ann
PS When I saw your pattern I knew I had to make these. It's exactly what I was looking for. Thank you!
Lee Ann Steinmetz
Thanks so much.
Lee Ann
PS When I saw your pattern I knew I had to make these. It’s exactly what I was looking for. Thank you!
moogly
You're very welcome! Glad I could help! 😀
Niki
I LOVE your pattern! I was wondering, though...well, you see, I have a nice jacket I love to wear, but the sleeves on the jacket are too thin, and I found your pattern which is perfect for what I need. But, how would I go abouts making the sleeve part a little longer (so that it would reach just under my armpits, so that it covers my entire arms)?
Thanks again, and love this pattern!
Niki
moogly
Hi Niki! Just keep making stripes as before, and keep increasing according to the pattern. If you need a larger upper arm, you might need to add a couple more increases as you go. Otherwise, just stop adding stripes until you're almost at the armpit, and then make the upper cuff! Check out the Sweet Striped Arm Warmers to see how I did it for the kid's size: https://www.mooglyblog.com/sweet-striped-crochet-arm-warmers/
TIffany
My "seam", or where my rounds meet, look a little weird and I can't figure out what I am doing wrong, if anything. It's the Bpdc that makes the extra stripe is what looks odd right at the seam. Is there a trick/tip or do you have any pictures of what that looks like on yours?
I love these by the way!!!
moogly
Hi Tiffany! I'm so glad you like the pattern! I don't know that I have a closeup of the seam... Let me see if I can get one and add it to the pattern!
moogly
Ok, photo added! If you click on it, it should enlarge and be much easier to see. I hope it helps!
TIffany
That's great!!! Thanks so much for getting that up so fast!! I really appreciate it and it totally helps!! Mine actually look the same, I was just worried I wasn't doing something right!! Thanks again!!!
moogly
So glad it helped! 😀
Aerial
Hello. I absolutely love this pattern! However, seeing that I am somewhat of a beginner I find myself being a bit confused with row 33 of the wrist cuff. Can you clarify what you mean little more when you say " turn to work into the side cuff
Aerial
Looping the piece into a ribbed cuff" Thanks! 🙂
moogly
Aerial, I mean that you take the first row of the cuff and bend the fabric so that it meets the last row (32) just made. Then you work into the sides of the rows, at the end, rather than into the tops (Vs) of the stitches.
Aerial
Oh ok! Thanks so much!
Angela
I just love, love,love these and I wanted to make them for my niece for Christmas and I have only been crocheting for about a month and I think I may have stepped in over my head. But when it comes to joining the cuff ends (row 33 to row 1) togehter. I am totally lost. I'm sorry, I know you have been asked before but I still don't get it. where do I put my needle on that very first stitch to join the two? I think I can get it if I just know where to start. Awesome cool pattern and it's killing me that I can't get it. Thanks in advance!!!
moogly
I'll do my best to explain!
At the end of row 32, the hook and working loop are on one side of the fabric. Holding the hook in your right hand, take hold of row 1 with your left hand and bend the cuff so that row 1 and row 32 are up against each other, and the cuff is making a loop. Now, chain 1 and work a sc into the side of row 1. Not into the top of a stitch as you normally would, but into the side of the row. Continue working a sc into the side of each row around the cuff. Rows 1 and 32 aren't actually sew into a closed cuff (or cuff with thumb hole) until the very end of the pattern. If you're unsure what I mean by "sc into the side of row 1", try watching this video on working into the edge - that might help clear that up: https://www.mooglyblog.com/working-into-the-edge/
Let me know if that helps or if you have more questions!
Monica
Ok, I'll be the one to say it...I even watched the video and I still have no clue how to complete row 33 :/
I'm SOOOOOOO excited to make these for myself, as I've been doing nothing but crocheting for other people...but I feel like a total idiot that I can't get past this row!
moogly
I so wish I had the setup to make a video and upload it immediately! Let me try and explain it a little differently.
When the arm warmer is all done, you will sew Row 1 and Row 32 together (leaving a thumb hole if desired). Looking at the photo below, you can see Row 1 labeled first row, and Row 32 labeled last row.
However, we're going to skip the sewing together for now, and start making the arm portion of the pattern - starting with Row 33. So, hold the cuff as seen above, and chain 1. Then, sc into the side of Row 1, and then sc into the side of Row 2. You can see arrows in the photo pointing to the ch 1, and the sc sts. This is crocheting into the edge - we're going into a stitch from the side, rather than working into the top as we normally do. Continue to sc once into the side of each row of sts. Since there are 32 rows, you'll have 32 sc sts. And that's it for Row 33!
Does this help at all? I can make a video, but I probably won't be able to put it up until after Christmas, unfortunately.
Monica
Ohhhhhhhhhhh my gosh. Yes, that helps! I kept thinking we were crocheting the cuff together now so none of what you said was computing!!
Thank you so much. That really helps!! I feel like getting out of bed and crocheting now! Haha
Thanks a million!!
moogly
Hooray! I'm so glad I was able to clarify! 😀 Whew!
Becks
Thanks for this pattern. I have not been crocheting for very long; I really appreciated your simple pattern (I just had to look up how to crochet a couple of the stitches). Worked up a pair for a friend in a solid color. Looking forward to making a striped pair for myself! I really loved that it takes just a few hours for both. Thanks again!!
moogly
You're very welcome Becks! I'm so glad the pattern was easy enough for you to follow! 😀
Amber
Just curious as to what im doing wrong. The yarn im using says its worsted and Im using an I hook but when i do the 32 rows of ribbed cuff it comes out ginormous like ten rows bigger than i need to go around my hand! and i have an average hand size i think. what could i be doing wrong??
moogly
Hi Amber, sorry to hear you're having trouble! I can think of a couple of things that might affect the size, but my best guess is that you and I just have very different tension levels. To compensate, I'd recommend going down a hooks size or two and see if that helps!
Mel
I had the same issue (using the small pattern). The wrist cuff and upper arm cuff were huge! (I actually wrapped the one part of the wrist cuff under my hand and tacked it then, wrapped the other part over my hand and tacked that as well. I think I will place a decorative button on the top where the wrap-and-tack is.) The stripes area was normal, width-wise. However the whole length of the warmer came way above my elbow. If I make these again I would shorten the warmer to just beyond the third stripe and place the cuff at that point, given then, it would end at my elbow.
Tamara Kelly
I suspect that you might be working too many rows on the cuff - it's easy to do. Watching the video tutorial should help!
Nicole Grech
I had to frog that whole row as well as it ended up huge! You need to sc2tog in all the stitches around the cuff (not just the 1st 2 stitches from row 1). I think there is a slight error in the pattern =) I hope that helps.
Brea
I really love this pattern. I made a pair for my sister and my sister in law for Christmas. they loved it so much that they have talked me into designing a matching slouchy hat. It's much more work than I thought, but I'm so excited it will be the first ever pattern I had to come up with on my own. Well mostly on my own.
moogly
Thanks Brea, I'm so glad they like them! A matching hat is a great idea!
Gwendolyn Endsley
The rows where you do bpdc leave a pronounced ridge on the front of the arm warmer. Is this normal because your picture doesn't look like it's that way. Also, I am not clear about where you join the slip stitch. Do you slip stitch into the second stitch of the Ch2 or the top of the first stitch?
moogly
Hi Gwendolyn! Yes, that's normal, and it's pretty pronounced while you're making them, but I find that the ridges flatten out significantly when they're being worn. Join to the top of the first stitch, not to the chain 2. Hope that helps - let me know if you have any more questions! 🙂
Gwendolyn Endsley
I appreciate your quick reply and I appreciate your free pattern for arm warmers. They are very nice and I think they would be great to make for people in nursing homes.
Gwendolyn Endsley
I appreciate your quick reply and I also appreciate your free pattern for the arm warmers. I think they would be great to make for people in nursing homes.
Katy Neiderman
I am confused as to what a back post double crochet two together is... Do you put two bpdc in one stitch? Thanks
moogly
Hi Kathy! Back post double crochet 2 together is worked like a regular dc2tog decrease, but with post stitches. There's a video on dc2tog here: https://www.mooglyblog.com/decreases-sc2tog-and-dc2tog/
Katy Neiderman
Thanks!
-Katy
Kim
I am currently working on these arm warmers to go with a scarf I just recently made. I started looking at some of the other patterns here. I just have a suggestion: putting skill levels on the projects that way readers will know about where they are in relation to the project. Although they seem pretty easy, this would help out a newbe. I don't concider myself acomplete beginner any longer, but I'm still not at an intermediate level just yet. I think that may help a bit. (-:
moogly
You're absolutely right, Kim, and that's something I hope to do coming soon!
Ainara
Hi, my name is Ainara and I am from Spain. I am starting a blog about crochet. I made this armwarmers and they are awesome!! I would love to put this pattern in my blog or at least my version of it. I´ll give you all the credit and of course I will add a link to your blog. But my blog is in spanish so I would have to translate the pattern on my post. it is ok if I do that? I don´t want to post anything wrong that may upset you. I don´t know if this is the right place to tell you this if it is not i hope you can forgiveme cause I am a newbe about all this blogging thing. Thank you for sharing all your beautifull patterns. Your blog is an inspiration to me!!
Pd: sorry for my english!
moogly
Hello Ainara! I'm glad you like the pattern, and I appreciate you contacting me! I would prefer if you linked to the pattern rather than reposting it, as it is copyrighted. You can of course share the details of any changes you made. For translations, there's a Google Translate option on the side of the blog people can use to translate the patterns to any language as needed. Good luck with your blog!
Julie Keyworth
I love this pattern!! You really made it easy to understand. And I loved all the pics. I made some for myself, but I used a turquoise and black...turned out amazing! I love them! I was wondering if I'm able to sell any of the ones that I make using this pattern?
moogly
Thanks so much, I'm so glad you like them!
As long as you don't sell or reproduce the written pattern, you are welcome to use any of the free Moogly patterns to make items to sell for charity or profit. I do ask that you include a link to the free pattern with credit for the design - on the online listing if selling online, or on the tag if selling at a craft fair or in a shop. This way everybody wins! Thanks so much!
Julie Keyworth
Awesome!! Thank you so much, I will definitely honor your request! 🙂 Once again, I really love these....beautiful!
Athena
Thanks for the pattern. Sometimes I forget about bpdc and fpdc. I might need to use these stitches in some of my other projects but I have been looking for a good pattern for arm warmers for a long time and finally found one that I enjoy! Thanks for posting it. (I found this pattern through ravelry)
Tamara Kelly
I'm so glad you do Athena! 😀
Nicole Grech
Hi! I love this pattern and I have just completed the right arm warmer... however I think I need a pattern for the left side?? The joining stitch throughout the sleeve is slightly visible if I was to make an identical arm warmer for the left, and it would look a bit odd having the seem on top of my hand. Thank you! I tried messaging you through facebook but it said I spammed you?!?!?! NIcki =)
Tamara Kelly
Facebook is an enigma - sorry about that! I found that the seam wasn't that visible on the left, but you could sl st along the first round a bit when joining the cuff to offset the seam if desired.
Beth
Okay.. I've watched the video repeatedly for the bpdc where the cuff and first stripe row meet. I don't get it still.. the video shows if you're bpdc-ing into a previous row of dc.. in your pattern the previous row is a sc.. so how does that work? Heeellllppp please?? 🙂
Tamara Kelly
Working a bpdc into a sc is exactly the same as working it into a row of dc - just go around the post of the stitch. Is that what you're asking?
Beth
I think my stitches are kind of tight and it's making it hard for me to see where the 'posts' of my sc are. Probably not helping that I'm using black yarn. I get how the bpdc is done, I just wish I could find a picture of it being done where the previous row is sc an not dc (where the posts are longer and easier to see) 🙂 So I guess my question is more of, what does a 'post' on a sc look like?
Tamara Kelly
Ah, I see! I've been thinking about making a video about how to work between stitches - which leads to how you make post stitches. I guess I'll add it to the list!
And yeah, black yarn is a killer! When I started crocheting it was easy, now.... oof.
Beth
Well thanks for your help anyway 🙂 I love the pattern and hope I can figure the rest out.. I like to wear arm warmers for the cold days at the renaissance faire I work at because a lot of my outfits are not quite cold weather gear.
Corinne
Thank you so much for an amazing free pattern! Worked up easily and I'm sure my goddaughter is going to love them... although I'm very tempted to keep them for myself because they are so comfy. I did go down a hook size, but I have pretty slender arms and my goddaughter is very petite. Thank you again!
Tamara Kelly
You're very welcome! 😀
Sarah
I was wonder if I could sell items I made from this pattern, if I gave you credit for the pattern.
Tamara Kelly
Yes, please do! Good luck with your sales! 😀
Rikou
Seriously I'm so excited to try and do one pair from this pattern for myself!! Haven't been able to fond what I want crocheted for myself until now! And I got just the perfect yarn for it! 😀 thank you so much for making these pattern and shared it!! I'm currently doing the first one for my right hand, it'll be my first arm warmers! Thank you thank you thank you! I really can't thank you enough! Thank you again! 😉
Tamara Kelly
😀 You're very welcome Rikou!
Rikou
Funny thing is this is my first time trying the bpdc and I got it backwards lol..thanks again! 😉
Tamara Kelly
Well now you're all set with fpdc - ready for crochet cabling! 😉
Rikou
Whoa! Seriously?? I might be able to do that???
Tamara Kelly
If you can make post stitches, then the only trick to crochet cabling is figuring out which post they want you to put each stitch around! 😀
Traci
I love love love these! Just finished a pair in Red Hearts With Love in Fruit Punch! Am wearing them now 🙂 Thanks so much for sharing your work!
Tamara Kelly
😀 Thank you for your kind comments Traci!
Maike
i love your tutorials! i am totally new to crocheting and they are so much help! more of them please! for this particular pattern it would be great to have one for the joining of the wrist cuff to the next. it took me forever to figure that one out and i am still not sure if i did it right =)
Tamara Kelly
😀 Thank you! I have lots of tutorials here: https://www.mooglyblog.com/category/video-tutorials/ Now when you say joining of the wrist cuff, are you referring to row 33(37), or do you mean the whip stitching at the end where you make the thumb hole?
Joselyne
OMG! i just found your blog and its amazing!!!! i LOVE everything you do and you are so nice to share all the patterns. Thanks so much! i have been looking for some nice yet simple hand/arm warmers since i have no idea where to begin and this are exactly what i wanted 🙂 Im still getting the hang of reading the patterns in english since im from Venezuela and my main language is spanish but im sure ill work this around 🙂 Again thank you very much.
Tamara Kelly
🙂 You're very welcome Joselyne!
Carmel
I love this pattern! works up pretty quick I got a pair done in an evening! Thank you so much for this wonderful pattern 🙂
Teresa
I just wanted to say thank you for this pattern, the younger version as well as the matching hat!!! I absolutely love the pattern and appreciate that you taught me how to make a cuff. It makes for a wonderful finish on hats and handwarmers!! Thank you again and again and again
Tamara Kelly
😀 Thank you so much Teresa! I'm so glad you like them!!
Noe
Great pattern. Thank you for sharing it!
Quick question, though, can these be made shorter, more like wrist warmers, if so is it as easy as just making less rows?
Thank you!
Tamara Kelly
Hi Noe, thank you! Yes! Just make the length desired. 🙂
Conni
I'm pretty new to crocheting. I really like your patterns and tutorials. I find them easy to follow. Unfortunately I'm not sure how to end row 33 (37)? Any help would be GREATLY appreciated! Thanks in advance!
Tamara Kelly
Hi Conni, thank you! To finish the cuff and start crocheting the arm, you bring row 1 and the last cuff row together, so that it looks like a bracelet. Then you start crocheting along the side of row 1, working right into the edge, and continuing around the side. Does that help?
Conni
I needed to know how to end that row. I ended up joining with a sl st then i chained 2. It followed the pattern of future rows. Thank you!
Tamara Kelly
Ah, sorry, most people ask about the beginning! The joining info is at the start of the next round, because of the color change instructions. This is one of my first patterns, and were I to it over I likely would structure it a little differently.
Conni
Thank you very much!
K G
I'm having a bit of a problem with the bpdc stitches. On the right side of the work, instead of looking like >>> sideways arrows, they end up looking like i i this inside of the stitches, I just can't seem to wrap my head around why this is happening.
Tamara Kelly
I'll be making a video for the All Grown Up series of patterns this week. 🙂
ekstein11
I'm curious, why did we leave an 8" tail around the wrist? Because it was an even number of rows, the yarn ended at the bottom where the shallow post stitches are so I can't even use to whip stitch the few to create a thumb hole. 🙁
Did I do something wrong?
Tamara Kelly
With an even number of rows, the tail should have been at the top, unless you started with foundation stitches. But you can just use a piece of scrap yarn to sew it up for the thumbhole 🙂
Marisa
I would like you to make this pattern in knitting.... if you don't mind. That would be amazingly helpful. Thank you and have a great day 🙂
Tamara Kelly
Hi Marisa! I don't have this one in knitting, but I do have the smaller size in knitting, so it would be easy to adapt: https://www.mooglyblog.com/free-pattern-sweet-striped-arm-warmers/
Tori
Hey, i love these, but I would LOVE it if there was a possibility of having a video tutorial?
Tamara Kelly
Hi Tori! Thank you! There is a tutorial for the cuff, and a tutorial for the shallow post stitches, is there another part that's giving you trouble?
Jennifer
Hi!
I'm new to crocheting and I'd love to crochet this for my boyfriend. The yarn I got is reflective, but I just learned that it probably won't work with your pattern since your pattern calls for worsted weight. I unfortunately can't find reflective worsted weight yarn, so I was wondering if there's any way I could change the pattern to work with the bulky yarn I have. Thanks so much for your suggestions!
Tamara Kelly
Hi Jennifer! To use thicker yarn, you'll need a bigger hook, and fewer stitches. How many stitches you'll need to eliminate will depend on your gauge - trying it on as you go will probably be the best option!
Jennifer
Thank you so much! I'll give that a try!
Kristi
I just made a pair & I love them!!!! Thank you
Tamara Kelly
😀 Thank you!
Crystal Robinson
Hey I love this pattern!! I was wondering is it possible to do this pattern with one scheme? I have a changing color one.
Tamara Kelly
Absolutely! Just keep crocheting! 🙂
JOHAnna
Hello Tamara, thank you so much for, once again, a beautiful and so well written pattern !! I found your patterns well designed, interesting, fun and well explained!
I measure 10.2 inch around my forearm (as per your instructions) so did the small size but I probably should have increased a bit more around the arm area as the warmers are very stretched out, but perfect around my hand (i have long skinny hands). Not your fault, we are all built differently ! I’m just saying this for others because this pattern is easily adaptable to make it fit perfectly 🙂
Tamara Kelly
Hi JOHAnna! And thank you so much! 🙂 Thank you for the feedback - it is tricky to try to design things to fit "most!"
JoLyn Wilkerson
I love this pattern but I have a question. I have a s/med hand width the 32 count but a large forearm the 36 count on the forearm how would I go about working that without it getting to big to quick?
Tamara Kelly
Hi JoLyn! In this case, I would try omitting the decreases in Round 3. If that makes the wrist too big, and you want to push the increases back toward the arm more, you can add an extra stitch in Round 7 and again in Round 9 if needed (using the same method as Round 5). Best of luck! 🙂
JoLyn Wilkerson
Thank you!
Kirby
Hi I have a question what do you mean by tail stitch do you mean cs ch because all I can find is long tail stitch if not you may want to make a tutorial of the tail ch please
Tamara Kelly
Hi Kirby! The "tail" isn't a stitch, it's the end of the yarn skein - the inches left unworked at the beginning and end that you weave in at the end of the project. In this pattern we put those yarn "tails" to use, so I've included instructions to leave them a bit longer than usual so they are ready to use in seaming and such as needed.
Kirby
Thank you
Kirby
So in 1 row we ch 13 ? That’s it no more Sorry if my question is dumb I just don’t understand what row 1 is supposed to be for....
Melissa
No. chain 13 when you start. Then on row 1, you skip the first stitch and wind up with only 12 sc. once you've crocheted 12 sc, chain 1, then turn your work. The ch1 at the end is actually starting your second row stitching, or more so giving you a longer reach of yarn for the next row.
Melissa
So basically, the ch13 in the beginning is your foundation. Row1 is the actual start of the building rows.
Tamara Kelly
The ch 13 is the foundation chain that you work into in Row 1, which is listed right below the ch instruction line. Some patterns list the chain before Row 1, some do it as part of Row 1. 🙂
Stayathomemother04
If someone didn’t want to use the thumb hole, could they just roll down the cuff? Or does it change how these fit too much?
Stayathomemother04
I forgot to also ask if I could use 3 weight yarn.
Tamara Kelly
You can, but they will turn out a bit smaller!
Tamara Kelly
I think rolling it down would work!
Stayathomemother04
Thank you.
stayathomemother04
I have made my first pair & really like them. However, I am also want to make some that are not so long. More of a wrist warmer than an arm warmer. At what row would you suggest stopping to add the second cuff for a shorter version? Thank you
Tamara Kelly
I would suggest trying them on to see - everyone is a little different!:)
T palmer
Is there a video for this pattern ? I am stumped after I get the cuff made . Have no idea how to proceed. 😩 Do you sc the side of the cuff closed or it remains open and you just sc around the top of it ?
Thank you !
Tamara Kelly
Hi T! So sorry for the confusion! There's not a video of this one - this was designed before I ever made one, I think! You sc all around the edge of the cuff, to start working up the arm. Does that make sense?
stayathomemother04
I have made my first pair & really like them. However, I am also want to make some that are not so long. More of a wrist warmer than an arm warmer. At what row would you suggest stopping to add the second cuff for a shorter version? Thank you
Katie
This pattern is so awesome! I've made 3 pairs already! My question is: is there a way to adapt this for super bulky (6) yarn?
Tamara Kelly
Thank you Katie! I would work the cuff with maybe 2-3 fewer stitches until it's the same length as the worsted weight cuff, and then sort of work evenly from there, using one of the other ones as a guide! 🙂