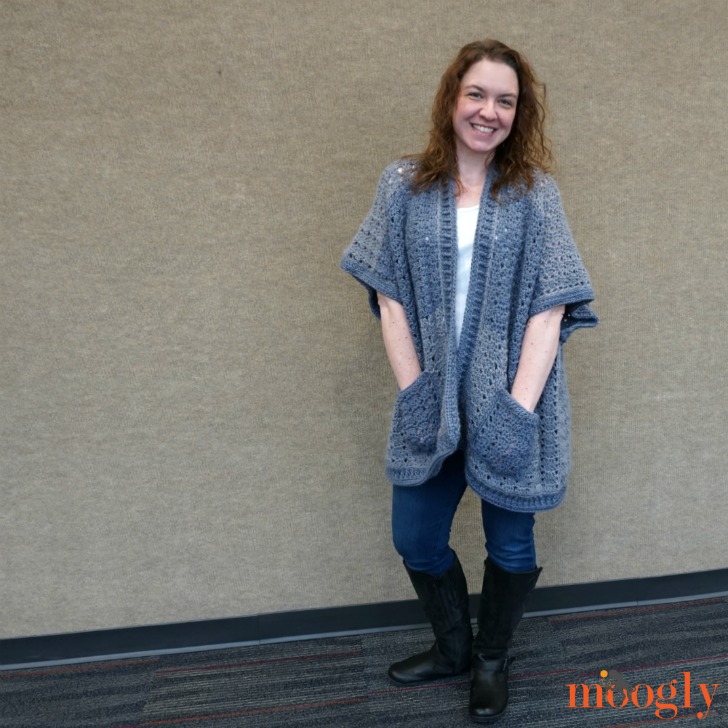
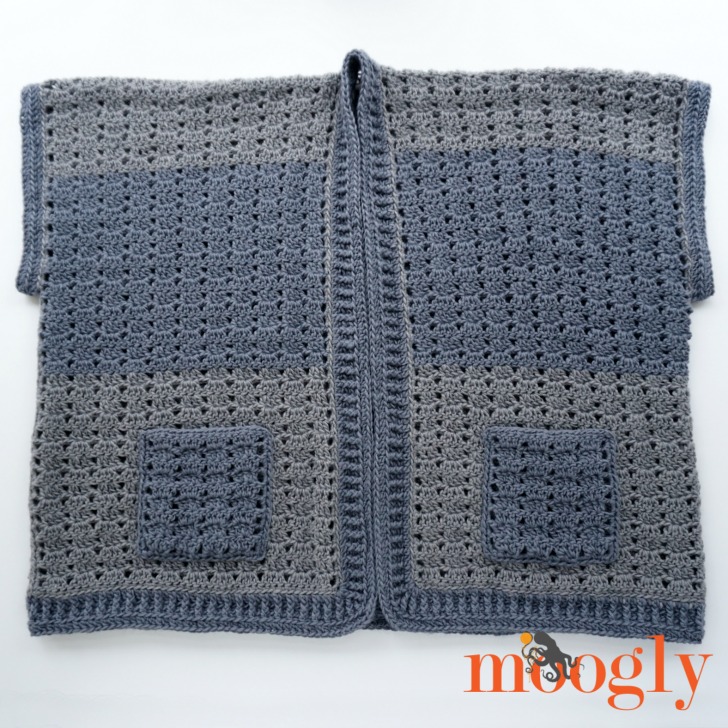
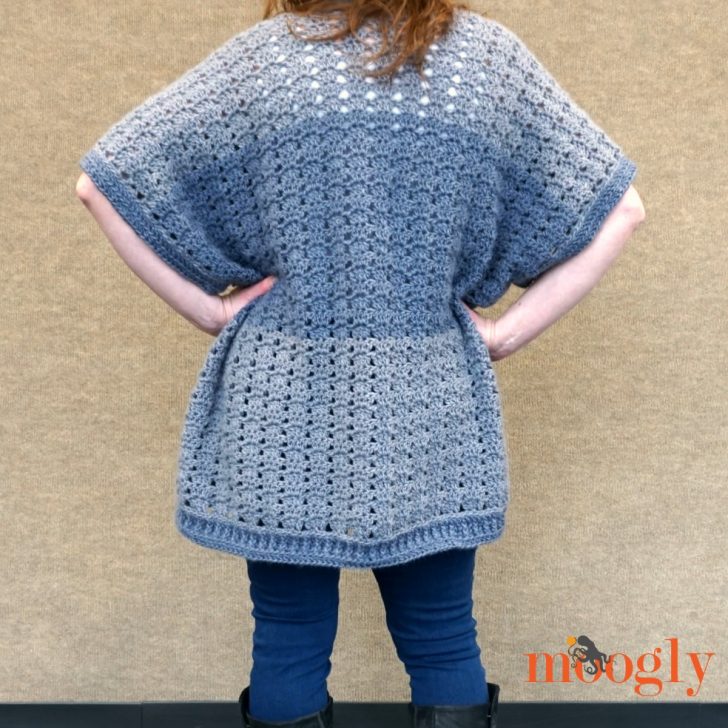
I have discovered a love for simple crochet garments, and the Riverbend Cardigan is my favorite so far! And I'm sharing the pattern free here on Moogly - introducing the Riverbend Cardigan!
 Disclaimer: This post includes affiliate links; yarn provided by Lion Brand; hook provided by Furls.

Easy to Make, Easy to Wear
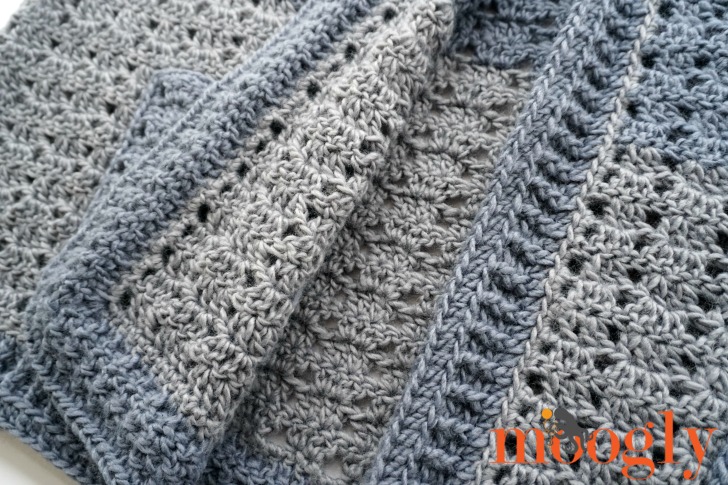
The Riverbend Cardigan is oversized, super cozy, and the perfect topper for jeans and leggings. Made in two shades of yarn, it's a fantastic neutral piece you'll want to throw on every day! This yarn is now discontinued, so pick your favorite worsted/aran/medium-weight yarn instead!

I've designed the Riverbend Cardigan in two sizes - Misses and Plus. Both are loose fitting, so already one size fits most. With two options, it should be one size fits all... or at least the vast majority! And the stitch multiple is included below if you prefer a custom size.
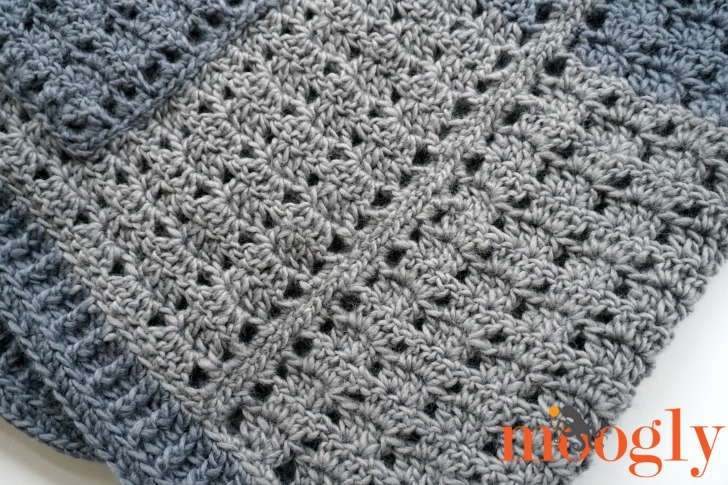
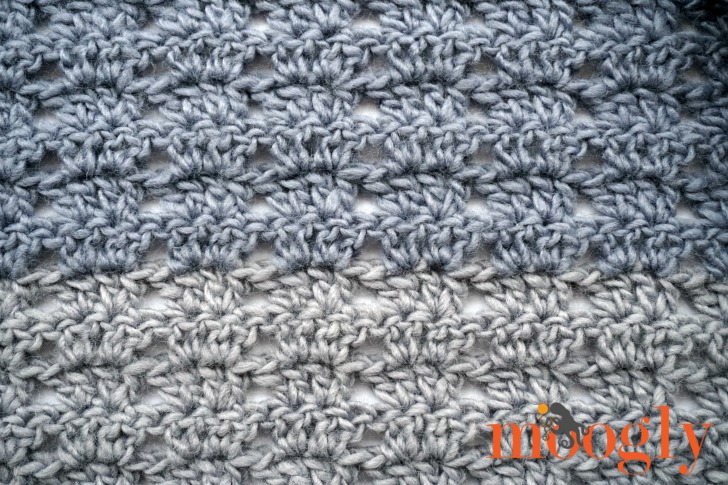
The main stitch pattern is the Twin V Stitch, which I have a tutorial already up for here on Moogly - look for the link below!

Riverbend Cardigan
Add this pattern to your Ravelry Queue & Favorites
US - K, 6.5mm hook - Furls Crochet
1400 - 1750 yds Lion Brand New Basic 175 (Worsted/yarn symbol “4”/UK:10-12 ply; 175 yds/160 m; 3.5 oz)
Color A: Grey (Misses: 4 balls; Plus: 5 balls)
Color B: Slate (Misses: 4 balls; Plus: 5 balls)
Gauge: 14 sts x 7 rows = 5" in twin V st
Sizes: Misses (Small - XL); Plus (2X - 5X)
Stitch Multiple: chain any mult of 4 to begin pattern (mult of 4, +2, +2 for the tch)
Helpful Links & Tutorials:
NOTE:
The instructions for the two sizes are listed separately.

MISSES RIVERBEND CARDIGAN INSTRUCTIONS:
Starting at the back bottom edge...
Row 1: With Color A, ch 92, dc in the 5th ch from the hook (skipped sts count as dc and skip 1), dc in same ch, 2 dc in next ch, *skip 2 ch, 2 dc in each of the next 2 chs; rep from * until 2 chs rem, skip next ch, dc in the last ch; turn. (90 dc)
Rows 2 - 16: Ch 3 (counts as first dc), skip next st, *2 dc in each of the next 2 sts, skip 2 sts; rep from * until 2 sts rem, skip next st, dc in the last st, turn. (90 dc) After Row 16, break Color A.
Row 17: With Color B, join to first st and repeat Row 2.
Rows 18 - 32: Repeat Row 2; after Row 32, break Color B.
Row 33: With Color A, join to first st and repeat Row 2.
Rows 34 - 40: Repeat Row 2.
Split for the first front panel...
Row 41: Ch 3, skip next st, *2 dc in each of the next 2 sts, skip 2 sts; rep from * 9 times, 2 dc in next st, dc in next 2 sts, turn. (45 dc)
Row 42: Ch 3, dc in next st, 2 dc in next st, skip 2 sts, *2 dc in each of the next 2 sts, skip 2 sts; rep from * until 2 sts rem, skip next st, dc in the last st, turn. (45 dc)
Rows 43 - 48: Repeat Rows 41 and 42; after Row 48, break Color A.
Row 49: With Color B, join to first st and repeat Row 41.
Rows 50 - 64: Repeat Row 42, then Rows 41 - 42; after Row 64, break Color B.
Row 65: With Color A, join to first st and repeat Row 41.
Rows 66 - 80: Repeat Row 42, then Rows 41 - 42; after Row 80, break Color A.
Now crochet the other front panel...
Row 81: With Color A, join to next unworked st of Row 40 (in the middle of the row), ch 3, dc in next st, 2 dc in next st, skip 2 sts, *2 dc in each of the next 2 sts, skip 2 sts; rep from * until 2 sts rem, skip next st, dc in the last st, turn. (45 dc)
Row 82: Ch 3, skip next st, *2 dc in each of the next 2 sts, skip 2 sts; rep from * until 4 3 sts rem, 2 dc in next st, dc in next 2 sts, turn. (45 dc)
Rows 83 - 88: Repeat Rows 81 and 82; after Row 88, break Color A.
Row 89: With Color B, join to first st and repeat Row 81.
Rows 90 - 104: Repeat Row 82, then Rows 81 and 82; after Row 104, break Color B.
Row 105: With Color A, join to first st and repeat Row 81.
Rows 106 - 120: Repeat Row 82, then Rows 81 and 82.
Let's create a nice edge to work into later...
Edging: Ch 1, sc evenly around entire piece working as follows: sc in each st across Row 120; ch 2 at the corner; 2 sc in the side of each row; ch 2 at the corner; across the foundation chain work a sc in each worked ch, sc in each ch-1 sp, and 2 sc in each ch-2 sp; ch 2 at the corner; 2 sc evenly in the side of each row; ch 2 at the corner; sc in each st across Row 80; ch 2 at the corner; 2 sc the side of each row on inside of front panels; ch 2 at the corner; join to first st of edging and break Color A.
Now seam the sides to create the sweater shape...
Assembly: With Color A, use the mattress stitch to join bottom back edge and Row 80/120, sewing 16" seam on each side.
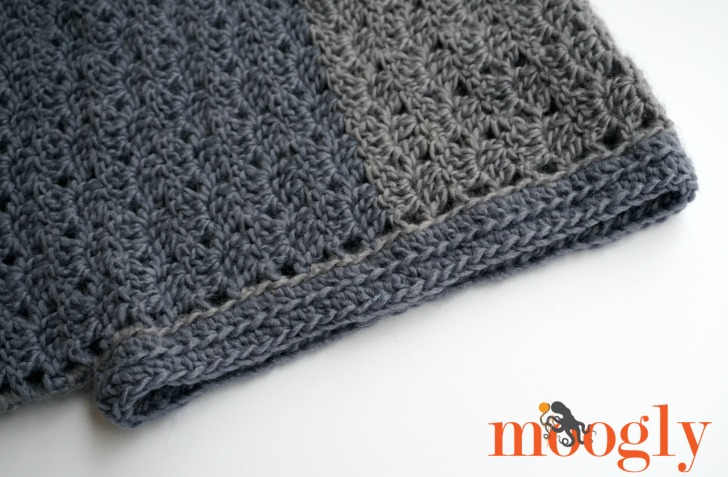
Next, we make the border rounds that work around the front opening and bottom hem...
Rnd 1: Join with Color B in blo of any st at bottom of sweater, dc in blo of each st around opening, working 5 dc in each ch-2 sp at the corner; join.
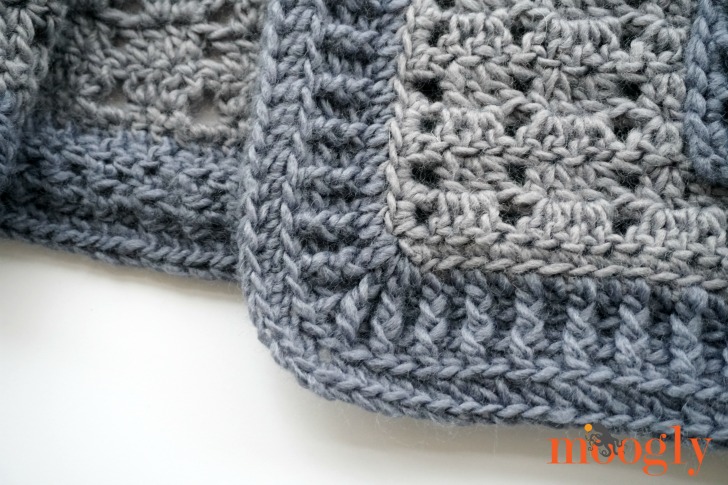
Rnds 2 and 3: Ch 1, hdc in blo of first st, fpdc in next st, *hdc in blo of next st, fpdc in next st; rep from * around working 3 sts in the center st at each corner, maintaining pattern; join.
Rnd 4: Ch 1, Ch 1, hdc in blo of each st around, working 3 hdc in the center st at each corner; join and break Color B.
Time to trim the armholes - be sure to repeat for each armhole (unless you're into the asymmetrical look)...
Arm Border Rnd 1: Join with Color B in blo of any st, ch 1, hdc in blo of each rem st of arm opening; join.
Arm Border Rnd 2: Ch 1, hdc in blo of each st around; join and break yarn.
You like pockets, right? I sure do! Let's make 2...
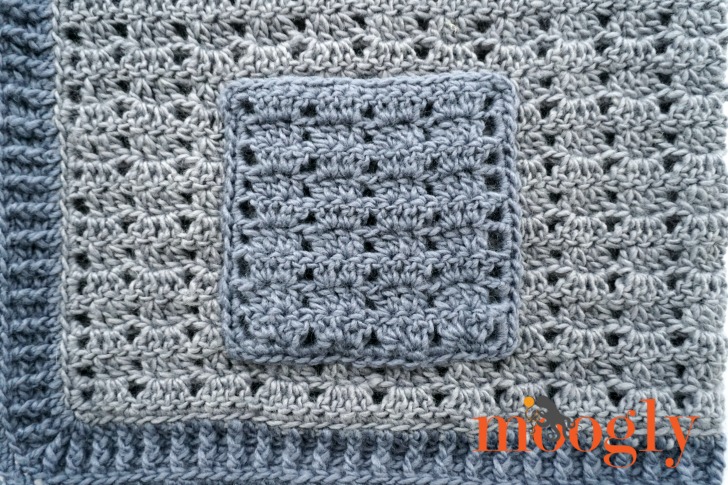
POCKET INSTRUCTIONS (use Color B):
Row 1: Ch 20, dc in the 5th ch from the hook (skipped sts count as dc and skip 1), dc in same ch, 2 dc in next ch, skip 2 ch, *2 dc in each of the next 2 chs, skip 2 chs; rep from * until 2 chs rem, skip next ch, dc in the last ch; turn. (18 sts)
Rows 2 - 9: Ch 3 (counts as first dc), skip next st, *2 dc in each of the next 2 sts, skip 2 sts; rep from * until 2 sts rem, skip next st, dc in the last st, turn. (18 dc)
Pocket Edging: Ch 1, sc evenly around entire piece working as follows: sc in each st across Row 9; ch 2 at the corner; 2 sc in the side of each row; ch 2 at the corner; across the foundation chain work a sc in each worked ch, sc in each ch-1 sp, and 2 sc in each ch-2 sp; ch 2 at the corner; 2 sc evenly in the side of each row; ch 2 at the corner; join to first st of edging and break yarn leaving a long tail. Use long tail to sew pocket to sweater.
PLUS RIVERBEND CARDIGAN INSTRUCTIONS:
Starting at the back bottom edge...
Row 1: With Color A, ch 108, dc in the 5th ch from the hook (skipped sts count as dc and skip 1), dc in same ch, 2 dc in next ch, *skip 2 ch, 2 dc in each of the next 2 chs; rep from * until 2 chs rem, skip next ch, dc in the last ch; turn. (106 dc)
Rows 2 - 17: Ch 3 (counts as first dc), skip next st, *2 dc in each of the next 2 sts, skip 2 sts; rep from * until 2 sts rem, skip next st, dc in the last st, turn. (106 dc) After Row 17, break Color A.
Row 18: With Color B, join to first st and repeat Row 2.
Rows 19 - 34: Repeat Row 2; after Row 34, break Color B.
Row 35: With Color A, join to first st and repeat Row 2.
Row 36 - 42: Repeat Row 2.
Split for the first front panel...
Row 43: Ch 3, skip next st, *2 dc in each of the next 2 sts, skip 2 sts; rep from * 11 times, 2 dc in next st, dc in next 2 sts, turn. (53 dc)
Row 44: Ch 3, dc in next st, 2 dc in next st, skip 2 sts, *2 dc in each of the next 2 sts, skip 2 sts; rep from * until 2 sts rem, skip next st, dc in the last st, turn. (53 dc)
Rows 45 - 50: Repeat Rows 43 and 44; after Row 50, break Color A.
Row 51: With Color B, join to first st and repeat Row 43.
Rows 52 - 67: Repeat Row 44, then Rows 43-44, ending with a Row 43 rep; after Row 67, break Color B.
Row 68: With Color A, join to first st and repeat Row 44.
Rows 69 - 84: Repeat Rows 43 - 44; after Row 84, break Color A.
Now crochet the other front panel...
Row 85: With Color A, join to next unworked st of Row 42 (in the middle of the row), ch 3, dc in next st, 2 dc in next st, skip 2 sts, *2 dc in each of the next 2 sts, skip 2 sts; rep from * until 2 sts rem, skip next st, dc in the last st, turn. (53 dc)
Row 86: Ch 3, skip next st, *2 dc in each of the next 2 sts, skip 2 sts; rep from * until 4 3 sts rem, 2 dc in next st, dc in next 2 sts, turn. (53 dc)
Rows 87 - 92: Repeat Rows 81 and 82; after Row 92, break Color A.
Row 93: With Color B, join to first st and repeat Row 81.
Rows 94 - 109: Repeat Row 82, then Rows 81 and 82; after Row 109, break Color B.
Row 110: With Color A, join to first st and repeat Row 81.
Rows 111 - 126: Repeat Row 82, then Rows 81 and 82.
Let's create a nice edge to work into later...
Edging: Ch 1, sc evenly around entire piece working as follows: sc in each st across Row 126; ch 2 at the corner; 2 sc in the side of each row; ch 2 at the corner; across the foundation chain work a sc in each worked ch, sc in each ch-1 sp, and 2 sc in each ch-2 sp; ch 2 at the corner; 2 sc evenly in the side of each row; ch 2 at the corner; sc in each st across Row 84; ch 2 at the corner; 2 sc the side of each row on inside of front panels; ch 2 at the corner; join to first st of edging and break Color A.
Now seam the sides to create the sweater shape...
Assembly: With Color A, use the mattress stitch to join bottom back edge and Row 84/126, sewing a 17" seam on each side.
Next, we make the border rounds that work around the front opening and bottom hem...
Rnd 1: Join with Color B in blo of any st at bottom of sweater, dc in blo of each st around opening, working 5 dc in each ch-2 sp at the corner; join.
Rnds 2 and 3: Ch 1, hdc in blo of first st, fpdc in next st, *hdc in blo of next st, fpdc in next st; rep from * around working 3 sts in the center st at each corner, maintaining pattern; join.
Rnd 4: Ch 1, Ch 1, hdc in blo of each st around, working 3 hdc in the center st at each corner; join and break Color B.
Time to trim the armholes - be sure to repeat for each armhole (unless you're into the asymmetrical look)...
Arm Border Rnd 1: Join with Color B in blo of any st, ch 1, hdc in blo of first st, fpdc in next st, *hdc in blo of next st, fpdc in next st; rep from * around working 3 sts in the center st at each corner, maintaining pattern; join.
Arm Border Rnd 2: Ch 1, hdc in blo of each st around, working 3 hdc in the center st at each corner; join and break yarn.
You like pockets, right? I sure do! Let's make 2...
POCKET INSTRUCTIONS (use Color B):
Row 1: Ch 20, dc in the 5th ch from the hook (skipped sts count as dc and skip 1), dc in same ch, 2 dc in next ch, skip 2 ch, *2 dc in each of the next 2 chs, skip 2 chs; rep from * until 2 chs rem, skip next ch, dc in the last ch; turn. (18 sts)
Rows 2 - 9: Ch 3 (counts as first dc), skip next st, *2 dc in each of the next 2 sts, skip 2 sts; rep from * until 2 sts rem, skip next st, dc in the last st, turn. (18 dc)
Pocket Edging: Ch 1, sc evenly around entire piece working as follows: sc in each st across Row 9; ch 2 at the corner; 2 sc in the side of each row; ch 2 at the corner; across the foundation chain work a sc in each worked ch, sc in each ch-1 sp, and 2 sc in each ch-2 sp; ch 2 at the corner; 2 sc evenly in the side of each row; ch 2 at the corner; join to first st of edging and break yarn leaving a long tail. Use long tail to sew pocket to sweater.
I hope you enjoy making - and wearing - the Riverbend Cardigan! It's one of my favorite pieces to date - so soft and cozy and warm!
If you do make the free Riverbend Cardigan crochet pattern, I'd love to see it! Be sure to tag me @mooglyblog on Instagram and Twitter, or stop by the Moogly Facebook page to share your photos!
The Fine Print
Written pattern copyright Tamara Kelly 2017, all rights reserved. Please do not reprint or repost this pattern. Please do link to this page to share this pattern with others. If you wish to make items for sale from this pattern or translate it to another language, please visit the About page for details. Thank you to Lion Brand Yarn for providing the yarn for this pattern.


Karen Bavouset says
Thanks so much. I love this for a snuggly cardigan
Tamara Kelly says
Thank you! 😀
Lisa says
Beautiful. Thank you
Tamara Kelly says
Thank you so much Lisa!
Jo Hunt says
I've never been brave enough to crochet a garment before.... something to do with lack of confidence, your Riverbend Cardigan looks perfect for me to have a go. New year's Resolution to make a wearable item is now a step closer. Thankyou so much for sharing your lovely pattern
Tamara Kelly says
Hi Jo! I hear ya - it took a bit of bravery for me to jump into designing adult garments! I do think this makes a great first one though - thank you!
Jo says
👍🤗👌
Merry Christmas & Happy New Year
Tamara Kelly says
Merry Christmas and Happy New Year to you, Jo! 😀
Kathleen Burnett says
I know I don’t know you but YOU CAN DO IT 😄
You will be so proud of yourself when your done!! Take it slow and enjoy the process. Moogly has great tutorials and the great part is that you can go as fast or slow as needed 😄 I wish you lots of luck and confidence!!!!
Tamara Kelly says
♥♥♥
Tina says
Just curious what your suggestion would be for making sleeves on this beautiful, seemingly simple cardigan?
Tamara Kelly says
Thank you Tina! Rather than making the armhole edgings, I would work in the round using the twin V stitch - any multiple of 3 sts in the armhole would be a good setup, but you can easily skip/not skip an extra stitch in the armpit if needed to make it work - or adjust how many stitches you put into the side seam.
To work the Twin V stitch in the round, I would split the repeat in half - ch 3 and dc in the first st, skip 2 sts, work around in pattern, then finish with 2 dc in the last st (right next to the first two), then join. You can keep working in one direction at this point, or use turned rounds if you'd prefer to keep your seam straight.
Then I'd just work to length, and finally add that armhole edging! 🙂 I hope that helps!
Marie says
I am having an issue when I get to row 43. It is not lining up with row 41. I have tried 6 times. I am making the missy size. I am reach 45 stitches and still have 2 stitches left.
Tamara Kelly says
Hi Marie! I'm sorry, I can't quite figure out the why of it without seeing it I'm afraid. Can you email me a photo to tamarakelly@mooglyblog.com?
Julie says
I really like this! Can't save it now, but will when I get back to the apartment after the 1st. Thank you so much for sharing! I hope you're having wonderful holidays yourself. We've done Hanukkah, now we'll do Christmas. 🙂
Tamara Kelly says
😀 Thank you Julie! Happy Holidays!!
Pat says
It looks so comfy! I'll have to make this onein the new year. Thank you so much!
Tamara Kelly says
Thank you Pat! Happy New Year! 😀
Chris says
Thanks for this beautiful pattern. I’ll be sure to try it — but one qu stion: 10-12 ply yarn???? I wasn’t aware that such a thing existed! Can I use 3 or 4 strands of a 4 ply yarn instead?? Or just pick up a “bulky” 6 ply yarn???
Tamara Kelly says
Hi Chris! The "ply" is for UK readers to try to find an equivalent - it's kind of confusing, but basically in the UK they say "ply" where in the US we would talk about "weight" or thickness - ie "4" or Medium or Worsted. It doesn't refer to the actual strands of string that make up the yarn. You don't want a bulky yarn for this pattern, just a medium weight one. 🙂
Chris says
Thanks! I’ll go shopping for a great looking 4 ply yarn tomorrow! It’s really a beautiful piece of apparel. Happy New Year to all!💥.
Minetta says
THANK YOU! I cannot wait to make this. thanks for the clear instructions!
Tamara Kelly says
😀 Thank you so much Minetta!
Julie says
Hello dear Tamara. It is so nice to receive some nice and very easy patterns that we can wair Dalie indoors or out. Would it be at all possible? To have the pattern in pictures like drowings in stead for reading the pattern. I am very oldely person(83) and it is so difficult to fallow the writing. I use to read the pictures that is how I can fallow the pattern. Please. Would it be at all possible? I would be so grateful to you if it can be done. It is looking so nice and I do wish to make it, but can not fallow the written pattern. Thank you so very much for your kindness. Love all what you are teaching and I do fallow all your site as I have sign up for it for a very long time now. You are a very, very clever Lady. May God bless you for all what you are doing. Best wishes and kind regard always: Juli. ❤️💕💓🕊
Mary Ellerd says
Thanks so much for the larger sizes. I wear a 4-5X and finding a pattern is so difficult.
Very few individuals and only 1 1 yarn distributor designs clothing for 5X individuals. It’s a huge (bad pun intended) problem.
Tamara Kelly says
🙂 I've been plus sized myself, I understand the struggle! I'm so glad you like it!
Eve Taylor says
I really love this and really appreciate your generosity in giving the pattern for free,it will look fantastic with jeans and a t-shirt,i am going to make some in different colours, your patterns are awesome i have added all three from your blog to my ravelry library, keep up the good work you are amazing xxx
Tamara Kelly says
Thank you so very much Eve! ♥
Janice Chrostoski says
Thank you for all the patterns. Happy New year. Here's to a great new years!
Tamara Kelly says
😀 Thank you! Happy New Year Janice!
carrie townsend says
Hi Tamara, thx for this wonderful design. I’m giving it a go. I just wanted to check something with you please. I’m doing the plus size version and I’m up to row 48. It says to “break colour a”, but then it says to join colour b in row 51. Am I reading it wrong or is there an error in the colour changes. I also noticed in the second front panel there seems to be a similar issue???
Thx
Tamara Kelly says
I'm so sorry about that Carrie, sometimes when working out the various sizes I miss a change. I've updated the pattern! Thank you for bringing this to my attention!
chloe says
Question for row 41 am I repeating the step 9 times or is it 11 times
Tamara Kelly says
It depends on what size you are making - the Misses size repeats 9 times, the Plus size repeats 11 times. 🙂
Chloe says
I am making a misses size when I repeat 9 times I am not ending with 45 dc stitches what I am doing wrong? thank you for your help and awesome pattern
Tamara Kelly says
Hi Chloe! It's hard to say without more info. Would you please email me at tamarakelly@mooglyblog.com with perhaps a photo or more details?
Soffity says
Dear Tamara , I’m so pleased you have taken up my request to put the “ply” of the yarn for your uK readers and us Aussies. It’s very helpful so thanks. . I was wondering what size bust the two sizes would be suitable for, it’s obviouly a very loose fit, I find sizes are so variable. In one shop a small size fits and in the next their extra large is too tightl
Tamara Kelly says
😀 I'm so glad it's helping! It's one of those things I plan to go back and add to old patterns as I "fix" them up - in all my spare time, of course. 😉
So since this sweater doesn't have a zipper or buttons, and has a lot of stretch, there's definitely a lot of bust room! But if you were to hold it closed, the Misses would accommodate up to a 64" bust without having to stretch, and the Plus would accommodate up to a 76" bust without stretching. 🙂
Mary says
Cannot wait to make this one. I got a yarn gift card for Christmas and this works out nicely. I am going to adjust the size slightly since I am 2x and need more than one but not quite as large as the other. I have adjusted patterns before so I am going to give it a shot. Thanks for the stitch pattern numbers.
Tamara Kelly says
🙂 I hope you enjoy making it!
jean says
I am making this with some yarn that I have. For color B I have about 620 yards. Do you think that will be enough, or should I narrow that stripe a bit? I want to use B for pockets and edge, so need to know before I finish main part of garment. Thanks for all the lovely patterns and the wonderful giveaways!
Tamara Kelly says
I would recommend making the pockets first, to set that aside and make sure you have it. It will be cutting it very very close though, so narrowing the stripe would be a good idea!
jean says
Thanks. That was what I was thinking. I was also thinking that if it looked close I could use both colors on the edging. Make either first or last row color A (or both)
Deborah says
Hi Tamara,
I'm making this right now, and loving it! Thanks so much for sharing the lovely design.
I am using a 80/20 acrylic/wool in 'aran' weight. Gotta love those folks across the pond. And it is right on guage for width. I've added 2 rows to each stripe to compensate for my short stitches and cuz I'm 5'11" tall 😃
I'm so excited to be almost finished, because I am looking forward to wearing it!
Thanks so much!
Tamara Kelly says
😀 I'm so glad you're enjoying it! Thank you Deborah!
Andrea says
Hi Deborah
I’m about to buy the same kind of yarn 20/80 acrylic/wool Aran.
I’m just wandering did you still use the same size crochet hook that the pattern says to use.
I get a little confused with hook sizes when I buy a different yarn to the pattern.
Thank you
kelly says
Beautiful!
Jean says
I know this is an older pattern, but I'm just now getting around to it. I'm questioning whether I have done something wrong, especially since I haven't seen anyone else mention the armhole border that has corners. I don't have any corners in my armholes, did I do something wrong? I sewed 2 pairs of corners at the bottom of the side seam and the other 2 are on the bottom edge of the front opening.
Tamara Kelly says
Hi Jean! I'm not sure what happened there - it's been so long I don't know where my head was when I wrote that part. So I'm going to edit it now! 🙂
Cathrin says
Could u make this cardigan using doubles and v stitches?
I don’t have enough wool to change the colours!!
It’s a great pattern too, thanks for sharing
Tamara Kelly says
Thank you! You can use all one color if you like. As for the stitches, you can really use whatever you like I suppose, just aim for the measurements in the schematic! 🙂
Katie says
What yarn do you recomend? The link says the yarn is discontinued.
Tamara Kelly says
Hi Katie! If you want to stick with a wool blend, Caron Cakes would be a good option. Otherwise, any worsted weight yarn should work! 🙂
Deborah says
Hi Tamara! First project for Christmas and your pattern is very easy to follow. About to seam the sides to complete the cardigan look and I'm having a hard time following the edging. What do ch-1 sp and ch-2 sp mean? This is really cool, thanks for sharing this so much!
Tamara Kelly says
Hi Deborah, and thank you! ch-1 sp is chain one space, and ch-2 space is ch-2 space. This video might help: https://www.mooglyblog.com/working-into-the-chain-vs-the-chain-space/
Nicolette says
This is exactly what I have been looking for to replace my favorite cardigan that is literally dissolving stitch by stitch!