Looking for free crochet letter patterns? The Moogly Crochet Uppercase Alphabet Letters are a fun and easy way to personalize blankets, hats, bags, nursery decor, gifts, signage, yarn bombs, and so much more! This collection includes all 26 uppercase crochet letters in a simple applique style that is beginner-friendly, quick to make, and easy to sew onto your projects. Whether you want to crochet names, monograms, initials, or custom messages, these crochet alphabet patterns make it easy to add a handmade touch to every project! Read on to see how we've updated this pattern for 2026!
Prefer an ad-free PDF? It's a Re-launch Special!
Newly tech edited and updated with a professionally made chart for each letter! Get the ad-free PDF for The Moogly Crochet Uppercase Alphabet for only $4.99 US through May 25th, 2026!


Newly Updated for 2026 and Beyond
I originally designed this set of letters in 2013 - and they have been used for all sorts of purposes since then! After all these years, I decided it was time to revisit this pattern and freshen it up a bit. I hired Lindsey Stephens to professionally tech edit all 26 uppercase letters and to create stitch diagrams for each one. I've completely rewritten and formatted this post, and created an ad-free PDF. In that PDF, each letter gets it's own page, so you can print just what you need!
So now, I feel confident that this alphabet is the best it can be - and ready to head into the future, and help you say whatever you want to say!

Matching Crochet Alphabet Applique Sets and Symbols
Be sure to check out the rest of the matching Moogly Crochet Alphabet sets, too! You can mix and match all of these sets, created for the same scale:
Mix and match the sets to create custom names, phrases, banners, monograms, and personalized crochet projects for every occasion!
How to Use These Crochet Uppercase Letters
These crochet uppercase letters are designed as appliques, which means you can sew or attach them to just about any project. Because each letter is made individually, you can mix and match them to spell anything you like, then arrange them before attaching to get the perfect layout. My best tip is to use stitch markers to hold each letter in place before you start stitching. This allows you to check your layout and spelling - and keep a straight line!
There are a few easy ways to attach your crochet letters, depending on your project. The most common method for adding to other crochet or knit fabrics is to use a yarn needle and whip stitch the letters in place along the edges. For a more secure hold, you can use a backstitch. For craft projects, glue or fusible webbing, or even velcro might be an option, especially for wall hangings or display pieces.
Of course, they don't have to be appliques! You can use them on their own as a learning toy with beginning readers - or add fridge magnets for extra fun!
Sizing and Customizing Your Crochet Letters
One of the best things about these crochet letters is how easy they are to customize. You can change hook size or yarn weight to make them larger or smaller while keeping the same proportions. This makes it simple to adapt the alphabet for everything from baby blankets to oversized home decor projects.
Frequently Asked Questions
Can beginners make these crochet letters?
Yes, these uppercase letters are designed to be beginner-friendly and use basic stitches in an easy appliqué style.
What yarn works best for crochet letters?
For the clearest stitch definition, a smoother yarn will give you crisper edges, while a softer or fluffier yarn will create a more textured, decorative look. If you are attaching the letters to a blanket or garment, make sure that the fibers are all compatible for washing and drying!
Do I need to block the letters?
Blocking is optional, but it can help even out edges and make your finished letters lie flatter, especially for display pieces. I like to use spray starch on cotton letters to help them hold their shape!
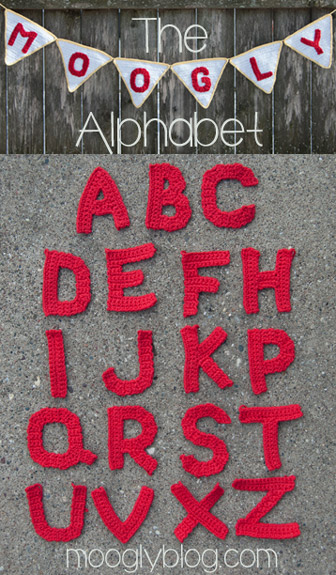
The Moogly Crochet Uppercase Alphabet
Add this pattern to your Ravelry Queue and Favorites
US - F, 3.75 mm hook
Any worsted-weight yarn
Size: Finished letters in this yarn measure approx 3.5” tall. For larger or smaller letters, use thicker or thinner yarn and a hook size that gives you a solid fabric.
HELPFUL LINKS AND TUTORIALS
FSC – Foundation Single Crochet
FSC - Extending a Row with Foundation Single Crochet
Klik HIER voor de Nederlandse vertaling van de Moogly Alfabet, met dank aan Elke Wellens!
SPECIAL STITCHES & TECHNIQUES:
Wide sc2tog (wide single crochet 2 together) over next 3 sts: insert hook in first st, yo, pull up a loop, skip next st, insert hook in third st, yo, pull up a loop, yo, pull through all 3 loops on hook.
Sc2tog (single crochet 2 together): insert hook in first st, yo, pull up a loop, insert hook in next st, yo, pull up a loop, yo, pull through all 3 loops on hook.
Hdc2tog (half double crochet 2 together): Yo, insert hook in first st, yo, pull up a loop, insert hook in next st, yo, pull up a loop, yo, pull through all 4 loops on hook.
Dc2tog (double crochet 2 together): Yo, insert hook in first st, yo, pull up a loop, yo, pull through 2 loops on hook, yo, insert hook in next st, yo, pull up a loop, yo, pull through 2 loops on hook, yo, pull through all 3 loops on hook.
FSC (Foundation single crochet): (see tutorial linked above) Insert in base of last st made, yo, pull up a loop, yo, pull through 1 loop on hook, [yo, pull through 2 loops] twice.
NOTES:
Chain 2 at beginning of a row does not count as a stitch throughout.
Chain 1 at beginning of a row does not count as a stitch throughout.
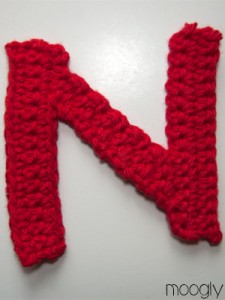
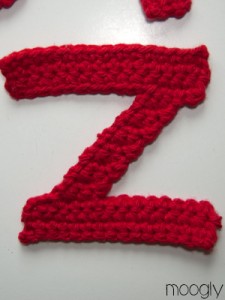
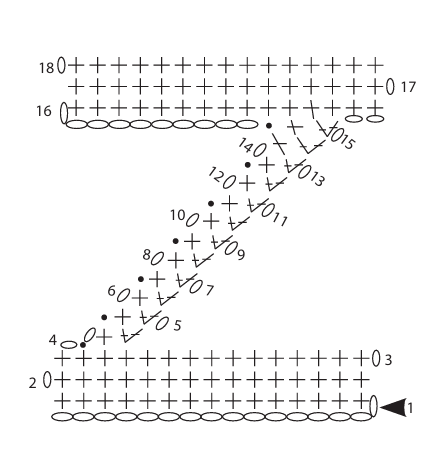
Please note that the instructions for letters M and W are the same, as are the instructions for N and Z: For the letter W, see the instructions for the letter M, and turn it upside down when finished. For the letter Z, see the instructions for the letter N, and turn it on it's side when finished.
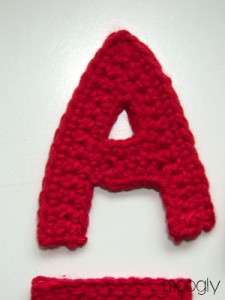
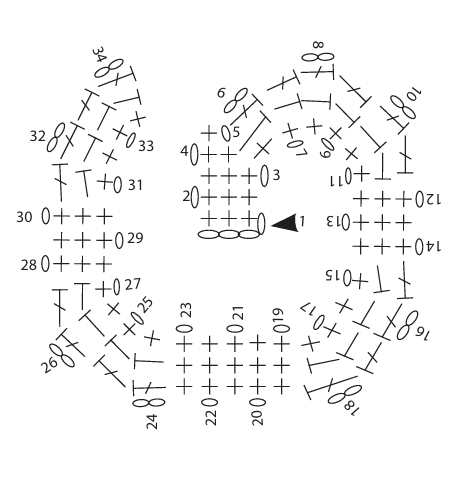
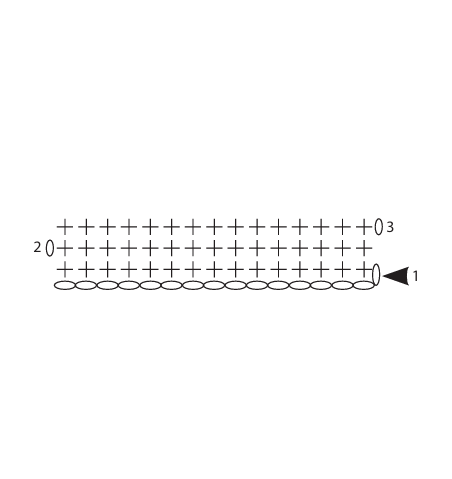
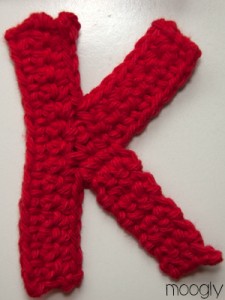
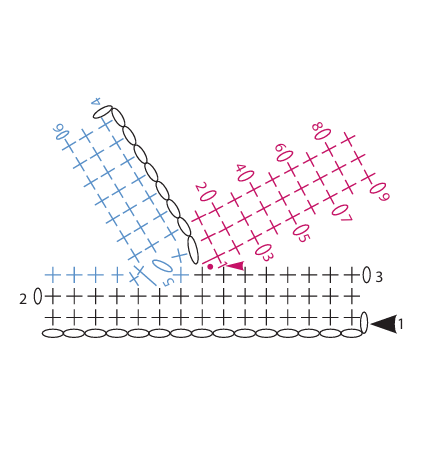
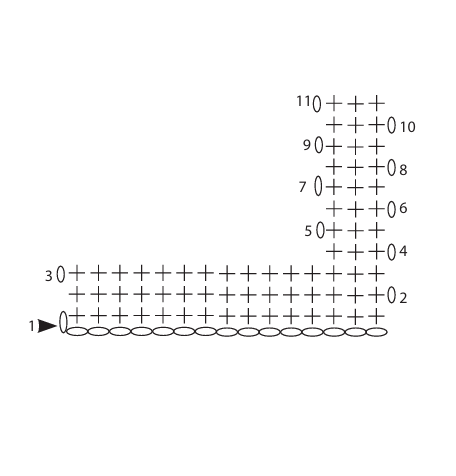
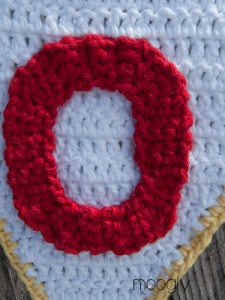
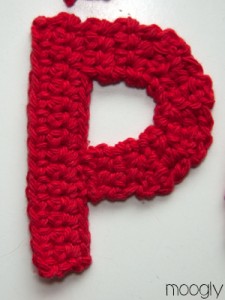
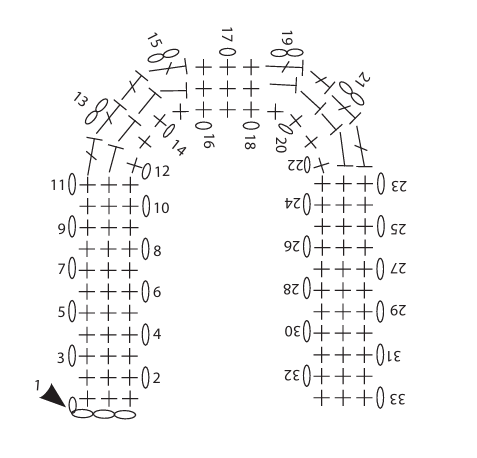
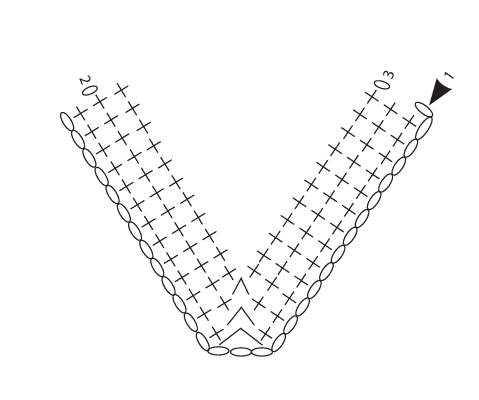
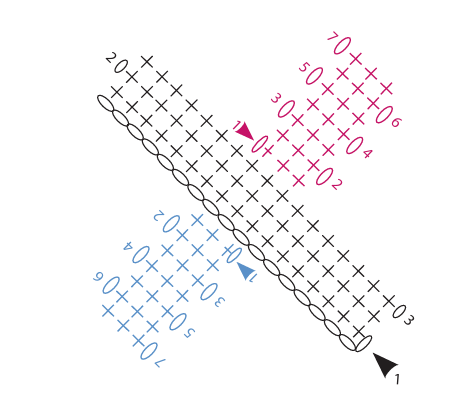
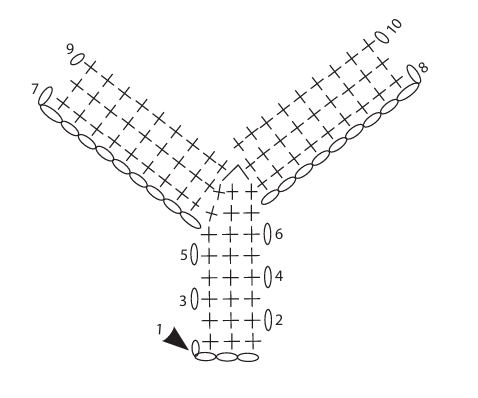
Each letter includes a photo of the finished letter made in worsted-weight yarn, followed by written instructions, followed by the crochet symbol diagram for that letter.
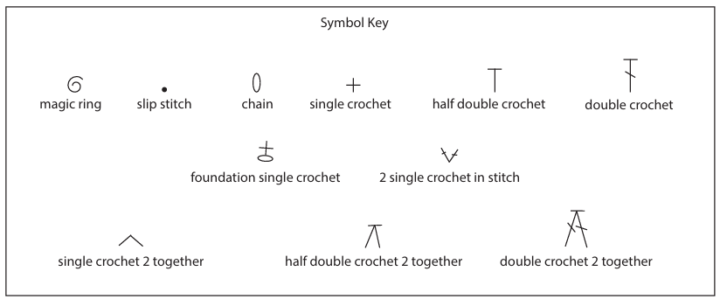
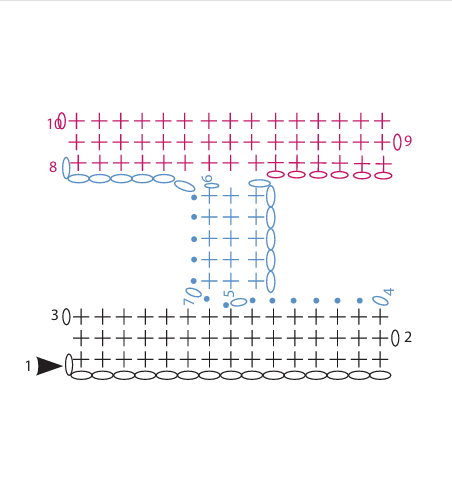
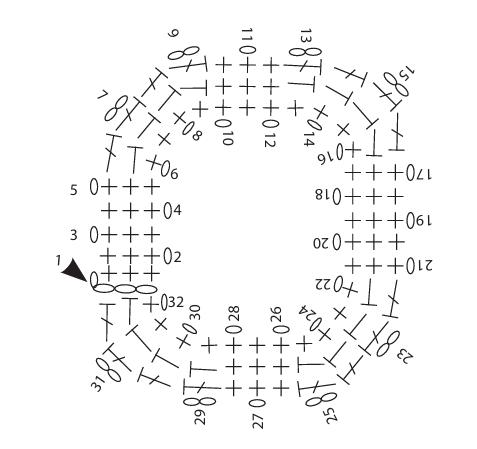
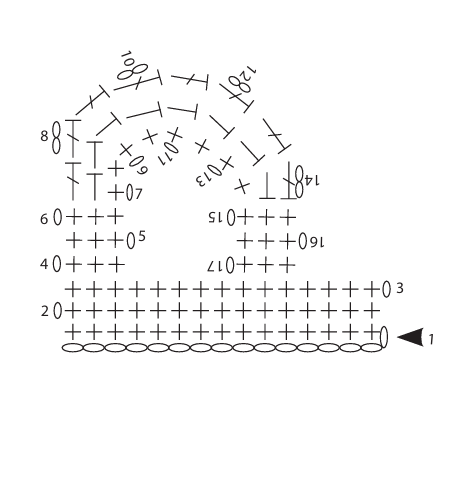
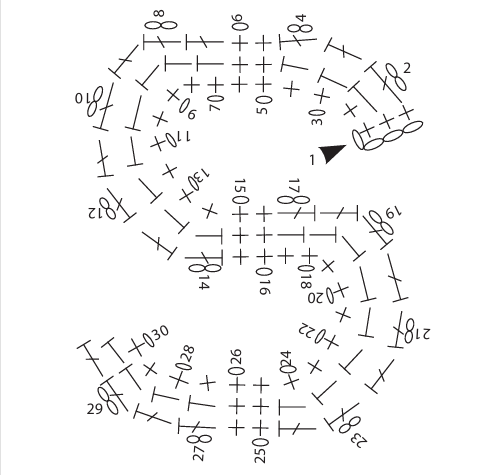
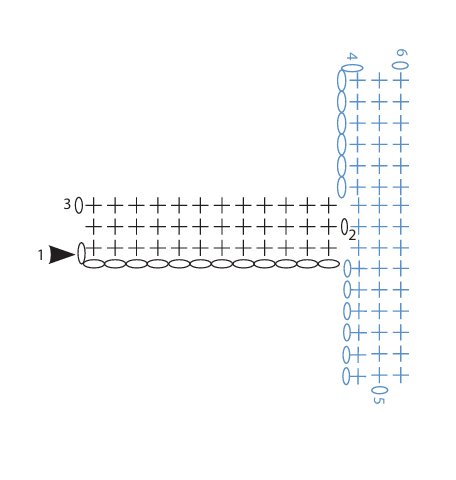
CROCHET DIAGRAM STITCH KEY
A grey/black arrow shows the beginning of the first row or round into the foundation chain.
When a letter is composed of multiple parts, the latter parts are shown in a different color for clarity. A new arrow means the yarn is rejoined to start the next section.
The Moogly Crochet Alphabet Instructions
THE LETTER A
Row 1: Ch 30, sc in 2nd ch from hook, sc in next 12 chs, wide sc2tog over next 3 sts. Sc in remaining 13 chs. Turn. (27 sts)
Row 2: Ch 1, sc in first 12 sts. Wide sc2tog over next 3 sts. Sc in remaining 12 sts. Turn. (25 sts)
Row 3: Ch 1, sc in first 11 sts. Wide sc2tog over next 3 sts. Sc in next 5 sts, leaving remaining sts unworked. Ch 4. (16 sc, 4 ch - this ch 4 starts the horizontal cross bar of the A.)
Row 4: Sc in back bump of 2nd ch from hook, sc in remaining 2 chs. Sc2tog into same st as last sc of Row 3 and next unworked st on Row 2. Turn. (4 sts)
Row 5: Do not ch. Sc in next 4 sts (the sc2tog and the 3 sc from Row 4). Turn. (4 sts)
Row 6: Ch 1, 2 sc in first st, sc in next 3 sts. Sc2tog into last st worked into on Row 2 and next unworked st on Row 2. Sc in remaining 4 unworked sts from Row 2. (10 sts total)
Finish off. Sew the loose end of the crossbar to the other side.
THE LETTER B
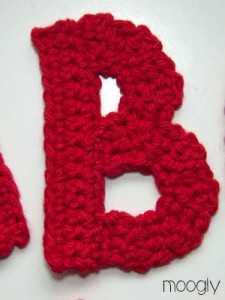
Row 1: Ch 16, sc in 2nd ch from hook, sc in each remaining ch. Turn. (15 sts)
Rows 2 - 3: Ch 1, sc in each st. Turn. (15 sts)
Row 4: Ch 2, dc in first st, hdc in next st, sc in next st. Turn, leaving remaining sts unworked. (3 sts)
Row 5: Ch 1, sc in first st, hdc in next st, dc in last st. Turn. (3 sts)
Row 6: Ch 2, dc in first st, hdc in next st, sc in last st. Turn. (3 sts)
Row 7: Repeat Row 5.
Rows 8 - 11: Repeat Rows 6 - 7. At the end of Row 11, do not turn.
Row 12: Ch 1, and working into the outside edge, work 2 sl st in the side of the dc from Row 11, work 1 sl st in the side of the dc from Row 10. Ch 1, sc in the side of the same dc, hdc and dc in the side of the dc from Row 9. Turn. (3 sl st, 1 sc, 1 hdc, 1 dc)
Rows 13 - 18: Repeat Rows 6 - 7.
Row 19: Repeat Row 6.
Row 20: Ch 1, sc in each st. Finish off and use tail to sew Row 20 to last 3 sts of Row 3.
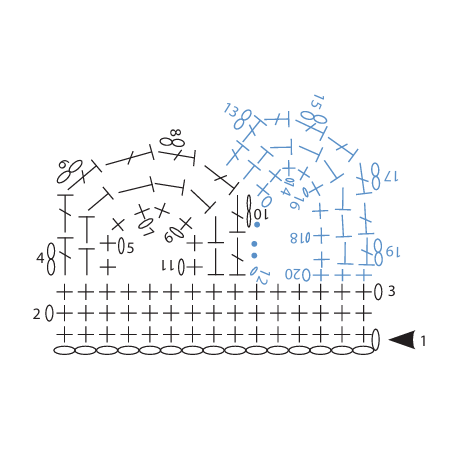
THE LETTER C
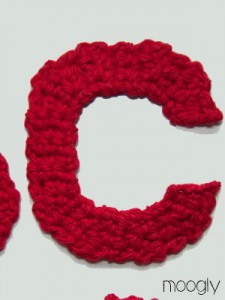
Row 1: Ch 4, sc in 2nd ch from hook, hdc in next ch, dc in last ch. Turn. (3 sts)
Row 2: Ch 2, dc in first st, hdc in next st, sc in last st. Turn. (3 sts)
Row 3: Ch 1, sc in first st, hdc in next st, dc in last st. Turn. (3 sts)
Row 4: Repeat Row 2.
Rows 5 - 7: Ch 1, sc in each st. Turn. (3 sts)
Rows 8 - 11: Repeat Rows 2 - 3.
Rows 12 - 16: Repeat Row 5.
Rows 17 - 20: Repeat Rows 3 - 4.
Rows 21 - 23: Repeat Row 5.
Rows 24 - 27: Repeat Rows 2 - 3.
Finish off.
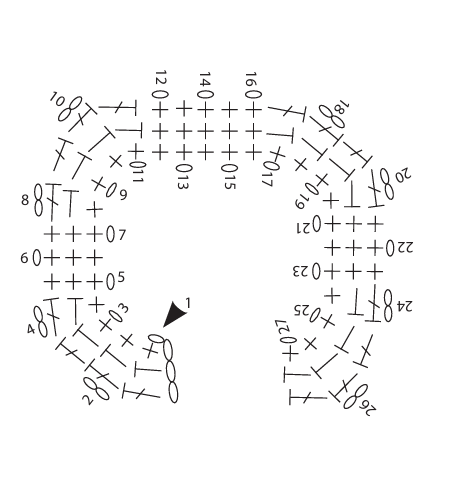
THE LETTER D
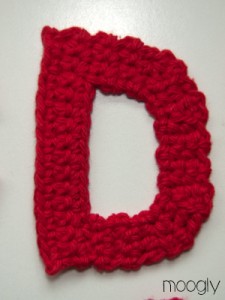
Row 1: Ch 16, sc in 2nd ch from hook, sc in each remaining ch. Turn. (15 sts)
Rows 2 - 3: Ch 1, sc in each st. Turn. (15 sts)
Row 4: Ch 1, sc in first 3 sts. Turn, leaving remaining sts unworked. (3 sts)
Rows 5- 6: Ch 1, sc in each st. Turn. (3 sts)
Row 7: Ch 1, sc in first st, hdc in next st, dc in last st. Turn. (3 sts)
Row 8: Ch 2, dc in first st, hdc in next st, sc in last st. Turn. (3 sts)
Rows 9 - 10: Repeat Rows 7 - 8.
Rows 11 - 15: Repeat Row 5.
Row 16: Ch 2, dc in first st, hdc in next st, sc in last st. Turn. (3 sts)
Row 17: Ch 1, sc in first st, hdc in next st, dc in last st. Turn. (3 sts)
Rows 18 - 19: Repeat Rows 16 - 17.
Row 20 - 22: Repeat Row 5.
Finish off. Use tail to sew Row 22 to last 3 sts of Row 3.
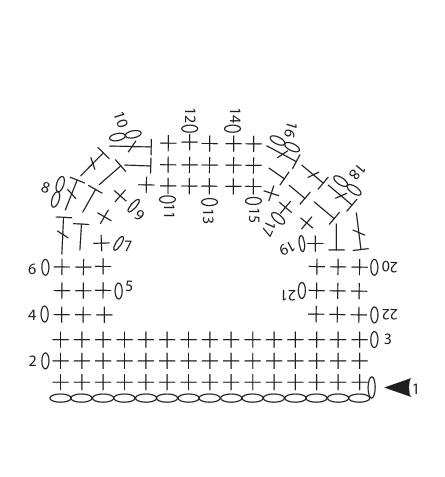
THE LETTER E
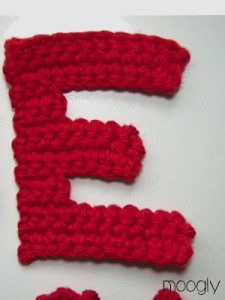
Row 1: Ch 12, sc in 2nd ch from hook, sc in each remaining ch. Turn. (11 sts)
Rows 2 - 3: Ch 1, sc in each st. Turn. (11 sts)
Row 4: Ch 1, sc in first 3 sts. Turn, leaving remaining sts unworked. (3 sts)
Row 5: Ch 1, sc in each st. Turn. (3 sts)
Row 6: Ch 1, sc in each st, ch 6. Turn. (3 sc, 6 ch)
Row 7: Sc in 2nd ch from hook, sc in each remaining ch, sc in each st. Turn. (8 sts)
Rows 8 - 9: Ch 1, sc in each st. Turn. (8 sts)
Row 10: Ch 1, sc in first 3 sts. Turn, leaving remaining sts unworked. (3 sts)
Row 11: Ch 1, sc in each st. Turn. (3 sts)
Row 12: Ch 1, sc in each st, ch 9. Turn. (3 sts, 9 ch)
Row 13: Sc in 2nd ch from hook, sc in each remaining ch, sc in each st. Turn. (11 sts)
Rows 14 - 15: Ch 1, sc in each st. Turn. (11 sts)
Finish off.
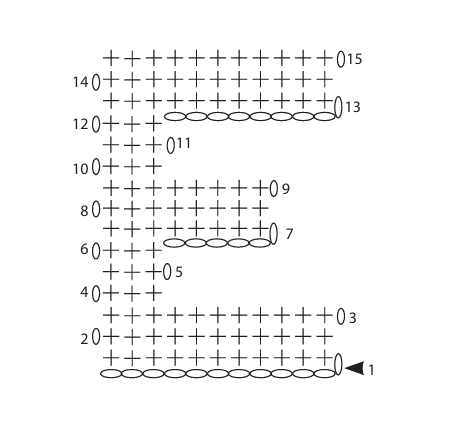
THE LETTER F
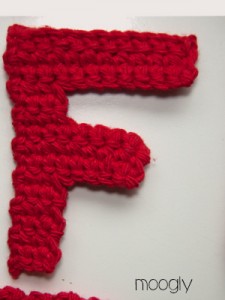
Row 1: Ch 12, sc in 2nd ch from hook, sc in each remaining ch. Turn. (11 sts)
Rows 2 - 3: Ch 1, sc in each st. Turn. (11 sts)
Row 4: Ch 1, sc in first 3 sts. Turn, leaving remaining sts unworked. (3 sts)
Row 5: Ch 1, sc in each st. Turn. (3 sts)
Row 6: Ch 1, sc in each st, ch 6. Turn. (3 sc, 6 ch)
Row 7: Sc in 2nd ch from hook, sc in each remaining ch, sc in each st. Turn. (8 sts)
Rows 8 - 9: Ch 1, sc in each st. Turn. (8 sts)
Row 10: Ch 1, sc in first 3 sts. Turn, leaving remaining sts unworked. (3 sts)
Rows 11 - 15: Ch 1, sc in each st. Turn. (3 sts)
Finish off.
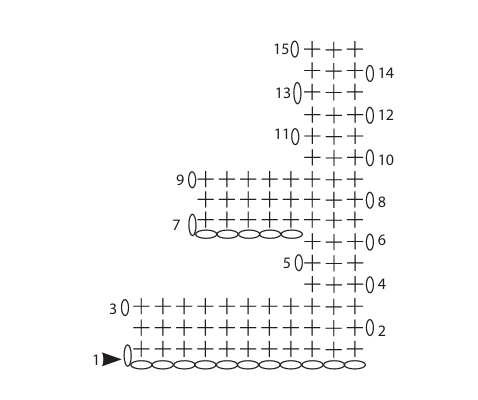
THE LETTER G
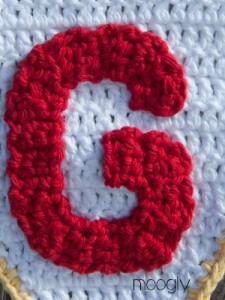
Row 1: Ch 4, sc in 2nd ch from hook, sc in each remaining ch. Turn. (3 sts)
Rows 2 - 3: Ch 1, sc in each st. Turn.
Row 4: Ch 1, sc in first 2 sts.Turn, leaving last st unworked. (2 sts)
Row 5: Ch 1, skip first st, sc in the next st. Turn. (1 st)
Row 6: Ch 2, skip sc made in Row 5, dc in beginning ch-1 of Row 5. Hdc in the side of the last sc made in Row 4. Sc in unworked st from Row 3. Turn. (3 sts)
Row 7: Ch 1, sc in first st, hdc in next st, dc in last st. Turn. (3 sts)
Row 8: Ch 2, dc in first st, hdc in next st, sc in last st. Turn. (3 sts)
Rows 9 - 10: Repeat Rows 7 - 8.
Row 11: Repeat Row 7.
Rows 12 - 14: Repeat Row 2.
Rows 15 - 18: Repeat Rows 7 - 8.
Rows 19 - 23: Repeat Row 2.
Row 24: Repeat Row 8.
Row 25: Repeat Row 7.
Rows 26 - 27: Repeat Rows 24 - 25.
Rows 28 - 30: Repeat Row 2.
Rows 31 - 34: Repeat Rows 7 - 8.
Finish off.
THE LETTER H
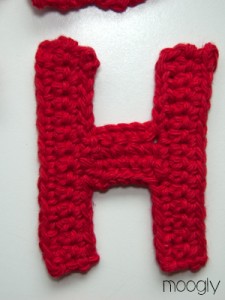
First Vertical Bar
Row 1: Ch 16, sc in 2nd ch from hook, sc in each remaining ch. Turn. (15 sts)
Rows 2 - 3: Ch 1, sc in each st. Turn. (15 sts)
Crossbar
Row 4: Ch 1, skip first st, sl st in next 5 sts. Ch 6, sc in 2nd ch from hook, sc in each
remaining ch, sl st in next unworked st of Row 3, ch 1, sl st in next unworked st of Row 3. Turn. (5 sc)
Row 5: Sc in each sc. Turn. (5 sts)
Row 6: Ch 1, sc in each sc, sl st in next unworked st of Row 3. Turn. (5 sc, 1 sl st)
Row 7: Ch 1, skip sl st, sl st in each of the 5 sc, ch 7. Do not turn. (5 sl st, 7 chs)
Second Vertical Bar
Row 8: Sc in 2nd ch from hook, sc in each remaining ch, 3 sc in the sides of Crossbar Rows, make 6 FSC. Turn. (9 sc, 6 FSC)
Rows 9 - 10: Ch 1, sc in each st. Turn. (15 sts)
Finish off.
THE LETTER I
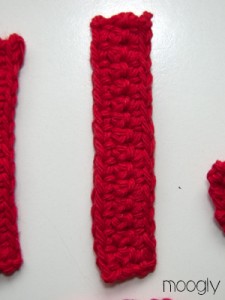
Row 1: Ch 16, sc in 2nd ch from hook, sc in each remaining ch. Turn. (15 sts)
Rows 2 - 3: Ch 1, sc in each st. Turn. (15 sts)
Finish off.
THE LETTER J

Row 1: Ch 4, sc in 2nd ch from hook, sc in each remaining ch. Turn. (3 sts)
Rows 2 - 11: Ch 1, sc in each st. Turn. (3 sts)
Row 12: Ch 1, sc in first st, hdc in next st, dc in last st. Turn. (3 sts)
Row 13: Ch 2, dc in first st, hdc in next st, sc in last st. Turn. (3 sts)
Rows 14 - 15: Repeat Rows 12 - 13.
Rows 16 - 18: Repeat Row 2.
Row 19: Repeat Row 13.
Row 20: Repeat Row 12.
Rows 21 - 22: Repeat Rows 19 - 20.
Row 23: Ch 1, sc in each st.
Finish off.
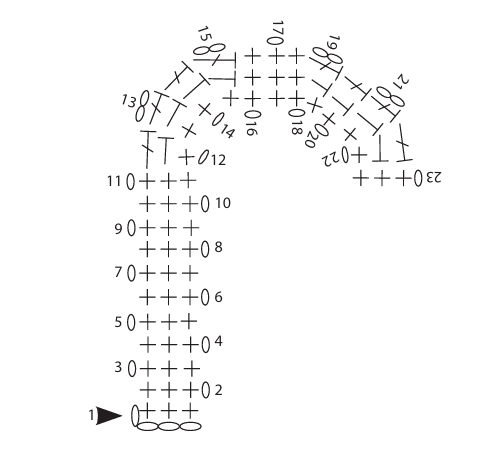
THE LETTER K
Row 1: Ch 16, sc in 2nd ch from hook, sc in each remaining ch. Turn. (15 sts)
Row 2: Ch 1, sc in each st. Turn. (15 sts)
Row 3: Ch 1, sc in first 8 sts, leaving remaining sts unworked, ch 9. Do not turn. (8 sc, 9 chs)
Upper Diagonal Bar
Row 4: Sc in 2nd ch from hook and each remaining ch. Sc in next unworked st of Row 2. Turn. (9 sts)
Row 5: Ch 1, skip first 2 sts, sc in remaining 7 sts. Turn. (7 sts)
Row 6: Ch 1, sc in each of 7 sts, sc in remaining 6 unworked sts of Row 2. Finish off.
Lower Diagonal Bar
Row 1: Rejoin yarn with a sl st to the 8th (last) sc of Row 3. Sc in the same st, working in opposite side of chs of
Upper Diagonal Bar, sc in next 2 chs. Turn. (3 sts)
Rows 2 - 9: Ch 1, sc in each st. Turn. (3 sts)
Finish off.
THE LETTER L
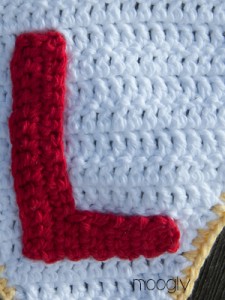
Row 1: Ch 16, sc in 2nd ch from hook, sc in each remaining ch. Turn. (15 sts)
Rows 2 - 3: Ch 1, sc in each st. Turn. (15 sts)
Row 4: Ch 1, sc in first 3 sts. Turn, leave remaining sts unworked. (3 sts)
Rows 5 - 11: Ch 1, sc in each st. Turn. (3 sts)
Finish off.
THE LETTERS M AND W
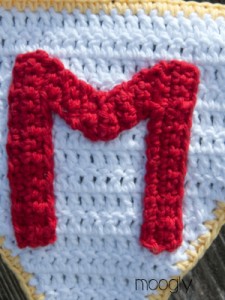
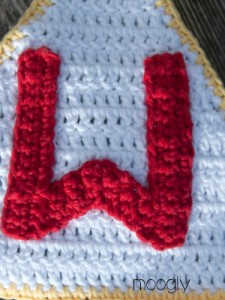
Row 1: Ch 16, sc in 2nd ch from hook, sc in each remaining ch. Turn. (15 sts)
Rows 2 - 3: Ch 1, sc in each st. Turn. (15 sts)
Row 4: Ch 1, skip first st, sc in next st, 2 sc in next st. Turn, leaving remaining sts unworked. (3 sts)
Row 5: Ch 1, 2 sc in first st, sc in next st, sl st in last st. Turn. (3 sc, 1 sl st)
Row 6: Ch 1, skip sl st and first sc, sc in next st, 2 sc in last st. Turn. (3 sts)
Row 7: Repeat Row 5.
Row 8: Repeat Row 6.
Row 9: Repeat Row 5.
Row 10: Ch 1, skip sl st, 2 sc in next st, sc in next st, sl st in last st. Turn. (3 sc, 1 sl st)
Rows 11 - 14: Repeat Rows 6 - 7.
Row 15: Repeat Row 6.
Row 16: Ch 1, sl st loosely in each st. Ch 13, turn. (3 sl st, 13 ch)
Row 17: Sc into 2nd ch from hook, sc in each remaining ch, sc in each sl st. Turn. (15 sts)
Rows 18 - 19: Ch 1, sc in each st. Turn. (15 sts)
Finish off.
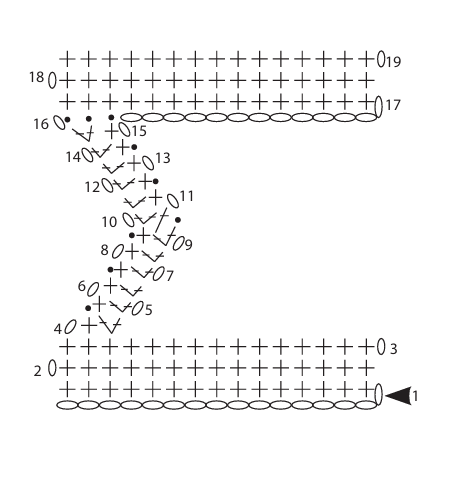
THE LETTERS N AND Z
Row 1: Ch 16, sc in 2nd ch from hook, sc in each remaining ch. Turn. (15 sts)
Rows 2 - 3: Ch 1, sc in each st. Turn. (15 sts)
Row 4: Ch 1, skip first st, sl st in next st. Ch 1, sc in next st, 2 sc in next st. Turn, leaving remaining sts unworked. (1 sl st, 3 sc)
Row 5: Ch 1, 2 sc in first st, sc in next st, sl st in last st. Turn. (3 sc, 1 sl st)
Row 6: Ch 1, skip sl st and first sc, sc in next st, 2 sc in last st. Turn. (3 sts)
Row 7: Ch 1, 2 sc in first st, sc in next st, sl st in last st. Turn. (3 sc, 1 sl st)
Row 8 - 15: Repeat Rows 6 - 7 four times. At end of last row, ch 10.
Row 16: Sc in 2nd ch from hook and each remaining ch, sc in sl st and each sc, make 2 FSC. Turn. (13 sc, 2 FSC)
Rows 17 - 18: Ch 1, sc in each st. Turn. (15 sts)
Finish off.
THE LETTER O
Row 1: Ch 4, sc in 2nd ch from hook, sc in each remaining ch. Turn. (3 sts)
Rows 2 - 5: Ch 1, sc in each st. Turn. (3 sts)
Row 6: Ch 1, sc in first st, hdc in next st, dc in last st. Turn. (3 sts)
Row 7: Ch 2, dc in first st, hdc in next st, sc in last st. Turn. (3 sts)
Rows 8 - 9: Repeat Rows 6 - 7.
Rows 10 - 12: Repeat Row 2.
Row 13: Repeat Row 7.
Row 14: Repeat Row 6.
Rows 15 - 16: Repeat Rows 13 - 14.
Rows 17 - 21: Repeat Row 2.
Rows 22 - 25: Repeat Rows 6 - 7.
Rows 26 - 28: Repeat Row 2.
Rows 29 - 32: Repeat Rows 13 - 14.
Finish off. Use end to stitch Rows 32 and 1 together.
THE LETTER P
Row 1: Ch 16, sc in 2nd ch from hook, sc in each remaining ch. Turn. (15 sts)
Rows 2 - 3: Ch 1, sc in each st. Turn. (15 sts)
Row 4: Ch 1, sc in first 3 sts. Turn, leaving remaining sts unworked. (3 sts)
Rows 5- 6: Ch 1, sc in each st. Turn. (3 sts)
Row 7: Ch 1, sc in first st, hdc in next st, dc in last st. Turn. (3 sts)
Row 8: Ch 2, dc in first st, hdc in next st, sc in last st. Turn. (3 sts)
Rows 9 - 14: Repeat Rows 7 - 8.
Rows 15 - 17: Repeat Row 2.
Finish off. Use end to sew Row 17 to the middle of Row 3.
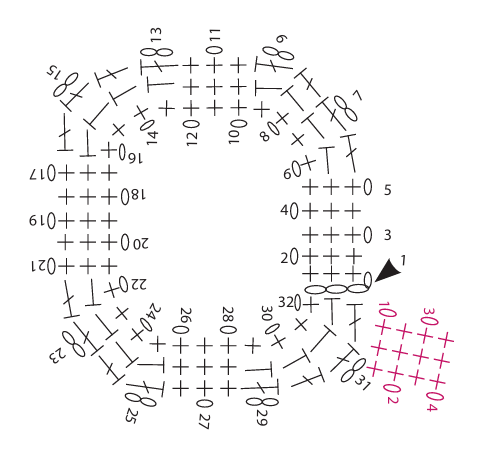
THE LETTER Q
Main Body
Row 1: Ch 4, sc in 2nd ch from hook, sc in each remaining ch. Turn. (3 sts)
Rows 2 - 5: Ch 1, sc in each st. Turn. (3 sts)
Row 6: Ch 1, sc in first st, hdc in next st, dc in last st. Turn. (3 sts)
Row 7: Ch 2, dc in first st, hdc in next st, sc in last st. Turn. (3 sts)
Rows 8 - 9: Repeat Rows 6 - 7.
Rows 10 - 12: Repeat Row 2.
Row 13: Repeat Row 7.
Row 14: Repeat Row 6.
Rows 15 - 16: Repeat Rows 13 - 14.
Rows 17 - 21: Repeat Row 2.
Rows 22 - 25: Repeat Rows 6 - 7.
Rows 26 - 28: Repeat Row 2.
Rows 29 - 32: Repeat Rows 13 - 14. At the end of Row 32, do not turn.
Tail
Row 1: Ch 1, and working into the sides of Rows 32 and 31, on the outside of the "O", make 3 sc. Turn. (3 sts)
Rows 2 - 4: Ch 1, sc in each st. Turn. (3 sts)
Finish off.
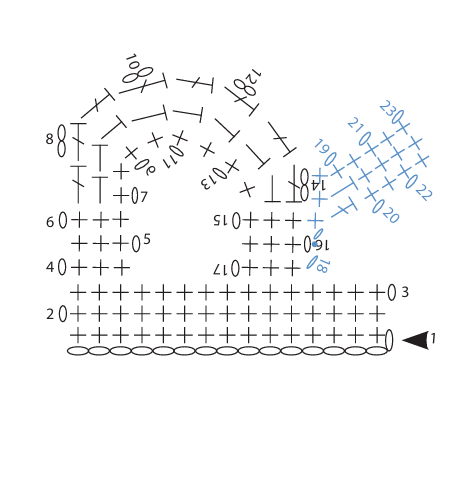
THE LETTER R
Row 1: Ch 16, sc in 2nd ch from hook, sc in each remaining ch. Turn. (15 sts)
Rows 2 - 3: Ch 1, sc in each st. Turn. (15 sts)
Row 4: Ch 1, sc in first 3 sts. Turn, leaving remaining sts unworked. (3 sts)
Rows 5-6: Ch 1, sc in each st. Turn. (3 sts)
Row 7: Ch 1, sc in first st, hdc in next st, dc in last st. Turn. (3 sts)
Row 8: Ch 2, dc in first st, hdc in next st, sc in last st. Turn. (3 sts)
Rows 9 - 14: Repeat Rows 7 - 8.
Rows 15 - 16: Repeat Row 2. (3 sts)
Row 17: Repeat Row 2. Do not turn (3 sts)
Lower Diagonal Bar
Row 18: Ch 1, working into the sides of Rows 17 through 14, on the outside of the curve, sl st, ch 1, work 3 sc. Turn. (3 sts, 1 sl st)
Row 19: Ch 1, sc in first st, hdc in next st, dc in last st. Turn. (3 sts)
Rows 20 - 23: Ch 1, sc in each st. Turn. (3 sts)
Finish off. Use one tail to sew Row 17 to the middle of Row 3.
THE LETTER S
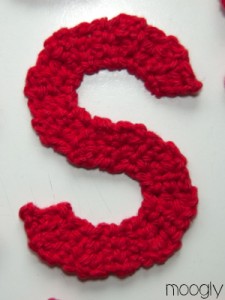
Row 1: Ch 4, sc in 2nd ch from hook, hdc in next ch, dc in last ch. Turn. (3 sts)
Row 2: Ch 2, dc in first st, hdc in next st, sc in last st. Turn. (3 sts)
Row 3: Ch 1, sc in first st, hdc in next st, dc in last st. Turn. (3 sts)
Row 4: Ch 2, dc in first st, hdc in next st, sc in last st. Turn. (3 sts)
Rows 5 - 6: Ch 1, sc in each st. Turn. (3 sts)
Rows 7 - 14: Repeat Rows 3 - 4.
Rows 15 - 16: Repeat Row 5.
Rows 17 - 24: Repeat Rows 2 - 3.
Rows 25 - 26: Repeat Row 5.
Rows 27 - 30: Repeat Rows 2 - 3.
Finish off.
THE LETTER T
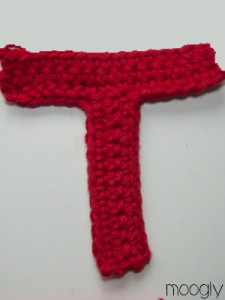
Row 1: Ch 13, sc in 2nd ch from hook, sc in each remaining ch. Turn. (12 sts)
Row 2: Ch 1, sc in each st. Turn. (12 sts)
Row 3: Ch 1, sc in each st. Do not turn. (12 sts)
Row 4: Ch 7, sc in 2nd ch from hook and each remaining ch, work 3 sc across the ends of Rows 1 - 3, make 6 FSC. Turn. (9 sc, 6 FSC)
Rows 5 - 6: Ch 1, sc in each st across. Turn. (15 sts)
Finish off.
THE LETTER U
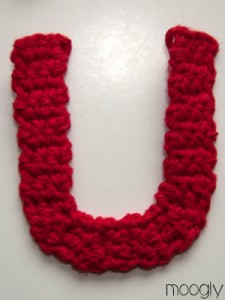
Row 1: Ch 4, sc in 2nd ch from hook, sc in each remaining ch. Turn. (3 sts)
Row 2 - 11: Ch 1, sc in each st. Turn. (3 sts)
Row 12: Ch 1, sc in first st, hdc in next st, dc in last st. Turn. (3 sts)
Row 13: Ch 2, dc in first st, hdc in next st, sc in last st. Turn. (3 sts)
Rows 14 - 15: Repeat Rows 12 - 13.
Rows 16 - 18: Repeat Row 2.
Row 19: Repeat Row 13.
Row 20: Repeat Row 12.
Rows 21 - 22: Repeat Rows 19 - 20.
Rows 23 - 33: Repeat Row 2. Finish off.
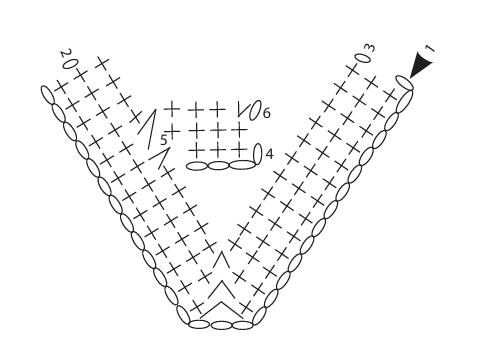
THE LETTER V
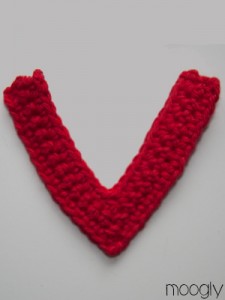
Row 1: Ch 30, sc in the 2nd ch from hook, sc in the next 12 chs. Wide sc2tog over next 3 sts. Sc in remaining 13 chs. Turn. (27 sts)
Row 2: Ch 1, sc in first 12 sts. Wide sc2tog over next 3 sts. Sc in remaining 12 sts. Turn. (25 sts)
Row 3: Ch 1, sc in first 11 sts. Wide sc2tog over next 3 sts. Sc in remaining 11 sts. (23 sts)
Finish off.
THE LETTER X
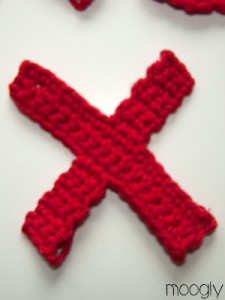
Main Bar
Row 1: Ch 18, sc in 2nd ch from hook, sc in each remaining ch. Turn. (17 sts)
Rows 2 - 3: Ch 1, sc in each st. Turn. (17 sts) At the end of Row 3, finish off.
Upper Diagonal Bar
Row 1: Rejoin yarn with a sl st in 8th st from left edge on either long side. Sc in this st and next 2 sts. Turn. (3 sts)
Row 2 - 7: Ch 1, sc in each st. Turn. (3 sts)
Finish off.
Lower Diagonal Bar
Repeat instructions for Upper Diagonal Bar on opposite long edge of Main Bar.
THE LETTER Y
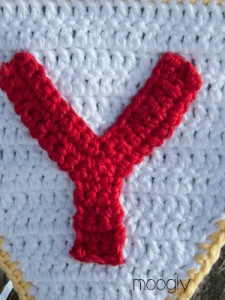
Row 1: Ch 4, sc in 2nd ch from hook, sc in each remaining ch. Turn. (3 sts)
Rows 2 - 5: Ch 1, sc in each st. Turn. (3 sts)
Row 6: Ch 1, sc in each st, ch 10. Turn. (3 sts, 10 chs)
Row 7: Sc in the 2nd ch from hook and each remaining ch, sc in each sc from Row 6, ch 10. Turn. (12 sc, 10 ch)
Row 8: Sc in the 2nd ch from hook and each remaining ch, sc in each sc to end. Turn. (21 sts)
Row 9: Ch 1, sc in first 9 sts. Wide sc2tog over the next 3 sts. Sc in the remaining 9 sts. Turn. (19 sts)
Row 10: Ch 1, sc in first 9 sts. Break yarn and use seamless join to finish off, joining to the sc2tog st in the center.
I hope you enjoy using the Moogly Crochet Uppercase Alphabet to personalize your life! If you share on socials, I would love to see it! You can always tag me @mooglyblog!
The Fine Print
Follow Moogly on YouTube, Facebook, Twitter, Pinterest, TikTok, and Instagram! Written pattern copyright Tamara Kelly 2026, all rights reserved. Please do not reprint or repost this pattern. Please do link to this page to share this pattern with others. If you wish to make items for sale from this pattern or translate it to another language, please visit the About page for details.


Jean says
How did you know this was just what I've been looking for? You always seem to read my mind. Have a new grand-baby on the way and I wanted to use initials on a couple of hats and blankets. THANKS a million!
Tamara Kelly says
😀 I'm so glad, Jean! You're welcome, and congratulations on the new grand-baby!
Shana says
Hi Ms. Kelly! I have a question regarding the Letter "A"
Row 4: Sc in the back hump of the 2nd ch from hook, sc in remaining 2 ch. Sc2tog, working into the same st as the last sc of Row 3 and the next unworked st (sts #5 and 6 of that side of the A.). Turn. (4 sts)
What does the "Sc2tog, working into the same st as the last sc of Row 3 and the next unworked st (sts #5 and 6 of that side of the A.)." mean?
Hope you reply ASAP! Thank you.
Tamara Kelly says
Hi Shana! Sc2tog is single crochet two together - it's a decrease stitch. Insert the hook into the same st as you made the last st of Row 3 in (on the right side "upright" of the A), yo and pull up a loop. Then insert the hook into the next stitch on the right side of the A (left unworked in Row 3), yo and pull up another loop. You now have 3 loops on the hook. Yo again and pull through all 3 loops on the hook. 🙂
Anna coetzee says
Hi, please can you inform me how to crochet the letters nig enough to stuff and hang on a rope as per your foto
.many thanks
Tamara Kelly says
Hi Anna! The ones shown in the photo on the banner are made with the worsted yarn and hook shown. I have made a giant set for the CGOA trade show booth, using Bernat Blanket Big or Extra Thick, and a 25mm hook!
stephanie tickle says
I love the idea of being able to crochet the alphabet but being a complete beginner im stuck on letter A, row four, makes absolutely no sense to me, is there any video demonstrations to help me out.xx
Tamara Kelly says
Not yet stephanie, but it's on the agenda! The A is the trickiest letter by far!
stephanie tickle says
ahh that's fab, look forward to it, ill keep practicing n hopefully get the hang of it. thank you.xxx
Barbara says
Great looking alphabet. Do you have a pattern for 2" alphabet?
Tamara Kelly says
Hi Barbara! To change the sizes, I recommend changing the yarn and hook size! 🙂
Barb says
What a fantastic way to teach kids the alphabet. Sandpaper letters are often helpful. But some kids are tactually sensitive. This is ideal for those kids.
Linda Nielsen says
Thanx a lot for sharing 🙂 Now I just need the Æ, Ø, Å 😀
Annie Shelton says
I'm so happy you posted this! I feel like it's just for meeee!!! =) When you asked on Facebook a few weeks ago what patters people would like to see, I said crochet alphabet! Hooray! Thanks!!!
Penny says
You are wonderful!!! Thank you so much. I really love the MOOGLY pennant you made and now that you've been so kind and generous to show us how to make the entire alphabet I'm gonna be a pennant making fool 🙂 Thanks so much for all you do and share with us.
Irma says
These are sooo cute!!! Thanks!!!
Now I gotta make something to put these on!!! 🙂
Thanks for the pattern!!!
Carmen says
Wow, these look great! I'm going to bookmark these for later use 😉
Patti Wells says
I just wanted to let you know how much I love your site. I anxiously await the time when I can finally look at it to see what you have offered each day. Thank you so much for being here.
Patti
tia mia says
Thanks so much for sharing your crochet patterns with all of us...I love your alphabet letters. Awesome work!!!!
Ali says
Thank you for your fab alphabet...and loads of other wonderful woolly wonders Tamara!
Keep up the great work - you are a real inspiration.
Ali
Tamara Kelly says
Thank you all so much! 😀 It's been a lot of fun to make, and I hope to add the numbers soon!
Marrie says
I've already seen numbers of moogly!..they were also tooooooooooooooooooo cool an' awesome!!
Julia Tellier says
Thank you for posting your Moogly Alphabet, I've been looking for a way to personalize my Teacher Husbands classroom with banners and these letters will be perfect for that. He teaches Algebra and Pre-Algebra which I will now crochet to put up on his walls. Thank you so much.
Tamara Kelly says
Sounds wonderful Julia!
Claudia says
Wow, Thank you!
jo says
What about the letter m and n??
Tamara Kelly says
They're there! Just scroll to their spot and you'll see the patterns. 🙂
T says
THANK YOU, THANK YOU, THANK YOU!! These are AWESOME!!!!
Brenda says
Thank you so much for sharing these!! Awesome!
Dianna says
ok i need some help. do i crochet the 'f' like the 'e' ? i am trying to place the correct letter next to the instructions and i seem to be off a few letters.
thank you for sharing your talents
Tamara Kelly says
Hi Dianna! The instructions for each letter are beneath the photo for that letter. Yes, the F is just like the E, except without that last "arm." 😀
Dianna says
thank you. but the way my printer printed up the letters are not near the instructions that is why i am a bit flustered over which is which.
Tamara Kelly says
Ah, gotcha! That does sound super confusing! Did you use the Print Friendly button at the bottom?
Dianna says
yes but when printer started printing i saw the craziness and didn't want ink wasted so i kept going.
can you help me where to connect each ?
Tamara Kelly says
Yikes, sorry about that, it should have stayed lined up! All I can recommend is comparing the printed version to the online version and marking each set of instructions as it's letter. They are at least in order I hope?
Tamara Kelly says
Ok, I just took a look at what the Print Friendly does to this pattern - what a mess! I'll add text labels so that will help with future printings. I had no idea it would rearrange it all like that!
Dianna says
thanks. i will check your pattern site again
Dianna says
ok i will recheck the pattern
Tess says
This is so awesome... have been looking for an alphabet for crochet!! This is perfect! Thank you so very much for sharing!!! And the videos!! Haven't checked them yet, but will be so helpful for visual!!! 🙂
GOD BLESS!!!
kristen carlton says
i seem to be having trouble with the 'a' the end of row three and row four is not working out for me is any one else having trouble or is it just me missing something
Tamara Kelly says
Hi kristen! The A is one of the trickier letters. The chain at the end of Row 3 are the start of the cross-bar of the A, and Row 4 is working back across those chains, and anchoring it back on the side, before working back onto the cross bar. Does that help at all?
Giuseppe Lucarelli says
Hi, I am getting stuck at this point too. Not getting when/where to anchor back to the other side. Is there a step missing?
Tamara Kelly says
Let me see if I can help. Ok, so you've got the left upright side of the A and the right upright side, and the cross bar that connects them horizontally. Now, when you read Row 3, it says
Ch 1, sc in the first 11 sts. Sc2tog over next 3 sts, skipping the center st. Sc in the next 4 sts, leaving remaining sts unworked. Ch 4, turn. (16 sc, 4 ch)
So, you sc up the left side (Ch 1, sc in the first 11 sts.), made the sc2tog that creates the top point between the sides (Sc2tog over next 3 sts, skipping the center st.), and start working down the right side, but stop after 4 sc (Sc in the next 4 sts, leaving remaining sts unworked.). Then you chain 4, which will be "pointing toward" the left side of the A (Ch 4, turn).
Now, we move to Row 4:
Sc in the 2nd ch from hook, sc in remaining 2 ch. Sc2tog, working into the same st as the last sc of Row 3 and the next unworked st. Turn. (4 sts)
Working back into the ch 4 you just made, skip the ch closest to the hook and sc in the next ch, as well as the other 2 ch (Sc in the 2nd ch from hook, sc in remaining 2 ch.). Then: insert the hook into the same stitch as the last sc made in Row 3 (the 4th sc on the right side of the A), and pull up a loop. Insert your hook again into the very next st on the left side of the A (the first unworked stitch left over from Row 3, what would've been the 5th st of that side), and pull up another loop. Yarn over and pull through. This completes the sc2tog (Sc2tog, working into the same st as the last sc of Row 3 and the next unworked st.).
Now for Row 5:
Sc in the next 4 sts (the sc2tog and the 3 sc from for 4). Turn. (4 sts)
Without chaining, sc in the top of the sc2tog that you just made, and the 3 sc sts of the cross bar. This gives you 4 sc sts.
So for Row 6:
Ch 1, 2 sc in the 1st st, sc in the next 3 sts. Sc2tog, working into the last st of the last sc2tog and the next unworked st. Sc in the remaining 4 unworked sts from Row 2. (10 sts) Break yarn and finish off.
Chain 1 and work 2 sc sts in the first st (still working into the cross bar). Sc in the other 3 sts of the cross bar (includes the st worked into the top of the sc2tog). These are the last stitches worked on the cross bar. Now you're going to make another sc2tog like you did in Row 4 - first insert the hook in the same stitch that you used for the second half of the previous sc2tog (the 5th st of the right side of the A). Yo, pull up a loop, and insert the hook into the next (unworked) st on the right side of the A (what would've been the 6th st of Row 3 if you hadn't made the cross bar), yo, and pull up a second loo. Yo and pull through again to complete the sc2tog. At this point there should be 4 remaining sts on the right upright of the A, so sc in each of those and you're done.
I hope this helps! Let me know if you're still having trouble!
Giuseppe says
Perfect! It turned out great. I had to sew the bridge onto the side by hand is that right?
Tamara Kelly says
Yes! 😀 I'm so glad it worked for you!
Amanda Allison says
Hello, do you happen to have the pattern breakdown for Y? I am doubling the pattern for larger letters. I had no issues with R since I was able to follow the pattern and see where each row landed on the R so I knew which rows did not get doubled. However, I am lost on Y. Thank you!
Tamara Kelly says
Hi Amanda! I'm not sure quite what you mean by pattern breakdown? Rows 1-6 are the base, then you split then rest to make the top V. Does that help?
angie says
I found the Letter A to be pretty easy. I having trouble with the B. I cannot get the first curve of the B to look right or connect to the main stroke of the letter. Duuyou have a video of this letter as a tutorial?
Tamara Kelly says
I'm afraid I don't have videos for any other letters.
Bonnie says
I love these alphabet patterns. Want time I need a letter I come to this page first. Thank you for posting it!!
Tamara Kelly says
Thank you so much, Bonnie!
kelley says
I'm struggling with the Letter B as well.
Meegan says
You are awesome for sharing this! Thank you so very much!
Jill_in_Alabama says
can't wait to pair the initials with the crochet bib patterns you listed a couple of weeks ago! It's such fun to make fun things!
Ray says
These are fabulous! I'm making a thank you garland for a friend.
Angie says
Thank you for the letters! Sweet! I was also having trouble with the A....I did it like 4 times and finally gave up but I couldn't five up forever. Because my whole family has an A in every name lol. I did the steps just like it said but for some reason I was missing the part where you would anchor or tie into the other bar. I finally just worked something out. My S looks great!!! My M is a little weird but I think that was just my stitching. I tried the B and had to give up last night but I'm going to try again tonight. I love your site and have shared it with friends. When I need a pattern for something I always come here first and see if you have it. Thanks again for all you do!!!!
Tamara Kelly says
😀 Some of the letters are rather tricky, I'll admit! And blocking helps a LOT - little things like this always want to be kind of wonky. With any luck I'll have a video on blocking them up very soon!
kristen says
Thank you so much! That did help also trying it during those few min of quiet time i get helped a lot too..haha again thank you so much for all the wonderful work you share. I have my daughters name done and ready to go...her name is Aria so i really had to master a...making a diaper bag now to put it on...thanks again
Tamara Kelly says
😀 I'm so glad that helped! You're very welcome!
hatangel says
You are a LIFESAVER! I have been so stressed trying to find a really good FREE (yea!) pattern for the entire alphabet. Do you have a numbers pattern, please, please, please? Thanks, hatangel.
Tamara Kelly says
😀 Coming very soon!
hatangel says
YEA!!!!!!!!!! I, like another poster finally "gave up" (getting too old and impatient) trying to make the letters and numbers come out looking professional. Looking forward to the numbers! God bless you!
Gladys says
Hi Tamara
Thanks for the of patterns.Do you perhaps have a tutorial video for the H alphabet? Stuck on row 9 ... foundation single crochet 🤔
Tamara Kelly says
Hi Gladys! I don't have a video tutorial for the letter itself, but I believe this video tutorial will help: https://www.mooglyblog.com/extending-rows-fsc/
mjmb says
I was excited to make this alphabet but I've been stuck on the "A" . I don't know what I'm doing wrong 🙁 think I'll take a break and try again another day.
Tamara Kelly says
Sorry you're having trouble mjmb! Did you read the comments before yours? There's a walk-through there that might help. It's a pity the A is first, it's probably the trickiest one!
mjmb says
Success! I tried it again today and it worked out fine. The "A" looks great! The additional instructions helped plus a good nights' sleep 🙂
Thank you!
Tamara Kelly says
I'm so glad! 😀 It is indeed tricky!
LIz says
Wow! I can't wait to get these done. I'm going to give them as gifts for first birthdays!
I'm having a hard time with row 12 on the "B" though. Can anyone help me out? I'm just not understanding.
Tamara Kelly says
Hi Liz! I'm sorry you're having trouble! Row 12 is made working into the outside curve of the upper curve of the B - into the edges of the rows. So Rows 1-11 make the straight upright line and the top curve. For Row 12, you slip stitch along the bottom outside edge of the top curve, then chain 1 and work a sc, hdc, and dc into the edge as well. The exact placement of the sts doesn't matter so much as that they're about "stitch width" apart. This starts the bottom curve of the B.
Does that help?
Julia says
This has helped me! Just wondering - how does the centre of the B get attached to the ‘bar’ part (rows 1-3). Do I sew it on? Thanks so much! Xx
Tamara Kelly says
Yes, that's part of the last line of instructions: Break yarn and use tail to sew Row 20 to last 3 sts of Row 3. 😀
Julia says
Thanks! What about the middle of the B? Do I sew that on too, to the middle of row 3?
Tamara Kelly says
Yes 🙂
Tania says
These are great! Will be using them soon for an upcoming project!
Tania
Lisa Lockhart says
Tamara, you're just the BEST! These are awesome.. I'm going to make banners for my granddaughter's and my "coming in late April/May 5th" grandson's rooms. They are SO cool! You give so much back to the crocheting community with your free patterns, videos and tireless help with all our questions!
p.s. My cell phone pouch (I was the one who asked you to design one last April!) is kinda dirty but still hanging strong. 🙂 I love your patterns and videos! Thanks again!
Gigi Lee says
These letters are great. I'm going to make bunting for my craft show tables. Thanks. Love your patterns.
Tamara Kelly says
Great idea Gigi! 😀 You're very welcome!
Natalie says
Fabulous, thank you!
Any chance of a pattern for the & sign or is that too ambitious?!
Am making wedding bunting for a friend and the & sign would be a welcome addition between their names!
Thanks x
Tamara Kelly says
It's already up! 😀 https://www.mooglyblog.com/perfect-party-pennant-garland/ You're welcome!
Natalie says
Thank you but I think I confused you! I've made the pennants already but need a pattern for the symbol
&
So I can make 'Tim & Helen' to stitch onto the pennants!
Does that make sense?! Thank you x
Tamara Kelly says
Aha! LOL, yes I was confused! Sorry about that. I don't have any symbols made up currently, but I could maybe whip that one up. 😉
Natalie says
Thanks lovely! I'd have no idea where to start LOL! Xx
Tamara Kelly says
Well, you could start with A... but that's one of the trickier ones... LOL!
Aimée says
What a great tutorial! I've free form crocheted letters, but these directions make it so much easier! I crocheted some blocks for my son when he was little and out his name on them.... Take a look!
http://the-aimee-way.blogspot.com/2013/04/crochet-toys.html
Tamara Kelly says
Those look great Aimee, fun post! I would've commented on it but I couldn't since I don't have Blogger.
Aimée says
What a great tutorial! I've free form crocheted letters, but these directions make it so much easier! I crocheted some blocks for my son when he was little and out his name on them.... Take a look!
http://the-aimee-way.blogspot.com/2013/04/crochet-toys.html
(I linked to your tutorial on my post!)
Sue Martino says
Jus a note to say thank u for the pattern to this alphabet. I thought it would be a good way for my grand daughters (3 & 5) to Learn the letters and spell words and play games with them. Again thank you.
Tamara Kelly says
You're very welcome! 🙂
Tracey Reichert says
Hi - thanks for these - they are awesome. I am not the most experienced and have most of the B down but most have done something around row 11. Do u have a video of B or any thoughts?
Tamara Kelly says
Ok, at the end of Row 11 you essentially have a P. So to make that bottom bump, you're moving around to the bottom of the top bump. If you look at the picture, you can see how the bottom bump start out to the right a bit, so you need to travel there via the start of Row 12. Does that help?
Gemma Blackwell says
Such great instructions thank you! I'm fairly new to crochet but found your instructions clear & easy to follow. I now have my friends little girl's name crocheted to go with my crocheted hearts to make some pretty bunting for her 1st birthday!
Tamara Kelly says
I'm so glad they were easy for you to follow! 😀 Thanks for commenting!
Hope says
thank you very much I've been looking for a written pattern cause I still can't read the pattern with symbol
I have a Q .. in LETTER A I cant get it ( skipping the center st. Sc in remaining ) in row 1-2-3
again
thank you very much for this easy pattern (:
xoxo
Hope says
its seems everybody have a trouble with letter A , so kindly can you make a tutorial ( how to crochet latter A ) thank you
Tamara Kelly says
I'll see if I can make a video!
Mercedes Smith says
I just came across this site... LOVE IT! Is there a link to how to attach the letters to things (like crochet blankets)? Thanks in advance!
Tamara Kelly says
Hi Mercedes! There isn't a link for that, but I would recommend leaving long tails on the letters and then sewing them on if possible.
Adele Anderton says
Have you go a lower case set as well?
This looks amazing a will use very soon.
Thank you
Tamara Kelly says
I do not, but I might in the future - great idea!
melissa says
Awesome!!! Are you working on numbers next ? 😀
Thanks for sharing this.
Tamara Kelly says
The numbers are already up! 😀 https://www.mooglyblog.com/the-moogly-crochet-numbers/
betsy ezell says
i have been trying for so long to find the letters ty so much for sharing them im sure was alot of work just wriying these up .very much appreciated ty so much again.
SUE HELMICK says
CAME ACROSS THE NUMBERS WHILE CHECKING THE SITE. WAS MORE THRILLED WHEN I CHECKED OUT THE LETTERS! CAN'T SAY THANK YOU BIG ENOUGH!!! HAVE WANTED THESE PATTERNS FOR A LONG TIME.
Tamara Kelly says
😀 Thanks so much, glad you found them!
Nicole says
Hi! Love this! Any tips on how to switch some of the letters around for a lefty? The only thing I have come up with is attaching the letters backwards o_O
Thanks! Love your blog!
Tamara Kelly says
Ack, I wish I were better with the lefthanded thing! Though sewing them on backwards might work since they're in rows and not in the round... heh.
Farah says
Thank you so much for the patterns , I just made letter s for a bag ,it was very easy to make thank you soo much
Tamara Kelly says
Glad to hear it Farah! 😀
Nadia Fuad says
I have this bookmarked!! Thank you so much! I have been looking to make letters and sewing them to bags!
philippa says
I was wondering if I could post a link to your site as a reference. I have been thinking about making a bunting saying Ramadan Kareem and was wondering if I could add a link to your site so that people can use your pattern to make their own letter buntings.
thank you
philippa
Tamara Kelly says
Please do philippa! 😀 That would be lovely!
philippa says
please ignore the last comment I couldn't find my comment and thought the worst . Am really sorry
thank you . Was hoping to start a new feature on my BlogSpot to show off the best sites for crochet knitting and general crafts and wanted to write about your site as it is really useful and accessible. thank you didn't want to put it on my blog without asking your permission first.
philippa
Tamara Kelly says
It's fine! 😀 I understand how things can get missed. <3 The nesting comment thing is tricky. I hope when you write it up you come back and share the link!
philippa says
I Wrote a post about my Ramadan bunting and recommended your site if you like you can look at my bunting on http://heavenspun.blogspot.com/
Hope you like it. I have to say I have been wanting to be able to make letters for the last three years so thank you soo much. I will be able to make name buntings for all my nieces now.
Tamara Kelly says
It's lovely philippa, and thank you for you the link! I would have commented on your blog but I don't have blogger. Happy Ramadan!
philippa says
so can I please put a link to your site from my blog. it would be good for you cos everyone that looks at my blog would come to you . I am not taking any credit for your designs I just want to be able to show the people who read my blog where I get my patterns from . Could you please reply to me . As my last comment was deleted and I have not idea why? Especially as its more good for you than me . I am not doing anything bad I just want to show people where to go to get a great pattern. And I was planning on writing a blog spot on how great your site is . So please do me the courtesy of replying to me.
philippa
philippa says
ooopse big embarrassing moment
I didn't see your reply
I am soo sorry
I thought you were ignoring me lol sorry really sorry
Alice says
Thank you for posting these:)
pippa king says
Thankyou so much for sharing these patterns 🙂 i have used them several times already to make bunting as birthday presents :), i was wondering if you has a set of lower case letters? would be sooo appreciated 🙂 thanks again for sharing x
Tamara Kelly says
😀 You're welcome! I don't have a lowercase set, but it's a good idea!
Serena says
I used these cute letters on a pillow for my nephew and his fiance for their wedding shower. I posted a picture on my Raverly page. (Rena19)
Thanks for all your posts and patterns!
Tamara Kelly says
I just favorited it Serena! Looks fantastic!
E. J. Pyewackit says
Ms Tamara,
Thank you so much for this how-to crochet letters and numbers! I'm a newbie with crochet and love the ease of making the letters and numbers from your directions. Awesome!
E.J. Pyewackit
Tamara Kelly says
You're very welcome E.J.! Thanks for commenting!
Ann Marie Lindsay says
What is the finish size for the letters?Thanks
Tamara Kelly says
About 3.5 inches tall as written. 🙂
Penny says
Hi Tamara - I just wanted to thank you again for sharing these patterns. I just made an iPad cozy for my mother in law, and she is a HUGE Nebraska Huskers fan, so I made your letter 'N' to put on the front of the cozy. It turned out great! Many thanks.
Penny
Tamara Kelly says
😀 That's awesome Penny! My sister and her husband were Huskers and live there still!
Andrea says
I've done the letter S 3 times now and still it comes out like a C. What am I doing wrong?!?!
Tamara Kelly says
It's hard to say without seeing it, but it sounds like maybe you're missing a Row 5 repeat, or possible repeating rows 2-3 when it's supposed to be 3-4 (or vice versa). Those are my best guesses anyway!
Serena says
It took me a few tries to get the "S" to come out correctly. I had to wait until I had no distractions so I could make sure I was doing the correct repeats. Take a break and come back to it...hopefully it will work for you!! Good luck!!
Jo Ann Bigham says
For: Tamara Kelly,
I am a bit confused about which patterns I would be allowed to make and "sell" at a craft show.
For instance: I just bought the Sven Sweater. I AM allowed to make and "sell" the finished product. Correct?
Yet, the Angel Pinafore dress (turquoise) downloaded for free on Moogly, I AM NOT allowed to crochet and "sell" the finished product correct?
How do I know for sure which ones I CAN and CANNOT crochet and sell?
How about the Antie "M" baby Abigail sweater? Yes or No to selling he finished product?
Tamara Kelly says
Any of the patterns I've written (all of which should say either copyright Tamara Kelly or copyright mooglyblog at the bottom), you are free to make and sell - that includes the Sven Sweater and any of the free patterns. The patterns in the roundups, such as the Angel Pinafore Dress, are not my designs - I didn't write them, and I don't own the copyright. I'm just sharing the links. You'll need to read the fine print or ask the designer on those, as each one will be different.
The Auntie M Abigail Baby sweater, while hosted here on Moogly, is not my pattern. Auntie M no longer has a blog and has given me permission to host the pattern so that it doesn't get lost. In the original post on Auntie M's blog she did ask that people not sell items made from that pattern.
Andrea says
Its not turning to make an S. i will keep trying though!!!
happy star says
you know what?...i have tried them to make within the couple of week!..but I know...u are genius!..I love u an' your tutorials!..♥♥♥! ;)..it's awesome!.specially ''V'' is difficult!..an' that is the 1 you make V.v nice ♥
Tamara Kelly says
Thank you happy star! I'm wondering if charts will help with the letters? They're definitely not beginner patterns- lots of twists and turns!
Marrie says
please can i get a video tutorial for letter 'M'? 🙁
Tamara Kelly says
I'll see what I can do! Would charts help?
marrie says
yes!..but if i will watch a video so it will be better
Marrie says
sorry Tamara!..you haven't replied!...well,if you have any cannot make so no problem!..i know you are busy person!.. thanks for your charts help!.& they are written in so clear words!..so no problem!..actually i am Saudi!..i have a little problem in understanding English!...THANK YOU for the help!...♥...still watching your tutorials!
Tamara Kelly says
Hi Marrie! I will see what I can do - I can only make 1 video a week, so to do all the letters would take many months. I hope to get the charts up soon - as they aren't in English I hope it will help faster.
Mel Kel says
I also am having problems with the M. I was able to do the T with great success and it forced me to learn the foundation SC. I can get half the M perfectly but as I start up the other side it just gets all muddled. Any advice? And yes, a chart might be helpful to make sure I'm not off in my counting.
Thanks so much, I really love the letters!
Melissa
Tamara Kelly says
I'll start working on charts asap!
Mel Kel says
Thanks!!
Connie says
Wow! This alphabet is just what I was looking for to compliment Christmas gifts I am crocheting for my 13 " grand-angels ". They are easy, just the right size and the photos are most helpful. Thank you, and God bless you for sharing.
Tamara Kelly says
😀 Thank you so much Connie! Lucky grandkids!
Naomi says
Hi I am doing a yarn bomb for Christmas and was looking for an alphabet to be able to make "merry christimas' out of, how easy do you think this would be to make larger? We are looking at our panels to be 30-40cm long.
Tamara Kelly says
Those are some big letters! I think it could be done - using several strands of yarn held together and a great big hook would get you close! Then work a nice sc edging all around. You might need to make the lines longer but it would take some experimenting to know for sure.
Kim says
How do you do a foundation single crochet? That's the only thing I'm having trouble with
Tamara Kelly says
Hi Kim! There's a tutorial for the foundation single crochet here: https://www.mooglyblog.com/foundation-single-crochet-fsc/
Dawn Goode says
Foundation single crochet
Help, I'm loving your crochet letter patterns, I have even done letter A without too many problems thanks to your video. I have got stuck on H when I have got to the six foundation single crochet. I can't see anything on your page, is there a video for how to do H? Any help greatly received
Dawn Goode says
Don't worry, just seen post above mine, sorry xxx
Dawn Goode says
Is there a video for H, your tutorial on foundation single crochet is very helpful but I'm missing something as the rest of the chain is thick but the join is thin. I have worked back and tried numerous times but still stuck. I'd be very grateful xxx
Tamara Kelly says
I'm afraid H is the only one with a video tutorial. I'm not sure what part you mean by join?
Dawn Goode says
No problems, finally sorted it, thank you for all your lovely patterns
Dawn Goode says
No problems, I managed it eventually. The fsc threw me. Thank you for all your lovely patterns
Tamara Kelly says
😀 Glad to hear it! 😀 You're very welcome.
Valerie says
These are terrific! I've been crocheting hats for my daughter who is about to turn four (a Batman hat / mask and a tiger, so far). Can't wait to make one with an initial on it!
Tamara Kelly says
😀 Thank you Valerie!
Shonalee says
Love the letters but need help with letter Y. Row 7 ch 10 sc in 2nd ch from hook and rest of chain makes 9 and sc in each from row6 which had 3 makes 9 sc for my total of 12 but in brackets says 21? Please help me figure out what Im doing wrong. Thanks so much
Tamara Kelly says
Hi Shonalee! Row 7 reads "Row 7: Ch 10, sc in the 2nd ch from hook and remaining 8 ch, sc in each sc from Row 6, ch 10. Turn. (12 sc, 10 ch)" I think you're reading the stitch count for Row 8. 🙂
Heather G. says
I am really off on the G. Don't ask me how but the first attempt looked more like an S than anything.
Tamara Kelly says
Ouch! My best guess would be you skipped a row of sc sts - which would send the curve off in the opposite direction! Such a bummer though!
Holly says
Would love love love lower case if you get around to it. Tried out the R & S tonight and your pattern was very easy to follow along 🙂 Thank you soooo much for making this & your numbers a free pattern 🙂
Tamara Kelly says
Thanks Holly! I might have to add lower case to the list!
Rachael says
Hi! Love your letters! Thanks for sharing! I'm so confused about the fsc on the h and t. Your video tutorial is very helpful but is it exactly the same when in the middle of a project instead of beginning? Do I still chain 2? When I chain 2 it creates separation.. I'm sure I'm being confusing.. Sorry. If you're able to help me it'd be greatly appreciated! Thanks!!
Tamara Kelly says
Hi Rachael! Sorry for the confusion - this is something I need to make a video about specifically, but it's a simple trick. Don't chain, but treat the last regular st you worked as a previous foundation stitch. In other words, insert your hook into the base of the stitch that you are extending from to start the fsc. Does that help?
Rachael says
Yes. Thank you sooo much! You're so sweet!!!
Melissa says
I used this tutorial to make a "M" for my daughters blanket I made her. Is there a trick to attaching the letters to a crochet blanket? When I winged it last night the M turned into what looked to be the W from the 'Wu Tang Clan' haha.
Tamara Kelly says
😀 I think just sewing them as you want them to be is the key. It also might help to block them a bit first!
melissa says
Your alphabet pattern is exactly right for my daughter's preschool teacher. I am having a rough go with the M pattern. It's going wonky in the middle. Any suggestions?
Tamara Kelly says
It may seem a little spread out in the middle, but sewing it down as you want it to lay helps. I'm not sure if that's what you mean?
Melissa says
Well, on each attempt the middle 'v' of the 'M' either goes wavy or in the wrong direction. I will not give up, but simply move on to the next letter and come back as another post noted when it's quieter and I can concentrate better. A video tutorial would do me well for this one, too because I don't read patterns very well. Your patterns are giving me a lot of practise though! 🙂
OAN, I hadn't thought about bunting for my daughter's preschool room but that may work out better than an extremely long two to four row sc chain.
doneva says
finishing up an afghan for my great grandson and decided to use the moogly alphabet so I could put his name on it. the A was fun but the video is pretty good and after you watch it the directions make sense. I did decide to slip stitch around each letter to even out the edges especially for those letters that curve and it really looks nice. thanks for offering the letters for free. always a good day when you not only find the pattern you need but it's FREE.
Tamara Kelly says
😀 Thanks doneva!
AlexandreA says
Hi I was wondering if you have a lower case set I'm making gifts my kids and want to put their names on them would love to have a lower case set
Thanks for the upper case
Tamara Kelly says
Hi Alexandre! I don't have the lowercase done yet, but it's on my to do list for the future!
Melissa says
Is anyone else having trouble understanding the directions for row 4 of the letter K? Or the K overall? I am struggling and I NEED that letter!! LOL HELP!!!
Tamara Kelly says
Hi Melissa! How can I help? Basically, in row 3, you sc in the first 8 sts and leave 7 sts unworked. Then, in Row 4, you chain 9, ignoring everything from Row 1-3, then skip the ch closest to the hook and sc back down that ch toward Row 3, and the sc in what would've been the 9th st of Row 3, if you had continued crocheting that row. Does that help?
stella says
Hi Tamara!
Thank you for thw wonderful pattern! All the instructions are well written and easy to follow and the result is amazing! I was wondering if you could help me with something.. I wanted to crochet a streamer that says Merry Christmas in Greek but the letter S in greek is different! All the other letter are alike and I can adjust them but S seems impossible! It's Σ in greek!
Thanx a lot!!
Tamara Kelly says
Thank you Stella! Have you taken a look at the numbers? I'm thinking the #3 could work - just mirror the top on the bottom?
Ashley Bri says
I really like these letters, they're really helpful for presents and personalizing projects. Thank you for putting them up. I'm having a little bit of trouble with the letters with S and C. When I try to do an S i get a large C and when i do a C i get a small awkward S. Can you help me with the pattern?
Tamara Kelly says
It sounds like you're working the wrong number of sc 3 rows in the middle - one too many or too few, which will affect the direction of the bottom curve.
Teri Robbins says
Thanks so much for the crochet letter patterns! I'm pretty good at improvising things I need when I don't have a pattern, or even altering a pattern to fit exactly what I want, but I've never done any letters before. And yes, only a few days ago I agreed to crochet a letter to go on an afghan for a friend's friend! Are all us crochet-ers guilty of that kind of thing or is it just me???
Either way, I just wanted to say thanks! I love your blog and you inspire me on many of my own projects!
Tamara Kelly says
😀 Thanks Teri! You're definitely not alone!
Harmony says
This is an amazing resource and the video for the letter "A" was very needed (for me anyway). I used the letters to make a new picture for my Facebook page:
https://www.facebook.com/creatingharmoniously
Tamara Kelly says
Thank you Harmony! Best of luck with your page!
Grace says
agh! I didn't get the part at the letter H where you have to chain 7 and SC in rows 5-7.... help!
crazycrocheter says
Basically, in the part where you made the bar in the center of the H, you have to sc in the side of the three rows there.
Does that help?
Alida says
Love Love Love your letters and numbers! Are you planning on doing a lower case letter set? 🙂 xx
Tamara Kelly says
Hi Alida, I am indeed! It's a big project, so as usual it's a matter of time, but I do have it on my agenda! Thank you!
Alida says
Great! Can't wait! 🙂 x
sarah smith says
I have been looking for patterns for the punctuation marks like the # ! &? Stuff like that do u know where I could find them
Tamara Kelly says
I haven't written them yet, but they are on the agenda!
Baybaycarr says
Hello, thank you for the crochet letter's and number's. I love then. I am having trouble making the letter H. Please help me with this letter. Thank you
Grace says
I'm having the same problem!
Tamara Kelly says
Can you tell me what the problem is? Where is it tripping you up?
Grace says
I got confused at row 9.
Tamara Kelly says
Ok, so in Rows 1-8 you've made one vertical side of the H and the horizontal crossbar that will connect it to the other side of the H. Row 9 begins the first row of the second vertical crossbar. So what you do is ch 7, to start the the top half of the vertical side, then skipping the ch closest to the hook, sc in the remaining 6 chains.
This brings you back to the horizontal cross bar. Sc 3 sts in the end of the bar, working right on across when the vertical bar should cross the horizontal bar. Then, you'll want to extend this row for the bottom half of the vertical bar with 6 foundation single crochet (fsc) stitches. I have a video tutorial on how to do this here: https://www.mooglyblog.com/extending-rows-fsc/ And that's it for Row 9. Does that help?
Grace says
Yes! Thank you!
Baybaycarr says
Hello thank you so much for the crochet letters. I love them. I am having trouble making the letter H. Please help me with this letter. Thank you
Tamara Kelly says
Hi there! Thank you! What part is giving you trouble?
Jaquie young says
Please help I am stuck on "n". I am new to this and I am not understanding the pattern. Thank you
Tamara Kelly says
Hi Jaquie! What part of it is giving you trouble?
Jaquie young says
I am having trouble making the second leg of the it. I am not really understanding how to make the second leg work. I have only been crocheting since December but I made the "a" and it was easy. But I think it was because the video really helped. Thank you
Tamara Kelly says
The part that is diagonal? Basically it's 3 sc sts, shifted to one side in each row, so that the last two are in the same stitch, creating the diagonal line. If you look at the crochet symbol chart, you are working from left to right. 🙂
Jaquie Young says
Yes the diagonal section. It just doesn't look right to me as I am working on it. I try to follow the chart but still being new at this is confuses me a little. Maybe it just looks different because I am left handed. I will keep working on it thanks.
Tamara Kelly says
Ah, yes! If you're left handed it will be backwards I think. Flipping the N over should solve that though.
Margo james says
My son asked me to make him an afghan using the ASU colors but he wanted the letters on a field of maroon. I have been looking for two years to find ready made letters or an ASU logo I could appliqué with no luck. Now I found your wonderful blog with these awesome letters, so I can finally fulfill his request. I need to make the letters maroon trimmed in gold, so I thought size 10 thread would be best for the trim. Thoughts? Thank you so much. I love your blog!
Tamara Kelly says
I think that would look great! Thank you Margo!
Lindsay says
Dear Tamara,
Thanks a bunch. My little girl is turning one next week...Making flags with her name on them!
Love the website!!
Tamara Kelly says
😀 Thanks so much Lindsay! And Happy Birthday to your little girl!
Ro says
Hi! Thank you so much for your tutorial - I'm finding it simple enough for a complete newbie so that's great! However my V is coming out about half the size as the rest of the letters - it's sandwiched between to Es but just won't fit on the garland. It's the same wool - where am I going wrong? If I double the length what stitches would I need to sc2tog in? Thank you! R
Tamara Kelly says
I don't know why it's half the size, but a decrease right in the middle is the trick!
Sonya says
Hi these are great,! I managed to do the A with no problem; however I'm struggling with the M. It turns out very wide compared to the others. I've tried twice but still no luck. What can you advice? Many thanks!
Tamara Kelly says
The M is a bit wider - blocking and sewing it as you want it to lay takes care of a lot of the issues. 🙂
judy says
can you not use the letter V for A and just add a middle /
Tamara Kelly says
Of course you can - do whatever works for you! 🙂
Georgina Santos says
Thanks a lot for sharing this patterns!!! Amazing alphabet!!! Very well explained plus your tutorials in video, much better 🙂
pamela says
I am having trouble with the letter R. When I looked at row 18 I got so confused. Could you may explain to me what would be the best route to doing that row right?
Row 18: Ch 1, and working into the sides or ends of Rows 17 and 16, on the outside of the curve, sl st, then ch 1 and sc 3. Turn. (3 sts, 1 sl st)
I am new with the letters and a bit of a beginner at crochet. This lettering deal means a great deal to me though. I'm using them to crochet my little baby girl's name onto her blanket. she is my first and I want the best for her once she is born. any advice would be a big help. thank you 🙂
Tamara Kelly says
Hi Pamela! Congratulations on your little girl! Ok, so for Row 18. If you look at what you've got so far, it should be a letter P. So with Row 18 you are moving to the bottom of the curve that makes the P, so you can start making the second "leg" to turn it into an R. Does that help?
Krissy says
I love these!! Started in the B cause didn't want the difficult A to be my first.
It seems that Row 7 is missing from the directions though. I got through rows 1-6 and then for 8-11 it says to repeat rows 6&7. With no 7 I repeated 5&6. Not sure if this is right though cause I didn't know when or how to join the top bubble of the B to the straight part. Does that mKe sense?
On the plus side however, I ditched the written instructions after three attempts at it and finished it using the pattern with symbols. Never done that before!!
So my B is done but I know it isn't exactly right. Could it be the missing Row 7?
Tamara Kelly says
I'm glad the chart helped. I see Row 7 there though, right after Row 6... how strange!
Jaine loh says
Love your patterns. I've finished "Class of 2015" for my daughter in her school's color. Does it matter which is the front or back for the alphabets and numbers? And, should I use yarn or sewing thread to sew the alphabets on the flag? Thanks.
Tamara Kelly says
Thank you so much Jaine! The front or back is just a matter of making sure they face the right way to be readable. I used yarn to sew them on, but you can use whichever you prefer. 🙂
Vladimira winkler says
Hi, thank you very much for this alphabet. I made Halloween sign out of the letters as a perfect part of my Halloween decoration. Have a look 🙂 http://vladiashandmade.blogspot.sk/2014/10/halloween-decoration-2014.html
Tamara Kelly says
Looks great, thank you! 😀
Rita Sewell says
Why is there no chart for the "S"? For some reason, mine came out all wrong on that one following the written instructions. Had no problem with the rest of the letters I needed. Thanks for your help!
Tamara Kelly says
A lack of time mainly - I keep meaning to come back to these! Sorry for the trouble Rita, I hope to add the rest of the charts as time allows!
Tamara Kelly says
The software is no longer functioning properly, and the designer of the software doesn't seem to be supporting it anymore, so I've tried to draw one out. It's not pretty, but hopefully it helps!
joyce glenn says
Do you have plans for a left handed set of letters and numbers
Tamara Kelly says
Not currently I'm afraid. I'm wondering if flipping them over would work?
Amy says
This is amazing!! Thank you! I'm so glad I found your website.
Also, for the letter A, for people like me who hate starting with a chain and prefer the foundation stitch, you can start row 1 with 13 foundation stitches and then on the next foundation stitch, pull through another chain stitch during that part of the foundation stitch and end the row with 13 more foundation stitches. It also helped me keep all the letters even height because I pull too tight with a chain start.
ram says
superrrr
deb christiansen says
these are great!
Tamara Kelly says
Thank you so much!
Loretta riddle says
I am having a problem in row 16, I don't know what it means when you said about the Foundation Single Crochet. Could you please tell me what you mean or how to do that stitch. Thanks for a quick reply on that. Loretta
Tamara Kelly says
Hi Loretta! To extend a row with FSC, here's a tutorial: CLICK HERE
Anna says
Thank you for the wonderful free alphabet! I used the T and L to adorn some hats for my cousin's newborn twin babyboys :-)nhttp://schwertfischaufkoks.de/2015/mutzen-fur-die-zwillingszwerge/
Tamara Kelly says
😀 You're very welcome! They look great!
Jessica says
Crocheting letters are something I have been looking to learn, so thank you for the patterns.
I know you have a tutorial for the letter A. I was hoping there were more tutorials to help those that need or want to follow a video to learn how to make the letters...I was disappointed to see there were none. Do you have any plans to create any?
Tamara Kelly says
Hi Jessica! It takes a week minimum to make each tutorial, so I'm afraid making them for every letter isn't possible. But I'm happy to answer any specific questions you have!
Kelly says
I'm having an issue with wording of the directions for the Q. Row 33 specifically. Am I really just supposed to work up the side of the "O" and then sew the "O" part together?
Tamara Kelly says
Yes, just like the O! 🙂
SUE BOWEN says
My 1st comment is that my email address is all in lower case letters (ha!ha) & I could not get the lower case letters to work when I put my email address in the email box. So, do it all in lower case, or I probably won't get it.
My 2nd comment is a ?. On the letter O in the upper case alphabet, there is no "diagram for the letter "O". How come Or is it just my computer?
My next comment is that this is so wonderful of you to have posted these online for others to others & use for "free"!!!!!!!! 🙂
I've done the letter "C" so far, but it didn't turn out the way that the diagram showed, but it could be something that I am doing wrong. I'll work on it. But even though it doesn't look like the letter "C", I'm also going to see if manipulating the yarn might work as well.
May GOD BLESS you for doing this for others to make & use for free!!!! There are so many gift ideas that can come out of these for OTHERS to do & use & give away as gifts!!!
May GOD BLESS you always!!!!! 🙂 🙂 SUE BOWEN 🙂
Tamara Kelly says
Thank you Sue! It comes through in all lower case, but it doesn't really matter - email addresses are not case sensitive.
There aren't diagrams for all the letters, just some. The O is pretty straightforward and repetitive, so it didn't get one. Each takes an hour or more, so I had to pick and choose. 🙂
Cindy says
I'm pretty new at crocheting and having trouble making the N. Is there a video tutorial for it? Thanks!
Tamara Kelly says
No, I'm afraid there isn't. Is there something I can help you with?
Annruzai Fernandes says
Hi Tamara dis is Ann...your simply amazing... I jus tried letter F ..its amazing...I need your help for FSC...I have been thru YouTube for FSC but some say chain 2 at the beginning and others say start frm last 2 strands of previous single Crochet...how do I go abt it? I m stuck at letter H 🙁
Tamara Kelly says
Hello Ann! Thank you!
FSC all by itself usually starts with a ch 2, but for the H you are extending an already existing row with FSC, so this tutorial should help: https://www.mooglyblog.com/extending-rows-fsc/
Annruzai Fernandes says
Hi Tamara... Thank you soooo much for the FSC...yes I got it now...Tamara it wud be great if u can help.. how do I attach the letters on a granny square... Shud I use a darning needle n sew it or is there any stitch particularly for attaching the letters. My concern is...at the end it shud not look shabby on the wrong side of the square... It shud look neat both sides.
Tamara Kelly says
😀 I'm so glad to hear it! I think the easiest way to sew them on with a darning needle. If the fabric you are sewing it to is thick enough, you can sew just through the top layer of the fabric, so that it doesn't show. Another option is the crochet around the letters with the block color, and then sew through that edging, so that the sewing yarn matches the background fabric. And one last possibility, IF none of the yarn you are using is acrylic, is iron on bonding tape! http://amzn.to/20Rqn9P 🙂 But it can only be used with natural fibers, or the iron will melt your project.
Robin Howell says
Hello, I wanted to say thank you as well for the crochet letters and numbers, they are great!
I would like to ask if you can explain the capital letter T more.
I am on row 4 and I am not getting it. I don't understand what to do after the sc across the foundation part.
"Row 4: Ch 7, sc in 2nd ch from hook and remaining ch, sc 3 in the ends of Rows 1 – 3, FSC (foundation single crochet) 6. Turn. (9 sc, 6 FSC)
Row 5 – 6: Ch 1, sc in each st across. Turn. (15 sts) Break yarn and finish off."
Do I chain those 6 and do the same as the same as for the ch 7??
I need answer ASAP if possible from anyone.
Thanks
Tamara Kelly says
Thank you Robin!
I think this video will help: https://www.mooglyblog.com/extending-rows-fsc/
Robin Howell says
Thank you! I got it after watching.
Tamara Kelly says
I'm so glad that helped! Thank you Robin!
Maria Macko says
Thank you so much for these letters! I love them! Just wanted to clarify that I can make items with these letters and sell them online or at craft fairs as long as I give credit to you as the creator of the patterns correct?
Tamara Kelly says
Absolutely! Thank you Maria! 😀 Best of luck with your sales!
Hannah says
Hi! Thank you so much for these patterns! Any tips for resizing them for a smaller letter?
Tamara Kelly says
Thank you Hannah! I would use thinner yarn and a smaller hook! 🙂
Tami says
Trying to print the alphabet off and can not get it to print with out the ads covering the directions.
Tamara Kelly says
Hi Tami! Please use the green Print Friendly button - it's at the bottom of the post, right by the social sharing buttons. It will make a popup (so make sure that isn't blocked on your browser!) that you can customize and print or download from - without ads or comments. 🙂
Jana says
Really really great! I've been looking for these patterns since years! 😀
Thank you for sharing them!
Tamara Kelly says
Thank you so much Jana! 😀
Cat says
Thank you for an awesome letter R pattern! I started with chain 20 instead and then extended with 2 more SC rows and ended with a SC, HDC, DC row. And it came out great 🙂
Lotte says
Thank you for a grate pattern 🙂
I'm stuck on row 12 on the letter B. Have read some of the other comments but still cant get it :/ can you do a short video tutorial please i'm about to give in, but its the last letter i need :/
Nikita Flood says
hi I was wondering if you have any videos for these letters already
Tamara Kelly says
Only for the A, I won't be making videos for the rest at this time.
betty grant says
Hi Tamara. Having problems with the letter W. can not figure out how to get to the other side. Stuck in the middle. I have this long strip. Then I chain the 11. does not look like a M/W. Help!
Tamara Kelly says
This one is helped greatly by blocking to sharpen up the corners. Have you looked at the chart? From your description, I'm not sure where to help.
patricia says
Hi, I kindly ask for permission to use the patterns for the letter P and T for my name's initials. Thank you!
Jodi Brunette says
I’m on letter S. At the end of the first row it says 15 sts. I know sts stands for stitches. But why did you say 15? There isn’t that many in the first row.
Tamara Kelly says
Hi Jodi! The first row of the letter S is: Row 1: Ch 4, sc in 2nd ch from hook, hdc in next ch, dc in last ch. Turn. (3 sts) - I think you might be looking at the R instructions, above.
Suha says
I just crocheted the word "TWINS" to attach to a bunting for a friend from this blog. Thank you very much for your efforts!
Tamara Kelly says
I'm so glad it helped you, thank you Suha!
Maggie H-G says
I am a long time user of your alphabet patterns. Thank you for such well designed work!! I just wanted to add: if ever you wanted to create a PDF version of each of the letters, I would happily purchase the file! Thanks again for sharing these so willingly! ~Maggie (TugboatYarning.com)
Tamara Kelly says
Thank you so much Maggie! ♥
Divya Saraf says
Hi
How do you fill these with pollyfill and make them into puffy letters. Like cushions or pin cushion ?
Tamara Kelly says
Hi Divya! You could just make two and stuff and sew around the edges! 🙂
Mikki says
Hi Tamara, I have tried the letter N over and over several times and I just can't get it right. I feel like I have more stitches left when it only says I should have 3 or something. This is forming the first diaonal.line. I am in an extreme time crunch, please help!
Tamara Kelly says
Hi Mikki! Is it Row 4? I'm not sure where you're running into trouble. Try putting a stitch marker in the first and last st of each row, perhaps that will help?
Hannah says
Hello! Love your patterns and use all the time I printed PDF printable and it leaves out rows I refer back to web link but it is a bit of a pain any chance you are able to fix this?
Tamara Kelly says
There seems to be some glitch on this and one other page we just can't figure out - we're still looking for a solution!
MAGGIE says
IM HAVING TROUBLE WITH THE N WITH THE ROW 5 CAN YOU PLEASE HELP ME WITH IT PLEASE THANK YOU AS SO AS POSSIBLE THANK YOU
MAGGIE
Tamara Kelly says
Hi Maggie! I'd love to try to help, can you tell me more specifically where you're having trouble?
Gwen says
Hello! On the letter O, rows 29-32, the pattern is backwards, it should be repeat row 14, then 13. I did row 13 then 14 and the last piece of my O was sticking out the wrong way. Not anything someone couldn’t figure out easily but just something I noticed 🙂
Jessica says
I think you missed a row because mine are coming out perfectly. ... Maybe it's one of the rows where you're only doing 3 SC across? Easy to lose count there.
Maria Conley says
Thank you so much for these patterns! I was wondering if you happened to have a pattern for a block O. Want to make a blanket for an Ohio State fan. Thanks for any help you can provide!!!
Tamara Kelly says
Maybe the Theta from here https://www.mooglyblog.com/crochet-greek-alphabet-part-1/ or the Omicron here: https://www.mooglyblog.com/crochet-greek-alphabet-part-2/ 🙂
Maria Conley says
Thank you so much, this will definitely help!
Jo Cullen says
Help! Is there a way of doing the T without FSC? I have watched every tutorial going and still just can’t seem to get it... :o(
Tamara Kelly says
I haven't been able to come up with one, maybe this will help? https://www.mooglyblog.com/extending-rows-fsc/
NORA GARZA says
hi, love your alphabet. use them all the time on mittens for first graders.
Tamara Kelly says
Thank you so much! ♥ What a fun idea!
Wendi says
Thank you for the patterns, i have used them in several lrojects, and love the easy directions. I was wondering if you would have (or know where i could find) a pattern that would be much larger, or can your be modified to make larger? Iam doing a baby blanket and would like the initials SD. All the patterns i find are not near large enough. Thank you for any info you can give, and thanks again.
Tamara Kelly says
Hi Wendy! Using a thicker yarn and bigger hook is the easiest way. 🙂
Rawda says
I like this website and I like your work soooo much. Hope to see more lovely crochet work out of you Mrs. Tamara Kelly
Tamara Kelly says
♥ Thank you so much, Rawda! I'm up to 500+ patterns and counting! 😀
Larissa says
Hi! I made the letters but I was wondering if you have any additional guidance on sewing them to a blanket
Tamara Kelly says
Hi Larissa! I have several stitching tutorials, but what sort of guidance are you looking for? 🙂
Joanne says
Thank you so much for sharing! I've finished crocheting a baby blanket for my friend and just trying to add the baby name initials to make it more unique. Can't wait to see the final result!
Julie says
Do you have a left-handed version of the alphabet? The L turned out fine but is the backside of the single crochet.
Tamara Kelly says
Hi Julie! I had to sit and ponder this one to come up with the answer! I think the easiest way might be to break the yarn after Row 3, and rejoin it to the third-to-last stitch to make the _ of the L!
Jessica says
Is there a diagram for the letter A
Tamara Kelly says
No, I need to rework all of these and update them. That one does have a video tutorial though!
Jessica says
Are there any diagrams for the capital letters A,O,Q,X, and Y
Tamara Kelly says
If you don't see them above, then not at this time.
Marline says
You are pretty awesome for designing and sharing the alfa. Good work. I will be trying to make them. Thanks
Tamara Kelly says
Thank you so much! ♥
Sarah Robertson says
Hi Tamara, these letters are amazing! Thank you so much! I have completed the "H" and "E" with no trouble but the "O" is a bit confusing when I get to Row 10-12 and it says repeat row 2. If you only do it twice, then move on the curve starts to go the opposite direction when you move intp repeating row 7 & 6 for row 13 & 14. Sorry if that doesn't make any sense.....
Tamara Kelly says
Hi Sarah! You repeat Row 2 there 3 times - for Rows 10, 11, and 12. 🙂 Does that help?
Kim Lall says
I LOVE the alphabet! I've crocheted it several times over the past few years for nieces and nephews
Tamara Kelly says
♥ Thank you so much, Kim!
Debbie Kimmel says
Is it possible to print out the patterns for the Uppercase letters? I crocheted pencil scarf for my grandson's awesome 1st grade teacher. I want to put a saying on the scarf. It's a little difficult to sit at the computer all day and crochet. I don't do FB or instagram.
thanks
Tamara Kelly says
Hi Debbie! I recommend using the green Print Friendly button at the bottom of the post! 🙂
Donna Martinez says
Kelly ! I love the patterns for the letters but I am stuck on the last leg of the N
I think it's that I am not understanding FSC ? I'm 73 and crochet for many years but this is confusing me. I have the begining of the N looking great but that last leg has me stuck. I have read most of the comments on here and I don't seen anyone asking about the N, sorry if I missed it. Help if you can , PLEASE
Tamara Kelly says
Hi Donna! It sounds like this video will help: https://www.mooglyblog.com/extending-rows-fsc/
Sharon says
Is there no diagram for the letter Y? I desperately need a diagram! Do I need to stitch it just like the V and add the base?
Tamara Kelly says
It's in the works!
Charlie-Mae says
Hello, Where is the picture pattern for Y?
Tamara Kelly says
Not all the letters have charts at this time.