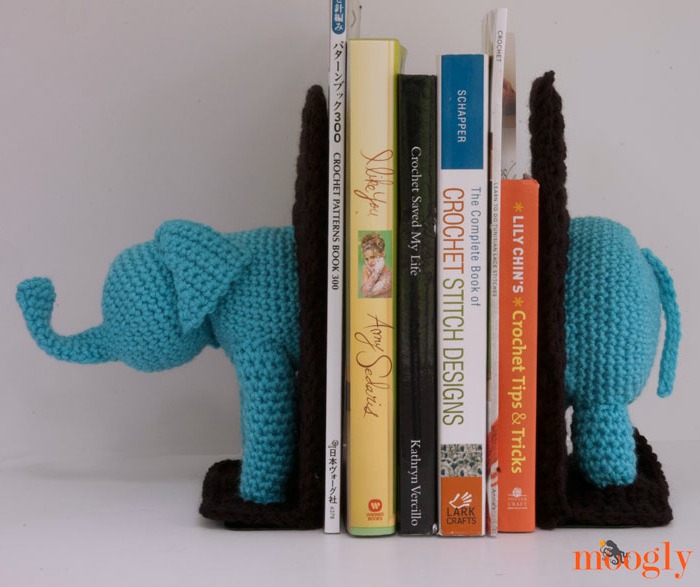
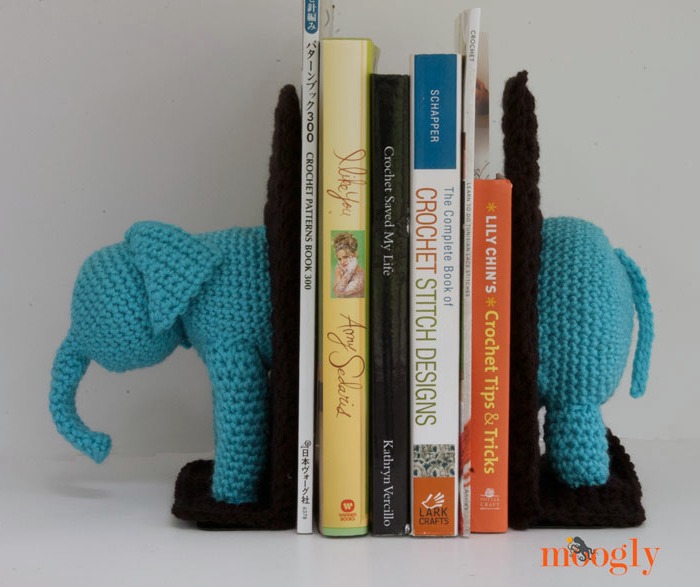
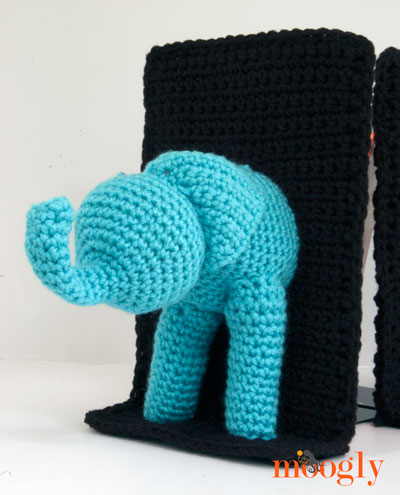
Growing up, one of my little brothers was obsessed with a VHS copy of the Disney movie Dumbo. And though we didn't quite get the "Pink Elephants on Parade" sequence, that didn't stop us from singing along! Well, instead of Pink Elephants on Parade... I've got Blue Elephants on Crochet! Elephant Bookends that is... and it's a free crochet pattern!
Disclaimer: This post contains affiliate links.
Prefer the ad-free PDF? You've got options!


Prefer the free blog version? Keep scrolling!
To be more specific, these would be considered bookend covers. Bookend cozies? They slip over the plain metal bookends you can buy in any office supply store or discount retailer. The set I purchased was well under $10, and were simply labeled "9 inch metal bookends." I've linked to a pair on Amazon below!
If yours are a different size, you'll need to adjust the Covers portion of the pattern to fit. But it's all single crochet, and I have full confidence you can pull it off. And you can pose your elephant however you like! It's all in the assembly - and a pipe cleaner up the trunk! I can't wait to see how you all make this pattern your own!
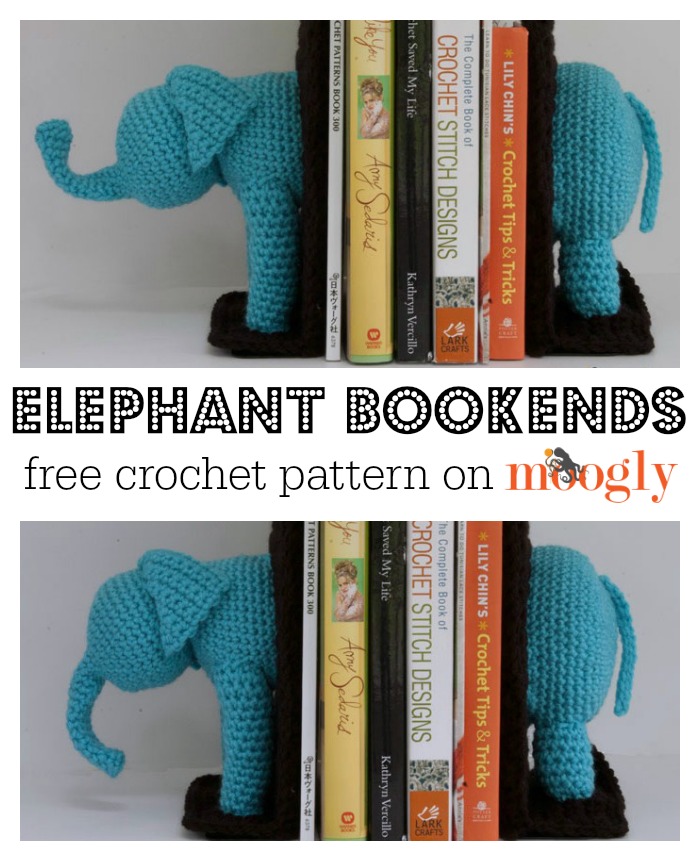
Crochet Elephants Bookends
Add this pattern to your Raverly Queue or Favorites
US - H, 5.0mm hook - Furls Crochet
2 colors Red Heart Super Saver (Aran /10 ply; 364 yards (333 meters); 198 grams (6.98 ounces))
- 250 yds in Black
- 200 yds in Turqua
Set of 2 9" metal bookends
Tapestry or Yarn Needle (Susan Bates Finishing Needles used)
Stitch Markers (Clover Locking Stitch Markers used)
Fiber Filling (small amount)
Pipe Cleaner (optional)
Gauge: 13 sts x 16 rows = 4" in sc
Note:
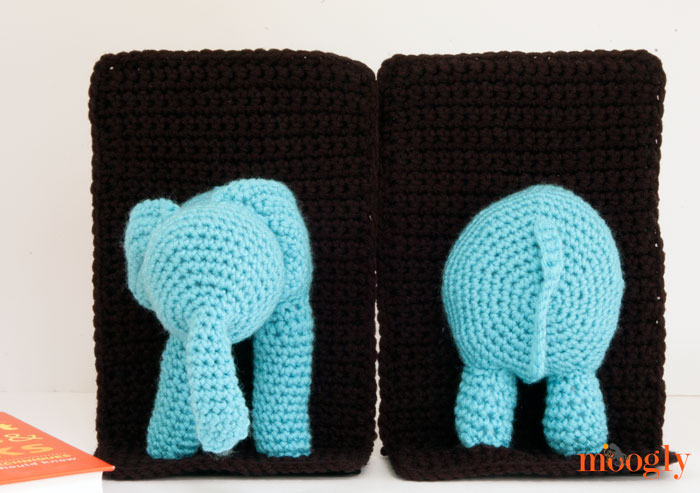
This pattern is made in several parts that are then sewn together. Please refer to the photos for placement - or go your own way! I've included an assembly overview up front so you an get an overall idea of how the bookends come together.
ASSEMBLY OVERVIEW: (Instructions for each piece is below)
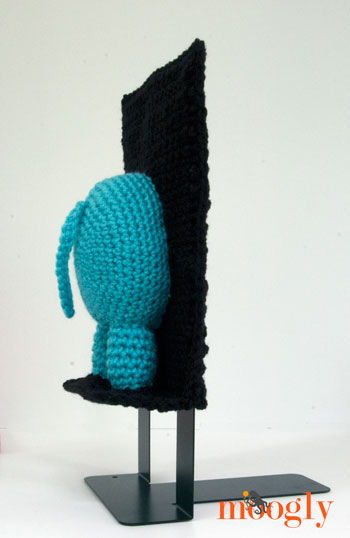 Make the Cover pieces - the black pieces that will act as the actual bookend covers, and that will hold up the elephant pieces. In the photos, these are in black.
- Make the Elephant Ears (make 2) and set aside.
- Make the Elephant Front Half - attach the ears and stuff with fiber fill when noted. Leave the trunk empty.
- Make the Elephant Front Legs, and sew them to the body.
- Make the Elephant Back End.
- Make the Elephant Tail and Legs, and sew them to the back end.
- Lightly stuff the legs, and sew them to the smaller bottom "flap" of each Cover Part A, so that the body opening is facing the taller upright part of the Cover Part A.
- Lightly stuff the bodies, and sew them to the larger upright portion of each Cover Part A. You can mold them a bit as you go!
- Single crochet or whip stitch each Cover Part A to a Cover Part B, leaving the bottom open so that it can slip over the metal bookends.
- Insert a pipe cleaner up the trunk if you want to make it pose-able.
- Slip the covers over your bookends and enjoy!
Crochet Elephant Bookends INSTRUCTIONS:
Make 2 of each part, do not sew together until elephant parts are attached You may need to adjust these to fit your own bookends.
Part A (Will face out and have elephant parts attached):
Row 1: Ch 20, skip the ch closest to hook, sc in next 19 ch; turn. (19 sts)
Row 2 - 36: Ch 1, sc across; turn. (19 sts)
Row 37: Ch 1, sc across in BLO (back loop only tutorial here); turn. (19 sts)
Row 38 - 44: Repeat Row 2. Break yarn and finish off. Note that the BLO row has created a "crease" or bend that pushes the last few rows forward - this forward flap is where the feet will be attached, while the body will be attached to the upright, larger portion before Row 37.
Part B (Will face inward against the books):
Row 1: Ch 20, skip the ch closest to hook, sc in next 19 ch; turn. (19 sts)
Row 2 - 36: Ch 1, sc across; turn. Break yarn and finish off. (19 sts)
ELEPHANT EARS INSTRUCTIONS:
Make 2 - these will be sewn on after Round 28 of the Front Half Instructions.
Row 1: Ch 3, skip the ch closest to the hook, sc in the last 2 ch; turn. (2 sts)
Row 2: Ch 1, work 2 sc in the first st, sc in the last st; turn. (3 sts)
Row 3: Ch 2, sc in the first 2 sts, 2 sc in the last st; turn. (4 sts)
Row 4: Ch 1, work 2 sc in the first st, sc in remaining sts; turn. (5 sts)
Row 5: Ch 1, sc in each st until 1 st remains, 2 sc in last st; turn. (6 sts)
Row 6 - 11: Repeat Rows 4 - 5 until thre are 12 sts total. Break yarn leaving long tail for sewing on.
ELEPHANT FRONT HALF HEAD AND BODY INSTRUCTIONS:
The front half is made in one piece except for the ears and legs - those are sewn on as shown or as desired. This main piece is worked in a spiral - do not join with a slip stitch, but use a stitch marker to mark the first st of each round to keep your place. The first "Round" is worked as a Row, but don't turn at the end - just start Round 2 in the of of the first stitch made in Round 1. This creates the circle shape.
Round 1: Ch 9, skip the ch closest to the hook, sc in the next 8 sts. ( 8 sts) (Do NOT join, will be working in a spiral, see note above)
Round 2 - 13: Sc in each st around (continuing to work in a spiral). (8 sts) (Note: trunk made)
Round 14: *Sc in the next st, 2 sc in the next st; repeat from * around. (12 sts)
Round 15: Sc in each st around. (12 sts)
Round 16: Work 2 sc in each st around (24 sts)
Round 17: *Sc in the next 11 sts, 2 sc in the next st; repeat from * once. (26 sts)
Round 18: *Sc in the next 8 sts, 2 sc in the next st; repeat from * once, then sc in the next 7 sts, 2 sc in the last st. (29 sts)
Round 19: Sc in the next 8 sts, 2 sc in the next st, *sc in the next 9 sts, 2 sc in the next st; repeat from * once. (32 sts)
Round 20: Sc in the next 15 sts, 2 sc in the next st, sc in the last 16 sts. (33 sts)
Round 21: *Sc in the next 10 sts, 2 sc in the next st; repeat from * to end. (36 sts)
Round 22: Work 2 sc in the next st, sc in the next 35 sts. (37 sts)
Round 23: Sc in each st around. (37 sts)
Round 24: Sc in the next 18 sts, sc2tog invisible decrease, sc in the next 17 sts. (36 sts)
Round 25: *Sc in the next 16 sts, sc2tog; repeat from * to end. (34 sts)
Round 26: *Sc2tog, sc in the next 9 sts; repeat from * once, then sc2tog, sc in the next 10 sts. (31 sts)
Round 27: Sc in the next 5 sts, sc2tog, *sc in the next 6 sts, sc2tog; repeat from * to end.(27 sts)
Round 28: Sc in the next 2 sts, sc2tog, *sc in the next 5 sts, sc2tog; repeat from * until 2 sts remain, sc in the last 2 sts. (23 sts) (Note: STOP HERE and sew on ears before proceeding. Sew to head and front as shown, and add a couple stitches at the back tips if desired)
Round 29: Sc2tog, sc in the next st, *sc2tog, sc in the next 2 sts; repeat from * to end. ( 17 sts) (Note: head made. Stuff lightly with fiber filling at this point before moving on to the body.)
Round 30: Sc in the next 5 sts, [2 sc in the next st] 6x, sc in the last 6 sts. (23 sts)
Round 31: Sc in the next 6 sts, 2 sc in the next st, [sc in the next st, 2 sc in the next st] 5x, sc in the last 6 sts. (29 sts)
Round 32: Sc in the next 7 sts, 2 sc in the next st, [sc in the next 2 sts , 2 sc in the next st] 5x, sc in the last 6 sts. (35 sts)
Round 33: Sc in each st around. (35 sts)
Round 34: Sc in the next 11 sts, [2 sc in the next st, sc in the next st] 7x, sc in the last 10 sts. (42 sts)
Round 35 - 42: Sc in each st around. (42 sts) Break yarn, leaving long tail or sewing on.
ELEPHANT FRONT LEGS INSTRUCTIONS:
Make 2 - sew to front of body as desired, leaving bottom of each leg open. Worked in spirals, as in the body.
Round 1: Ch 13, skip the ch closest to the hook and sc in the remaining 12 ch. (12 sts)
Round 2 - 14: Sc in each st around. (12 sts) Break yarn and leave long tails to sew to body.
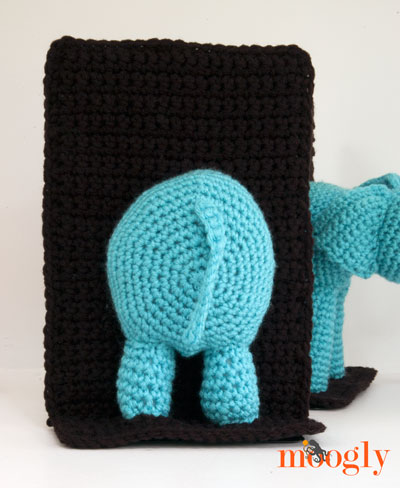 ELEPHANT BACK END INSTRUCTIONS:
This portion will also be worked in spirals, without joining at the end of the rounds.
Round 1: Starting with a magic circle, work 6 sc into the ring. (6 sts)
Round 2: Work 2 sc into each st around. (12 sts)
Round 3: *Sc in the next st, 2 sc in the next st; repeat from * to end. (18 sts)
Round 4: *Sc in the next 2 sts, 2 sc in the next st; repeat from * to end. (24 sts)
Round 5: *Sc in the next st, 2 sc in the next st, sc in the next 2 sts; repeat from * to end. (30 sts)
Round 6: *Sc in the next 4 sts, 2 sc in the next st; repeat from * to end. (36 sts)
Round 7: *Sc in the next 5 sts, 2 sc in the next st; repeat from * to end. ( 42 sts)
Round 8: *Sc in the next 6 sts, 2 sc in the next st; repeat from * to end. (48 sts)
Round 9: *Sc in the next 3 sts, 2 sc in the next st, sc in the next 4 sts; repeat from * to end. (54 sts)
Round 10 - 15: Sc in each st around. (54 sts) Break yarn and leave long tail for sewing.
ELEPHANT TAIL INSTRUCTIONS:
Row 1: Ch 15, skip ch closest to the hook, sl st in the next 9 ch, sc in the last 5 ch. Break yarn, leaving long tail, and sew to Elephant Back End as shown.
ELEPHANT BACK LEGS INSTRUCTIONS:
Make 2 - sew to back end as desired, leaving bottom of each leg open. Worked in spirals, as in the body.
Round 1: Ch 12, sc in the first ch made (next to the slip knot), sc in each rem ch around. (12 sts)
Round 2 - 7 (or to height desired): Sc in each st around. (12 sts) Break yarn and leave long tails to sew to body.
ASSEMBLY: Refer to ASSEMBLY OVERVIEW above!
Whew! That's it! Your very own set of crochet elephant bookends! You could go with pink, blue, stripes... add eyes or tusks.... get creative! I kept these a little more "grown up" so they can go in my craft room, but in the right colors these would be super cute in a nursery or child's bedroom. I can't wait to see what you all make!
And if you're wondering about the books in the photos, they're some of my favorite crochet and crafty books - I have a lot more, but then they wouldn't fit in the photo! Pictured books include I Like You by Amy Sedaris, Crochet Saved My Life by Kathryn Vercillo, The Complete Book of Crochet Stitch Designs by Linda P. Schapper, Learn to do Tunisian Lace Stitches by Kim Guzman, and Crochet Tips and Tricks by Lily Chin. The Japanese Stitch Dictionary I can neither translate the title of or find online - if you see one in person, be sure to check it out!

The Fine Print
Written pattern and graphics copyright Tamara Kelly 2014. Please do not reprint or repost this pattern, but please do link to this page to share this pattern with others. If you wish to make items for sale from this pattern, please visit the About page for details.


Sarah says
Tamara! These are SO CUTE! 😮 win 😀
Tamara Kelly says
😀 Thank you so much Sarah!
Lisa says
Oh my! That is so sweet and clever!
Clotilde/Craftybegonia says
Tamara, those are super clever and cute!
Tamara Kelly says
Thank you Clotilde!
Sangeetha says
Super!! I hope I can find similar bookends in India. I have to make these!! 🙂 Thank you.
Tamara Kelly says
😀 Thank you Sangeetha!
Tamara / txmommylady says
Just adorable, as usual!! Going to make this for my grandsons 🙂
Tamara Kelly says
😀 Thank you Tamara!
Linda says
Oh HOW CUTE is this?? I want to make a set for my grandchildren!! Thanks so much for the pattern.
Tamara Kelly says
😀 Thank you Linda!
Emilly says
It'd be really better if you but eyes on it using yarn or the real eyes found in toys.. isn't it??? 🙂
Tamara Kelly says
I like them without eyes but that's the fun of it - making it your own! 🙂
! says
These are awesome! I've been racking my brain trying to figure out a birthday present for my mom - This will be perfect - except I'll do a amigurumi nautilus shell instead of an elephant. Thank you for putting such great ideas and patterns out there! I love getting on facebook daily just to see your next roundup of posts!
Tamara Kelly says
😀 Thank you so much!
Kat says
Thank you for this pattern! This could even be adapted to put any favorite animal on them. Love your site, you are incredibly talented. Your patterns and tutorials have helped me to improve upon my crochet abilities.
Tamara Kelly says
😀 Thank you so much Kat! And yes, I think any amigurumi or crochet animal could be "halved" for these - too fun!
Lori Bennett Kramer says
Adorable! Thank you for the pattern! love your blog!
Tamara Kelly says
😀 Thank you so much Lori!
Lisa Sisco says
This is the most ingenious crochet pattern I have seen in a long time! Gotta make these!
Tamara Kelly says
😀 Thank you so much Lisa!
elsie says
oui, vous avez raison, ces serre-livres sont fabuleux ! merci
Sally Korneychuk says
This is such a unique one of a kind design.....I love it!!!!!!!
Tamara Kelly says
😀 Thank you so much Sally!
SHirlee says
Hi Tamara, I'm making your cute bookends for my daughter who loves elephants. I am on round 6 of the back end instructions and I cannot make the stitches come out right. I have ripped it twice but I keep having 2 stitches left over- giving me 37 stitches. Help - what am I doing wrong! Thanks!
Tamara Kelly says
Hi Shirlee! It's hard to say without being there in person, but I wouldn't worry about it too much - an extra stitch on each round won't hurt anything, it's doesn't have to "fit"! 🙂
Teresa says
Hi Shirlee; I'm in the process of making these now too. I had the same problem. Here is what I did to get the right stitch count. I believe there is an error to rows 6,7 and 8 before it gets back on track again.
Row 6 - *sc in first 4 sts, 2sc in next st* - repeat around for 36 sts
Row 7 - *sc in first 5 sts, 2 sc in next st* - repeat this around for 42 sts
Row 8 - *sc in first 6 sts, 2sc in next st * - repeat around for 48 sts.
Hope this helps if you haven't already continued on.
Teresa
Tamara Kelly says
Right you are Teresa, the pattern has been updated. 🙂 Thanks!
Teresa says
Hi Tamara! Thanks so much for this great idea and pattern. My sister spotted these and immediately requested a pair. A pink elephant on a white background for all her knitting/crochet books. How CUTE!!! I'm just about finished. Any way I can share a picture with you of the end results? Thanks again for sharing this with us. Keep up the great work! Teresa
Tamara Kelly says
😀 Thanks so much Teresa! I'd love to see a photo! You can email it to me at TamaraKelly at mooglyblog dot com, or post it on the Moogly Facebook page!
Cathy JOrdan says
I would like to make the elephant bookends. Is there a simple way to download the instructions only?
Tamara Kelly says
Hi Cathy! You can use the green Print Friendly button to create a custom printable with just the parts of the pattern you need - here's a tutorial! 🙂
jOYCE says
Thanks so much for the cute elephant bookends pattern.
I went to GHS, in Gainesville, GA, so I think I'm going to make the red GHS elephant and use them for my yearbooks. Can't wait to see how many want a set.
lol
Tamara Kelly says
😀 You're very welcome Joyce, thanks so much!
Angela says
I cannot figure out how to do the trunk and the face. I understand the trunk is supposed to be done in a spiral, but mine is looking like a foot or something.
Is there another video to help with the trunk area other than the video on the spiral?
Tamara Kelly says
Hi Angela! Sorry you're having trouble. It's just a simple tube, so as long as you work even long enough it should extend into a trunk! 🙂
Shawn says
I've ripped out the trunk like 6 times now. As its written it makes no sense. Please help?
Tamara Kelly says
Hi Shawn! Can you tell me where you're having trouble more specifically? It's just sc-ing in a spiral, so I'm not sure what part is giving you trouble.
Shawn says
"The first “Round” is worked as a Row, but don’t turn at the end – just start Round 2 in the of of the first stitch made in Round 1. This creates the circle shape."
Could you maybe do a pic of the process after I do the 8 single crochet? The way I'm reading it is much like you would do the sole of a baby's shoe or the cup portion of a bikini top.
Tamara Kelly says
Does this help? http://www.lookatwhatimade.net/crafts/yarn/crochet/crochet-tutorials/how-to-crochet-in-the-round-spiral-vs-joining/
Shawn says
Yes... however, the confusing bit is where you put "Do NOT join" 🙂 Thanks for clarifying.
Susan says
These are awesome. Would you consider a pony set (ie MLP)? My daughter loves ponies.
Tamara Kelly says
Thank you Susan! I would think any Pony stuffie pattern would be pretty easy to adapt - just make it in two pieces, and leave out a couple of the "middle" rows! 🙂 Here are some patterns you can use: http://rav.to/1aX1jcJ
rOMA says
such cute & clever idea!! THANKS for sharing
Tamara Kelly says
Thank you! 🙂
Helene says
these are AWESOME!!
You are SO talented and so terrific for sharing this beauty!!
Thank you!
Tamara Kelly says
😀 Thank you so much Helene!!
Dolores says
This pattern is fabulous!
Do you have any other animal patterns like these?
I work in a preschool and i would love to make it (and any other animals ) so my kids can play by matching the top and bottom parts.
Any help is greatly appreciated.
Thanks
Tamara Kelly says
Thank you Dolores! I'm afraid I don't currently have any others though.
Deborah Weisblatt says
Hi Tamara,
LOVE this pattern! We have 3-month old twin granddaughters and I just bought a selection of books for my daughter. She mentioned that she needs bookends and then you sent this pattern!
However, instead of an elephant, she'd like a unicorn. I saw this adorable unicorn pattern in your unicorn list - https://www.ravelry.com/patterns/library/charley-the-unicorn.
Do you think it would be difficult to use this pattern instead of the elephant?
Thanks SO much!
Deb
Tamara Kelly says
They way the body is made, it should "split" very well! 😀 I think that would be a great combo!
Deborah Weisblatt says
Hi Tamara,
OK. I'm making the bookend covers. How does the bottom flap stay stiff? As I understand it, I'm making the vertical panel and the bottom part and then another vertical panel so I can slip it over the metal bookend. How does the bottom part stay? Will it just lay on top of the metal at the bottom?
Thanks! Really enjoying this project and will send a pic to you when it's done!
All the best,
Deb
Tamara Kelly says
Hi Deb, and thank you! Yes, it just rests on top of the horizontal portion. You can run a couple strings underneath if you like, but I didn't "encase" that part because I didn't want to make the bookends not grip the bookshelf. 🙂
Deborah Weisblatt says
Hi Tamara,
I totally agere with you re blocking the grip pads.
Thanks for your reply. I hope to send you a picture soon!
All the best,
Deb
Tamara Kelly says
I can't wait to see it! 😀
Victoria says
I followed your link and ordered my bookends! They arrived on 3/17/2020 and I am uploading a video to YouTube( I am a crochet podcaster) on Friday 3/20/2020 sharing the link back to here for this Adorable pattern. Thank you so much for taking the time to do this and write this all up and offer it as a free pattern. I know it takes a lot of work and I just wanted you to know how much it iOS appreciated! Thank you!
Tamara Kelly says
Hi Victoria! Thank you, I'm so glad you like it!
Sue Richards says
These will be a Christmas present for my granddaughter who collects elephants!