Decreasing in crochet is usually done in one of two ways. The most common is working "2tog" - where you make the first half of the stitch in two stitches, and finish them as one stitch. The other common method is to just skip a stitch all together! But there are times when these methods just won't do. They might create a lump, leave a hole, or just plain not look right. Enter the Invisible Decrease!

Video Tutorial: How to Crochet the Invisible Decrease
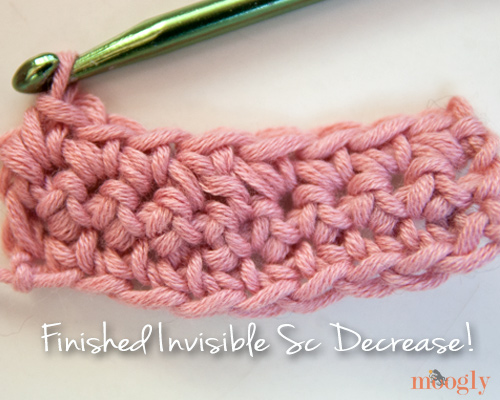
Photo Tutorial for Invisible Decreases
When decreasing in single crochet (sc):
- Insert the hook under the Front Loop Only (FLO) of the next st. Do not yarn over.


- Then insert the hook under the FLO of the st after that. There are now 3 loops on the hook.

- Yarn over and pull through the first two loops (the front loops of the 2 sts).

- Yarn over again and pull through the last 2 sts to finish the sc.

When decreasing in double crochet (dc): The main difference is you yo at the start, then yo and pull through twice at the end (as for a normal dc).
- Yarn over, then insert the hook under the FLO of the next st. Do not yarn over again.
- Then insert the hook under the FLO of the st after that. There are now 4 loops on the hook.
- Yarn over and pull through the first two loops (the front loops of the 2 sts).
- Now work as for a normal dc - yarn over and pull through 2, yarn over and pull through 2.
 Not too hard, eh? The Invisible Decrease works better in some types of yarn than others, and is better choice for certain items. For instance, this method is particularly useful for amigurumi, where you are working your stitches very tightly and need to not leave any gaps. For other items, one of the other decreases might be the right choice. I recommend trying a couple of different methods if you're not happy with the results you're getting on a particular project - it's easy enough to pull out one stitch and try again! And now you've got yet another awesome crochet trick up your sleeve!
The yarn shown in the photos and video is LB Collection Cotton Bamboo in Cherry Blossom - and it's so soft and gorgeous! Great stitch definition and easy to work with. I'm in love! Thank you Lion Brand!

Be sure to check out and like the moogly Facebook page to get the latest updates, links, and sneak peeks. Moogly is also on Pinterest, Twitter, Tumblr, Sulia, and Google+ – come join the fun! TamaraKelly@mooglyblog.com.


Vicki says
Thanks!!! Very neat!
Tamara Kelly says
You're very welcome Vicki!
Wendy says
Great tip and tutorial...Thank you so much!
fariba says
Hi ,It's very simple ,thank you for your pattern. 😉
Deena says
Very cool - question: why do you insert hook only in the front loops? Would it be too bulky to insert hook as you normally would, through front and back loops?
Tamara Kelly says
Essentially yes! This way you're still pulling through two loops - just like you would in a normal sc or dc. It preserves the illusion better!
Linda L. says
I've been crocheting for years and consider myself pretty well versed - but your tips and tricks just blow me away! You've solved so many of my petty gripes about how things could be done better but no ones know how to improve them. Love your tutorials! Thanks!
Tamara Kelly says
😀 Thank you so much Linda! I appreciate you saying so!
Heather says
Thank you!
This clears things up for me. The video was so easy to understand! I'm going to go try it right now 🙂
Thanks again
Jennifer says
I love this tip! My question is, why didn't you show how to invisible decrease in rows? It's very straightforward in the round. Thanks!
Tamara Kelly says
It's exactly the same in rounds or rows. 🙂
Laurie Ryan says
Can you use this decrease at the end of a row?
Tamara Kelly says
I would think so! 🙂 It might be a little less invisible, but it never hurts to try.
lia says
Thank you so much for the video!
Very usefull for me and I love the form that you start with a dc!!!
Have a wonderfull week!
Tamara Kelly says
😀 Thank you Lia!
Gayle says
Excellent suggestion for invisible decrease! What does it look like on the reverse side? Is it still "invisible", or do you see a ridge from those two "back" stitches?
Tamara Kelly says
You do see the ridge on the back - that's why it's best for projects with a definite right/wrong side. 🙂
Marie-Eve says
Great technique. Amazing for amigurumis: the best one y have seen yet!! Thank you so much!
Tamara Kelly says
Thank you so much! 😀
Linda Kindred says
Thank you so much for the tip. I needed this stitch for what I'm trying to do. Your directions are so easy to follow for a beginner like me.
Tamara Kelly says
😀 I'm so glad I could help!
Paula Ricketts says
I'm going to be mami g some Christmas stockings very soon and will need to decrease in some places. This is much better than the instructions in the pattern. Thank yyou so much!
Tamara Kelly says
I'm so glad you like it, thank you!
Lisa says
I was "taught" in a Russian pattern to insert the hook UP (from underneath) into next stitch then insert hook DOWN (from above)into next stitch, yarn over and pull through the 2 loops. Is your technique better?
Tamara Kelly says
I suspect it depends on the yarn, pattern, and whatever look you like best! 🙂 Always good to have a variety of options!
Janice says
I think that there was a video about doing a HDC decrease on your website but I cannot, for the life of me, seem to find it. I swear by your methods, they are super. I don't use the HDC decrease often so always forget the method. Thanks for pointing me in the right direction.
Tamara Kelly says
Thank you so much! Here's the link: https://www.mooglyblog.com/half-double-crochet-decreases-hdc2tog/ 🙂