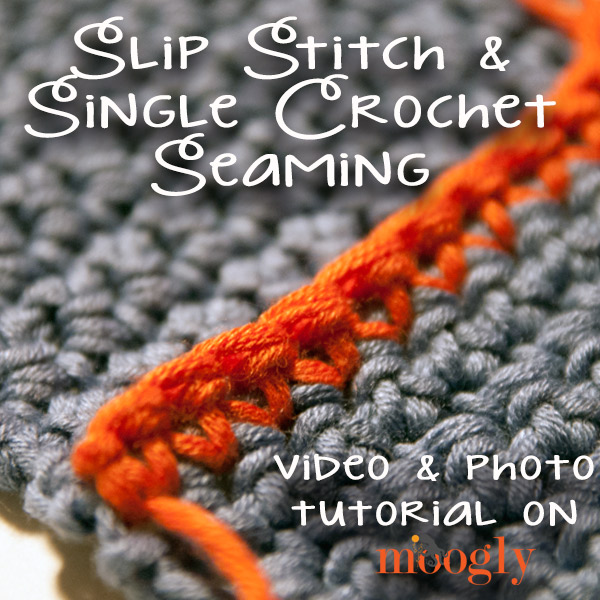
Seaming two pieces of crochet together using slip stitches is exactly the same as seaming them together using single crochet - the only difference being, of course, the stitch used. And they're both super easy once you know how it's done! So watch and learn!
Slip Stitch and Single Crochet Seaming Video Tutorial
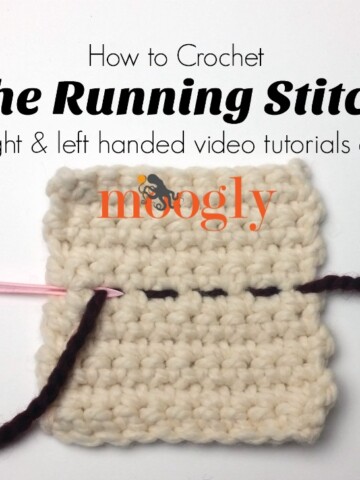
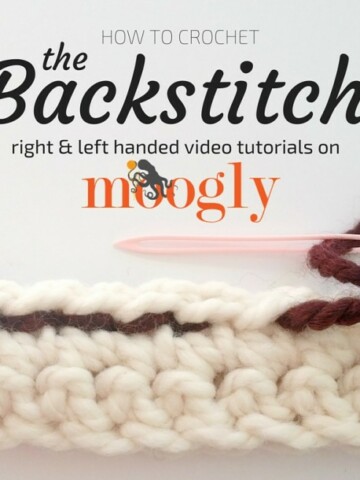
Slip Stitch & Single Crochet Seaming Photo Tutorial
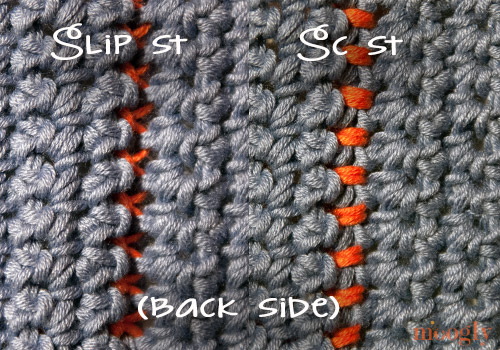
Both slip stitch and single crochet seaming create a decorative, visible seam. With the slip stitch, the pieces that you're crocheting together form the peak of the seam, whereas with single crochet, it's the single crochet stitches that form the visible ridge. The advantage of these methods is that they are as as fast and easy as the stitches themselves - and just as easy to frog if you make a mistake.
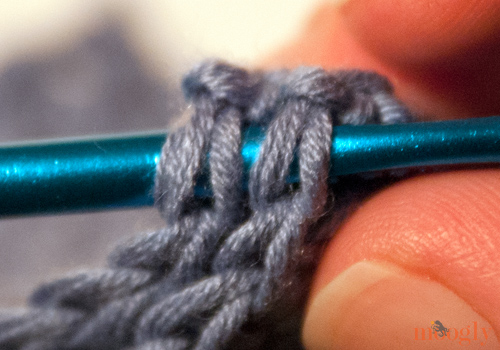
As with the Mattress Stitch and Whip Stitch Seaming, you'll want to hold your pieces to be seamed together, as if sandwiched. You'll want the RS or the WS of both together - depending on what your pattern calls for. And you'll want to hold the seam together in several places to make sure you're working evenly if you're not working stitch for stitch.
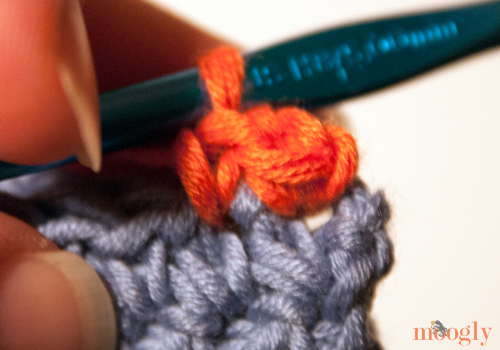
This tutorial features Lion Brand LB Cotton Bamboo and a US - H, 5mm hook.
Step 1: Insert your hook in the first st of both pieces.
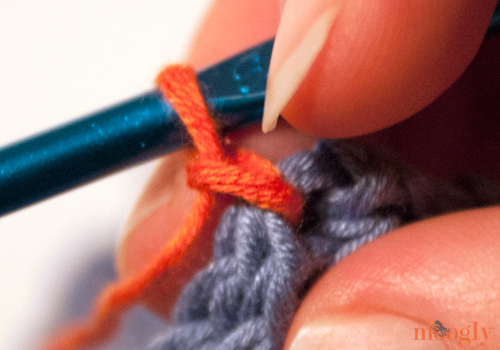
Step 2: Work a slip stitch.
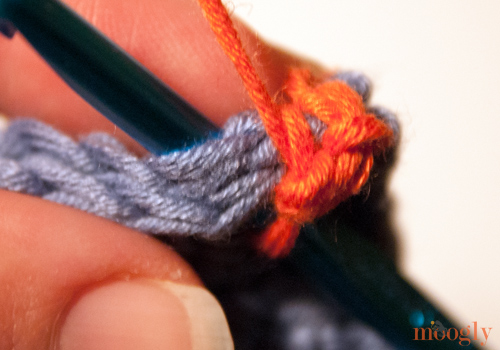
Step 3: Work a single crochet (shown) OR slip stitch in that first stitch.

Step 4: Insert hook in the next st of both pieces, and continue working stitch of choice along the seam.
The Results! 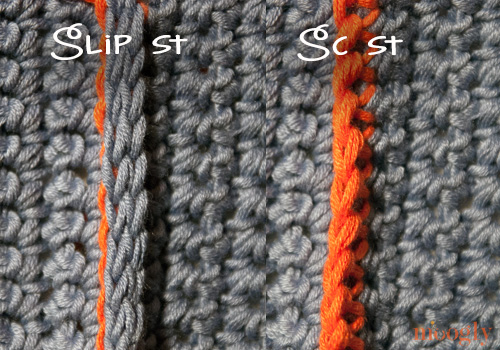
And now you know how to work single crochet seaming and slip stitch seaming! Easy as can be. What's your favorite seaming method? Share in the comments!
Thanks for reading! Get Moogly on your favorite social media sites: Facebook, Twitter, G+, Pinterest and Tumblr, and sign up for the Newsletter so you don’t miss a thing! TamaraKelly@mooglyblog.com

Linda says
Cannot find the pattern for knit tiny gnomes.
Thanks for your help.
Linda
Tamara Kelly says
Are you looking for Korknisser? http://www.saartjeknits.nl/patterns/Korknisse.html
Christine says
Single crochet in back loops 🙂
Tamara Kelly says
That is a good one!
Jane @ Handiworking says
I just seamed some fingerless gloves this way ... it's wonderful!
Noemia says
I loved your tutorial. I usually join with slip stiches... 😉
Tamara Kelly says
😀 Thanks Noemia! I think everyone has their favorite - I tend to mix it up, once I finish one project I want to do something else next time lol.
Marg broun says
Thank you for this very clear tutorial. Now how do you join to the next two squares. Am just a beginner at crochet. Have just finished 24 squares of pattern and not sure of the best way to join them all together. I am using single crochet to join seams. I don't want to have loose ends everywhere when I finish. Thank you for your help.
Tamara Kelly says
Hi Marg! You can line them up in pairs, and just keep going along one seam, and then go back the other way (perpendicular) with the other rows already attached later, or you can add each square individually - they give slightly different looks, so it's up to you!
Tania Chadwick says
OMG! Thank you for always be the right source to find answers. I struggle when patterns skip a lot of steps leaving us newbies lost in the weeds. You always have the magic to find solutions.
Thank you!!
Tamara Kelly says
😀 Thank you Tania!
CP says
Although I like the ridge of sc in some applications, I've always hated how it lies to one side. I fix this by doing every other sc "backwards". I do it like a purl stitch: yarn in front, enter from the back. Then it lies nice and centered along the seam.
Tamara Kelly says
Interesting and talented! Thanks CP!
WENDY says
Ooh - thanks CP - I shall have to give that a go too. I am about to make a small lap blanket for a friend and will have 50 squares to join together. I'm just waiting for the yarn to be delivered! I have made several practice granny squares and have decided to turn on each corner to make them reversible. My friend wants them all solid colour and joined with a contrasting colour with a border in the same contrasting colour. I can now practice joining the practice squares - if that makes sense.
Tamara - do you have a tutorial showing how to ensure a neat sc join down the uneven sideplease?
Tamara Kelly says
Hi Wendy! I'm not sure by what you mean by uneven side? But you can find all my tutorials here. 🙂
Wendy says
Sorry Tamara - I mean down the sides of the rows rather than where there are clear stitches across the tops and bottoms. On granny squares these should be equal but on a solid square of sc or dc the sides are uneven? In your tutorial you show the tops but not the sides - unless I'm looking in the wrong place?
Tamara Kelly says
Ah! Okay, I understand now! 🙂 This is the tutorial you want.
kelly says
How do you do the corners?
Tamara Kelly says
Hi Kelly! It depends on the project, and can be done decoratively or "straight."
If you are joining squares want to keep it straight, then do an entire row in one direction before coming back to do the rows in the other direction - sort of like rows vs columns. But as an example of a decorative application, you can see the Wavy Baby Blanket at https://www.mooglyblog.com/wavy-baby-blanket-free-crochet-pattern/ - in that pattern I used the sc seaming technique on the right side, worked to join the squares in a specific pattern, and it becomes part of the design.
If you are seaming two pieces around a corner, then you just work one to one unless the corner is very sharp - then you might need to work an extra stitch or two at the corner itself.
I hope that helps! In the end, seaming often comes down to doing what you think looks good in that particular spot!