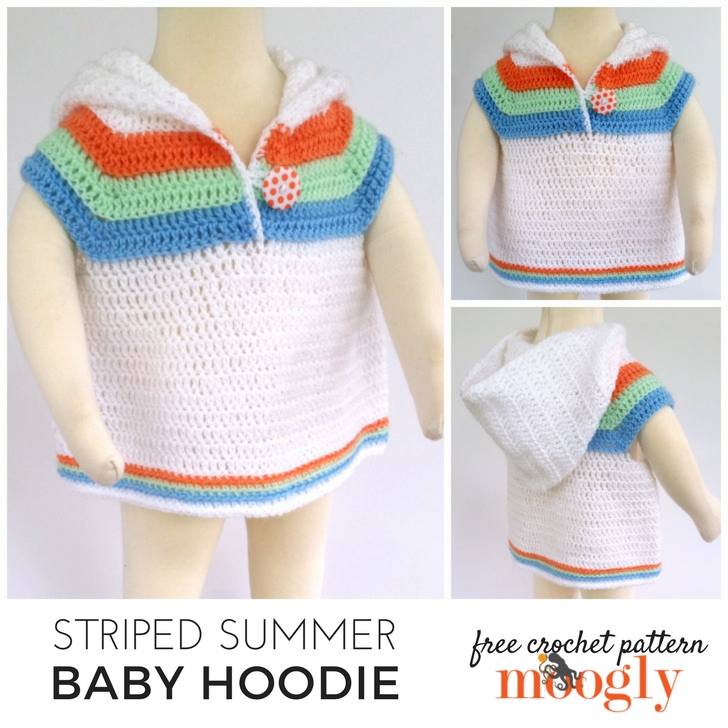
The Striped Summer Baby Hoodie is sleeveless, hooded (of course), and ready for action! Crochet it today in 0-6 mths or 6-12 mths - both sizes are included in this free crochet baby sweater pattern!
Disclaimer: This post contains affiliate links. Lion Brand Yarn provided the yarn for this pattern creation.
Prefer an ad-free PDF? You've got options!


Prefer the free blog version? Keep scrolling!
Light Summer Layers
The Striped Summer Baby Hoodie features a classic summer color palette that's ready for your custom touches. It makes a fantastic little beach or pool coverup, as well as a final layer for breezy days. Alas, I no longer have a little one to model it for you - but I did use the sizing standards provided by the Craft Yarn Council, to get two sizes to carry your little one right through their first summer!

Striped Summer Baby Hoodie
Click here to add this pattern to your Ravelry Queue and Favorites
US - G, 4.0mm hook - Furls Crochet
Lion Brand Baby Soft Pompadour (Light/DK/yarn symbol "3"/UK: 8ply; 367 yds/335m; 4 oz)
Color A: Baby White Pompadour (1 ball for smaller size, or 325 yds; 2 balls for larger size, or 425 yds)
Lion Brand Baby Soft (Light/DK/yarn symbol "3"/UK: 8ply; 459 yds/420m; 5 oz)
Color B: Apricot (1 ball for both sizes, or 20-40 yds)
Color C: Mint (1 ball for both sizes, or 30-50 yds)
Color D: Pastel Blue (1 ball for both sizes, or 40-60 yds)
Stitch Markers - Clover
Button (optional) - 1" (25mm) Coral Dot shown
Gauge: 18 sts x 10 rows = 4"/10 cm in dc
Sizes: 0-6 mths (shown); 6-12 mths
Helpful Links: Crochet Abbreviations; Top Down Yokes; BLO (back loop only); Whip Stitch
Special Stitches:
MC - Make Corner: Work 3 dc in indicated st, placing a stitch marker in the center dc - note that when the sts before and after the corner are worked in the BLO, the MC sts should also be worked in the BLO.
Optional: Replace the ch 3 at the beginning of each round with a Chainless Starting Double Crochet or Standing Double Crochet.
INSTRUCTIONS
0-6 Month Size Instructions:
Row 1 (RS): With Color A, ch 58, skip 2 chs closest to hook, dc in next 10 sts, MC in next st, dc in next 8 sts, MC in next st, dc in next 16 sts, MC in next st, dc in next 8 sts, MC in next st, dc in last 10 sts; turn. (64 dc)
Row 2 (WS): Ch 3 (counts as 1st dc), [dc in next 10 sts, MC in next st] twice, dc in next 18 sts, [MC in next st, dc in next 10 sts] twice, dc in last st; turn and break yarn. (72 dc)
Row 3: With Color B, join to 1st st and ch 3, blo dc in next 11 sts, MC in next st, blo dc in next 12 sts, MC in next st, blo dc in next 20 sts, MC in next st, blo dc in next 12 sts, MC in next st, blo dc in next 11 sts, dc in last st; turn. (80 dc)
Row 4: Ch 3, dc in next 12 sts, MC in next st, dc in next 14 sts, MC in next st, dc in next 22 sts, MC in next st, dc in next 14 sts, MC in next st, dc in last 13 sts; turn and break yarn. (88 dc)
Row 5: With Color C, join to 1st st and ch 3, blo dc in next 13 sts, MC in next st, blo dc in next 16 sts, MC in next st, blo dc in next 24 sts, MC in next st, blo dc in next 16 sts, MC in next st, blo dc in next 13 sts, dc in last st; turn. (96 dc)
Row 6: Ch 3, dc in next 14 sts, MC in next st, dc in next 18 sts, MC in next st, dc in next 26 sts, MC in next st, dc in next 18 sts, MC in next st, dc in last 15 sts; turn and break yarn. (104 dc)
Row 7: With Color D, join to 1st st and ch 3, blo dc in next 15 sts, MC in next st, blo dc in next 20 sts, MC in next st, blo dc in next 28 sts, MC in next st, blo dc in next 20 sts, MC in next st, blo dc in next 15 sts, dc in last st; turn. (112 dc)
Row 8: Ch 3, dc in next 16 sts, MC in next st, dc in next 22 sts, MC in next st, dc in next 30 sts, MC in next st, dc in next 22 sts, MC in next st, dc in last 17 sts; turn and break yarn. (120 dc)
Round 9 (underarms made and fronts joined, see yoke tutorial linked above): With Color A, join to 2nd marked st in blo, ch 3, blo dc in next 32 sts, blo dc in next (3rd marked) st, ch 8 (underarm made), skip next 24 sts, blo dc in next (4th) marked st, blo dc in next 14 sts, then overlapping the last 4 sts of this front half on top of the 4 sts at the other end of the previous row (last 4 sts on the other front half), blo dc through the next 4 sts and through both loops of each st behind them, then continuing on the other front half blo dc in the next 14 sts, blo dc in next (1st marked) st, ch 8, skip last 24 sts; join to 1st dc of this rnd with a sl st, remove all st markers. (68 dc and 16 ch)
Round 10: Ch 3, dc in 1st st, dc in next 32 sts, 2 dc in next st, dc in next 8 chs, 2 dc in next st, dc in next 32 sts, 2 dc in next st, dc in next 8 ch; join. (88 sts)
Round 11: Ch 3, dc in next 16 sts, 2 dc in next st, [dc in next 21 sts, 2 dc in next st] 3 times, dc in last 4 sts; join. (92 sts)
Round 12: Ch 3, dc in next 4 sts, 2 dc in next st, [dc in next 22 sts, 2 dc in next st] 3 times, dc in last 17 sts; join. (96 sts)
Round 13: Ch 3, dc in next 8 sts, 2 dc in next st, [dc in next 23 sts, 2 dc in next st] 3 times, dc in last 14 sts; join. (100 sts)
Round 14: Ch 3, dc in next 12 sts, 2 dc in next st, [dc in next 24 sts, 2 dc in next st] 3 times, dc in last 11 sts; join. (104 sts)
Round 15: Ch 3, dc in next 1 st, 2 dc in next st, [dc in next 25 sts, 2 dc in next st] 3 times, dc in last 23 sts; join. (108 sts)
Round 16: Ch 3, dc in next 18 sts, 2 dc in next st, [dc in next 26 sts, 2 dc in next st] 3 times, dc in last 7 sts; join. (112 sts)
Round 17: Ch 3, dc in next 10 sts, 2 dc in next st, [dc in next 27 sts, 2 dc in next st] 3 times, dc in last 16 sts; join. (116 sts)
Round 18 - 21: Ch 3, dc in each remaining st around; join. (116 sts) After Round 21, break yarn.
Round 22: With Color B, join to any st in blo, ch 1 and sc in same st as join, blo sc in each remaining st around; join and break yarn. (116 sts)
Round 23: With Color C, repeat Round 22.
Round 24: With Color D, repeat Round 22.
Round 25: With Color A, repeat Round 22, do not break yarn.
Round 26: Ch 1, sc in each st around; join and break yarn. (116 sts)
0-6 Month Hood Instructions (optional, skip to Finishing Instructions below if desired):
Row 1 (RS - worked across the unused loops at the "bottom" of Row 1, at the neckline): With Color A, join to 1st st and ch 3, dc in next 26 sts, 2 dc in next st and place marker (pm) in 2nd dc made, 2 dc in next st and pm in 1st dc made, dc in each remaining st across; turn. (58 sts)
Row 2 (WS): Ch 3, dc in each st to marked st, 2 dc in each of next 2 sts (move markers up to corresponding sts on each row), dc in each remaining st across; turn. (60 sts)
Row 3 - 5: Repeat Row 2. (66 sts in Row 5)
Row 6 - 12: Ch 3, dc in each remaining st across (maintain marker placement); turn. (66)
Row 13: Ch 3, dc in each remaining st to st before 1st marked st, [dc2tog in next 2 sts (pm)] twice, dc in each remaining st across; turn. (64 sts)
Row 14 - 20: Repeat Row 13. (50 sts in Row 20)
Row 21 (seam top of hood): Ch 3, dc in next 22 sts, sc2tog twice; break yarn leaving long tail (rem sts unworked). Use tail to whip stitch Row 21 sts to unworked sts of Row 20.
0-6 Month Finishing Instructions:
With Color A, join to front half at base of opening (bottom of Row 8), sc evenly all around front of sweater and hood and down other half of front; break yarn. Optional: Using Color A, sew button to sweater as shown, and ch a loop long enough to go around button, sew to opposite front as shown.
![]()
6-12 Month Size Instructions:
Row 1 (RS): With Color A, ch 58, skip 2 chs closest to hook, dc in next 10 sts, MC in next st, dc in next 8 sts, MC in next st, dc in next 16 sts, MC in next st, dc in next 8 sts, MC in next st, dc in last 10 sts; turn. (64 dc)
Row 2 (WS): Ch 3 (counts as 1st dc), [dc in next 10 sts, MC in next st] twice, dc in next 18 sts, [MC in next st, dc in next 10 sts] twice, dc in last st; turn and break yarn. (72 dc)
Row 3: With Color B, join to 1st st and ch 3, blo dc in next 11 sts, MC in next st, blo dc in next 12 sts, MC in next st, blo dc in next 20 sts, MC in next st, blo dc in next 12 sts, MC in next st, blo dc in next 11 sts, dc in last st; turn. (80 dc)
Row 4: Ch 3, dc in next 12 sts, MC in next st, dc in next 14 sts, MC in next st, dc in next 22 sts, MC in next st, dc in next 14 sts, MC in next st, dc in last 13 sts; turn and break yarn. (88 dc)
Row 5: With Color C, join to 1st st and ch 3, blo dc in next 13 sts, MC in next st, blo dc in next 16 sts, MC in next st, blo dc in next 24 sts, MC in next st, blo dc in next 16 sts, MC in next st, blo dc in next 13 sts, dc in last st; turn. (96 dc)
Row 6: Ch 3, dc in next 14 sts, MC in next st, dc in next 18 sts, MC in next st, dc in next 26 sts, MC in next st, dc in next 18 sts, MC in next st, dc in last 15 sts; turn and break yarn. (104 dc)
Row 7: With Color D, join to 1st st and ch 3, blo dc in next 15 sts, MC in next st, blo dc in next 20 sts, MC in next st, blo dc in next 28 sts, MC in next st, blo dc in next 20 sts, MC in next st, blo dc in next 15 sts, dc in last st; turn. (112 dc)
Row 8: Ch 3, dc in next 16 sts, MC in next st, dc in next 22 sts, MC in next st, dc in next 30 sts, MC in next st, dc in next 22 sts, MC in next st, dc in last 17 sts; turn and break yarn. (120 dc)
Row 9: With Color B, join to 1st st and ch 3, blo dc in next 17 sts, MC in next st, blo dc in next 24 sts, MC in next st, blo dc in next 32 sts, MC in next st, blo dc in next 24 sts, MC in next st, blo dc in next 17 sts, dc in last st; turn. (128 dc)
Row 10: Ch 3, dc in next 18 sts, MC in next st, dc in next 26 sts, MC in next st, dc in next 34 sts, MC in next st, dc in next 26 sts, MC in next st, dc in last 19 sts; turn and break yarn. (136 dc)
Round 11 (underarms made and fronts joined, see yoke tutorial linked above): With Color A, join to 2nd marked st in blo, ch 3, blo dc in next 36 sts, blo dc in next (3rd marked) st, ch 8 (underarm made), skip next 28 sts, blo dc in next (4th) marked st, blo dc in next 16 sts, then overlapping the last 4 sts of this front half on top of the 4 sts at the other end of the previous row (last 4 sts on the other front half), blo dc through the next 4 sts and through both loops of each st behind them, then continuing on the other front half blo dc in the next 16 sts, blo dc in next (1st marked) st, ch 8, skip last 28 sts; join to 1st dc of this rnd with a sl st, remove all st markers. (76 dc and 16 ch)
Round 12: Ch 3, dc in 1st st, dc in next 36 sts, 2 dc in next st, dc in next 8 chs, 2 dc in next st, dc in next 36 sts, 2 dc in next st, dc in next 8 ch; join. (96 sts)
Round 13: Ch 3, dc in next 16 sts, 2 dc in next st, [dc in next 23 sts, 2 dc in next st] 3 times, dc in last 6 sts; join. (100 sts)
Round 14: Ch 3, dc in next 4 sts, 2 dc in next st, [dc in next 24 sts, 2 dc in next st] 3 times, dc in last 19 sts; join. (104 sts)
Round 15: Ch 3, dc in next 8 sts, 2 dc in next st, [dc in next 25 sts, 2 dc in next st] 3 times, dc in last 16 sts; join. (108 sts)
Round 16: Ch 3, dc in next 12 sts, 2 dc in next st, [dc in next 26 sts, 2 dc in next st] 3 times, dc in last 13 sts; join. (112 sts)
Round 17: Ch 3, dc in next 1 st, 2 dc in next st, [dc in next 27 sts, 2 dc in next st] 3 times, dc in last 25 sts; join. (116 sts)
Round 18: Ch 3, dc in next 18 sts, 2 dc in next st, [dc in next 28 sts, 2 dc in next st] 3 times, dc in last 9 sts; join. (120 sts)
Round 19: Ch 3, dc in next 10 sts, 2 dc in next st, [dc in next 29 sts, 2 dc in next st] 3 times, dc in last 18 sts; join. (124 sts)
Round 20: Ch 3, dc in next 24 sts, 2 dc in next st, [dc in next 30 sts, 2 dc in next st] 3 times, dc in last 5 sts; join. (128 sts)
Round 21: Ch 3, dc in next 4 sts, 2 dc in next st, [dc in next 31 sts, 2 dc in next st] 3 times, dc in last 26 sts; join. (132 sts)
Round 22-25: Ch 3, dc in each remaining st around; join. (132 sts) After Round 25, break yarn.
Round 26: With Color B, join to any st in blo, ch 1 and sc in same st as join, blo sc in each remaining st around; join and break yarn. (132 sts)
Round 27: With Color C, repeat Round 26.
Round 28: With Color D, repeat Round 26.
Round 29: With Color B, repeat Round 26.
Round 30: With Color A, repeat Round 26, do not break yarn.
Round 31: Ch 1, sc in each st around; join and break yarn. (132 sts)
6-12 Month Hood Instructions (optional, skip to Finishing Instructions below if desired):
Row 1 (RS - worked across the unused loops at the "bottom" of Row 1, at the neckline): With Color A, join to 1st st and ch 3, dc in next 26 sts, 2 dc in next st and place marker (pm) in 2nd dc made, 2 dc in next st and pm in 1st dc made, dc in each remaining st across; turn. (58 sts)
Row 2 (WS): Ch 3, dc in each st to marked st, 2 dc in each of next 2 sts (move markers up to corresponding sts on each row), dc in each remaining st across; turn. (60 sts)
Row 3 - 7: Repeat Row 2. (70 sts in Row 7)
Row 8 - 14: Ch 3, dc in each remaining st across (maintain marker placement); turn. (70)
Row 15: Ch 3, dc in each remaining st to st before 1st marked st, [dc2tog in next 2 sts (pm)] twice, dc in each remaining st across; turn. (68 sts)
Row 16 - 24: Repeat Row 13. (50 sts in Row 24)
Row 25 (seam top of hood): Ch 3, dc in next 22 sts, sc2tog twice; break yarn leaving long tail (rem sts unworked). Use tail to whip stitch Row 25 sts to unworked sts of Row 24.
6-12 Month Finishing Instructions:
With Color A, join to front half at base of opening (bottom of Row 10), sc evenly all around front of sweater and hood and down other half of front; break yarn. Optional: Using Color A, sew button to sweater as shown, and ch a loop long enough to go around button, sew to opposite front as shown.
And that's the Striped Summer Baby Hoodie free crochet pattern on Moogly! I hope you enjoy making it for the little ones in your life!
As always, getting out one free pattern a week means a quick turnaround - so YOU are the testers! Please let me know if you find any errors in the patterns above so you can help make them better for all. And if you make it and love it, please come share your photos on Ravelry or on the Moogly Facebook page!
The Fine Print
Written pattern copyright Tamara Kelly 2017, all rights reserved. Please do not reprint or repost this pattern, but please do link to this page to share this pattern with others. If you wish to make items for sale from this pattern or translate it to another language, please visit the About page for details. Thank you to Lion Brand Yarn for providing the yarn for this pattern!


Rita Binder says
Do you have the finished measurements for each size. I followed the pattern exactly for the 6-12 month size and the finished piece looks way too big. What are the standard measurements for each size or where can I look them up.
Thanks. I love this pattern and would like to make a few for all my grandkids.
Rita
Tamara Kelly says
Hi Rita! I used the standard sizes provided by the Craft Yarn Council: http://www.craftyarncouncil.com/sizing.html
Nancy Kirkpatrick says
Hello,
I don't see the yoke tutorial that is referenced after row 10 (6-12mos).
Tamara Kelly says
Hi Nancy! It's linked above, "Top Down Yokes" in the Helpful Links list. 🙂
Sharon Anderson says
Love the pattern but a little confused as to where to mark the stitches. I can't find anywhere in the pattern where its says to place a marker. Need to get this done by sat for a baby shower so would love a quick reply. Thank you so much for the free pattern also.
Tamara Kelly says
Hi Sharon, and thank you! Under the Special Stitches, the instructions for "Make Corner" include the stitch marker placement. But if you've gotten that far without them, it's okay - just look for the center of the sets of 3 dc sts in the corners and mark the center of each set. 🙂
aj says
What a fun pattern. Is there by chance an easy-ish option to add arms to make it a full hoodie? I'm thinking ahead to the fall and winter months, and really like how this pattern works up so far.
Tamara Kelly says
Thank you so much Aj! And yes! 😀 You can grab sleeves for this pattern here: Loopy Love Baby Sweater - you might have to add an extra stitch or two in the armpit, but the idea is the same!
Wendy says
I thought you made this sweater in a larger size, for toddlers, but I cant find it again. there wasn't a link to add it to my Raverly favorites. Can you help me find it again please?
Thank You Tsmra
Wendy
Tamara Kelly says
I'm afraid that must be someone else's pattern!