This little crochet trick has been invented and reinvented repeatedly over the years! And the Chainless Starting Double Crochet stitch IS tricky - it definitely takes some practice. But it's worth it, because it tricks the eye - and makes the telltale starting chain obsolete! Learn how to make it in this tutorial!
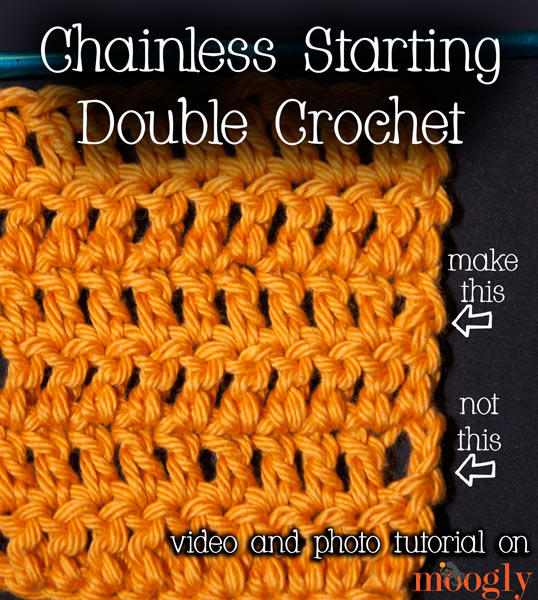
Now don't get this stitch confused with the Standing Double Crochet! They perform the same function - getting rid of the conspicuous starting or joining chain 3. But they are used in two different situations. The Standing Double Crochet is used when you are joining or starting a new row with a new color. On the other hand, the Chainless Starting Double Crochet is used when you're working the next row in the same color as before. You can use the Chainless Starting Double Crochet for a one skein or one color project, or when picking up a color that you are carrying along the side!
Chainless Starting Double Crochet Video Tutorial - Right Handed
Left Handed
Chainless Starting Double Crochet Written Instructions
The Chainless Starting Double is worked as the first st of a row, to replace a chain 2 or chain 3 start - the usual method of working the "first dc" of a row.
To make the stitch, pull up the loop on the hook to the height of a normal dc st. (Look at the row below if possible to get a good idea of what this looks like - this part takes a little practice to eyeball it!)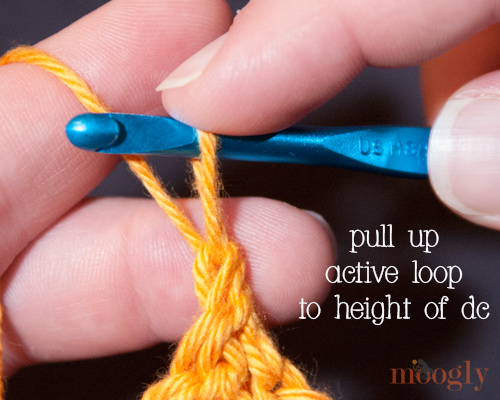
Hold the forefinger of your hook-holding hand on top of the stretched loop, against the hook, so it can't move.
Yarn over the hook with the stretched loop, so that the loop is wrapped around the hook as shown below.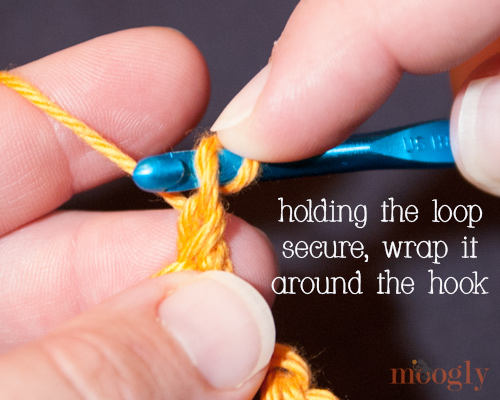
Yarn over with the working yarn and carefully pull up a loop behind the stretched loop, so that the new loop and the top of the stretched loop (still held down by your finger) are on the hook.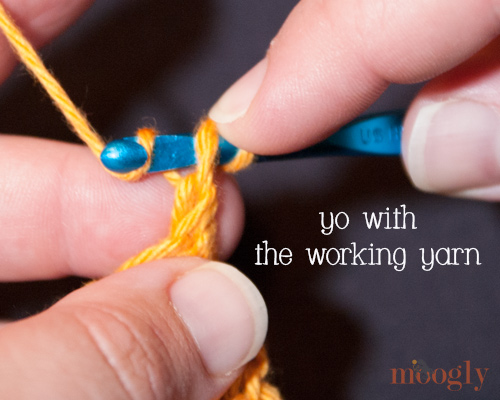
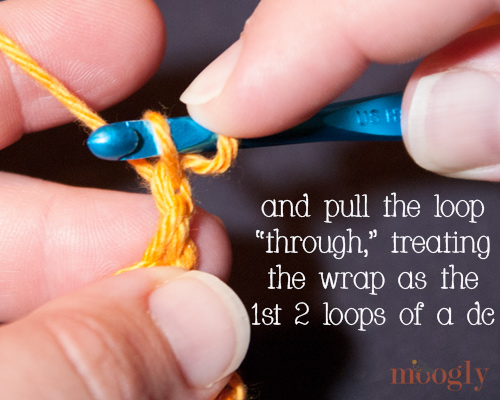
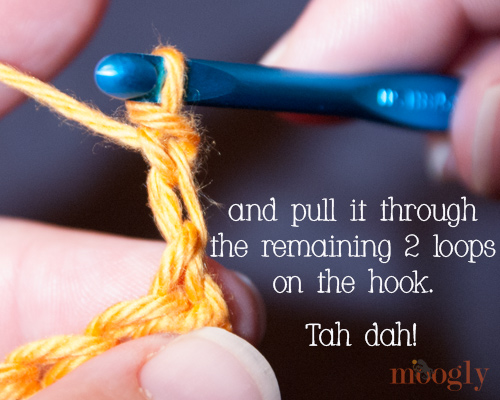
Yarn over with the working yarn again, and pull through both loops on the hook (releasing the pressure on the stretched loop as you pull the other loop through). 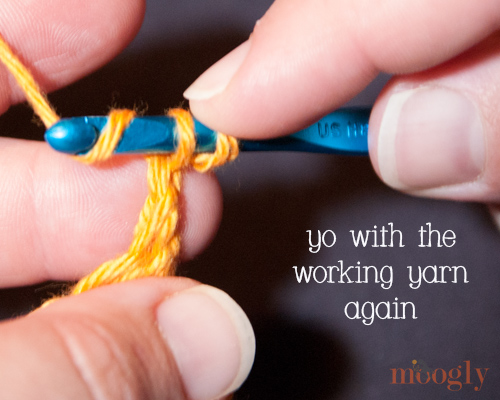
Now could you do this for a treble crochet, or trc st? Absolutely! Just pull the loop up higher, and wrap it twice, etc!
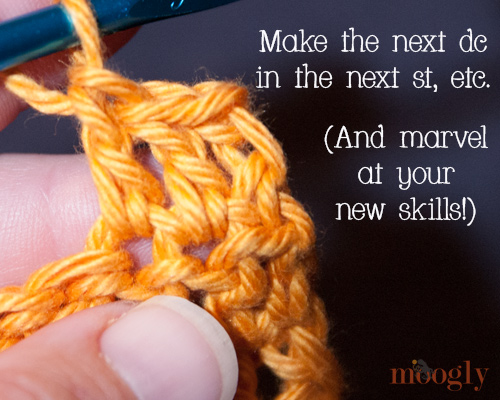
It takes some practice - pulling up the loop to just the right height (a little shorter is easier!), keeping the stretched loop on the hook, and finishing off the stitch. It might look a little funny at first. But it looks WAY better than a ch 3, and if you keep practicing you can master it - I believe in you!
Be sure to check out and like the moogly Facebook page to get the latest updates, links, and sneak peeks. Moogly is also on Pinterest, Twitter, Tumblr, Sulia, and Google+ – come join the fun! You can contact me via the Facebook page or at TamaraKelly@mooglyblog.com.

Liz Weldy says
If it wasn't already, I think it's official now. I love you, you crocheting genius!
Darla says
I have been using this method for a long time. I found a video on YouTube that was called a “faux double crochet”. It really works well.
Gigi Lee says
Thank you. This is absolutely great!
linda bienvenu says
You demonstrate your tutorials so well.
Tamara Kelly says
Thank you!
Sónia Pisco says
This is great! I just tried it in a hat, and it really works! Thanks!
Cherish says
Genius! Thanks for sharing!!
Nyree says
Excellent tutorial! I can't wait to try this technique on the next blanket I make.
Elaine says
Brilliant! Thanks.
Caryn P says
This trick is awesome! I love how It gives my pieces a perfectly polished look!
Sandy Ghorbani says
I 'm new to crochet, 73 yrs. Old, & doing quite well. So happy to learn as much as possible. Looking forward to your emails. Sandy G.
Judy Ashwell says
Thank you! I have been crocheting for thirty years and have always had that ragged edge to everything. So nice to have this technique. Off to practice!
Susan Smith says
Way cool!
Preeti says
Yes!! That's what I was looking for 🙂 thanks Tamara!!
I asked for the same on your post about standing double crochet but I could not explain further what I actually wanted so I gave up. This is a great solution!! 🙂
Sandy Martin says
I did this on an afghan I'm making for daughter's wedding present. Love it, looks great. Thanks so much for the tip..
Alison says
This is completely badass! I hate starting rows with a ch3, and this is the coolest thing EVER!! 🙂
Darlene says
I just want to say this works great on hats. I love it, thanks so much for sharing.
Tamara Kelly says
Thank you Darlene - I agree!
Lindsey King says
Will this technique work from the foundation chain as well? For example, if I am told to chain 30 and then dc into 4th ch from the hook, could I instead chain 27, make a chainless dc, and go from there? Thanks for all of your patterns, tutorials, etc. They are fabulous.
Tamara Kelly says
Absolutely! I highly recommend it! 😀 Thank you!
Andi says
THANK you from the bottom of my hooks! I started using this today and I will never abandon it! Gone are my gaps. You are a fountain of information!
Tamara Kelly says
😀 You're very welcome!
Faith says
I completely understand this technique if you are turning your work but what if you're joining a circle and continuing on in the same direction? When you start the CSDC you turned your work. I can't figure out how to do this without turning my work?
Tamara Kelly says
Hi Faith! It's worked exactly the same when working in the round. Join the previous round first, then pull up the tall loop and proceed as before. If you want the loop to have more twist, as if you had turned your work, you can remove the hook from the active loop, insert it in the opposite direction, and then spin it around 180 degrees to work the CSDC. Does that help?
Lisa T says
Thanks for sharing this. I have been using it on some scarves I have been working on. It looks great. I now can do it with a treble stitch as well and still looks great.
Tamara Kelly says
You're very welcome! 😀
Penny says
Awesome. I just tried this on a basket weave afghan I'm working on. Wish I'd been doing this all along! It works great! Thank you, thank you, thank you!
Stacey says
Will this technique work if you're doing a treble crochet instead of a double crochet by extending the loop further and wrapping it twice? Unless you know of a better way to do a treble without chains. We all know the chains for dc look baggy but it's even worse with a treble st.
Tamara Kelly says
Yes! Be sure to keep the loop very taut, and you might want to add an extra twist to it first, but it does work!
Marisa Miani Cavalcanti says
Muito útil. Principalmente nos trabalhos circulares. Perfeito ! Obrigada.
vovó Baísa
Ericka says
Just want to give a huge thanks for all your tutorials and awesome blog!!!
Tamara Kelly says
😀 Thank you!!
Lisa L says
Wow... this is SO clever! I just made my first baby sweater as a Christmas gift and I did a lot of weaving tails through those chain 3's at the seams so it didn't look like big holes. This is BRILLIANT! Thank you! (p.s. I'm going to make the Eloise for a friends new baby girl!)
Tamara Kelly says
😀 Thanks so much Lisa, I'm so glad you like it!
Ellen M says
Oh my gosh! This stitch, along with the Foundation Double Crochet, brings things to an entirely superior level! Beautiful. I've been crocheting for about a year and was wondering what to do to make edges look tidy. Presto. Truly remarkable difference.
Have a few rows done on (your) Eloise sweater; the bottom edge surely would not look as nice with chains.
Thank you, thank you.
Look forward to incorporating all of your tricks.
Tamara Kelly says
😀 Thanks so much Ellen! I'm so glad to help share the tricks!
Ria says
This is a really awesome trick! I've been practicing since I came across this post and am never going back to chain starts again! Thanks, Tamara!
Tamara Kelly says
You're very welcome! 🙂
Cheryl says
Thank you for all of the free patterns! Also a big thank you for the stitch tutorials and videos. I'm going to use the Chainless Starting Double Crochet on the blanket I'm making now!
Anum says
U just made my life easier!!! :*
Tamara Kelly says
😀 Glad to hear it! 😀
Karen says
Thanks for the technique! I am always looking for ways to make my work look more professional. I am left-handed and have practiced the technique. The stitch looks exactly like yours. However, I still have a whole in the work just as with a Ch 3. Do you have any ideas what could be causing the hole? I have lengthened and shortened the loop, and neither seems to eliminate the hole.
Tamara Kelly says
Hm, I'm not sure Karen! That's a tough one. Does it lessen when you work the next row into it?
karen says
No, the holes stay the same size. There must be something - maybe a twist that I make that a right-handed person would not make. I will keep working on it. Thanks!
Tamara Kelly says
Oh! That does give me an idea - I wonder if we turn our work in opposite directions?
Karen says
I have turned the work both ways. They both leave the hole. I'll keep working on it!
Tamara Kelly says
Well shoot, I had hoped I was on to something. :/
Brooke Travis says
I have had the same problem as a right-handed crocheter. I either couldn't get the stitch tight enough (though I was really pulling the yarn) or something I just couldn't figure out. The best thing I could come up with was to slip stitch into the first stitch after I turned and then did the chainless starting dc over it. It really helped me get the stitch lined up with one below and reduced that gap a lot. Has anyone else tried this?
sherry says
You are a crochet Goddess! I love the way you teach and what you teach! I got this on my second try! Amazing! It looks so nice on the baby blankets I am making to donate! Thanks so much for being so awesome!
Tamara Kelly says
😀 I'm so glad it helped you - and thank you so very much!
Valerie Kelley says
Where have I been? This is such a great technique!! Thank you for all of the tips and tools you provide us. It's nice to know that someone(me) who has been crocheting for over 40 years can still learn something new :).
Tamara Kelly says
😀 Thank you so much Valerie! I'm so glad you like it!
Loretta says
really, really nice. thank-you
Leelou says
I make this chainless starting double crochet for many years, and I looked for a good video for a long time to sharing with my friends..... Your video is very clear, even if we don't understand all your words !! Bravo and Thanks a lot for sharing !! Merci beaucoup !! Leelou from France
Leelou says
I have shared your link here : http://petityarnparadis.canalblog.com/archives/2014/06/09/30040292.html
My friends will be happy, encore MERCI, Leelou
Tamara Kelly says
Merci Leelou! 😀
Paula says
So I've been looking through comments and posts and haven't seen this mentioned elsewhere...any way to do this with a hdc? When I try it just falls apart, but it was wondering if maybe I missed something. 🙂
Tamara Kelly says
Hi Paula! I'm afraid that doesn't work out very well for me either.
dianne says
Hmmm. I wonder if a very snug, taut dc would compensate for a chainless starting hdc? Something to play with. Might still leave a bit of a gap if it's taller than the rest of the row. Hmmm. Would it be entirely too high maintenance to go down a hook size to make the chainless starting dc align with the rest of the row? Things that make you go "Hmmmm".
Tamara Kelly says
😀 The best of crochet geeking out! Always something new to discover!
Connie M. says
This is THE most useful trick I have learned, I have adapted it to use with hdc also, and it does such a great job of hiding an obvious seam when working in the round also 🙂
Tamara Kelly says
😀 I'm so glad to hear it Connie!
KATHY says
THANK YOU SOOOOOOOO MUCH,THAT SPACE BETWEEN THE STARTING CHAIN DC ALWAYS REALLY BOTHERED.I LOVE IT SO MUCH
KEEP COMING UP WITH THE GOOD TIPS.....
Tamara Kelly says
😀 Thank you Kathy, so glad you like it!
geri says
I'm proud as punch this morning. What a difference between the new rows using your technique and the previous 23 using the 3-ch starting dc.
I'm not too proud to unravel those 23 rows though (=
Thank you!
Tamara Kelly says
😀 Thank you Geri! So glad it works for you!
Wendy Trieber says
This big tip has helped me so much. Thank you a million times, I still need more practice but now my edges are more even and pretty.
Tamara Kelly says
😀 I'm so glad to hear it Wendy! Thank you!
Maribelle says
I gave up smoking for crafting almost a year ago (last Xmas eve to be exact) and have to say it's women like you who help keep things interesting.
I mostly crochet and am just loving your tutorials.
Thank you so much for your generosity with your knowledge.
I know I appreciate it!
Tamara Kelly says
🙂 Stopping smoking is what first got me interested in crochet! Congratulations on quitting - I know how tough it is!
Maribelle says
The quitting smoking came on the heels of an extended illness. I had a lot of time in bed to surf crafting sites and yours definitely delivers - great patterns and tutorials.
I only wish known about chainless starting before making my last poncho, but there's always my next project.
Thanks again for the work you put in.
Tamara Kelly says
Well I hope you are much improved now. 🙂 Thank you!
Susan Bolton says
Ahhh, kindred spirits! I quit smoking Christmas Eve 1981.... Then quit drinking Christmas Eve 2015..... what better Christmas presents could we give ourselves?
Congratulations Maribelle and Tamara. And thanks Tamara for all your great tutorials.
Tamara Kelly says
😀 Thank you so much!
Chelle says
Thanks so much for this and for explaining it so well, and with screenshots - it is much appreciated and will have to try it - I'm so tired of my outside dc's looking like they have 'separated' from the rest of the project!!
lady27vox says
Thank you for the great tutorial! I had viewed a different video for this stitch and it just didn't make sense to me. You made it very understandable! Thanks again!
Tamara Kelly says
I'm so glad to hear it, thank you!
Julie ADgate says
Thank you so much. I've always hated the way the beginning chain looks on a new row. This is now my forever starting row DC.
Tamara Kelly says
😀 I'm glad you like it Julie!
Deborah Zotian says
Brilliant! Wish I had seen this before I started on the blanket I'm working on right now. Unfortunately, I'm 3/4 way through the pattern, so I won't be tearing it out - but I will use this on the rest of the blanket! Thank you.
Tamara Kelly says
😀 Thank you Deborah!
Jennifer Christensen says
This stitch is amazing! I use it all of the time now, especially when working in the round using double crochet. The seam is practically invisible! I love it! I had put a link to it on my WordPress site when I first discovered it to share the love and would recommend it to everyone! Thank you so much for this tutorial 🙂
Tamara Kelly says
😀 Thank you so much Jennifer!
Michelle says
How would you do a chainless starting half double crochet? I am starting a major afghan project and would love to use this instead of the typical chains at the beginning of each row.
Thank you for all the wonderful information and videos on your site. I have learned so much from you!
Tamara Kelly says
It gets terribly fidly, and a little bulky with hdc. I would instead recommend doing a ch 1 and then hdc in the first stitch (instead of a ch 2 and then skip the first st, as most patterns suggest). It gives a nice firm edge. 🙂
Kathy Strouth says
Thank you for this stitch you are a wonderful teacher. You made it look simple as I am a visual learner. Could you answer a question for me? When someone tells you to do multiples of 8, or 10 do they mean the same stitches as before. I have seen this on certain patterns that I have tried to read. I will most certainly return to your web site to learn more of your wonderful stitching techniques.
I love sewing and crocheting and quilting.
Tamara Kelly says
Thank you so much Kathy! 🙂 In answer to your question, the stitch multiple is often given at the beginning of a stitch pattern, or a pattern where people are likely to want to customize the size. Basically, it refers to the number of stitches you need to have to "complete" a repeat of the pattern. For instance, let's say I am making something that's a dc, followed by a sc, then repeating across. I could say it's a multiple of 2, because it takes 2 sts to complete the stitch pattern. So if it were a washcloth pattern, I'd say it's a multiple of 2, because that way people can make a bigger or smaller cloth, or even adapt it to a blanket, just but adding or subtracting any multiple of 2 from the starting chain. So when you're using the multiple info, you'll use it to help you decide how long your starting chain will be. 🙂
Ellen FRAZER says
Your video.and photo instruction around so good. I am finally getting good results crocheting. That's so much!
Tamara Kelly says
🙂 Thank you Ellen, I'm so glad to hear it!
Dominique says
Hi Tamara!
You are so very gifted and I wish I could say this video helped me, but I'm lost. I'm working with sportweight pashmina yarn so perhaps that's what's throwing me? This is the first time since teaching myself to crochet that I've felt like, "Oh my gosh, why can't I grasp this?" I'm not sure if there are any tips you could offer me but I'm desperately trying to work on something for my mom's birthday (in 3 days) and while I could do it with a chain 3 (since I'm still new, do I put the chain 3 at the end of the row or the beginning? I figured if I just did the csdc like the pattern called for since many patterns call for this technique I'd be better off. Help, please!
Tamara Kelly says
Hello Dominique!
It might be the slippery yarn making it tricky. I would recommend grabbing some kitchen cotton or a wool blend - something not so silky - and practice on a little swatch! 🙂
Lisa says
Thank you so much for the left-handed version!!
Tamara Kelly says
😀 I'm so glad it helps!
Tess Vowels says
Tamara, you are really something!!! Thanks for this!!! So much prettier!!
Tamara Kelly says
Thank you so much Tess, I'm so glad you like it!
Ann says
Thank you so much! That was great.... and you are an angel for doing it left handed too!
Tamara Kelly says
😀 I'm so glad you like it! Thank you!
Leah Hiett says
Question: will this work the same way for half double crochet stitch?
Tamara Kelly says
Theoretically yes, but I find that it's a bit thicker and clunkier - for hdc, I find that ch 1 and hdc in the first stitch is the better method. 🙂
Martha says
Hi! I just sumply love your clearly performed tutorials and amazing patterns! Thanks a lot for them! 😀
Tamara Kelly says
Thank you so much Martha! 😀
Sue B Helm says
Where have you been all my life? Thank you so much for this tutorial. And an extra thank you for the left-handed versions. We usually have to translate right to left ourselves.
Tamara Kelly says
😀 I'm so glad you like it, thank you!
cASSIe says
Thank you, Tamara! I've been using your technique for my afghans & blankets for years. It's been a border (and sanity-saver)! Love your tutorials!
Tamara Kelly says
I'm so glad to hear it! Thank you Cassie!
Kristy says
I'm currently making a whoooooole bunch of simple hexagons to stitch together into patchwork baby blankets for my niece that just had triplets! I really didn't like the look of the ch 3 in the middle of the rows, and remembered reading this technique when I did the Leaping Stripes and Blocks pattern last year. Looking at my finished hexagons, I can barely even tell where the rows end thanks to this technique. Thank you for posting such a clear tutorial.
Tamara Kelly says
Hi Kristy! Thank you, I'm so glad you like it! ♥
Freelancecynic says
What a beautiful stitch and friendly tutorial. thank you!
Tamara Kelly says
Thank you so much! 🙂
Marilyn Petroff says
Hi Tamara, I did at one time belong to Moogly and enjoyed it. The stitch sounds like it would make a smoother and more presentable edge for many projects. Thank you for the tutorial. I miss being on Moogly. I just need to sign in again..
Tamara Kelly says
Hi Marilyn! ♥ Please let me know if you need any help! And thank you!