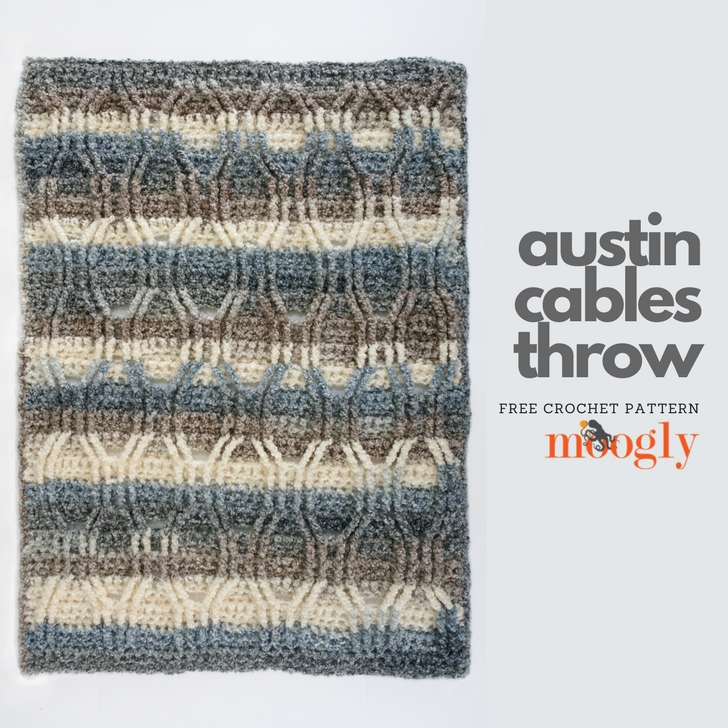
Recently I was lucky enough to take a trip to Austin, Texas - I had hoped to warm up a bit from the chilly Iowa fall weather, but of course, they had a cold snap that week! I needed a warm blanket in a hurry, and this throw was fast, fun, and couldn't be cozier. Introducing the Austin Cables Throw!
 Disclaimer: This post includes affiliate links; yarn provided by Lion Brand Yarn; hook provided by Furls.

This was the first chance I've had to work with Lion Brand Homespun Thick & Quick, and I loved how it worked up! It's super soft, lofty, and combined with a big hook and a bold design, it creates a happy, stripey blanket you can show off to all your friends and family.
![]()
If you haven't worked with crochet cables before, do not fret - this is a great pattern to start with! Row 2 sets up the pattern and uses simple stitches to get the cables started. From there, the cable stitches are only made on the even numbered rows, and only into the post stitches that are two rows below. Once you get going, it's easy as can be - heck, I found that it was hard to stop!
Austin Cables Throw
Add this pattern to your Ravelry Queue and Favorites
US - P, 15mm hook - Furls Crochet
750 yds Lion Brand Homespun Thick & Quick (Super Bulky/”6″; 160 yds/146 m; 8 oz)
Colorway Shown: Granite Stripes (5 skeins)
Size: 42" x 52"
Gauge: 4 sts x 4 rows = 4" in pattern
Stitch multiple: Mult of 8, +4
Helpful Links & Tutorials:
Crochet Abbreviations;
Post Stitches;
Tall Stitches;
Working into the Edge
Get the pattern and the yarn as a Lion Brand Kit!
NOTES:
If preferred, substitute a CSDC (click for tutorial) for the ch 3 at the beginning of every odd-numbered row starting with Row 3. This is shown in the photos but is optional.
Remeber that when working a post stitch, you do not work into the top of the stitch behind the post stitch - that would cause an increase. Maintain your stitch count in every row.
INSTRUCTIONS:
Row 1: Ch 44, dc in 4th ch from hook and each remaining ch across; turn. (42 sts in every row of the pattern)
Row 2: Ch 1, sc in the first st, fpdc in next 2 sts, sc in next 4 sts, *fpdc in next 4 sts, sc in next 4 sts; rep from * across until 3 sts remain, fpdc in next 2 sts, sc in last st, turn.
Row 3 and every odd numbered row: Ch 3 (counts as first dc), dc in each st across; turn.
Row 4: Ch 1, sc in the first 3 sts, fpdtr in each of the first 4 post sts 2 rows below, *sc in the next 4 sts, fpdtr in each of the next 4 post sts 2 rows below; rep from * across until 3 sts remain, sc in last 3 sts, turn.
Row 6 and 8: Ch 1, sc in the first 3 sts, fptr in each of the first 4 post sts 2 rows below, *sc in the next 4 sts, fptr in each of the next 4 post sts 2 rows below; rep from * across until 3 sts remain, sc in last 3 sts, turn.
Row 10: Ch 1, sc in the first st, fpdtr in each of the first 2 post sts 2 rows below, sc in next 4 sts, *fpdtr in each of the next 4 post sts 2 rows below, sc in next 4 sts; rep from * across until 3 sts remain, fpdtr in last 2 post sts 2 rows below, sc in last st, turn.
Row 12 and 14: Ch 1, sc in the first st, fptr in each of the first 2 post sts 2 rows below, sc in next 4 sts, *fptr in each of the next 4 post sts 2 rows below, sc in next 4 sts; rep from * across until 3 sts remain, fptr in last 2 post sts 2 rows below, sc in last st, turn.
Row 16 - 51: Repeat Rows 4-15 three times.
Row 52/Edging: Ch 1, sc in each st across, ch 2, sc evenly along side of blanket, ch 2, sc in each st of foundation chain, ch 2, sc evenly along last side of blanket, ch 2; join and break yarn. Weave in ends.
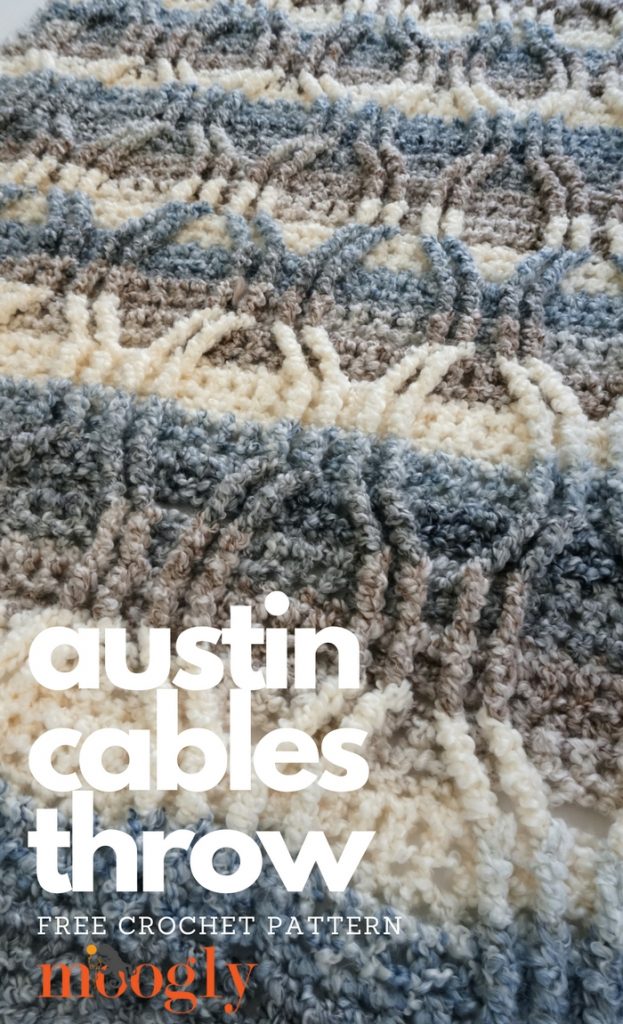
Big, bold, super chunky cables and cozy warmth can be yours with the Austin Cables Throw! These are the biggest cables I've ever made - so far at least! What do you think? Don't you just want to crawl in there?
![]()
If you do make the Austin Cables Throw, I'd love to see your finished projects! Be sure to tag me @mooglyblog on Instagram and Twitter so I can see your gorgeous work!
The Fine Print
Written pattern copyright Tamara Kelly 2017, all rights reserved. Please do not reprint or repost this pattern. But please do link to this page to share this pattern with others. To print or download, use the Print Friendly button below, or go to PrintFriendly.com, or right click to copy and paste it into a word processing document if those options do not work for you (please note that Print Friendly is a free outside website that the button links to, and you can click here for a tutorial on how to use it, but I cannot provide additional technical support for this service). If you wish to make items for sale from this pattern or translate it to another language, please visit the About page for details. Thank you to Lion Brand Yarn for providing the yarn for this pattern.


Judy says
Wow! I'm amazed at how well the cables show up with a Homespun yarn. This is great news for all of us who love Homespun but find our choices of patterns somewhat limited. THANK YOU once again, Tamara, for another beautifull pattern. (Great color choice, too!)
Tamara Kelly says
😀 Thank you so much Judy! It was fun finding a pattern that would still POP with all that texture!
Marny ca says
Love this! I have a lot of Plush - and will give that 'fuzz' a whirl for this lovely pattern. I've never done a cable with crochet.
Tamara Kelly says
😀 I hope you enjoy it, thank you!
Sibel says
I agree with Judy. I've had a few skeins of this yarn and haven't really known what to do with them. Now I know! Thank you for this beautiful and free pattern, Tamara.
Tamara Kelly says
😀 Thank you so much!
Sharon says
I love Homespun!! And have never found a pattern for a blanket to use this with. Thank you! I’m buying yarn TODAY!!
Tamara Kelly says
Thank you so much! I really enjoyed using it for this pattern - so fluffy!!
Mary O says
This looks like it would make a great men's sweater. don't suppose you're working on that?????
🙂
i'm looking for a nice warm, wool, pullover, with mock turtle sort of collar to make for my brother.
Let me know if have any suggestions!
Tamara Kelly says
Hi Mary! I am not currently, but I do agree! I have a collection of free sweater patterns at https://www.mooglyblog.com/manly-men-wear-crochet-sweaters-10-free-patterns/
The Crochet Dude also has a mock turtleneck sweater in his book (my amazon affiliate link): http://amzn.to/2yys7MZ
Kelly White says
Hi Tamara, I love this pattern. Already gicing it a go, and I'm confused on row 4 on "fpdtr in each of the first 4 post sts 2 rows below". If I understand correctly that would be working down into row 2. But, those stitches are sc & not the first 4 post stitches to work into. Help!
Tamara Kelly says
Hi Kelly! Ok, Row 2 is made of sc sts and fpdc sts. So when you crochet the fpdtr sts in Row 4, you work into/around the fpdc sts you made in Row 2. Does that help?
Kelly White says
Thank you Tamara. I'm sorry to post on both facebook & your blog post - but, so excited to work this pattern. I understand row 2 is made of sc sts & fpdc sts. In row 4 when it's time to work the first fpdtr, I'm going down into row 2 to work a fpdtr around a post. My confusion comes in when I'm ready to work the fpdtr, I'm looking "straight down" to row 2 and there is a sc. The first 4 posts I'd come to (in row 2) are further into the row towards the left. Is that where I start working the fpdtr around the post? I'm new to doing cable stitch, and so appreciate your patience. You're such a great teacher - have learned so much from you over the years! Thank you for your patience!!
Tamara Kelly says
🙂 No worries! Don't worry about going straight down for the post stitches - start at the right (assuming you're right-handed, left if you're left-handed) and look for the first 4 post stitches that were made in Row 2. That's where you'll work the first 4 fpdtr sts in Row 4. That's why they are such tall stitches - they need to streeeeetch over to the post stitches! 😀 Does that make sense?
KELLY White says
Yes, thank you so much!!!
Caz says
HI Tamara, sorry to bother you with this, but I'm having the same issue as Kelly and what you have said to help her isn't making sense to me. I should say at this point that I'm teaching myself, so my knowledge is minimal, which probably explains my confusion.. But, the 1st 3 rows make total sense... they work fine. & I get the 1st 4 stitches of row 4. But when it comes to "fpdtr in each of the first 4 post sts 2 rows below, this is where it isn't making sense to me. When I do this, those 1st 4 post sts 2 rows down are 7 stitches into the row. So if I am to fpdtr into these at row 4, it means I'm not crocheting into 3 stitches on row 4? Then if I "*sc in the next 4 sts, fpdtr in each of the next 4 post sts 2 rows below; rep from * across until 3 sts remain, sc in last 3 sts, turn." it means that row 4 doesn't have 42 stitches anymore, it only has 39. I am clearly missing something with it (fyi this is my first attempt at cabling.... and blankets lol But it just looks so lovely I really wanted to try this one). What am I missing? I'm a bit of a visual learner, so even if you could direct me to any video clips of this section, that might help me get my head around it. Thanks for your help.
Tamara Kelly says
Hi Caz! No worries, these are pretty standard questions to have a for a first crochet cables project! 🙂 Just difficult to explain with words only, but I'll do my best. You might also like this video: https://www.mooglyblog.com/basic-crochet-cables/ I don't have a video tutorial for this specific pattern - yet. 🙂
When you are crocheting cables, the post stitches move all over the fabric, which is how you get those great shapes. The big thing to keep in mind:
When you crochet a post stitch - wherever indicated - you "skip" the stitch behind it (the one that would come next if you were crocheting any other stitch) unless otherwise indicated. This isn't actually counted as a skip, just as if that stitch was already worked.
Okay, so for this specific stitch pattern, Row 4 begins as:
Sc in the first 3 sts
Fpdtr in the first 2 fpdc sts in Row 2 - these will have already been passed over when working the 2nd and 3rd sc sts, so you are crocheting to the right (if you are right handed)
Fpdtr in the next 2 fpdc sts in Row 2 - these will be a few stitches away to the left, the first 2 in a set of 4, so you are crocheting to the left (if you are right handed)
**At this point, you need to "skip" just 4 sts of Row 3 to account for the 4 fpdtr sts just made, so look at the top of Row 3 to see where to go next!**
Sc in the next 4 sts.
From there, you are moving across the fabric, working 2 fpdtr in the leftover 2 posts stitches in the previous Row 2 group and 2 fpdtr in the first 2 post stitches of the next group, with 4 sc in between.
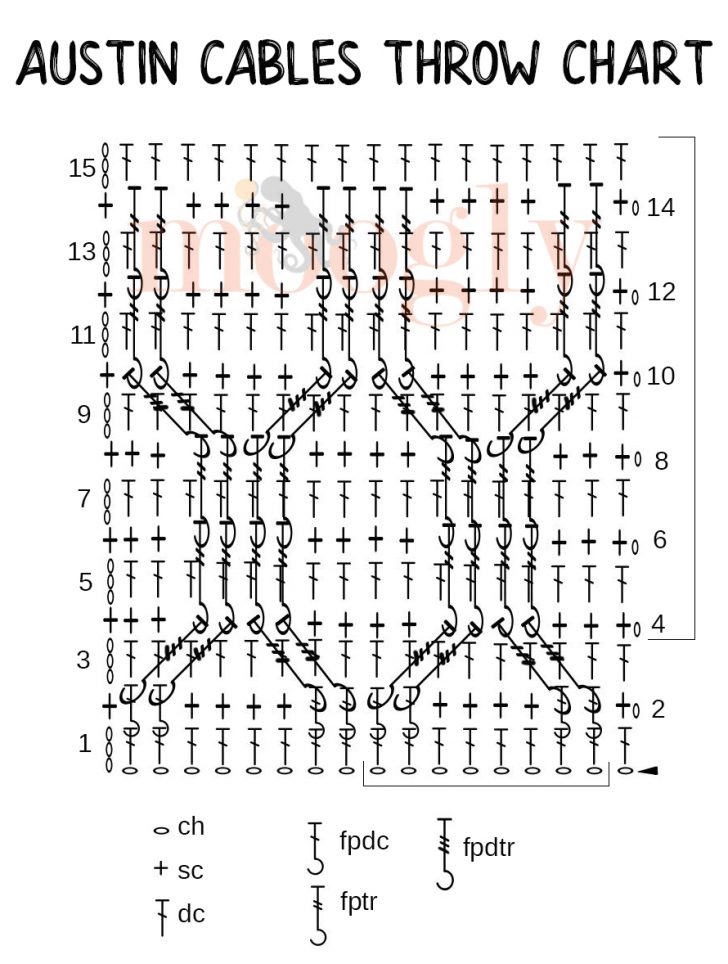
Does that help? Do you think a crochet symbol chart would help?
Kelly White says
Thanks Tamara. I think I needed the extra explanation too. And thanks to Caz for asking the question! I'm the newbie on Cables - that's for sure!😉
Tamara Kelly says
I'm so glad to hear it's helpful! Thank you Kelly!
caz says
ah brilliant Tamara. Thank you SO much. I'm so excited to get started on the blanket (i can only wear so many scarfs lol - my go to learning patterns!) I was going to the 1st group of 4 not the 2! So that meant I was jumping across and missing lots of stitches! When I read 'the 1st 4 post' I interpreted that as the 1st group of 4! D'oh!!!
You are an absolute gem, thank you so much for taking the time to help me with that! I really can't wait for my wool to arrive... but i'll get practicing with my left over wool.. Too exciting 🙂
Tamara Kelly says
It's one of the things I love about the blog format for sharing patterns - being able to help and clarify when the patterns are tricky! I'm so glad that clears it up - and I hope you enjoy making the rest of the pattern!
caz says
Definitely helps. & glad my newbie questions might have helped Kelly too 🙂 Now to get to it with my new wool 🙂
Tamara Kelly says
I'm so glad to hear it! 😀 Thanks Caz!
Teresa says
Hi love the pattern but would like to make it wider. What is the repeat number of stitches across? Thanks for the lovely pattern!
Tamara Kelly says
Hi Teresa! The stitch multiple is listed above, right below the gauge/hook/yarn info. 🙂
Bev says
So I have regular homespun (5 weight) not the thick and quick (6 weight). Any suggestions of the number of stitches and size crochet hook I should use?
Tamara Kelly says
Hi Bev! I would try a 7mm or 8mm crochet hook, and for the number of stitches I would just start with the long chain method! 🙂 https://www.mooglyblog.com/long-starting-chains-made-easy/
Dawn says
Hello - This is a beautiful throw and I love the Lion Brand yarn. I must admit I am having issues with the pattern. I have restarted it about 6 times as I missed a few stitches. This time, I made it to row 10 and I cannot see the pattern showing up. The cables appear to be more like pretzel rods and not the 'oval' wave (for lack of a better term.
In the instructions, it looks like everything is done 4s and I cannot see at what point we get the oval. I would love to send you a picture to see what I am doing wrong. I will stick with it because I think it is lovely and I am determined to make it work!
Lois Patterson says
I am having the same problems!! Help. Pics or extra explanation would help. I'm tired of ripping this out!
Dawn says
Hi Tamra -
I have tried this pattern based on the original instructions and what you replied to Caz starting at row 4 is different. Are there any more modifications to the original pattern? I am really trying to get tis right. I love this throw. Please advise. Thank you 🙂
Row 4 (original instructions):
Ch 1,
sc in the first 3 sts,
fpdtr in each of the first 4 post sts 2 rows below,
*sc in the next 4 sts, fpdtr in each of the next 4 post sts 2 rows below;
rep from * across until 3 sts remain, sc in last 3 sts, turn.
NEW FROM POST:
Okay, so for this specific stitch pattern, Row 4 begins as:
Sc in the first 3 sts
Fpdtr in the first 2 fpdc sts in Row 2 – these will have already been passed over when working the 2nd and 3rd sc sts, so you are crocheting to the right (if you are right handed)
Fpdtr in the next 2 fpdc sts in Row 2 – these will be a few stitches away to the left, the first 2 in a set of 4, so you are crocheting to the left (if you are right handed)
**At this point, you need to “skip” just 4 sts of Row 3 to account for the 4 fpdtr sts just made, so look at the top of Row 3 to see where to go next!**
Sc in the next 4 sts.
From there, you are moving across the fabric, working 2 fpdtr in the leftover 2 posts stitches in the previous Row 2 group and 2 fpdtr in the first 2 post stitches of the next group, with 4 sc in between.
Tamara Kelly says
The instructions are the same, just worded differently to try to give a new perspective on that line of instruction. 🙂
dawn says
Hi Tamara -
Thank you for the reply but I am just not seeing it. I wish I could send you a picture of what it looks like 10 rows in. anyway I can share the photo?
Thank you.
~D
Tamara Kelly says
Sure! My email is tamarakelly@mooglyblog.com 🙂
Lois Patterson says
Did you get the pic and change anything for her? i'm in the same boat.
Tamara Kelly says
No changes have been made to the pattern. The chart is now up!
dawn says
Hi Tamara -
Thank you for the reply but I am just not seeing it. I wish I could send you a picture of what it looks like 10 rows in. anyway I can share the photo?
Thank you.
~D
Lois Patterson says
I'm starting this pattern and also having difficulty. I'm up to row 4 and my gauge is off. It is nowhere near as wide as what it it supposed to be. I even moved up to a larger hook and am only getting it to be 34 " wide. Please advise I'm still trying to figure out the fpdtr as well.
Tamara Kelly says
Hi Lois! Are you using the called for yarn? This yarn is super bouncy and stretchy, so the gauge is a little wonky. I would recommend adding more stitches to get the width desired for the yarn you're using.
Ca says
I am having large gaps on the odd numbered rows after row 3, is this correct, or do you need to DC through the skipped stitches and the post stitches, or DC just the skipped stitches?
Thanks
Tamara Kelly says
There will be gaps with this gauge and cables - you skip the sts "behind" the post stitches.
Nancy says
Hi! I love this pattern and was wondering what modifications I would need to make to make it with a size 5/bulky yarn?
Tamara Kelly says
Hi Nancy! You'll want to go down to a hook size that works with your yarn to give you the fabric you like. Then you'll need to adjust the number of starting chains, depending on how big a blanket you'd like to make. You can use the stitch multiple listed above, or the long chain method: https://www.mooglyblog.com/long-starting-chains-made-easy/