Or at least easier! There are many gorgeous patterns out there that start off with a long, long... long chain. We're talking 100, 200, 300 chains or more! There are strategies to keep track (stitch markers are #1!), but mistakes in counting happen. And is there anything worse than getting to the end of the first row and finding out you're just 1 or 2 chains short? This method is one quick and easy solution!
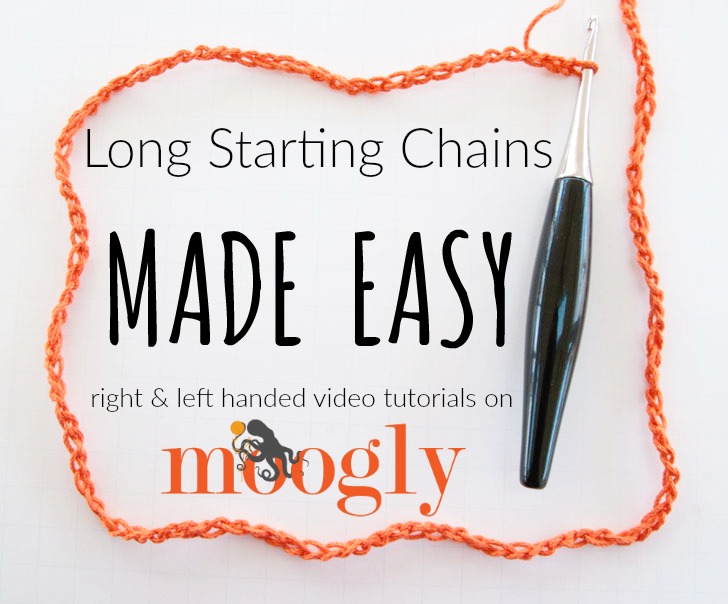
Long Starting Chains Made Easy - Right Handed
Long Starting Chains Made Easy - Left Handed
As Seen in This Video (click for more info)
In words...
When you start a long chain for a project, make the slip knot loosely - pinch it with your fingers if needed to keep it in place as you begin chaining. Then, when you think you've chained enough... chain a few more! The longer the chain, the more extras I'll make.
Finally, work that first row. When you're ready to finish your project, weaving in ends and such, then undo the slip knot, and carefully pull out the extra chains. You can use your yarn needle to make a knot at the base of the first stitch, or just weave in the end, and done!
The most important thing here is to make that initial slip knot loose, so you can pull it apart later with your yarn needle. It's fiddly at first, but it has saved me hours of grief!
It's also a great trick for when I'm designing something new, and I know the general width of the project I want, but I'm not sure how many chains I'll need to get started. I just chain to the width I want, plus a few extra for a margin of error, and then start crocheting. Then I can go back and get the chain count when I've got the first row established! If you are designing your own project, it's a great way to get started without the stress!
Thanks for watching!
Get Moogly on your favorite social media sites: Facebook, Twitter, G+, Pinterest, Instagram and Tumblr, and sign up for the free Newsletter so you don’t miss a thing!

Margaret says
Great way to give the chain the exact amount of stitches. Thanks for this tutorial.
Have a great day, Margaret
Tamara Kelly says
😀 Thank you Margaret! I'm glad you liked it!
Sharon says
Great tip indeed!
Tamara Kelly says
😀 Thank you Sharon!
Joanne bailey says
Thank you so very much. I always wondered what to do in this instance.
Smiles!!!!!
Tamara Kelly says
😀 I'm so glad, thank you Joanne!
Jess | Make and Do Crew says
This seems kind of obvious, but I'm so glad you pointed it out! I can def see how it's helpful with blankets and similar unruly gigantic chains. I also just learned the foundation crochet stitch--between these two new tips, my whole starting-project-world is getting rocked! 🙂
Tamara Kelly says
😀 Thank you Jess! It was a "aha" moment for me too when I learned it!
Marilee says
Great Idea! And THANK YOU for always including text content in addition to your videos. I find videos inconvenient to watch (probably bc I'm usually on mobile), so I always skip to your text (which is always clear & concise!). 🙂
Tamara Kelly says
I try - occasionally I have overlooked it, but I'm trying to do better every time! 🙂 Thank you Marilee!
Kitty says
Thank you so much, wonderful tip!
Tamara Kelly says
Thank you! 😀
Tiffany says
Or if you're doing a pattern that has a specific repeat, just count that many, over and over again. I do a ripple blanket that has 14+3 repeat, so I just count 1-14 over and over in my head until I get the chain to be about as long as the blanket should be, then I add 3!
Tamara Kelly says
Yes, that's a good way to start too! 🙂
Evelyn says
Something so frustrating simplified....what could be better! Thank you for all your tips. Happy Spring!
Tamara Kelly says
😀 Thank you so much Evelyn! I'm so glad you liked it! Happy Spring to you as well!
Michael says
Fantastic idea! Especially for a beginner like me. It's people like you posting tips like this that make crocheting more accessible. Thank you.
Tamara Kelly says
😀 Thank you so much Michael!
Randi says
Thank you so much for sharing this tip! You have saved me hours, stitch markers and angst!
Tamara Kelly says
😀 I'm so glad it helped you Randi!
Sue says
Brilliant, obviously itll work best with smother threads but I can se it being really useful so long as yarn isnt too flufy. Video & written instructions are greatx.
Tamara Kelly says
😀 Thank you so much Sue, I'm so glad you liked it!
Sandra says
Thank you for this great tip.!!!
My question is if the pattern calls for SC in the second row, how do you know how many SC's you need to work without counting? The third row starts the pattern, so only then you would be able to see if you have too many sc's!!! I don't understand how you knew you had too many stitches on the sc row!!!
I don't know if I am clear enough on this, pls help me understand . I am a novice crocheter, maybe that's why!!!
Thank you!!!
Tamara Kelly says
Hi Sandra!
You still have to count your stitches in the first row. But stitches are typically a lot easier to count than chains, particularly if it's not just a row of plain sc, but something with a stitch repeat. I just made a few sc and called that row "done" for purposes of demonstration for this video. 🙂
Pong says
Thank you for the tip. Now..How about when you.do not have enough chain to work with?
Tamara Kelly says
That's a little different - I'll have to make a new video! 😀
Cunthia says
Great tutorial. I was in my 40s before I learned this one. I'm 59 now. I guess you can teach an old dog.
Tamara Kelly says
😀 I'm in my 40s and still learning new stuff all the time!
Kathi says
Thanks for showing the left handed method. It took me forever to master the magic circle because I have to mirror image everything. Keep those left hander videos coming.
Tamara Kelly says
😀 I'm so glad it helped!
Anj says
Wonderful post! I have some very old crochet patterns that tell one to cut off the excess chain. I think the idea is to be understood that you cut it off and weave in the ends. No reply necessary - I just wanted to compliment you and to compare old versus new. 🙂
Tamara Kelly says
😀 That's really interesting, I haven't come across that before but it makes sense! Thank you for sharing that, I'll have to keep an eye out for it now. 🙂
Toni Wood says
Do you think I can make this blanket for my 25 year old son who has his own place? I was thinking of making it in navy blue and white, the UCONN Husky's colors and has finally realized how utilities cost. LOL Any ideas or suggestions would be greatly appreciated. I am an experienced crocheter and an advanced knitter.
Tamara Kelly says
Hi Toni! I'm not sure which blanket pattern you're referring to, but that sounds lovely!