
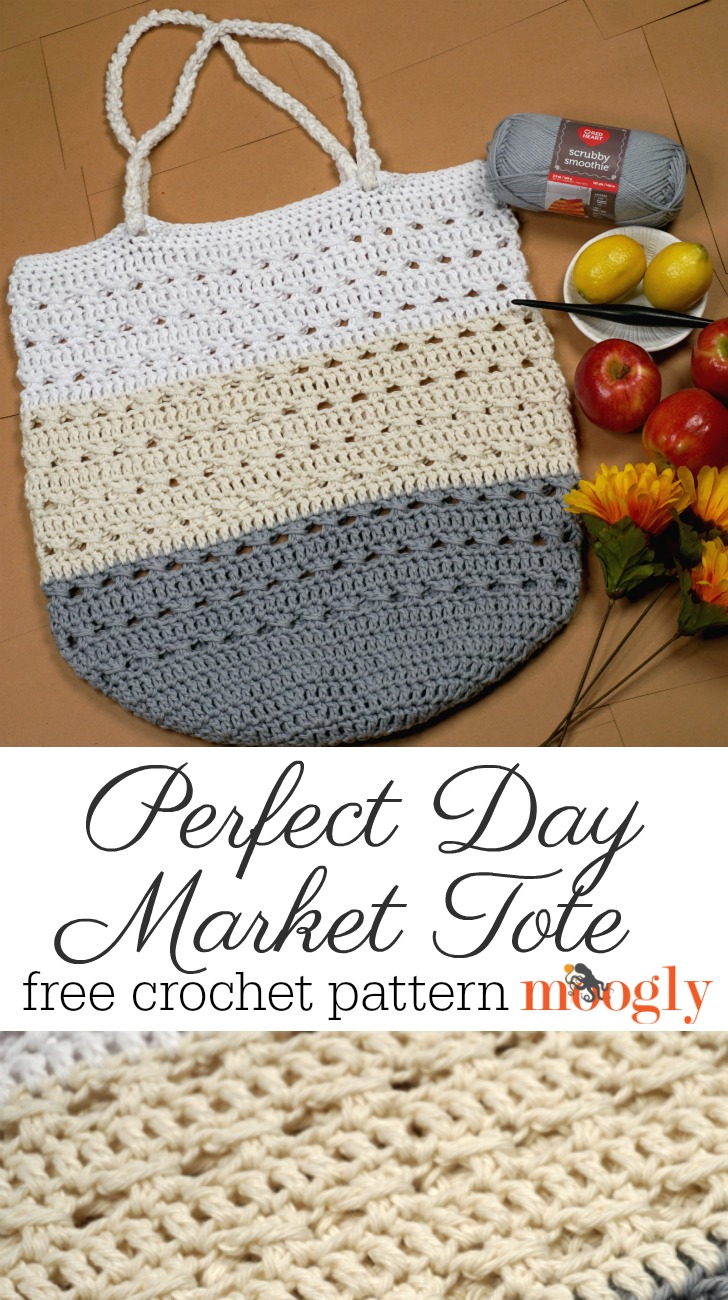
The Perfect Day Market Tote was inspired by all my trips to the local farmer's market this season - the start to a perfect summer day! But you don't have to take it to the market - it's handy wherever you go. And it's a free crochet pattern here on Moogly!
Disclaimer: This post includes affiliate links; materials provided by Red Heart Yarn and Furls Crochet Hooks.
Prefer an ad-free PDF? You've got options!


Prefer the free blog version! Keep scrolling!
Make This Bag in ANY Size!
This is a big, big market bag - but the clever thing about this pattern is that you can actually make it any size! Just stop increasing in circles when you've got the base size you like, and then crochet on up the sides (starting with Rnd 9).

You might want to add or subtract a few more rows, depending on the overall size you like, but that's easy enough too, with a simple two-row repeat. Then it's just a matter of figuring out your handle placement (and I have a tutorial for that linked below).

I made the Perfect Day Market Tote in three lovely neutral shades of Red Heart Scrubby Smoothie - it's the perfect yarn for this project! And it comes in tons of colors - so I can't wait to see which ones you choose for your Perfect Bag!
Perfect Day Market Tote
Add this pattern to your Ravelry Queue and Favorites
US - K, 6.5mm hook - Furls Crochet
450 yds Red Heart Scrubby Smoothie (100% Cotton; “4”/Medium/Worsted/UK: 10-12 ply; 153 yd/140 m; 3.5 oz/100 g)
Color A: Grey (1 ball)
Color B: Loofa (1 ball)
Color C: White (1 ball)
This yarn is discontinued - recommended substitutes include Lily Sugar'n Cream, Bernat Handicrafter, and WeCrochet Dishie
Gauge: 11 sts x 6 rows = 4"/10cm in dc
Size (laid flat): 17.5" wide x 20 long (excluding handles)
Helpful Links and Tutorials:
Perfect Day Market Tote Tutorial
NOTES:
If preferred, substitute a Chainless Starting Double Crochet for the "Ch 3" beginning Rnds 1-30.
If preferred substitute a Standing Double Crochet for the "Join with sl st and ch 3" at the beginning of Rnds 16 and 24.
INSTRUCTIONS:
Rnd 1: With Color A, make a magic circle, ch 3 (counts as first dc, here and throughout), dc 11 in the ring; join. (12 dc)
Rnd 2: Ch 3, dc in the first st, 2 dc in each rem ch around; join. (24 dc)
Rnd 3: Ch 3, 2 dc in the next st, *dc in the next st, 2 dc in the next st; rep from * around, join. (36 dc)
Rnd 4: Ch 3, dc in the next st, 2 dc in the next st, *dc in the next 2 sts, 2 dc in the next st; rep from * around, join. (48 dc)
Rnd 5: Ch 3, dc in the first st, dc in the next 3 sts, *2 dc in the next st, dc in the next 3 sts; rep from * around, join. (60 dc)
Rnd 6: Ch 3, dc in the next 3 sts, 2 dc in the next st, *dc in the next 4 sts, 2 dc in the next st; rep from * around, join. (72 dc)
Rnd 7: Ch 3, dc in the first st, dc in the next 5 sts, *2 dc in the next st, dc in the next 5 sts; rep from * around, join. (84 dc)
Rnd 8: Ch 3, dc in the next 5 sts, 2 dc in the next st, *dc in the next 6 sts, 2 dc in the next st; rep from * around, join. (96 dc)
Rnd 9 and 10: Ch 3, dc in each st around; join. (96 sts)
Rnd 11: Ch 3, dc in the next st, dc around posts of last 2 dc made, skip next st, *dc in the next 2 sts, dc around posts of last 2 dc made, skip next st; rep from * around, join. (96 sts)
Rnd 12 - 15: Rep Rnds 10 and 11 twice; break Color A.
Rnd 16: With Color B, join with sl st and ch 3 in first st of previous rnd, dc in each rem st around; join.
Rnd 17: Repeat Rnd 11.
Rnd 18 - 23: Rep Rnds 10 and 11 three times; break Color B.
Rnd 24: With Color C, join with sl st and ch 3 in first st of previous rnd, dc in each rem st around; join.
Rnd 25: Rep Rnd 11.
Rnd 26 - 29: Rep Rnds 10 and 11 twice.
Rnd 30: Repeat Rnd 10.
Rnd 31: Ch 1, sc in each st around; join. Place stitch markers in sts # 11, 33, 59, 81.
Rnd 32: Ch 1, sc to first marked st, ch 3, skip marked st, *sc to next marked st, ch 3, skip marked st; rep from * twice, then sc in each rem st, join. (92 sc, 4 ch-3 loops)
Rnd 33: Ch 1, sc in each st around, working 3 sc in each ch-3 sp; join and break Color C. (104 sc)
Handles (Make 2):
Step 1: Holding Colors B and C together, tightly chain to 112" inches, break yarn, leaving a long tail on each end.
Step 2: Tightly chain each row of chains as if it were a strand of yarn. Check to make sure the handles are now the same length, removing chains if needed.
Step 3: Insert the end of each handle into a ch-3 sp in Rnd 32 from RS to WS. Using the long tails, sew the end to the 8th chain from the end, burying your tails inside the handles. One handle should be inserted through the spaces at sts #11 and 33, and the other at sts #59 and 81.
And that's how to make the Perfect Day Market Tote! It's pretty, practical, and ready for customizing - I hope you enjoy making it your own!
I can’t wait to see what colors of Red Heart Scrubby Smoothie you choose! So if you make the Perfect Day Market Tote and share it on social media, be sure to tag me @mooglyblog or #mooglyblog – and happy crocheting!
The Fine Print
Written pattern copyright Tamara Kelly 2018, all rights reserved. Please do not reprint or repost this pattern, but please do link to this page to share this pattern with others. If you wish to make items for sale from this pattern or translate it to another language, please visit the About page for details. Thank you to Red Heart Yarn, Furls Crochet, and Clover USA for providing the materials for this pattern.


Lynette says
I love your patterns but can't get Red Hearts Yarn as I live in Western Australia. Any ideas?
Tamara Kelly says
Thank you so much Lynette! I don't really know what yarns are available in Australia so I can't recommend specifics, but I would just try to match the fiber and the weight whenever possible - so a medium weight cotton would be good here. And since it's not a garment, the exact sizing doesn't matter, so as long as you like the look of your stitches, you're good for this one!
Maureen says
Tamara,
I am lost row number 11. I cannot find a tutorial on DC around posts of last 2 stitches. Please help as I am stuck now.
Thank you,
Maureen
Tamara Kelly says
Hello Maureen!
There will be a video tutorial for this bag added to the blog tomorrow, and you can see an example of a wrapped stitch here: https://www.mooglyblog.com/wrap-around-stitches/ 🙂
Becky Holder says
I'm stuck on 11. It reads, Rnd 11: "Ch 3, dc in the next st, dc around posts of last 2 dc made." On the tutorial video for this stitch, it looks like you Ch 3, dc in the next 2 st, dc around posts of last 2 dc made. Which way is correct here?
Tamara Kelly says
Hi Becky! The Wrap Stitch Tutorial is from a previous pattern, and demonstrates just one kind of wrap stitch - I tried to talk about that a bit in the video. For this pattern, it's the same "wrap stitch" idea, but worked as just one dc. You can see that tutorial for this specific pattern at https://www.mooglyblog.com/perfect-day-market-tote-tutorial/ 🙂
Becky says
Wow! Thanks for the quick response! Your guidance helped me resolve the confusion I having. I can't wait to finish this project.
Tamara Kelly says
I'm so glad to hear it, thank you Becky!
Joy Schwarzkopf says
Love this bag! Have it on my to-do list. I was wondering if you’ve tried the Bernat Maker outdoor yarn? I was thinking of trying it for this but I know I’d really have to change the gauge and not sure I’m up for the challenge. 😁 Plus it seems really stretchy and I don’t want a saggy tote.
Tamara Kelly says
Thank you! I'm afraid I haven't tried that particular yarn. 🙂
Ann Merklin says
What is the Magic Circle ?
Tamara Kelly says
Hi Ann! It's a way to begin projects worked in the round without having the chain and join: https://www.mooglyblog.com/the-magic-circle/
Pamela says
Hi, Tamara! Another great pattern for me to make!
Btw, porting is most definitely a word; hence Porter.
Tamara Kelly says
😀 Thank you Pamela!
j Winslow says
There must be a better way to print these patterns. I Hit PRINT in order to get the pattern for the" Perfect day Market Tote" and printed 7 pages. That is a terrible waste of paper and ink.
JW
Tamara Kelly says
Hi JW! Here is a tutorial that should help: https://www.mooglyblog.com/print-pattern-use-print-friendly-button-moogly/
susan jones says
love this bag I'm about 1/3 of the way through and am wondering if it will be sturdy enough without lining? Thanks so much, Siusan
Tamara Kelly says
Thank you so much! Lining is totally optional - but would certainly make it more sturdy!
Jocelyn says
My internet is not good enough to watch the video. I am just wondering if this is front post or back post wrap?
Tamara Kelly says
Hi Jocelyn! These wrap stitches are different from post stitches. Here's a photo tutorial that should help: https://www.mooglyblog.com/wrap-around-stitches/ 🙂
Brandi says
I’m loving this pattern, but when I complete the round for the DC around the post, there are no discernible stitches left for me to see where to do my DC in the next round. I find myself just guessing where to put a stitch and so my stitch numbers are always off.
I watched the video tutorial and when you do the DC around the post, a visible stitch is left but I am not having that luck! Can’t figure out what I’m doing wrong ..
Tamara Kelly says
Hi Brandi! Thank you! My best advice is to find the Vs at the top and pull them out straight so you can see where the next V comes out of the previous one. Or am I misunderstanding?
Brandi says
Thank you for your quick reply!
I see what you mean. The problem is when I do the DC around the post, there is no "v" at all once I finish the stitch to see where to put the DC when I come around for the next row. So I am not sure where I would pull to make them more noticeable.
I believe I may be doing the stitch wrong all together, and that is why there is no clear chain, or row of visible stitches left behind when I finish round 11.
Brandi says
Just wanted to update that after watching the video on .25 speed SEVERAL times, and using stitch markers out the wazoo, I figured it out!!!! Turns out, I was holding my crochet hook incorrectly, and it made all the different when I made a slight adjustment. Can't wait to finish this bag:)
Tamara Kelly says
Oh wow! I'm so glad you were able to figure it out though! ♥