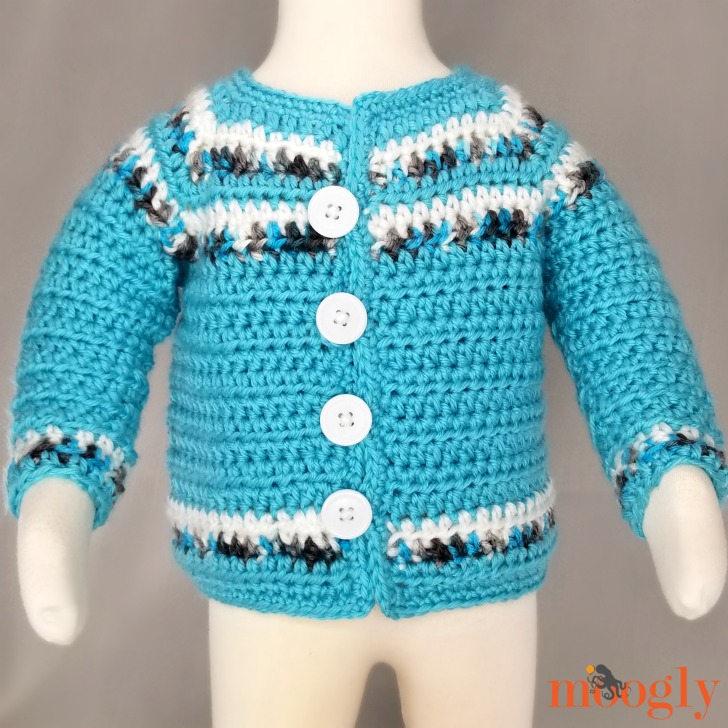
The Essential Baby Sweater is that go-to, easy-peasy, every baby shower gift crochet pattern. It's simple, basic, totally unisex - and super customizable! Read on for this free Moogly baby cardigan crochet pattern!
Disclaimer: Materials provided by Red Heart and Clover USA; this post includes affiliate links.
Prefer an ad-free PDF? You've got options!


Prefer the free blog version? Keep scrolling!
A Baby Sweater for Beginner Crocheters
To design the Essential Baby Sweater, I used Red Heart Soft Essentials Baby - a super soft yarn in fab colors perfect for babies, that you can mix and match with the other Soft Essentials options!

I tried to keep the stitching just as simple as possible - this baby cardigan pattern includes just chains, half double crochets, and single crochets. There aren't even any increase or decrease stitches! This is a great baby crochet pattern for beginners - and a super quick go-to pattern for all your baby shower invites!

Since the stitches of the Essential Baby Sweater are so simple, you can have a lot of fun with the colors! Adding a stripe of white and another of variegated yarn almost creates a faux fair isle look - but you can go solid, change colors every row, whatever you like! The possibilities are endless.

Essential Baby Sweater
Add this pattern to your Ravelry Queue and Favorites
US-J, 6.0mm hook - Furls Streamline
230 yds Red Heart Soft Essentials Baby (4 - Medium; 100% Acrylic)
Color A: Aqua Sky (less than 1 ball)
Color B: Cotton (less than 1 ball)
Color C: Blue Horizon (less than 1 ball)
Gauge: 12 sts x 10 rows = 4"/10cm in hdc
Size: 0-6 mths
Helpful Links and Tutorials:
Essentials Baby Sweater Tutorial
Changing colors for striped patterns
How to crochet armholes in a top-down sweater
Slip Stitches you can crochet into
How to sew on buttons with yarn
SPECIAL STITCH:
Make Corner - 3 hdc in the indicated st, place a st marker in the center of the 2nd hdc.
NOTE:
The sleeves on this sweater are made in turned rounds, or joined rows. This means that the even-numbered rows are worked from the inside of the sleeve.
In Rnd 2 of the Button Holes and Final Edging, the ch-5 button loop may need to be adjusted for your button choice - be sure to check before you finish.
Odd Rows = Right Side (RS); Even Rows = Wrong Side (WS)
INSTRUCTIONS:
Row 1: With Color A, ch 43, hdc in the 2nd ch from hook, hdc in the next 6 ch, make corner in the next ch, hdc in the next 6 ch, make corner in the next ch, hdc in the next 12 ch, make corner in the next ch, hdc in the next 6 ch, make corner in the next ch, hdc in the last 7 ch finishing last st with Color B; turn. (50 sts)
Row 2: With Color B, ch 1, hdc in the first 8 sts, make corner (move st marker up from previous row), hdc in the next 8 sts, make corner, hdc in the next 14 sts, make corner, hdc in the next 8 sts, make corner, hdc in the last 8 sts finishing last st with Color C; turn. (58 sts)
Row 3: With Color C, ch 1, hdc in the first 9 sts, make corner, hdc in the next 10 sts, make corner, hdc in the next 16 sts, make corner, hdc in the next 10 sts, make corner, hdc in the last 9 sts finishing last st with Color A; turn. (66 sts)
Row 4: With Color A, ch 1, hdc in the first 10 sts, make corner, hdc in the next 12 sts, make corner, hdc in the next 18 sts, make corner, hdc in the next 12 sts, make, hdc in the last 10 sts finishing last st with Color B; turn. (74 sts)
Row 5: With Color B, ch 1, hdc in the first 11 sts, make corner, hdc in the next 14 sts, make corner, hdc in the next 20 sts, make corner, hdc in the next 14 sts, make corner, hdc in the last 11 sts finishing last st with Color C; turn. Break Color B. (82 sts)
Row 6: With Color C, ch 1, hdc in the first 12 sts, make corner, hdc in the next 16 sts, make corner, hdc in the next 22 sts, make corner, hdc in the next 16 sts, make corner, hdc in the last 12 sts finishing last st with Color A; turn. Break Color C. (90 sts)
Row 7: With Color A, ch 1, hdc in the first 13 sts, hdc in the marked st (remove 1st marker), ch 5, skip 18 sts, hdc in next marked st (remove 2nd marker), hdc in the next 24 sts, hdc in the next marked st (remove 3rd marker), ch 5, skip 18 sts, hdc in last marked st (remove 4th marker), hdc in the last 13 sts; turn. (54 hdc and 10 ch)
Row 8: Ch 1, hdc in each st and ch across; turn. (64 sts)
Row 9 - 17: Ch 1, hdc in each st across; turn. Finish last st of Row 17 with Color B. (64 sts)
Row 18: With Color B, rep Row 9, finishing last st with Color C, break Color B. (64 sts)
Row 19: With Color C, rep Row 9, finishing last st with Color A, break Color C. (64 sts)
Row 20: With Color A, rep Row 9, break Color A. (64 sts)
Add Sleeves (Repeat for both armholes):
Rnd 1: With Color A, from RS of sweater, join to center st of the armpit (bottom of armhole), ch 1, hdc 27 sts evenly around arm opening; join and turn. (27 sts)
Rnd 2: Ch 1, hdc in each st around until 1 st rem, skip last st; join. (26 sts)
Rnd 3 - 14: Repeat Rnd 2. Finish last st of Row 14 with Color B.
Rnd 15: With Color B, ch 1, hdc in each st around; join and turn finishing last st with Color C, break Color B. (14 sts)
Rnd 16: With Color C, rep Rnd 15 finishing last st with Color A, break Color C. (14 sts)
Rnd 17: With Color A, rep Rnd 15; break Color A. (14 sts)
Button Holes and Final Edging:
Before beginning the next Round, plan the placement of your button loops and mark with a stitch marker. Note that the buttons and loops as shown are the boy's version - switch the buttons and loops to the opposite edges for a girl's version.

Rnd 1: With Color A, join to any st at back of neck, ch 1, sc in each st to front opening, ch 2, sl st along front edge, ch 2, sc in each st at bottom hem, ch 2, sl st along other side of front edge, ch 2, sc in each rem st at neck; join. Recheck placement of st markers for button loops, and move markers to sl sts.
Rnd 2: Ch 1, sc in each st, (sc, ch 2, sc) in each ch-2 corner, and (sc, ch 5, sc) in each marked st; join and break.
Sew on buttons opposite the button loops. See tutorial linked above, or use matching thread.
I hope you like this free crochet baby sweater pattern! I tried to make it easy and straight-forward, but still flexible. I can't wait to see all the fun things you all do with this free baby cardi crochet pattern!

Ready to make your own Essential Baby Sweater? If this free crochet cardigan pattern does inspire you, and you post a photo on social media, be sure to tag me @mooglyblog or #mooglyblog so I can check it out too! I love seeing what you make!
The Fine Print
Follow Moogly on Facebook, Twitter, Pinterest, Instagram, and more! Thank you to Red Heart Yarns and Furls for providing the materials shown in this post. Written pattern copyright Tamara Kelly 2019, all rights reserved. Please do not reprint or repost this pattern, but please do link to this page to share this pattern with others. If you wish to make items for sale from this pattern or translate it to another language, please visit the About page for details.


Gigi says
I always have a problem with patterns for wearable things because I am left-handed. Do you have any suggestions on how to read these patterns for left-handed people? Do I read the pattern backward ? Will you do both a right- and left-handed tutorial, please?
Diane Plummer says
Can I make this fit A 10 year old boy?
Tamara Kelly says
Probably not. That would be a big redesign, as the proportions change as they grow.
Lynn Dale says
How can I adjust for a 12 month size? Thanks
Tamara Kelly says
You can add another round to the yoke before making the armpit row, and then add a couple more rows to the body and sleeves. 🙂
Barbara Daugherty says
Can I use 3 Ply instead of 4 Ply yarn?
Barbara Daugherty says
Will try one more time....Can I use a 3 ply instead of 4 ply for this sweater. I am making a newborn boy sweater. Thank you!
Tamara Kelly says
You can as long as you get gauge and a fabric you like! 🙂
Rachel Burton says
How long is the baby cardigan when finished from top to bottom
Tamara Kelly says
Approximately 8 inches. 🙂
Terri says
I sure hope you can help. I made my gauge swatch and did fine. Now however whenever I measure to make sure I'm still hitting the gauge I lose 2 stitches I'm at 10 instead of 12. I am using a bulky 5 in the Soft essential line and a 4.25 mm hook. I can't go any further down as it becomes difficult to work with.
Tamara Kelly says
Hi Terri! I think the problem is that you are using a 5 weight yarn whereas this pattern calls for a 4 weight yarn. 🙂
Terri Dreiling says
Thank you! I thought so...On the hunt for another pattern. Thank you again.
Alyssum Zueheart says
This pattern is awesome for beginners who want to begin branching out into more complicated patterns. Complex enough that it switches things up, and simple enough so that it doesn’t leave one frustrated and confused. I definitely recommend it!
Tamara Kelly says
Thank you so much, Alyssum! ♥