The Ups and Downs Slouchy Beanie has done pretty well for itself (thanks to all of you!) and I had a little yarn leftover... so of course I designed a matching pair of mitts! Introducing the Ups and Downs Crochet Fingerless Gloves!
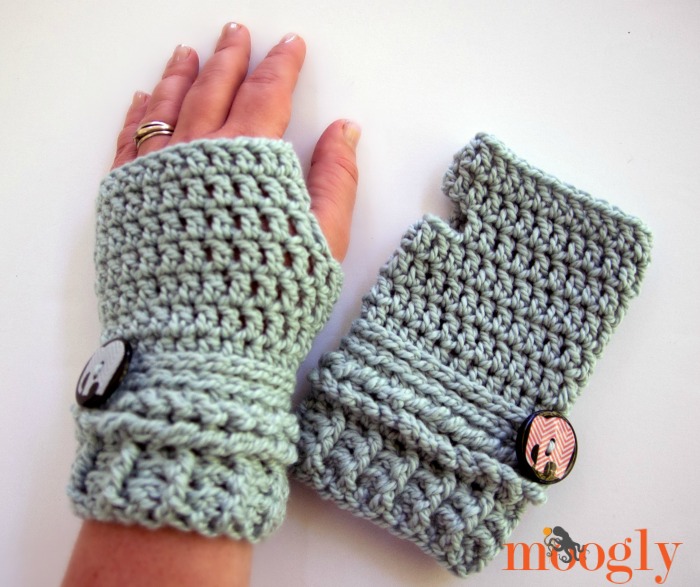

The Ups and Downs Crochet Fingerless Gloves use the same great stitches as the hat, and it is super easy to create a custom fit. Just wrap the first row around your wrist to get started with your custom size - as long as you have an even number of stitches, you'll be all set!

Or just follow the directions below for a standard women's size. They're very stretchy, and actually pretty darn simple to make! You can whip up a pair today!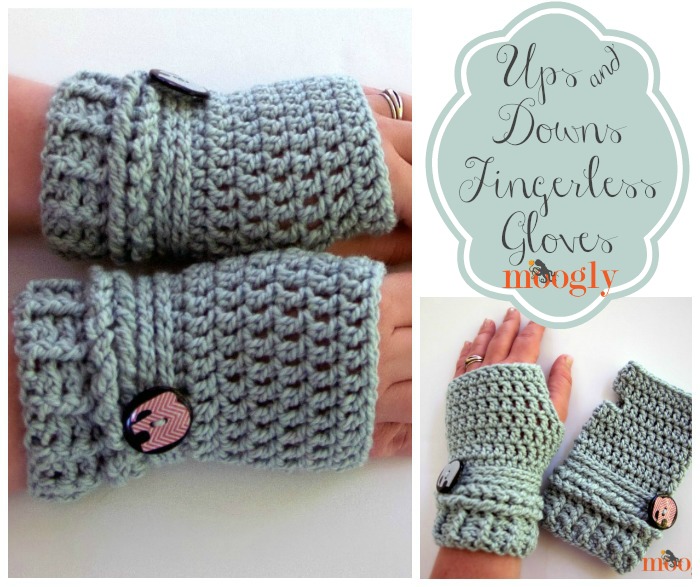 Disclaimer: This post includes affiliate links.
Ups and Downs Crochet Fingerless Gloves
Click here to add this pattern to your Ravelry Queue and Favorites
- US – I, 5.5mm hook (Furls Fiberarts in Cocobolo used)
- 102 yds worsted weight yarn (Purl Soho Worsted Twist; 100% Merino Wool; 164 yds/100g; Desert Blue used)
- 2 buttons (1.25″/32mm; Crafting With Buttons Elephant used; purchased at JoAnn Fabrics)
- 2 stitch markers (Clover Lock Ring Markers used)
- tapestry or yarn needle (Susan Bates Finishing Needle used)
- Gauge: 12 sts x 7 rows = 4″ in dc
- Size: Women's Average (Need to make adjustments? Work any even number of stitches for Round 1!)
Click on the highlighted stitches and instructions for video tutorials!
LEFT MITT INSTRUCTIONS:
Round 1: FDC 24, join with sl st to first FDC to work in the round. (24 sts)
Round 2 – 3: Ch 2 (does not count as a st), fpdc in the first st, bpdc in the next st, *fpdc in the next st, bpdc in the next st; repeat from * around, join with a sl st in the first fpdc. (24 sts)
Round 4: Ch 6 (counts as first st), QuadTr in each st around; join with a sl st in the top of the ch 6. (24 sts)
Round 5: Ch 1, hdc in each st around; join with a sl st in the top of the first hdc. (24 sts)
Round 6 – 7: Ch 1, hdc in the 3rd loop (in back, behind the top two loops) of each st around; join with a sl st in the top of the first hdc. (24 sts)
Round 8 - 10: Ch 2, dc in each st around; join with a sl st in the top of the first dc. (24 sts)
Round 11: Ch 2, dc in the 1st 2 sts, ch 4, skip 4 sts, dc in remaining sts around; join with a sl st in the top of the first dc. (20 dc, 4 ch)
Round 12: Ch 2, dc in each st and ch around; join with a sl st in the top of the first dc. (24 sts)
Round 13: Ch 2, dc in each st and ch around; break yarn and seamless join. Weave in ends. (24 sts) Make Right Mitt, and then go to Assembly Instructions below.
RIGHT MITT INSTRUCTIONS:
Round 1: FDC 24, join with sl st to first FDC to work in the round. (24 sts)
Round 2 – 3: Ch 2 (does not count as a st), fpdc in the first st, bpdc in the next st, *fpdc in the next st, bpdc in the next st; repeat from * around, join with a sl st in the first fpdc. (24 sts)
Round 4: Ch 6 (counts as first st), QuadTr in each st around; join with a sl st in the top of the ch 6. (24 sts)
Round 5: Ch 1, hdc in each st around; join with a sl st in the top of the first hdc. (24 sts)
Round 6 – 7: Ch 1, hdc in the 3rd loop (in back, behind the top two loops) of each st around; join with a sl st in the top of the first hdc. (24 sts)
Round 8 - 10: Ch 2, dc in each st around; join with a sl st in the top of the first dc. (24 sts)
Round 11: Ch 2, dc in each st until 6 sts remain, ch 4, skip 4 sts, dc in last 2 sts; join with a sl st in the top of the first dc. (20 dc, 4 ch)
Round 12: Ch 2, dc in each st and ch around; join with a sl st in the top of the first dc. (24 sts)
Round 13: Ch 2, dc in each st and ch around; break yarn and seamless join. Weave in ends. (24 sts) Go to Assembly Instructions below.
ASSEMBLY INSTRUCTIONS:
- Lay gloves on table, palms (seams) down. Place buttons and stitch markers as shown. Sew on the buttons.

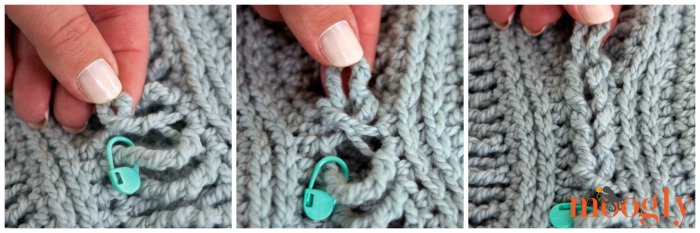
- Braid the QuadTr sts in Round 6 as shown below (photos from the Beanie), starting to the left of the marked stitch on the left glove, and to the right of the marked stitch on the right glove. You want the final loop (the marked stitch) to be pointing out the the sides, not to the other glove. Slide the final loop up over the button of each glove.
And now you have the matching Ups and Downs Set! The fingerless gloves are the perfect stashbuster for using up the yarn leftover from the hat. I hope you had fun crocheting them both!

Written pattern and graphics copyright Tamara Kelly 2014. Please do not reprint or repost this pattern, but please do link to this page to share this pattern with others. If you wish to make items for sale from this pattern, please visit the About page for details. To print this pattern please use the Print Friendly button (tutorial here).


Dana says
I do not have access to this kind of yarn without ordering online (and paying crazy shipping fees!) Is there a comparable yarn that could be used?
Tamara Kelly says
Any worsted weight yarn should work. 🙂
Cherrie says
I made it using CARON Simply Soft and it worked beautifully and was very soft. Used for both the hat and gloves.
Tamara Kelly says
😀 Thanks Cherrie!
Amanda says
Thanks for the heads up Tamara. I'm going to be a busy lady this weekend, I can tell already <3
Tamara Kelly says
😀
Suzanne says
Oh, thank you so much!! Love the beanie, & the matching mitts take it over the top...can't wait to start 🙂
Tamara Kelly says
😀 Thank you Suzanne!
Allyson says
Such an easy and fun pattern!! Thank you!!
Tamara Kelly says
😀 Thank you Allyson!
Clotilde/Craftybegonia says
Really cute, love them!
Tamara Kelly says
Thank you Clotilde!
Catherine says
Thank you!
Tamara Kelly says
😀 You're very welcome!
Jen Kaminsky says
I am absolutely going to make these! Thanks for sharing!!
Tamara Kelly says
😀 Thanks Jen!
Barbara says
Love these!
lillian says
Very nice
Tamara Kelly says
😀 Thank you lillian!
Annarita says
I can't wait to try this pattern on, together with the hat's one. Thank you! xx
Tamara Kelly says
😀 Thank you Annarita!
Tracy says
I was working on my 2nd ups and downs hat last night and was thinking that I needed to make up some fingerless gloves to go with it! Thanks for being a step ahead! 🙂 🙂
Tamara Kelly says
😀 Thank you Tracy!
Kat says
Great pattern on the hat. Have made several for charity. Will now make the gloves as well. Thank you for posting the pattern. Can you tell me where you got the buttons from or the name of a good button website with fun buttons. I'm making these for kids, so I'd like something a little more lively.
Thanks,
Tamara Kelly says
Hi Kat! Thank you! I got the buttons at my local JoAnn Fabrics - they've got lots of fun ones these days!
Marrie says
GREAT! Will look awesome with ups and down crochet hat!! LOVE CHA 😛
Thank you!!!!
Tamara Kelly says
😀 Thanks Marrie!
Shannon Fuentes says
Absolutely awesome! I whipped up one of the pair before starting work this morning. I will make the second one while on my lunch break. Then I can just dig through the huge collection of buttons I inherited from my Grammie when she passed away to find 4 matching buttons because I will be making the hat right after work while watching the news tonight.
Would I be able to use this pattern for a possible CAL at my LYS? I am teaching crochet there on Saturdays and would love to use this pattern to introduce people to some different techniques. I refer a lot of people to your blog when they are just learning because your videos are phenomenal. I have also played with the idea of using your videos during my class, especially to show the "newbies" the basics. I hold my hook and yarn very differently than most people (and I yo in the opposite direction as well, but it works for me) so I feel that some people are just focused on the way I hold a hook and not learning the technique.
Like you, I am also "self-taught" - my very first pattern was a bed doll from Fibre Crafts called Peppermint Patty. It took me 2 months to figure out everything and make her, but she was a much beloved gift for a little girl's 4th birthday. I still have all my Fibre Crafts doll patterns and even though I don't make bed dolls for selling any more, I remember every single one I ever made, who bought them or received them as a gift and what city or country the doll is in (my MIL has 3 of my dolls in a little village in Mexico. I learned to crochet long before the days of the internet, but having the internet has enhanced my skills. I have 30 years under my belt and am enjoying passing the love of crochet on to other people. I learned how to knit about 3 or 4 years ago, and thanks to the internet and the very passionate owners of my LYS, I have really improved my skills in that craft tremendously in the last 6 months, but my first love will always be crocheting.
Thank you for your fabulous patterns and I really look forward to make a bunch of these sets for Christmas gifts. My daughters are both in college in cities that get quite cold (one in NYC and the other right outside of Boston), so these will be great gifts for all their college friends that they are going to need gifts for. Again, thank you!
Tamara Kelly says
😀 Thank you so much Shannon! I really appreciate it!
I'm so glad you enjoy the pattern! You are welcome to use it for a CAL at the LYS! I do ask that you hand out the URL and have everyone print out their own copy before the CAL starts if possible. (Since visits is how I make my income 😉 )
Lynsey says
I love this pattern & got to the last step of braiding the Quadtr & have no idea what to do!! I don't understand how to do it!! So bummed! Any tips!
Tamara Kelly says
Hi Lynsey, I'm sorry you're confused! If you look at the hat instructions it's broken down a little more I think!
Amy says
I love the beanie pattern, can't wait to try the mittens. I've even created an infinity cowl using the same stitches. Love it!
Tamara Kelly says
😀 Thanks so much Amy!
Marcie says
I love this pattern ! I especially appreciated the links to stitch videos.
Tamara Kelly says
😀 Thanks so much Marcie!
Angelica says
¡Wow! What a pretty and different set! I love it, I want it, I'll make it as soon as possible, thanks a lot for sharing, Tamara Hugs from Spain 🙂
Tamara Kelly says
😀 Thank you so much Angelica!
Sharon says
Working on my second pair. My daughters are fighting over the first pair. Thanks for the great pattern!
Tamara Kelly says
😀 You're very welcome! Thank you!
Kati says
Hey! LOVE THESE! I just made a pair using WE and wanted to know how to adjust for a thicker yarn.
Thanks again for the pattern!
Tamara Kelly says
Hi Kati, thank you! To adjust for a thicker yarn, just wrap the first row around your wrist to get started with your custom size – as long as you have an even number of stitches, you’ll be all set!
shantilly says
I love the gloves. I am a self taught crocheter and learn from free patterns or tutorials. I did my left one last night but when I connect a row, I do the slip stitch and chain however many, but I end up with a seam. And the seam is right on the top of the hand when I put the glove on. Any help?
Tamara Kelly says
I think maybe you're wearing them on the wrong hands? Also, to make the seam less noticable, you can substitute a chainless starting dc st for the ch. 🙂 I hope that helps! Thank you!
Maren says
Thank you for this pattern. This is my first crochet project since elementary school and surprisingly easy with your How-to videos.
Love, love, love the wrist warmers. The pattern is so beautiful...
Tamara Kelly says
Thank you so much Maren! 😀
Theresa H. says
Had extra yard so I made the matching fingerless gloves. They were fast and easy and look great!
Belinda says
Someone mentioned in the comments that they had made an infinity cowl to match on their own but do you have a pattern for that or for a shorter length cowl?
Tamara Kelly says
Not yet, I'm hoping to add one soon! 🙂
KATHLEEN says
Hi , I was wondering if there was any way you could give me a chart explaining the abbreviations
Tamara Kelly says
Hi Kathleen! You'll find the Crochet Abbreviations page under the patterns tab, or at https://www.mooglyblog.com/crochet-abbreviations/ 😀
Giselle says
I'm a little confused about row 6 & 7. Not sure what the 3rd loop is.
Tamara Kelly says
Hi Giselle! If you click on those words in the pattern they are a link to a tutorial. 🙂
Michelle says
Do you have a video tutorial for this? I don't quite understand the braiding part.
Tamara Kelly says
Hi Michelle! I do indeed: click here 🙂
Melanie says
I think I have made 25 pairs of these. Everyone I know wants a pair. Thanks for such a wonderful, stylish pattern!
Tamara Kelly says
Wow! 😀 Thank you, I'm so glad you (and everyone else!) like it!!
kam says
Hello,
Thank you for this amazing pattern. These mitts are soooo cute and were pretty simple to make. I am having a little trouble finishing with the QuadTr braid though. Please help.
Tamara Kelly says
Hi Kam! Thank you! I think this video tutorial might help! 🙂
KrystleJoy says
Thank you so much for sharing this pattern! I love making them, I was asked to make some for a friend and now I sold a few...I posted it in my etsy...credits to you and link in the description of course 🙂 Can we send you pics? I mean...if you like seeing them. I also posted on Instagram and used your name as the hashtag 🙂
Tamara Kelly says
I'll look for the hashtag! 😀 Also, you're welcome to share pics on the Moogly Facebook page, or you can email them to me. 😀 Thank you!
maria Bom says
you're the best, thank you so much
Tamara Kelly says
😀 Thank you Maria!
Lisa H says
I made these for my daughter for Christmas with the matching hat. They turned out great. I made a matching infinity scarf using the same stitches that also turned out great. I bet I can make matching leg warmers, lol. She aksed me for leg warmers a while back. This was an awesome pattern. Thanks so much for sharing 🙂
Tamara Kelly says
Thanks so much Lisa! You can find the boot cuffs pattern HERE - that might be a good start! 🙂
Wendy says
I love these! My hubby came up with a wonderful idea- instead of buttons, use a small crocheted flowers! Oh, the possibilities...
Tamara Kelly says
😀 Thank you Wendy! Crocheted embellishments would be great!!
Darla says
Thank you for this pattern and the video tutorials. These fingerless mittens are adorable. It took me a minute to figure out the braid but it really makes the mittens!
Tamara Kelly says
😀 Thank you Darla!
Julee says
It's been a long time since I was excited about crochet. I learned to chain in first grade, so by the time I was 40 I was beyond bored & moved on to knitting. Still a hardcore knitter, but am sooo excited by these patterns! Yay! Even learned some new things while hooking, so that was icing on the cake. Made hat, mitts & boot toppers for my 17 yr old daughter. Now it's my turn, & I'm still pumped up about it. Thanks so much for the blog & reigniting my interest in my old hobby
Tamara Kelly says
😀 I loved reading this!! Thank you so much Julee!
rAMONA says
I REALLY LOVE THIS PATTERN... I HAVE ALREADY MADE 3 HATS (ALL FOR MYSELF) USING RED HEART SUPER SAVER AND THEY CAME OUT GREAT!! I GET A LOT OF COMPLIMENTS AND NOW I AM WORKING ON THE 4TH ONE FOR A CO-WORKER WHO IS IN LOVE WITH MY HATS. THANK YOU FOR THE GREAT PATTERN.
Tamara Kelly says
😀 Thank you so much Ramona!
Cheryl says
I need to try these! Has anyone played with making them a bit longer? Thanks for another great pattern.
Tamara Kelly says
Yes, some people have indeed added more rows before the thumb with good success. 🙂
sarah says
Great pattern! These work up really quick and fit a ladies hand well using Red Heart Super Saver 4 weight 100% acrylic yarn using an I/9 5.50mm hook.
Tamara Kelly says
Thank you Sarah!
Michelle says
I just created an ear warmer pattern based off of he gloves as a gift. My sister doesn't wear hats and I live the hat that matches this. The ear warmer came out very cute. I would like to show it to you and also link back to your page when I post the pattern as you are the inspiration and I never would have done this without your pattern
Lynn rosenbarker says
I went online a few days ago to refresh my knowledge of the few stiches that my grandmother taught me over 40 years ago and saw this pattern. I sat down thinking I was just going to try a few stitches, and because of the great tutorials and easy directions I finished one glove in just a few hours. I was amazed at how cute it was. Too bad I started out with a small ball of yarn and only had enough to do one!!!! I never thought it would have come out good enough to use my first time around. I can't wait to make a pair and I think all my daughters and daughter in laws will be getting these next Christmas. They work so great with the cheap little gloves that they sell in all colors. Thank you for making it so easy and for offering the free site that makes it available to so many.
Tamara Kelly says
😀 Thank you so very much Lynn! I'm so glad you enjoyed the pattern!
Cally says
I came across your page this afternoon and im loving your patterns im a newbie to crochet and i find your patterns easy to follow thank you so much 🙂
Tamara Kelly says
Thank you so much Cally! I'm so glad to hear it!
Ally says
Omgoodness. If i could hug you i would! Just whipped up 5 pair of these mitts. Totally in love. I only changed the cuff part. I only completed one row because i have small hands and wrists and didnt want to cover my jewelery on my wrist. Still beautiful
Tamara Kelly says
😀 Thank you so much Ally!
Susanna BEncomo says
I love this pattern. I'm not a novice crocheted but I don't understand row one. How do I make a starting chain of fdc? I would love to make these for my daughter who just had hand and wrist surgery. Thank you.
Tamara Kelly says
Hi Susanna! Thank you! You can click right on "FDC" in the first round instructions to go to the tutorial. 🙂 Best wishes for your daughter's speedy recovery!
Leslee says
I'm always looking for ideas for my 3 nieces for Christmas. I decided on fingerless gloves and boot cuffs this year. I came across your post and instantly loved the pattern. I used the same to make the boot cuffs and I know they will love them. Thank you so much for sharing this easy, beautiful pattern. I also appreciate the links to the video tutorials. I picked up some helpful hints. Thank you very much!
Tamara Kelly says
😀 Thank you Leslee, I'm so glad to hear it!
Elizabeth says
I made a set of these for all of the women in my family as Christmas presents along with a headband ear warmer. Since the pattern for the headband called for a flower motif, I added a small flower around the loop to be connected to the button, and sewed a button onto the center of the flower of the headband. Made for an adorable set that worked up very nicely. I'm making up the hat for myself right now. I'd love to see a pattern for a complimenting scarf!
Tamara Kelly says
I'm glad you enjoyed the pattern! There is a matching cowl HERE. 🙂
Renata says
Thank you for the great pattern. Made these or my daughter who loves them. Now making more for gifts. See a photo - - -
https://www.flickr.com/photos/28010958@N03/23481698899/in/dateposted-public/
Tamara Kelly says
They are gorgeous Renata! ♥ Thank you!
lili says
Love the fingerless mitts as well as the slouchy beanie. I made both for my 7 years granddaughter who loves them. Thank you!!!!
Tamara Kelly says
Thank you! 😀
Annie says
I never did crochet before and I think that not only it's a fun and quick pattern, it's also a wonderful way to learn and practice basic techniques. I am so glad I started with this pattern. No teaching book could have done as well. Many thanks!
Tamara Kelly says
Wow, thank you Annie! I'm super impressed by your skills! 😀 Thank you so much!
Linnea says
I learned two new techniques which is awesome! Fun, easy pattern. Thank you for sharing with us. 🙂
Tamara Kelly says
😀 Thank you so much Linnea, I'm so glad to hear it!
Linda says
Oh my goodness this has been by far the easiest pattern ever! I have made five pair of these as Holiday gifts for friends. I changed the button placement from the side to on the back of the hand. It seems to work better.
Tamara Kelly says
🙂 I'm so glad you like them Linda! 😀
JoAnne says
I really enjoyed making these gloves. I learned two new stitches, (hd in the 3rd loop, and the quad treble) I made a pair in just a few hours and they turned out so cute. I can't wait to start the beanie. Thank you do much for the great pattern and tutorials.
Tamara Kelly says
Thank you so much JoAnne!
Wendy says
Thank you for this pattern. I was snowed in today, so I made a pair for my daughter. I did rounds of 18 (she is small) and left a row of DC off, and she loves them! I learned a few new stitches from yòur tutorials along the way! Thanks again.
Tamara Kelly says
😀 I'm so glad to hear it! Thank you Wendy!
Leigh Ann says
Hi. Newbie crocheter here. What do I do for Dc in each stitch and chain around?
Tamara Kelly says
Hi Leigh! You work a double crochet stitch in each stitch and chain of the previous round. 🙂
Leigh Ann says
Thank you!